
MULTIPLE COMPACT DISC PLAYER
DPF-J9030
CD-4900M
INSTRUCTION MANUAL
KENWOOD CORPORATION
B60-4465-08 00 (K, T)
AP
9909
This unit is designed for home use only. If the unit is
used in a location other than at home, such as in a
shop (for commercial use), in a car or in a ship, etc.,
and is damaged, a service fee may be charged even
during the warranty period.
This instruction manual is used to describe multiple
models listed above.
Model availability and features (functions) may differ
depending on the country and sales area.
2
Your New Kenwood 200-Disc Mega-Changer
Chapter
1
Chapter
2
Chapter
3
Chapter
4
Chapter
5
Chapter
6
Chapter
7
Units are designed for operation as follows.
U.S.A. and Canada ................................................................... AC 120 V only
Europe and U.K. ........................................................................ AC 230 V only
For the United Kingdom
Factory fitted moulded mains plug
1.The mains plug contains a fuse. For replacement, use only a 13-
Amp ASTA-approved (BS1362) fuse.
2.The fuse cover must be refitted when replacing the fuse in the
moulded plug.
3.Do not cut off the mains plug from this equipment. If the plug
fitted is not suitable for the power points in your home or the cable
is too short to reach a power point, then obtain an appropriate
safety approved extension lead or adapter, or consult your dealer.
If nonetheless the mains plug is cut off, remove the fuse and dis-
pose of the plug immediately, to avoid a possible shock hazard by
inadvertent connection to the mains supply.
IMPORTANT: The wires in the mains lead are coloured in accord-
ance with the following code:
Blue
: Neutral
Brown : Live
Do not connect those leads to the earth terminal of a three-pin plug.
Safety precautions
WARNING : TO PREVENT FIRE OR ELECTRIC SHOCK, DO NOT EXPOSE THIS APPLIANCE TO
RAIN OR MOISTURE.
CAUTION: TO REDUCE THE RISK OF ELECTRIC SHOCK, DO NOT REMOVE COVER
(OR BACK). NO USER-SERVICEABLE PARTS INSIDE. REFER SERVICING TO QUALI-
FIED SERVICE PERSONNEL.
RISK OF ELECTRIC SHOCK
DO NOT OPEN
THE LIGHTNING FLASH WITH ARROWHEAD SYMBOL, WITHIN AN EQUILATERAL TRIANGLE, IS INTENDED TO
ALERT THE USER TO THE PRESENCE OF UNINSULATED "DANGEROUS VOLTAGE" WITHIN THE PRODUCT'S
ENCLOSURE THAT MAY BE OF SUFFICIENT MAGNITUDE TO CONSTITUTE A RISK OF ELECTRIC SHOCK TO
PERSONS.
THE EXCLAMATION POINT WITHIN AN EQUILATERAL TRIANGLE IS INTENDED TO ALERT THE USER TO THE
PRESENCE OF IMPORTANT OPERATING AND MAINTENANCE (SERVICING) INSTRUCTIONS IN THE LITERATURE
ACCOMPANYING THE APPLIANCE.
CAUTION
The marking is located on the rear panel and says that the compo-
nent uses laser beams that have been classified as Class 1. It means
that the unit is utilizing laser beams that are of a weaker class. There
is no danger of hazardous radiation outside the unit.
CLASS 1
LASER PRODUCT
The marking of products using lasers
(Except for some areas)
Before applying power
Caution : Read this page carefully to ensure safe operation.
3
Your New Kenwood 200-Disc Mega-Changer
Chapter
1
Chapter
2
Chapter
3
Chapter
4
Chapter
5
Chapter
6
Chapter
7
Your New Kenwood 200-Disc CD Changer
Welcome to your new Kenwood 200-Disc CD Changer.
CD-4900M is sold in USA. DPF-J9030 is sold in other countries.
This CD changer offers the following exciting features :
÷ 200-disc capacity
÷ 10-key remote and infrared remote keyboard
÷ Digital audio output
÷ CD Text, which displays text from encoded CDs on the unit's display.
÷ Disc and Track Naming, which allows you to program your own names for discs and tracks.
÷ Music Type File, which lets you organize your discs into specific musical types (such as Classical, Jazz,
Rock), and then play them by type.
÷ Dual disc transport mechanisms (2 CD players)
÷ Continuous Single-Zone Playback, which uses both the changer's players to play all discs or tracks
continually, without interruption.
÷ Simultaneous Dual-Zone Playback, which plays 2 different CDs in 2 rooms at once when used with a
Kenwood Dual-Zone/Dual-Source receiver.
Your new changer can play the following disc types :
÷ Standard 12 cm CDs
÷ CDV (Video) and CDG (Graphics), although it will not display the video portion
You may not play 8 cm CD "singles."
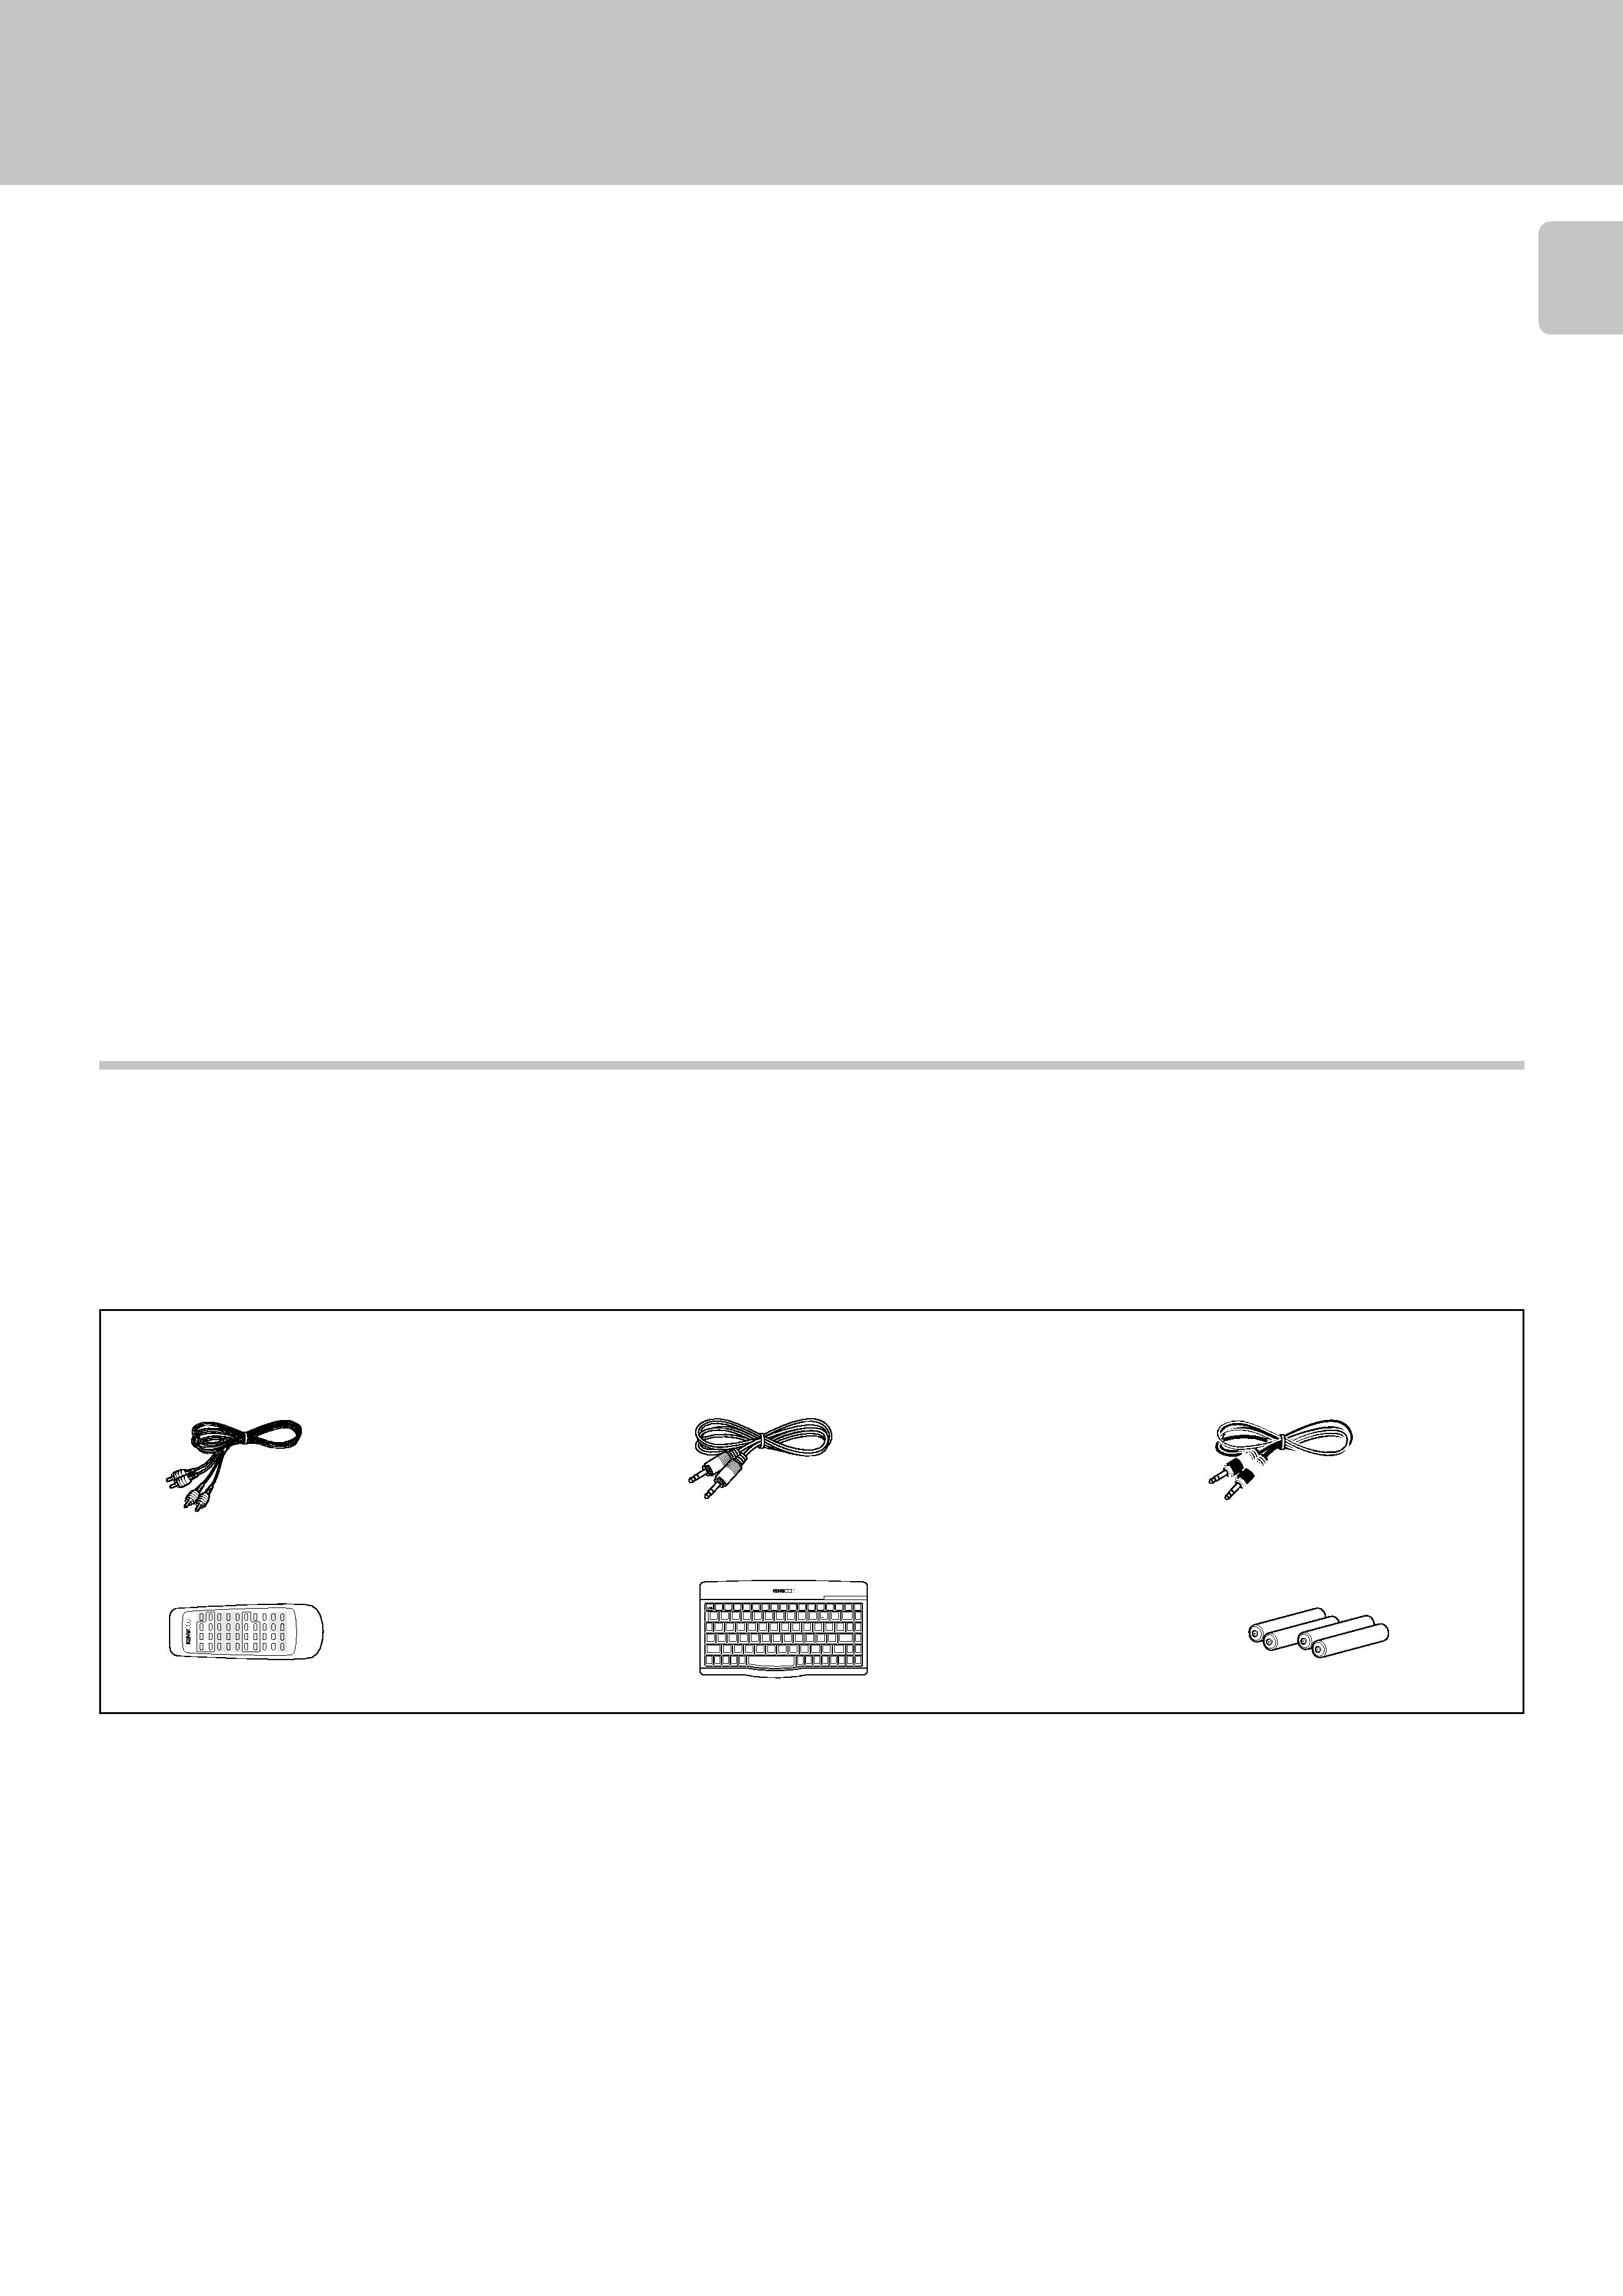
Unpacking
Accessories
Audio cables .................... (2)
System control cable ...... (1)
Batteries (R6/AA) ............ (4)
10-key Remote ................ (1)
Infrared Remote Keyboard ...... (1)
,
REMOTE CONTROL UNIT RC-KB2
<
POWER
CONFIRM
BEST
SEL.
TITLE
INPUT
ROOM
B
ROOM
B
CURSOR
R
CURSOR
L
CONT
PLAY
DISC
SEL
USER
FILE
NAME
SUB
OUT
MONIT.
DISC
SKIP
UP
DISC
SKIP
DOWN
CHARAC.
SRCH
UP
CHARAC.
SRCH
DOWN
REPEAT
RANDOM
DISPLAY
DELETE
+10
+100
76
4
¢
1
¡
ENTER
SET
MODE
SHIFT
SHIFT
P.MODE
CHECK
CLEAR
SPACE
QW
E
R
T
Y
U
I
OP
AS
DF
G
H
J
K
L
:
Z
X
CV
BNM
>
/
?
.
,
,,
,
;
@
2
!
1
#
3
$
4
%
5
^
6
&
7
D
8
9
0
-
+
=
()
Communication cable ..... (1)
Unpack your new CD changer carefully and make sure that all the accessories are present:
If any accessories are missing, or if the changer is damaged or fails to operate, notify your dealer immediately. If your
changer was shipped to you directly, notify your shipper immediately. Kenwood recommends that you retain the
original carton and packing materials in case you need to move or ship the changer in the future.
Keep this manual handy for future reference.

4
Your New Kenwood 200-Disc Mega-Changer
Chapter
1
Chapter
2
Chapter
3
Chapter
4
Chapter
5
Chapter
6
Chapter
7
Table of Contents
Chapter 1 : Setting Up Your New CD Changer ........... 5
Connecting to a Receiver or Amplifier ................................ 6
System Control Chaining ........................................................ 8
Setting Up the 10-Key Remote and Keyboard .................... 9
10-Key Remote .......................................................... 9
Keyboard .................................................................... 9
Chapter 2 : Getting to know Your New CD Changer...... 10
Front Panel .............................................................................. 11
Front Panel Displays ............................................... 12
10-Key Remote and Keyboard ............................................. 13
10-Key Remote ........................................................ 13
Keyboard .................................................................. 14
Chapter 3 : Loading and Playing Discs ..................... 16
Preparation ............................................................................. 17
Loading discs in the carousel ................................ 17
Normal play (TRACK mode) ................................................. 19
Playing tracks in order from track No.1 ............... 19
Playback from desired track .................................. 21
Repeated playback (REPEAT mode) ................................... 22
Playback in a random order (RANDOM mode) ............... 23
Programming tracks in desired order
(PGM mode) (Player A only) ................................................... 24
Continuous playback ............................................................ 26
Timer operation (Player A only) .......................................... 27
Registration of DTS discs ..................................................... 28
Chapter 4 : Specifying and Using Disc or Track Data .. 29
Registration of Title ............................................................... 30
Assigning Title (TITLE INPUT mode) .................... 30
To change or delete a title ..................................... 32
Listening to music by genre (MUSIC TYPE mode) .............. 33
Registration of music type (MUSIC TYPE SET mode)
................................................................................... 33
Registration of user's disc file (USER FILE SET mode)
................................................................................... 34
Playing the music type or user file
(MUSIC TYPE PLAY mode) (Player A only) .......... 35
Disc search (DISC SEARCH mode) (Player A only) .................. 36
Searching a disc by the disc title
(CHARAC. SEARCH mode) ..................................... 36
Searching the music type or user file
(M.TYPE SEARCH mode) ........................................ 37
Listening to your favorite titles
(BEST SELECTION mode) (Player A only)
....................................... 38
Registration of best selection file ......................... 38
Playing the best selection file ............................... 38
Chapter 5 : Dual-Zone Capabilities ........................ 40
Chapter 6 : In case of difficulty ............................... 41
In case of difficulty ................................................................ 41
Important items ...................................................................... 42
Before applying power ............................................... 2
Safety precautions ..................................................... 2
Your New Kenwood 200-Disc CD Changer ................ 3
Chapter 7 : Warnings and Specifications ............. 43
Warnings ................................................................................. 43
Specifications ........................................................................ 43
Caution : Read the pages marked
carefully to ensure safe operation.

5
Connecting to a Receiver or Amplifier
Chapter
1
Chapter
2
Chapter
3
Chapter
4
Chapter
5
Chapter
6
Chapter
7
Chapter 1 : Setting Up Your New CD Changer
Welcome to the Kenwood CD-4900M/DPF-J9030 Instruction manual.
The Instruction manual contains all the information you need to know to set up and operate your new CD changer safely and enjoy-
ably.
This chapter guides you through the connection and setup of your new CD changer and its remote.
1. All cables (except the digital optical cable) should have been supplied with your new CD changer.
see "Unpacking"
3
If you need to purchase additional or replacement cables, visit any home electronics store or the Kenwood USA Web site at
www.kenwoodusa.com. You can also call 1-800-KENWOOD. (For USA and Canada only)
2. Do not plug in the CD changer's power cord until you have finished making connections to your receiver or amplifier.
3. If you exposed your changer to a great difference in temperature (for example, if you purchased it in winter from a store with
an unheated warehouse) or if the humidity in the room changes, condensation may form inside the unit. If this occurs, connect
the unit, turn it on, and leave it on but unused for a few hours. This will evaporate the condensation and return your changer to
working order. Restart the changer before using it again.
4. Clean your CD changer with a soft, dry cloth. Avoid solvents of any kind, as they may damage the cabinet components.
5. Do not use CD accessories such as protection sheets or disc cleaners with your new CD changer.
6. Kenwood recommends having your CD changer's precision optical pickup inspected periodically. Depending on the operation
environment (humidity, dust, smoke, etc.), this pickup should operate approximately 1,000 hours before requiring inspection. To
schedule inspection, consult the store where you purchased the changer or visit the Kenwood USA Web site's Support area.
7. Only player A supports DTS playback.
8. Be sure to locate your changer on a level and stationary surface, or it will not be able to play discs properly.
9. Your CD changer continues to store the following information for at least 3 weeks after you unplug its power cord:
÷ Power status (on or off)
÷ Disc and track names
÷ Music Type assignments
÷ User File assignments
÷ Best Selection assignments
÷ DTS assignments
After that you must reset this information according to the instructions in this manual.
q
10. Once you have set up the changer and loaded discs, you should not move it without doing the following:
(1) Remove all the discs from the unit and close the disc door.
(2) Look at the display(s). "NO DISC" should appear steadily (i.e., it should not be flashing).
(3) Turn off the CD changer.
(4) A few seconds after the display appears, disconnect the CD changer from the receiver and unplug the CD changer from the
wall outlet or power strip.
Notes
Notes
Before You Begin
Be sure to read the notes on this page before you begin setting up the changer.
Refer to the following pages for details on these issues :
÷ Connecting to a Receiver or Amplifier
6
÷ System Control Chaining
8
÷ Setting Up the 10-Key Remote and Keyboard
9
Your CD changer includes a standard remote and a remote keyboard (for easier text entry). You can use
either device to control the changer. For the sake of simplicity, this manual provides standard remote
instructions for all functions except text entry.