DPC-MP727
DPC-MP922
B60-4989-00 00 CH (K.M.T.X)
CR
0012
In addition to normal audio CDs (CD-DA), this equipment is capable
of playing back media on which MP3 and WMA files have been stored.
PORTABLE COMPACT DISC PLAYER
INSTRUCTION MANUAL
Note:
This instruction manual is for common use with the 2 models
above.
Unpacking
Unpack the unit carefully and make sure that all accessories are put aside
so they will not be lost.
Examine the unit for any possibility of shipping damage. If your unit is
damaged or fails to operate, notify your dealer immediately. If your unit
was shipped to you directly, notify the shipping company without delay.
Only the consignee (the person or company receiving the unit) can file a
claim against the carrier for shipping damage.
We recommend that you retain the original carton and packing materials
for use should you transport or ship the unit in the future.
Before using the rechargeable batteries
The rechargeable batteries comes non-charged condition. Read
"Recharging the batteries" carefully and charge the batteries be-
fore use.
Note:
KENWOOD follows a policy of continuous advancements in development. For this reason
specifications may be changed without notice.
Accessories
The accessories marked by an asterrisk (*) are provided only for some areas.
Safety precautions
Caution: Read this page carefully to ensure safe operation.
WARNING: TO PREVENT FIRE OR ELECTRIC SHOCK, DO NOT EXPOSE THIS APPLIANCE TO RAIN OR
MOISTURE.
IMPORTANT SAFEGUARDS
1. Power sources -- The unit should be connected to a power supply only of the type described
in the operating instructions or as marked on the appliance.
2. Power-cord protection -- Power-supply cords should be routed so that they are not likely to
be walked on or pinched by items placed upon or against them. Pay particular attention to
cords at plugs, convenience receptacles, and the point where they exit from the unit.
3. Enclosure removal -- Never remove the enclosure. If the internal parts are touched acciden-
tally, a serious electric shock might occur.
4. Drop -- Do not drop the unit or apply strong shock to it. (Damage due to dropping the unit is
not covered by the warranty.)
5. Ventilation -- Avoid hindering the ventilation of the unit by covering it with a cloth, etc.
6. Abnormal smell -- If an abnormal smell or smoke is detected, immediately turn the power
OFF and pull out the power cord. Contact your dealer or nearest service center.
7. Heat -- Avoid placing the unit under direct sunlight or near a source of heat such as heating
equipment. Particularly, never leave it in an automobile or on the dashboard.
8. Temperature -- The unit may not function properly if used at extremely low, or freezing tem-
peratures. The ideal ambient temperature is above +5°C (41°F).
9. Water and moisture -- The unit should not be used near water -- for example, near a bath-
tub, washbowl, kitchen sink, laundry tub, in a wet basement, or near a swimming pool, etc.
10. Dust and moisture -- Avoid places where is dusty or where the humidity is high.
11. Vibrations -- Avoid placing the unit on an unstable place such as a shelf or in a place
subject to vibrations.
12. Magnetic fields -- Keep the unit away from sources of magnetic fields such as TV sets,
speaker systems, radios, motorized toys or magnetized objects.
13. Cleaning -- Do not use volatile solvents such as alcohol, paint thinner, gasoline, or benzine,
etc. to clean the cabinet. Use a clean dry cloth.
14. Nonuse periods -- The power cord of the unit should be unplugged from the outlet when left
unused for a long period of time.
Please read all of the safety and operating instructions before operating this unit. For best results, follow all warnings placed on the unit and adhere to the operating
and use instructions. These safety and operating instructions should be retained for future reference.
Notes on using through car stereo
¶ In case of abnormality such as smoke production, immediately unplug the car bat-
tery adapter from the cigar lighter socket.
¶ Do not leave the products or batteries in the car, particularly above the dashboard,
for this may lead to malfunction or damage due to solar heat.
¶ If the unit is connected to a car stereo using an audio cord, noise may sometimes
interfere.
Caution: Read this page carefully to ensure safe operation.
*For other countries
AC voltage selection
This unit operates on 110-120 or 220-240 AC voltage. The AC voltage selector switch on the
AC adapter is set to the voltage that prevails in the area to which the unit is shipped. Before
connecting the power cord to your AC outlet, make sure that the setting position of this switch
matches your line voltage. If not, it must be set to your voltage in accordance to the following
direction.
Note:
Our warranty does not cover damage caused by excessive line voltage due to improper setting
of the AC voltage selector switch.
AC voltage selector switch
Move switch lever to match your line
voltage with a small screwdriver or other
pointed tool.
The marking is located on the bottom side says that this
product has been classified as Class 1. It means that
there is no danger of hazardous radiation outside the
product.
The marking of products using lasers (Except for some areas).
CLASS 1
LASER PRODUCT
Media that can be played back with this
equipment
Usable media apart from audio CDs (CD-DA)
Usable media
: CD-ROM, CD-R, CD-RW
Usable formats : ISO9660 level 1 and level 2 (excluding expanded formats)
Files that can be played back: MP3 and WMA files
Creating media for playing back on this
equipment
Compressing MP3 and WMA files
Please set up the transfer bit rate setting for the compression software when com-
pressing MP3 and WMA files as follows:
MP3 Files
: 128kbps recommended (32kbps-320kbps)
WMA Files
: 128kbps recommended (64kbps-160kbps)
¶ This unit is compatible with 32kHz, 44.1kHz (recommended) and 48kHz samplimg
frequencies.
Categorizing folders
As MP3 and WMA files are compressed into high-quality sound files at an extremely
high rate of compression, it is possible to record several times more tracks than audio
CDs onto a single medium. It is therefore convenient to split the tracks into different
folders by genre, artist or album for retrieval and repeat playback purposes.
¶ A maximum of 23 folders or a maximum of 200 files can be stored on a single media.
¶ There are cases where it is not possible to save folders in the desired sequence
depending on the software being used.
Naming files
Single-byte characters between A and Z, single-byte numerals between 0 and 9, and
the single-byte underscore (_) can be used when naming files. A maximum of twelve
characters can be displayed. Ensure that the ".MP3" (MP3 files) or ".WMA" (WMA files)
extension logs are attached to all file names.
¶ Never add the MP3 or WMA extension logs to any files other than MP3 and WMA
files. If the MP3 or WMA extension logs are added to any files other than MP3 and
WMA files, the equipment will assume that they can be played back, and this will
produce loud noises in the headphones, resulting in damage of adverse effects.
Hint for when naming folders and files
When media containing MP3 and WMA files are played back on this equipment, the
sequence in which each track is played back will be the same as the sequence in which
they were saved. It is possible to set up the playback sequence by adding numbers
from between 01 and 99 to the front of the folder and the file name when saving the file.
¶ There are cases where it is not possible to save files in the desired sequence de-
pending on the software being used.
Additional information
Depending on the MP3 and WMA compression software in use, it is possible to save
track titles, artist names and other information together with each sound file as addi-
tional information.
Although it is possible to display pre-recorded title and artist information with this infor-
mation, it is necessary to ensure that this information has been entered in single-byte
alphanumericals (Up to a maximum of 30 alphanumericals for each.).
¶ The method of entering title and artist information will differ in accordance with the
compression software. Refer to the compression software's instruction manual or
help file.
Confirming media and files
Check to ascertain that MP3 and WMA files can be played back correctly on the per-
sonal computer in use prior to saving them onto the media. Check to ensure that the
saved file can be played back normally.
¶ It is not possible to confirm that files can be played back correctly while they are
being saved onto the media.
When saving files onto media
Ensure that the session is closed or finalized when data has been written on media.
There are cases where media on which the session has not be closed or finalized will
not be played back correctly with this equipment.
¶ There are cases were the folder names and file names will not be displayed cor-
rectly depending on the software used to save them.
¶ Do not store files or folders other than MP3 and WMA on media to be played back
with this equipment.
¶ It is recommended that ten or less sessions are stored when recording MP3 and
WMA files onto a medium.
¶ There are cases where playback is not possible when MP3 and WMA files (CD-
ROM) and music CD information (CD-DA) are saved on the same media.
Specifications
Standards
Signal reading format ······················· Non-contact signal reading (semi-conductor laser)
Characteristics
Frequency characteristics ··························································· 20Hz to 20kHz, +/-3dB
Headphone output (16 , 1kHz) ································································ 9mW + 9mW
LINE OUT output level/impedance ····················································· MAX 0.85V/10k
Power supply
External DC supply ·················································································· DC 4.5 to 5.1V
Size AA alkaline batteries available on the open market (LR6/AA x 2 or 4) ········· DC 3V
Rechargeable batteries (NB-150 x 2) ································································ DC 2.4V
Maximum external dimensions (width x height x depth) ······ 129mm x 32mm x 138mm
(5-1/16x 1-1/4 x 5-7/16)
Weight (net) ··································································································· 260g (0.6lb)
Battery life expectancy (during continual repeated playback)
Size AA alkaline batteries available
on the open market (LR6/AA x 2)
Size AA alkaline batteries available
on the open market (LR6/AA x 4)
Rechargeable battery (NB-150 x 2)
Approximately
9 hours
Approximately
18 hours
Approximately
7 hours
Approximately
10 hours
Approximately
22 hours
Approximately
8 hours
Battery
When D.A.S.C. is off When D.A.S.C. is on During MP3/WMA file playback
15. Damage requiring service -- The unit should be serviced by qualified service personnel
when:
A. The power-supply cord or the plug has been damaged.
B. Objects have fallen, or liquid has been spilled into the unit.
C. The unit has been exposed to rain.
D. The unit does not appear to operate normally or exhibits a marked change in performance.
E. The unit has been dropped, or the enclosure damaged.
16. Servicing -- The user should not attempt to service the unit beyond that described in the
operating instructions. All other servicing should be referred to qualified service personnel.
17.
CAUTION -- TO PREVENT ELECTRIC SHOCK DO NOT USE THE AC PLUG
WITH AN EXTENSION CORD, RECEPTACLE OR OTHER OUTLET UNLESS THE
BLADES CAN BE FULLY INSERTED TO PREVENT BLADE EXPOSURE.
For CANADA
NOTICE:
This Class B digital apparatus complies with Canadian ICES-003.
FCC WARNING:
This equipment may generate or use radio frequency energy. Changes or modifications to
this equipment may cause harmful interference unless the modifications are expressly ap-
proved in the instruction manual. The user could lose the authority to operate this equipment
if an unauthorized change or modification is made.
NOTE:
This equipment has been tested and found to comply with the limits for a CLASS B digital
device, pursuant to Part 15 of the FCC Rules. These limits are designed to provide reason-
able protection against harmful interference in a residential installation. This equipment may
cause harmful interference to radio communications, if it is not installed and used in accor-
dance with the instructions. However, there is no guarantee that interference will not occur in
a particular installation. If this equipment does cause harmful interference to radio or televi-
sion reception, which can be determined by turning the equipment off and on, the user is
encouraged to try to correct the interference by one or more of the following measures:
--
Reorient or relocate the receiving antenna.
--
Increase the separation between the equipment and receiver.
--
Connect the equipment into an outlet on a circuit different from that to which the
receiver is connected.
--
Consult the dealer or an experienced radio/TV technician for help.
Before applying power
AC adaptors are designed for operation as follows.
U.S.A. and Canada ··········································································· AC 120 V only
Australia ···························································································· AC 240 V only
Europe and U.K. ··············································································· AC 230 V only
*Other countries ············································ AC 110-120 / 220 -240 V switchable
For the U.S.A.
Approximately
10 hours
Approximately
22 hours
Approximately
8 hours
Details
DPC-MP727
DPC-MP922
AC adapter
Headphones
Remote controller
(Except for U.S.A., Canada and Australia)
Rechargeable batteries
(Except for U.S.A., Canada, U.K. and Europe)
External battery case
Battery carrying case
(Except for U.S.A., Canada, U.K. and Europe)
Car cassette adapter (CAC-3A)
Car battery adapter
AC plug adapter (Except for U.S.A., Canada,
Australia, U.K. and Europe)
For your records
Record the serial number, found on the back of the unit,
in the spaces designated on the warranty card, and in
the space provided below. Refer to the model and serial
numbers whenever you call upon your dealer for infor-
mation or service on this product.
Model
Serial Number
The standard accessories vary depending on the model of the unit. The accessories which
are not standard are optionally available. For details, please consult your dealer.
1
1
*1
*1 pair
1
*1
-
-
*1
1
1
-
-
1
-
1
1
-
Part names
Player
Liquid crystal display
OPE
N
_
+
DC
IN
PHO
NE
S/LIN
E
O
UT
REM
OTE
VOLUME
HOLD
1
4
3
2
5
7
6
8
9
0
-
_
+
DC IN
14
3
2
5
6
8
7
1 D.A.S.C. display
Illuminated when the sound skip guard function is on.
2 B.BOOST display
Illuminated when the bass tones have been boosted.
3 RANDOM display
Illuminated when random playback has been selected.
4 Repeat display
Illuminated when repeat playback has been selected.
5 Battery display
Illuminated when the batteries are being recharged.
6 Information display area
Displays track numbers, amount of time elapsed, titles and other disc information,
and the status of the equipment.
7
mark
Illuminated if files that can be played back are contained within the selected folder
when media on which MP3 and WMA files are stored has been inserted into the
player (blinks during folder selection).
8
mark
Illuminated if other folders are contained within the selected folder when media on
which MP3 and WMA files are stored has been inserted into the player (blinks during
folder selection).
1 MODE key
Used to switch between the playback mode, the display mode and other modes.
2 1
1
1
1
1, ¡
¡
¡
¡
¡ keys
Used for fast forward and fast reverse, and to select folders.
3 4
4
4
4
4, ¢
¢
¢
¢
¢ keys
Used to search the beginning of tracks, to set up the various modes, and to select
folders.
4 STOP/OFF key
Used to stop, to switch off the power supply, and to recharge the batteries.
5 PLAY/PAUSE key
Used for playback, pausing, and to switch on the power supply.
6 D.A.S.C. (Digital Anti-Shock Circuit) key
Used to switch across to the sound skip guard function.
7 Liquid crystal display
8 DC IN (external power supply terminal)
Used for connecting the AC adapter supplied.
Used for connecting the car battery adapter when using a car battery for playback
purposes.
9 REMOTE PHONES/LINE OUT terminals
Used for connecting the remote controller or headphones supplied.
Used for connecting an amplifier or speakers built into amplifiers when used as a
LINE OUT terminal.
Used for connecting the car cassette adapter when using for playing back car audio
units.
0 VOLUME knob
Used to adjust the volume.
- OPEN/HOLD switch
Used when the top cover is to be opened and when switching the hold function be-
tween on and off.
2
1
3
4
5
6
1 PHONES terminal
Used to connect the headphones.
2 VOLUME knob
Used to adjust the volume.
3 HOLD switch
Used to switch the hold function be-
tween on and off.
4 4
4
4
4
4 key (SKIP DOWN)
Used for searching for the beginning of
tracks, etc.
5 STOP 77777 key
Used to stop the player and switch off
the power.
6 3
3
3
3
3/¢
¢
¢
¢
¢ key (PLAY/SKIP UP)
Used for playing and searching for the
beginning of tracks, etc.
Remote controller (DPC-MP727)
(Except for U.S.A., Canada and Australia)
Remote controller and headphone
connections
¶ The headphones are connected to the PHONES
terminal on the remote controller. The headphones
can also be connected directly to the player when
the remote controller is disconnected.
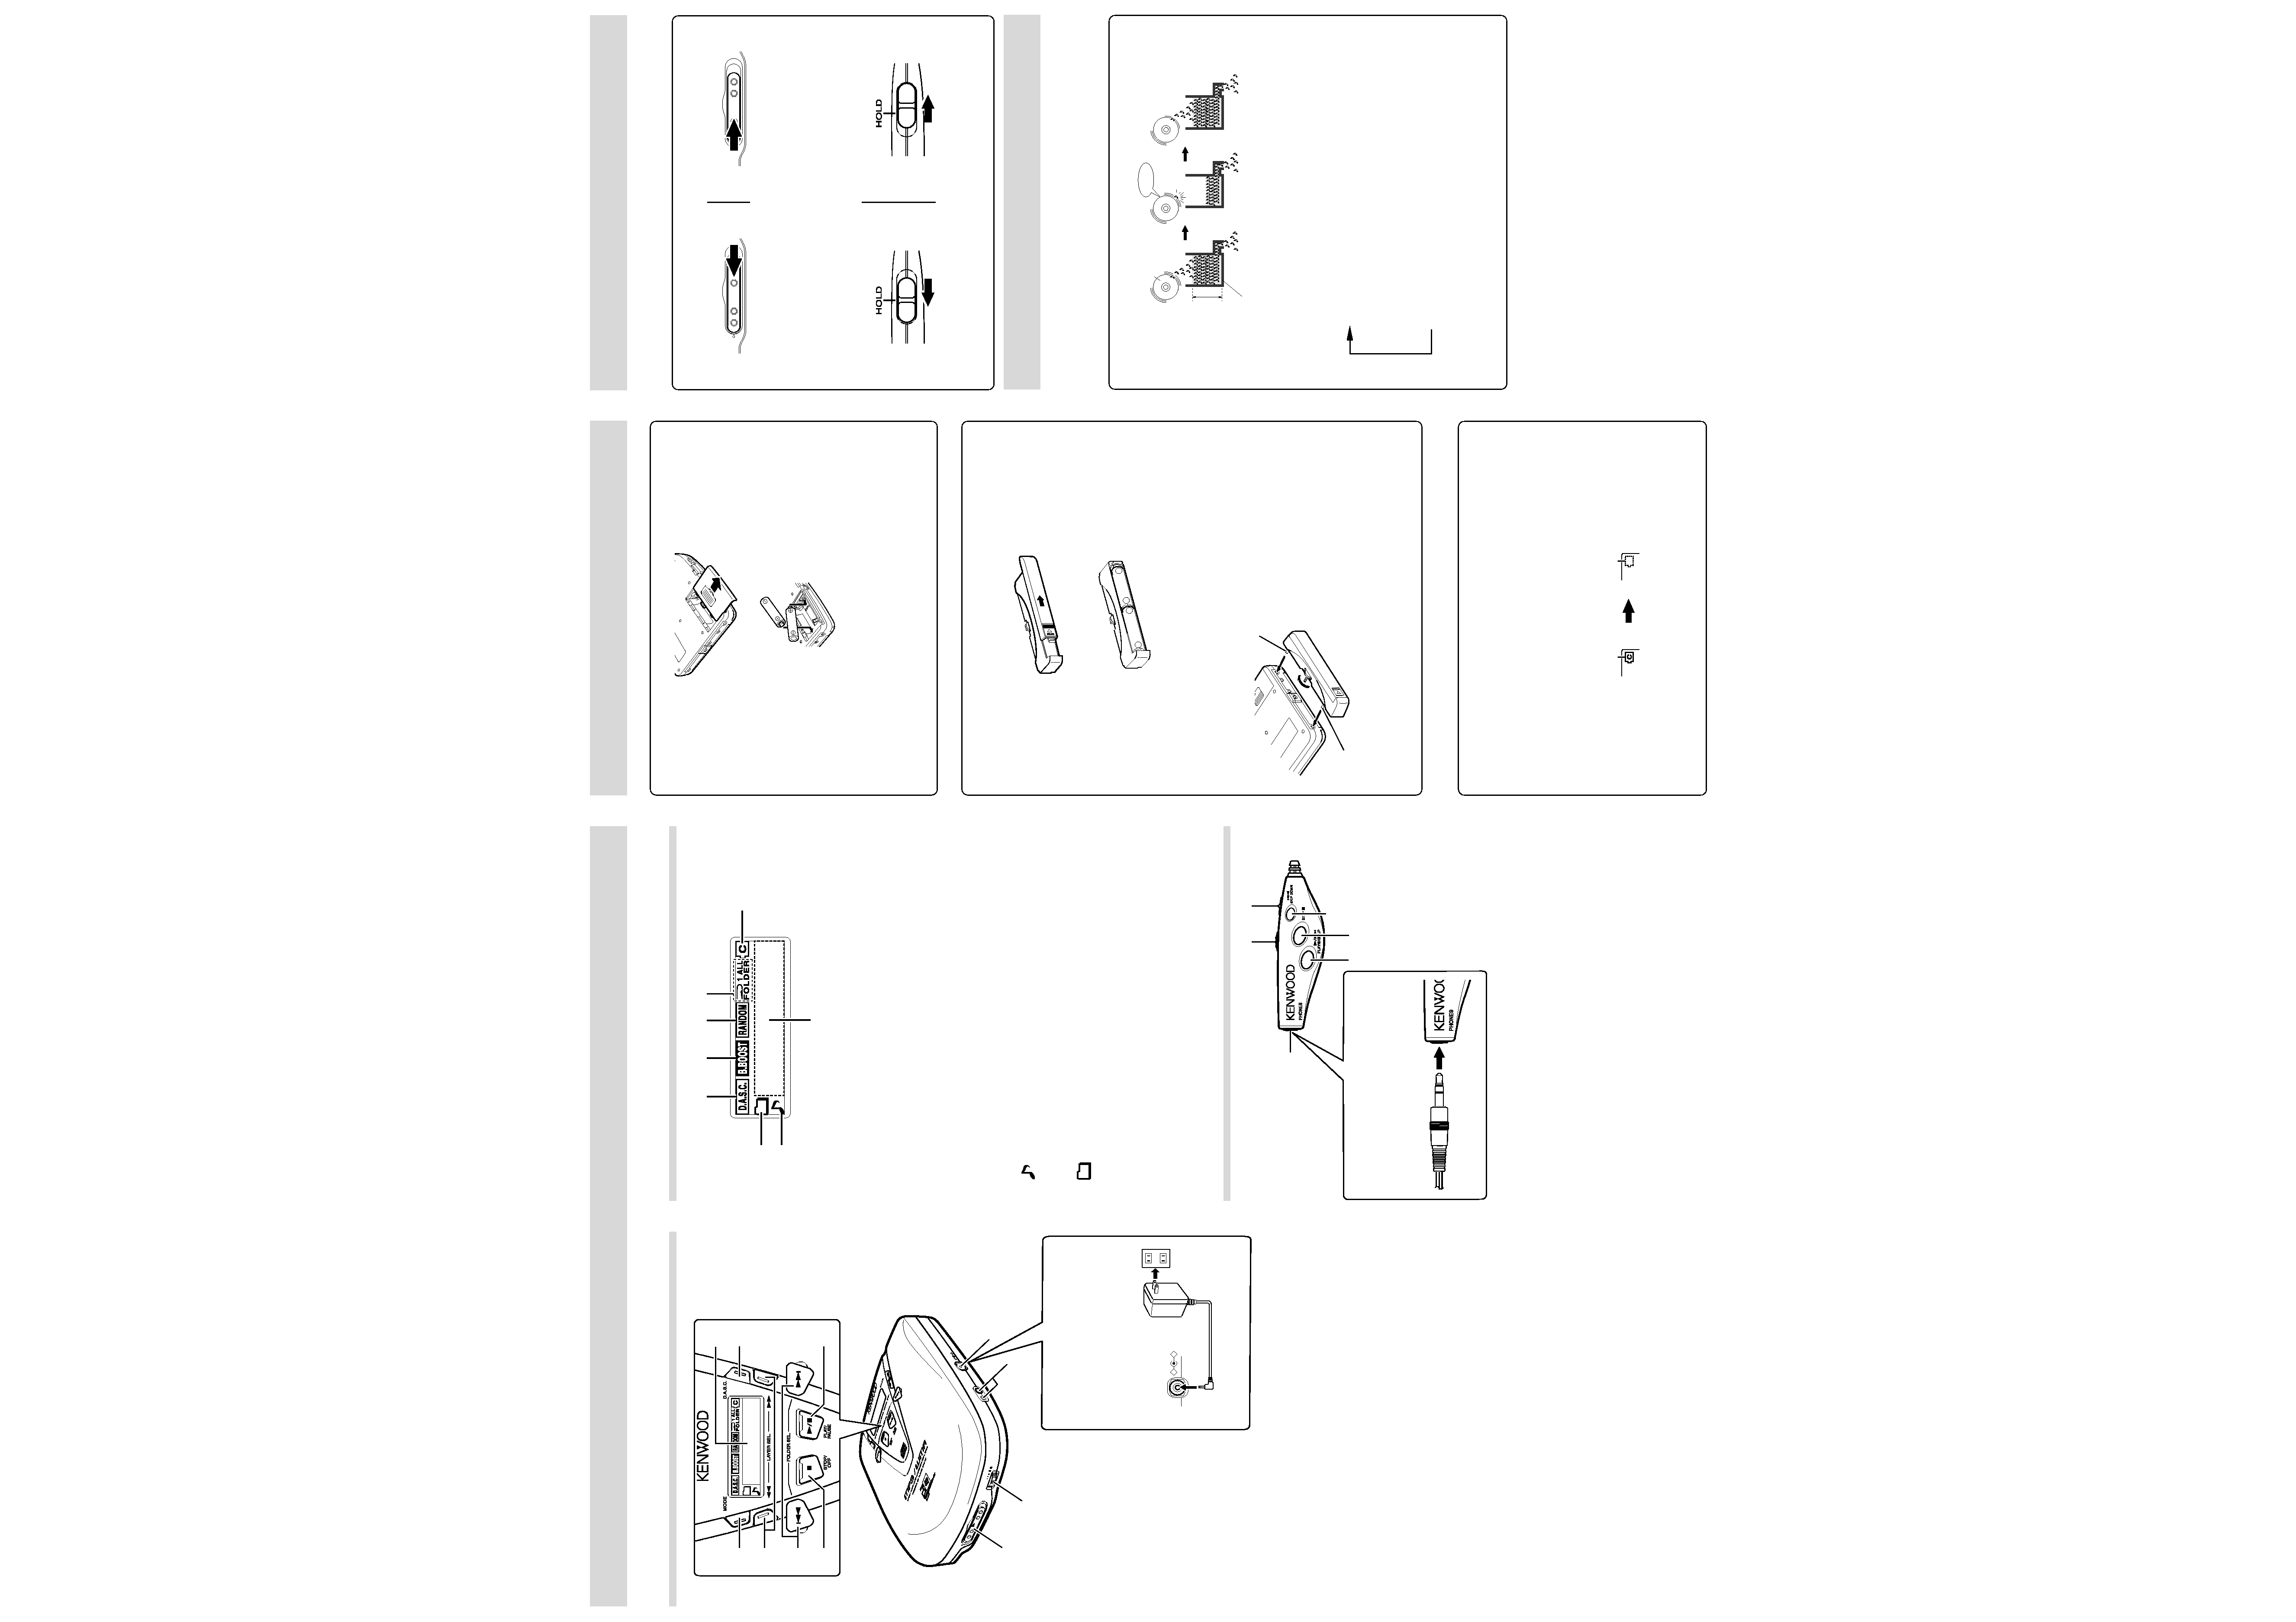
Inserting and recharging the batteries
Inserting the batteries in the player
1 Open the cover.
OP
EN
2 Taking care over the positive (+) and negative (-) poles, in-
sert the batteries.
¶ When running the player on normal dry-cell batteries, use size AA alkaline
batteries (LR6) available on the open market.
¶ As playback time will be greatly reduced when manganese batteries are used,
ensure that size AA alkaline batteries are used.
¶ Make sure that both batteries are replaced when changing batteries.
¶ Do not use rechargeable batteries and size AA alkaline batteries together.
3 Close the cover.
Using the external battery case
Using the battery case together with the rechargeable batteries or size AA alkaline bat-
teries set in the player will provide extended periods of continual play.
1 Remove the cover on the battery case.
2 Taking care over the positive (+) and negative (-) poles, in-
sert the size AA alkaline batteries.
_
+
_
+
¶ It is not possible to recharge the batteries with the external battery case.
¶ As playback time will be greatly reduced when manganese batteries are used,
ensure that size AA alkaline batteries are used.
¶ Make sure that both batteries are replaced when changing batteries.
3 Close the cover.
4 Attach the case to the player.
Caution:
Remove the battery case from the player when it is not to be used for long periods of
time. As the dry-cell batteries will recharge the rechargeable batteries, the dry-cell bat-
teries will run out quickly. Also, ensure that the batteries are removed from the case.
Recharging the batteries
Refer to the "Accessories" table.
¶ Ensure that only the rechargeable batteries supplied with the player (NB-150) or
sold separately (NB-130) are used. Batteries other than special Kenwood batteries
must not be used under any circumstances.
¶ Remove the external battery case.
1 Insert the rechargeable batteries in the player, and then
connect the AC adapter.
2 Switch the power off.
3 Wait for five seconds, press the STOP key twice in succes-
sion, and then confirm that the symbol is illuminated.
¶ The recharge timer will be switched off after approximately six hours. The power
will be switched off once recharging is complete.
4 Disconnect the AC adapter from the player once recharg-
ing is complete.
Electrode
Guide pin
Align the guide pin and electrode
with the holes on the player and
press the battery case into position,
and then turn the screw in the di-
rection of the arrow to fix it in place.
Insert from the positive (+) side.
Recharging
Illuminated
Recharging complete
Extinguished
Avoiding miss-operations
It is possible to avoid miss-operations when the player is placed in a bag with the use
of the hold function that prevents all keys, with the exception of special keys, from
being operated.
Player:
Slide the OPEN/HOLD key to the HOLD position.
When on hold:
When the hold is cancelled:
OPEN
3
HOLD
OPEN
3
HOLD
¶ All keys on the player, with the exception of the OPEN/HOLD switch and the volume
knob, will stop operating.
¶ Slide the OPEN/HOLD switch to the central position to cancel the hold function and
resume operations.
¶ The operation keys on the remote control will not be set in the hold mode when the
OPEN/HOLD switch on the player is set in the HOLD position.
Remote controller (DPC-MP727):
Slide the HOLD switch to the HOLD position.
When on hold:
When the hold is cancelled:
¶ All keys on the remote controller, with the exception of the volume knob, will stop
operating.
¶ Slide the HOLD key to the off position to cancel the hold function and resume opera-
tions.
Sound skip guard function (D.A.S.C.)
Sound skipping caused by vibrations, etc., is prevented by recording the sound
data into the memory and then playing it back from the memory.
The D.A.S.C. function will always be activated with MP3 and WMA files (approxi-
mately 110 seconds when saved with a transmission bit rate of 128kbps and a sam-
pling frequency of 44.1kHz).
Sound skip guard function mechanism
CD
Digital data
recorded
Digital memory
Vibrations
Playback sound
¶ There are cases where, depending on the degree of the vibrations, the memory data
will be used up and the sound skip guard function will be temporarily disabled.
D.A.S.C. setup (Audio CDs (CD-DA) only)
Press the D.A.S.C. key.
The display will alternate between the following whenever the key is pressed.
"40-SEC":
Records approximately 40 seconds of sound data.
This is the highest sound skip guard mode level.
"10-SEC":
Records approximately 10 seconds of sound data.
This mode provides lower sound skip guard mode
levels in comparison with the 40-SEC mode, but the
quality of the sound is better.
D.A.S.C.function
is released :
Cancels the sound skip guard function.
(D.A.S.C. disappears)
¶ Sound being played back will be cut off when switching between modes.
¶ The D.A.S.C. setting will become 40-SEC when the top cover is opened.
DPC-MP727/MP922(EN)1
Using the AC adapter*
Do not use anything other than the AC
adapter supplied.
¶ Note that the power will be switched off
when the cable is plugged in or unplugged
from the player's DC IN terminal.
* Shape of AC adapter may differ de-
pending on the sales area.
Playing back MP3 and WMA files
It is not possible to play back folders (up to 23) and files (up to 200) that exceed the
maximum limitations of the media.
If the copyright is in effect for a WMA file, "PROTECTED FILE" will be displayed for
that particular file and the player will move onto the next file.
A certain amount of time is required for the player to confirm the media on which
MP3 and WMA files have been recorded before playback will commence.
Playback
Insert the media, and then confirm that the hold function has been
released before continuing with subsequent operations.
1 Press the PLAY/PAUSE key.
¶ The power will be switched on and playback will commence.
¶ The same operation can be performed by pressing the PLAY/PAUSE button
on the remote controller.
¶ The files will be played back in the sequence in which they were recorded
(written).
¶ The
mark will be displayed when a folder exists in the next layer.
¶ The
mark will be displayed when a file exists in the next layer.
2 Turn the VOLUME knob to adjust the volume.
Stopping
Press the STOP button.
¶ The same operation can be performed by pressing the STOP 7 button on the re-
mote controller.
Searching for the beginning of files
Press the
4
4
4
4
4 or ¢
¢
¢
¢
¢ keys.
¶ The beginning of the required file will be located in accordance with the number of
times the keys are pressed. Keep the key pressed down to skip consecutively through
the files to be played back.
¶ If the 4 key is pressed once during playback, playback will return to the beginning
of the file.
¶ A certain amount of time may be required when searching for the beginning of files
depending on the number of files and the situation of the folder layers.
Pausing during playback
Player only:
Press the PLAY/PAUSE key during playback.
¶ The mode currently set will blink in the display area, and playback will be paused.
¶ Press the PLAY/PAUSE key once again to resume playback.
Fast forward and fast reverse
Note:
Fast forwarding and fast reversing is not possible with MP3 and WMA files.
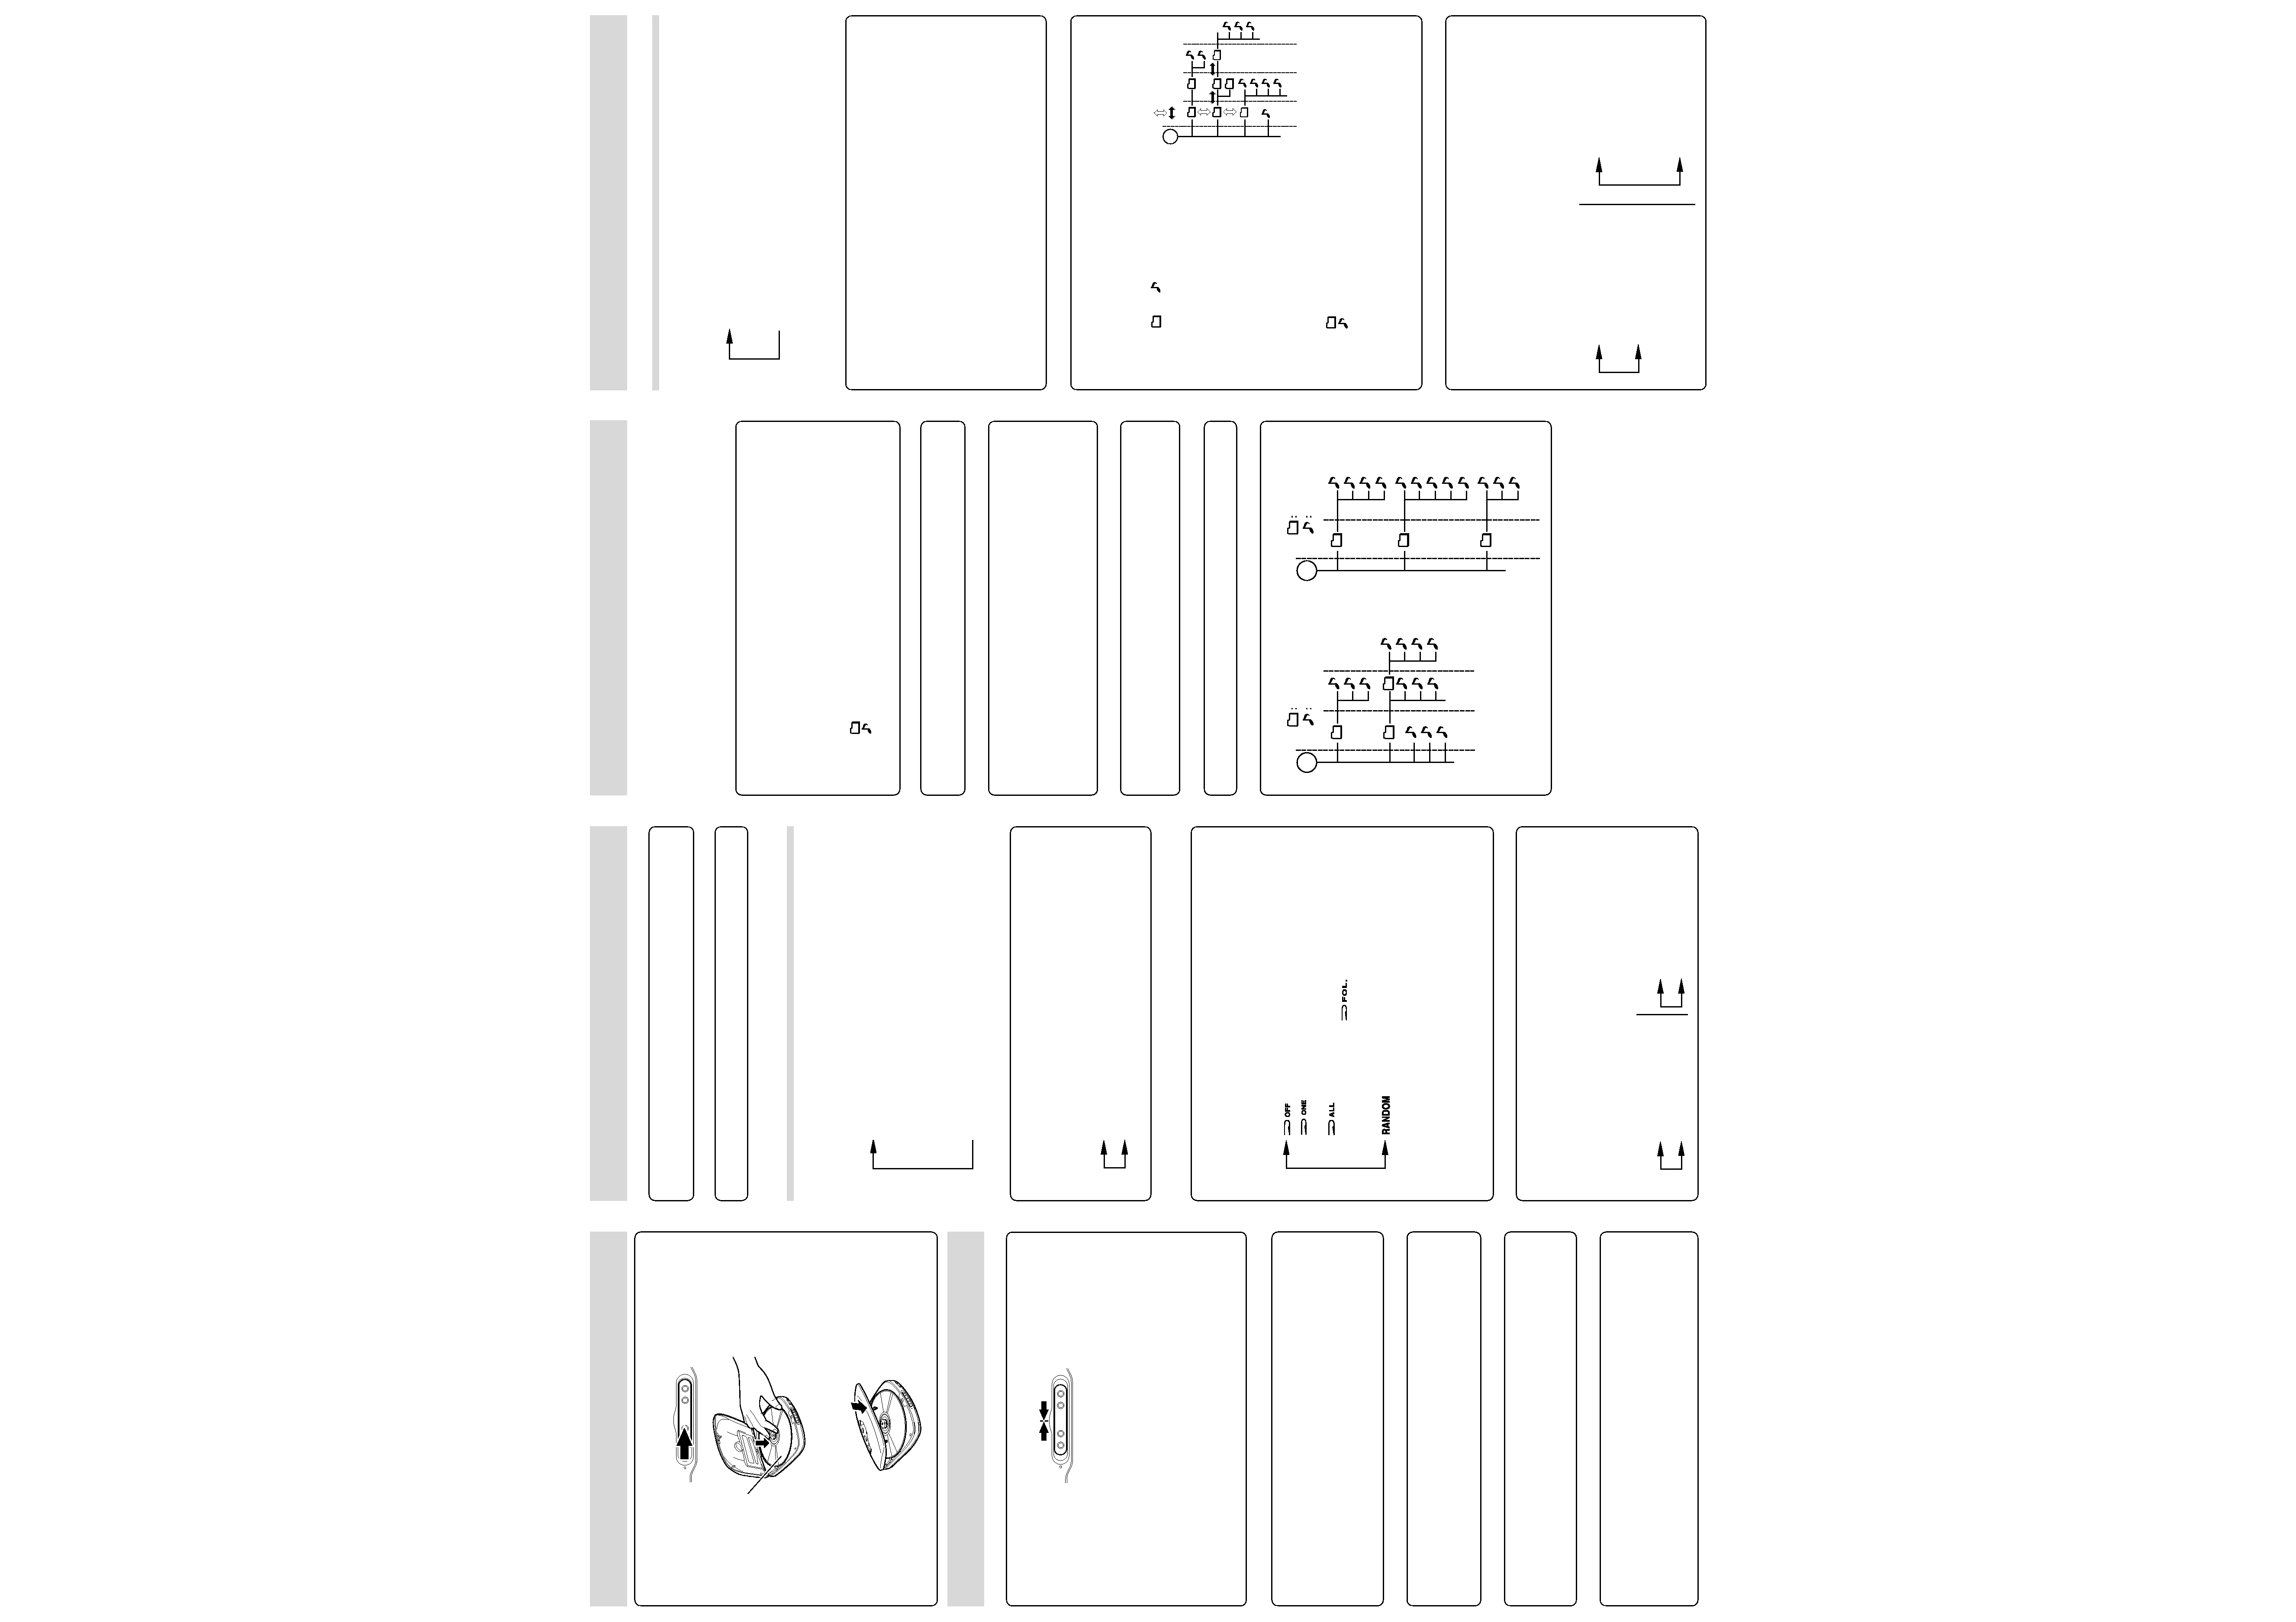
Conceptual diagram of a media directory
(EX.1)
(EX.2)
Using the MODE key for operations
It is possible to search for folders, and amend the sound quality, playback styles
and the display style with the use of the MODE key.
The following mode settings will change alternately as follows whenever the MODE
key is pressed.
Folder search (folder search/folder select)
B.BOOST setting (boosts the bass tones)
Playback mode setting
Display setting
End the procedure by pressing the MODE key.
¶ The B.BOOST setting and the playback mode setting are the same for audio CDs.
Refer to the explanations in the section of CDs.
Searching for folders (during playback)
Sequentially selects folders.
1 Press the MODE key during playback to make the
"FOLDER" display blink.
¶ Perform the next operation within eight seconds.
2 Press the ¢
¢
¢
¢
¢ or 4
4
4
4
4 keys to select the required folder.
¢ key: Selects the next folder in the sequence it was written.
4 key: Selects the previous folder in the sequence it was written.
¶ The folder name will be displayed inside parenthesis "( )".
¶ Playback will automatically start from the first file in the folder once a folder has
been selected.
¶ A certain amount of time may be required when searching for folders depend-
ing on the number of files and the situation of the folder layers.
¶ The player will return to the first folder in which files exists when the STOP 7
key is pressed.
Selecting folders (when stopped)
Selects the folders to be played back directly regardless of the or-
der in which it was written (operated from the player).
1 Press the MODE key when stopped to make the"FOLDER"
display blink and press the PLAY/PAUSE key to enter the
folder selection mode.
¶ The
and
marks will blink during folder
selection.
2 Press the ¢
¢
¢
¢
¢ or 4
4
4
4
4 keys to select
a folder in the same layer.
¢ key:Selects the next folder in the same
layer.
4 key:Selects the previous folder in the
same layer.
Press the
¡
¡
¡
¡
¡ or 1
1
1
1
1 keys to move to
the layer.
¡ key: Moves to the lower layer.
1 key: Moves to the higher layer.
¶ The folder name will be displayed inside parenthesis "( )".
¶ The
mark will blink if another folder exists within the selected folder.
The
mark will blink if a file exists within the selected folder.
¶ Press the STOP 7 button to return to ROOT.
3 Select the required folder, and the press the PLAY/PAUSE key.
¶ Playback will start from the first file in the selected folder.
¶ Files in the next folder will be played back when no files exist in the selected
folder.
Viewing the information contained in the media (Display setting)
This function allows media information, such as the folder and file
titles and the number of files contained on the media, to be viewed.
1 Press the MODE key to enter the media display mode.
¶ The currently set mode will blink once the media display mode has been reached.
¶ Perform the following operation within eight seconds.
2 Press the 4
4
4
4
4 or ¢
¢
¢
¢
¢ keys to change the display.
The display will switch between the following information whenever these keys
are pressed.
When stopped:
During playback:
ROOT
: Press the
4/¢ key.
: Press the
1/¡ key.
Folder title (
)
Total number of files in the
folder (
)
The total number of files on
the media [
]
The name of the file being
played back
Title and artist information
Folder title (
)
Number of the file being
played back
The amount of time elapsed
for the file
Playing back MP3 and WMA files
ROOT
ROOT
Folder
File
Folder
File
First
layer
Second
layer
Third
layer
Fourth
layer
First
layer
Second
layer
Third
layer
Ensure that the side
with the label is facing
upwards.
Loading disc
1 Slide the OPEN/HOLD switch in the direction of the arrow
to open the top cover.
OPEN
3
HOLD
2 Load the disc.
¶ Press the area around the hole until the central axis clicks into place.
3 Close the top cover.
¶ Press the front of the cover in the center until it clicks firmly into place.
Playing back audio CDs (CD-DA)
Sequentially from the first track.
1 Check to ascertain that the OPEN/HOLD switch is set in
the central position.
OPEN
3
HOLD
¶ The hold function is cancelled when the OPEN/HOLD switch is in the central
position. Ensure that the hold function has been cancelled when operating the
player with the use of player keys.
2 Press the PLAY/PAUSE key.
¶ The power supply will be switched on and playback will commence from the
first track.
¶ The same operations can be performed by pressing the 3/¢ key on the
remote controller.
3 Turn the VOLUME knob to adjust the volume.
¶ The volume knob on the remote controller is not interlinked with the volume
level of the player. The volume to which the player has been adjusted will be
effective when the volume on the remote controller has been turned up full.
Searching for the beginning of tracks
Press the
4
4
4
4
4 or ¢
¢
¢
¢
¢ keys.
¢: Press to select the next track.
4: Press to select the previous track.
¶ The beginning of the required track will be located in accordance with the number of
times the keys are pressed.
¶ Press the 4 key once during playback to return to the beginning of the track.
¶ The same operations can be performed by pressing the 4 or 3/¢ keys on the
remote controller.
Fast forward/fast reverse
Player only:
Press the
¡
¡
¡
¡
¡ (fast forward) or 1
1
1
1
1 (fast reverse) keys continu-
ously during playback.
¶ Playback will recommence from the place the key is released.
¶ High-speed fast forward and fast reverse is possible when in the pause mode.
Pausing during playback
Player only:
Press the PLAY/PAUSE key during playback.
¶ The track number and the amount of time elapsed for the track being played back
will blink in the information display area, and playback will be paused.
¶ Press the PLAY/PAUSE key once again to resume playback.
Stopping playback
Press the STOP key.
¶ The total number of tracks and the total time will be displayed in the information display area.
¶ The location that playback was stopped will be memorized automatically when the
STOP/OFF key is pressed. Playback will be resumed from the memorized location
when the
3 key is pressed as long as the disc is not replaced or the power switched
off.
¶ The same operations can be performed by pressing the STOP 7 key on the remote controller.
Playing back audio CDs (CD-DA)
Switching off the power
Press the STOP key when playback has been halted.
¶ The same operations can be performed by pressing the STOP 7 key on the remote
controller.
Auto power-off function
The power will be switched off automatically in order to preserve battery power after
three or more minutes have elapsed in the stop mode.
Setting up with the MODE key
It is possible to amend the sound quality and playback styles, and the display style
with the use of the MODE key.
The following mode settings will change alternately as follows whenever the MODE
key is pressed.
B.BOOST setting:
Boosts the bass tones that tend to be suppressed when music is lis-
tened to on the headphones.
Playback mode setting:
Enables repeated playback and random playback.
Display setting:
Enables the number of tracks on the CD and time information to be
viewed.
End the procedure by pressing the MODE key.
Boosting the bass tones (B.BOOST setting)
1 Press the MODE key repeatedly to make the [BB off] or [BB
on] displays blink.
Perform the next operation within eight seconds.
2 Press the 4
4
4
4
4 or ¢
¢
¢
¢
¢ key.
The display will switch between the following whenever these keys are pressed.
BB off: Cancels the bass boost function.
BB on: Boosts the bass tones.
¶ The B.BOOST setting is canceled when the top cover is opened.
Repeat playback and random playback (Playback mode
setting
1 Press the MODE key repeatedly until the playback mode is
displayed.
The currently set mode will blink once the playback mode has been reached.
2 Press the 4
4
4
4
4 or ¢
¢
¢
¢
¢ keys to select the playback mode.
The display will switch between the following whenever these keys are pressed.
:
Cancels repeat playback and random playback.
:
Repeats a single track.
Repeats the track being played back or the track selected.
:
Repeats all tracks.
(Folder repeat (
) when CD-ROMs are being played
back.)
Repeats all tracks. (Repeats all files in the folder.)
: Random playback (can only be selected when playback is
stopped).
Randomly selects tracks for playback. Playback will stop once
all tracks have been played back. (Random playback can only
be canceled when playback is stopped. The Folder Seach and
Folder Select functions cannot be used when the random mode
is in effect.)
¶ The preset playback mode will be displayed with an icon.
¶ The B.BOOST setting is canceled when the top cover is opened.
Viewing CD information (Display setting)
Player only:
1 Press the MODE key repeatedly to select the CD informa-
tion display mode.
The currently set mode will blink once the CD information display mode has been
reached.
2 Press the 4
4
4
4
4 or ¢
¢
¢
¢
¢ keys to change the display mode.
The display will switch between the following whenever these keys are pressed.
When stopped:
During playback :
Total number of tracks
Track number being played back
Total amount of time
Amount of time elapsed for the track
Battery consumption display
The following black-and white inverted mark will be displayed at the liquid crys-
tal display's information display area when the batteries are running low.
The timing for displaying the black-and white inverted marker for indicating the
consumption level of the batteries will differ in accordance with the battery type.
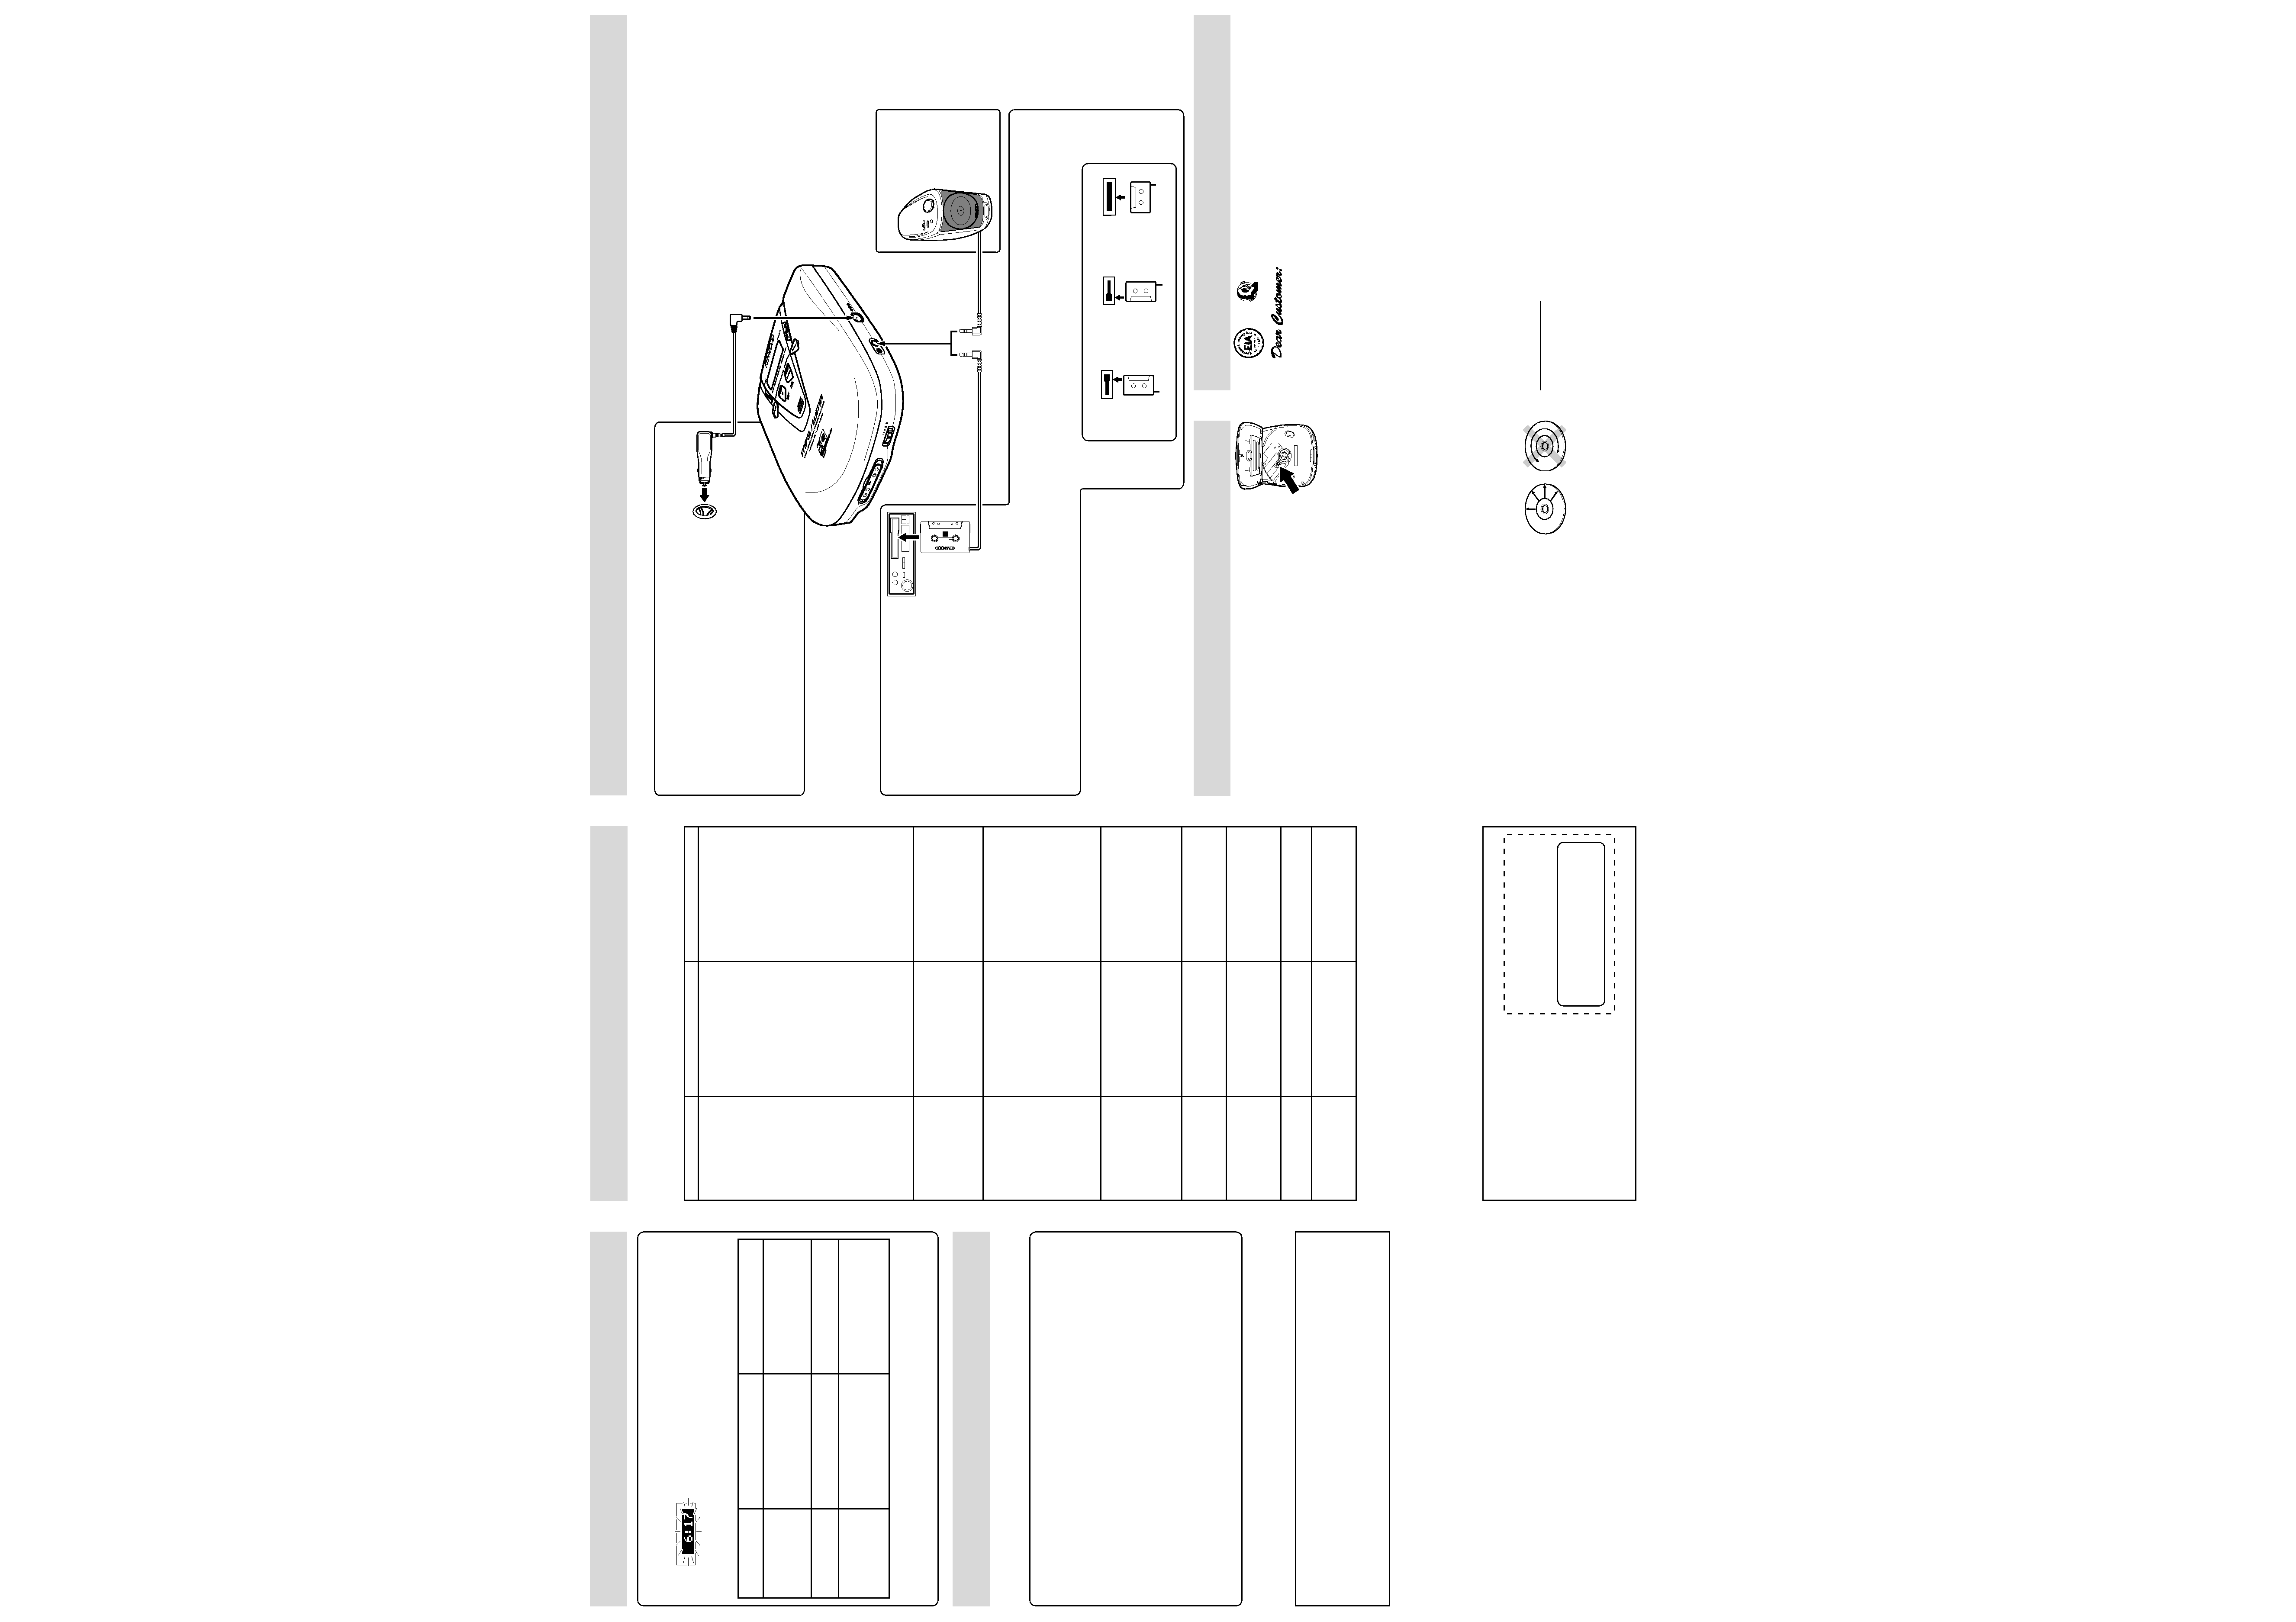
Connections
Using the car battery adapter
¶ When the unit is not used, unplug the car bat-
tery adapter. (Otherwise, the car battery may
run out, with some car models.)
¶ The plug may not match the cigar lighter
socket of some car models.
¶ If the unit cannot be operated with the car bat-
tery adapter connected, suspect the possibil-
ity of a blown fuse. The fuse can be replaced
by turning the electrode on the tip of the
adapter plug. When replacing the fuse, be
sure to use a fuse with a rating of 1 A.
Car battery adapter
(Cars with DC 12V battery only)
¶ Refer to the "Accessories"
table.
Connect to
cigar lighter socket
Speakers with
built-in amplifier
Listening through car audio
¶ If sound is not produced, change
the tape playing direction of the
car stereo.
(Sound is not produced if the car
stereo is set to play tape side B.)
¶ Audio reproduction may be im-
possible with the following type
of car stereo.
One-way models which have the
play head on the left side.
Models which function by detect-
ing the tape tension.
(With these car stereo models,
the car cassette adapter is
ejected automatically when it is
inserted.)
Insert into cas-
sette deck slot.
Car cassette
adapter.
¶ Refer to the
"Accessories"
table.
Before using the car cassette adapter
¶ This unit can be used exclusively with a KENWOOD portable CD player.
¶ The direction in which the cord comes out should be changed depending on the car
stereo model. Read the following instructions carefully and correct the unit properly
before use.
Ensure that the power of all components is off before connecting the cord.
OPE
N
_
+
DC
IN
PH
ON
ES
/LI
NE
OU
T
RE
MO
TE
VOLUME
HOLD
A
CASSETTE
VOLUME
MIN
MAX
Caution of hearing (For U.S.A.)
Selecting fine audio equipment such as the unit you've just purchased is only the start of your musical
enjoyment. Now it's time to consider how you can maximize the fun and excitement your equipment offers.
This manufacturer and the Electronic Industries Association's Consumer Electronics Group want you to get
the most out of your equipment by playing it at a safe level. One that lets the sound come through loud and
clear without annoying blaring or distortion -- and, most importantly, without affecting your sensitive hearing.
Sound can be deceiving. Over time your hearing "comfort level" adapts to higher volumes of sound. So
what sounds "normal" can actually be loud and harmful to your hearing. Guard against this by setting your
equipment at a safe level BEFORE your hearing adapts.
To establish a safe level:
¶ Start your volume control at a low setting.
¶ Slowly increase the sound until you can hear it comfortably and clearly, and without distortion.
Once you have established a comfortable sound level:
¶ Set the dial and leave it there.
Taking a minute to do this now will help to prevent hearing damage or loss in the future. After all, we
want you listening for a lifetime.
We Want You Listening For A Lifetime
Used wisely, your new sound equipment will provide a lifetime of fun and enjoyment. Since hearing
damage from loud noise is often undetectable until it is too late, this manufacturer and the Electronic
Industries Association's Consumer Electronics Group recommend you avoid prolonged exposure to
excessive noise. This list of sound levels is included for your protection.
Level
Example
30 dB
Quiet library, soft whispers
40 dB
Living room, refrigerator, bedroom away from traffic
50 dB
Light traffic, normal conversation, quiet office
60 dB
Air conditioner at 20 feet, sewing machine
70 dB
Vacuum cleaner, hair dryer, noisy restaurant
80 dB
Average city traffic, garbage disposals, alarm clock at two feet.
THE FOLLOWING NOISES CAN BE DANGEROUS UNDER CONSTANT EXPOSURE
90 dB
Subway, motorcycle, truck traffic, lawn mower
100 dB
Garbage truck, chain saw, pneumatic drill
120 dB
Rock band concert in front of speakers, thunderclap
140 dB
Gunshot blast, jet plane
180 dB
Rocket launching pad
Information courtesy of the Deafness Research Foundation.
For the U.S.A.
CAUTION:
Use of controls or adjustments or perform-
ance of procedures other than those speci-
fied herein may result in hazardous radia-
tion exposure.
In compliance with Federal Regulations,
following are reproductions of labels on, or
inside the product relating to laser product
safety.
KENWOOD CORPORATION
2967-3, ISHIKAWA-CHO,
HACHIOJI-SHI,
TOKYO, JAPAN
Location: Bottom Panel
KENWOOD CORP. CERTIFIES THIS
EQUIPMENT CONFORMS TO DHHS
REGULATIONS NO. 21 CFR 1040.10,
CHAPTER 1, SUBCHAPTER J.
Recharge the rechargeable batteries, or replace them with new batteries if alkaline
batteries are in use.
When the batteries run out, the power will be switched off automatically.
¶ The HOLD switch on the
player or remote controller is
set to HOLD.
¶ The batteries have run out.
¶ The AC adapter or car battery
adapter are not connected.
¶ The format of the disc in use
is wrong, or it has not been
finalized.
¶ The wrong procedure has
been performed for MODE
key operations, or the
method of selecting the
folder and file is incorrect.
¶ The headphones have not
been plugged in far enough.
¶ The volume has been turned
down on the player or re-
mote controller.
¶ The D.A.S.C. function (sound
skip guard) is switched off.
¶ The power of the vibrations
exceeds the capabilities of
the D.A.S.C. function.
¶ The disc is soiled.
¶ The lens is soiled.
¶ The batteries are running
out.
¶ The headphones plug is
soiled.
¶ The batteries are running
out.
¶ The headphones have not
been plugged in far enough.
¶ Normal dry cell batteries are
being used.
¶ No disc is loaded.
¶ The disc has been inserted
upside down.
¶ The disc is abnormal.
(The disc cannot be read).
¶ The disc does not contain
the MP3 or WMA files.
Nothing
happens
when the operation
keys are pressed.
¶ Cancel the HOLD function.
¶ Replace both alkaline batter-
ies, or recharge the re-
chargeable batteries.
¶ Connect the adapter prop-
erly.
¶ Create a disc in a format that
can be used.
Use only discs that have
been correctly finalized.
¶ Perform the procedure for
playing back MP3 discs and
WMA discs correctly.
¶ Plug the headphones firmly
into the PHONES terminal.
¶ Adjust the volume on the
player and remote controller.
¶ Switch the D.A.S.C. function
on.
¶ Place the player in a loca-
tion with minimal vibrations.
¶ Clean the disc.
¶ Clean the lens.
¶ Replace or recharge the bat-
teries.
¶ Clean the plug.
¶ Replace or recharge the bat-
teries.
¶ Plug the headphones firmly
into the PHONES terminal.
¶ Replace the batteries in the
player with the rechargeable
batteries.
¶ Load a disc that can be
played back.
¶ Insert the disc with the label
facing upwards.
¶ Replace with a disc that can
be played back.
¶ Replace with a disc which
contains files that can be
played back.
No sound is emitted
from the headphones.
The sound skips or
breaks up.
White noise can be
heard.
The batteries cannot
be recharged.
Symptom
Cause
Recovery
* The power will be switched off automatically when an error is displayed.
Caution:
1. This system uses a microcomputer, and there are cases where normal functioning will
not be possible owing to noise from external sources and other noise forms. In this
event, temporarily unplug the power cord or remove the batteries, and then try again.
2. There are cases where malfunctions will occur when the headphones are plugged in
and unplugged. This is not a defect.
3. There are cases where it is not possible to play back media and files that have not been
correctly saved.
"no DISC" is displayed
"ERROR" is displayed
"no FILE" is displayed
*
*
*
Problems?
There are cases where problems that appear to indicate a defect are in fact attribut-
able to other causes. In this event, check the problem against the table below to
ascertain what the trouble is. (There are cases where requests for service owing to
problems attributable to the causes outlined in the table will be charged.)
Maintenance
Simple care
Care of lens
When the lens in the pick-up gets dirty, malfunctions including the
impossibility of playback may occur. The lens should be cleaned
using a commercially available camera lens blower, etc. Do not
touch the lens to prevent damaging the mechanism. Also do not
use a lens cleaner or disc cleaner product.
Care of main unit
When the unit gets dirty, clean with a soft, dry cloth. If the unit is stained seriously, a
moistened cloth can be used. Do not use benzine or thinner for these will damage the unit.
Cleaning the plug
Wipe the headphone plug with a soft cloth to keep it clean.
A dirty plug may cause noise or malfunction.
Caution on disc used
Usable discs
8 cm single CDs can be played as they are; do not use a commercially-available single
CD adapter.
Handling
Hold compact discs so that you do not touch the playing surface.
Do not attach paper or tape to either the playing side or the label side of compact discs.
Never play a cracked or warped disc.
During playback, the disc rotates at high speed in the player. Therefore, to avoid danger,
never use a cracked or deformed disc or a disc repaired with tape or adhesive agent.
Cleaning
If fingerprints or foreign matter become attached to the disc,
lightly wipe the disc with a soft cotton cloth (or similar) from
the center of the disc outwards in a radial manner.
Storage
When a disc is not to be played for a long period of time,
remove it from the CD player and store it in its case.
Precaution against condensation
Immediately after a room is heated or in a room with high humidity (or vapor), the unit
may malfunction due to the condensation of dew or mist on the pick-up lens. In such a
case, leave the unit for about an hour before trying to use it again.
We
We
Want You
Want You
LISTENING
LISTENING
For A Lifetime
For A Lifetime
For rechargeable battery
WARNING
¶ Use specified charger only.
¶ Do not disassemble or mutilate,may cause burns.
¶ Do not incinerate or heat,may cause burns,burst or release toxic materials.
¶ Do not short circuit,may cause burns.
¶ Keep away from children.
Getting the best out of your player
Precautions when using rechargeable batteries
(NB-150 Nickel-Metal Hydrogen rechargeable batteries)
¶ Do not use any rechargeable batteries other than the ones specially required by the
player. Failure to observe this may result in damage.
¶ Nickel-Metal Hydrogen rechargeable batteries are used with the player. Owing to
the characteristics of these batteries, it is necessary to recharge them at least once
every two months even when they have not been used.
¶ It is possible to recharge the batteries approximately 300 times.
¶ Replace the rechargeable batteries when the amount of time they can be used is
minimal even after recharging (use NB-130 batteries sold separately.)
¶ A small amount of current will be consumed even when the power to the player is
switched off. It is therefore recommended that the batteries are removed if the player
will not be used for a long period of time.
¶ Place the rechargeable batteries in the battery carrying case supplied when carrying
them around. There is a risk of the positive and negative poles being shorted if they
come into contact with key holders or other metallic objects when carried in a pocket.
The rechargeable batteries have a tendency to become warm when recharged and
during use. This is not a defect.
Ensure that the instruction manual supplied with rechargeable batteries is read thor-
oughly when purchased separately for models that do not include them.
DPC-MP727/MP922(EN)2
When both recharge-
able batteries and al-
kaline dry-cell batter-
ies are used together
When approximately half of
the alkaline battery life has
been used
Battery type
Timing for displaying the black-
and white inverted marker
Action
Rechargeable bat-
teries
When the remaining capacity
of the batteries is low
The power will be automati-
cally switched off after a cer-
tain period of time. Recharge
the batteries.
Alkaline dry-cell
batteries
When approximately half of
the battery life has been used
Playback is possible while the
display is blinking.
Playback is possible while the
display is blinking.
Usable cassette slot types
(Factory setup)
A
B
B
B
B
B
C
C
C
C
C
A
A
A
A
A
A
A