
1
B
XL-PG59SL / LVT0979-004A / B
p1
Use numbers in parentheses when asking for replacement parts.
Stereo headphones .......................................................................................................................... 1 pc.
AC adaptor (AA-R4515) ................................................................................................................. 1 pc.
Remote control ................................................................................................................................. 1 pc.
Rechargeable Ni-Cd batteries (BN-R1211) ............................................................................... 2 pcs.
Supplied Accessories
Check the packing carton for these accessories.
Concerning Compact Discs
Precautions
0403SKMCREORI
©2003 VICTOR COMPANY OF JAPAN, LIMITED
EN
PORTABLE CD PLAYER XL-PG59SL
INSTRUCTIONS
Thank you for purchasing this JVC product. Please read these instructions carefully before starting
operation to be sure to obtain optimum performance and a longer service life from the unit.
Only compact discs bearing this mark can be used with this unit.
However, continued use of irregular shape CDs (heart-shape, octagonal, etc.) can damage
the unit.
If moisture has formed on a disc
When moisture has formed because the
disc was brought suddenly into a warm
room from a cold environment, wipe off
the moisture using a soft dry cloth.
When storing discs
Avoid locations which are
· Exposed to direct sunlight.
· Susceptible to high levels of humidity or
dust.
· Directly exposed to heat from a heating
appliance.
· On top of a car dashboard or near the
rear window.
Handling precautions
· On the label side (the side with writing)
Do not write anything using a pencil,
ball-point pen, etc. Do not use adhesive
paper or labels.
· On the disc (shiny) side
Handle this side carefully to keep it free
from fingerprints or scratches. Do not
use record cleaners, solvents, etc.
· Do not attach labels or stickers to CDs.
Do not use CDs with exposed adhesive
from tape or left over peeled off stickers.
· Do not use scratch-proof protectors or
covers other than those specified for use
with this unit.
If the disc surface is dirty
Wipe it with a damp cloth and then wipe dry.
Wipe from the center toward the outer edge.
How to hold a disc
How to store the disc in
its case
How to remove a disc from its case
Label side up
LVT0979-004A [B]
in-
he
rized
ler.
CD-R and CD-RW discs recorded with the audio
CD format can be played back, though some may
not be played back because of the disc characteris-
tics or recording condition.
Play surface (shiny surface)
Marking sign is located on bottom of
the unit.
CAUTION
!
THIS PRODUCT UTILIZES A LASER.
USE OF CONTROLS OR ADJUST-
MENTS OR PERFORMANCE OF PRO-
CEDURES
OTHER
THAN
THOSE
SPECIFIED HEREIN MAY RESULT IN
HAZARDOUS RADIATION EXPOSURE.
DO NOT OPEN COVERS AND DO NOT
REPAIR YOURSELF. REFER SERVIC-
ING TO QUALIFIED PERSONNEL.
WARNING:
TO REDUCE THE RISK OF FIRE OR
ELECTRIC SHOCK, DO NOT EXPOSE
THIS APPLIANCE TO RAIN OR MOIS-
TURE.
1. CLASS 1 LASER PRODUCT
2. DANGER: Invisible laser radiation when open and interlock
failed or defeated. Avoid direct exposure to beam.
3. CAUTION: Do not open the top cover. There are no user
serviceable parts inside the Unit; leave all servicing to qualified
service personnel.
CAUTION:
· Do not block the ventilation opening or holes. (If the ventilation
openings of holes are blocked by a newspaper or cloth, etc., the
heat may not be able to get out.)
· Do not place any naked flame sources, such as lighted candles, on
the apparatus.
· When discarding batteries, environmental problems must be con-
sidered and local rules or laws governing the disposal of these
batteries must be followed strictly.
· Do not expose this apparatus to rain, moisture, dripping or splashing
and that no objects filled with liquids, such as vases, shall be placed
on the apparatus.
DANGER
INVISIBLE LASER RADIATION WHEN OPEN AND INTERLOCK DEFEATED.
AVOID DIRECT EXPOSURE TO BEAM.
ADVARSEL
USYNLIG LASERSTRÅLING VED ÅBNING, NÅR SIKKERHEDSAFBRYDERE
ER UDE AF FUNKTION. UNDGÅ UDSÆTTELSE FOR STRÅLING.
VARO!
AVATTAESSA JA SUOJALUKITUS OHITETTAESSA OLET ALTTIINA
NÄKYMÄTÖNTÄ LASERSÄTEILYLLE. ÄLÄ KATSO SÄTEESEEN.
VARNING
OSYNLIG LASERSTRÅLNING NÄR DENNA DEL ÄR ÖPPNAD OCH
SPÄRREN ÄR URKOPPLAD. BETRAKTA EJ STRÅLEN.
ADVARSEL
USYNLIG LASERSTRÅLING NÅR DEKSEL ÅPNES OG SIKKERHEDSLÅS
BRYTES. UNNGÅ EKSPONERING FOR STRÅLEN.
VORSICHT
UNSICHTBARE LASERSTRAHLUNG, WENN ABDECKUNG GEÖFFNET
UND SICHERHEITSVERRIEGELUNG ÜBERBRÜCKT.
NICHT DEM STRAHL AUSSETZEN.
(Påsat under apparatet)
(Tuotteen pohjassa)
(Apparatens undersida)
(Produktets underside)
(Unterseite des Gerätes)
(Bottom of product)
Bottom of the unit
y can
ht for
e mal-
ng ex-
or dis-
eate a
ue use
et you
at you

2
3
XL-PG59SL / LVT0979-004A / B
p2
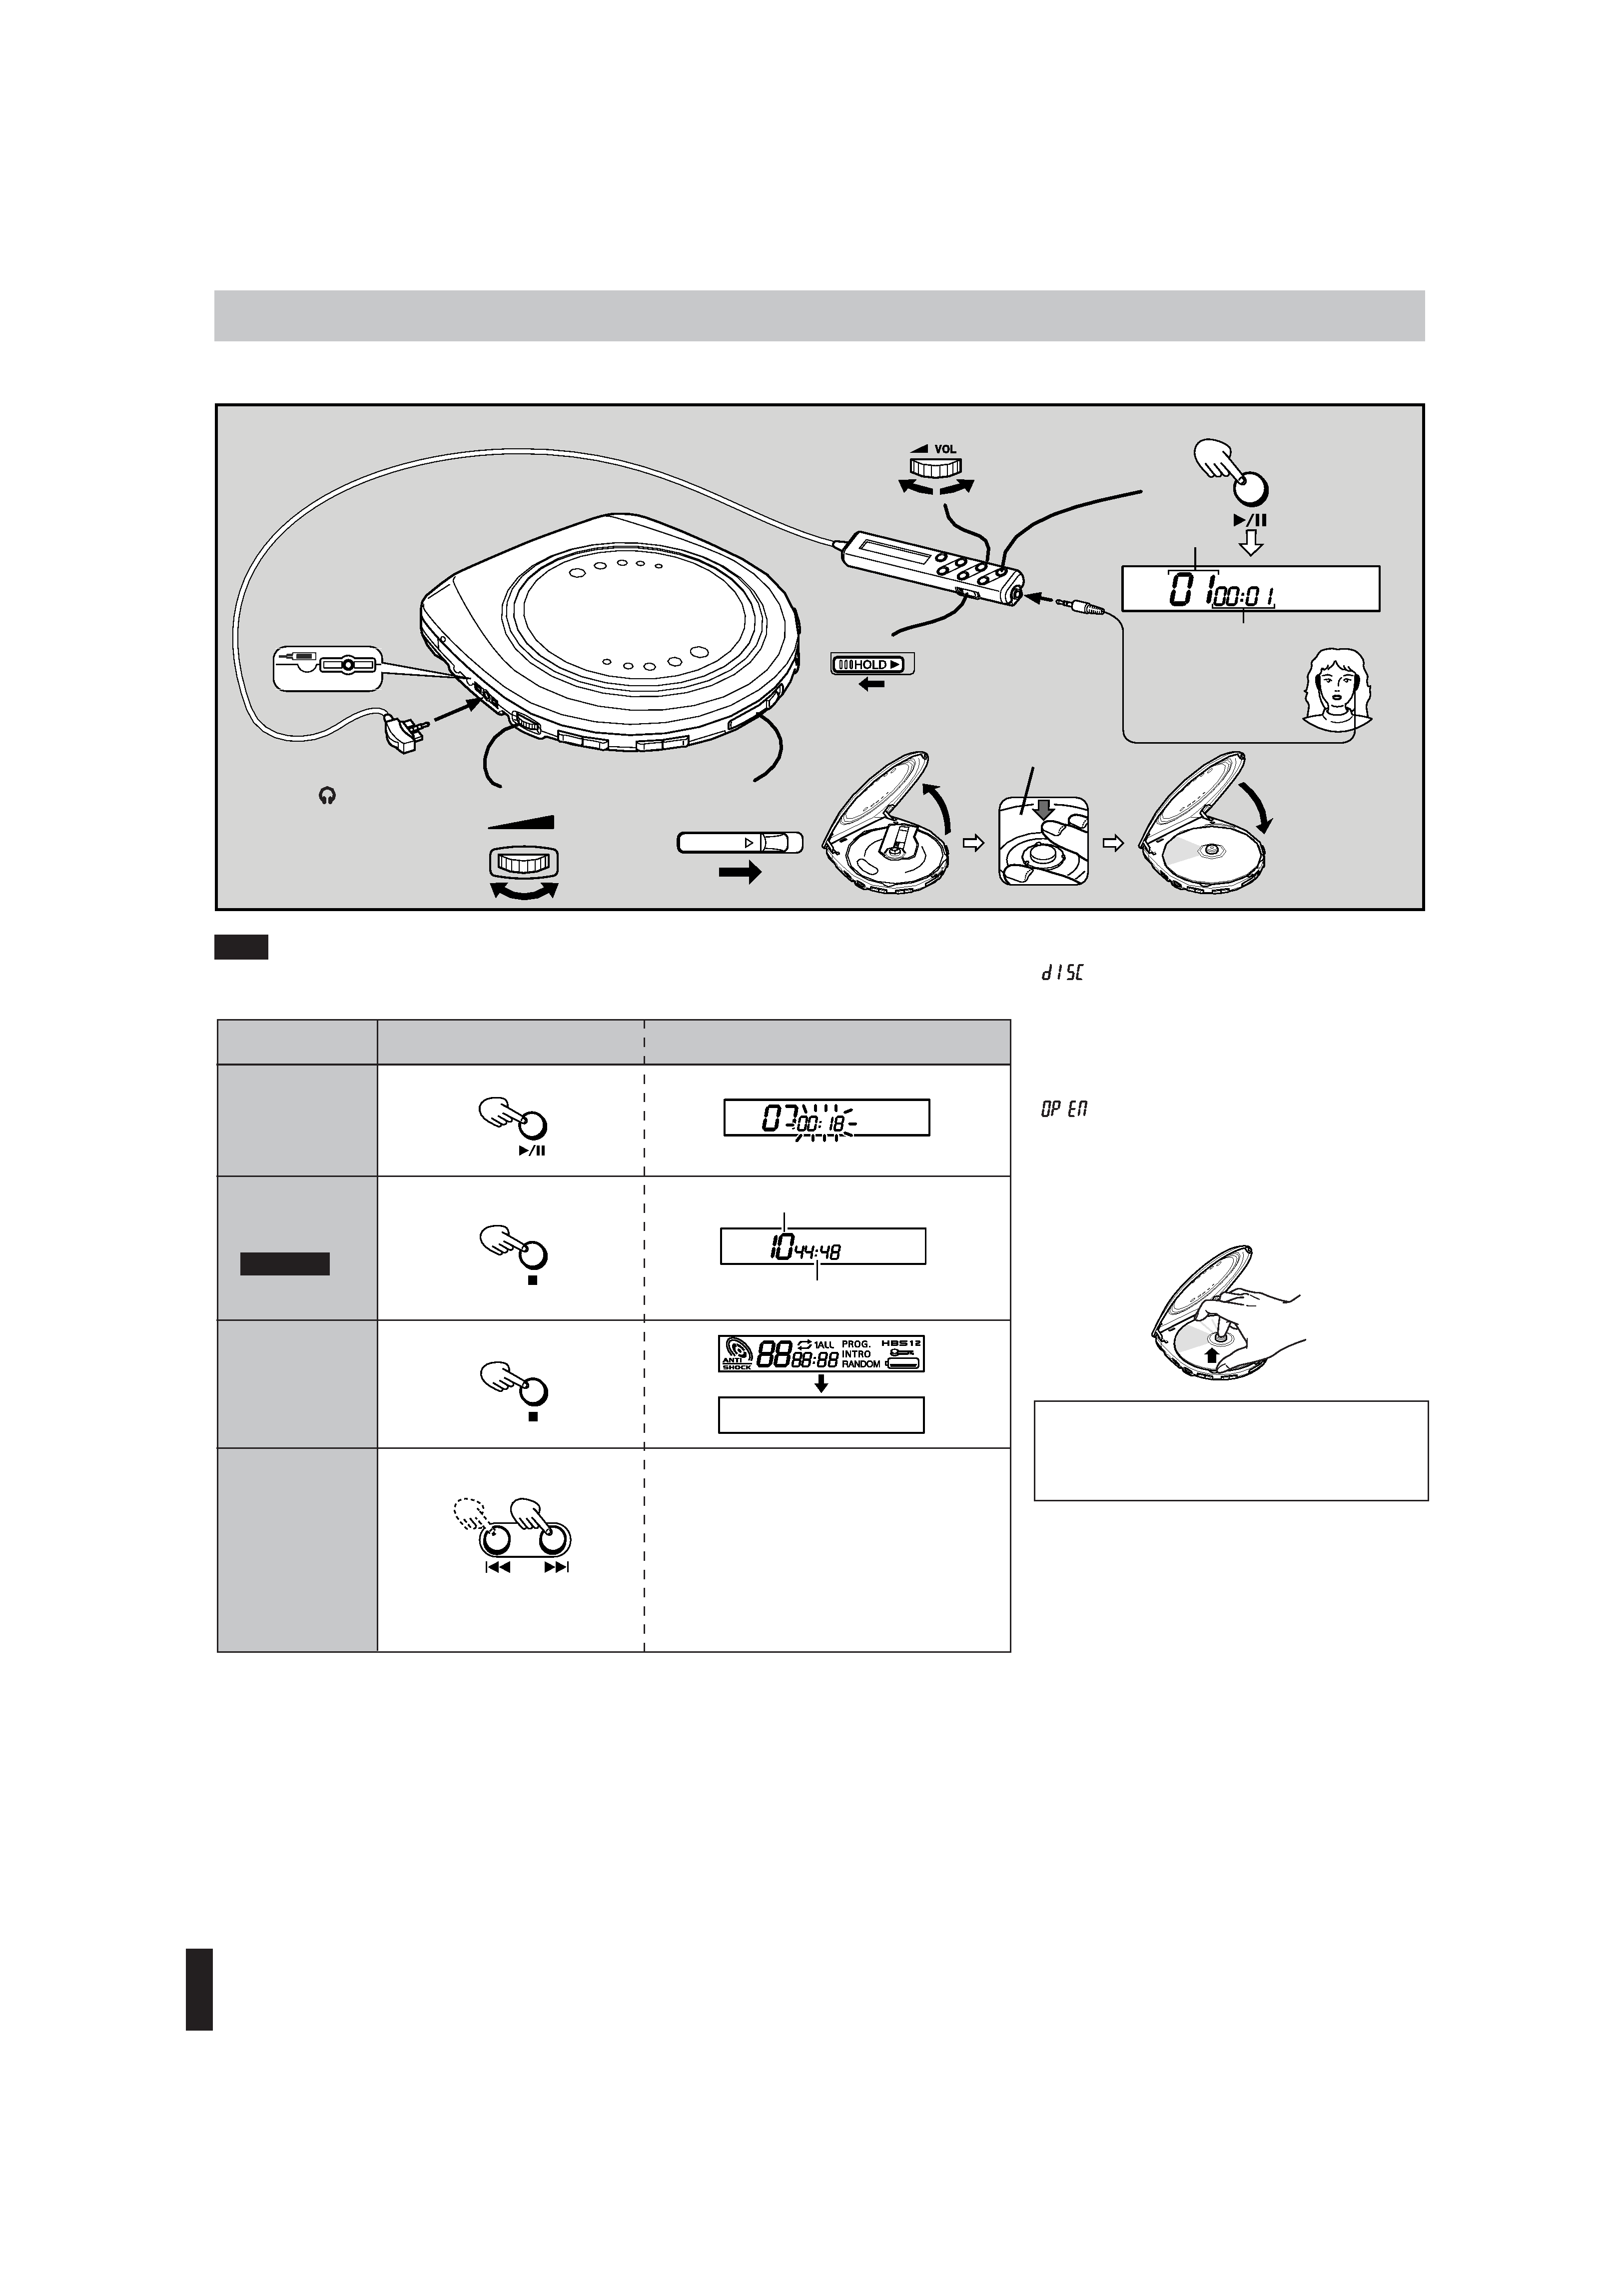
Power Supply Preparations
Using rechargeable batteries
(supplied)
Be sure to recharge the rechargeable batteries before using them.
Recharging procedure
1 Insert the rechargeable batteries.
* Insert the battery as you push it in the indicated direction.
Caution:
Do not forcibly open the battery lid too wide.
2 Connect the AC adaptor (supplied).
Recharging will be completed after 10 hours.
3 When recharging is complete, unplug the
AC adaptor from the AC power outlet and
the DC IN jack.
O
To
To
To
F
A
B
Battery indicator
Using the AC adaptor (supplied)
Connect the AC adaptor.
Refer to "Using rechargeable batteries" for connection instruc-
tions.
Note:
Even if the unit is turned off, small power is consumed as long as
the AC adaptor is connected to the AC power outlet.
Location of Controls
Using dry-cell batteries
(not supplied)
After disconnecting the AC adaptor, insert two "AA" (LR6) alka-
line batteries.
The procedure for inserting and removing dry-cell
batteries is identical to that for rechargeable bat-
teries.
Battery indicator
This indicator flashes on and off when the batteries are almost out
of power. Power will be cut off a short while later.
Note:
Turning off the Anti-Shock Protection EX will save the battery
power more or less. For details, see "Anti-shock Protection EX"
on page 4.
If the unit malfunctions or freezes during use,
disconnect the power source (the AC adaptor
and batteries) once. Then, re-connect the power
source and continue operation.
Notes:
· Rechargeable batteries have a service life of approximately
300 charge-discharge cycles. If the operating time on one full
charge becomes noticeably shorter than it used to be, the batteries
have reached the end of their service life and should be replaced.
· You can recharge the batteries only when the unit is turned off.
· The AC adaptor and rechargeable batteries may become warm
while recharging is in progress. This is normal and is not a mal-
function.
Portable CD player A
Headphones / remote control jack
(
/ REMOTE)
Volume control (VOLUME
)
Skip / search buttons (
4, ¢)
Stop / power off button (
7)
Play / pause button (
3/8)
Lid open switch (OPEN
3)
DC in jack (DC IN 4.5 V
)
ASP (Anti-Shock Protection EX)
button
Hold switch (HOLD)
B
A
B
AC power outlet
S
Remote control
Display
Hyper-Bass Sound button (H.B.S)
Program button (PROG)
Skip / search buttons (
4, ¢)
Play / pause button (
3/8)
Volume control (
VOL)
Headphones jack
Stop / power off button (
7)
Hold switch (HOLD
3)
Mode button (MODE)
Unless
Note th
DC IN jack
(DC IN 4.5 V
)
AC adaptor
F
Note
In step
Otherw
If the battery lid
compartment
comes loose
Slide the lid back into
place horizontally.
Removing batteries
XL-PG59SL_B.p65
2
4
3
4A / B
XL-PG59SL / LVT0979-004A / B
p3
1
2
VOLUME
3
7
86
5
OPEN
4
/REMOTE
Track number in play
Elapsed playing time of
each track
RL
Label side.
Button
Operation
To pause play
To stop play
To turn off the
unit
Fast forward/
reverse
Display/reference
Skip function
During play,
Search function
Keep depressed during play.
· Play stops automatically
when all the tracks have
been played.
For your reference:
"
"
This indication appears if
3/8 is pressed when no disc is loaded
in the unit or if the disc is not properly seated.
" "
· Preparation period before playing the track
Flashes for several seconds after pressing
3/8 to play the disc.
"
"
This indication appears when the lid is open.
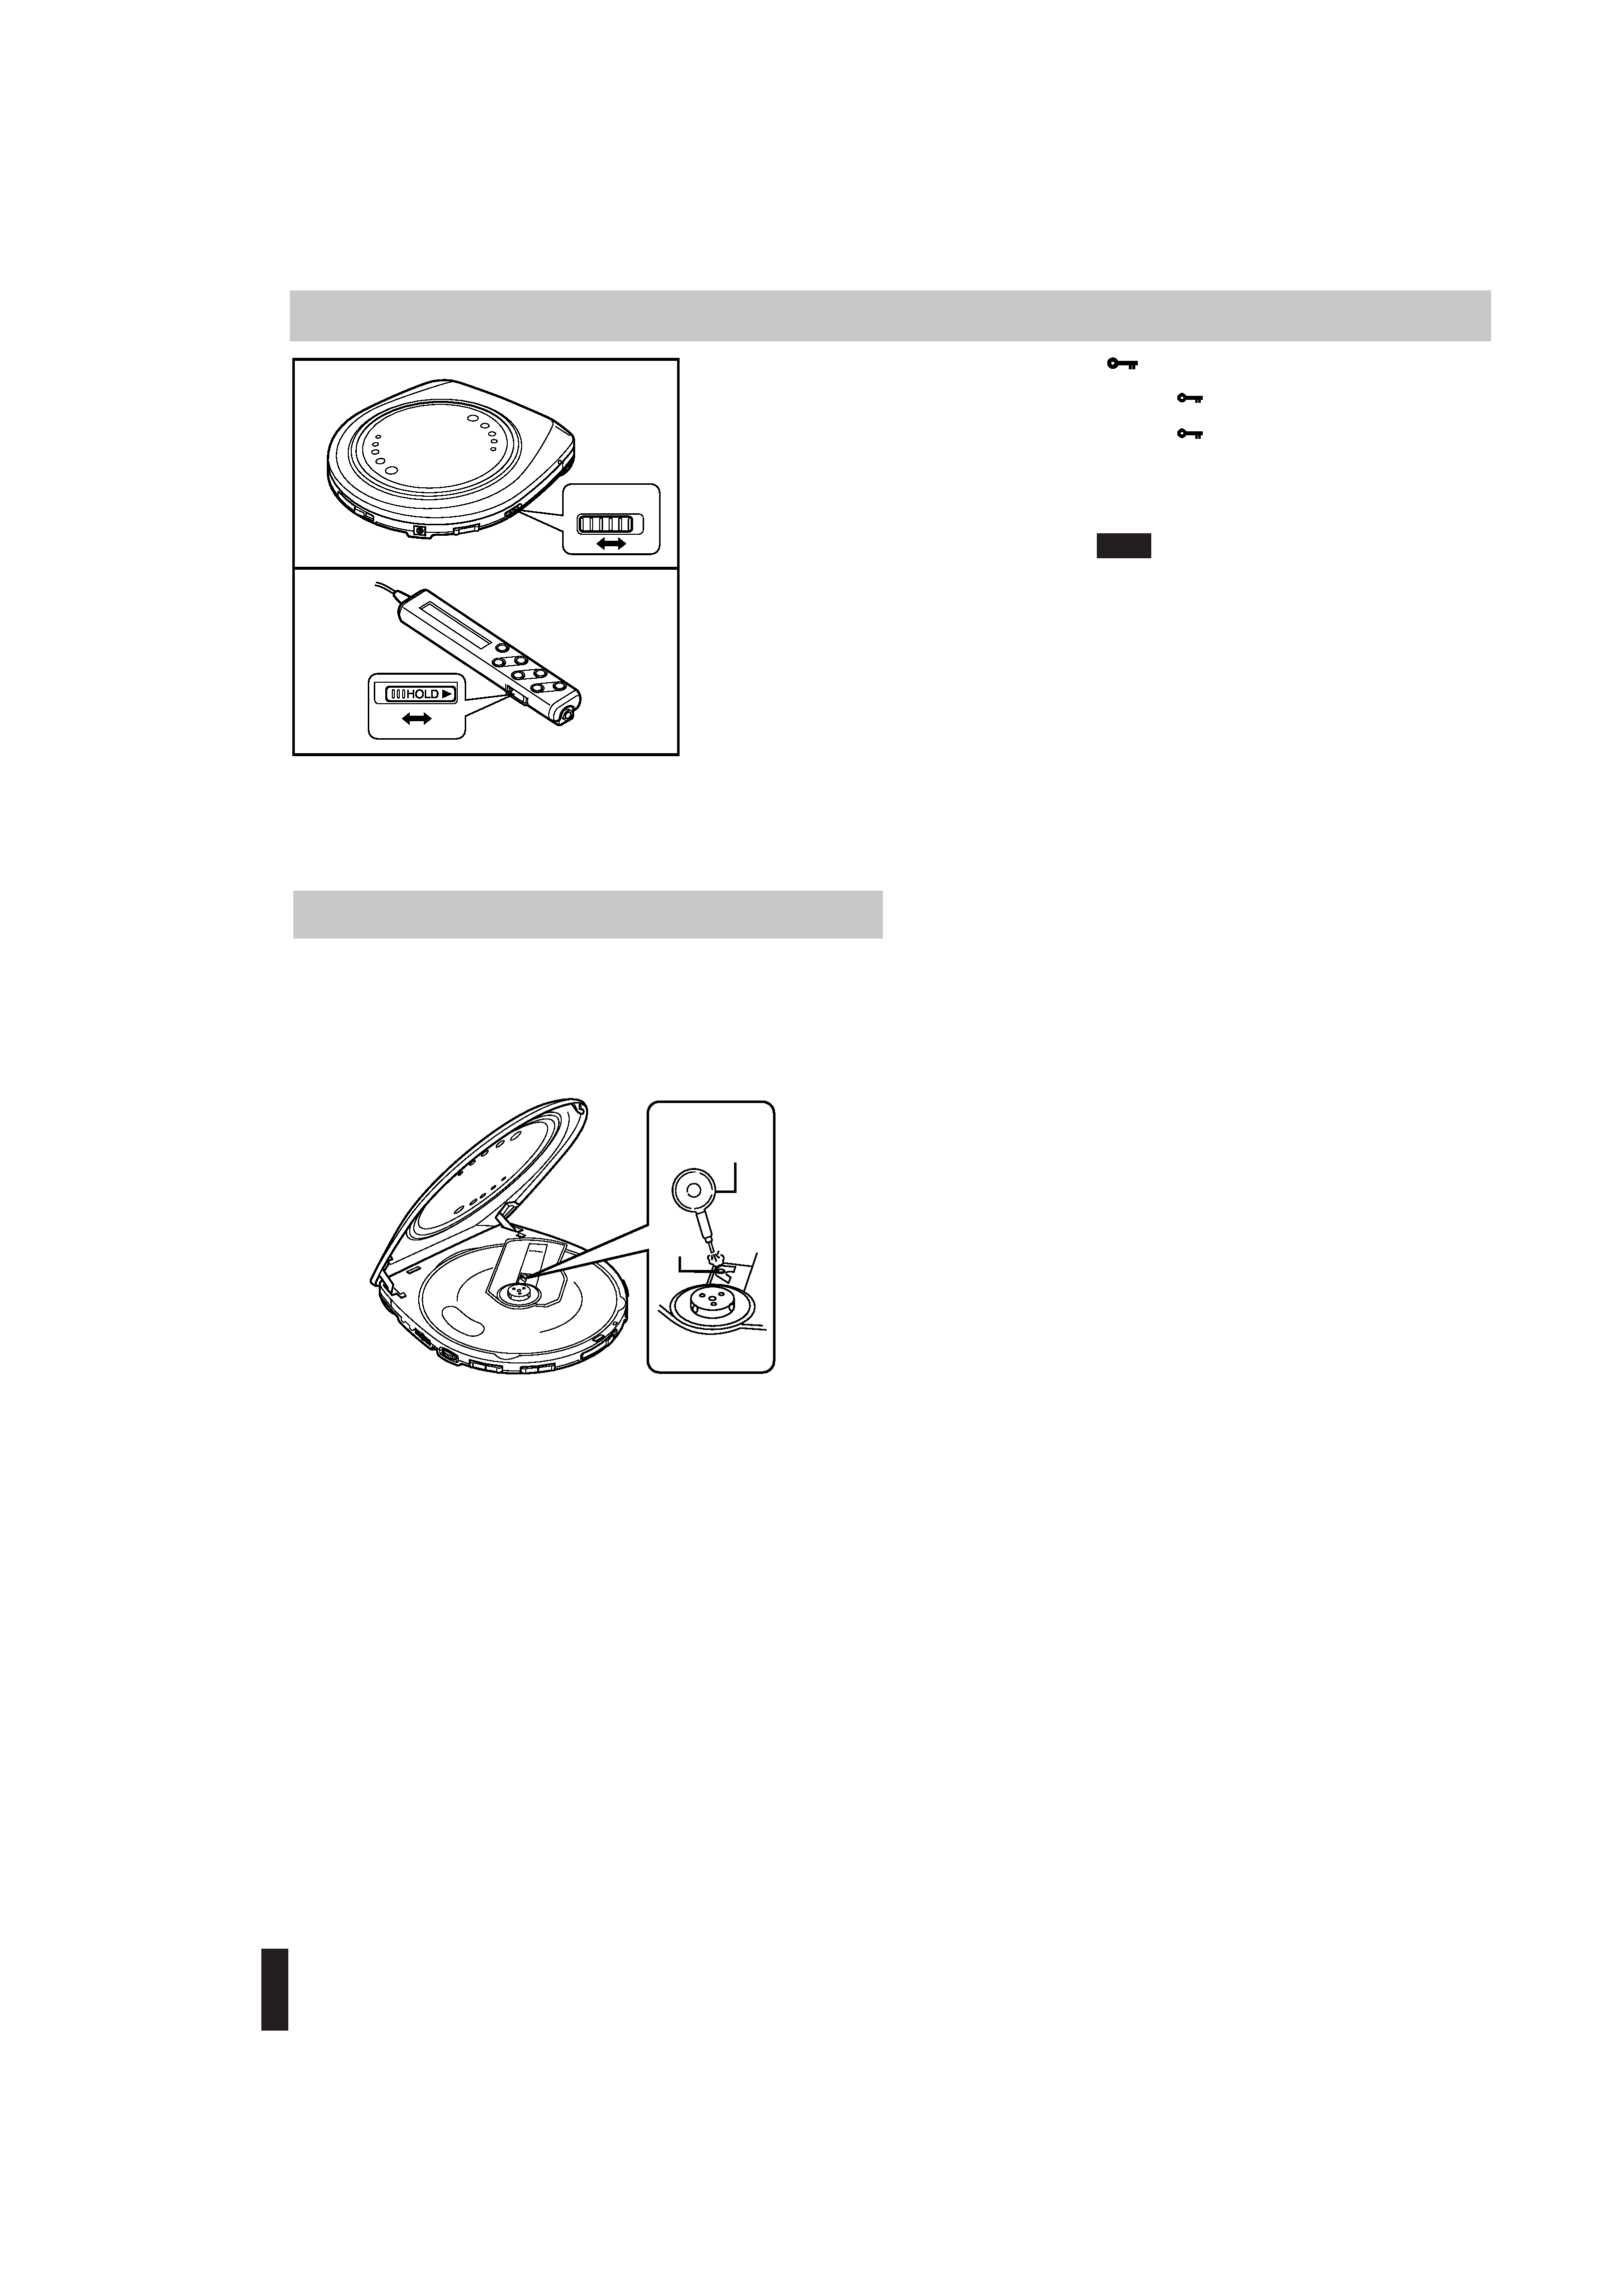
Removing discs
Turn off the unit and, after the disc has stopped rotating, remove
the disc as shown below:
Auto power off function
If the unit is left in stop mode for 30 seconds, the unit turns
itself off automatically to prevent the batteries from running
down.
· To skip back to the previous track, quickly press
4
twice.
· During Program play, the button is used to fast for-
ward or back through the programmed sequence of
tracks.
· During Random play, the skip button cannot be used
to skip back to tracks that were played previously in
the random sequence.
During play,
During play,
In stop mode,
Press again to resume play.
Basic Play
This function has be
against sound inter
to enjoy listening to
This function is a
servo circuit and au
ahead of time (up to
Normally, the "AN
and the Anti-Shock
Anti-S
Other
y indicator
two "AA" (LR6) alka-
removing dry-cell
rechargeable bat-
batteries are almost out
e later.
will save the battery
-shock Protection EX"
zes during use,
the AC adaptor
nnect the power
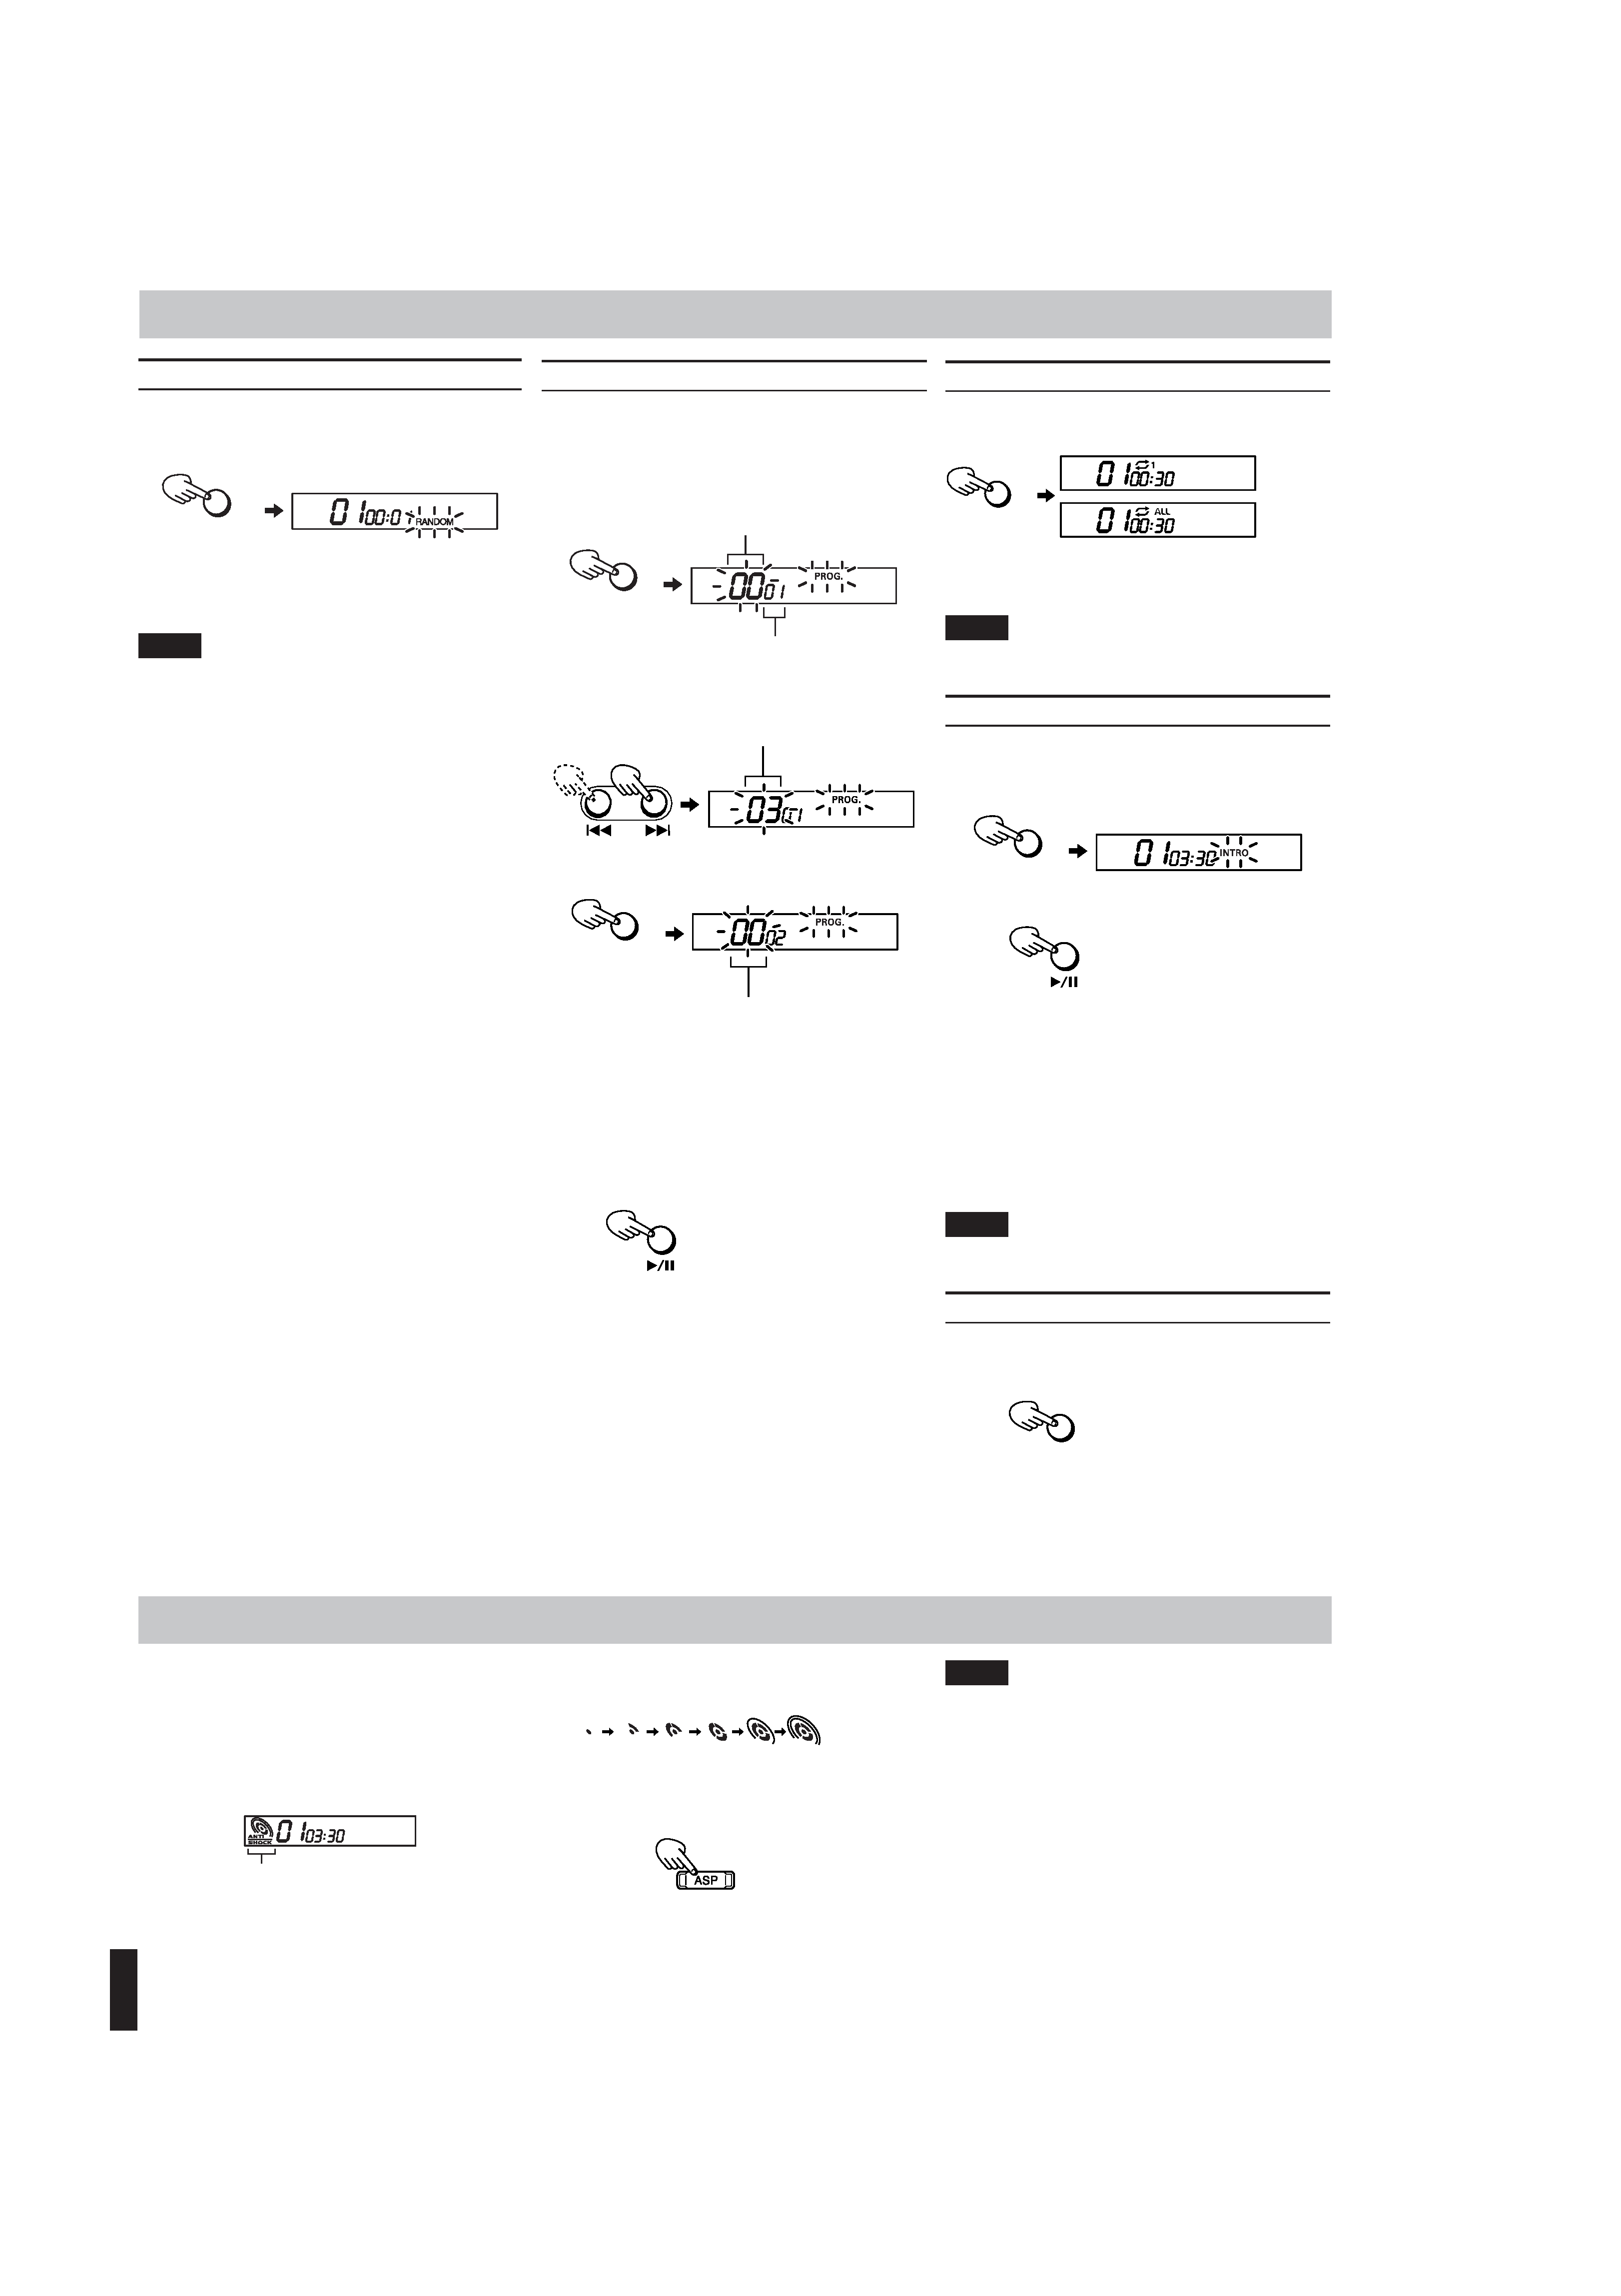
Random play
You can play all trac
the unit stops.
During playbac
MODE
To cancel
Press MODE until "R
Notes:
· You can also selec
· During Program
B
Total number of tracks
Total playing time.
ANTI S
Stop mode
button (H.B.S)
ROG)
ns (
4, ¢)
n (
3/8)
VOL)
utton (
7)
D
3)
E)
Reverse
Forward
(repeatedl
Insert the plug in the
indicated direction. The
plug cannot be inserted
opposite direction.
Unless otherwise noted, the remote control unit's buttons are used in the following explanation.
Note that the unit's button with the same mark works equally to the remote control's button.
Follow the steps in the numerical order.
Note:
In step 1, firmly connect the plug into the jack.
Otherwise, the display may not show the correct contents.
6/25/03, 1:39 PM
4
B
XL-PG59SL / LVT0979-004A / B
p4
L
matically
acks have
is loaded
the disc.
g, remove
it turns
running
This function has been developed to achieve excellent performance
against sound interruption caused by vibrations. You will be able
to enjoy listening to music during jogging (not vigorous jogging).
This function is achieved by utilizing the high-performance
servo circuit and audio data that has been stored in the memory
ahead of time (up to 45 seconds worth).
Normally, the "ANTI SHOCK" indicator lights up on the display
and the Anti-Shock Protection EX is in effect.
Anti-Shock Protection EX
Other Play Methods
When the disc is played, as the audio data gradually stored in
the memory, the "ANTI SHOCK" indicator changes as follows:
To cancel
Press the ASP button.
The "ANTI SHOCK" indicator goes out on the display.
To activate again
Press the ASP button.
Random play
You can play all tracks in a random order. After playing all tracks,
the unit stops.
During playback,
MODE
To cancel
Press MODE until "RANDOM" goes out, or press
7 to stop the disc.
Notes:
· You can also select Random play in stop mode.
· During Program play, you can not select Random play.
Program play
You can program up to 20 tracks in any desired order including
the same tracks.
1 During playback or in stop mode,
PROG
2 Select the desired track.
3
PROG
The track is registered.
4 Repeat steps 2 and 3 to program other
tracks.
When you program exceeding 20 tracks, the program se-
quence number returns to "01" and will overwrite the previ-
ous setting.
5
The tracks are played in the programmed order.
· To confirm the program
In stop mode, press PROGRAM repeatedly. The programmed
track number will successively appear together with the pro-
gram sequence number. At this time, you can change the pro-
gram, if required.
If the programmed tracks are less than 20, track number "00"
appears for the youngest programmable sequence number, en-
abling further programming.
· To delete the entire program
Turn off the unit, or set the track number to 00 for the first pro-
gram sequencer number, "01".
Program sequence
number
Track number to be programmed
00: Not programmed yet.
e.g. Track number 3
Repeat Play
You can repeat one track or all tracks.
During playback,
MODE
To cancel
Press MODE repeatedly until the repeat indicator goes out.
Notes:
· You can also select Repeat play in stop mode.
· You can also select Repeat play during Program play.
Intro play
You can successively play the first 10 seconds of every track.
Intro play stops after playing the last track.
1 During playback,
MODE
2
Intro play will start from the first track.
Pressing
¢ instead of 3/8 will start Intro play from the
next track. Pressing
4 will start Intro play from the cur-
rent track. When no button is pressed, Intro play will start
from the next track after the current track has finished.
To cancel
Press MODE repeatedly until "INTRO" goes out.
To normally play the track being played
Press
3/8 during Intro play.
Notes:
· You can also select Intro play in stop mode.
· You can also select Intro play during Program play.
Hyper-Bass Sound effect
You can enjoy powerful bass sound.
To get or cancel the Hyper-Bass Sound effect
H.B.S
The display changes as follows.
HBS 1
= HBS 2 = (cancelled)
HBS 2 provides more effect.
Notes:
· During Anti-Shock Protection EX operation, the disc rotates at
a higher rate than usual in order to collect extra audio data.
This may cause the batteries to run out faster and could result
in a slight increase in disc rotation noise.
· The Anti-Shock Protection EX function can be switched ON
and OFF during playback. However, this may cause a slight
interruption in the sound because the disc's rotational speed
changes.
[Fully stored]
ANTI SHOCK indicator
(repeatedly)
Next program sequence
number
(repeatedly)
(repeatedly)
(One track)
(All tracks)
(repeatedly)
(on the unit)
6
5
XL-PG59SL / LVT0979-004A / B
p5
Portab
Type
Signal det
Pickup sy
Number o
Frequency
Wow & fl
Output
Duration
(with Ant
Protection
Power req
Dimensio
Mass
AC ada
Input pow
Output vo
*
Design
Sp
Ca
Unit
Wipe the unit with a soft cloth. Remove stubborn dirt using a cloth which has been dipped in water
or soapy water and wrung out, and then wipe dry.
· If you intend to use a chemically treated cleaning cloth, read its directions first.
· Do not use alcohol or paint thinners.
Lens
Maintenance
Air blower for
camera lens
Lens
Preventing Accidental Operation (Hold mode)
This function causes the unit to ignore accidental button presses.
Hold mode prevents the following:
· Powering on the unit accidentally (which can cause the batter-
ies to go dead).
· Play being cut off unexpectedly.
The HOLD switch on the unit sets the unit in Hold mode.
The HOLD switch on the remote control sets the remote control
in Hold mode.
To use the Hold mode
· To prevent the unit from powering on accidentally, set the
HOLD switch to the ON position.
· To prevent the unit from unexpected operation during play,
set the HOLD switch to the ON position after you starts play-
ing the disc.
"
"
Power on : "
" stays lit when the remote control is set in Hold
mode.
Power off : "
" lights up for a few seconds when
6 is
pressed in Hold mode.
To release the function
Set the HOLD switch to OFF position.
Note:
When the HOLD switch on the unit is set to the ON position,
you cannot turn on the unit with the
6 on the unit. On the
other hand, when the HOLD switch on the remote control is set
to the ON position, you cannot turn on the unit with the
6 on
the remote control.
OFF
ON
HOLD
(OFF)
(ON)
Recha
· Only th
· If the p
time aft
over. D
· Recharg
life.
· When r
not bee
shorter
dischar
state.
· Do not
chargea
is dange
· Do not
ies. Sho
Dry ce
batte
To preven
the follow
· Align th
teries.
· Do not
batterie
· Remove
long pe
· Do not
assemb
· Do not
Carry
recha
When put
ensure th
together w
ing which
XL-PG59SL_B.p65
1