;/)=%.
&203$&7 ',6&$8720$7,& &+$1*(5
PROGRAM CANCEL
CALL
RANDOM
23
4
1
67
8
5
10
+10
9
REPEAT
OPEN/
CLOSE STANDBY/ON
RM-SXLFZ700J
REMOTE CONTROL
DISC 1
DISC 2
DISC 3
DISC 4
DISC 5
DISC 6
DISC 7
DISCSKIP
STANDBY
STANDBY/ON
PAUSE
PLAY
STOP
OPEN/CLOSE
SKIP
XL-FZ700 COMPACT DISC AUTOMATIC CHANGER
DISC 1
DISC 2
DISC 3
DISC 4
DISC 5
DISC 6
DISC 7
PLAY & EXCHANGE
7-DISC
EXCHANGE/DISC SKIP
CD-R/RW PLAYBACK
1BIT P.E.M D.D.CONVERTER
Introduction
2
Before using for the first time
5
Basic operations
7
Various playback patterns
11
General informations
13
)RU&XVWRPHU 8VH
(QWHU EHORZ WKH 0RGHO 1R DQG 6HULDO 1R
ZKLFKDUHORFDWHGRQWKHUHDU ERWWRPRU
VLGH RI WKH FDELQHW 5HWDLQ WKLV LQIRUPDWLRQ
IRUIXWXUHUHIHUHQFH
0RGHO 1R
6HULDO 1R
/97$
>-@
,16758&7,216
;/)=%. - ERRN 3DJH )ULGD\-DQXDU\ 30
CAUTION:
TO REDUCE THE RISK OF ELECTRIC SHOCK.
DO NOT REMOVE COVER (OR BACK)
NO USER SERVICEABLE PARTS INSIDE.
REFER SERVICING TO QUALIFIED SERVICE PERSONNEL.
RISK OF ELECTRIC SHOCK
DO NOT OPEN
The lightning flash with arrowhead symbol,
within an equilateral triangle is intended to
alert the user to the presence of uninsulated
"dangerous voltage" within the product's
enclosure
that
may
be
of
sufficient
magnitude to constitute a risk of electric
shock to persons.
The exclamation point within an equilateral
triangle is intended to alert the user to the
presence
of
important
operating
and
maintenance (servicing) instructions in the
literature accompanying the appliance.
CAUTION
WARNING: TO REDUCE THE RISK OF FIRE
OR ELECTRIC SHOCK, DO NOT EXPOSE
THIS APPLIANCE TO RAIN OR MOISTURE.
For U.S.A.
This equipment has been tested and found to comply with the limits
for a Class B digital device, pursuant to part 15 of the FCC Rules.
These limits are designed to provide reasonable protection against
harmful interference in a residential installation.
This equipment generates, uses and can radiate radio frequency
energy and, if not installed and used in accordance with the
instructions,
may
cause
harmful
interference
to
radio
communications. However, there is no guarantee that interference
will not occur in a particular installation. If this equipment does cause
harmful interference to radio or television reception, which can be
determined by turning the equipment off and on, the user is
encouraged to try to correct the interference by one or more of the
following measures:
Reorient or relocate the receiving antenna.
Increase the separation between the equipment and receiver.
Connect the equipment into an outlet on a circuit different from that
to which the receiver is connected.
Consult the dealer or an experienced radio/TV technician for help.
For Canada/pour le Canada
CAUTION: TO PREVENT ELECTRIC SHOCK, MATCH WIDE
BLADE OF PLUG TO WIDE SLOT, FULLY INSERT
ATTENTION: POUR EVITER LES CHOCS ELECTRIQUES,
INTRODUIRE LA LAME LA PLUS LARGE DE LA FICHE DANS LA
BORNE CORRESPONDANTE DE LA PRISE ET POUSSER
JUSQUAU FOND
For Canada / Pour le Canada
THIS DIGITAL APPARATUS DOES NOT EXCEED THE CLASS B
LIMITS FOR RADIO NOISE EMISSIONS FORM DIGITAL
APPARATUS AS SET OUT IN THE INTERFERENCE-CAUSING
EQUIPMENT STANDARD ENTITLED "DIGITAL APPARATUS," ICES-
003 OF THE DEPARTMENT OF COMMUNICATIONS.
CET APPAREIL NUMERIQUE RESPECTE LES LIMITES DE BRUITS
RADIOELECTRIQUES
APPLICABLES
AUX
APPAREILS
NUMERIQUES DE CLASSE B PRESCRITES DANS LA NORME
SUR LE MATERIEL BROUILLEUR: "APPAREILS NUMERIQUES",
NMB-003 EDICTEE PAR LE MINISTRE DES COMMUNICATIONS.
CAUTION
To reduce the risk of electrical shocks, fire, etc.:
1.
Do not remove screws, covers or cabinet.
2.
Do not expose this appliance to rain or moisture.
ATTENTION
Afin d'éviter tout risque d'électrocution, d'incendie, etc.:
1.
Ne pas enlever les vis ni les panneaux et ne pas ouvrir le coffret de
l'appareil.
2.
Ne pas exposer l'appareil à la pluie ni à l'humidité.
Warnings, Cautions and Others
Mises en garde, précautions et indications diverses
IMPORTANT FOR LASER PRODUCTS
IMPORTANT POUR LES PRODUITS LASER
1.
CLASS 1 LASER PRODUCT
2.
DANGER: Visible laser radiation when open and interlock failed or
defeated. Avoid direct exposure to beam.
3.
CAUTION: Do not open the top cover. There are no user service-
able parts inside the Unit; leave all servicing to qualified service
personnel.
1.
PRODUIT LASER CLASSE 1
2.
ATTENTION: Radiation laser visible quand l'appareil est ouvert ou
que le verrouillage est en panne ou désactivé. Eviter une exposition
directe au rayon.
3.
ATTENTION: Ne pas ouvrir le couvercle du dessus. Il n'y a aucune
pièce utilisable à l'intérieur. Laisser à un personnel qualifié le soin
de réparer votre appareil.
Caution STANDBY/ON
switch!
Disconnect the mains plug to shut the power off completely. The
STANDBY/ON
switch in any position does not disconnect the
mains line. The power can be remote controlled.
Attention Commutateur STANDBY/ON
!
Déconnecter la fiche de secteur pour couper complètement le courant.
Le commutateur STANDBY/ON
ne coupe jamais complètement la
ligne de secteur, quelle que soit sa position. Le courant peut être
télécommandé.
;/)=%. - ERRN 3DJH )ULGD\-DQXDU\ 30

1
English
English
We would like to thank you for purchasing one of our
JVC products.
Before connecting this unit to the wall outlet, please read
the instructions carefully to ensure that you obtain the
best possible performance.
If you have any questions, please consult your JVC
dealer.
Table of Contents
Introduction
Page 2
Precautions......................................................................... 2
About this manual ............................................................. 2
Names of buttons .............................................................. 3
Main unit...................................................................................3
Remote control unit .................................................................4
Display window........................................................................4
Before using for the first time
Page 5
Installing the unit............................................................... 5
Connecting to the Analog Output Jacks ......................... 5
Connecting to the Digital Output Jack............................ 5
Supplying the power......................................................... 5
To connect the AC power cord of the main unit ...................5
To install the batteries in the remote control unit.................6
COMPU LINK connection .................................................. 6
Basic operations
Page 7
Basic functions for disc playback .................................... 7
Turning on the power of this unit...........................................7
Remote control operation .......................................................7
Inserting and removing discs .................................................7
Playing a disc ...........................................................................8
Stopping playback ...................................................................8
Locating a point to start playback .................................. 9
Skipping to a desired disc during playback (DISC SKIP) ......9
Changing to a desired disc during playback DISC (1-7) .......9
Skipping to a desired track during playback .........................9
Searching for a desired section ..............................................9
Specifying a desired track in stop mode..............................10
Changing discs during playback (EXCHANGE)............. 10
Playing tracks in a order of disc/track number............. 10
Various playback patterns
Page 11
Playing tracks in a desired order (Program Play) ......... 11
Playing tracks in a random order (Random Play) ......... 12
Playing repeatedly (Repeat Play) ................................... 12
Repeating all the tracks of a disc ..........................................12
Repeating one track ...............................................................12
General informations
Page 13
COMPU LINK remote control system ............................ 13
Care and handling............................................................ 14
Troubleshooting .............................................................. 15
Specifications................................................................... 15
;/)=%. - ERRN 3DJH )ULGD\-DQXDU\ 30
2
Intr
oduction
Introduction
Precautions
Load compact discs only
Never insert anything other than compact discs into any
part of the player.
If a problem persists
If something goes wrong, turn off the power
immediately. If the same problem reoccurs when the
power is turned on once more, turn off the power again
and consult your JVC dealer.
Handling the power cord
When unplugging from the wall socket, always pull the
plug body, never the power cable.
Volume settings
A CD player has almost zero background noise. Because
of this, the technique of listening to the background level
and then setting the volume before the music starts, as
used with analog turntables or tape decks, cannot be
used. If you raise the volume level too high, speaker
damage may result.
Condensation
The CD player uses optical components. If it is moved
from a cold location to a warm one, or is used in a room
subject to excessive humidity or where a fire has just
been lit, condensation could form on the optical
components.
This may prevent the laser beam from being properly
transmitted and thus causes noise or even a
malfunction.
If condensation has formed and the CD player does not
function correctly, we recommend that you leave it
turned on for an hour or two. If at the end of this time the
CD player still does not function properly, please consult
your JVC dealer.
Using compact discs
Compact discs are made of plastic and can easily be
damaged. If the disc is dirty, scratched, warped or
otherwise damaged, the digital information may not be
picked up correctly.
Applicable discs
This unit can only be used with compact discs bearing
the marks below. Never use discs of other types.
CD-R and CD-RW discs recorded with the Audio CD format
can be played back, though some may not be played back
because of the disc characteristics or recording condition.
About this manual
This manual covers the operating instructions for the
compact disc automatic changer XL-FZ700BK.
This manual is organized as follows:
The first part, "Introduction", gives you the precautions
when using this unit, and shows you the names of
buttons on the main unit and the remote control unit.
The second part, "Before using for the first time", tells
you what kind of operations you should do before
playing discs. This part describes where to place the unit
for best results, how to install batteries in the remote
control unit and how to connect this unit to the amplifier/
receiver and other components.
The third part, "Basic operations", describes how to load
discs, and convenient basic functions for playing discs.
The fourth part, "Various playback patterns", describes
various functions for playing discs.
The fifth part, "General informations", describes the
COMPU LINK remote control system which facilitates
various operations between JVC components, and
explains how to take care of discs.
This part also includes "Troubleshooting", which tells
you how to check the unit when a malfunction occurs,
and the technical informations regarding this unit.
Transporting the unit
When carrying this unit, it is best to avoid either
tilting or turning it upside-down. When you cannot
avoid doing so, please remove the discs first.
NOTE
·
CD-R and CD-RW discs must be finalized.
Recordable
ReWritable
;/)=%. - ERRN 3DJH )ULGD\-DQXDU\ 30
Introduction
3
Intro
duction
English
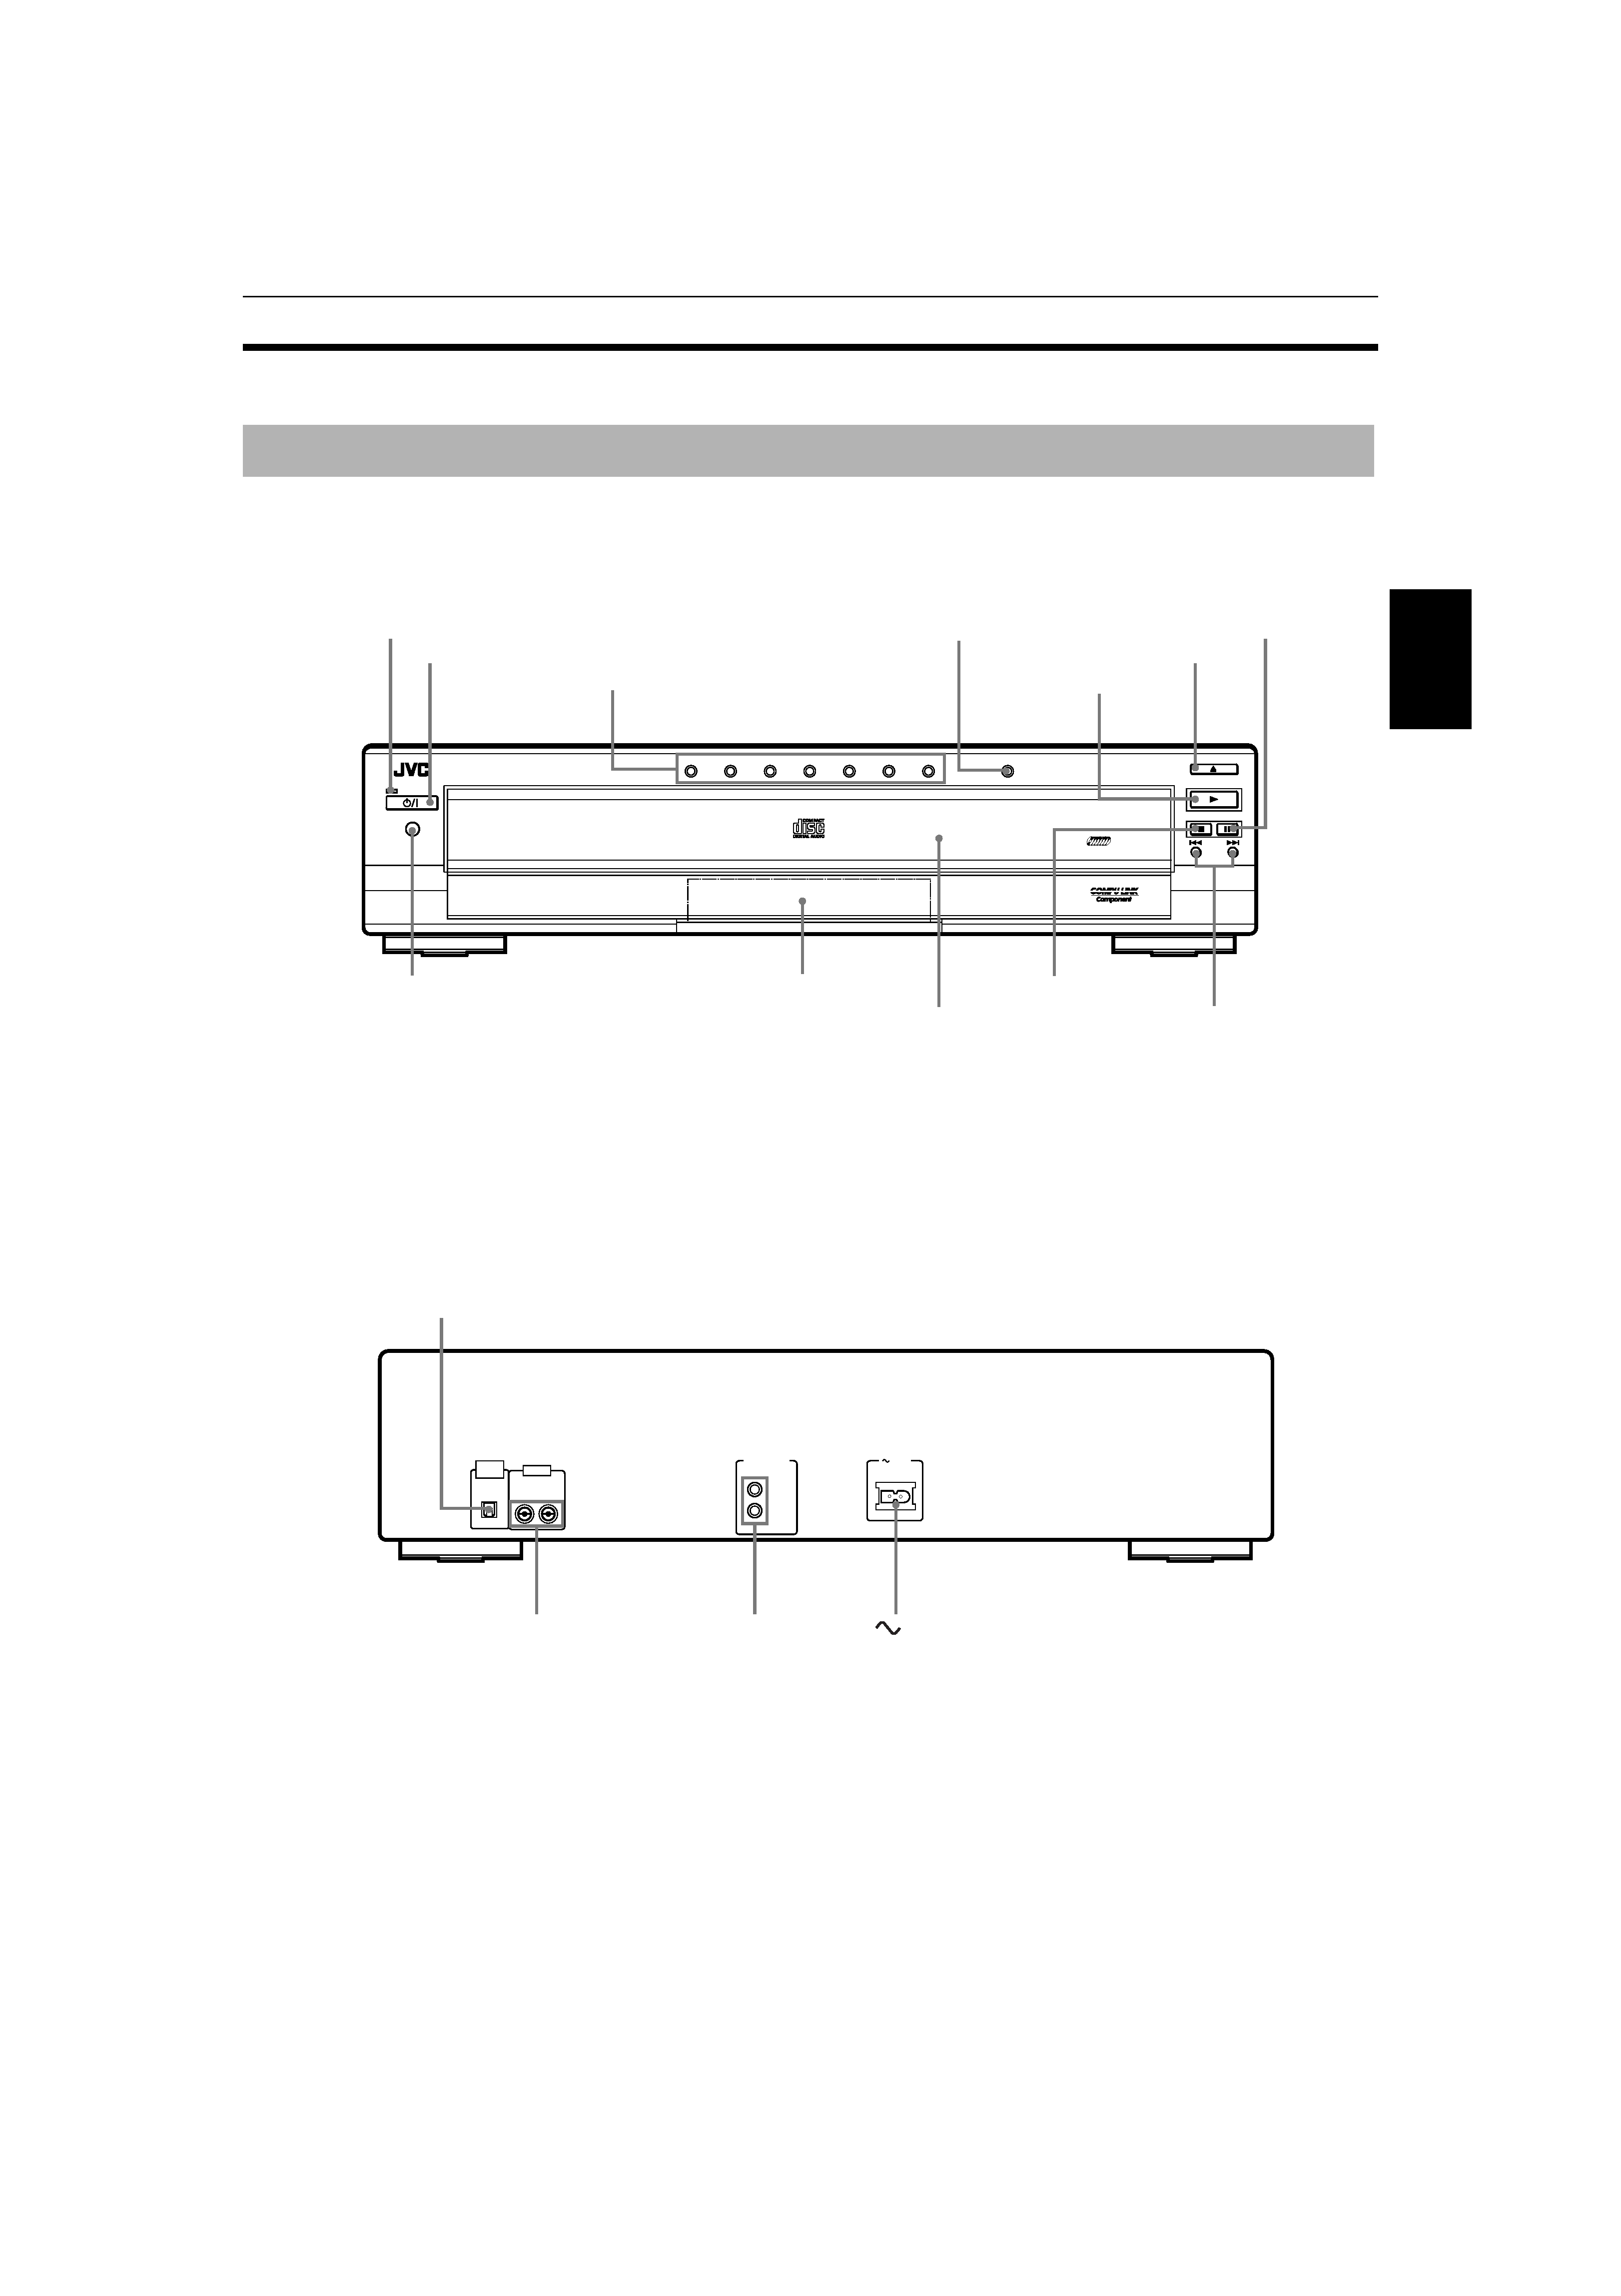
Names of buttons
Main unit
STANDBY
STANDBY/ON
PAUSE
PLAY
STOP
OPEN/CLOSE
SKIP
XL-FZ700 COMPACT DISC AUTOMATIC CHANGER
DISC 1
DISC 2
DISC 3
DISC 4
DISC 5
DISC 6
DISC 7
PLAY & EXCHANGE
7-DISC
EXCHANGE/DISC SKIP
CD-R/RW PLAYBACK
1BIT P.E.M D.D.CONVERTER
RIGHT LEFT
OUTPUT
(SYNCHRO)
COMPU LINK - 3
DIGITAL
OUT
OPTICAL
AC IN
AC IN
%
%
%
% STANDBY/ON button
Display window
DISC (1-7) buttons
remote sensor
STANDBY indicator
COMPU LINK-3
(SYNCHRO) jacks
0
0
0
0 OPEN/CLOSE button
OUTPUT (RIGHT/LEFT) jacks
DIGITAL OUT OPTICAL jack
AC IN connector
4
4
4
4/¢
¢
¢
¢ SKIP buttons
7
7
7
7 STOP button
3
3
3
3 PLAY button
8
8
8
8 PAUSE button
Carousel
EXCHANGE/DISC SKIP button
;/)=%. - ERRN 3DJH )ULGD\-DQXDU\ 30