User's Manual
ENGLISH
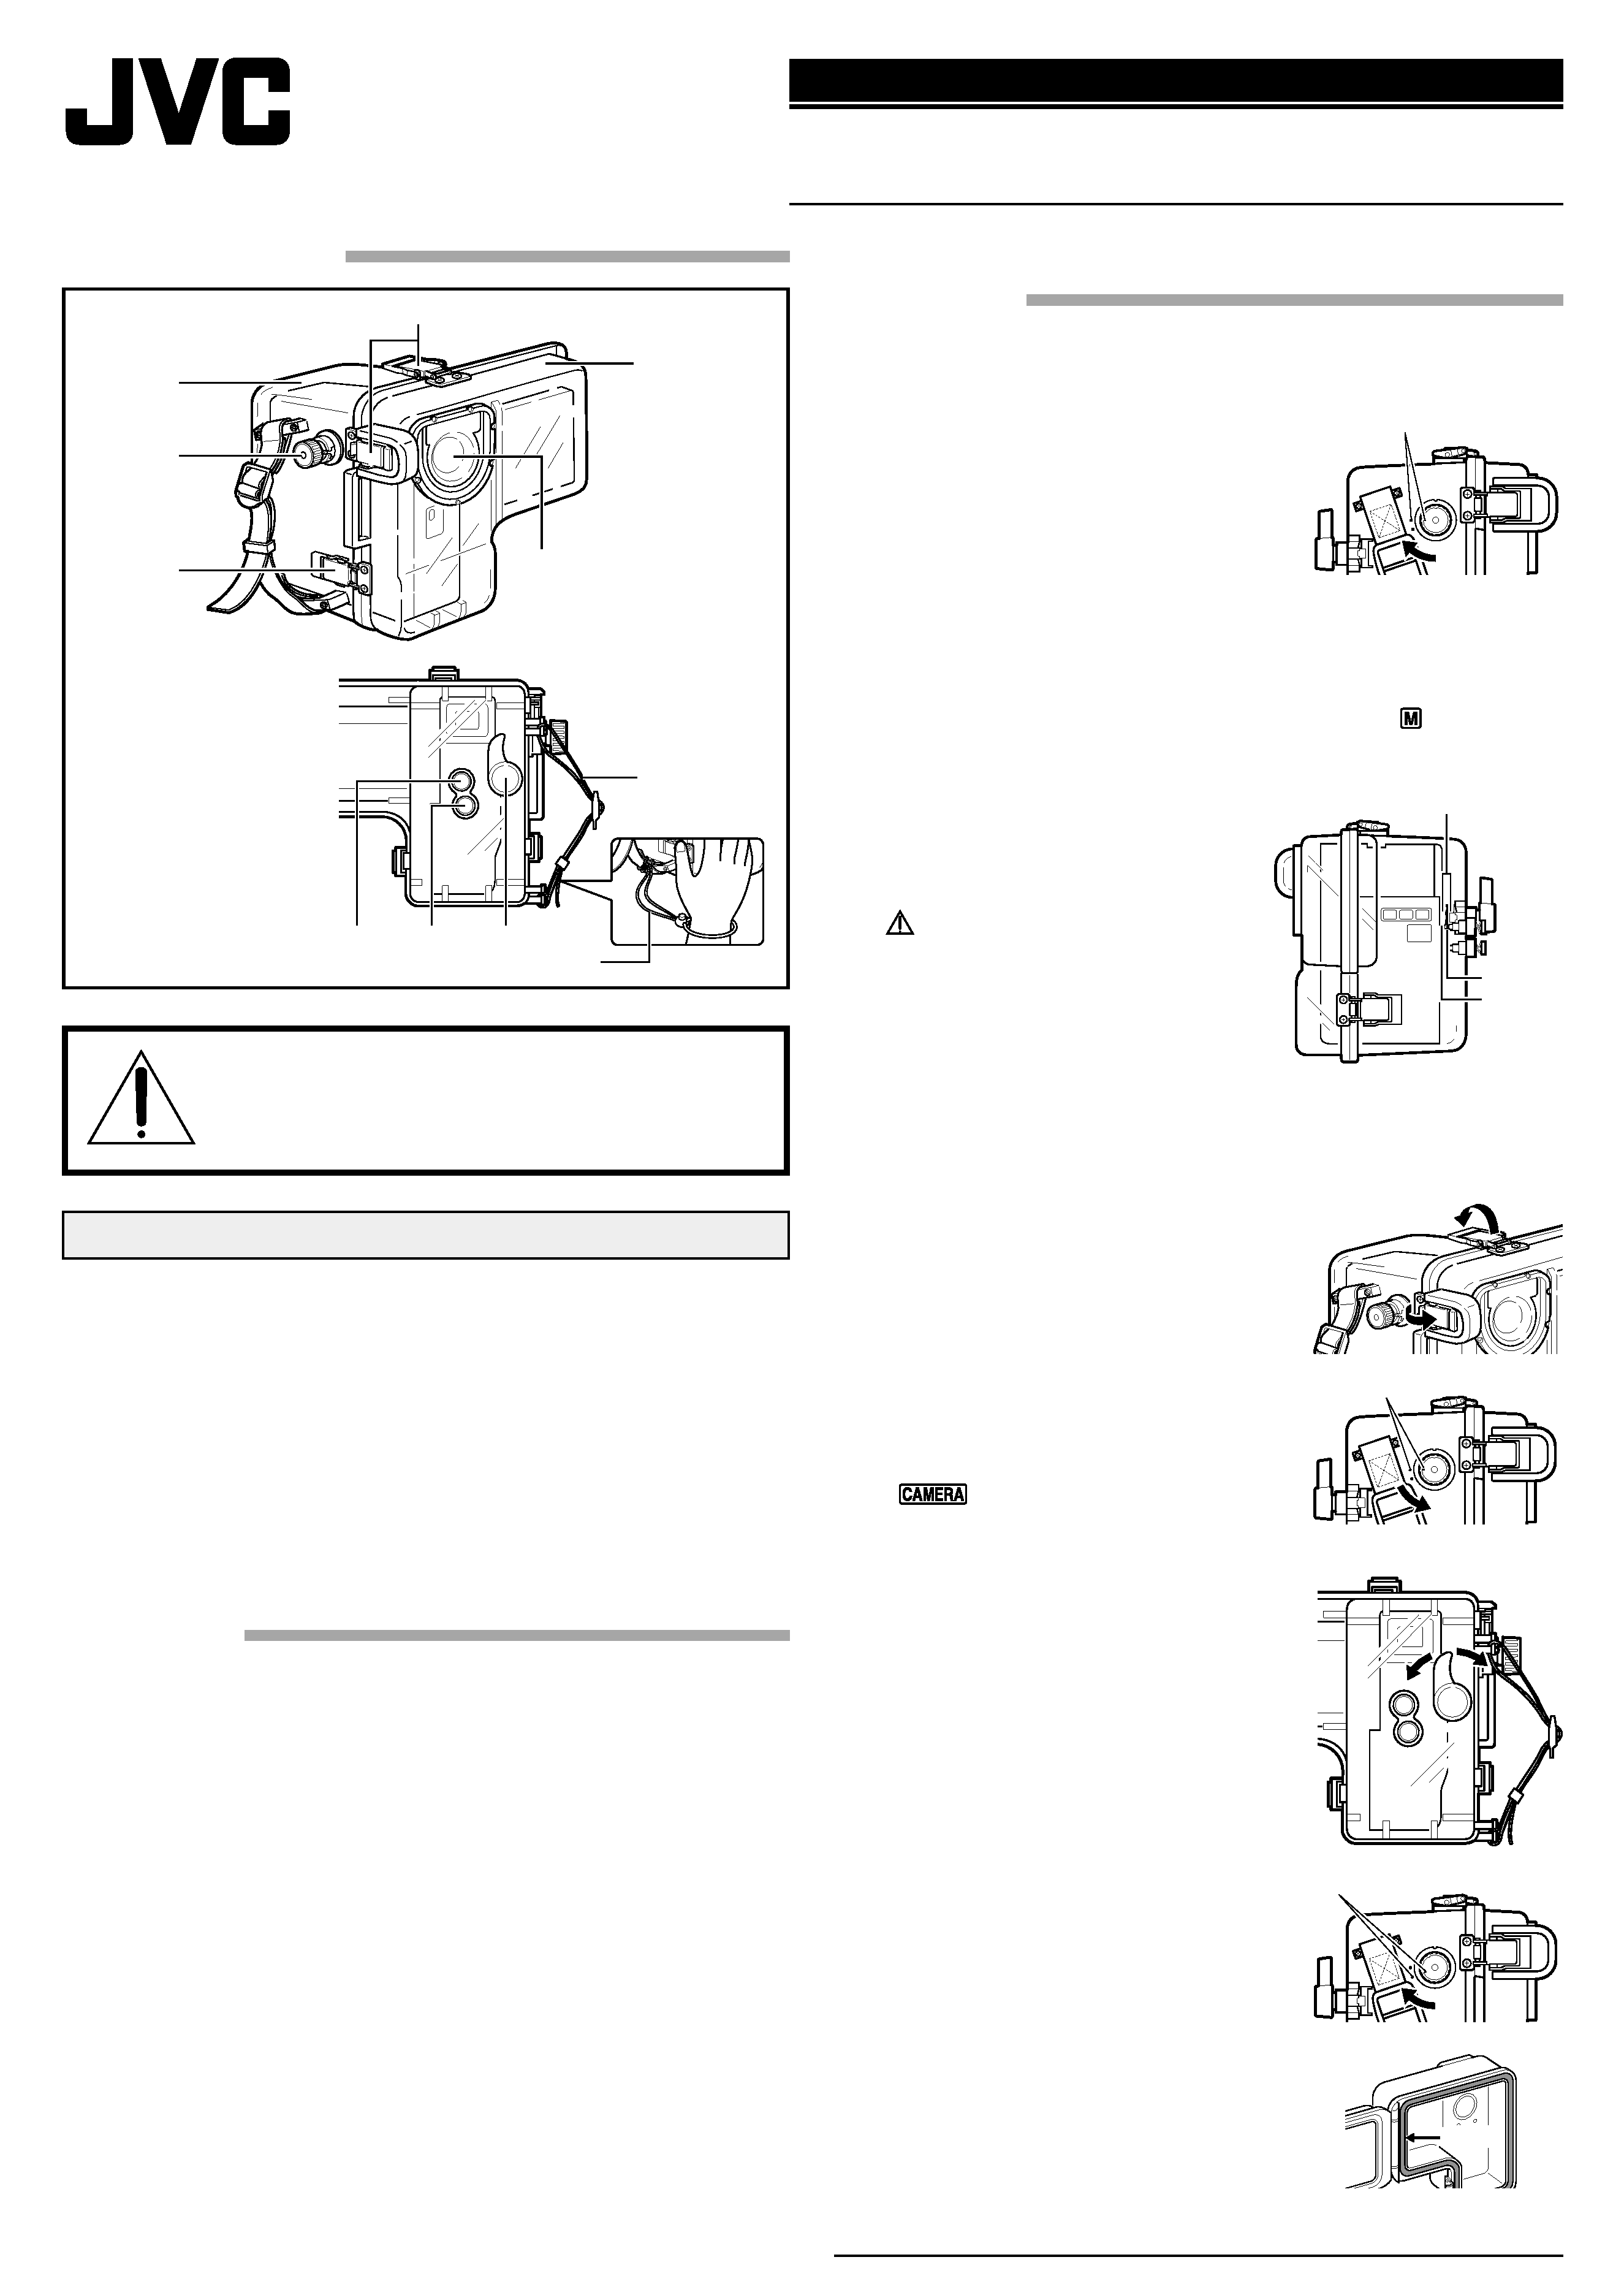
Names of the parts
Please read before use.
This marine case is a precision instrument designed to permit safe
video recording under high water pressure. Please pay careful
attention when handling the unit before and after use, as explained
in this user's manual.
Each part of the marine case has been subject to strict controls
during the manufacturing process, and the individual functions
have faced stringent tests during the assembly process. Each marine
case has also had to pass water-proof inspections using high-
pressure water testers. However, damage can sometimes occur
during transport and distribution, or during storage after purchase,
so before diving always carry out the following pre-use test to
verify safety.
Pre-use test
Be sure to perform the following pre-use test before diving.
1. Before mounting the camcorder inside the marine case, dive
with only the empty marine case and test for water leaks.
· You can easily check for water leaks at a depth of 1 m, where
there is no water pressure. Be sure to perform this test to
ensure the safety of your camcorder.
2. The following are some common causes of water leaks:
A. The marine case is used without attaching the O-ring.
B. The O-ring is not mounted in the correct position.
C. The O-ring is damaged or deformed.
D. There is sand, dirt, hair or other foreign matter on the O-ring.
E. There is sand, dirt, hair or other foreign matter on the contact
surface of the O-ring or on the inside of the lid.
F. The provided strap or silica gel bag is pinched inside the
marine case when the lid is closed.
To protect your camcorder and ensure optimum use, keep the
examples listed above in mind when using the marine case.
JVC accepts no responsibility for water leakage or damage to
anything inside the marine case (camcorder, cassette, etc.) due to
careless usage of this product. Be sure to follow correct procedures
when using the marine case.
Mounting method and operating method
for each part
1. Tighten the camcorder's grip strap.
2. Remove the four buckles on the marine case and open the
front lid.
3. Align the mark on the Power Dial
with the "OFF" mark on the marine
case.
4. Set the camcorder's Power Switch to
"OFF", then open the LCD monitor
and insert the camera into the marine
case.
Place the included anti-fogging silica gel in the gap between
the camcorder and the marine case to prevent fogging in the
marine case.
· Set the camcorder's MODE Dial to the desired setting.
· If the camcorder's Operation Switch is set to "
", perform
settings as required then insert the camcorder into the marine
case.
5. Fit the Zoom Lever projection on
the marine case over the outer
groove of the Power Zoom Lever
on the camcorder, making sure that
it is securely fit.
If the camcorder's Power
Switch is not set properly when the
camcorder is placed in the marine
case, it could break and/or it could
damage the Power Dial aligning
boss on the marine case.
6. Before sealing the marine case, check that there is no sand,
dirt, or other foreign matter on the O-ring mounted on the front
lid or on the O-ring contact surface on the main unit.
Also make sure that the inserted silica gel bag is not pinched. If
you dive with foreign matter trapped
in these areas, water will leak.
7. Check that the O-ring on the front lid
is correctly mounted in the groove,
then press in the front lid. Flip down
the four buckles in the directions
indicated by the arrows in the figure
on the right to seal the marine case.
8. Turn the marine case's Power Dial in
the direction of the arrow while
pressing it down to set the
camcorder's Power Switch to
"
".
· The camcorder's Power Lamp
lights.
9. To start video recording, press the
Recording Start/Stop Button.
To stop video recording, press it again.
· Press the Snapshot Button to perform
Snapshot recording. If the flash is used,
its brightness will be darker than usual
due to the marine case. This is normal
and is not a malfunction.
· When recording in the PS-WIDE
mode, a shadow (eclipse) may
appear around recorded images.
10. The zoom can be adjusted with the
Zoom Lever.
11. When you are finished shooting, set
the marine case's Power Dial to
"OFF" (in the direction of the arrow)
while pressing it down to set the
camcorder's Power Switch to "OFF".
· The camcorder's Power Lamp goes
out.
NOTES:
The O-ring is made from rubber and is
mounted on the front lid.
Refer to the camcorder's instructions for
more information.
For Digital Video Camera
GR-DVM90, GR-DVM80,
GR-DVX90, GR-DVX80,
GR-DVX10, GR-DVX9, GR-DVX8
Before use, this unit must be pre-tested
to check if there is any water leakage.
WR-DV89U
Marine Case
LYT0655-001A
Align the marks.
ZOOM
SNAP SHOT
START/STOP
1
2
3
4
8
7
56
3
Front glass
Strap
OFF
CAMERA
(ON)
PUSH
OFF
CAM
ERA
(ON
)
PUSH
ZOOM
SNAP SHOT
START/STOP
OFF
CAM
ERA
(ON
)
PU
SH
Fit the Zoom Lever projection
over the Power Zoom Lever
Projection
Power
Zoom
Lever
1.Marine case front lid
2.Main unit
3.Buckle
4.Power dial
5.Recording start/stop
button (START/STOP)
6.Snapshot button
(SNAP SHOT)
7.Zoom lever (ZOOM)
8.Grip strap
Align the marks.
Align the marks.
O-ring

EN
Usage precautions
1. Never use any of the following chemicals for cleaning, rust-proofing, fog prevention, repair, or other purposes.
1) Do not clean the marine case with alcohol, gasoline, paint thinner, or other volatile organic solvents, chemical cleaners or similar
agents. (Pure water or lukewarm water is adequate for cleaning.)
2) Do not use rust-proofing agents or the like on metal parts. (Stainless steel and aluminum are used for all metal parts, so pure water
is adequate for cleaning.)
3) Do not use commercially-available anti-fogging agents. (Always use the fogging agent that came with the marine case.)
4) Do not use any silicon grease other than that specified for the O-ring. (Always use the silicon grease that came with the marine
case.)
5) Do not use any adhesives for repairs, etc. (If any repairs are necessary, please consult the store of purchase.)
Direct or indirect use (vaporized chemicals) of any of the above chemicals on the marine case can cause cracks when the marine
case is placed under high pressure.
2. Exercise caution, as this marine case is a completely airtight structure. If it is left exposed to direct sunlight, or in a car, ship, or on the
beach, the internal temperature can climb extremely high, which may cause the camcorder inside to stop working properly.
3. Do not use the glass cleaner or cleaner for any purpose other than cleaning the front glass.
4. If the camcorder is sealed inside the marine case in an area where the humidity and temperature are high, diving will make the
humidity trapped inside the marine case cool down, causing condensation to form and the glass surface to become fogged. It is
recommended that you insert the camcorder into the marine case in an area where the humidity is low and the temperature is close to
that of the water where you will be diving.
If a piece of aluminum foil is cut to approx. 50 cm2 and is inserted into the glass part of the marine case, fog inside the marine case
will adhere to the aluminum foil, as its heat conductivity is higher than that of glass. This is an effective way to quickly reduce fog
inside the marine case.
5. Do not open or close the case in areas where it may be subjected to water spray or sand.
6. If you must open the marine case at the diving site in order to replace the battery or tape, observe the precautions below.
1) Select a location safe from water spray and sand.
2) Completely wipe off any water between the main unit and the lid section of the main case and on the buckles. Thoroughly dry off
any water remaining on the marine case with a dry cloth.
3) When removing the buckles and opening the lid section, be careful that no water drips from your hair or body into the marine
case.
4) In order to avoid touching the camcorder with hands that have salt water on them, place a towel dampened with pure water in a
plastic bag beforehand and use it to wipe any salt off your hands and fingers before touching the camcorder.
7. Do not throw the marine case into the water.
8. After use, wash off adequately with pure water as soon as possible. If the marine case has been used in salt water, soaking the marine
case in pure water for a while is an effective way to remove salt.
Be sure to operate all levers and buttons to wash off any salt in the grooves. If any salt remains, it will dry out and crystallize. This
could result in water leakage.
9. After washing, wipe off any water with a dry cloth free of salt to completely dry off the marine case. However, do not expose the
marine case to direct sunlight in order to dry it. This can cause discoloration and breakage of the marine case, and can speed up
deterioration of the O-ring.
10. Wipe the inside of the marine case with just a dry cloth. Maintain the transparency of the front glass by wiping the inside face with a
silicon cloth or the like moistened with cleaner agent.
11. If the front glass is left dirty, it may cause fogging.
12. Remove the O-ring from the lid section and wipe off any salt, sand, and other foreign matter. In the same manner, wipe off any adhering
foreign matter from the groove into which the O-ring was fit and from the main unit of the marine case where the O-ring contacted it.
When removing the O-ring from the groove, avoid using sharp-tipped metal objects; instead use a round-tipped object, such as a hair
pin, to avoid damaging the O-ring when you remove it.
13. Since the marine case is made of polycarbonate resin, handle it carefully. In particular, it can be easily scratched by rocks, etc. at the
shooting site and may be damaged if it is dropped or otherwise subject to shock. When going to the shooting site by car, ship, train, or
plane, avoid transporting the camcorder in the marine case. If you take adequate handling precautions, however, there should be no
problem in transporting the camcorder in the marine case for a short distance, for example from the target site to the diving site.
14. Avoid removing any parts other than those indicated in the user's manual, altering the marine case, or using any parts other than those
specified. If any problems occur, please consult the store of purchase.
15. The appearance and specifications of this unit are subject to change without prior notice.
Main specifications
Maximum pressure
: Water depth up to 30 meters
Power switch
: CAMERA (ON)/OFF
Recording start/stop
: START/STOP
Snapshot
: SNAPSHOT
Zoom
: T/W
Main unit dimensions
(W x H x D)
: 180 mm x 150 mm x 150 mm
Main unit weight
: 0.7 kg
Compatible model
: GR-DVM90, GR-DVM80, GR-DVX90, GR-DVX80, GR-DVX10, GR-DVX9,
GR-DVX8
Accessories
: Maintenance kit (glass cleaner agent (for anti-fogging), cleaner agent (for removing
dirt), silicon grease, silicon cloth, anti-fogging silica gel, paper, cotton swabs,
O-ring, strap)