LVT0516-001A
[ B ]
For Customer Use:
Enter below the Model No. and Serial
No. which are located either on the rear,
bottom or side of the cabinet. Retain this
information for future reference.
Model No.
Serial No.
TH-A10R
DVD DIGITAL CINEMA SYSTEM
INSTRUCTIONS
Consists of XV-THA10R, SP-PWA10, SP-XCA10, and SP-XSA10.
SP-PWA10
XV-THA10R
SP-XCA10
SP-XSA10
SP-XSA10
TH-A10R[B]Cover/f
00.6.27, 0:38 PM
1
G-1
Warnings, Cautions and Others
1. CLASS 1 LASER PRODUCT
2. DANGER: Visible and invisible laser radiation when open and
interlock failed or defeated. Avoid direct exposure to beam.
3. CAUTION: Do not open the top cover. There are no user service-
able parts inside the Unit; leave all servicing to qualified service
personnel.
IMPORTANT for the U.K.
DO NOT cut off the mains plug from this equipment. If the
plug fitted is not suitable for the power points in your home or
the cable is too short to reach a power point, then obtain an
appropriate safety approved extension lead or consult your
dealer.
BE SURE to replace the fuse only with an identical approved
type, as originally fitted.
If nonetheless the mains plug is cut off ensure to remove the
fuse and dispose of the plug immediately, to avoid a possible
shock hazard by inadvertent connection to the mains supply.
If this product is not supplied fitted with a mains plug then
follow the instructions given below:
IMPORTANT.
DO NOT make any connection to the terminal which is
marked with the letter E or by the safety earth symbol or
coloured green or green-and-yellow.
The wires in the mains lead on this product are coloured in
accordance with the following code:
Blue :
Neutral
Brown :
Live
As these colours may not correspond with the coloured
markings identifying the terminals in your plug proceed as
follows:
The wire which is coloured blue must be connected to the
terminal which is marked with the letter N or coloured black.
The wire which is coloured brown must be connected to the
terminal which is marked with the letter L or coloured red.
IF IN DOUBT - CONSULT A COMPETENT ELECTRICIAN.
Caution
button!
Disconnect the XV-THA10R and SP-PWA10 main plugs
to shut the power off completely. The
button on the
XV-THA10R in any position do not disconnect the meins
line. The power can be remote controlled.
CLASS
1
LASER
PRODUCT
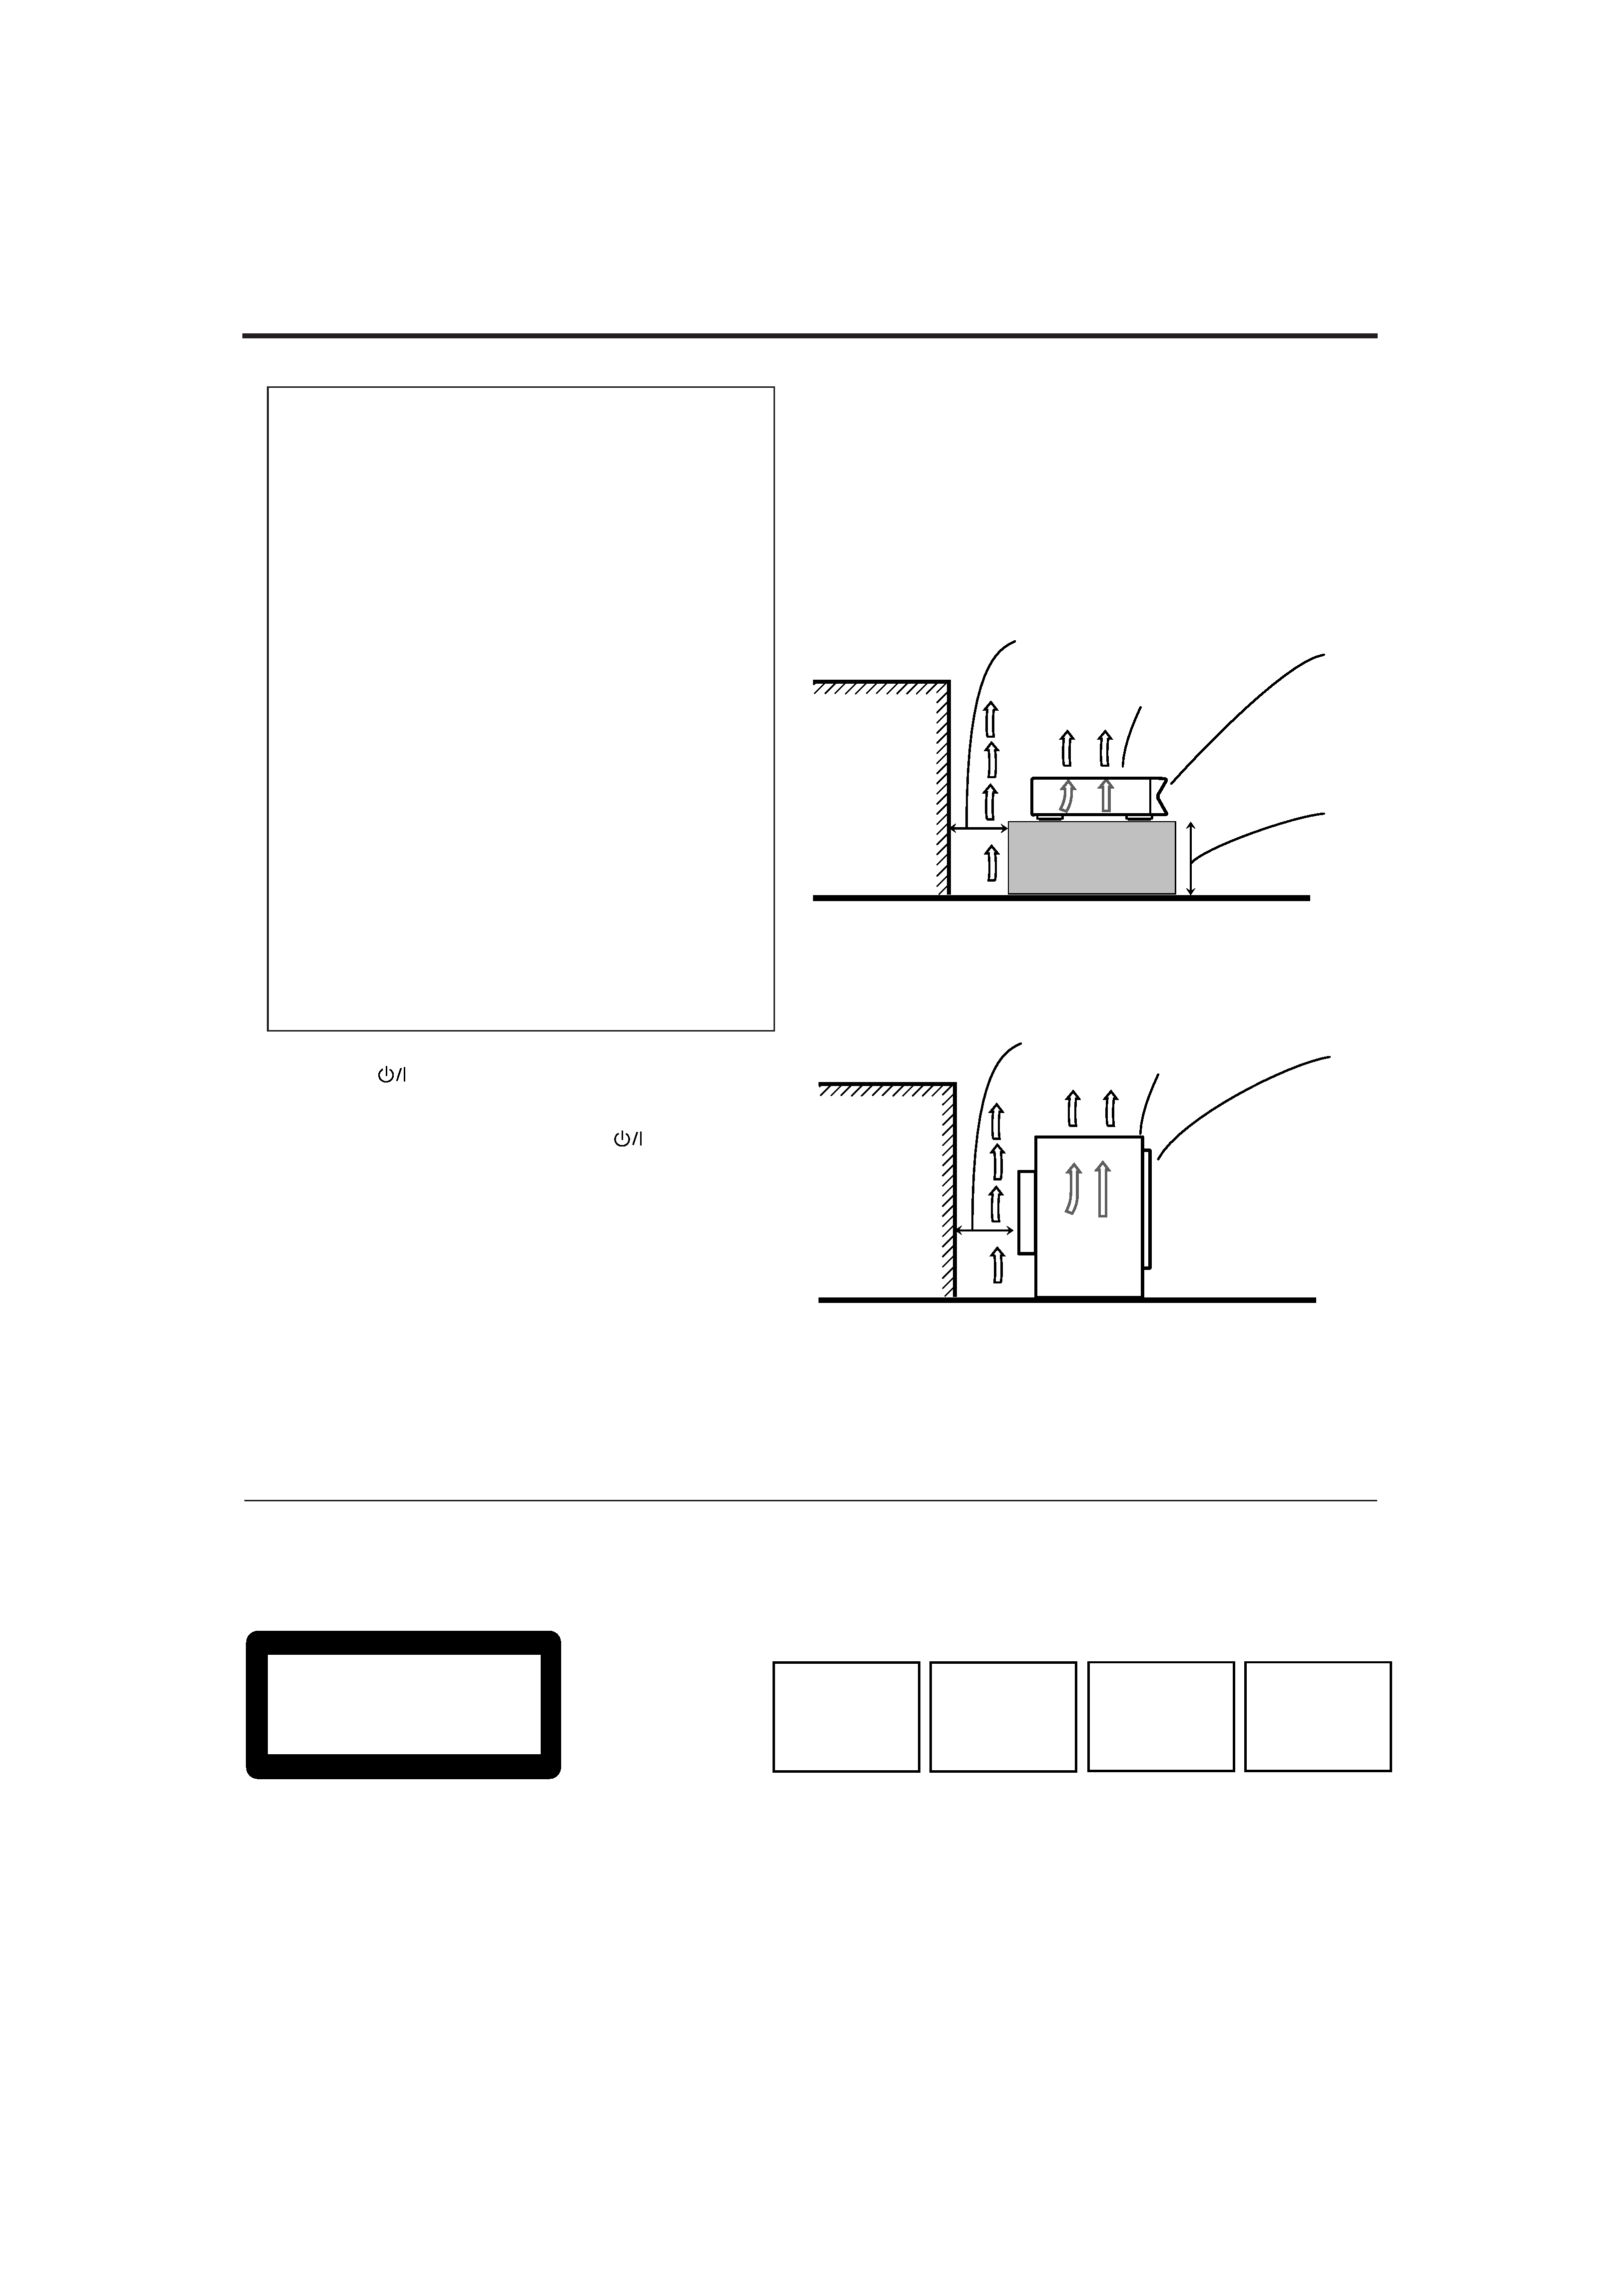
Caution: Proper Ventilation
To avoide risk of electric shock and fire and to protect from
damage.
Locate the apparatus as follows:
Front:
No obstructions open spacing.
Sides:
No obstructions in 3 cm from the sides.
Top:
No obstructions in 5 cm from the top.
Back:
No obstructions in 15 cm from the back
Bottom:
No obstructions, place on the level surface.
CAUTION
To reduce the risk of electrical shocks, fire, etc.:
1.
Do not remove screws, covers or cabinet.
2.
Do not expose this appliance to rain or moisture.
1 CLASSIFICATION MARK, PLACED ON REAR ENCLOSURE
2 WARNING LABEL, PLACED INSIDE THE UNIT
IMPORTANT FOR LASER PRODUCTS
REPRODUCTION OF LABELS
CAUTION: Invisible laser
radiation when open and
interlock failed or defeated.
AVOID DIRECT EXPOSURE
TO BEAM.
(e)
ADVARSEL: Usynlig laser-
stråling ved åbning, når
sikkerhedsafbrydere er ude
af funktion. Undgå udsæt-
telse for stråling
(d)
VARNING: Osynlig laser-
strålning när denna del är
öppnad och spärren är
urkopplad.
Betrakta
ej
strålen.
(s)
VARO: Avattaessa ja suo-
jalukitus ohitettaessa olet
alttiina
näkymättömälle
lasersäteilylle. Älä katso
säteeseen.
(f)
Spacing 15cm or more
Front
Stand height
5cm or more
Wall or
obstructions
Floor
XV-THA10R
Spacing 15cm or more
Front
Wall or
obstructions
Floor
SP-PWA10
XV-THA10R
SP-PWA10
TH-A10R[B]Cover/f
00.6.27, 0:38 PM
2
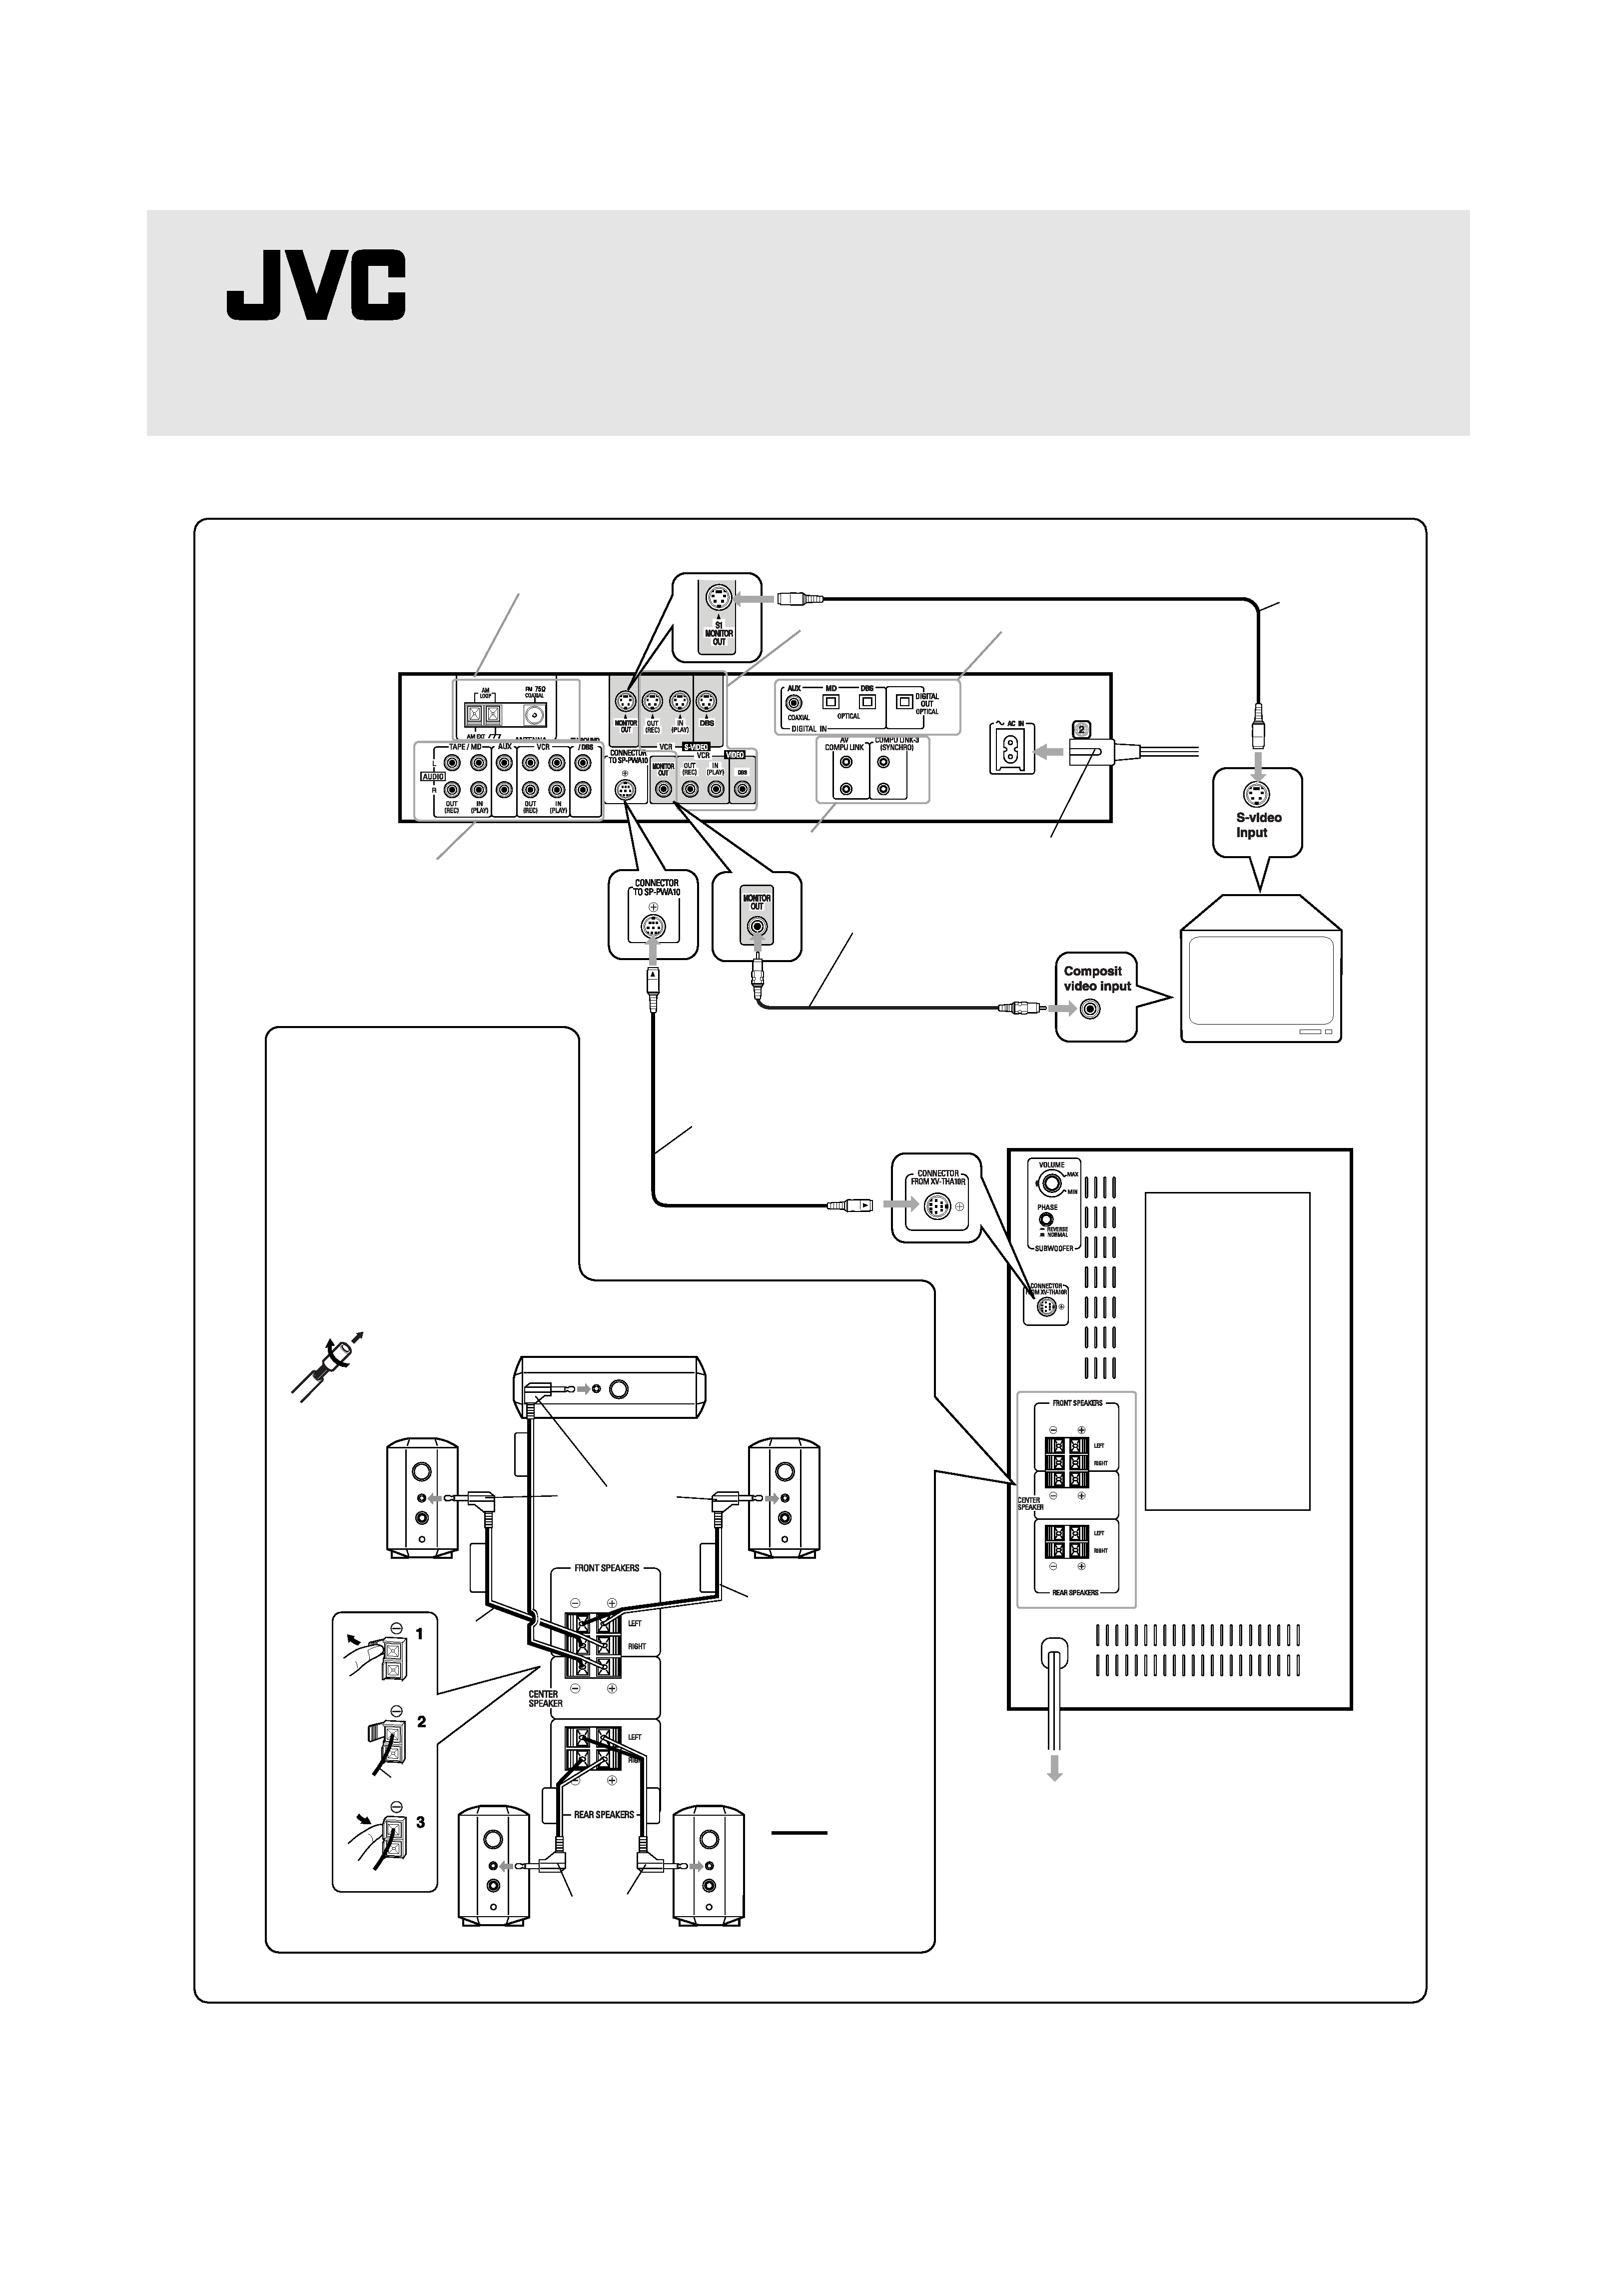
DVD DIGITAL CINEMA SYSTEM
TH-A10R
Simplified connection manual
Please see INSTRUCTIONS from page 6 to page 10 as well.
XV-THA10R
(Center unit)
SP-PWA10 (Powered sub-woofer)
FM and AM antenna terminals (6)
S-video output and
input terminals (6, 8, 9)
Digital input and
output terminals (9)
S-video cable
(not supplied)
Connect to the TV if
it has an S-video in-
put (for higher image
quality). Connect the
cables with the
£
mark facing down.
AC power cord (supplied) (10)
Before plugging the center unit
into an AC outlet, make sure that
all connections have been made.
COMPU LINK terminals (54)
Video cable (supplied) (6)
Connect the MONITOR OUT
terminal to composit video
input terminal on the TV.
Yellow
Yellow
System cable (supplied) (6)
Connect the center unit to
powered sub-woofer.
Ensure that the
£
mark on the plug
faces to the right.
Ensure that
the
£ mark
on the plug
faces upwards.
Analog audio input and output terminals (8, 9)
To connect speakers (7)
Connect the satellite speakers and center
speaker to the terminals on the powered
subwoofer using the speaker cords supplied.
Labels are attached to the speaker cords to
indicate the speaker and terminal to which
each is to be connected.
· The four satellite speakers may be used at
either front or rear.
· Ensure that the left and right speakers are
connected to left and right respectively, and
that they are connected with the correct
polarity (+ve, ve). The white speaker cord
connects to the + terminal, and the black
speaker cord connects to the terminal.
Twist and remove
the insulation at the
end of each speaker
cord.
Front right speaker
Front left speaker
Speaker cord (6 m)
(19.7 ft)
Center speaker
Rear left
speaker
Rear right
speaker
Speaker cord
(15 m) (49.2 ft)
White
Black
To AC outlet
Before plugging the powered sub-woofer
into an AC outlet, make sure that all
connections have been made.
LVT0517-001A [B]
Please see the reverse page.
Note:
· Mixing up the polarity
of the speaker cords
can reduce the stereo
effect and sound
quality.
SCM1[B]
00.6.30, 3:29 PM
1
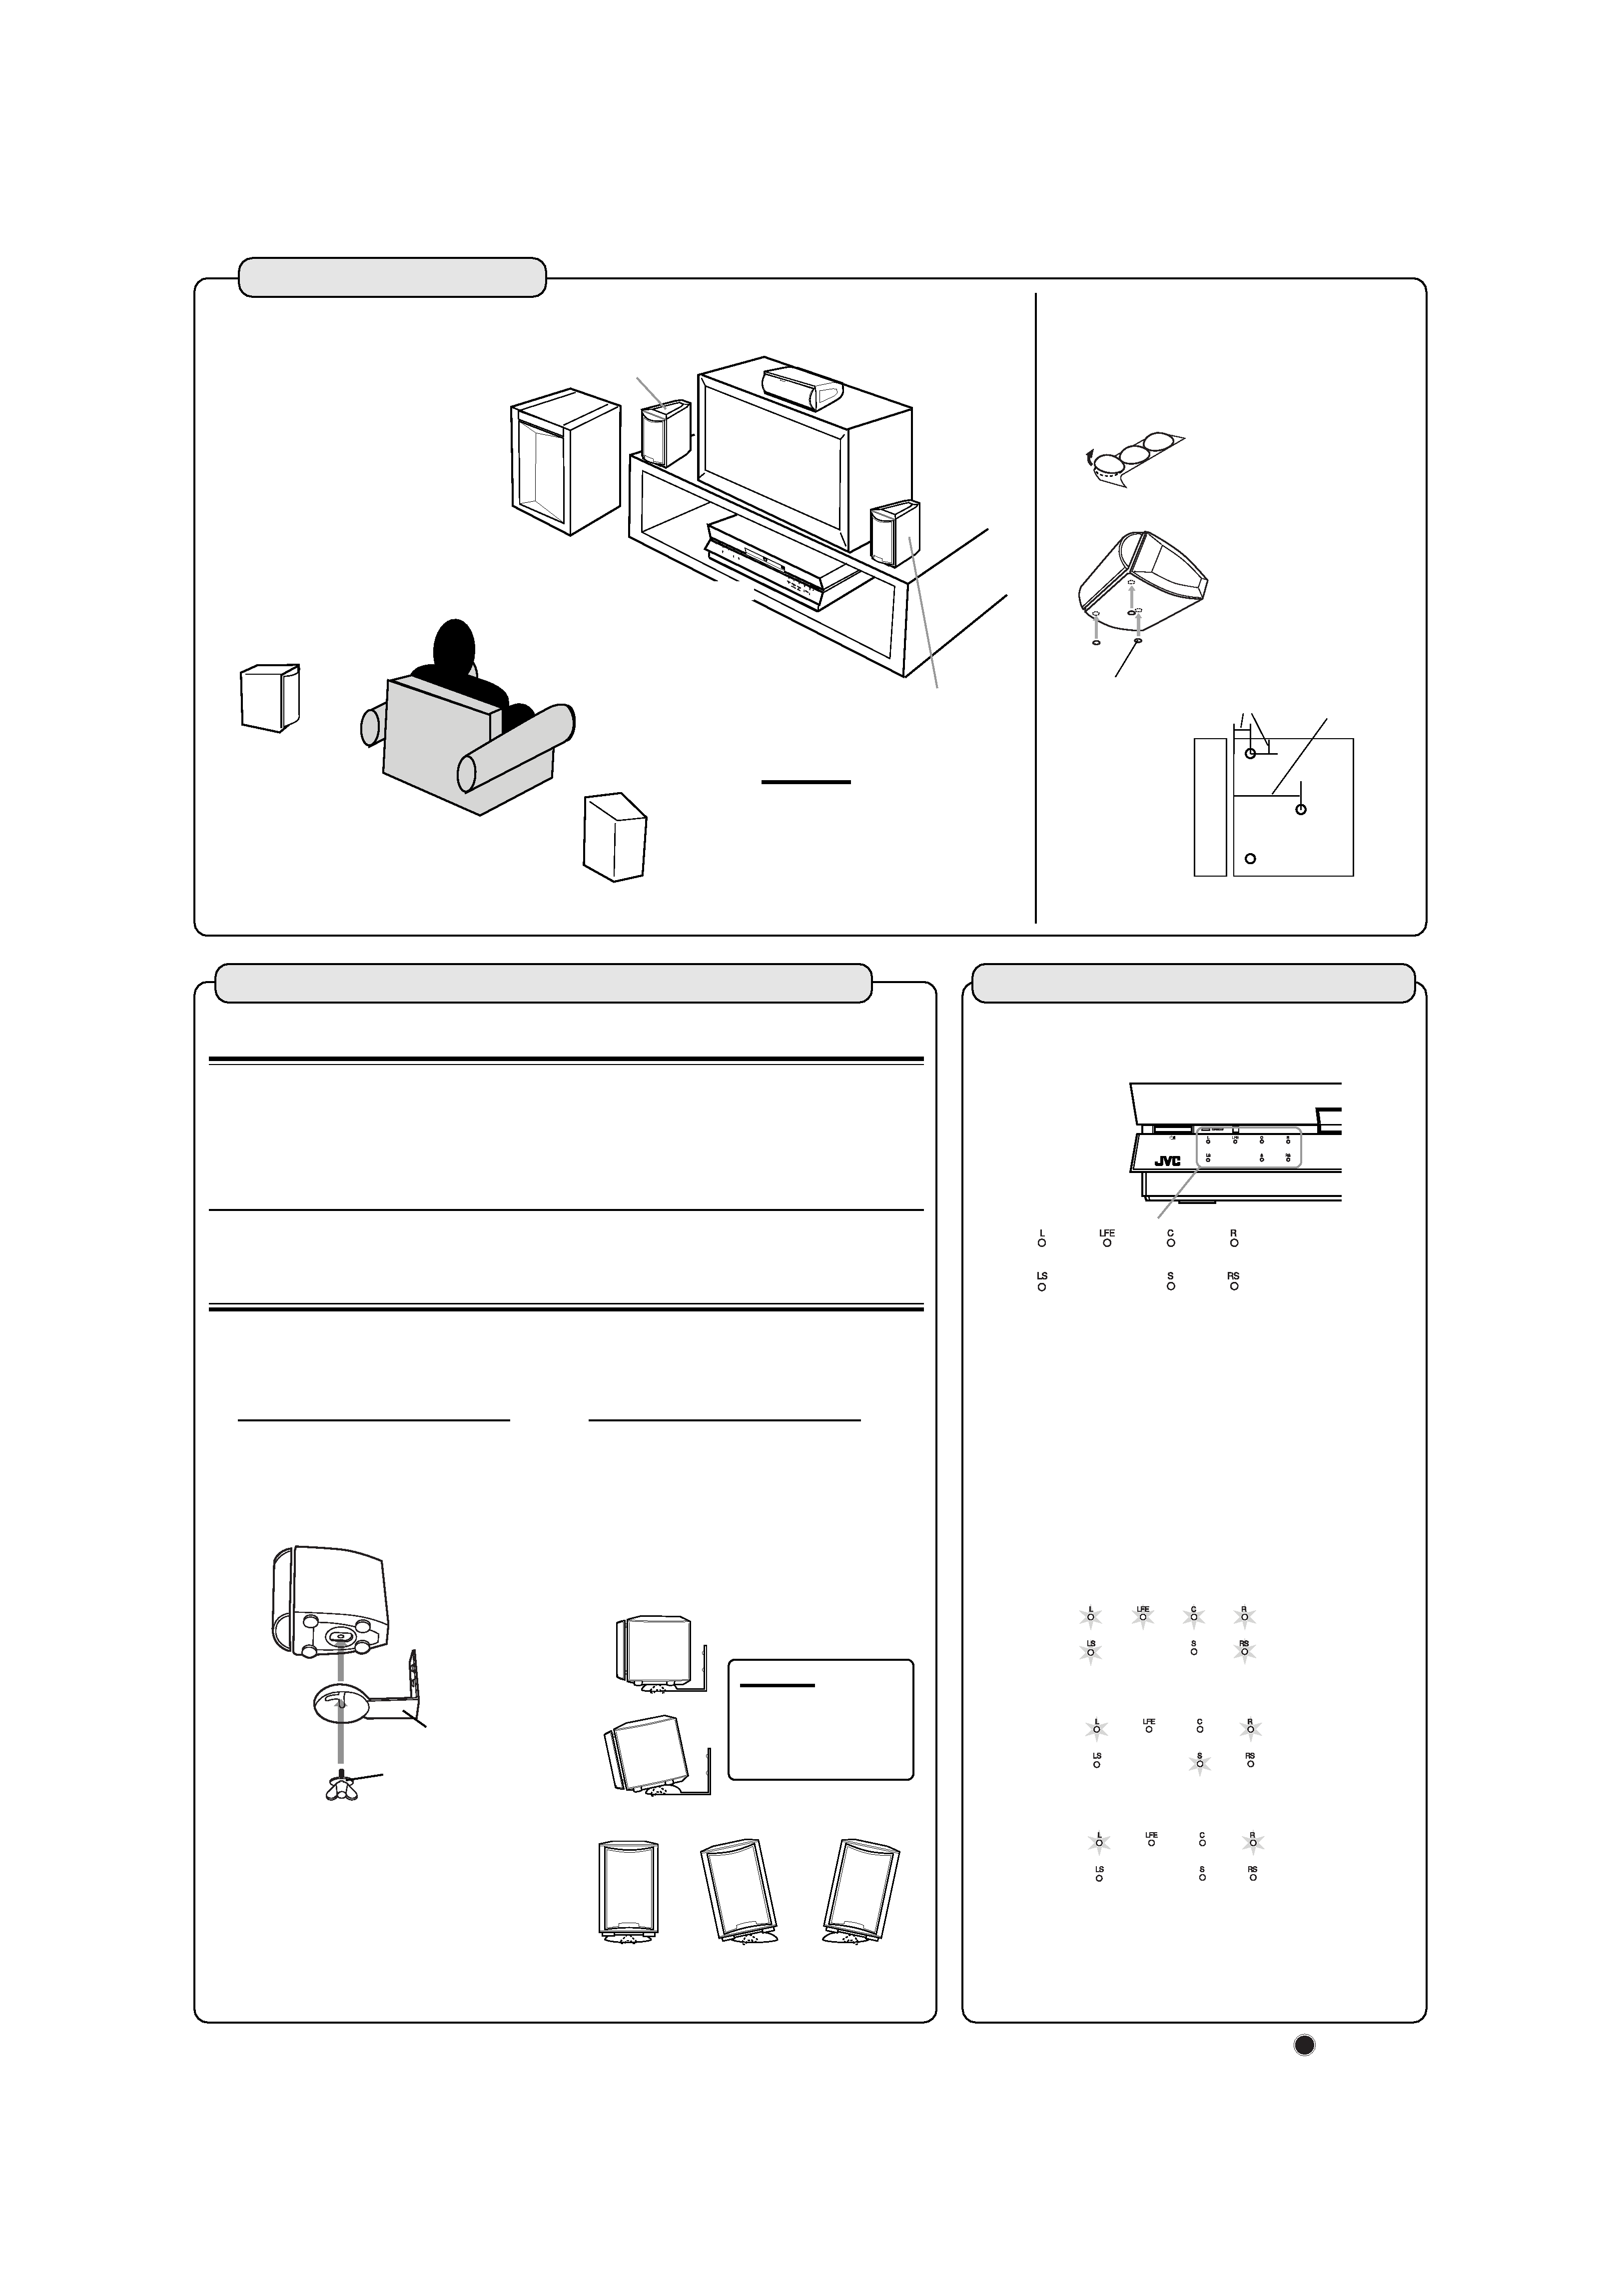
Installation
Example
TV
Satellite speaker
(front left stpeker)
Satellite speaker
(front right speaker)
Center speaker
Powered sub-woofer
Satellite speaker
(rear left speaker)
Satellite speaker
(rear right speaker)
The rear speakers are
placed behind the
listening position.
Center unit
CAUTIONS:
· For safety reasons, always ensure
that there is sufficient place behind
the powered sub-woofer.
· If the front and rear speakers are
placed on the floor, always ensure
that they are level.
To attach non-slip rubbers to the center
speaker
Attach the supplied non-slip rubbers at three points on the
bottom of the center speaker.
1 cm (7/16") 5 cm (2")
Front side
Bottom
The non-slip rubbers are
adhesive. Peel off the seal
before applying.
Use the supplied bracket to fix satellite speakers to the wall.
CAUTION: ATTACHING THE BRACKETS ON THE WALL
When attaching the brackets on the wall, have them attached to the wall by a qualified
person.
DO NOT attach the brackets on the wall by yourself to avoid an unexpected damage of
their falling from the wall, caused by incorrect attachment or weakness in the wall.
Location of attachment to wall:
Care is required in selecting a location for attaching satellite speakers to the wall.
Injury to personnel, or damage to equipment, may result if the speakers are attached in a
location which interferes with daily activities.
Attaching speakers to the bracket
Tilting the speaker to the front
Tilting left-right
Bracket
CAUTION:
If the screw is not
tightened firmly, it may
cause injury to personnel
or damage to equipment.
Screw
1. Use the screw supplied to attach the
speaker to the bracket.
2. Adjusting the angle of the satellite
speakers
The angle of the speaker may be adjusted
in the front-rear and left-right directions
along the channel in the bracket.
When adjusting the angle, loosen the
screw slightly, make the adjustment, and
then tighten the screw firmly.
To hang satellite speakers from the wall
Uses lamps to display the audio channel configuration for the
disc currently playing.
The lamps refer to the speaker channel as follows.
L:
Left front speaker channnel
R:
Right front speaker channel
C:
Center speaker channel
RS: Right surround speaker channel
LS: Left surround speaker channel
S:
Rear speaker channel (monaural)
LFE: Sub-woofer channel
The lamp display indicates the type of disc (DVD or CD)
currently playing as follows.
Example:
With Dolby digital 5.1 ch, DTS digital 5.1 ch, or MPEG
Multichannel 5.1 ch surround
With Dolby digital (Lt/Rt)
With stereo sound (eg Audio CD)
Attach non-slip rubbers at
the three points shown in the
diagram.
Attach two rubbers at left
and right at the front of the
speaker, and one in the
middle at the rear.
Audio channel display lamp
Non-slip rubber
· The audio channel
display lamp is not
an indicator of
which speakers are
producing sound.
When playing DVD recorded in Dolby Digital, Dolby Pro Logic,
DTS, or MPEG Multichannnel Surround Sound, set the main
system surround mode to "SURROUND ON."
When it is set to "SURROUND OFF" the audio channel display
lamp will not change. However, sound will be played without
surround effects (see page 21).
J
VC 0600TNMNATJSC
SCM1[B]
00.6.30, 3:29 PM
2

1
Table of Contents
Getting Started ........................................................................................... 2
Important cautions ........................................................................ 2
Safety precautions ......................................................................... 2
Checking the supplied accessories ................................................ 2
System outline ............................................................................................ 3
Installation .................................................................................................. 4
To attach non-slip rubbers to the center speaker ........................... 4
To hang satellite speakers from the wall ....................................... 4
About discs ................................................................................................. 5
Playable disc types ........................................................................ 5
Video CDs with Playback Control function ................................. 5
Disc structure ................................................................................ 5
Connections ................................................................................................ 6
Connecting the FM and AM (MW) antennas ............................... 6
To connect the powered sub-woofer ............................................. 6
Connecting the TV ........................................................................ 6
To connect speakers ...................................................................... 7
Connecting Audio/Video Components ......................................... 8
Connecting the power cord ......................................................... 10
Putting batteries in the remote control ........................................ 10
Parts Identification .................................................................................. 11
Principles of operation ........................................................................... 13
Operation with the remote control .............................................. 13
To operate via the on-screen menu ............................................. 14
Preventing screen burn-out with the screen saver
[SCREEN SAVER] ................................................................. 15
Basic operations ...................................................................................... 16
To turn the system power supply ON and OFF (standby) .......... 16
To turn TV power ON and OFF .................................................. 16
Adjusting volume ........................................................................ 16
Muting the sound ........................................................................ 17
Selecting the source to play ........................................................ 17
Changing the source name .......................................................... 17
Selecting the analog or digital input mode ................................. 18
Changing the decode mode ......................................................... 18
Adjusting the Input Signal Level ................................................ 19
Sub-woofer volume control and phase setting ............................ 19
Audio channel display lamp ....................................................... 19
Using the Sleep Timer ................................................................ 20
Using the DSP Modes ................................................................. 20
Using the DVD player .............................................................................. 22
To play a disc .............................................................................. 22
Pausing ........................................................................................ 23
Fast forward and rewind ............................................................. 23
Locating the beginning ............................................................... 23
Resuming playback ..................................................................... 24
Selecting playback from the DVD menu .................................... 24
Selecting the location to view from the video CD menu ............ 25
To specify the title or track number for playback ....................... 25
To play from the beginning of a title, chapter, or track .............. 26
To specify the chapter number for playback
[CHAP. SEARCH] .................................................................. 26
To specify the time for playback [TIME SEARCH] .................. 26
To select the screen for playback from the digest screen
[DIGEST] ................................................................................ 27
To advance the picture one frame at a time ................................ 28
Slow-Motion Playback [SLOW] ................................................. 28
To display Continuous Photos [STROBE] ................................. 28
Zooming a scene [ZOOM] .......................................................... 29
Changing the Subtitle Language [SUB TITILE] ........................ 29
Changing the audio language or sound [AUDIO] ...................... 30
Changing the audio channel [AUDIO] ....................................... 30
Viewing from Multiple Angles [ANGLE] .................................. 31
Selecting the Picture Character [THEATER POSITION] .......... 32
Repeating a current title, chapter or track, or all tracks
[REPEAT] ............................................................................... 32
Repeating a desired part [A-B REPEAT] ................................... 33
Sampling all tracks [INTRO] ...................................................... 33
Checking the Disc Time [TIME SELECT] ................................ 34
Programming the Playing Order of the Tracks [PROGRAM] .... 34
Random Play [RANDOM] ......................................................... 35
Receiving radio broadcasts ................................................................... 36
Tuning in stations manually ........................................................ 36
Using preset tuning ..................................................................... 36
Selecting the FM reception mode ............................................... 37
Beat cut ....................................................................................... 37
Using the RDS (Radio Data System) to receive FM stations ..... 38
What information can RDS signals provide? ............................. 38
Searching for a program by PTY codes ...................................... 38
Switching to a broadcast program of your choice temporarily ... 39
Performing miscellaneous settings ..................................................... 40
AV amplifier settings on-screen display ..................................... 40
DVD settings on-screen display ................................................. 40
MAIN MENU Settings ............................................................................. 41
Opening the MAIN MENU ........................................................ 41
ON SCREEN LANGUAGE ....................................................... 41
Setting the SLEEP TIMER ......................................................... 41
Changing the DECODE MODE ................................................. 42
Changing the DSP MODE .......................................................... 42
Adjusting the volume .................................................................. 42
SOUND MENU Settings .......................................................................... 43
Opening the SOUND MENU ..................................................... 43
Adjusting the balance ................................................................. 43
Using LOUDNESS ..................................................................... 43
Adjusting input signal ................................................................. 44
Adjusting the sub-woofer output level ........................................ 44
Adjusting the dynamic range ...................................................... 44
Adjusting the DSP effect ............................................................ 44
SPEAKER MENU Settings ....................................................................... 45
Opening the SPEAKER MENU ................................................. 45
Switching speaker mode ............................................................. 45
Playing a test tone ....................................................................... 46
Setting speaker size ..................................................................... 46
Setting speaker level ................................................................... 47
Adjusting delay time ................................................................... 47
DVD MENU Settings ................................................................................ 48
Opening the DVD MENU .......................................................... 48
Choosing menu language ............................................................ 48
Choosing audio language ............................................................ 49
Choosing subtitle language ......................................................... 49
On-screen guide settings ............................................................. 49
Select monitor type ..................................................................... 50
Screen saver settings ................................................................... 50
Limiting playback by children ............................................................... 51
To set Parental Lock for the first time [PARENTAL LOCK] ..... 51
To temporarily release the Parental lock ..................................... 52
Care and handling of discs .................................................................... 53
How to handle discs .................................................................... 53
COMPU LINK Remote Control System .................................................. 54
Operating JVC's Audio/Video Components ......................................... 55
Operating Other Manufacturers' Video Equipment ........................... 57
Troubleshooting ........................................................................................ 59
Specifications .......................................................................................... 60
TH-A10R[B]1/f
00.7.3, 7:56 PM
1