625
TV PR +
TV PR Ð
T
V
Ð
TV
+
12
3
45
6
78
9
1
2
1
2
3
VHS
DV
TV
CABLE/SAT
TV/VCR
:
AUDIO
0000
START
DEBUT
STOP
FIN
DATE
PR
DAILY/QTDN.
VPS/PDC
AUX
WEEKLY/HEBDO
EXPRESS
LCD PROG
0
PROG
OK
3
4
4
MENU
30 SEC
ENTER/ENTREE
VHS
DUB
COPIE
DV
DV
VHS
PR
Ð / +
PUSH / TURN
24H
EXPRESS
1
32
PULL-OPEN
TIRER-OUVRIR
PULL-OPEN
TIRER-OUVRIR
EN
CONTENTS
Filename [SR-VS30EK_Cov1-EN.fm]
Mini DV/S-VHS
VIDEO CASSETTE RECORDER
SAFETY FIRST
2
Safety Precautions .....................................2
Some Do's And Don'ts On The Safe Use
Of Equipment ............................................3
INDEX
4
INSTALLING YOUR NEW RECORDER
10
Check Contents .......................................10
Basic Connections ...................................11
S-VIDEO Connection ...............................12
INITIAL SETTINGS
13
Auto Set Up .............................................13
Preset Download .....................................14
T-V LINK
16
T-V Link Functions ..................................16
SAT CONTROL SET
17
Satellite Receiver Control Setting .............17
PLAYBACK/RECORDING ON VHS DECK
20
Basic Playback (VHS deck) ......................20
Basic Recording (VHS deck) ....................21
Playback Features (VHS deck) .................22
Recording Features (VHS deck) ................26
B.E.S.T. Picture System (VHS deck) ..........29
PLAYBACK/RECORDING ON DV DECK
30
Basic Playback (DV deck) ........................30
Basic Recording (DV deck) ......................31
Playback Features (DV deck) ...................32
Recording Features (DV deck) .................34
TIMER RECORDING
36
VIDEO Plus+® Timer Programming .........36
Express Timer Programming ....................38
24 Hour Express Timer Programming ......40
EDITING
44
Tape Dubbing (from DV to VHS) .............44
Tape Dubbing (from VHS to DV) .............45
Normal Dubbing (from DV to VHS) .........46
Normal Dubbing (from VHS to DV) .........47
Edit From A Camcorder ...........................48
Edit To Or From Another Video
Recorder ..................................................50
Output/Input Set ......................................52
Audio Dubbing ........................................54
Insert Editing ............................................56
Random Assemble Editing .......................58
REMOTE CONTROL
60
Remote Control Functions .......................60
SYSTEM CONNECTIONS
63
Connecting To A Printer ..........................63
Connecting To A Satellite Receiver ..........64
Connecting/Using A Stereo System ..........65
SUBSIDIARY SETTINGS
66
Mode Set .................................................66
Tuner Set .................................................72
Clock Set .................................................80
VIDEO Plus+® System Setup ....................82
TROUBLESHOOTING
83
QUESTIONS AND ANSWERS
87
SPECIFICATIONS
88
LIST OF TERMS
89
LPT0679-001B
SR-VS30EK_Cov1-EN.fm Page 1 Tuesday, February 19, 2002 12:56 PM
Filename [SR-VS30EK_1-EN.fm]
Masterpage:Left
2
Page 2
February 1, 2002 1:40 pm
SAFETY FIRST
Safety Precautions
The rating plate and the safety caution are on the rear of the unit.
WARNING: DANGEROUS VOLTAGE INSIDE
WARNING: TO PREVENT FIRE OR SHOCK
HAZARD, DO NOT EXPOSE THIS
UNIT TO RAIN OR MOISTURE.
When the equipment is installed in a cabinet or a shelf, make
sure that it has sufficient space on all sides to allow for
ventilation (10 cm or more on both sides, on top and at the rear.)
When discarding batteries, environmental problems must be
considered and the local rules or laws governing the disposal of
these batteries must be followed strictly.
Failure to heed the following precautions may result in damage
to the recorder, remote control or video cassette.
1. DO NOT place the recorder ...
... in an environment prone to extreme temperatures or
humidity.
... in direct sunlight.
... in a dusty environment.
... in an environment where strong magnetic fields are
generated.
... on a surface that is unstable or subject to vibration.
2. DO NOT block the recorder's ventilation openings or holes.
(If the ventilation openings or holes are blocked by a
newspaper or cloth, etc., the heat may not be able to get out.)
3. DO NOT place heavy objects on the recorder or remote
control.
4. DO NOT place anything which might spill on top of the
recorder or remote control.
(If water or liquid is allowed to enter this equipment, fire or
electric shock may be caused.)
5. DO NOT expose the apparatus to dripping or splashing.
6. DO NOT use this equipment in a bathroom or places with
water. Also DO NOT place any containers filled with water
or liquids (such as cosmetics or medicines, flower vases,
potted plants, cups, etc.) on top of this unit.
7. DO NOT place any naked flame sources, such as lighted
candles, on the apparatus.
8. AVOID violent shocks to the recorder during transport.
MOISTURE CONDENSATION
Moisture in the air will condense on the recorder when you
move it from a cold place to a warm place, or under extremely
humid conditions--just as water droplets form in the surface of a
glass filled with cold liquid. Moisture condensation on the head
drum will cause damage to the tape. In conditions where
condensation may occur, keep the recorder turned on for a few
hours to let the moisture dry.
Cassettes marked "S-VHS" and "VHS" can be used with this video cassette recorder. However, S-VHS recordings are possible only
with cassettes marked "S-VHS".
By using the S-VHS ET function, it is possible to record and play back with S-VHS picture quality on VHS cassettes with this recorder.
Cassettes marked "Mini DV" can be used with the DV deck of this recorder. The DV deck can play back and record only PAL signals.
VIDEO Plus+ and PlusCode are registered trademarks of Gemstar Development Corporation. The VIDEO Plus+ system is
manufactured under license from Gemstar Development Corporation.
CAUTION
8 When you are not using the recorder for a long period of
time, it is recommended that you disconnect the power
cord from the mains outlet.
8 Dangerous voltage inside. Refer internal servicing to
qualified service personnel. To prevent electric shock or
fire hazard, remove the power cord from the mains outlet
prior to connecting or disconnecting any signal lead or
aerial.
IMPORTANT
Connection to the mains supply in the United Kingdom.
DO NOT cut off the mains plug from this equipment. If the
plug fitted is not suitable for the power points in your home
or the cable is too short to reach a power point, then obtain a
proper safety approved extension lead/adapter or consult
your dealer.
In the unlikely event of the plug fuse failing be sure to
replace the fuse only with an identical approved type, as
originally fitted, and to replace the fuse cover. If the fuse
fails again consult your nearest JVC dealer.
If nonetheless the mains plug is cut off remove the fuse and
dispose of the plug immediately, to avoid a possible shock
hazard by inadvertent connection to the mains supply.
If this product is not supplied fitted with a mains plug then
follow the instructions given below:
DO NOT make any connection to the Larger Terminal coded
E or Green.
The wires in the mains lead are coloured in accordance with
the following code:
If these colours do not correspond with the terminal
identifications of your plug, connect as follows:
Blue wire to terminal coded N (Neutral) or coloured Black.
Brown wire to terminal coded L (Live) or coloured Red.
If in doubt -- consult a competent electrician.
IMPORTANT
8 Please read the various precautions on pages 2 3 before
installing or operating the recorder.
8 It should be noted that it may be unlawful to re-record
pre-recorded tapes, records, or discs without the consent
of the owner of copyright in the sound or video recording,
broadcast or cable programme and in any literary,
dramatic, musical, or artistic work embodied therein.
Blue to N (Neutral) or Black
Brown to L (Live) or Red
The STANDBY/ON
1 button does not completely shut off
mains power from the unit, but switches operating current on
and off. "
`" shows electrical power standby and "!" shows
ON.
Video tapes recorded with this video recorder in the LP (Long
Play) mode cannot be played back on a single-speed video
recorder.
SR-VS30EK_1.book Page 2 Friday, February 1, 2002 1:50 PM

Masterpage:Right-Full-NoTitle0
3
Filename [SR-VS30EK_1-EN.fm]
Page 3
February 1, 2002 1:40 pm
Some Do's And Don'ts On The Safe Use
Of Equipment
This equipment has been designed and manufactured to meet international safety standards but, like any
electrical equipment, care must be taken if you are to obtain the best results and safety is to be assured.
DO read the operating instructions before you attempt to use the equipment.
DO ensure that all electrical connections (including the mains plug, extension leads and interconnections
between pieces of equipment) are properly made and in accordance with the manufacturer's
instructions. Switch off and withdraw the mains plug when making or changing connections.
DO consult your dealer if you are ever in doubt about the installation, operation or safety of your
equipment.
DO be careful with glass panels or doors on equipment.
DON'T continue to operate the equipment if you are in any doubt about it working normally, or if it is
damaged in any way -- switch off, withdraw the mains plug and consult your dealer.
DON'T remove any fixed cover as this may expose dangerous voltages.
DON'T leave equipment switched on when it is unattended unless it is specifically stated that it is designed
for unattended operation or has a standby mode. Switch off using the switch on the equipment and
make sure that your family knows how to do this. Special arrangements may need to be made for
infirm or handicapped people.
DON'T use equipment such as personal stereos or radios so that you are distracted from the requirements
of road safety. It is illegal to watch television whilst driving.
DON'T listen to headphones at high volume, as such use can permanently damage your hearing.
DON'T obstruct the ventilation of the equipment, for example with curtains or soft furnishings.
Overheating will cause damage and shorten the life of the equipment.
DON'T use makeshift stands and NEVER fix legs with wood screws -- to ensure complete safety always fit
the manufacturer's approved stand or legs with the fixings provided according to the instructions.
DON'T allow electrical equipment to be exposed to rain or moisture.
ABOVE ALL...
-- NEVER let anyone especially children push anything into holes, slots or any other opening in the
case -- this could result in a fatal electrical shock;
-- NEVER guess or take chances with electrical equipment of any kind -- it is better to be safe than
sorry!
SR-VS30EK_1.book Page 3 Friday, February 1, 2002 1:50 PM
Masterpage:Left-index
4
Filename [SR-VS30EK_1-EN.fm]
Page 4
February 1, 2002 1:40 pm
INDEX
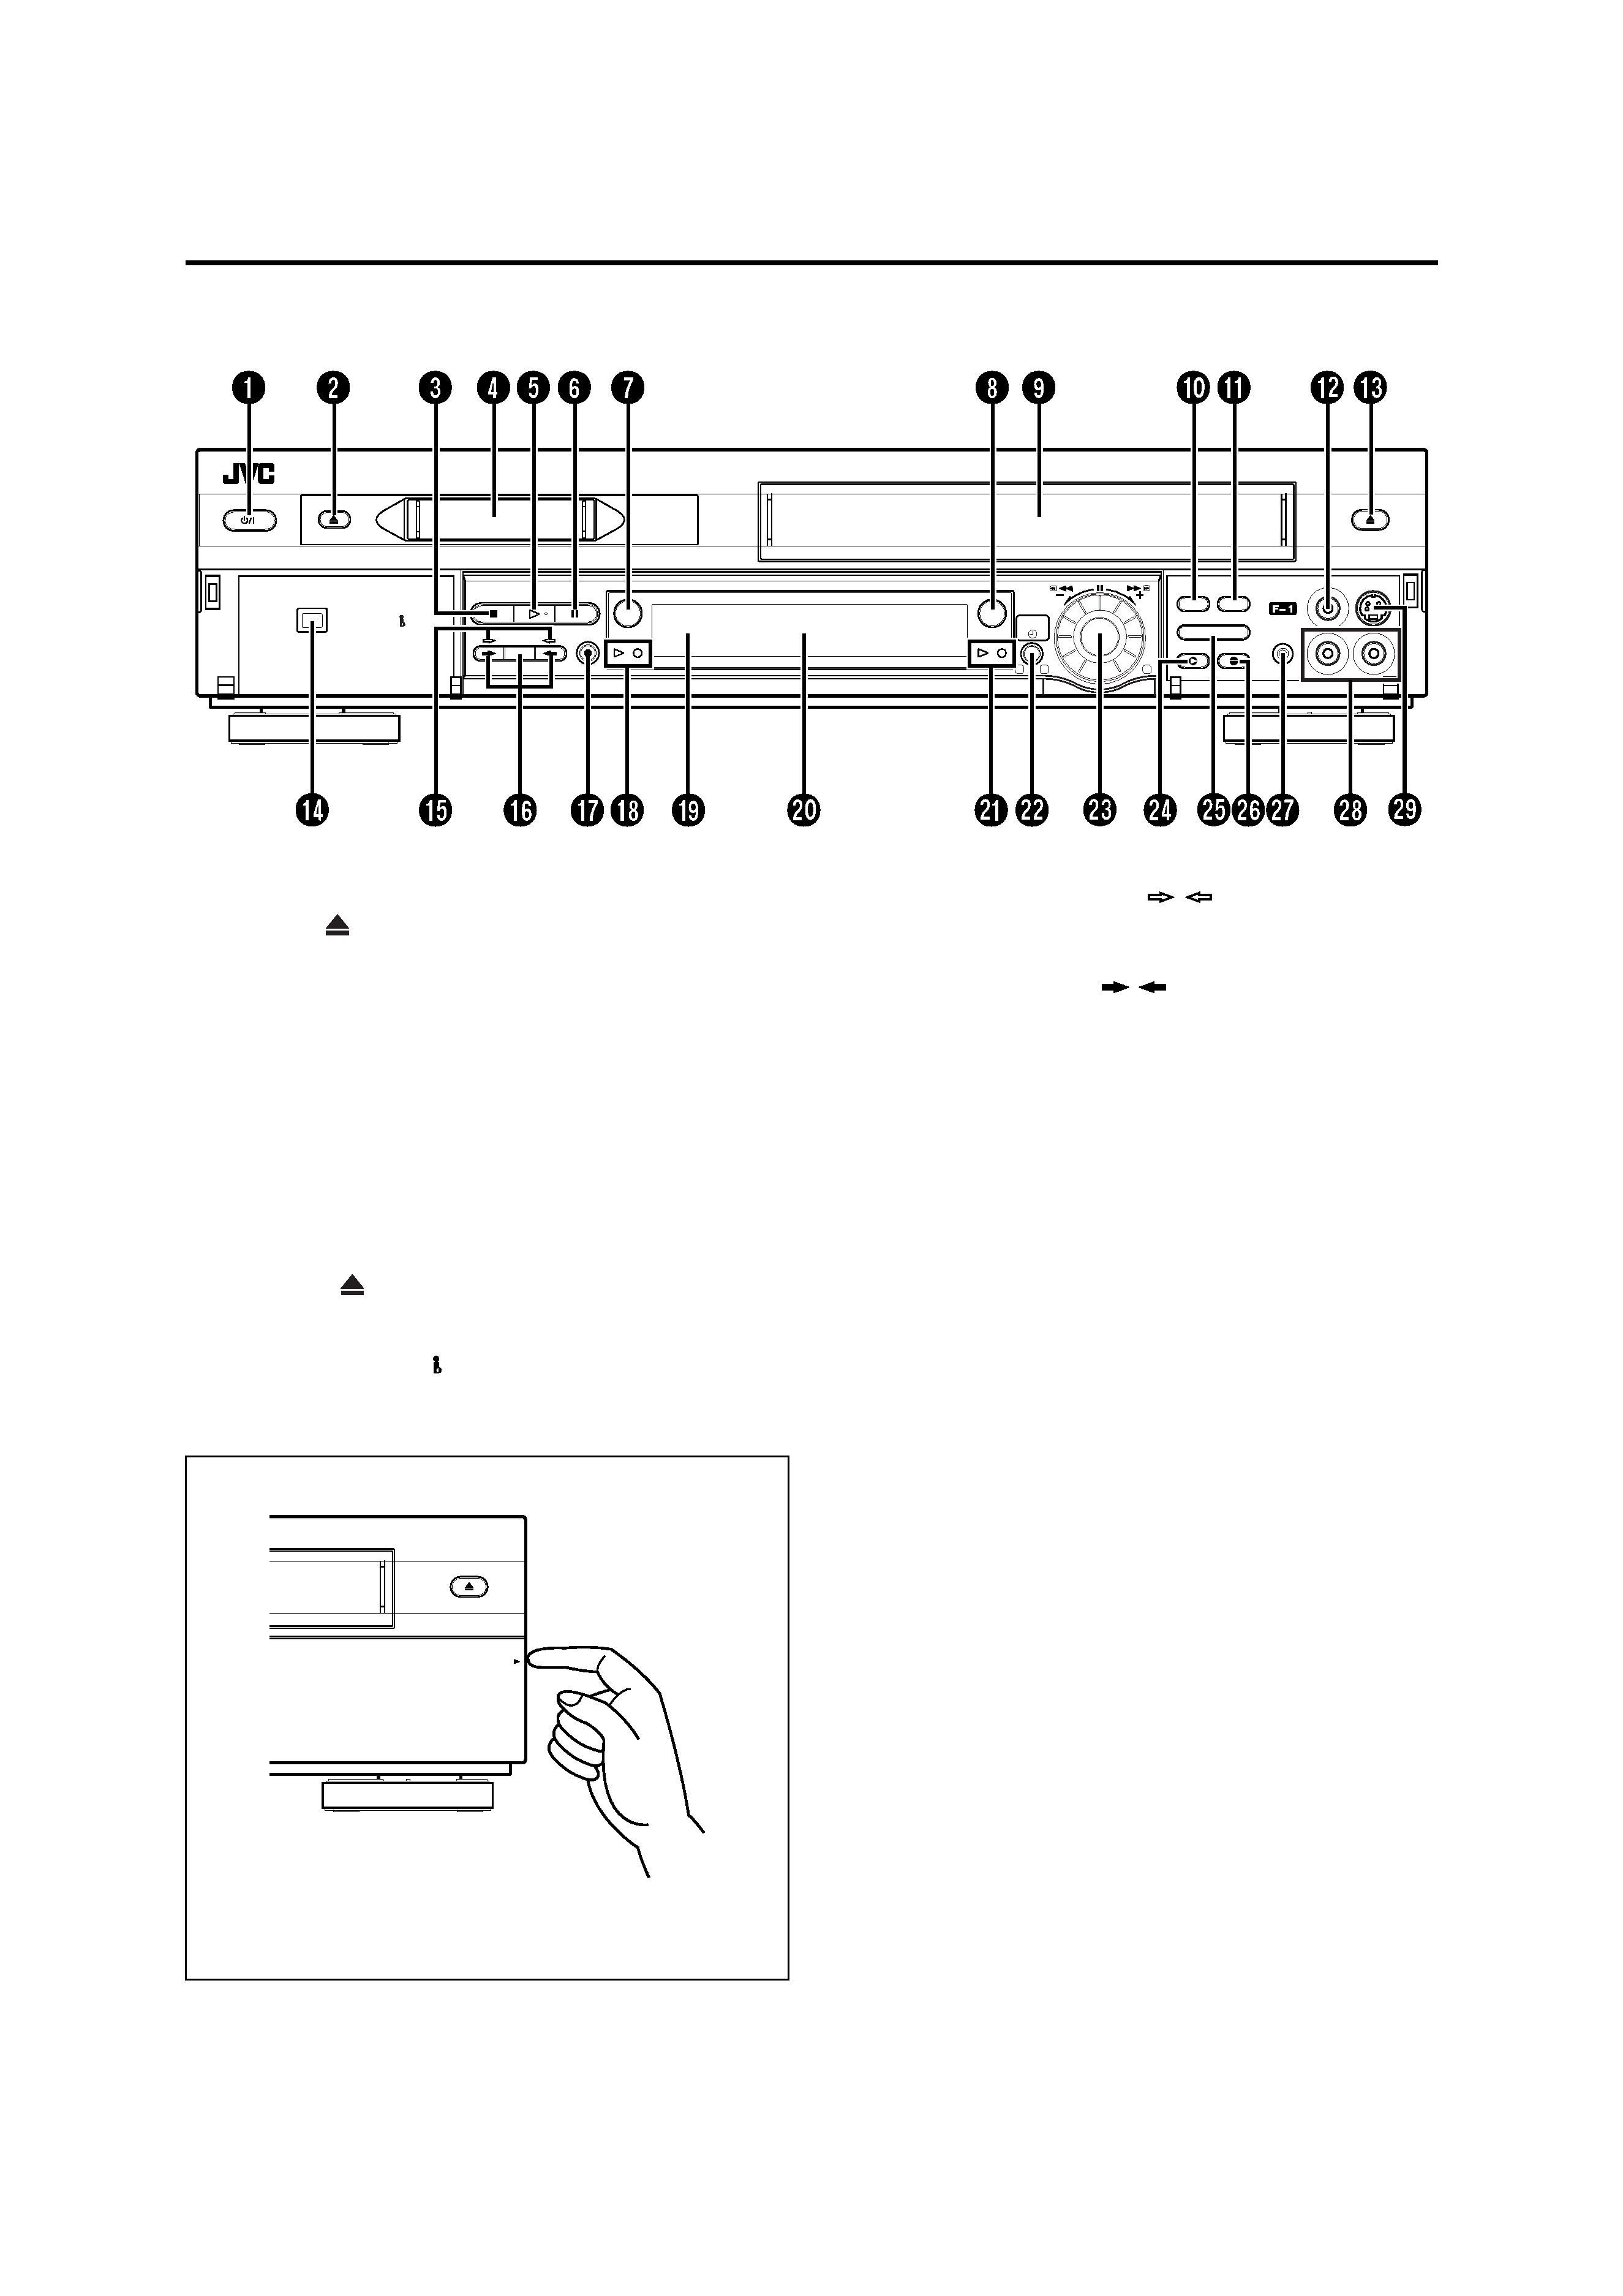
FRONT VIEW
DV IN/OUT
ENTREE/SORTIE DV
VHS
DUB
COPIE
DV
DV
VHS
PR
/ +
PUSH / TURN
24H
EXPRESS
1
32
R.A.EDIT
START
IN /OUT
INSERT
A.DUB
A STANDBY/ON
1 Button
pg. 13
B DV Eject
Button
pg. 30, 31
C Stop
8 Button
pg. 20, 21, 30, 31
D Mini DV Cassette Loading Slot
E Play
4 Button
pg. 20, 30
F Pause
9 Button
pg. 21, 22, 31, 32
G DV Button
pg. 30, 31
H VHS Button
pg. 20, 21
I VHS Cassette Loading Slot
J Random Assemble Edit (R.A.EDIT) Button
pg. 58
K Random Assemble Edit START Button
pg. 59
L VIDEO Input Connector
pg. 48, 56
M VHS Eject
Button
pg. 20, 21
N DV IN/OUT connector (i.Link*)
pg. 48
* i.Link refers to the IEEE1394-1995 industry specification and
extensions thereof. The
logo is used for products compliant with
the i.Link standard.
O Dubbing Direction (DV
/
VHS) Indicators
pg. 44, 45
P Dubbing (DUB) Button
pg. 44, 45
Dubbing Direction (
/
) Buttons
pg. 44, 45
Q Record
7 Button
pg. 21, 31
R DV mode Indicators
pg. 30, 31
S Infrared Beam Receiving Window
T Front Display Panel
pg. 6
U VHS mode Indicators
pg. 20, 21
V 24H EXPRESS
# Button
pg. 40
W Advanced JOG Dial
pg. 20, 30, 40
X INSERT Button
pg. 57
Y Random Assemble Edit IN/OUT Button
pg. 58
Z Audio Dubbing (A.DUB) Button
pg. 55
a Remote PAUSE Connector
pg. 48
b AUDIO Input Connectors
pg. 48, 54, 56
c S-VIDEO Input Connector
pg. 48, 56
To access covered buttons/connectors, pull and open the
cover.
PULL-OPEN
TIRER-OUVRIR
SR-VS30EK_1.book Page 4 Friday, February 1, 2002 1:50 PM
Masterpage:Right-index
5
Filename [SR-VS30EK_1-EN.fm]
Page 5
February 1, 2002 1:40 pm
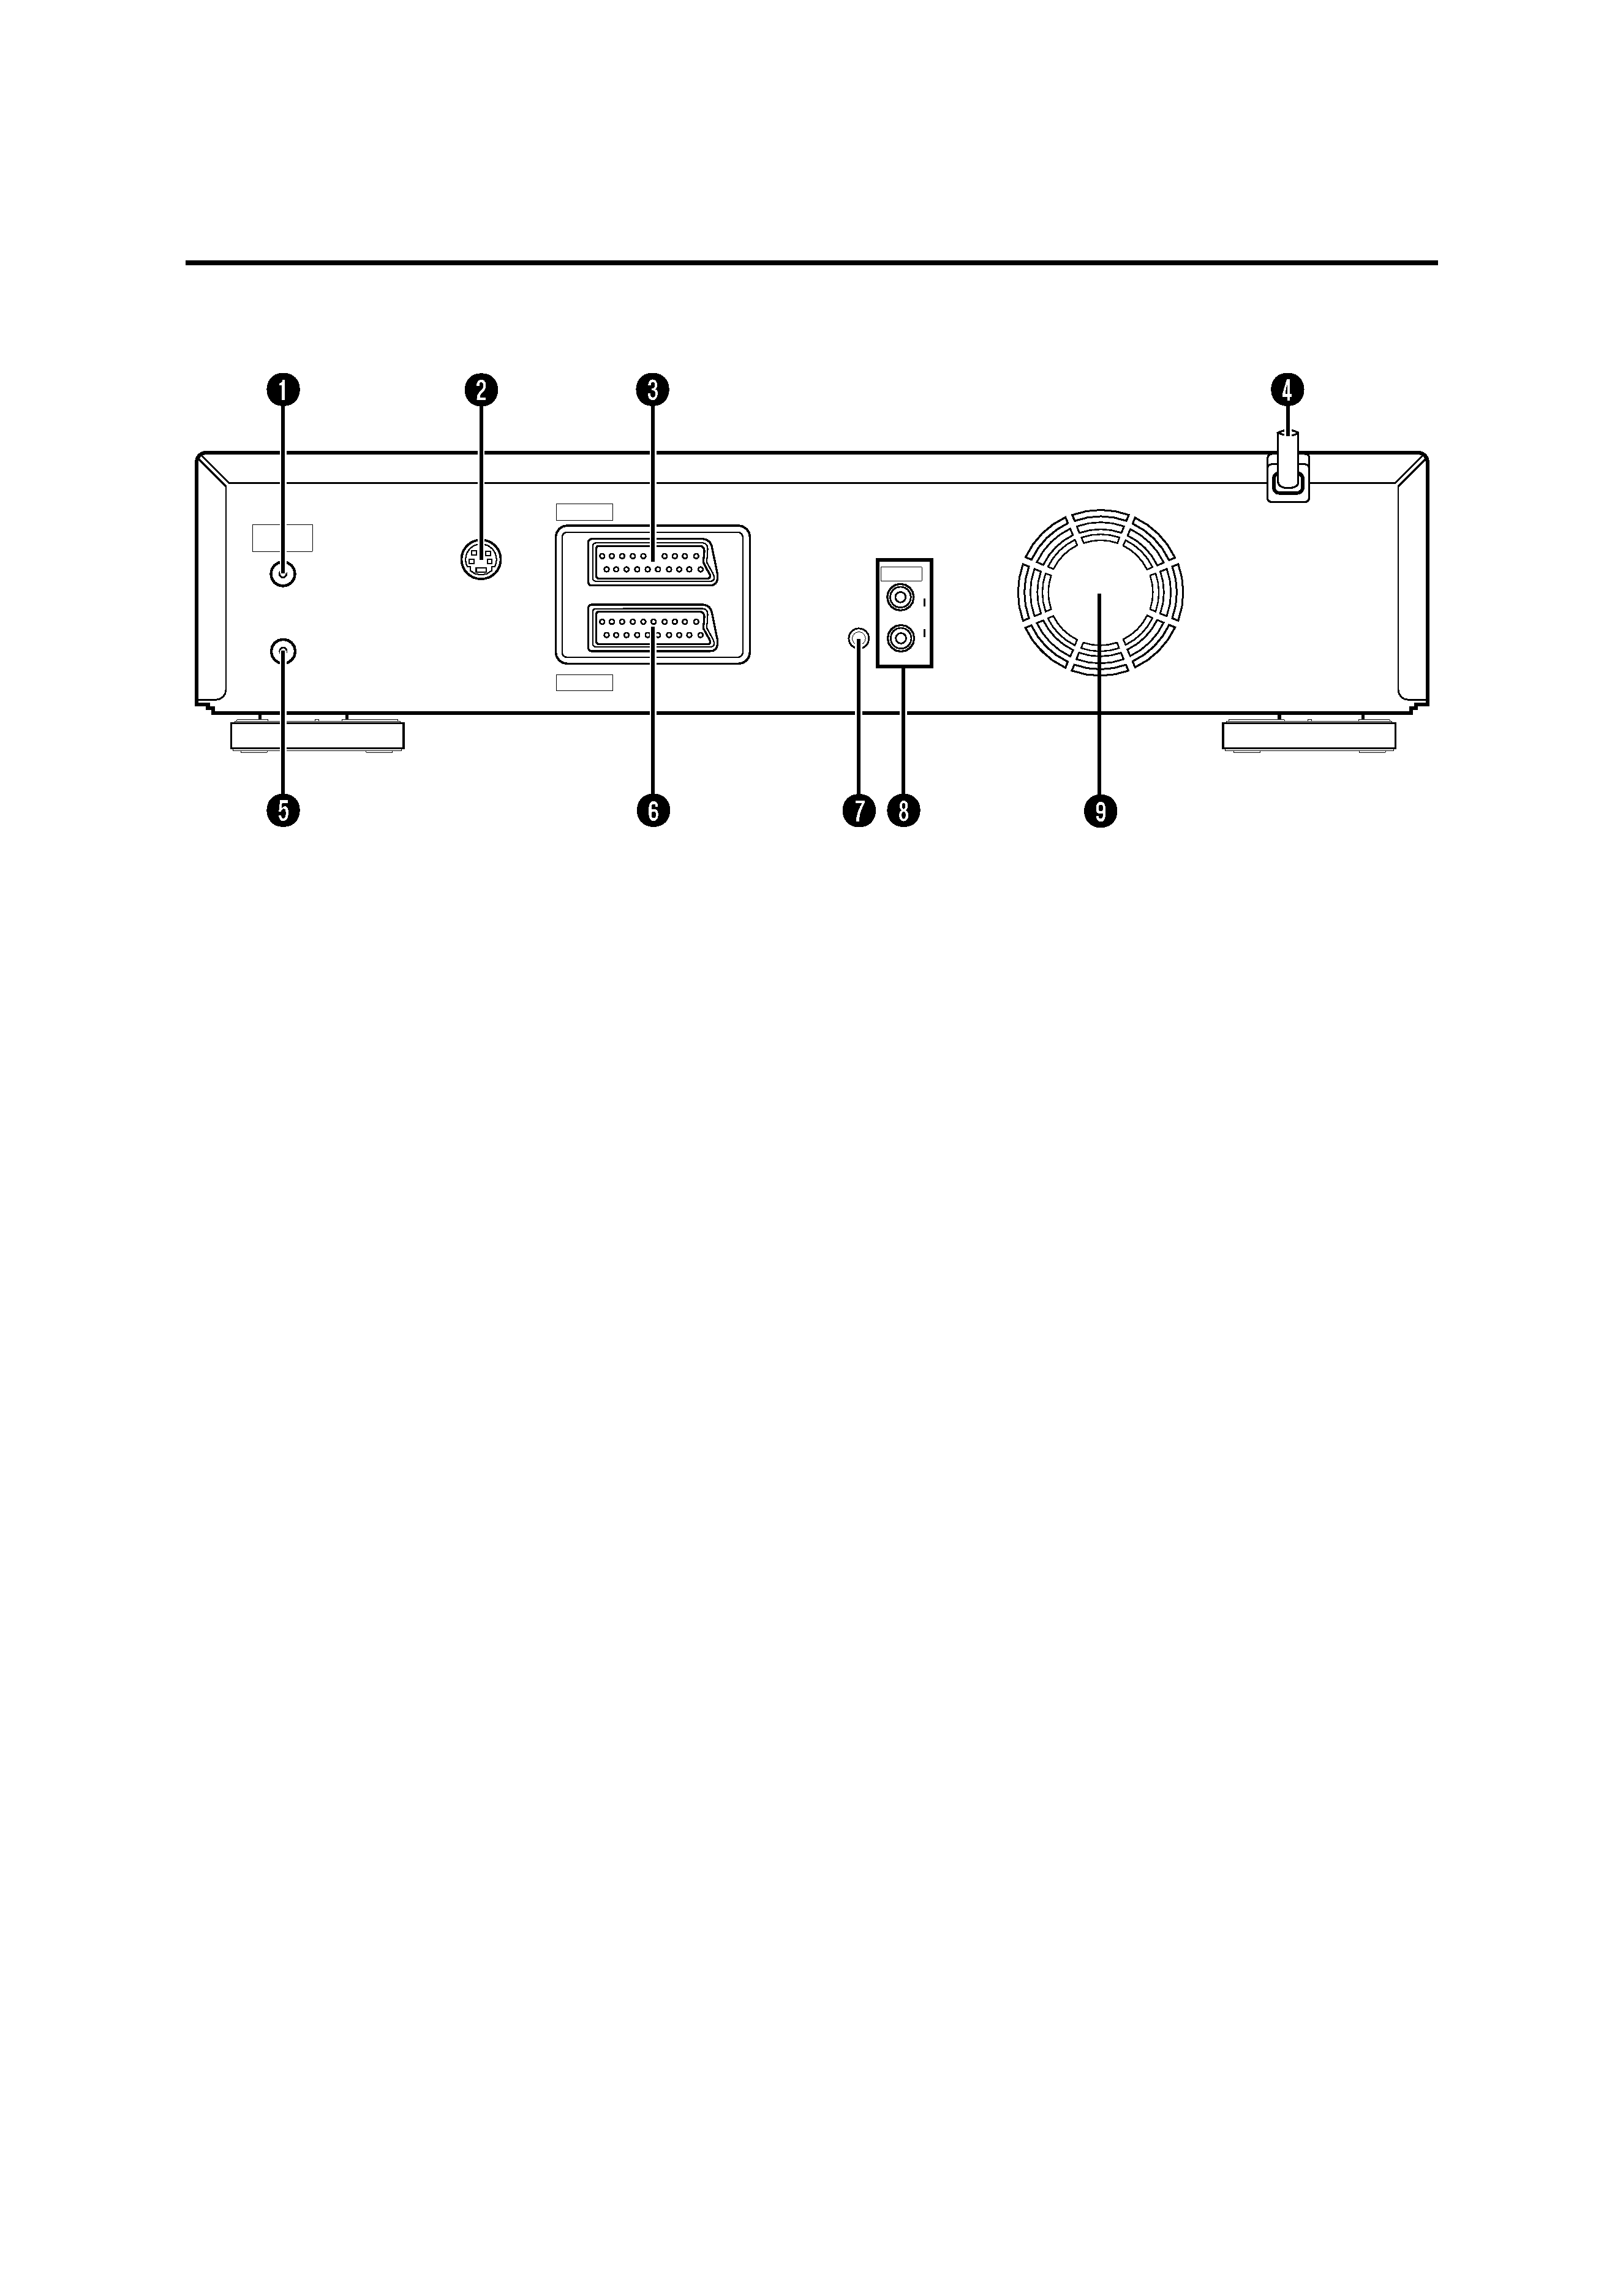
REAR VIEW
S
OUT
SORTIE
ANTENNA
ANTENNE
IN
ENTREE
OUT
SORTIE
AUDIO
L
R
SAT CONTROL
CONTROLEUR SAT
OUT
SORTIE
AV2 (L-2)
IN/DECODER
ENTREE/DECODEUR
AV1 (L-1)
IN/OUT
ENTREE/SORTIE
A ANTENNA IN Connector
pg. 11
B S OUT Connector
pg. 12
C AV1 (L-1) IN/OUT Connector
pg. 11, 50, 64
D Mains Power Cord
pg. 11
E ANTENNA OUT Connector
pg. 11
F AV2 (L-2) IN/DECODER Connector
pg. 17, 50, 64
G SAT CONTROL Connector
pg. 17
H AUDIO OUT (L/R) Connectors
pg. 65
I Cooling fan
This prevents the temperature from rising inside the recorder.
Do not remove it.
Install the recorder so as not to block the area around the fan.
The fan may be activated even if the recorder is turned off.
SR-VS30EK_1.book Page 5 Friday, February 1, 2002 1:50 PM