
For Customer Use:
Enter below the Model No. and Serial
No. which are located either on the rear,
bottom or side of the cabinet. Retain this
information for future reference.
Model No.
Serial No.
LVT0618-007A
[UW]
RX-8012VSL
INSTRUCTIONS
MANUAL DE INSTRUCCIONES
INSTRUÇÕES
CONTROL
DOWN
UP
EFFECT SETTING
DIGITAL
EQ
TV SOUND/DBS
VIDEO
VCR 2
VCR 1
DVD
DVD MULTI
MIDNIGHT MODE
DSP MODE
S-VIDEO
VIDEO
VIDEO
L--AUDIO--R
SURROUND ON/OFF
SUBWOOFER OUT ON/OFF
SPEAKERS ON/OFF
FM/AM TUNING
FM/AM PRESET
FM MODE
MEMORY
PHONES
1
STANDBY
USB AUDIO
PUSH OPEN
INPUT
ANALOG/DIGITAL
INPUT ATT
FM / AM
USB AUDIO
TAPE / MD
CDR
CD
PHONO
LEVEL
ADJUST
RX-8012V
AUDIO/VIDEO CONTROL RECEIVER
LINE DIRECT
BASS BOOST
MASTER VOLUME
DIGITAL
SURROUND
DIGITAL
2
SOUCE NAME
SOUCE NAME
STANDBY/ON
DIGITAL
CONTROL
+
-
+
-
+
-
23
1
56
4
89
7/P
0
+10
10
LINEDIF.ECT
BOOST
EFFECT
MENU
ENTER
SIZE
ROOM
BASS
MODE
TEST
CTRTONE
LIVENESS
MIDNIGHT
SOUND
SUBWFR
DIGITALEQ REARL REARR
L/RBAL CENTER
MUTING
CH/
LEVEL TVVOL
PLAY
STOP
/REW
DOWN TUNING UP
FF/
EXIT
BALL
BALR
VOLUME
CATV/DBS
CONTROL
TV/VIDEO
MENU
TEXT
REC
DISPLAY
PAUSE
PAUSE
SET
RETURN
FMMODE
100+
CONTROL
A/V CONTROL RECEIVER
CATV/DBS
VCR 1
TV
AUDIO
DSP
MODE
INPUT
ON/OFF
DVD MUILTI
DVD
USB
CD
CDR
TAPE/MD
TV/DBS
VIDEO
PHONO
FM/AM
VCR 1
VCR 2
SURROUND
ANALOG/DIGITAL SLEEP
RM-SRX8012U
RECEPTOR DE CONTROL DE AUDIO/VÍDEO
RECEPTOR DE COMANDO AUDIO/VÍDEO
AUDIO/VIDEO CONTROL RECEIVER
RX-8012VSL[UW]COVERÅQf
01.2.14, 6:16 PM
1
G-1
CAUTION
To reduce the risk of electrical shocks, fire, etc.:
1.
Do not remove screws, covers or cabinet.
2.
Do not expose this appliance to rain or moisture.
Caution
switch!
Disconnect the mains plug to shut the power off completely. The
switch in any position does not disconnect the mains line. The power
can be remote controlled.
Precaución Interruptor
!
Desconectar el cable de alimentación para desactivar la alimentación
totalmente. Cualquier que sea la posición de ajuste del interruptor
, la alimentación no es cortada completamente. La alimentación
puede ser controlada remotamente.
Precaução Interruptor
!
Desconectar o cabo de alimentação para desligar a alimentação por
completo. Qualquer que seja a posição de ajuste do interruptor
,
a alimentação não é completamente cortada. A alimentação pode
ser controlada remotamente.
CAUTION
·
Do not block the ventilation openings or holes.
(If the ventilation openings or holes are blocked by a
newspaper or cloth, etc., the heat may not be able to
get out.)
·
Do not place any naked flame sources, such as
lighted candles, on the apparatus.
·
When discarding batteries, environmental problems
must be considered and local rules or laws governing
the disposal of these batteries must be followed strictly.
·
Do not use this apparatus in a bathroom or places
with water. Also do not place any containers filled
with water or liquids (such as cosmetics or medi-
cines, flower vases, potted plants, cups, etc.) on top
of this apparatus.
ATENÇÃO
Para reduzir riscos de choques eléctricos, incêndio, etc.:
1.
Não retire parafusos nem desmonte as tampas ou o gabinete.
2.
Não exponha este aparelho à chuva nem à umidade.
PRECAUCIÓN
Para reducir riesgos de choques eléctricos, incendio, etc.:
1.
No extraiga los tornillos, los cubiertas ni la caja.
2.
No exponga este aparato a la lluvia o a la humedad.
Warnings, Cautions and Others / Avisos, precauciones y otras notas /
Advertêcias, precauções e outras notas
PRECAUCION
·
No obstruya las rendijas o los orificios de ventilación.
(Si las rendijas o los orificios de ventilación quedan tapados
con un periódico, un trozo de tela, etc., no se podrá disipar
el calor).
·
No ponga sobre el aparato ninguna llama al descubierto,
como velas encendidas.
·
Cuando tenga que descartar las pilas, tenga en cuenta
los problemas ambientales y observe estrictamente los
reglamentos o las leyes locales sobre disposición de las
pilas.
·
No utilice este aparato en el cuarto de baño o en lugares
donde hay agua. Tampoco coloque ningún recipiente
que contenga agua u otros líquidos (frascos de cosmé-
ticos o medicinas, floreros, macetas, vasos, etc.) enci-
ma de este aparato.
AVISO
·
Não obstrua as aberturas e orifícios de ventilação. (Se
os orifícios ou aberturas de ventilação estiverem
obstruídos por qualquer papel ou tecido, não haverá
circulação do ar quente.)
·
Não coloque nenhum objeto com chamas, como velas
acesas, sobre o aparelho.
·
Ao descartar as baterias, leve em consideração os
problemas que possam ser causados ao meio ambiente
e os regulamentos e leis locais e governamentais sobre
recolhimento dessas baterias devem ser rigorosamente
seguidos.
·
Não utilize este aparelho em banheiros ou em locais
com água. Além disso, não coloque nenhum recipiente
com água ou qualquer tipo de líquido (como cosméticos
ou remédios, vasos com flores, plantas, xícaras, etc.)
sobre o aparelho.
RX-8012VSL[UW]safety_f
01.2.14, 6:16 PM
1
English
G-2
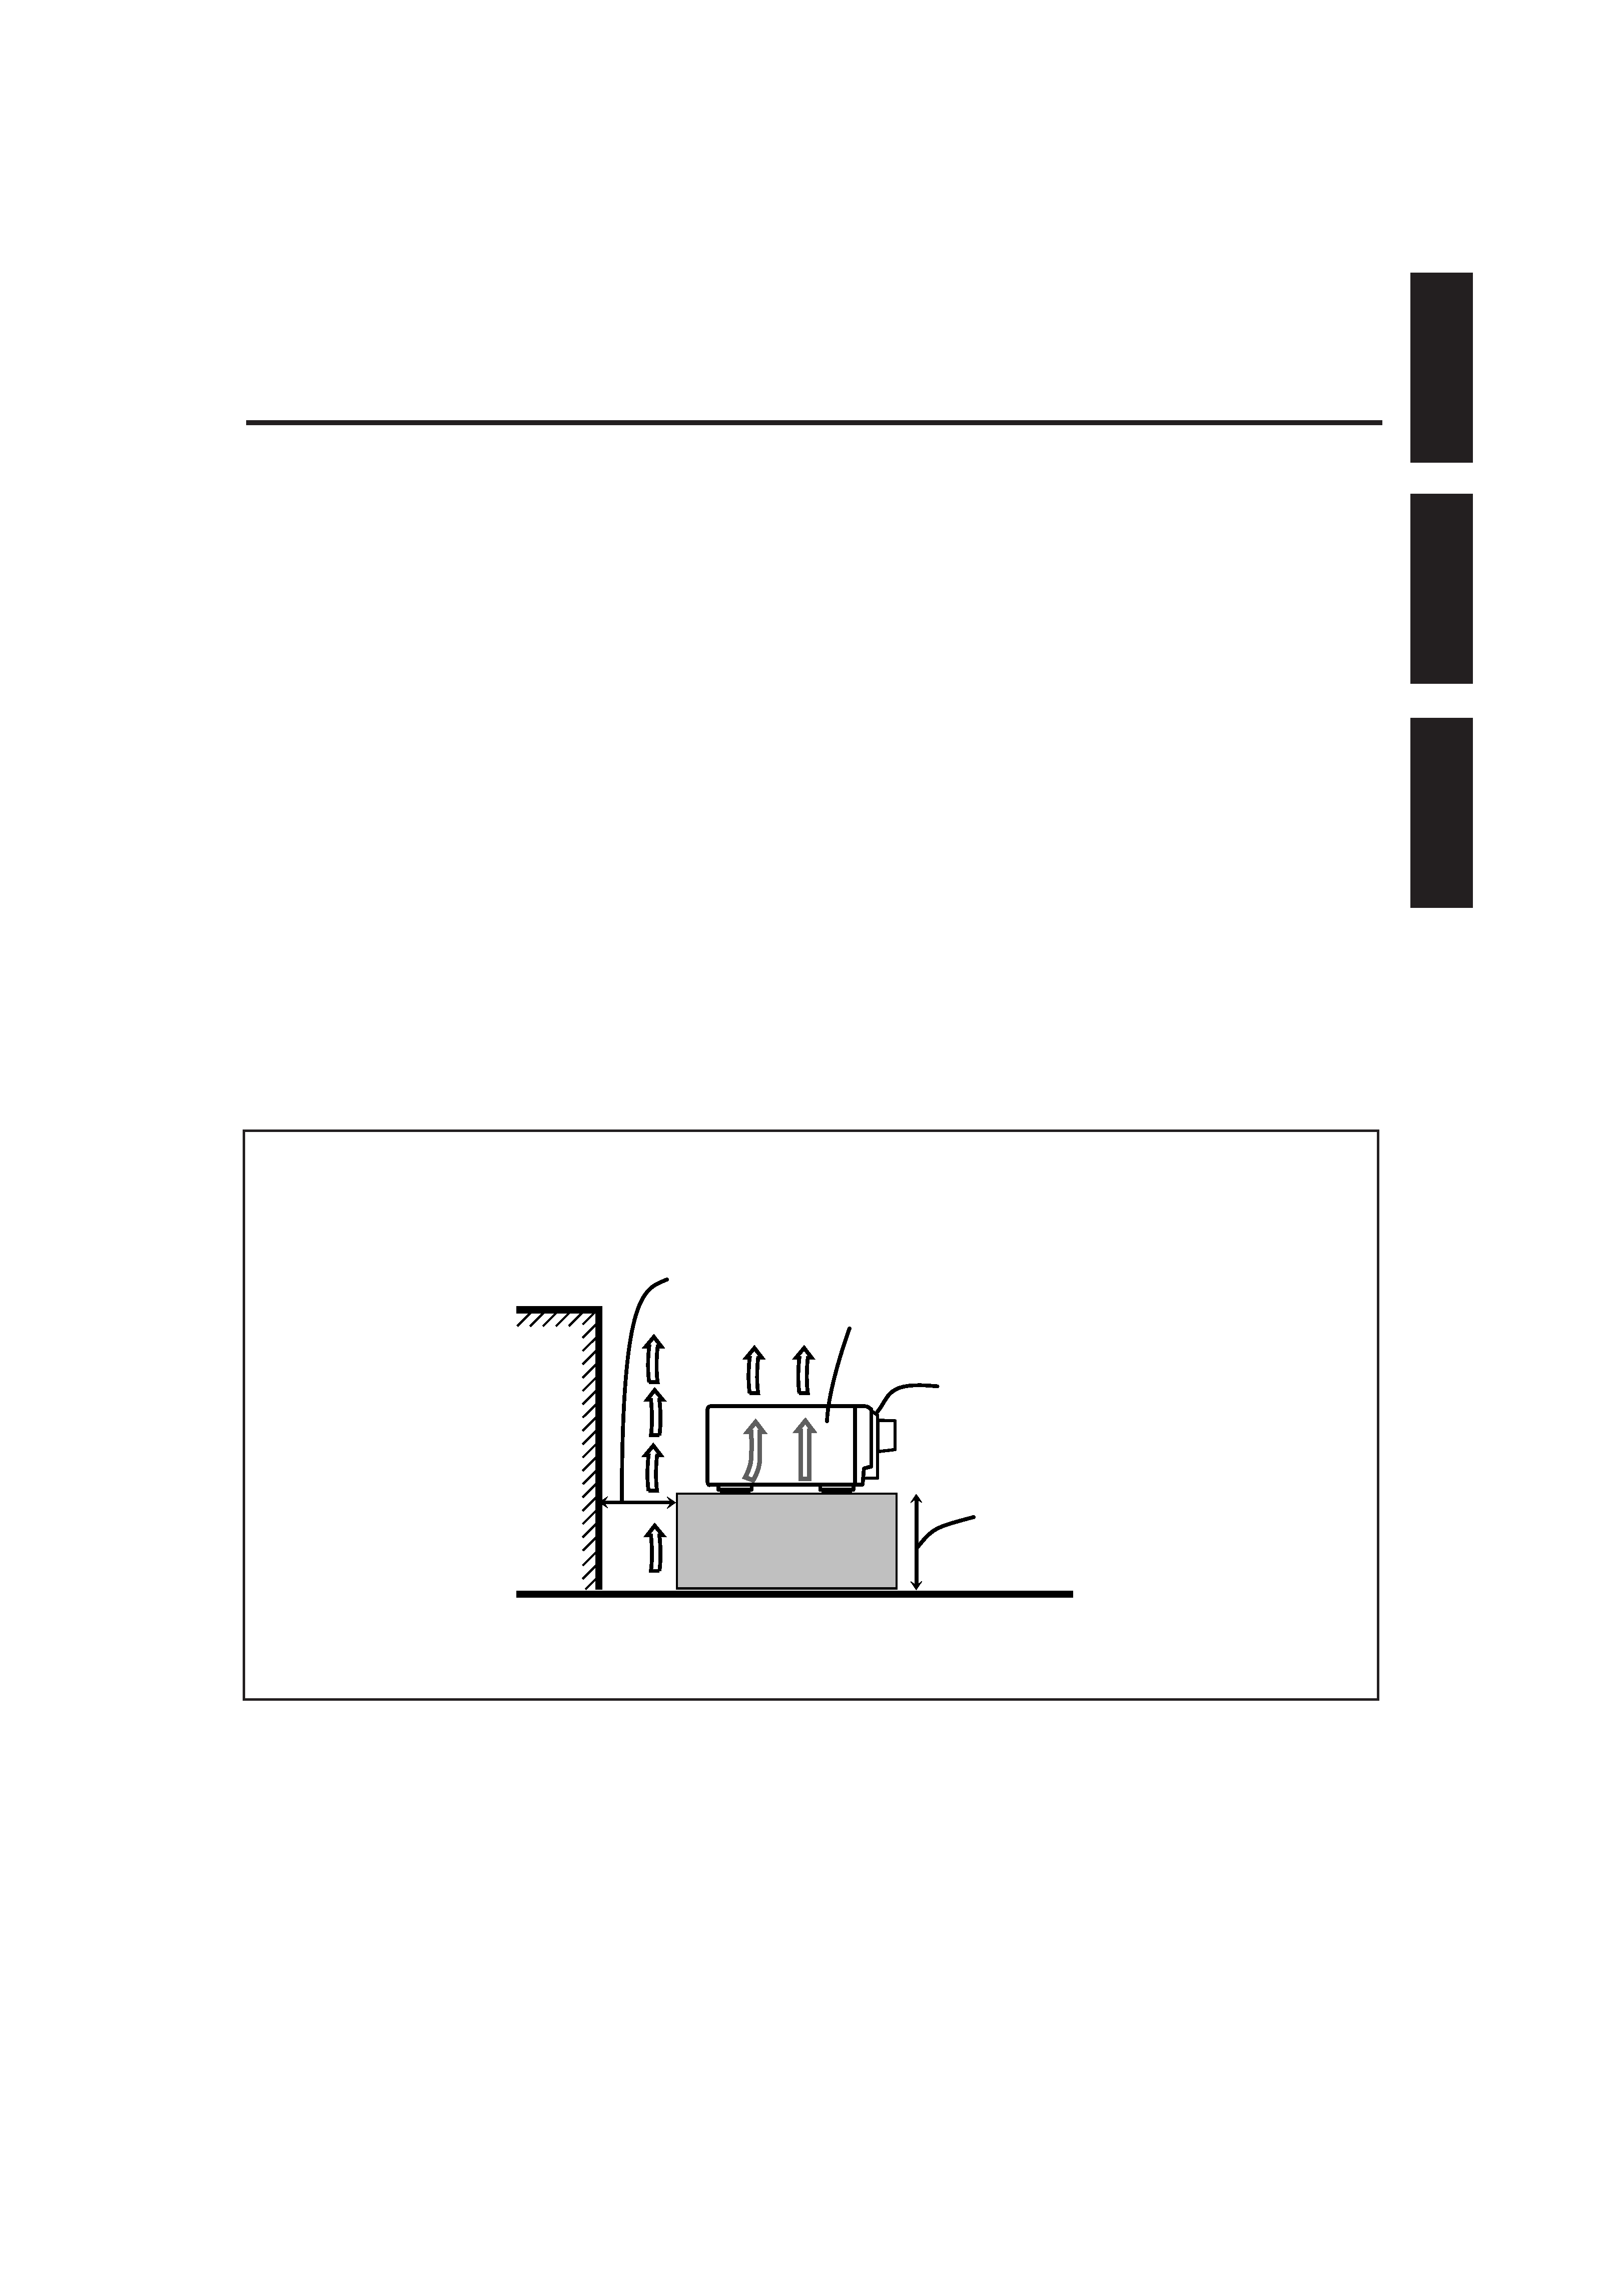
Caution: Proper Ventilation
To avoid risk of electric shock and fire and to protect from damage.
Locate the apparatus as follows:
Front:
No obstructions open spacing.
Sides:
No obstructions in 10 cm from the sides.
Top:
No obstructions in 10 cm from the top.
Back:
No obstructions in 15 cm from the back.
Bottom:
No obstructions, place on the level surface.
In addition, maintain the best possible air circulation as illustrated.
Precaución: Ventilación Adecuada
Para evitar el riesgo de choque eléctrico e incendio y para proteger el
aparato contra daños.
Ubique el aparato de la siguiente manera:
Frente:
Espacio abierto sin obstrucciones
Lados:
10 cm sin obstrucciones a los lados
Parte superior: 10 cm sin obstrucciones en la parte superior
Parte trasera:
15 cm sin obstrucciones en la parte trasera
Fondo:
Sin obstrucciones, colóquelo sobre una superficie
nivelada
Además, mantenga la mejor circulación de aire posible como se
ilustra.
Precaução: ventilação apropriada
Para prevenir o risco de choque elétrico ou incêndio e para proteger o
aparelho contra danos.
Localize-o da seguinte maneira:
Frente:
Espaço aberto, sem obstruções
Lados:
Espaço de 10 cm sem obstruções nos lados
Topo:
Espaço de 10 cm sem obstruções acima
Atrás:
Espaço de 15 cm sem obstruções atrás
Parte inferior:
Sem obstruções. Coloque o aparelho em superfície
nivelada.
Mantenha, além disso, a maior circulação de ar possível, como indica
a ilustração.
Español
Português
Floor
Piso
Piso
Wall or obstructions
Pared u obstrucciones
Parede ou obstáculo
RX-8012VSL
Front
Frente
Frente
Stand height 15 cm or more
Allura del soporte 15 cm o más
Base com altura de 15 cm ou mais
Spacing 15 cm or more
Espacio de 15 cm o más
Espaço de 15 cm ou mais
RX-8012VSL[UW]safety_f
01.2.14, 6:16 PM
2

1
English
Table of Contents
Creating a Surround Field in Your Room ....... 24
7 Surround modes .................................................................... 24
7 DSP modes ........................................................................... 24
Reproducing the Sound Field .................................................... 25
Available DSP Modes According to the Speaker Arrangement .. 26
Adjusting the Surround Modes ................................................ 27
Adjusting the DAP Modes ....................................................... 28
Adjusting the Surround Modes with the DAP Modes .............. 30
Adjusting the 5 CH/4 CH Stereo Mode ................................... 32
Adjusting the 3D-PHONIC Modes .......................................... 33
Using the DVD MULTI Playback Mode .......... 35
Activating the DVD MULTI Playback Mode .......................... 35
Using the On-Screen Menus ........................ 36
7 Showing the MENU on the TV Screen ................................ 36
7 Activating the Surround Modes ............................................ 36
7 Activating the DSP Modes ................................................... 36
7 Selecting the Analog or Digital Input Mode........................... 36
7 Adjusting the Equalization Pattern ....................................... 37
7 Adjusting the Surround and DSP Modes .............................. 37
7 Adjusting the DVD MULTI Playback Mode ........................ 38
7 Listening at Night -- Midnight Mode .................................. 38
7 Attenuating the Input Signal ................................................. 38
7 Selecting the Line Direct Function ....................................... 39
7 Selecting the Bass Boost Function ....................................... 39
7 Activating the Subwoofer Sound .......................................... 39
7 Operating the Tuner .............................................................. 39
7 Storing the Preset Stations .................................................... 39
7 Setting the Basic Setting Items ............................................. 40
COMPU LINK Remote Control System ......... 41
TEXT COMPU LINK Remote Control System .. 42
7 Showing the Disc Information on the TV Screen................. 43
7 Searching for a Disc (Only for the CD player) .................... 44
7 Entering the Disc Information .............................................. 45
AV COMPU LINK Remote Control System .... 47
Operating JVC's Audio/Video Components ... 49
Operating Audio Components .................................................. 49
Operating Video Components .................................................. 51
Operating Other Manufacturers' Video
Equipment ............................................ 52
Troubleshooting ......................................... 55
Specifications ............................................ 57
Parts Identification ...................................... 2
Getting Started ........................................... 3
Before Installation ...................................................................... 3
Checking the Supplied Accessories ........................................... 3
Setting the Voltage Selector Switch ........................................... 3
Connecting the FM and AM Antennas ....................................... 3
Connecting the Speakers ............................................................ 4
Connecting Audio/Video Components ....................................... 5
7 Analog Connections ............................................................... 5
7 Digital Connections ................................................................ 8
7 USB Connection ..................................................................... 9
Connecting the Power Cord ..................................................... 10
Putting Batteries in the Remote Control .................................. 10
Basic Operations ....................................... 11
Turning the Power On and Off (Standby) ................................ 11
Selecting the Source to Play ..................................................... 11
Adjusting the Volume ............................................................... 12
Selecting the Front Speakers .................................................... 13
Muting the Sound ..................................................................... 13
Listening at Night -- Midnight Mode ..................................... 13
Activating the Subwoofer Sound ............................................. 14
Reinforcing the Bass ................................................................ 14
Attenuating the Input Signal .................................................... 14
Selecting the Line Direct Function .......................................... 14
Adjusting the Equalization Patterns ......................................... 15
Using the Sleep Timer .............................................................. 15
Recording a Source .................................................................. 15
Basic Settings ........................................... 16
Adjusting the Front Speaker Output Balance ........................... 16
Changing the Source Name ...................................................... 16
Selecting the Video Input Terminal .......................................... 16
Setting the Subwoofer Information .......................................... 17
Adjusting the Subwoofer Output Level .................................... 17
Setting the Speakers for a Surround Field ................................ 17
Digital Input (DIGITAL IN) Terminal Setting ......................... 19
Selecting the Analog or Digital Input Mode ............................ 20
Showing the Text Information on the Display ......................... 21
Basic Setting and Adjustment -- Auto Memory ...................... 21
Receiving Radio Broadcasts ........................ 22
Setting the AM Tuner Interval Spacing .................................... 22
Tuning in Stations Manually .................................................... 22
Using Preset Tuning ................................................................. 22
Selecting the FM Reception Mode ........................................... 23
EN01_10.RX-8012V[UW]_f
01.2.14, 11:51 AM
1
2
English
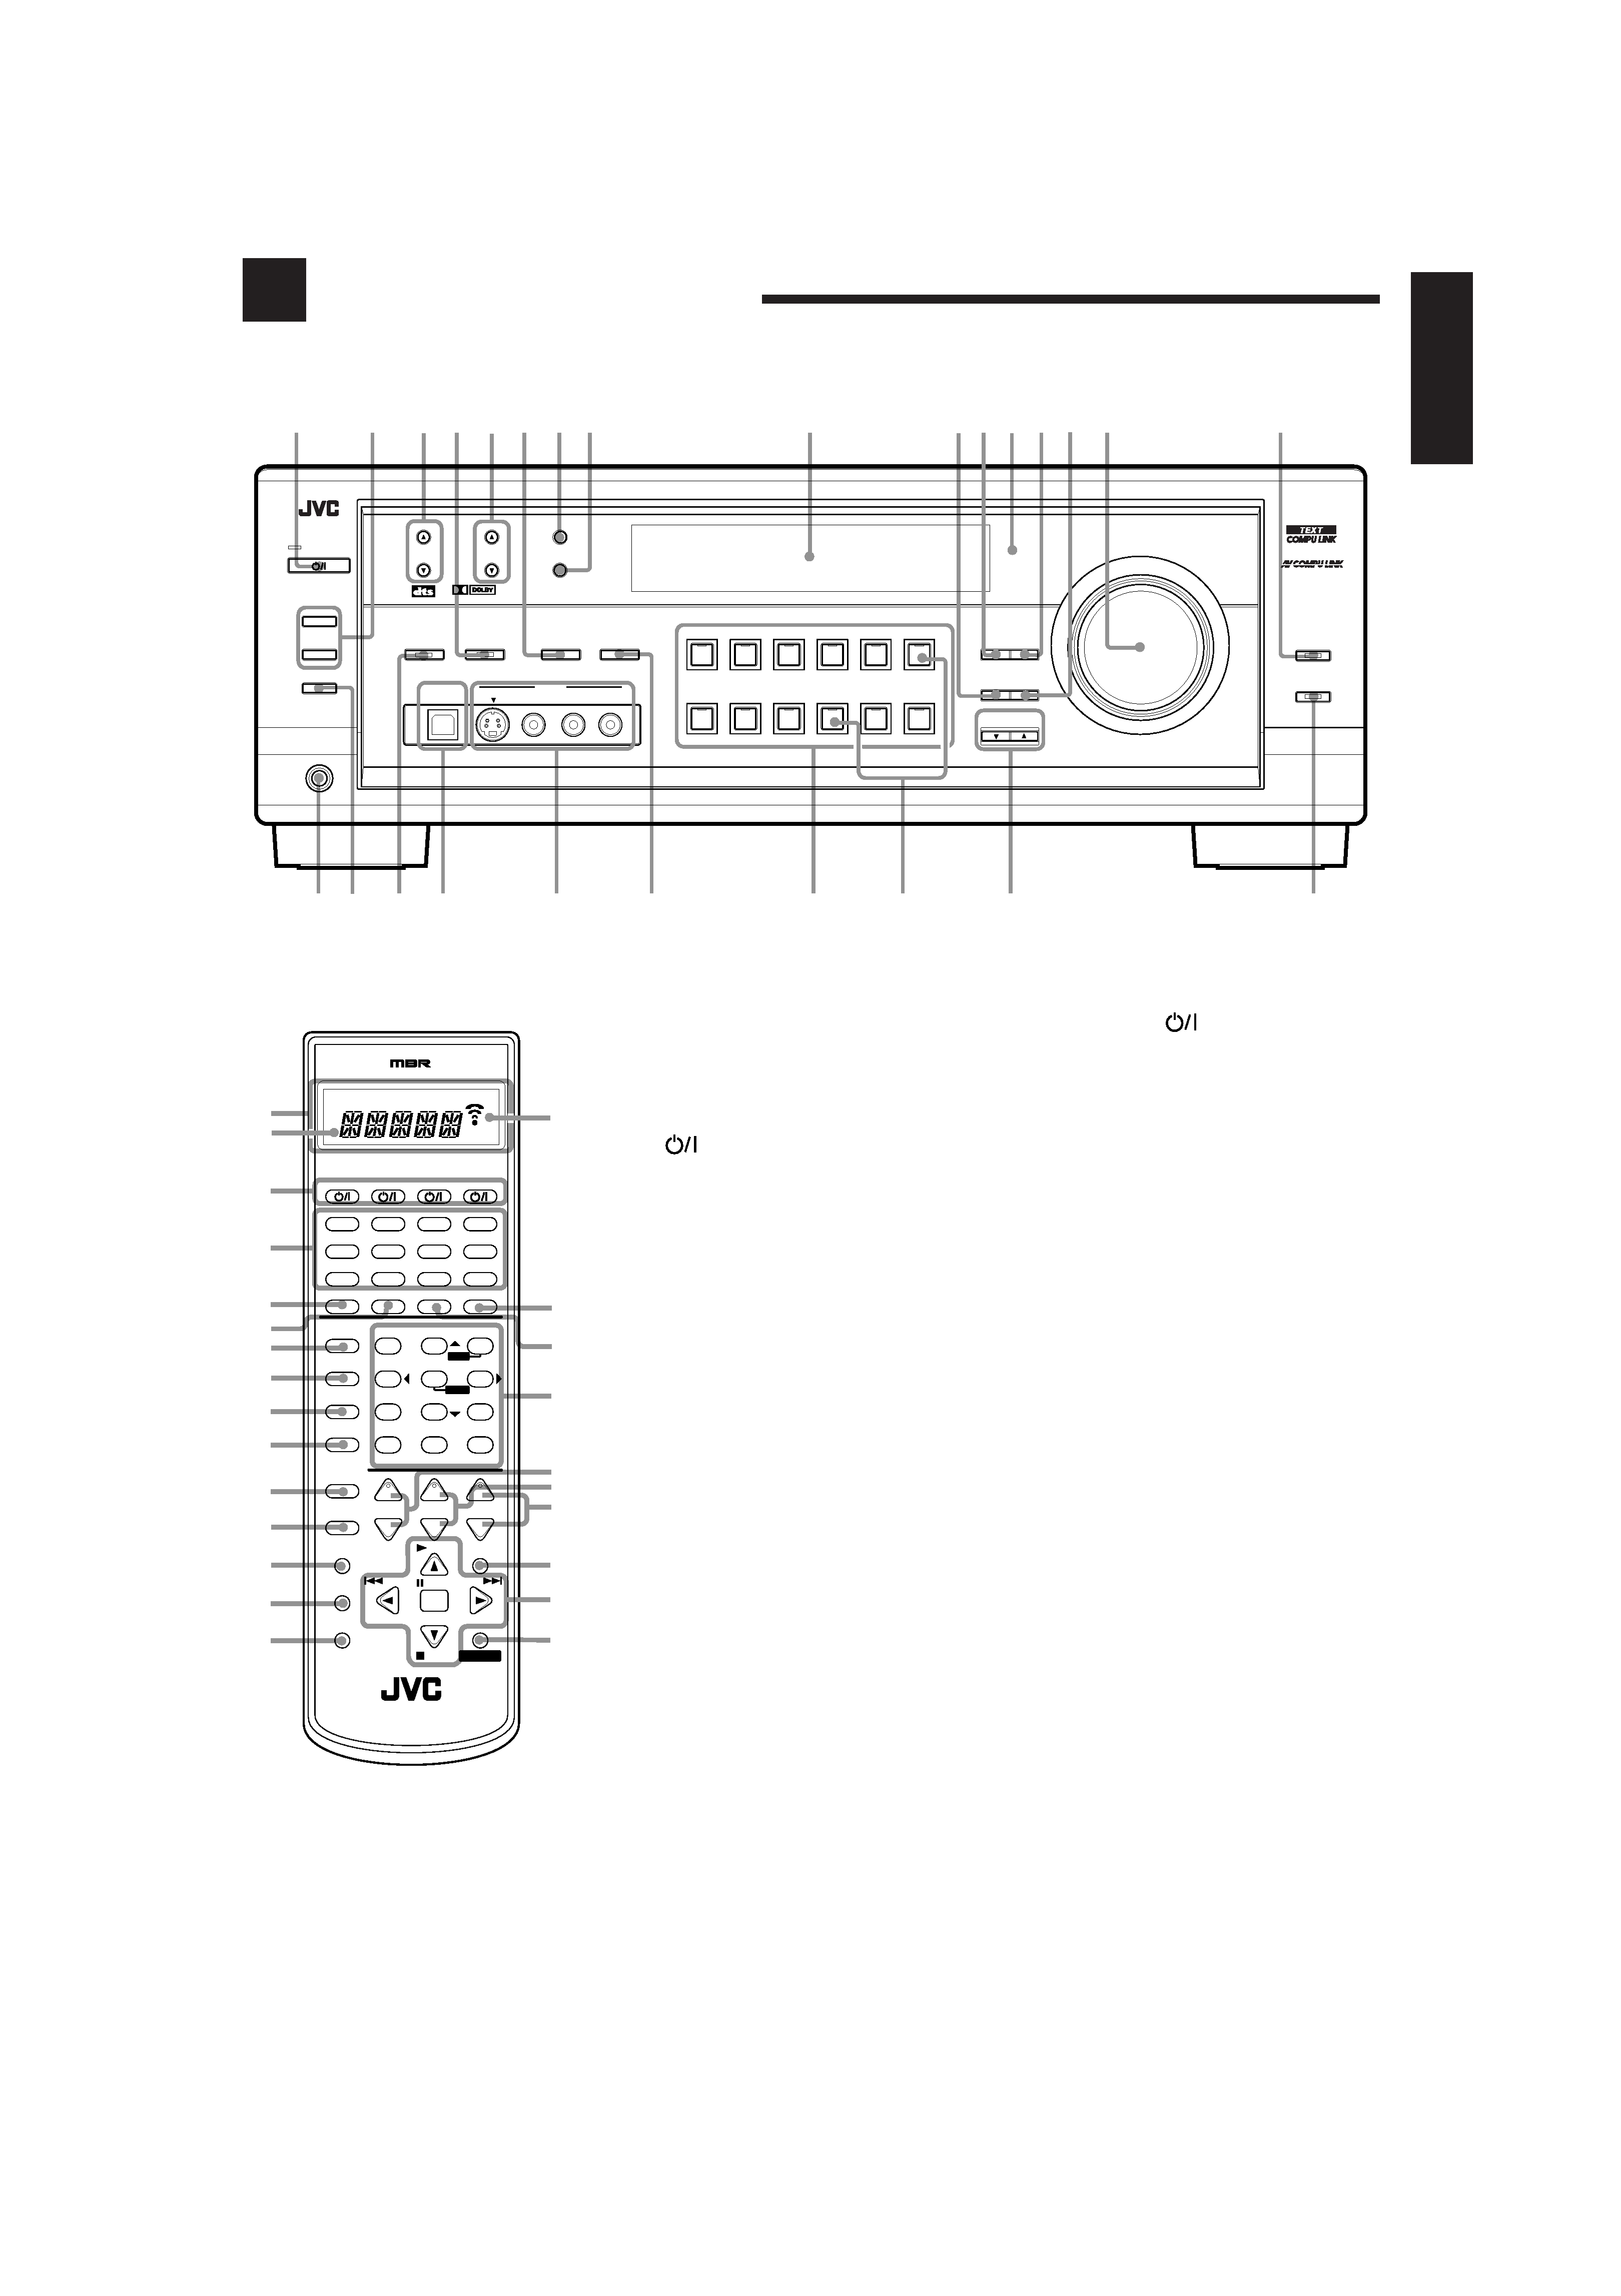
Parts Identification
Become familiar with the buttons and controls on the receiver before use.
Refer to the pages in parentheses for details.
CONTROL
+
-
+
-
+
-
23
1
56
4
89
7/P
0
+10
10
LINEDIF.ECT
BOOST
EFFECT
MENU
ENTER
SIZE
ROOM
BASS
MODE
TEST
CTRTONE
LIVENESS
MIDNIGHT
SOUND
SUBWFR
DIGITALEQ REARL REARR
L/RBAL CENTER
MUTING
CH/
LEVEL TVVOL
PLAY
STOP
/REW
DOWN TUNING UP
FF/
EXIT
BALL
BALR
VOLUME
CATV/DBS
CONTROL
TV/VIDEO
MENU
TEXT
REC
DISPLAY
PAUSE
PAUSE
SET
RETURN
FMMODE
100+
CONTROL
A/V CONTROL RECEIVER
CATV/DBS
VCR 1
TV
AUDIO
DSP
MODE
INPUT
ON/OFF
DVD MUILTI
DVD
USB
CD
CDR
TAPE/MD
TV/DBS
VIDEO
PHONO
FM/AM
VCR 1
VCR 2
SURROUND
ANALOG/DIGITAL SLEEP
POWER
5
6
7
8
9
&
^
%
$
#
@
!
=
-
1
4
3
)
*
(
0
2
~
b
a
RM-SRX8012U
Front Panel
1 STANDBY/ON
button and STANDBY
lamp (11, 22)
2 · SPEAKERS ON/OFF 1 button (13)
· SPEAKERS ON/OFF 2 button (13)
3 FM/AM TUNING
5/ buttons (22)
4 DSP MODE button and lamp (26, 28 33)
5 FM/AM PRESET
5/ buttons (22, 23)
6 · INPUT ANALOG/DIGITAL button (20)
· INPUT ATT button (14)
7 FM MODE button (23)
8 MEMORY button (22)
9 Display (11)
p EFFECT button (28 33)
q DIGITAL EQ button (15)
w Remote sensor (10)
e LEVEL ADJUST button (16, 17, 28 35)
r SETTING button (16 19, 21)
t MASTER VOLUME control (12)
y LINE DIRECT button and lamp (14)
u PHONES jack (13)
i SUBWOOFER OUT ON/OFF button (14)
o SURROUND ON/OFF button and lamp (26, 28,
31)
; USB AUDIO terminal (9)
a VIDEO input terminals (7)
s MIDNIGHT MODE button (13)
d Source selecting buttons and lamps (11)
DVD MULTI, DVD, VCR 1, VCR 2, VIDEO, TV
SOUND/DBS, PHONO, CD, CDR, TAPE/MD,
USB AUDIO, FM/AM
f SOURCE NAME buttons (16)
g CONTROL UP
5/DOWN buttons
h BASS BOOST button and lamp (14)
* These buttons function only after pressing
10 keys on the remote control which are
marked with an asterisk (*).
a
;
o
u
2
1
34 5
78
9
pq we r ty
i
s
d
g
6
h
f
CONTROL
DOWN
UP
EFFECT SETTING
DIGITAL
EQ
TV SOUND/DBS
VIDEO
VCR 2
VCR 1
DVD
DVD MULTI
MIDNIGHT MODE
DSP MODE
S-VIDEO
VIDEO
VIDEO
L--AUDIO--R
SURROUND ON/OFF
SUBWOOFER OUT ON/OFF
SPEAKERS ON/OFF
FM/AM TUNING
FM/AM PRESET
FM MODE
MEMORY
2
PHONES
STANDBY
USB AUDIO
INPUT
ANALOG/DIGITAL
INPUT ATT
FM / AM
USB AUDIO
TAPE / MD
CDR
CD
PHONO
LEVEL
ADJUST
RX-8012V
AUDIO/VIDEO CONTROL RECEIVER
LINE DIRECT
BASS BOOST
MASTER VOLUME
DIGITAL
SURROUND
DIGITAL
1
SOURCE NAME
SOURCE NAME
STANDBY/ON
Remote Control
1 Display window (11)
a. Remote control operation mode indicator
b. Signal transmission indicator
Lights up when transmitting the remote
control signal.
2
buttons (11, 51 54)
CATV/DBS, VCR 1, TV, AUDIO
3 Source selecting buttons (11)
DVD,DVDMULTI,CD,FM/AM,TV/DBS,VIDEO,
CDR, PHONO, VCR 1,VCR 2, TAPE/MD, USB
4 SURROUND ON/OFF button (26, 27, 30)
5 DSP MODE button (26, 29 33)
6 LINE DIRECT button (14)
7 MIDNIGHT MODE button (13)
8 SOUND button (14 17, 27 35, 49)
9 MUTING button (13)
0 CATV/DBS CONTROL button (53)
- TV/VIDEO button (51, 52)
= MENU button (36 40)
~ TEXT DISPLAY button (43 46)
! REC PAUSE button (50, 51, 53)
@ SLEEP button (15)
# ANALOG/DIGITAL INPUT button (20)
$ · 10 keys for selecting preset channels (23)
· 10 keys for adjusting sound (14 17, 27 35,
49)
· 10 keys for operating audio/video components
(49 54 )
% · LEVEL +/ buttons* (15, 17, 27 35)
· BAL L and BAL R buttons* (16)
· CH +/ buttons (51 53)
^ TV VOL +/ buttons (51, 52)
& VOLUME +/ buttons (12)
* EXIT button (36 40, 43 45)
( · TUNING UP
3/DOWN 2 buttons (22, 49)
· On screen operation buttons (36 40, 43 46)
· Operating buttons for audio/video components
(49 54)
) CONTROL button (50, 51)
EN01_10.RX-8012V[UW]_f
01.2.14, 11:51 AM
2