For Customer Use:
Enter below the Model No. and Serial
No. which are located either on the rear,
bottom or side of the cabinet. Retain this
information for future reference.
Model No.
Serial No.
LVT1007-010A[A]
MASTER VOLUME
PUSH OPEN
SUBWOOFER OUT ON/OFF
SPEAKERS ON/OFF
PHONES
1
STANDBY
RX-7032V
AUDIO/VIDEO CONTROL RECEIVER
BASS BOOST
ANALOG DIRECT
2
STANDBY/ON
TV SOUND/DBS
VCR
DVD
DVD MULTI
AM
FM
TAPE/CDR
CD
SETTING
ADJUST
QUICK SPEAKER
SETUP
EXIT
SURROUND
DSP
SURROUND/ DSP
OFF
+
-
+
-
+
-
23
1
56
4
89
7/P
0
+10
FRONT·L
MENU
ENTER
FRONT·R
TEST
CDDISC
MIDNIGHT
CENTERSUBWOOFER
DIGITALEQ SURR BACK
SURR·L SURR·R
SOUND
CH/
LEVEL TVVOL
/REW
DOWN
TUNING
UP
FF/
MUTING
DIMMER
VOLUME
CATV/DBS
CONTROL
TAPE/CDR
CONTROL
VCR
CONTROL
TV/VIDEO
REC PAUSE
SLEEP
RETURN
FMMODE
100+
REMOTE CONTROL
RM-SRX7032U
CATV/DBS
VCR
TV
AUDIO
DSP
OFF
DVD MULTI
CD
ANALOG/DIGITAL
BASS BOOST
TAPE/CDR
FM/AM
TV/DBS
VCR
SURROUND
EX/ES
SURR/DSP
A/V CONTROL RECEIVER
INPUT
MODE
DIRECT
ANALOG
DVD
10/0
INSTRUCTIONS
AUDIO/VIDEO CONTROL RECEIVER
RX-7032VSL
COVER_7032[A]3.pm6
03.5.12, 7:03 PM
1
G-1
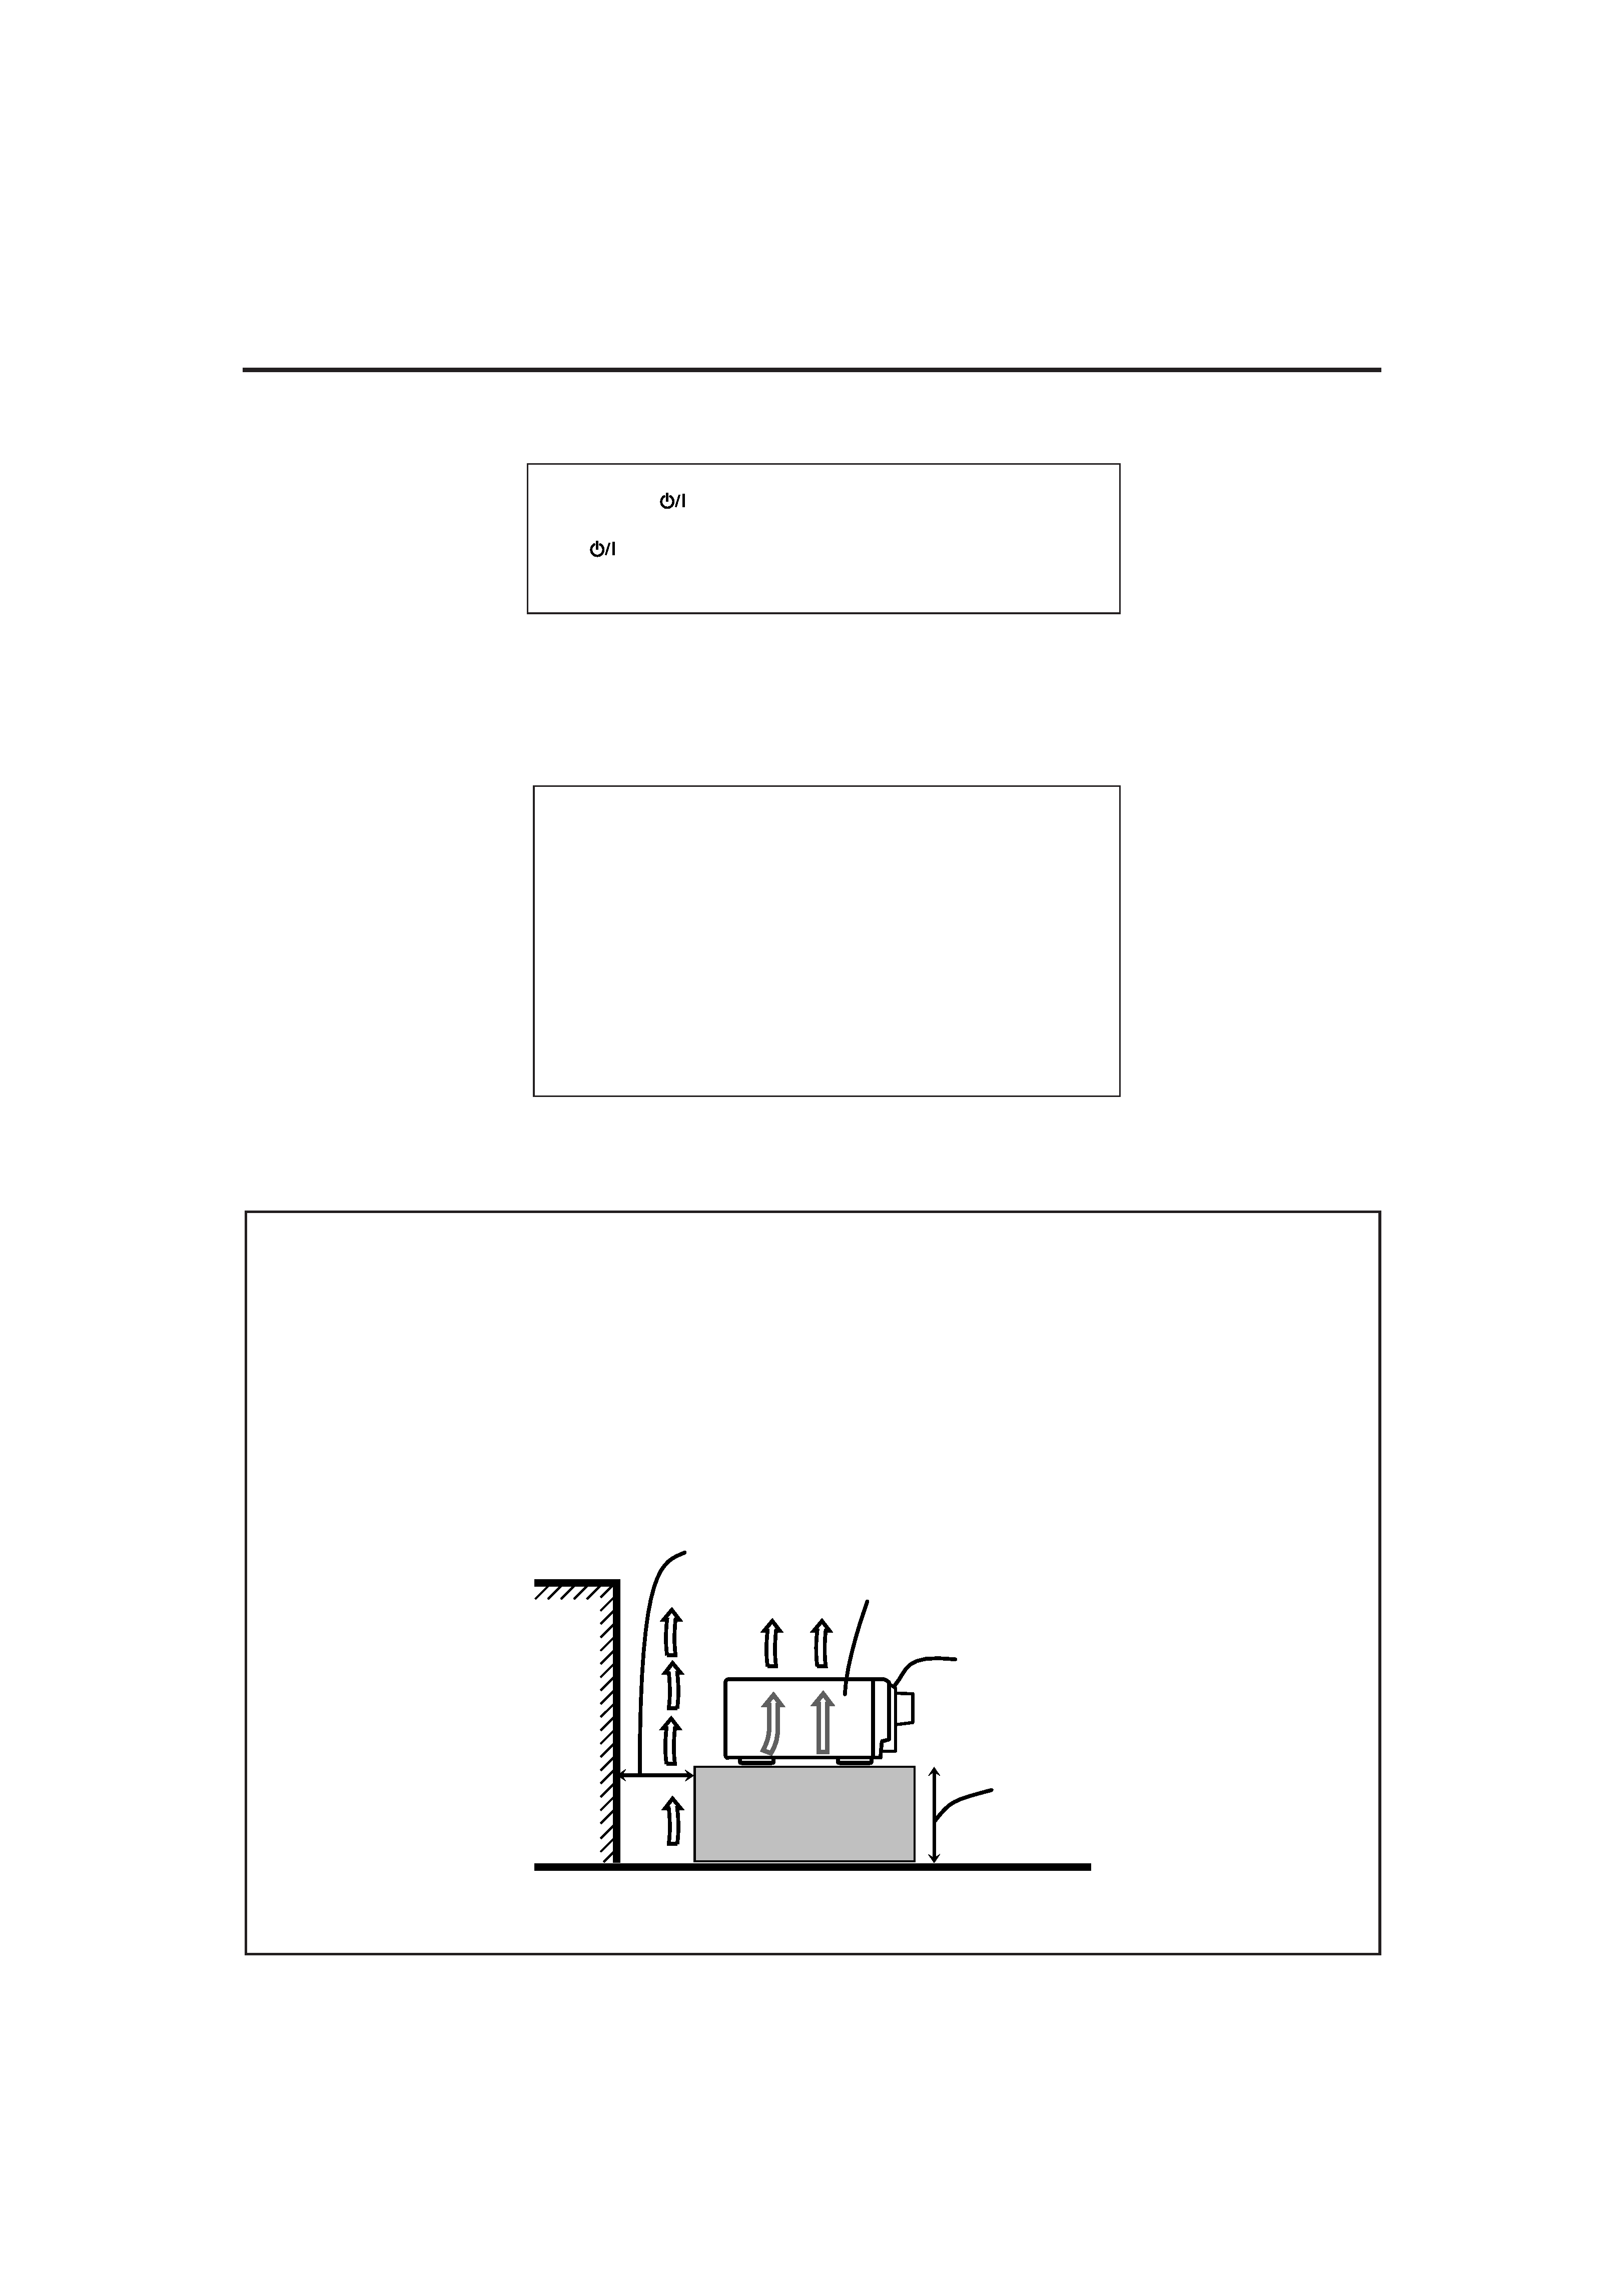
Caution
STANDBY/ON switch!
Disconnect the mains plug to shut the power off completely.
The
STANDBY/ON switch in any position does not discon-
nect the mains line. The power can be remote controlled.
Warnings, Cautions and Others
CAUTION
·
Do not block the ventilation openings or holes.
(If the ventilation openings or holes are blocked by a newspa-
per or cloth, etc., the heat may not be able to get out.)
·
Do not place any naked flame sources, such as lighted
candles, on the apparatus.
·
When discarding batteries, environmental problems must be
considered and local rules or laws governing the disposal of
these batteries must be followed strictly.
·
Do not expose this apparatus to rain, moisture, dripping or
splashing and that no objects filled with liquids, such as
vases, shall be placed on the apparatus.
CAUTION
To reduce the risk of electrical shocks, fire, etc.:
1.
Do not remove screws, covers or cabinet.
2.
Do not expose this appliance to rain or moisture.
Caution: Proper Ventilation
To avoid risk of electric shock and fire and to protect from damage.
Locate the apparatus as follows:
Front:
No obstructions open spacing.
Sides:
No obstructions in 10 cm from the sides.
Top:
No obstructions in 10 cm from the top.
Back:
No obstructions in 15 cm from the back.
Bottom:
No obstructions, place on the level surface.
In addition, maintain the best possible air circulation as illustrated.
Wall or obstructions
Front
Stand height 15 cm or more
RX-7032VSL
Spacing 15 cm or more
Floor
Safety_7032[A]3.pm6
03.5.12, 7:02 PM
1

1
Table of Contents
Adjusting Sound ........................................ 29
Basic Setting Items ................................................................... 29
Basic Procedure ........................................................................ 29
Adjusting the Equalization Patterns ................................... 30
Adjusting the Speaker Output Levels ................................ 30
Adjusting the Sound Parameters for the
Surround and DSP modes ............................................ 31
Using the Surround Modes .......................... 32
Reproducing Theater Ambience ................................................ 32
Introducing the Surround Modes ............................................. 32
Surround Modes Applicable to the Various Software .............. 34
Activating the Surround Modes ............................................... 35
7 Activating the EX/ES setting ................................................ 35
7 Activating the Surround Modes ............................................ 35
Using the DSP Modes ................................ 36
Reproducing the Sound Field ................................................... 36
Introducing the DSP Modes ..................................................... 36
Activating the DSP Modes ....................................................... 37
Using the DVD MULTI Playback Mode .......... 38
Activating the DVD MULTI Playback Mode .......................... 38
COMPU LINK Remote Control System ......... 39
AV COMPU LINK Remote Control System .... 40
Operating JVC's Audio/Video Components ... 42
Operating Audio Components .................................................. 42
Operating Video Components .................................................. 44
Operating Other Manufacturers' Video
Equipment ............................................ 45
Troubleshooting ......................................... 49
Specifications ............................................ 50
Introduction ................................................ 2
Parts Identification ...................................... 3
Remote Control .......................................................................... 3
Front Panel ................................................................................. 4
Rear Panel .................................................................................. 6
Getting Started ........................................... 7
Before Installation ...................................................................... 7
Checking the Supplied Accessories ........................................... 7
Putting Batteries in the Remote Control .................................... 7
Connecting the FM and AM Antennas ....................................... 8
Connecting the Speakers ............................................................ 9
Connecting Audio/Video Components ..................................... 11
7 Analog Connections ............................................................. 11
7 Digital Connections .............................................................. 14
Connecting the Power Cord ..................................................... 14
Basic Operations ....................................... 15
Daily Operational Procedure .................................................... 15
Turning On the Power .............................................................. 15
Selecting the Source to Play ..................................................... 15
Adjusting the Volume ............................................................... 16
Selecting the Front Speakers .................................................... 17
Activating and Adjusting the Subwoofer Sound ...................... 17
Selecting the Analog or Digital Input Mode ............................ 17
Setting the Dynamic Range ...................................................... 18
Attenuating the Input Signal .................................................... 18
Turning Analog Direct On and Off .......................................... 19
Changing the Source Name ...................................................... 19
Reinforcing the Bass ................................................................ 20
Muting the Sound ..................................................................... 20
Changing the Display Brightness ............................................. 20
Using the Sleep Timer .............................................................. 20
Receiving Radio Broadcasts ........................ 21
Tuning in to Stations Manually ................................................ 21
Using Preset Tuning ................................................................. 21
Selecting the FM Reception Mode ........................................... 22
Basic Settings ........................................... 23
Setting the Speakers Configuration .......................................... 23
Basic Setting Items ................................................................... 24
Basic Procedure ........................................................................ 25
Setting the Speakers ........................................................... 25
Setting the Speaker Distance ............................................. 26
Setting the Bass Sounds ..................................................... 27
Selecting main or sub channel--DUAL MONO ............... 27
Setting the Digital Input Terminals .................................... 28
Setting the Component Video Input ................................... 28
Memorizing the Volume Level for Each Source ................ 28
This mark indicates that ONLY the remote control
CAN be used for the operation explained.
Remote
NOT
This mark indicates that the remote control
CANNOT be used for the operation explained.
Use the buttons on the front panel.
01-14_7032[A]3.pm6
03.5.12, 7:02 PM
1

2
Introduction
We would like to thank you for purchasing one of our JVC products.
Before operating this unit, read this manual carefully and thoroughly to obtain the best possible performance
from your unit, and retain this manual for future reference.
Precautions
Power sources
· When unplugging the receiver from the wall outlet, always pull
the plug, not the AC power cord.
· Do not handle the AC power cord with wet hands.
· If you are not going to operate the receiver for an extended period
of time, unplug the AC power cord from the wall outlet.
Ventilation
High power amplifiers built in this receiver will generate heat inside
the cabinet. For safety, observe the following carefully.
· Make sure there is good ventilation around the receiver. Poor
ventilation could overheat and damage the receiver.
· Do not block the ventilation openings or holes. (If the ventilation
openings or holes are blocked by a newspaper or cloth, etc., the
heat may not be able to get out.)
Others
· Should any metallic object or liquid fall onto the unit, unplug the
unit and consult your dealer before operating any further.
· Do not expose this apparatus to rain, moisture, dripping or
splashing and that no objects filled with liquids, such as vases
shall be placed on the apparatus.
· Do not disassemble the unit since there are no user serviceable
parts inside.
If anything goes wrong, unplug the AC power cord and consult your
JVC dealer.
Features
Compatible with various audio formats including
DTS 96/24
RX-7032VSL allows you to enjoy a newly introduced audio
format such as Dolby Digital EX, Dolby Pro Logic II, DTS-ES,
DTS Neo:6, and DTS 96/24.
· This unit is also compatible with Dual Mono signals recorded in
Dolby Digital and DTS discs.
DAP (Digital Acoustic Processor)
Sound field simulation technology allows precise ambience
recreation of existing theaters and halls. Thanks to the high-
performance DSP (Digital Signal Processor) and high-capacity
memory, you can enjoy multi-channel surround sound by playing
2-channel or multi-channel software according to the speaker
setting.
Multi-channel headphone virtual surround
sound--3D HEADPHONE Mode
The built-in headphone virtual surround system is compatible with
Multi-channel software like Dolby Digital, DTS Surround, etc.
Thanks to the new signal processing algorithms used by the high-
performance DSP, you can enjoy a natural surround sound through
the headphones.
COMPU LINK remote control system
The COMPU LINK remote control system allows you to operate
other JVC audio/video components from this receiver.
01-14_7032[A]3.pm6
03.5.12, 7:02 PM
2
3
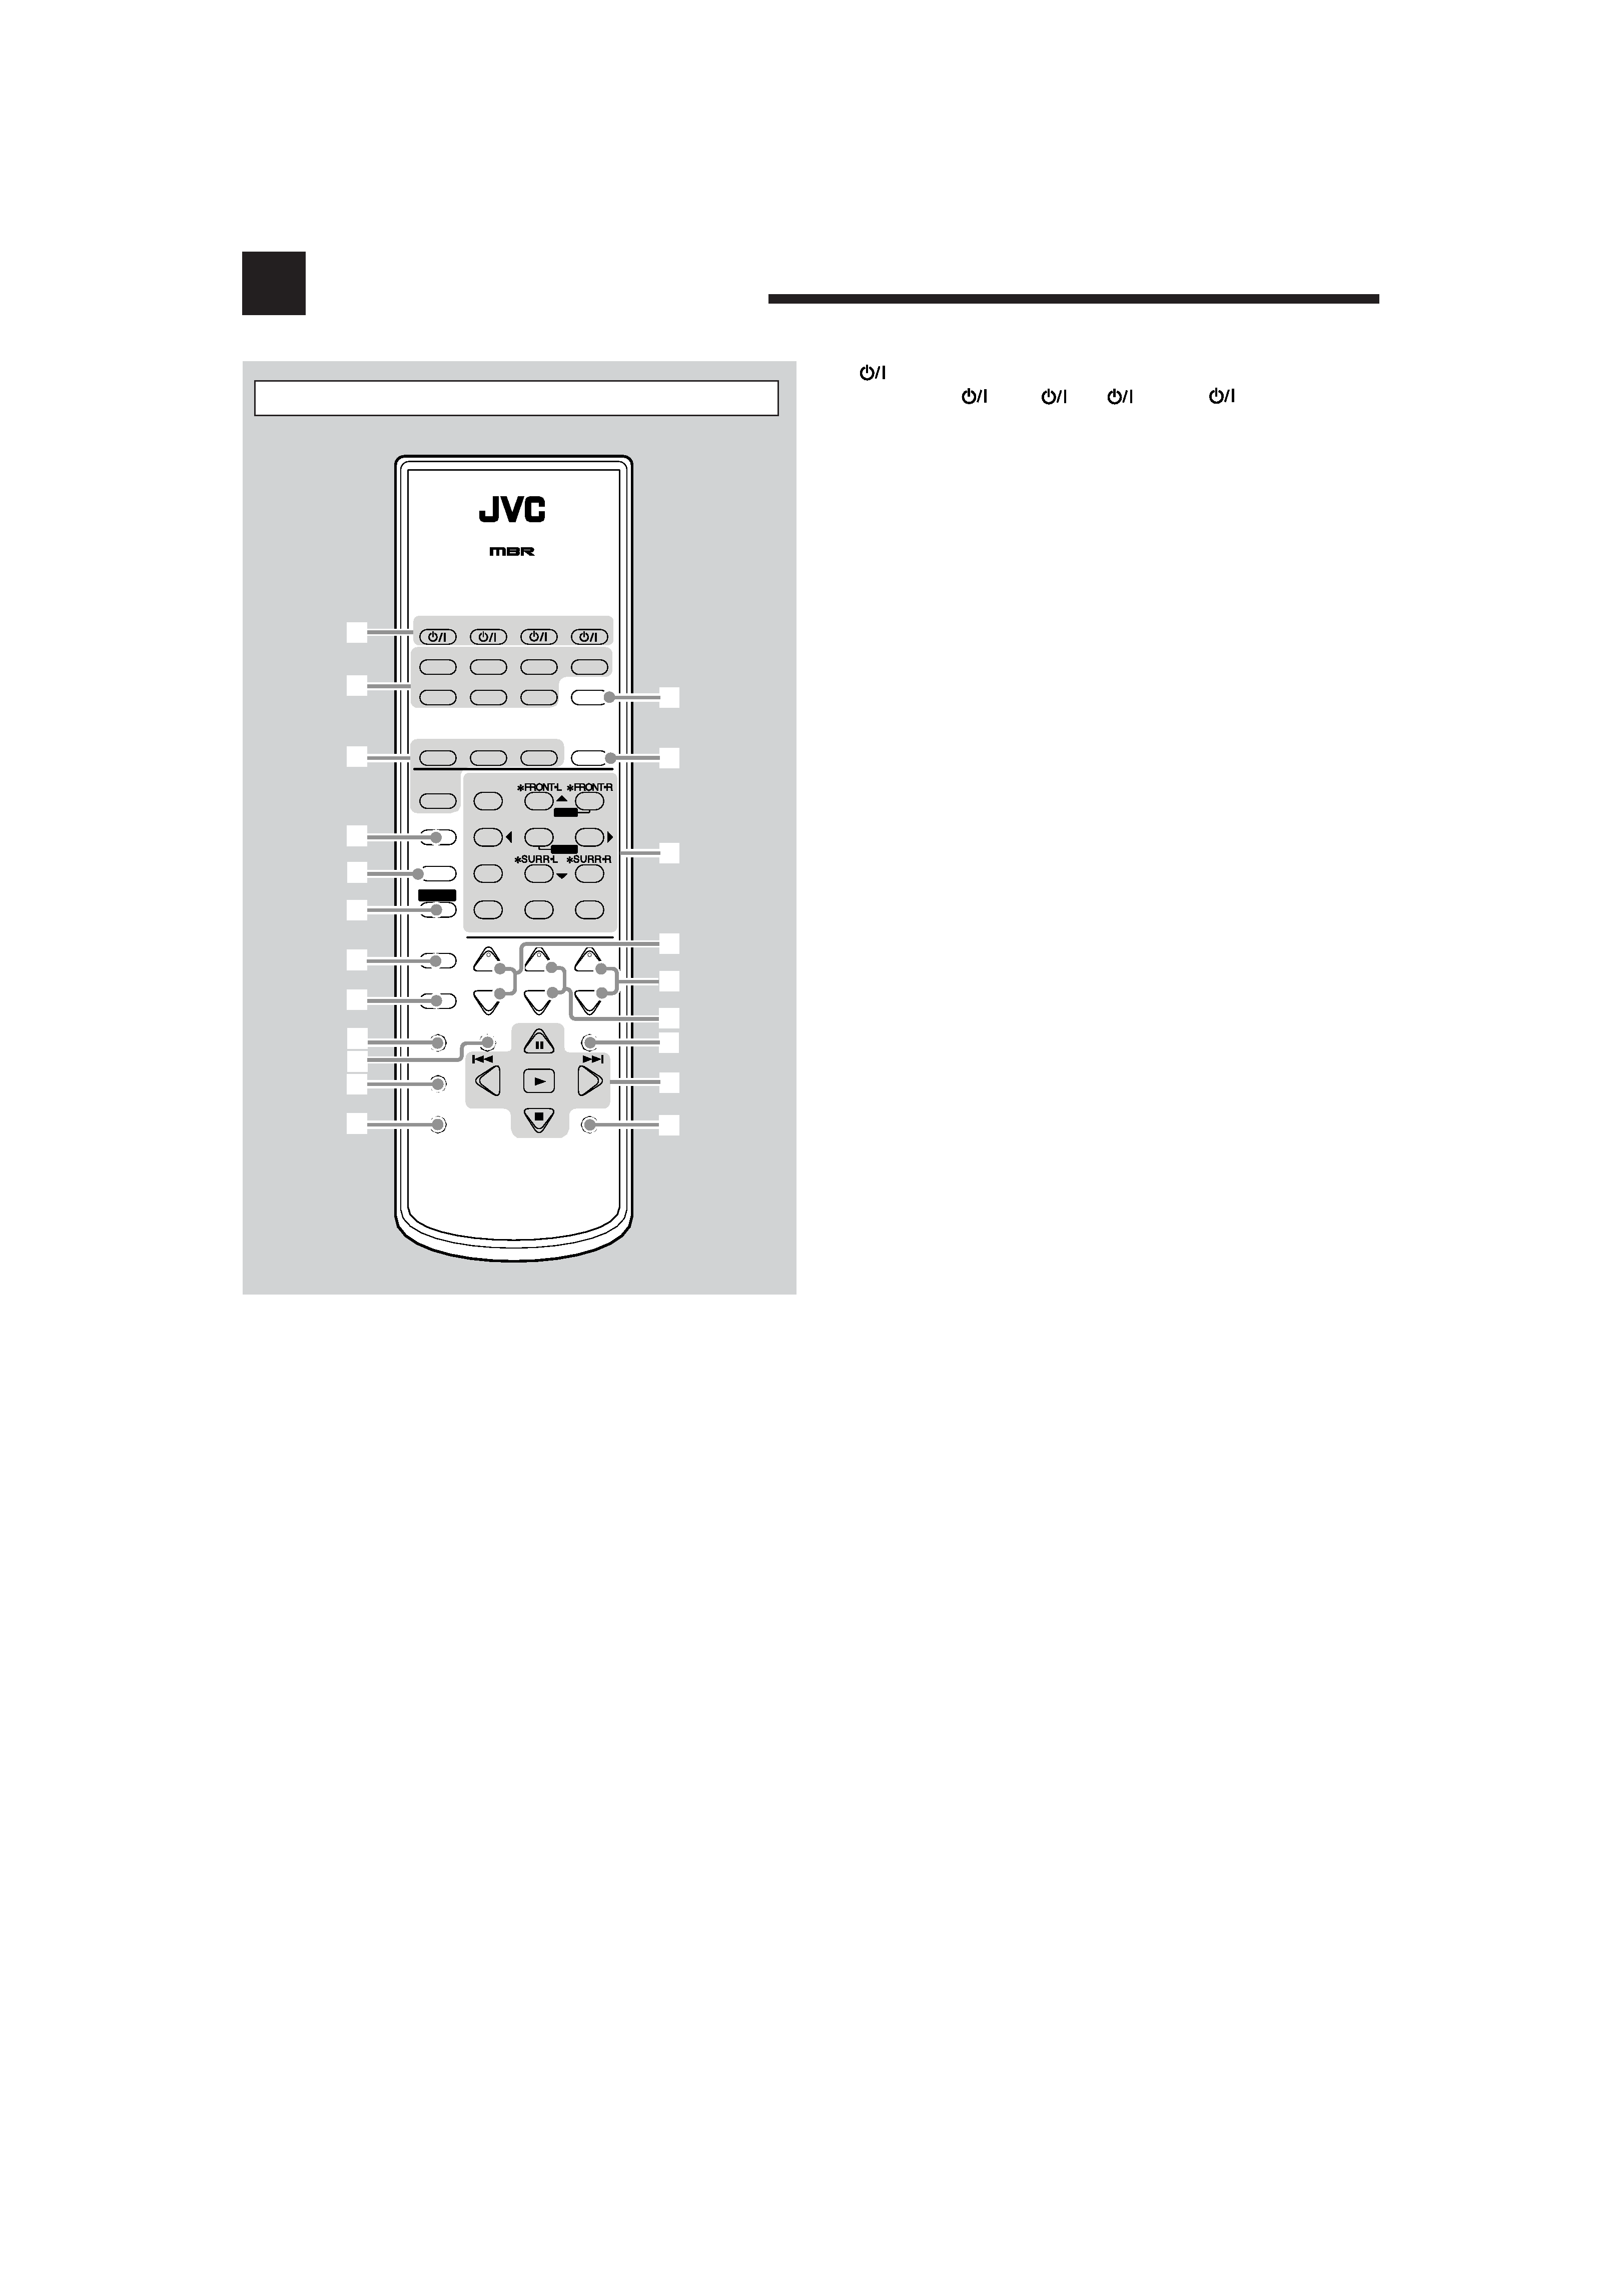
Parts Identification
1
buttons (15, 44 48)
CATV/DBS
, VCR
, TV
, AUDIO
2 Source selection buttons (15, 16, 17, 21, 22, 35, 38)
DVD MULTI, DVD, CD*, FM/AM*, TV/DBS, VCR,
TAPE/CDR*
* When you press one on these source selection buttons on the
remote control, the receiver automatically turns on.
3 · SURROUND button (35)
· DSP button (37)
· SURR (surround)/DSP OFF button (35, 37)
· EX/ES button (35)
4 CD DISC button (43)
5 MIDNIGHT MODE button (18)
6 SOUND button (20, 30, 31)
7 CATV/DBS CONTROL button (46)
8 TV/VIDEO button (44, 45)
9 VCR CONTROL button (44)
p TAPE/CDR CONTROL button (43)
q REC PAUSE button (43, 44, 47)
w SLEEP button (20)
e ANALOG/DIGITAL INPUT button (18)
r ANALOG DIRECT button (19)
t · 10 keys for operating the tuner (22)
· 10 keys for adjusting sound (30, 31)
· 10 keys for operating audio/video components (42 48)
y · CH (channel) +/ buttons (44 47)
· *LEVEL +/ buttons (30, 31, 42)
The LEVEL +/ buttons function only after pressing SOUND
then 10 keys which are marked with an asterisk (*) on the
remote control.
u VOLUME +/ buttons (16)
i TV VOL (volume) +/ buttons (44, 45)
o MUTING button (20)
; · TUNING UP/DOWN buttons (21)
· Operating buttons for audio/video components
(42 44, 47, 48)
3, 8, 7, 4/REW, FF/¢
a DIMMER button (20)
Remote Control
+
-
+
-
+
-
23
1
56
4
89
7/P
0
+10
MENU
ENTER
TEST
CDDISC
CENTERSUBWOOFER
DIGITALEQ SURR BACK
CH/
LEVEL TVVOL
/REW
DOWN TUNING UP
FF/
MUTING
DIMMER
VOLUME
CATV/DBS
CONTROL
VCR
CONTROL
TAPE/CDR
CONTROL
TV/VIDEO
REC PAUSE
SLEEP
RETURN
FMMODE
100+
REMOTE CONTROL
RM-SRX7032U
CATV/DBS
VCR
TV
AUDIO
DSP
OFF
DVD MULTI
CD
TAPE/CDR ANALOG/DIGITAL
FM/AM
TV/DBS
VCR
SURROUND
EX/ES
SURR/DSP
A/V CONTROL RECEIVER
INPUT
MIDNIGHT
MODE
DIRECT
ANALOG
DVD
u
t
;
10/0
SOUND
7
o
r
e
p
BASS BOOST
i
y
a
w
q
9
8
6
5
4
2
1
3
01-14_7032[A]3.pm6
03.5.12, 7:02 PM
3