For Customer Use:
Enter below the Model No. and Serial
No. which are located either on the rear,
bottom or side of the cabinet. Retain this
information for future reference.
Model No.
Serial No.
GVT0057-001A
[J,C]
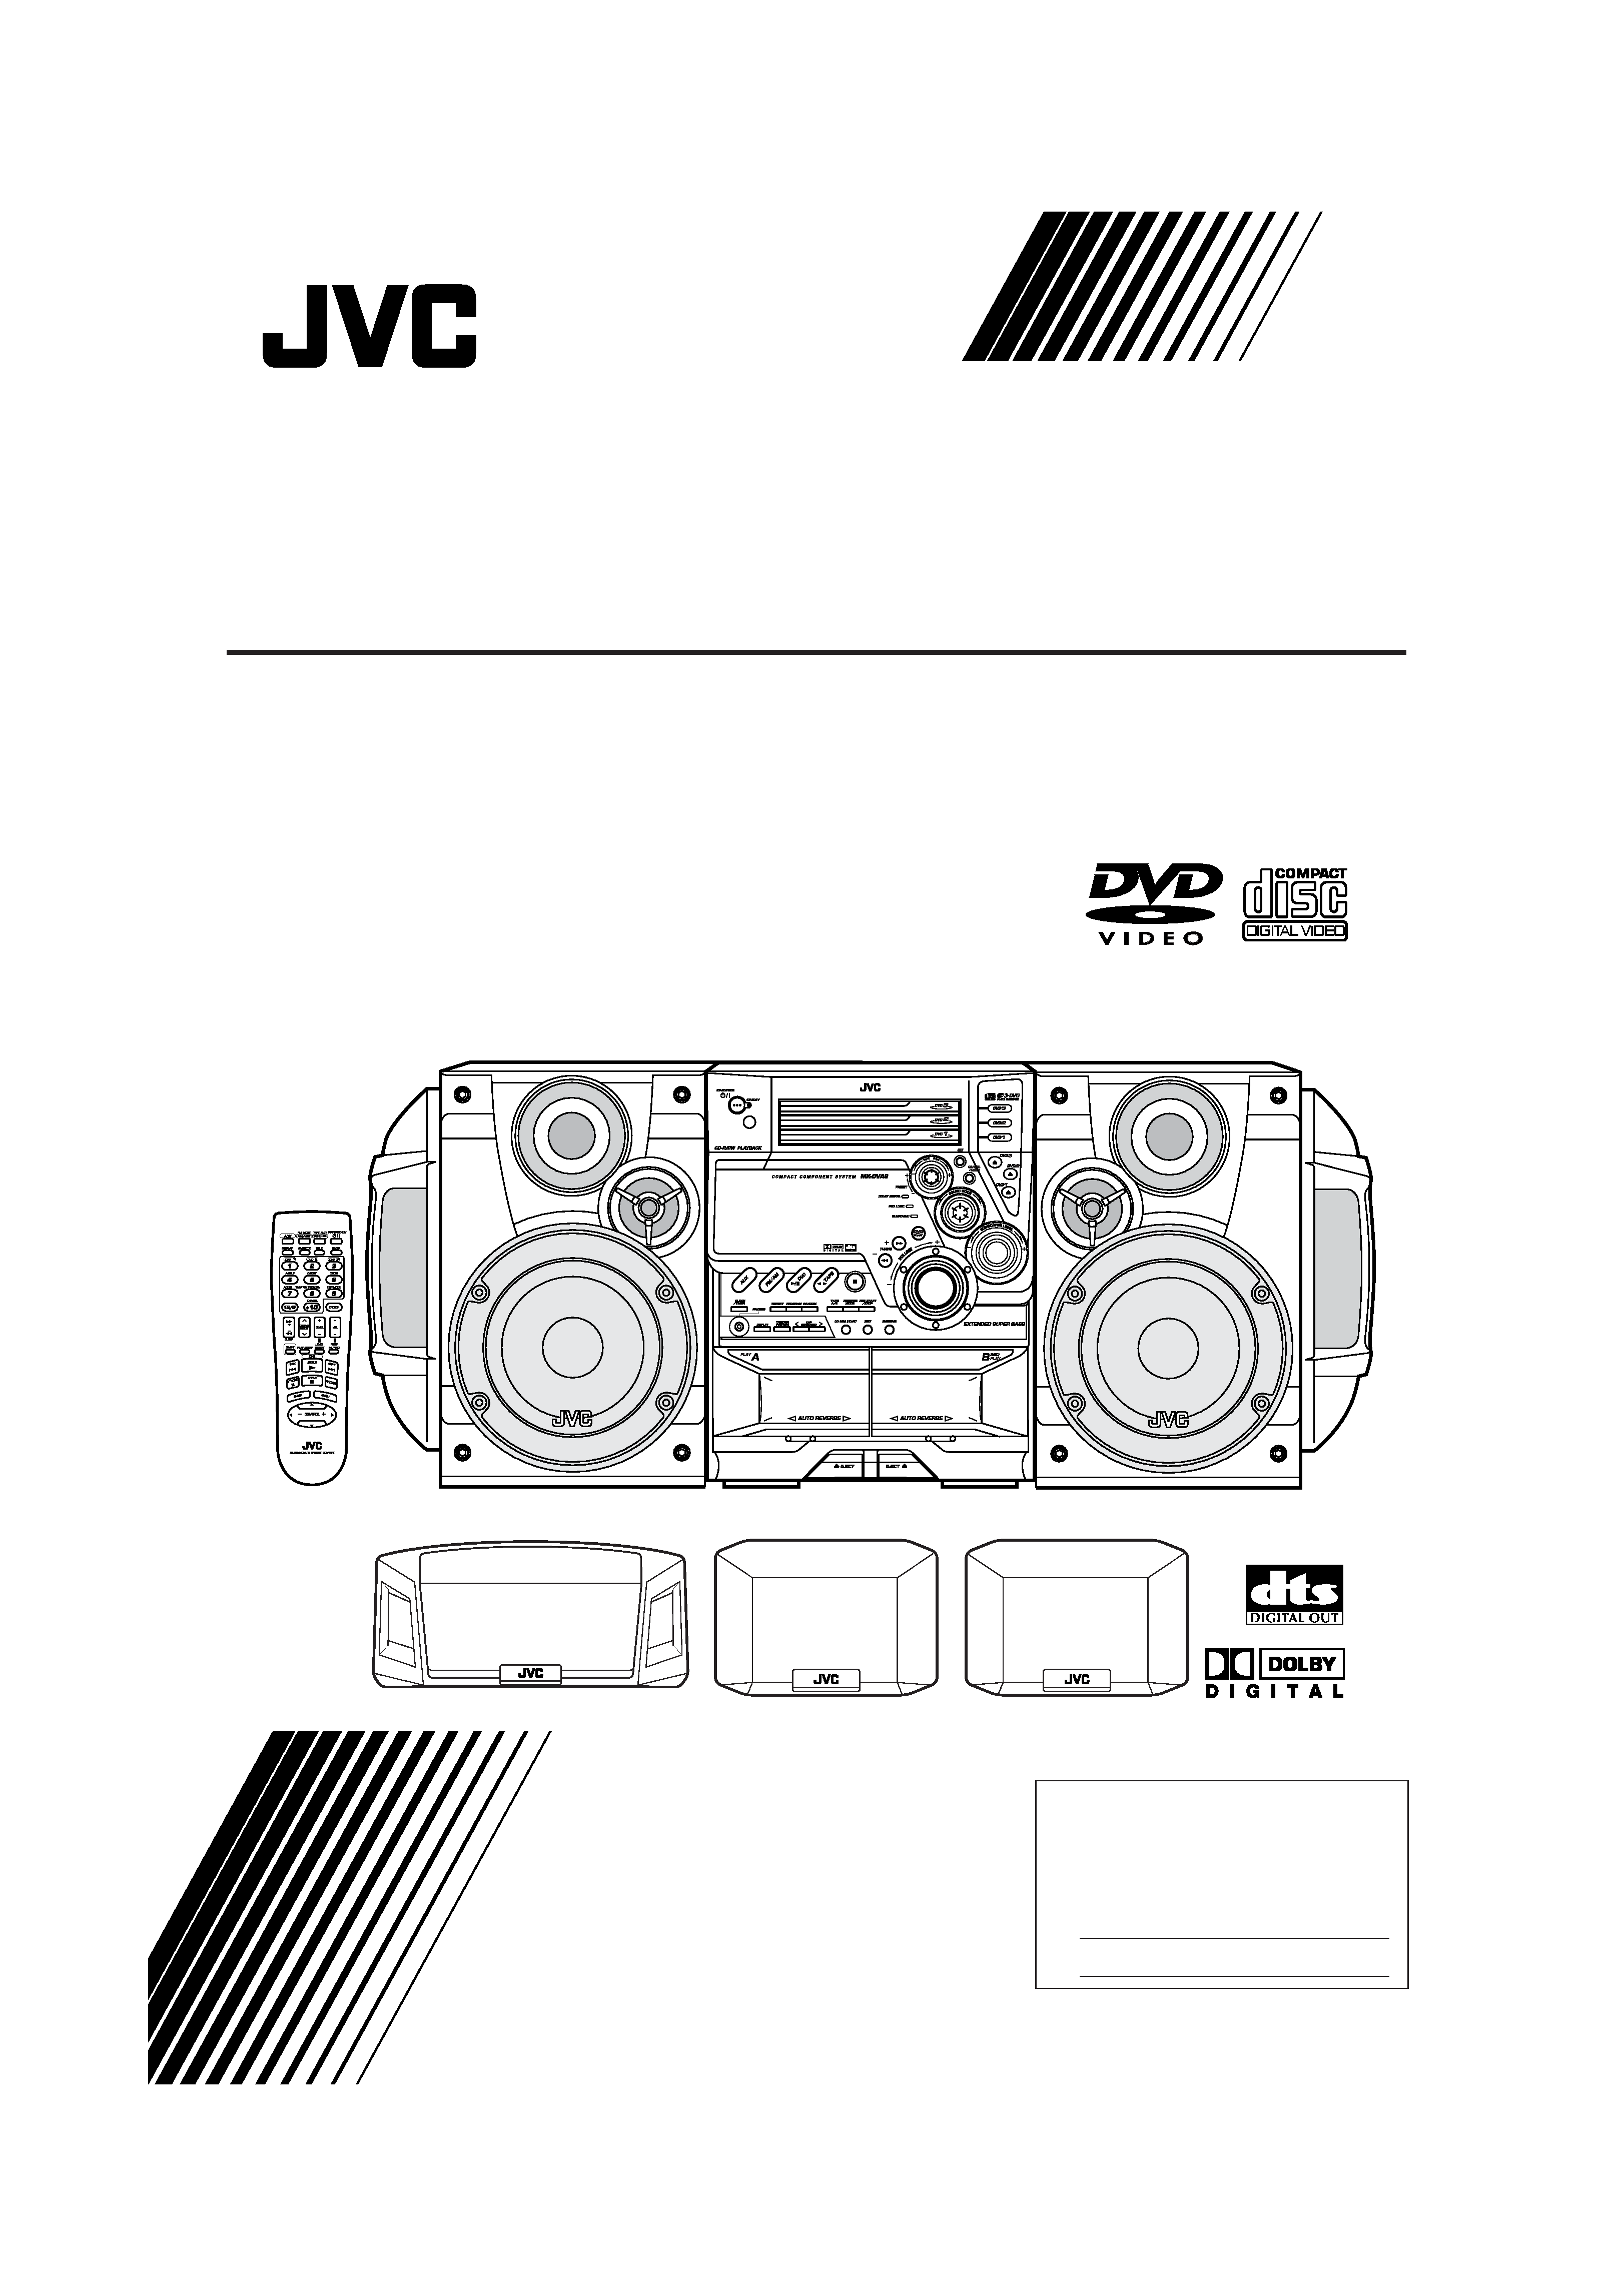
MX-DVA9
-- Consists of CA-MXDVA9, SP-MXG79, and SP-DS99TN (SP-DSC99TN and SP-DSS99TN)
-- Composé du CA-MXDVA9, SP-MXG79 et SP-DS99TN (SP-DSC99TN et SP-DSS99TN)
SP-MXG79
SP-MXG79
CA-MXDVA9
(SP-DSC99TN)
(SP-DSS99TN)
SP-DS99TN
COMPACT COMPONENT SYSTEM
SYSTEME DE COMPOSANTS COMPACT
INSTRUCTIONS
MANUEL D'INSTRUCTIONS
MX-DVA9[J,C]COVER_f
01.7.5, 11:42 AM
1
G-1
Warnings, Cautions and Others
Mises en garde, précautions et indications diverses
CAUTION
To reduce the risk of electrical shocks, fire, etc.:
1.
Do not remove screws, covers or cabinet.
2.
Do not expose this appliance to rain or moisture.
ATTENTION
Afin d'éviter tout risque d'électrocution, d'incendie, etc.:
1.
Ne pas enlever les vis ni les panneaux et ne pas ouvrir
le coffret de l'appareil.
2.
Ne pas exposer l'appareil à la pluie ni à l'humidité.
IMPORTANT FOR LASER PRODUCTS
1. CLASS 1 LASER PRODUCT
2. DANGER: Invisible laser radiation when open and interlock
failed or defeated. Avoid direct exposure to beam.
3. CAUTION: Do not open the top cover. There are no user
serviceable parts inside the Unit; leave all servicing to
qualified service personnel.
1. PRODUIT LASER CLASSE 1
2. ATTENTION: Radiation laser invisible quand l'appareil est
ouvert ou que le verrouillage est en panne ou désactivé.
Eviter une exposition directe au rayon.
3. ATTENTION: Ne pas ouvrir le couvercle du dessus. Il n'y a
aucune pièce utilisable à l'intérieur. Laisser à un personnel
qualifié le soin de réparer votre appareil.
CAUTION:
TO REDUCE THE RISK OF ELECTRIC SHOCK,
DO NOT REMOVE COVER (OR BACK).
NO USER SERVICEABLE PARTS INSIDE.
REFER SERVICING TO QUALIFIED SERVICE PERSONNEL.
RISK OF ELECTRIC SHOCK
DO NOT OPEN
The lightning flash with arrowhead symbol,
within an equilateral triangle is intended to
alert the user to the presence of uninsulated
"dangerous voltage" within the product's
enclosure
that
may
be
of
sufficient
magnitude to constitute a risk of electric
shock to persons.
The exclamation point within an equilateral
triangle is intended to alert the user to the
presence
of
important
operating
and
maintenance (servicing) instructions in the
literature accompanying the appliance.
CAUTION
For U.S.A.
This equipment has been tested and found to comply with the limits
for a Class B digital device, pursuant to part 15 of the FCC Rules.
These limits are designed to provide reasonable protection against
harmful interference in a residential installation.
This equipment generates, uses and can radiate radio frequency
energy and, if not installed and used in accordance with the
instructions,
may
cause
harmful
interference
to
radio
communications. However, there is no guarantee that interference
will not occur in a particular installation. If this equipment does cause
harmful interference to radio or television reception, which can be
determined by turning the equipment off and on, the user is
encouraged to try to correct the interference by one or more of the
following measures:
Reorient or relocate the receiving antenna.
Increase the separation between the equipment and receiver.
Connect the equipment into an outlet on a circuit different from that
to which the receiver is connected.
Consult the dealer or an experienced radio/TV technician for help.
WARNING: TO REDUCE THE RISK OF FIRE
OR ELECTRIC SHOCK, DO NOT EXPOSE
THIS APPLIANCE TO RAIN OR MOISTURE.
Caution STANDBY/ON
button!
Disconnect the mains plug to shut the power off completely.
The STANDBY/ON
button in any position does not
disconnect the mains line. The power can be remote
controlled.
Attention Commutateur STANDBY/ON
!
Déconnecter la fiche de secteur pour couper complètement
le courant. Le commutateur STANDBY/ON
ne coupe
jamais complètement la ligne de secteur, quelle que soit sa
position. Le courant peut être télécommandé.
For Canada/pour le Canada
CAUTION: TO PREVENT ELECTRIC SHOCK, MATCH WIDE
BLADE OF PLUG TO WIDE SLOT, FULLY INSERT.
ATTENTION: POUR EVITER LES CHOCS ELECTRIQUES,
INTRODUIRE LA LAME LA PLUS LARGE DE LA FICHE DANS
LA BORNE CORRESPONDANTE DE LA PRISE ET POUSSER
JUSQUAU FOND.
For Canada/pour le Canada
THIS DIGITAL APPARATUS DOES NOT EXCEED THE CLASS
B LIMITS FOR RADIO NOISE EMISSIONS FROM DIGITAL
APPARATUS AS SET OUT IN THE INTERFERENCE-CAUSING
EQUIPMENT STANDARD ENTITLED "DIGITAL APPARATUS,"
ICES-003 OF THE DEPARTMENT OF COMMUNICATIONS.
CET APPAREIL NUMERIQUE RESPECTE LES LIMITES DE
BRUITS RADIOELECTRIQUES APPLICABLES AUX APPAREILS
NUMIRIQUES DE CLASSE B PRESCRITES DANS LA NORME
SUR LE MATERIEL BROUILLEUR: "APPAREILS NUMERIQUES",
NMB-003
EDICTEE
PAR
LE
MINISTRE
DES
COMMUNICATIONS.
Note to CATV system installer:
This reminder is provided to call the CATV system
installer's attention to Section 820-40 of the NEC which
provides guidelines for proper grounding and, in particular,
specifies that the cable ground shall be connected to the
grounding system of the building, as close to the point of
cable entry as practical.
MX-DVA9[J]Safety_1
01.6.20, 4:55 PM
1
G-2
1) Read Instructions -- Read carefully this instructions for your
safe use before this product is installed, wire-connected, and
operated.
2) Retain Instructions -- For your future reference, retain this
instruction.
3) Heed Warnings -- Heed warnings on the product and in the
operating instructions.
4) Follow Instructions -- Follow and obey all warnings, cautions
and instructions marked on this product and this instruction.
5) Cleaning -- Unplug this product from the wall outlet before
cleaning. Do not use liquid cleaners or aerosol cleaners. Use a
damp cloth for cleaning.
6) Attachments -- Do not use attachments not recommended by
the manufacturer of this product as they may cause hazards.
7) Water and Moisture -- Do not expose this product to rain, water
and moisture, or operate it near water -- for example near a
bathtub, wash bowl, kitchen sink, laundry tub, in a wet
basement or near a swimming pool, and the like.
8) Ventilation -- Slots and openings in the cabinet are provided for
ventilation. To ensure reliable operation of the product and to
protect it from overheating, these openings must not be blocked
or covered.
· Do not block the openings by placing the product on a bed,
sofa, rug or other similar surface.
· Do not place the product in a built-in installation such as a
bookcase or rack unless proper ventilation is provided or the
manufacturer's instructions have been adhered to.
9) Power Sources -- Operate your product only from the type of
power source indicated on the marking label. If you are not sure
of the type of power supply to your home, consult your product
dealer or local power company. If your product is intended to
operate from battery power, or other sources, refer to the
operating instructions.
10) Grounding or Polarization
Your product may be equipped with a polarized alternating-
current line plug (a plug having one blade wider than the other).
This plug will fit into the power outlet only one way. This is a
safety feature. If you are unable to insert the plug fully into the
outlet, try reversing the plug. If the plug should still fail to fit,
contact your electrician to replace your obsolete outlet. Do not
defeat the safety purpose of the polarized plug.
11) Power Cord Protection -- Power supply cords should be routed
so that they are not likely to be walked on or pinched by items
placed upon or against them, paying particular attention to
cords at plugs, convenience receptacles, and the point where
they exit from the product.
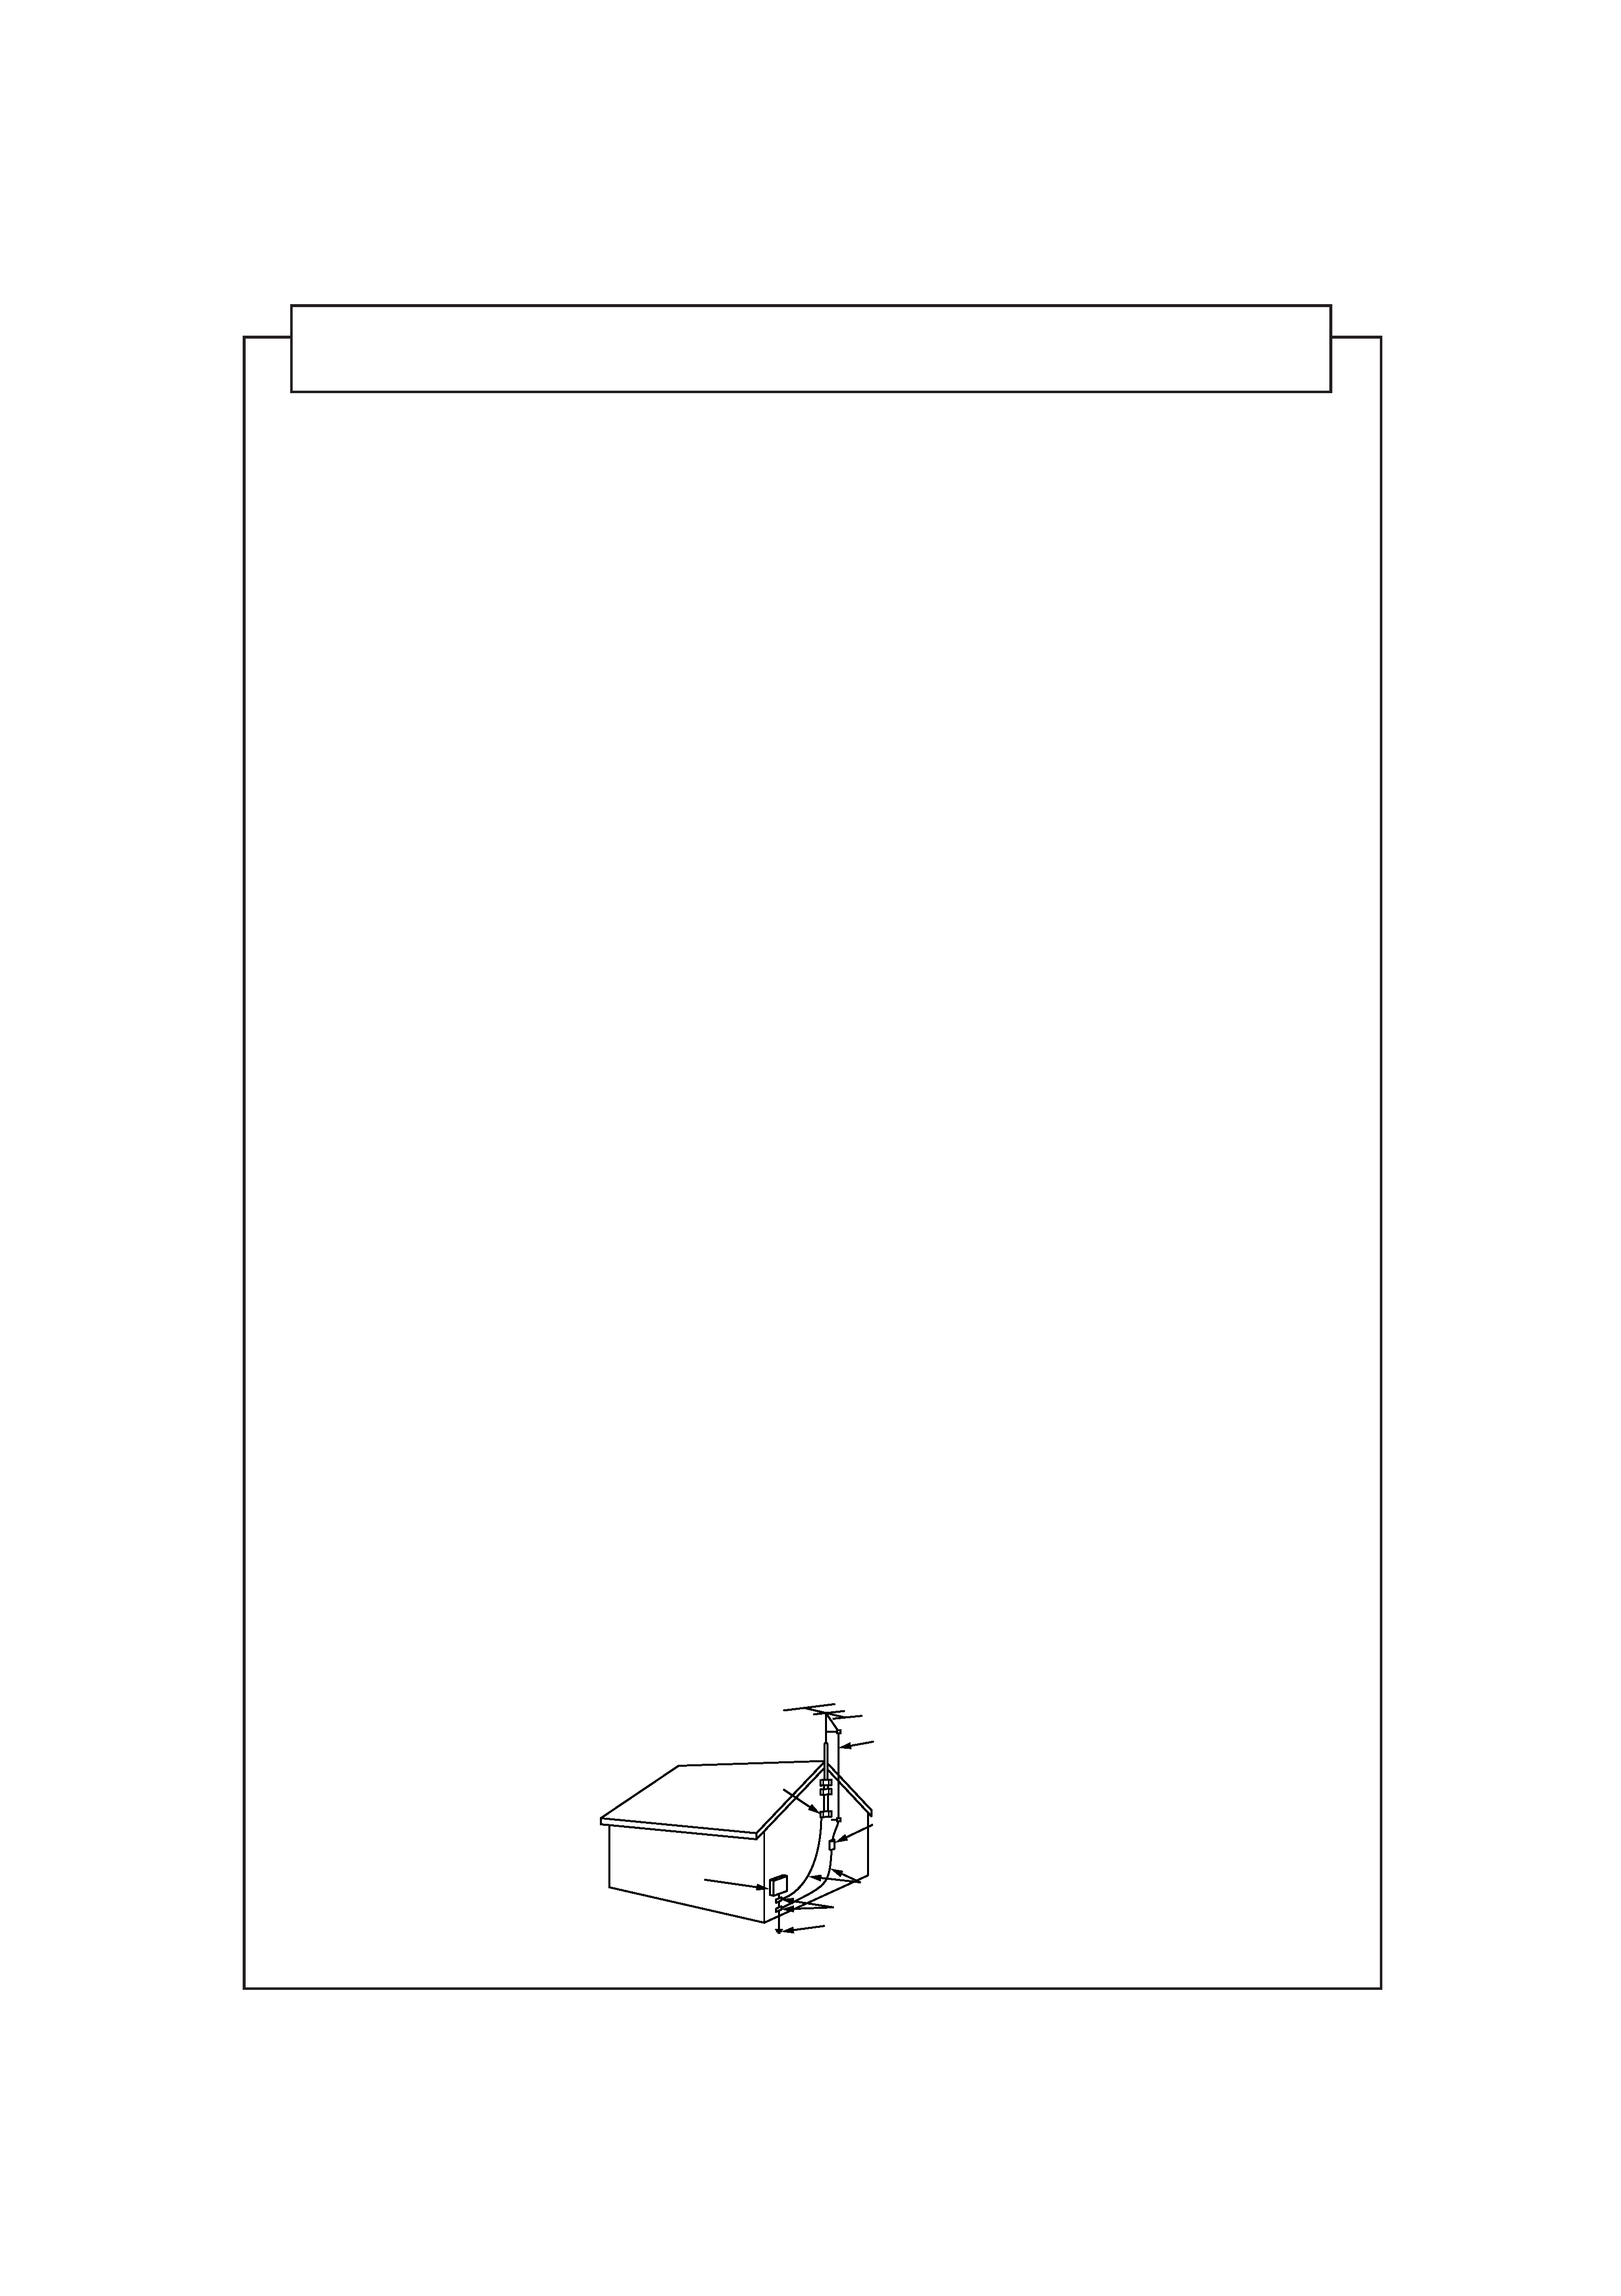
12) Outdoor Antenna Grounding -- If an outside antenna or cable
system is connected to the product, be sure the antenna or
cable system is grounded so as to provide some protection
against voltage surges and built-up
static charges. Article 810 of the
National Electrical Code, ANSI/NFPA
70, provides information with regard to
proper grounding of the mast and
supporting structure, grounding of
the lead-in wire to an antenna
discharge unit, size of grounding
conductors, location of antenna
discharge unit, connection to
grounding electrodes, and
requirements for the grounding
electrode. Example of antenna
grounding is illustrated in here.
IMPORTANT PRODUCTS SAFETY INSTRUCTION
(Statement in accordance with the UL standards)
GROUND CLAMP
ELECTRIC
SERVICE
EQUIPMENT
NEC -- NATIONAL ELECTRICAL CODE
POWER SERVICE GROUNDING
ELECTRODE SYSTEM
(NEC ART 250. PART H)
GROUND CLAMPS
GROUNDING CONDUCTORS
(NEC SECTION 81021)
ANTENNA
DISCHARGE UNIT
(NEC SECTION 81020)
ANTENNA
LEAD IN WIRE
EXAMPLE OF ANTENNA GROUNDING
AS PER NATIONAL ELECTRICAL CODE
13) Lightning -- For added protection for this product during a
lightning storm, or when it is left unattended and unused for
long periods of time, unplug it from the wall outlet and
disconnect the antenna or cable system. This will prevent
damage to the product due to lightning and power-line surges.
14) Power Line -- An outside antenna system should not be
located in the vicinity of overhead power lines or other electric
light or power circuits, or where it can fall into such power lines
or circuits. When installing an outside antenna system, extreme
care should be taken to keep from touching such power lines or
circuits as contact with them might be fatal.
15) Overloading -- Do not overload wall outlets, extension cords, or
integral convenience receptacles as this can result in a risk of
fire or electric shock.
16) Object and Liquid Entry -- Never push objects of any kind into
this product through openings as they may touch dangerous
voltage points or shout-out parts that could result in a fire or
electric shock. Never spill liquid of any kind on the product.
17) Servicing -- Do not attempt to service this product yourself as
opening or removing covers may expose you to dangerous
voltage or other hazards. Refer all servicing to qualified service
personnel.
18) Damage Requiring Service -- Unplug this product from the wall
outlet and refer servicing to qualified service personnel under
the following conditions:
a) When the power-supply cord or plug is damaged.
b) If liquid has been spilled, or objects have fallen into the
product.
c) If the product has been exposed to rain or water.
d) If the product does not operate normally by following the
operating instructions. Adjust only those controls that are
covered by the operating instructions as an improper
adjustment of other controls may result in damage and will
often require extensive work by a qualified technician to
restore the product to its normal operation.
e) If the product has been dropped or damaged in any way.
f) When the product exhibits a distinct change in performance
-- this indicates a need for service.
19) Replacement Parts -- When replacement parts are required, be
sure the service technician has used replacement parts
specified by the manufacturer or have the same characteristics
as the original part. Unauthorized substitutions may result in
fire, electric shock, or other hazards.
20) Safety Check -- Upon completion of any service or repairs to
this product, ask the service technician to perform safety checks
to determine that the product is in proper operating condition.
21) Heat -- The product should be situated away from heat sources
such as radiators, heat registers, stoves, or other
products(including amplifiers) that produce heat.
MX-DVA9[J]Safety_1
01.6.20, 4:55 PM
2
1
Introduction
About This Manual
This manual is organized as follows:
· The manual mainly explains operations using the
buttons and controls on the unit. You can also use the
buttons on the remote control if they have the same or
similar names (or marks) as those on the unit.
If operation using the remote control is different from
that using the unit, it is then explained.
· Basic and common information that is the same for many
functions is grouped in one place, and is not repeated in
each procedure. For instance, we do not repeat the
information about turning on/off the unit, setting the
volume, changing the sound effects, and others, which are
explained in the section "Common Operations" on pages
10 to 12.
· The following marks are used in this manual:
Gives you warnings and cautions to prevent
from damage or risk of fire/electric shock.
Also gives you information which is not good
for obtaining the best possible performance
from the unit.
Gives you information and hints you had better
know.
Precautions
Installation
· Install in a place which is level, dry and neither too hot nor
too cold--between 5°C (41°F) and 35°C (95°F).
· Install the unit in a location with adequate ventilation to
prevent internal heat buildup in the unit.
· Leave sufficient distance between the unit and the TV.
· Keep the speakers away from the TV to avoid interference
with TV.
DO NOT install the unit in a location near heat
sources, or in a place subject to direct sunlight,
excessive dust or vibration.
We would like to thank you for purchasing one of our JVC products.
Before operating this unit, read this manual carefully and thoroughly to
obtain the best possible performance from your unit, and retain this manual
for future reference.
Power sources
· When unplugging from the wall outlet, always pull the
plug, not the AC power cord.
DO NOT handle the AC power cord with wet
hands.
Moisture condensation
Moisture may condense on the lens inside the unit in the
following cases:
· After starting heating in the room
· In a damp room
· If the unit is brought directly from a cold to a warm place
should this occur, the unit may malfunction. In this case,
leave the unit turned on for a few hours until the moisture
evaporates, unplug the AC power cord, and then plug it in
again.
Others
· Should any metallic object or liquid fall into the unit,
unplug the AC power cord and consult your dealer before
operating any further.
· If you are not going to operate the unit for an extended
period of time, unplug the AC power cord from the wall
outlet.
DO NOT disassemble the unit since there are no
user serviceable parts inside.
If anything goes wrong, unplug the AC power cord and
consult your dealer.
EN01-13.MX-DVA9[J,C]_f
01.7.3, 3:09 PM
1

2
Contents
Location of the Buttons and Controls ....................... 3
Front Panel ................................................................. 3
Remote Control .......................................................... 5
Getting Started ............................................................ 6
Supplied Accessories .................................................. 6
Putting the Batteries into the Remote Control ........... 6
Connecting Antennas ................................................. 6
Connecting Speakers .................................................. 7
Connecting Other Equipment ..................................... 8
Canceling the Display Demonstration ....................... 9
Common Operations ................................................ 10
Turning On or Off the Power ..................................... 10
Setting the Clock ...................................................... 10
Selecting the Sources ................................................. 10
Adjusting the Volume ............................................... 11
Adjusting the Front Speaker Output Balance ........... 11
Reinforcing the Bass Sound ..................................... 11
Selecting the Sound Modes ...................................... 11
Creating Your Own Sound Modes
--Manual Mode .................................................. 12
Listening to FM and AM Broadcasts ...................... 13
Tuning into a Station ................................................ 13
Presetting Stations .................................................... 13
Tuning into a Preset Station ..................................... 13
Playing Back Discs--Introduction .......................... 14
Disc Structure ........................................................... 14
DVD Features ........................................................... 15
· Selecting the Multi-Angle View ......................... 15
· Selecting the Audio Language ........................... 15
· Selecting the Subtitle ......................................... 15
Basic Disc Playback .................................................. 16
Loading Discs ........................................................... 16
Common Basic Disc Operations .............................. 16
DVD Playback .......................................................... 16
VCD/CD Playback ................................................... 18
Searching for a Particular Point ............................... 19
Prohibiting Disc Ejection--Tray Lock .................... 19
Menu-Driven Playback--DVD/VCD with
PBC Function ....................................................... 20
Menu Operations ...................................................... 20
Selecting Playback Modes ........................................ 21
Programming the Playing Order of the Titles and
Tracks--Program Play ....................................... 21
Playing at Random--Random Play ......................... 23
Repeating Playback .................................................. 23
· Repeat Play ........................................................ 23
· A-B Repeat ......................................................... 24
DVD/VCD Special Effect Playback ......................... 25
Still Picture/Frame-by-Frame Playback ................... 25
Viewing Continuous Still Pictures--Strobe ............. 25
Slow Motion Playback--Slow ................................. 25
Zoom in the Picture--Zoom .................................... 25
Viewing the Desired Chapters/Tracks--Digest ........ 26
Selecting the Picture Brightness
--Theater Position .............................................. 26
Playing Back Tapes ................................................... 27
Playing Back a Tape ................................................. 27
Locating the Beginning of a Song--Music Scan ..... 27
Using DSP Surround Mode ..................................... 28
Activating and Adjusting
the DSP Surround Mode ..................................... 28
Recording .................................................................. 29
Recording a Tape on Deck B .................................... 29
Dubbing Tapes .......................................................... 30
VCD/CD Direct Recording ....................................... 30
Auto Edit Recording .................................................. 31
Operating the On-Screen Menu .............................. 32
Basic Procedure ........................................................ 32
Changing the Initial Language Settings ................... 33
Changing the Various Audio Settings ....................... 33
Changing the Display Settings ................................. 35
Changing the System Settings .................................. 36
Using the Parental Lock ........................................... 37
Setting the Parental Lock Level ............................... 37
Unlocking the Parental Lock Temporarily ............... 37
Using the Timers ....................................................... 38
Using Daily Timer .................................................... 38
Using Recording Timer ............................................ 40
Using Sleep Timer .................................................... 41
Timer Priority ........................................................... 41
Using AV COMPU LINK Control System .............. 42
Appendix A--Maintenance ...................................... 43
Appendix B--Troubleshooting ................................ 44
Appendix C--Output Signals Through the
OPTICAL DIGITAL OUTPUT Terminal ......... 45
Appendix D--Channel Display ............................... 45
Appendix E--Language Code
for On-Screen Menu ............................................ 46
Appendix F--Country Code for Parental Lock ..... 47
Appendix G--Glossary ............................................ 49
Specifications ............................................................. 50
EN01-13.MX-DVA9[J,C]_f
01.7.3, 3:09 PM
2