Installation / Connection Manual for steering wheel remote control
Einbauhinweise für Lenkrad-Fernbedienungs-Adapter
Indication de montage de l'adaptation de commande au volant
Istruzioni di Montaggio dell'adattatore dal telecomando sullo sterzo
KS-RC111 OE Remote Adapter Alfa Romeo, Citroën Jumper.
KS-RC111 Lenkrad-Fernbedienungs-Adapter Alfa Romeo, Citroën Jumper.
KS-RC111 Adaptation de commande au volant Alfa Romeo, Citroën Jumper.
KS-RC111 Adattatore dal telecomando sullo sterzo Alfa Romeo, Citroën Jumper.
WARNINGS
Installation requires some special knowledge.
Do not install the adapter yourself. For safe and reliable installation, consult a dealer having special knowledge.
· Never use bolts or nuts from the car's safety devices for installation.
If bolts or nuts from the steering wheel, brakes or other safety devices are used for installation of the adapter, it may cause an accident.
· Use the adapter with a DC 12V negative ground car.
This adapter cannot be used in large trucks which use a DC 24V battery.
If it is used with a DC 24V battery, it may cause a fire or accident.
· Avoid installing the adapter in following places.
-
Where it would hinder your safe driving.
-
Where it could damage the car's fittings.
CAUTION
Since there may be legal regulations defining the permissible installation locations for this adapter,
be sure to install the adapter in a location complying with any such laws.
_________________________________________________________________________________________________________
WARNUNG
Die Installation sollte durch geschultes Fachpersonal durchgeführt werden.
· Verwenden Sie niemals sicherheitsrelevante Schrauben, Bolzen oder sonstige Befestigungspunkte an Lenkung,
Bremssystem oder anderen Komponenten, um Ihre eigene Fahrsicherheit nicht zu gefährden.
· Schließen Sie den Adapter nur an 12V KFZ Spannung mit Masseverbindung zur Karosserie an.
Diese Unterbaugruppe ist nicht zugelassen zum Einsatz in LKWs oder anderen KFZ mit 24V Bordspannung.
· Vermeiden Sie den Einbau des Adapters an Stellen wodurch Ihre Fahrsicherheit
oder die Funktionstüchtigkeit anderer im Fahrzeug verbauter Unterbaugruppen eingeschränkt würde.
HINWEIS
Bitte verwenden Sie die in dieser Montageanleitung vorgeschriebenen Punkte zur
Montage des Lenkrad-Fernbedienungs-Adapters.
_________________________________________________________________________________________________________
ATTENTION
Puisque le montage de l'adaptation exige des connaissances spéciales, chargez-en un marchand ayant du personnel qualifié.
· N'utilisez jamais d´ écrous, de boulons ou d'autres points de fixation du volant, des freins,
ou d'autres parties importantes pour votre sécurité. Cela pourrait causer un accident.
· Ne branchez l'adaptation qu'à une tension de 12 V pour véhicules automobiles avec une connexion de la masse à la carrosserie.
Cette adaptation est interdite aux camions et autres véhicules avec une tension de 24 V.
· Evitez le montage de l'adaptation là où elle pourrait gêner votre sécurité de conduite et où les fonctions des autres installations
du véhicule pourraient être limitées.
REMARQUE
Vous êtes prié d'installer l'adaptation de commande au volant aux endroits indiqués dans cette instruction de montage.
_________________________________________________________________________________________________________
AVVERTENZE
L'installazione richiede conoscenze tecniche particolari.
Non installare quest'adattatore da sé. Per un'installazione sicura ed affidabile, consultare un concessionario dotato di tali
conoscenze tecniche. L'installazione è possibile solo a veicolo fermo. Scollegare la batteria dall'impianto elettrico della vettura.
Rispettare inoltre le istruzioni del fabbricante della vettura.
· Non usare mai bulloni o dadi tolti dai dispositivi di sicurezza del veicolo.
Usando per installare l'adattatore dei bulloni o dadi provenienti dallo sterzo, dai freni o da altri dispositivi di sicurezza si
possono causare incidenti.
· Usare l'adattatore solo con veicolo a corrente continua da 12 V e terra negativa.
Questo adattatore non deve venire usato in camion di grandi dimensioni che usano batterie a corrente continua da 24 V.
Se usato con una batteria a corrente continua da 24 V, si possono avere incendi o incidenti.
· Evitare l'installazione dell'adattatore in posizioni come le seguenti.
-
Dove possa rendere insicura la guida
-
Dove potrebbe danneggiare le finiture del veicolo
ATTENZIONE
Dato che possono esistere leggi locali che definiscono le posizioni permesse di installazione di questo adattatore, installarlo
sempre in posizioni conformi a tali leggi.
LVT1396-001A
1
This OE Remote adapter KS-RC111 has been developed to be used in the following cars in order to operate a JVC Car Receiver*
using the originally built in remote control unit **
Der Lenkrad-Fernbedienungs-Adapter KS-RC111 wurde für folgende Fahrzeuge entwickelt **
L'adaptation de commande au volant KS-RC111 a été développée pour les voitures suivantes **
L'adattatore telecomando sullo sterzo KS-RC111 può venire usato con le seguenti vetture **
** Alfa Romeo 147 (05/01~), 156 (10/97~),
Citroën Jumper (09/01~)
* Must be equipped with the steering wheel remote input.
* Muss mit einem Eingang zur Aufnahme einer OEM Lenkrad-Fernbedienung ausgestattet sein.
* Faut être équipé d'une entrée pour brancher une commande au volant OEM.
* Deve essere equipaggiato con l'ingresso per il telecomando a volante.
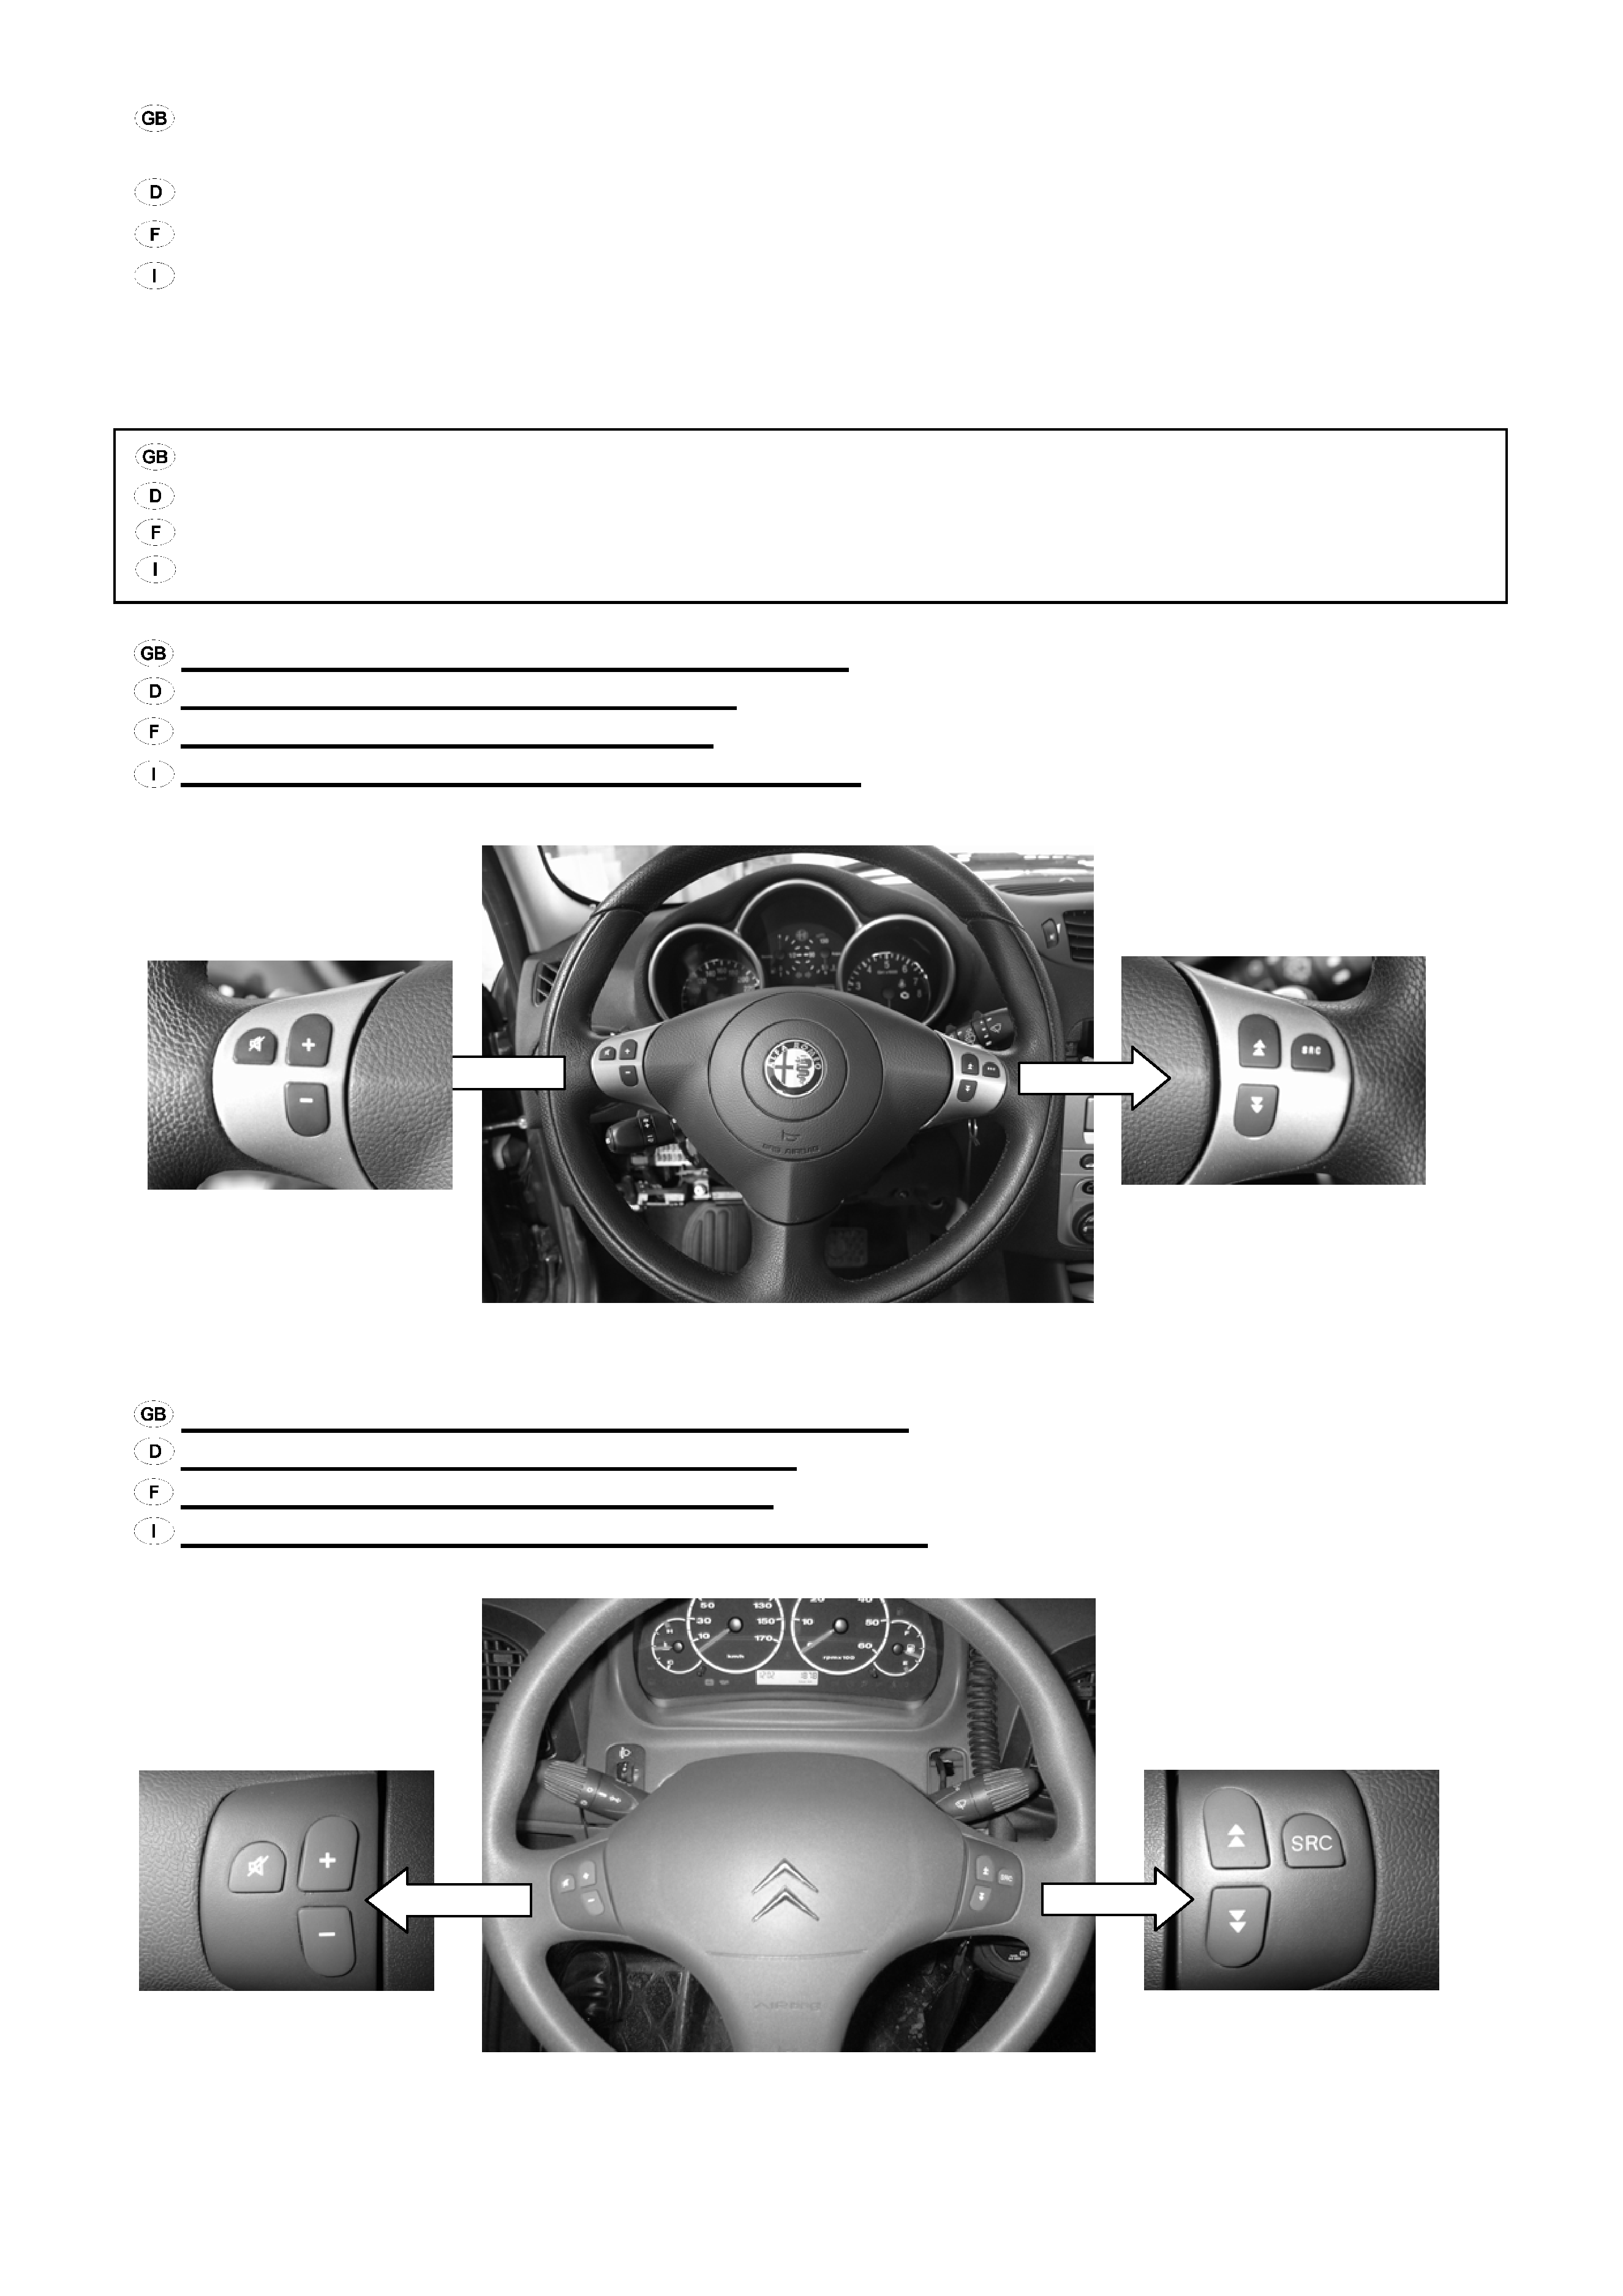
Alfa Romeo steering wheel remote control:
Alfa Romeo Lenkradfernbedienung:
LVT1396-001A
2
Commande au volant Alfa Romeo:
Telecomando sullo sterzo per l'Alfa Romeo:
_______________________________________________________________________________________________
Citroën Jumper steering wheel remote control:
Citroën Jumper Lenkradfernbedienung:
Commande au volant Citroën Jumper:
Telecomando sullo sterzo della Citroën Jumper:

Installation:
Einbauanleitung:
Procédure d´installation:
Installazione:
1.
Remove and disconnect the car receiver previously built in your car.
Das Originalradio ausbauen.
Démontez la radio d'origine.
Scollegare e rimuovere la radio precedentemente installata sulla vettura.
2.
Connect the mini ISO plug from KS-RC111 to the car harness.
Den mini ISO Stecker des KS-RC111 mit dem Gegenstück am Fahrzeug Kabelbaum verbinden.
Liez la fiche mini ISO de la KS-RC111 au pendant du harnais de câble du véhicule.
Collegare lo spinotto mini ISO dalla KS-RC111 al fascio fili del veicolo.
3.
Put the mono plug from KS-RC111 into the JVC car receiver.
Den Klinkenstecker des KS-RC111 mit dem Gegenstück am JVC Radio verbinden.
Liez le jack du KS-RC111 au pendant à la radio JVC.
Collegare lo spinotto mono dalla KS-RC111 alla radio.
4.
Connect the red wire from KS-RC111 to ignition (KL.15), and the ISO plug to the JVC car
receiver.
Rote Leitung des KS-RC111 mit Zündung (Klemme 15), und ISO Stecker mit dem
JVC Radio verbinden.
Liez le câble rouge de KS-RC111 à l'allumage (borne 15), branchez la fiche ISO dans
la radio JVC.
Collegare il filo rosso dalla KS-RC111 all'accensione (KL.15) e lo spinotto ISO alla radio.
5.
CAUTION: In some cars a Sound system is built in. Problems can appear with the adaptation
of the Soundsystem.
ACHTUNG: In manchen Fahrzeugen ist ein Soundsystem verbaut. Hier können Probleme
mit der Anpassung des Soundsystems auftreten.
ATTENTION: certains systèmes sono actifs peuvent être difficiles à adapter.
ATTENZIONE: in alcune auto il sistema audio è già esistente. Potrebbero esserci problemi
di adattamento dell'interfaccia.
6.
Switch on the JVC car receiver and check the steering wheel control.
JVC Radio einschalten, Steuerfunktionen überprüfen.
Allumez la radio JVC, vérifiez les fonctions de contrôle.
Accendere la radio e controllare che lo sterzo giri senza impedimenti.
7.
Build in the JVC car receiver into the intended place. CAUTION: Facia adapter is needed.
JVC Radio einbauen. ACHTUNG: Zum Einbau des JVC Radios wird eine Radioblende benötigt.
Montez la radio JVC. ATTENTION: vous avez parfois besoin d'une couverture radio JVC pour
monter une radio accessoire.
Rimettere la radio nel cruscotto o nel suo alloggiamento. ATTENZIONE: potrebbe essere
necessario l'uso di ulteriori adattatori per non lasciare spazi vuoti.
LVT1396-001A
3
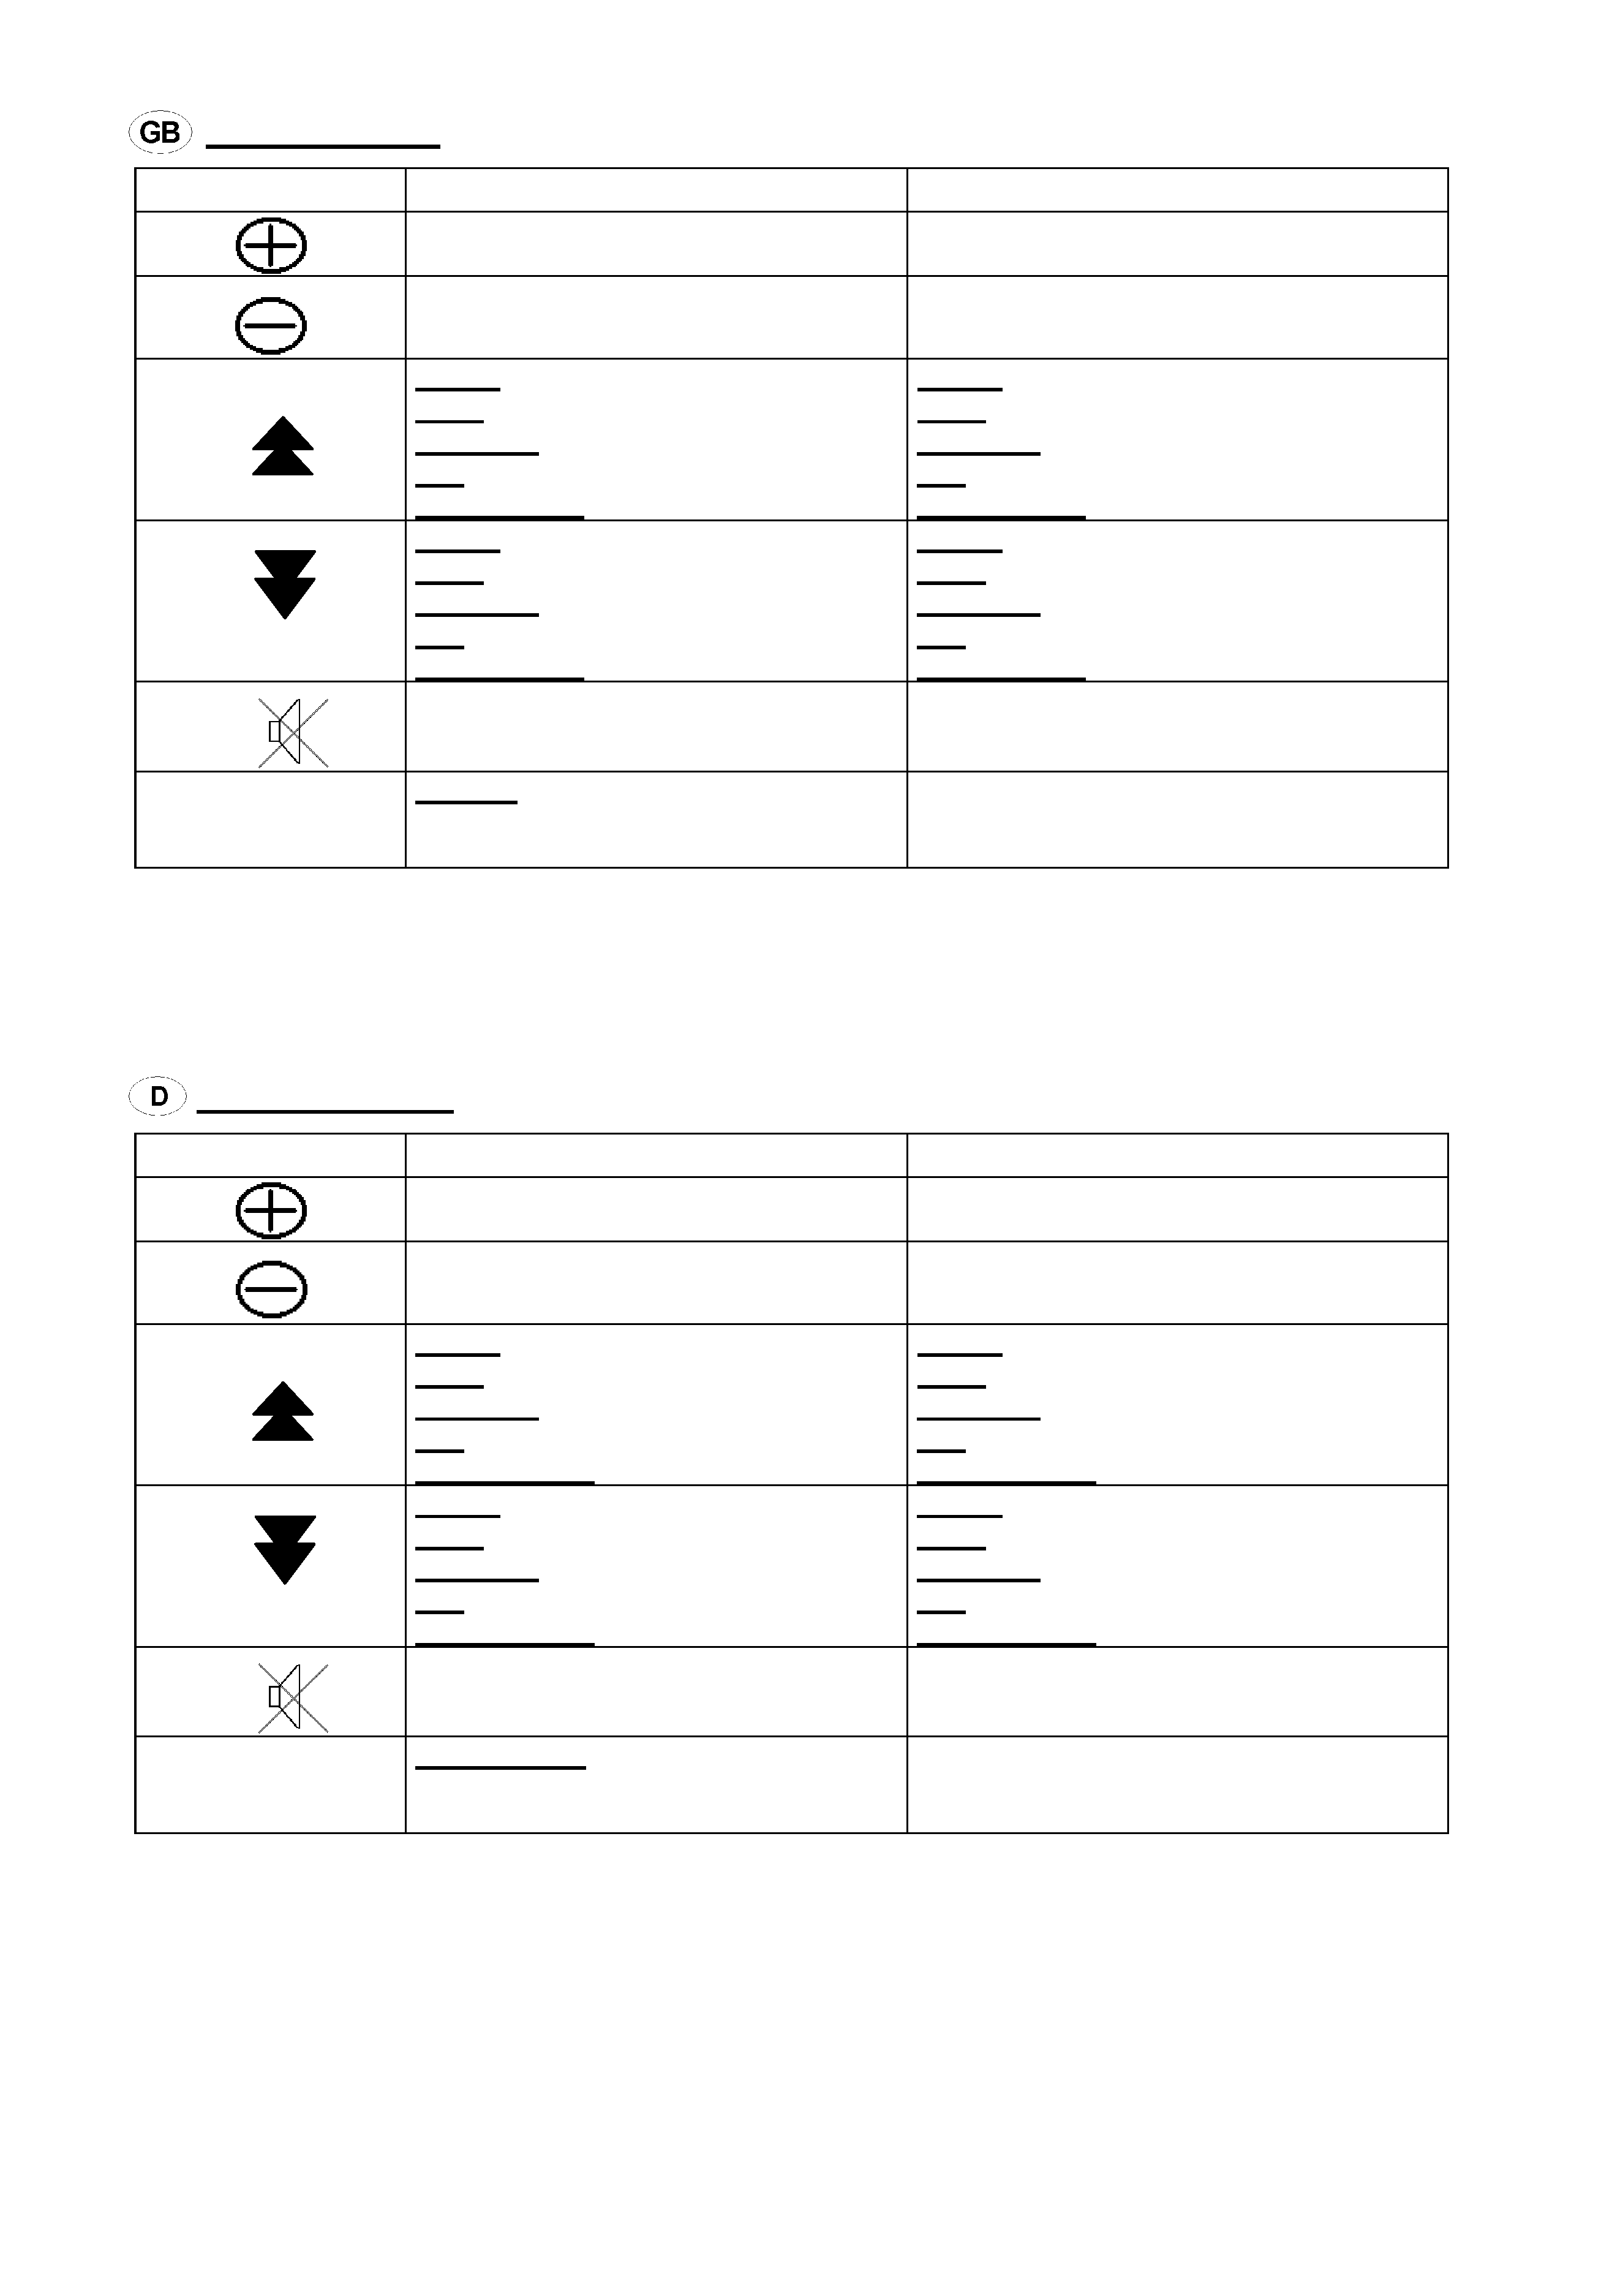
Function table:
LVT1396-001A
4
button
short press
long press
volume step up
volume up
volume step down
volume down
Radio: seek up
DAB: service up
Cassette: MMS +1
CD: next track
CD-Changer: next track
Radio: ------
DAB: seek up
Cassette: fast forward
CD: search up
CD-Changer: search up
Radio: seek down
DAB: service down
Cassette: MMS -1
CD: previous track
CD-Changer: previous track
Radio: ------
DAB: seek down
Cassette: rewind
CD: search down
CD-Changer: search down
ATT
Power ON, OFF
SRC
Source: Radio, DAB, Cassette/CD, CD
Changer *
* specific to used equipment
------
The functions and controls of the buttons vary according to the JVC car receiver. Please check the
installation / connection manual of the JVC car receiver to understand the supported functions and
controls.
Funktionsweise:
Taste
kurzer Tastendruck
langer Tastendruck
Lautstärke einen Schritt höher
Lautstärke lauter
Lautstärke einen Schritt niedriger
Lautstärke leiser
Radio: Suchlauf vorwärts
DAB: nächster Sender
Kassette: MMS +1
CD: nächster Titel
CD-Wechsler: nächster Titel
Radio: ------
DAB: Suchlauf vorwärts
Kassette: vorspulen
CD: Suchlauf vorwärts
CD-Wechsler: Suchlauf vorwärts
Radio: Suchlauf zurück
DAB: letzter Sender
Kassette: MMS -1
CD: letzter Titel
CD-Wechsler: letzter Titel
Radio: ------
DAB: Suchlauf zurück
Kassette: zurückspulen
CD: Suchlauf zurück
CD-Wechsler: Suchlauf zurück
ATT
Radio EIN, AUS
SRC
Quellenwahl: Radio, DAB,
Kassette/CD, CD-Wechsler *
* Geräte abhängig
------
Die Funktionen der Tasten der Lenkradfernbedienung hängen von der Ausstattung des JVC Radios ab.
Die unterstützten Funktionen ihres JVC Radios entnehmen sie der Bedienungsanleitung.
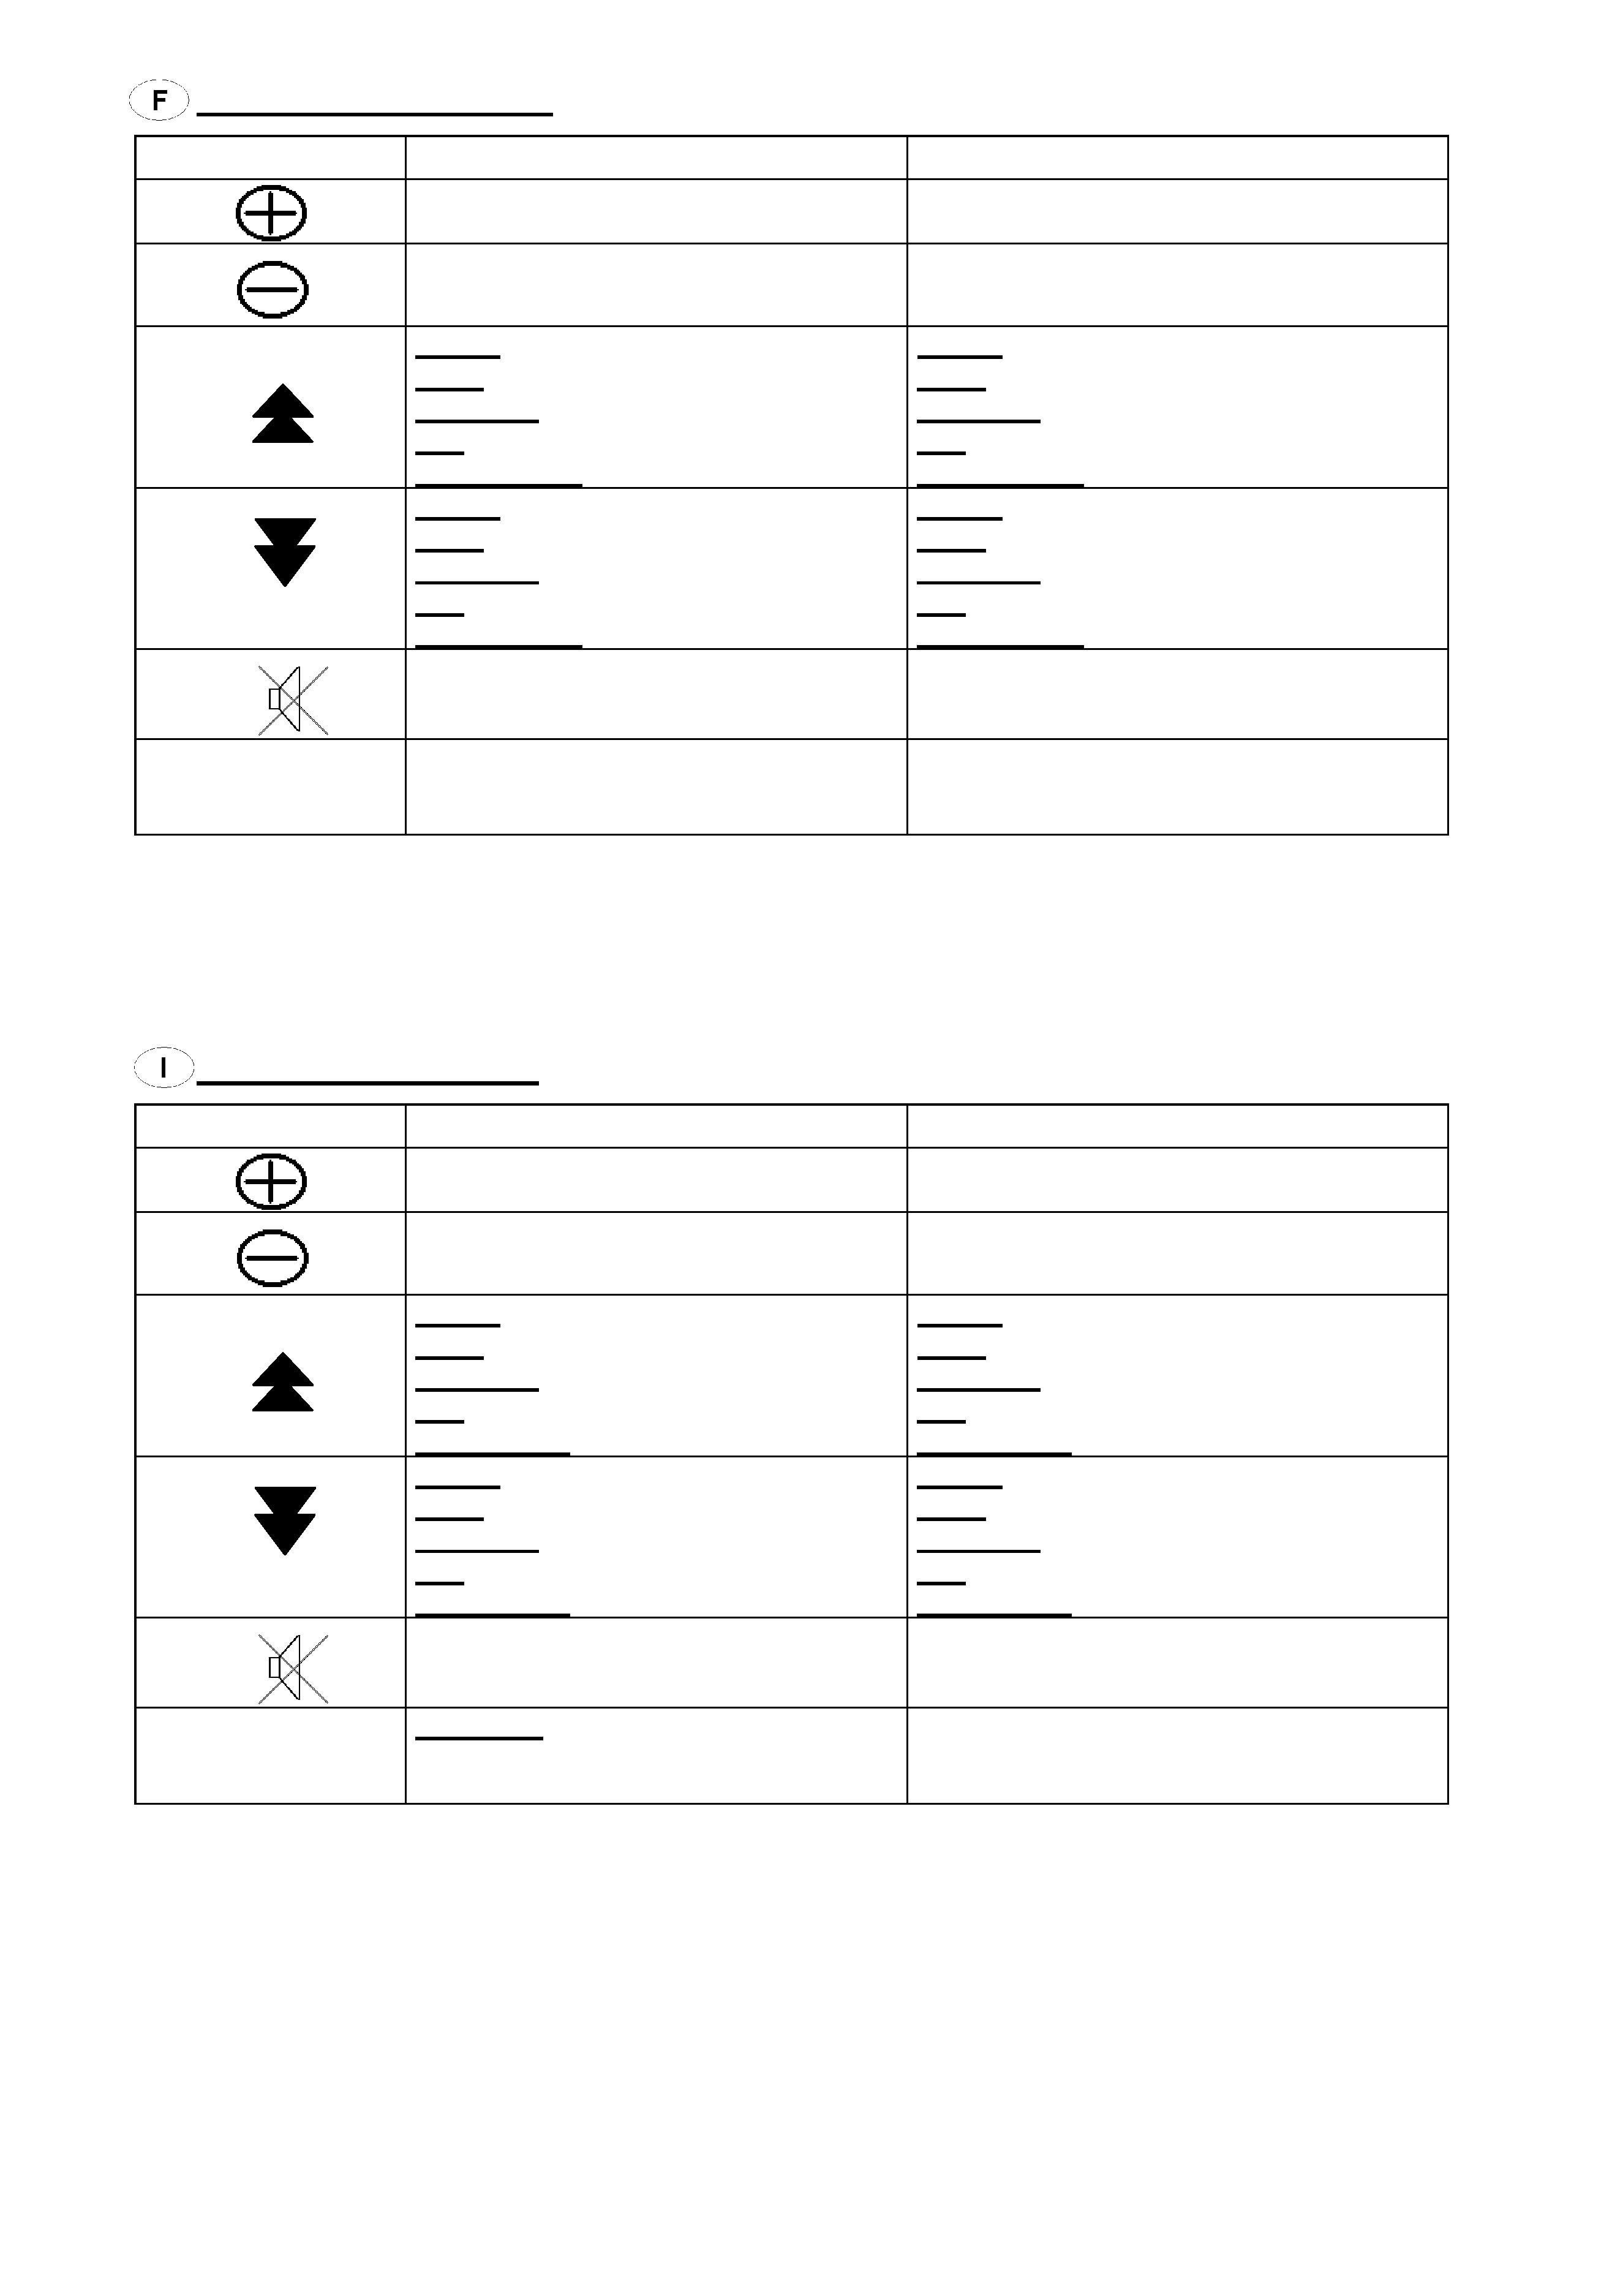
Tableau des fonctions:
LVT1396-001A
5
Touche
pression rapide de la touche
maintien de la touche
augmenter le volume
augmenter le volume
baisser le volume
baisser le volume
Radio: prochaine station
DAB: prochaine station
Cassette: MMS +1
CD: prochain titre
CD Changer: prochain titre
Radio: ------
DAB: recherche station avance
Cassette: recherche titre avance
CD: recherche titre avance
CD Changer: recherche titre avance
Radio: précédent station
DAB: précédent station
Cassette: MMS -1
CD: précédent titre
CD Changer: précédent titre
Radio: ------
DAB: recherche station retour
Cassette: recherche retour
CD: recherche retour
CD Changer: recherche titre retour
ATT
éteindre / allumer
SRC
sélection de source
-----
Les fonctions des touches de la command au volant peuvent être différent, dépendant les accessoires
fourni avec la radio JVC. Pour savoir le fonction supportée, referez au mode d´emploi de votre radio
JVC, S.V.P.
Tabella delle funzioni:
Pulsante
Pressione breve
Pressione lunga
Aumento di un passo del volume
Aumento del volume
Diminuzione di un passo del volume
Diminuzione del volume
Radio: ricerca verso l'alto
DAB: servizio verso l'alto
Cassette: MMS +1
CD: brano successiva
Cambia CD: brano successiva
Radio: ------
DAB: ricerca verso l'alto
Cassette: avanzamento rapido
CD: ricerca verso l'alto
Cambia CD: ricerca verso l'alto
Radio: ricerca verso il basso
DAB: servizio verso il basso
Cassette: MMS -1
CD: brano precedente
Cambia CD: brano precedente
Radio: ------
DAB: ricerca verso il basso
Cassette: riavvolgimento
CD: ricerca verso il basso
Cambia CD: ricerca il basso
ATT
Accensione e spegnimento
SRC
Sorgente: Radio, DAB, Cassette/CD,
Cambia CD*
* dipendenti dall'apparecchio usato
------
Attenzione: i comandi delle autoradio JVC variano a seconda dei modelli, consultare il Manuale di
Istruzioni per attivare correttamente le funzioni.