LVT0831-001A
[E/EX]
INSTRUCTIONS
BEDIENUNGSANLEITUNG
MANUEL D'INSTRUCTIONS
GEBRUIKSAANWIJZING
ENGLISH
DEUTSCH
NEDERLANDS
FRANÇAIS
For installation and connections, refer to the separate manual.
Für den Einbau und die Anschlüsse siehe das eigenständige Handbuch.
Pour l'installation et les raccordements, se référer au manuel séparé.
Bijzonderheden over de installatie en aansluiting van het apparaat vindt u in de desbetreffende
handleiding.
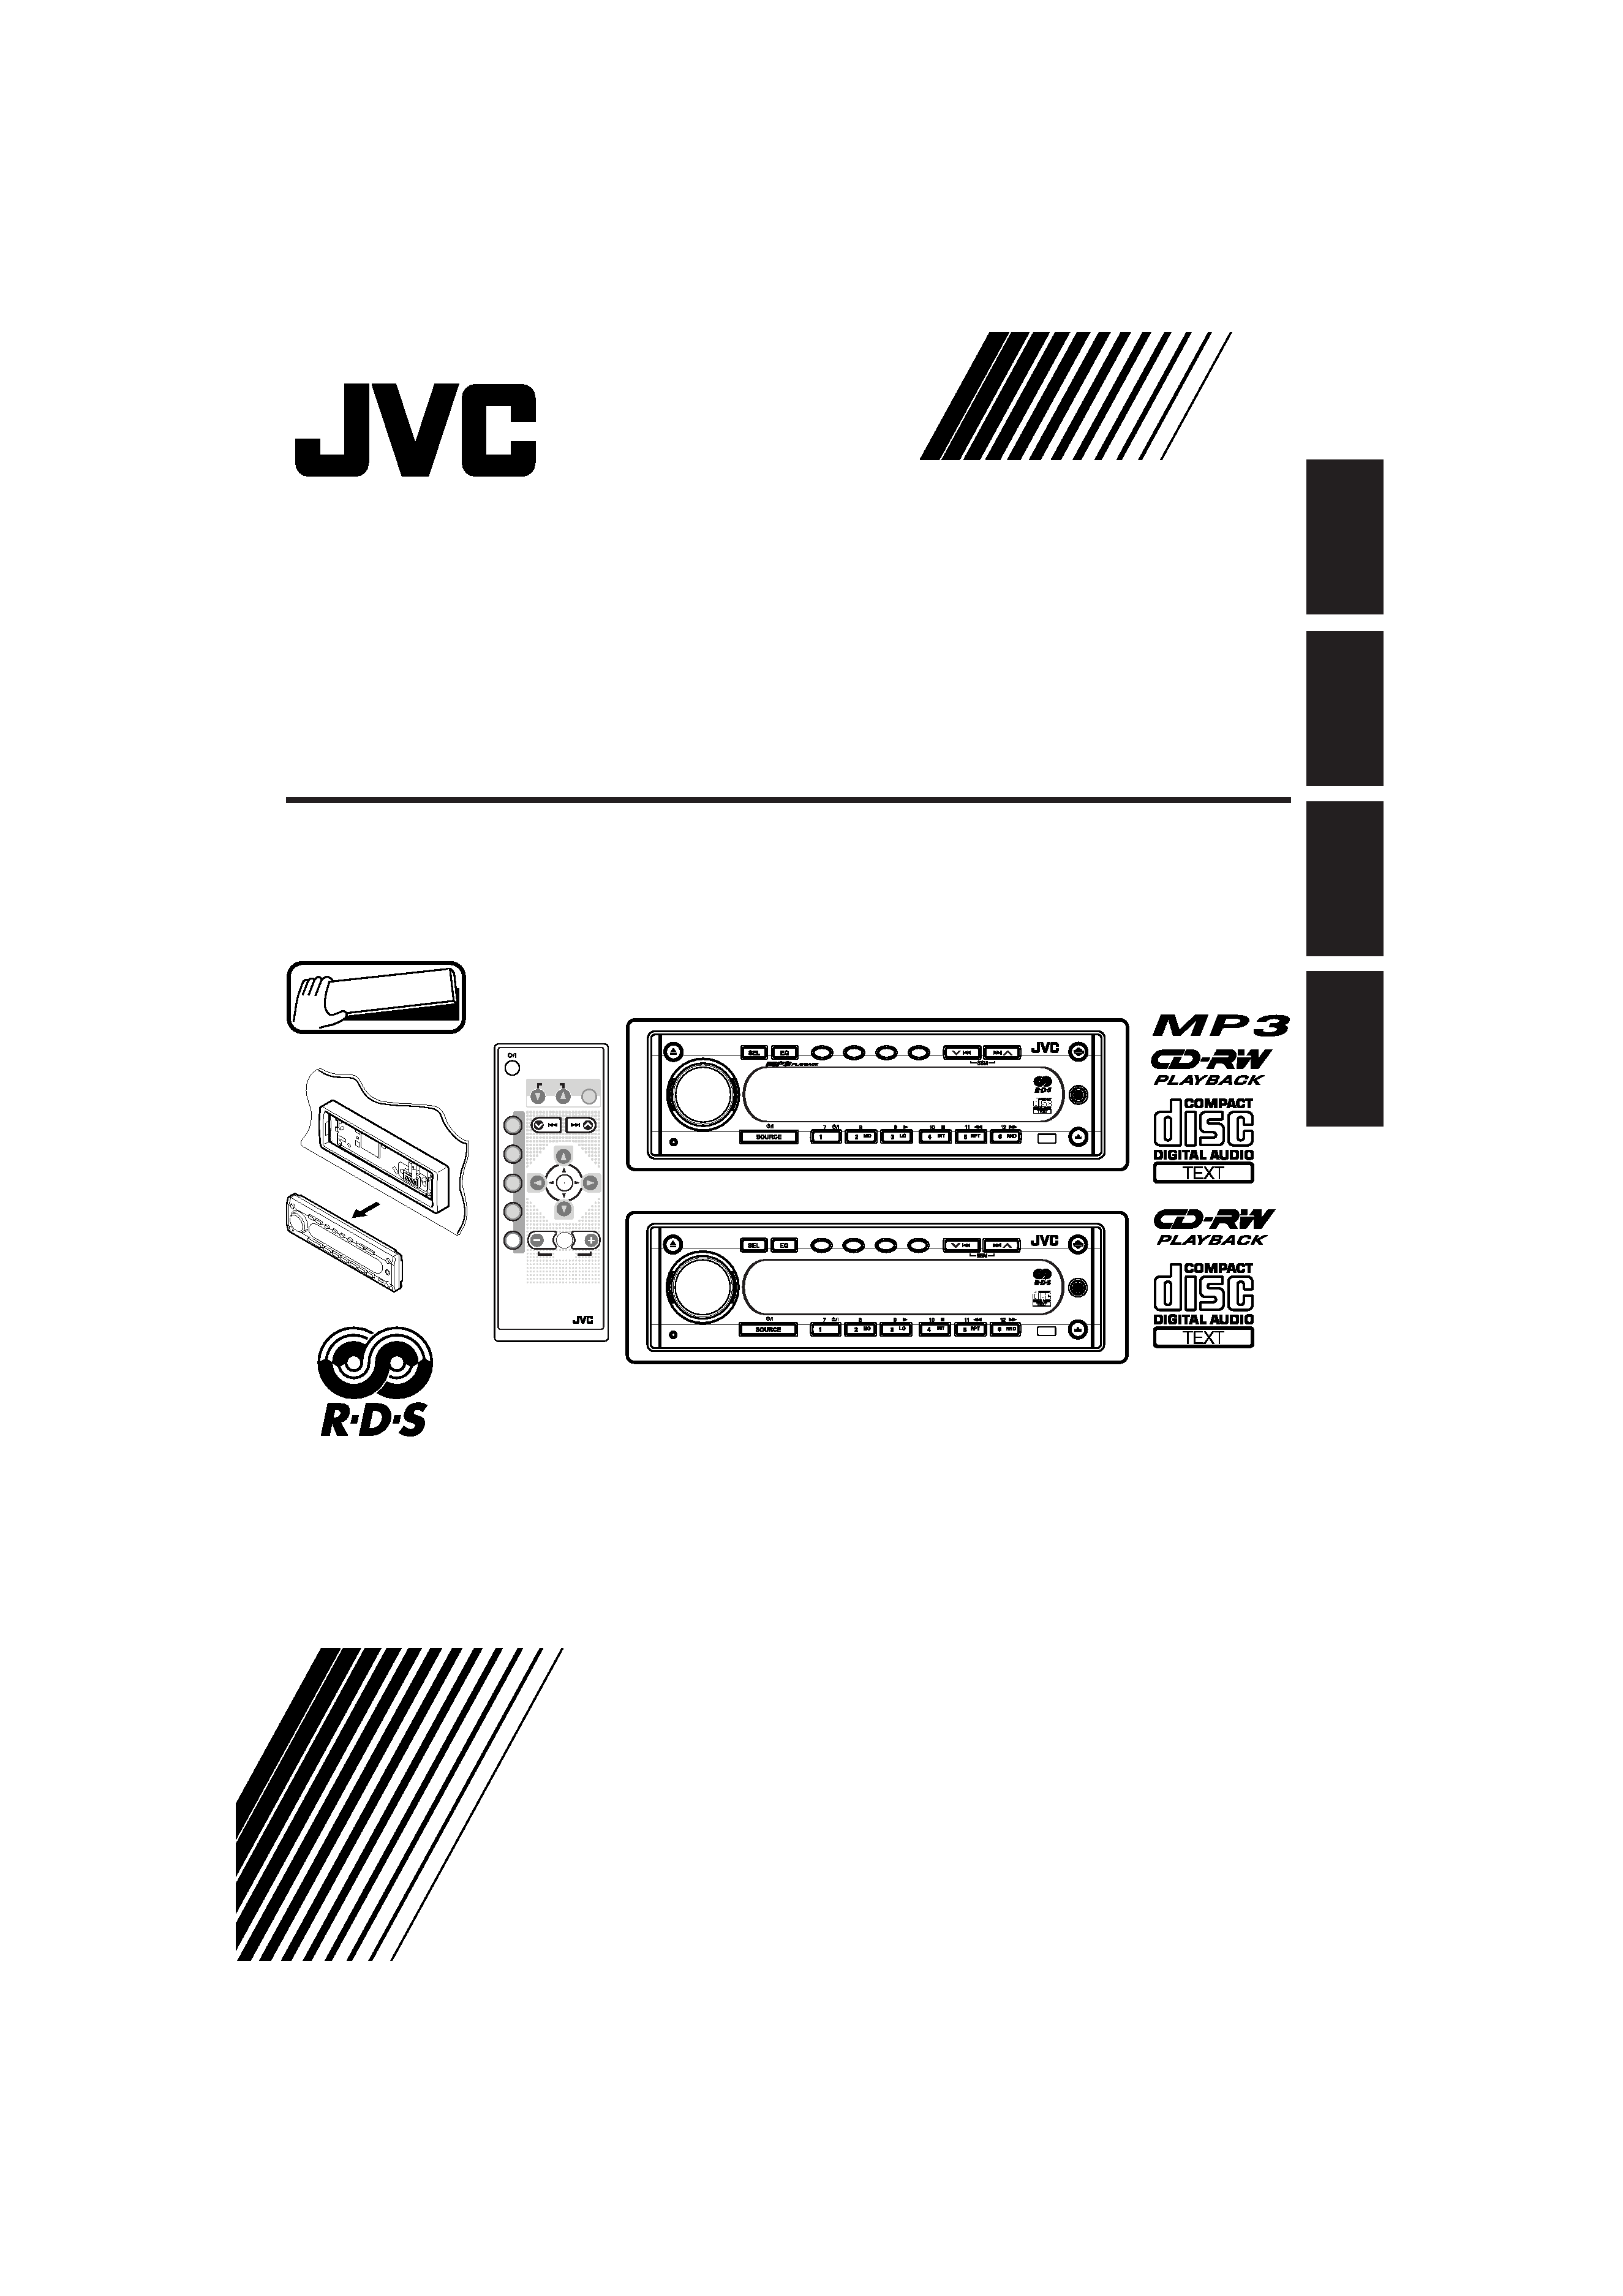
Detachable
KD-SH909R
KD-SH909R/KD-SH707R
CD RECEIVER
CD-RECEIVER
RECEPTEUR CD
CD-RECEIVER
KD-SH707R
ATT
MOSFET
DB
M
T/P
KD-SH909R
ANGLE
RM-RK100
CD
FM
AM
CH
AUX
SEL
VOLUME
R D
ATT
DAB
DISC
PRESET
PRESET
DISC
EQ
ATT
MOSFET
DB
M
T/P
KD-SH707R
COVERKDSH909R[E]001A.pm5
1/14/02, 7:12 PM
3
2
ENGLISH
Position And Reproduction Of Labels
Bottom Panel of the main unit
Name/Rating plate
Caution:
This product contains a laser component
of higher laser class than Class 1.
CLASS
LASER
1
PRODUCT
CAUTION: Invisible laser
radiation when open and
interlock failedor defeated.
AVOIDDIRECTEXPOSURE
TO BEAM.
(e)
ADVARSEL: Usynlig laser-
stråling ved åbning, når
sikkerhedsafbrydere er ude
af funktion. Undgåudsæt-
telse for stråling.
(d)
VARNING: Osynlig laser-
strålning när denna del är
öppnad och spärren är
urkopplad.
Betrakta
ej
strålen.
(s)
VARO:
Avattaessa
ja
suojalukitus ohitettaessa
olet alttiina näkymättö-
mälle
lasersäteilylle.
Älä katso säteeseen. (f)
IMPORTANT FOR LASER
PRODUCTS
Precautions:
1. CLASS 1 LASER PRODUCT
2. CAUTION: Invisible laser radiation when open
and interlock failed or defeated. Avoid direct
exposure to beam.
3. CAUTION: Do not open the top cover. There
are no user-serviceable parts inside. Leave all
servicing to qualified service personnel.
4. CAUTION: This CD player uses invisible laser
radiation and is equipped with safety switches
to prevent radiation emission when unloading
CDs. It is dangerous to defeat the safety
switches.
5. CAUTION: Use of controls, adjustments or
performance of procedures other than those
specified herein may result in hazardous
radiation exposure.
BEFORE USE
*For safety....
· Do not raise the volume level too much, as this will
block outside sounds, making driving dangerous.
· Stop the car before performing any complicated
operations.
*Temperature inside the car....
If you have parked the car for a long time in hot or
cold weather, wait until the temperature in the car
becomes normal before operating the unit.
Note:
Your preset adjustments such
as preset channels or sound
adjustments will be erased.
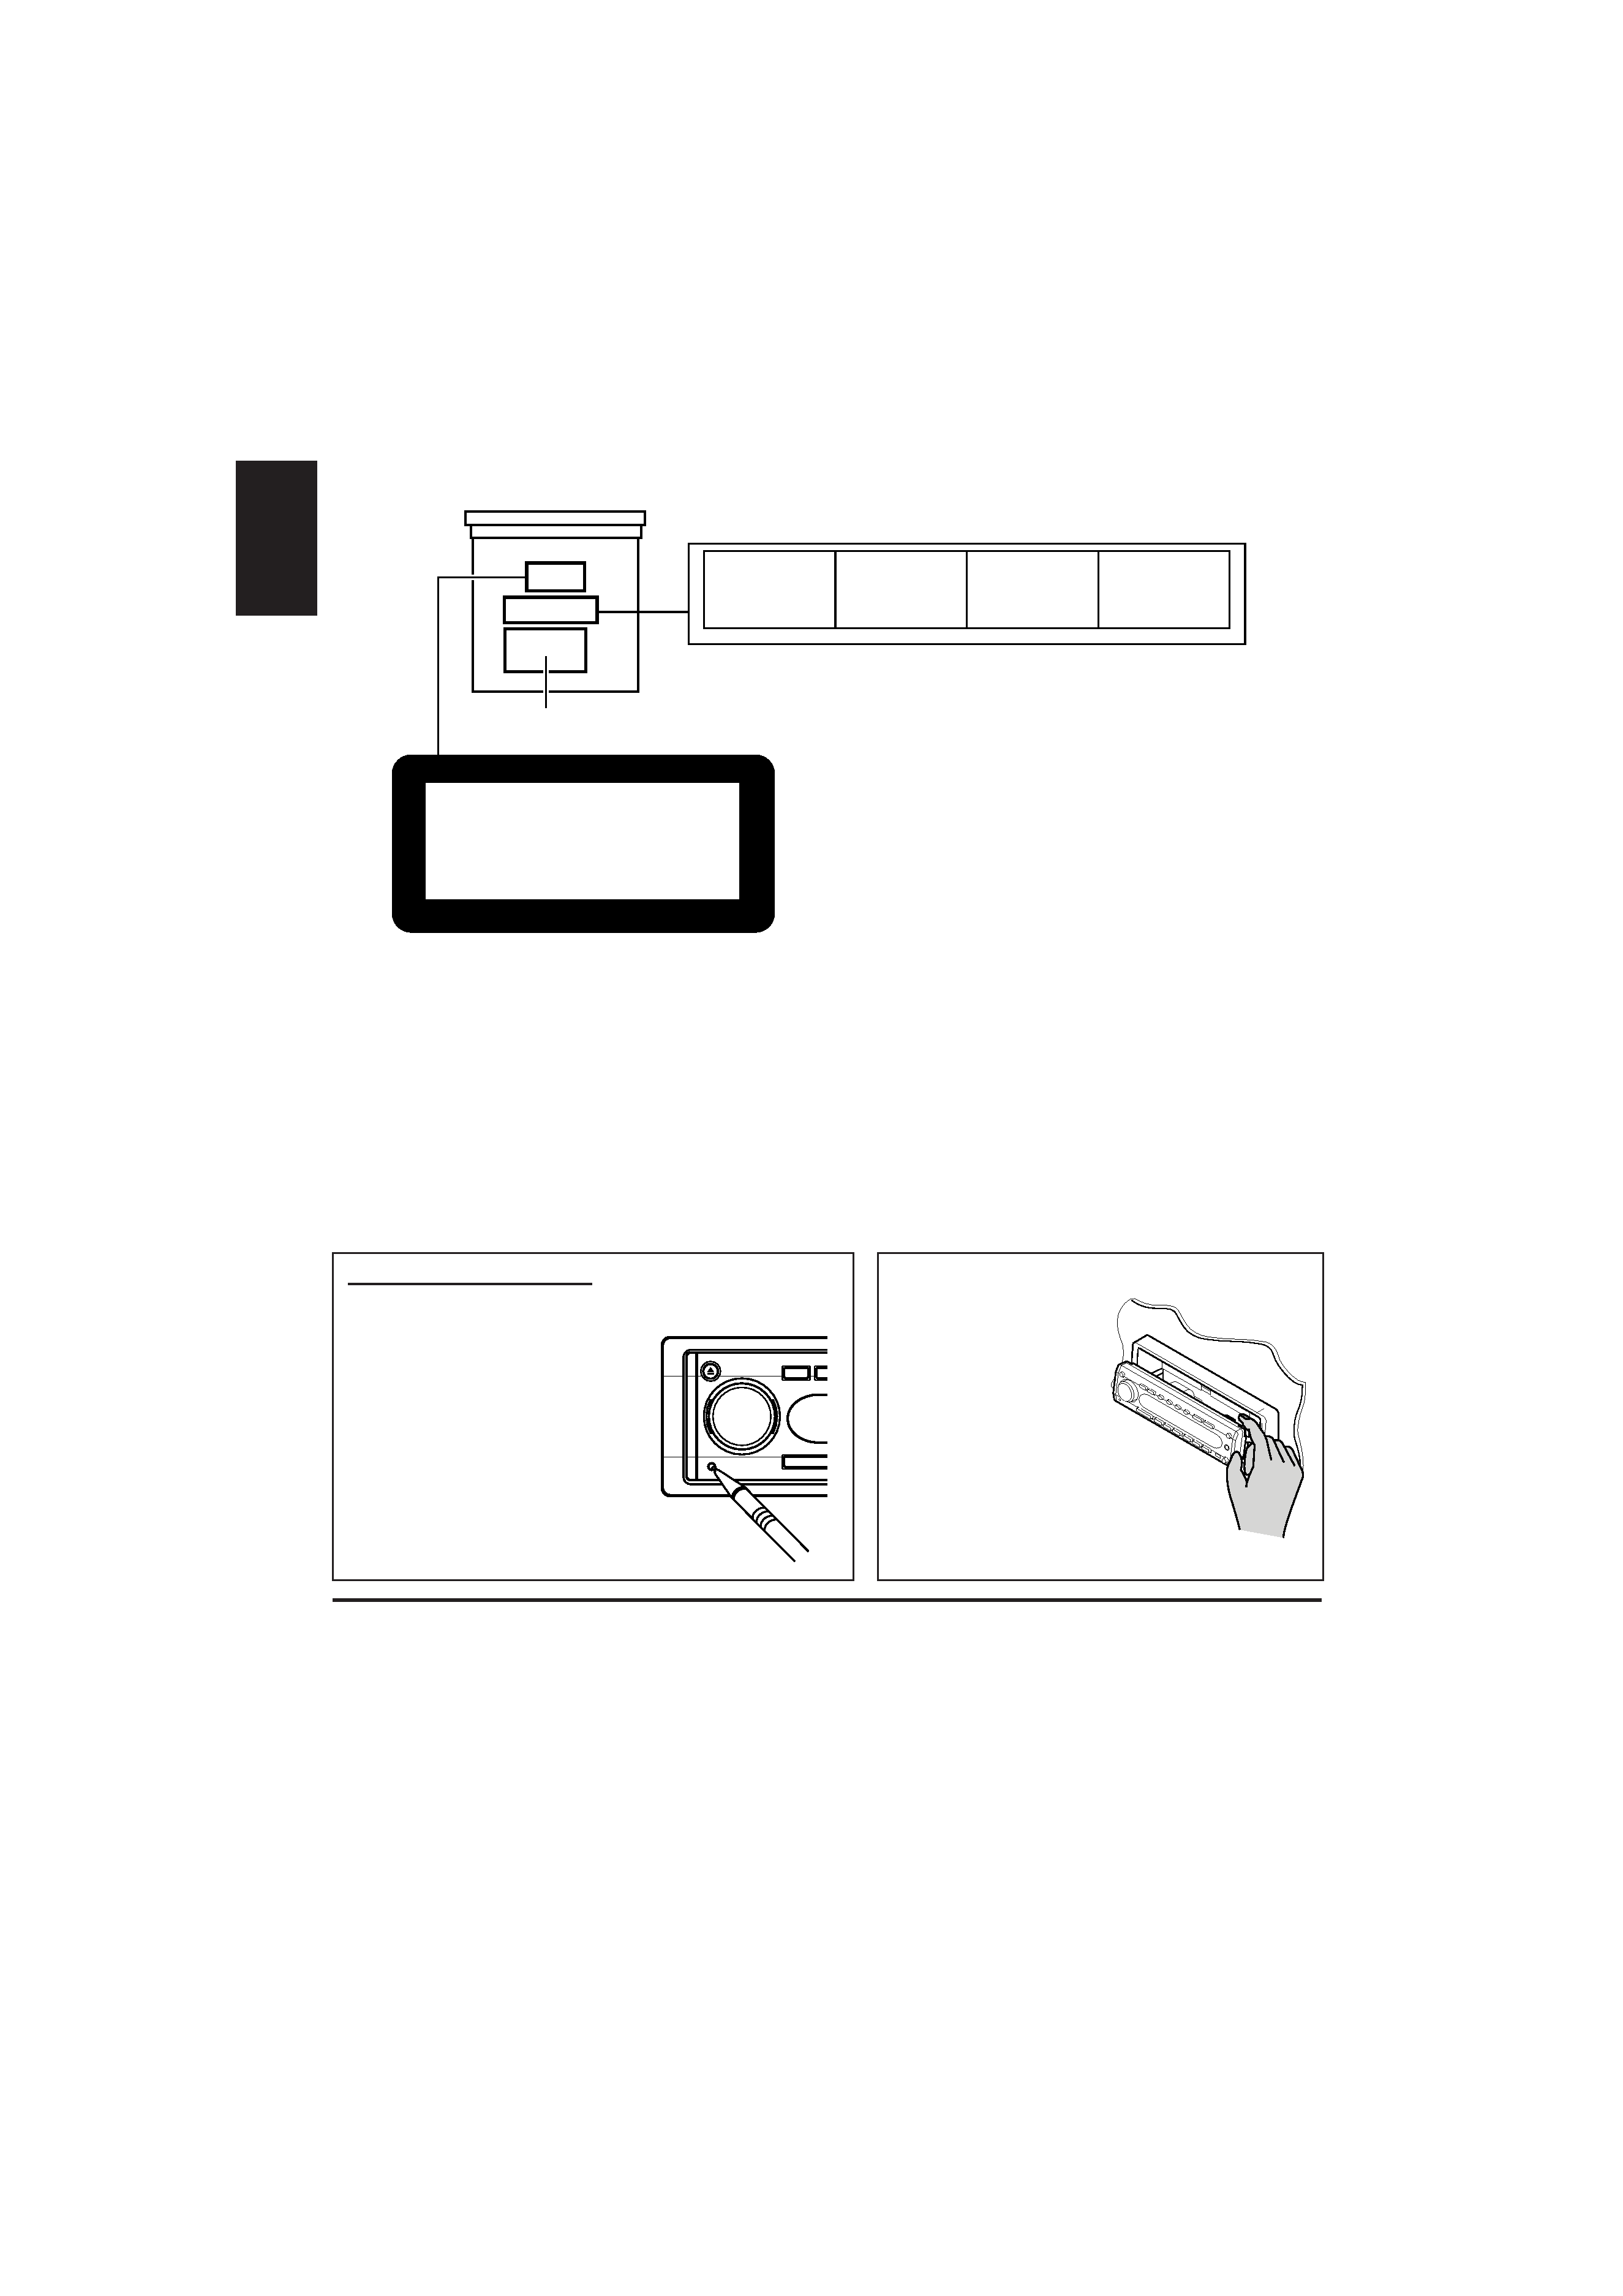
CAUTION:
NEVER insert your
finger in between the
control panel and the
unit, as it may get
caught or hurt.
(See page 42.)
How to reset your unit
Press the reset button on the front panel using a
ball-point pen or similar tool.
EN02_05SH909_707R[E]f.pm5
1/23/02, 11:18 AM
2

3
ENGLISH
CONTENTS
Thank you for purchasing a JVC product. Please read all instructions carefully before operation,
to ensure your complete understanding and to obtain the best possible performance from the unit.
How to reset your unit ...............................
2
How to use the M (mode) button ..............
4
How to change the display patterns .........
4
LOCATION OF THE BUTTONS ............
5
Control panel ...........................................
5
Remote controller ....................................
6
Preparing the remote controller ................
7
BASIC OPERATIONS ......................
8
Turning on the power ................................
8
Setting the clock ......................................
9
RADIO BASIC OPERATIONS ............. 10
Listening to the radio ................................
10
Storing stations in memory .......................
12
Tuning in to a preset station .....................
13
RDS OPERATIONS ........................ 14
What you can do with RDS .......................
14
Other convenient RDS functions and
adjustments ...........................................
18
CD OPERATIONS .......................... 21
Playing a CD ............................................
21
Locating a track or particular portion
on a CD .................................................
22
Playing a CD Text ....................................
23
Selecting CD playback modes ..................
23
Prohibiting disc ejection ............................
24
MP3 INTRODUCTION ..................... 25
(ONLY FOR KD-SH909R)
What is MP3? ..........................................
25
How are MP3 files recorded and
played back? .........................................
25
MP3 OPERATIONS ........................ 27
(ONLY FOR KD-SH909R)
Playing an MP3 disc .................................
27
Locating a file or particular portion
on an MP3 disc .....................................
29
Selecting MP3 playback modes ...............
32
SOUND ADJUSTMENTS .................. 33
Adjusting the sound .................................
33
Selecting preset sound modes (EQ) ........
34
Storing your own sound adjustments .......
35
OTHER MAIN FUNCTIONS ............... 36
Changing the general settings (PSM) ......
36
Assigning names to the sources ..............
41
Changing the control panel angle .............
42
Detaching the control panel ......................
43
EXTERNAL COMPONENT OPERATIONS ... 44
Playing external components ...................
44
CD CHANGER OPERATIONS ............. 46
Playing CDs .............................................
46
Selecting CD playback modes ..................
47
DAB TUNER OPERATIONS ............... 49
Tuning in to an ensemble and one of the
services .................................................
49
Storing DAB services in memory .............
51
Tuning in to a preset DAB service ............
52
What you can do more with DAB ..............
52
ADDITIONAL INFORMATION ............. 53
TROUBLESHOOTING ...................... 54
MAINTENANCE ............................ 56
Handling discs .........................................
56
SPECIFICATIONS .......................... 57
EN02_05SH909_707R[E]f.pm5
1/23/02, 11:18 AM
3
4
ENGLISH
CAUTION on Volume Setting
CDs produce very little noise compared with other sources. If the volume level is adjusted for the tuner, for
example, the speakers may be damaged by the sudden increase in the output level. Therefore, lower the
volume before playing a disc and adjust it as required during playback.
Note:
For security reasons, a numbered ID card is provided with this unit, and the same ID number is imprinted on
the unit's chassis. Keep the card in a safe place, as it will help the authorities to identify your unit if stolen.
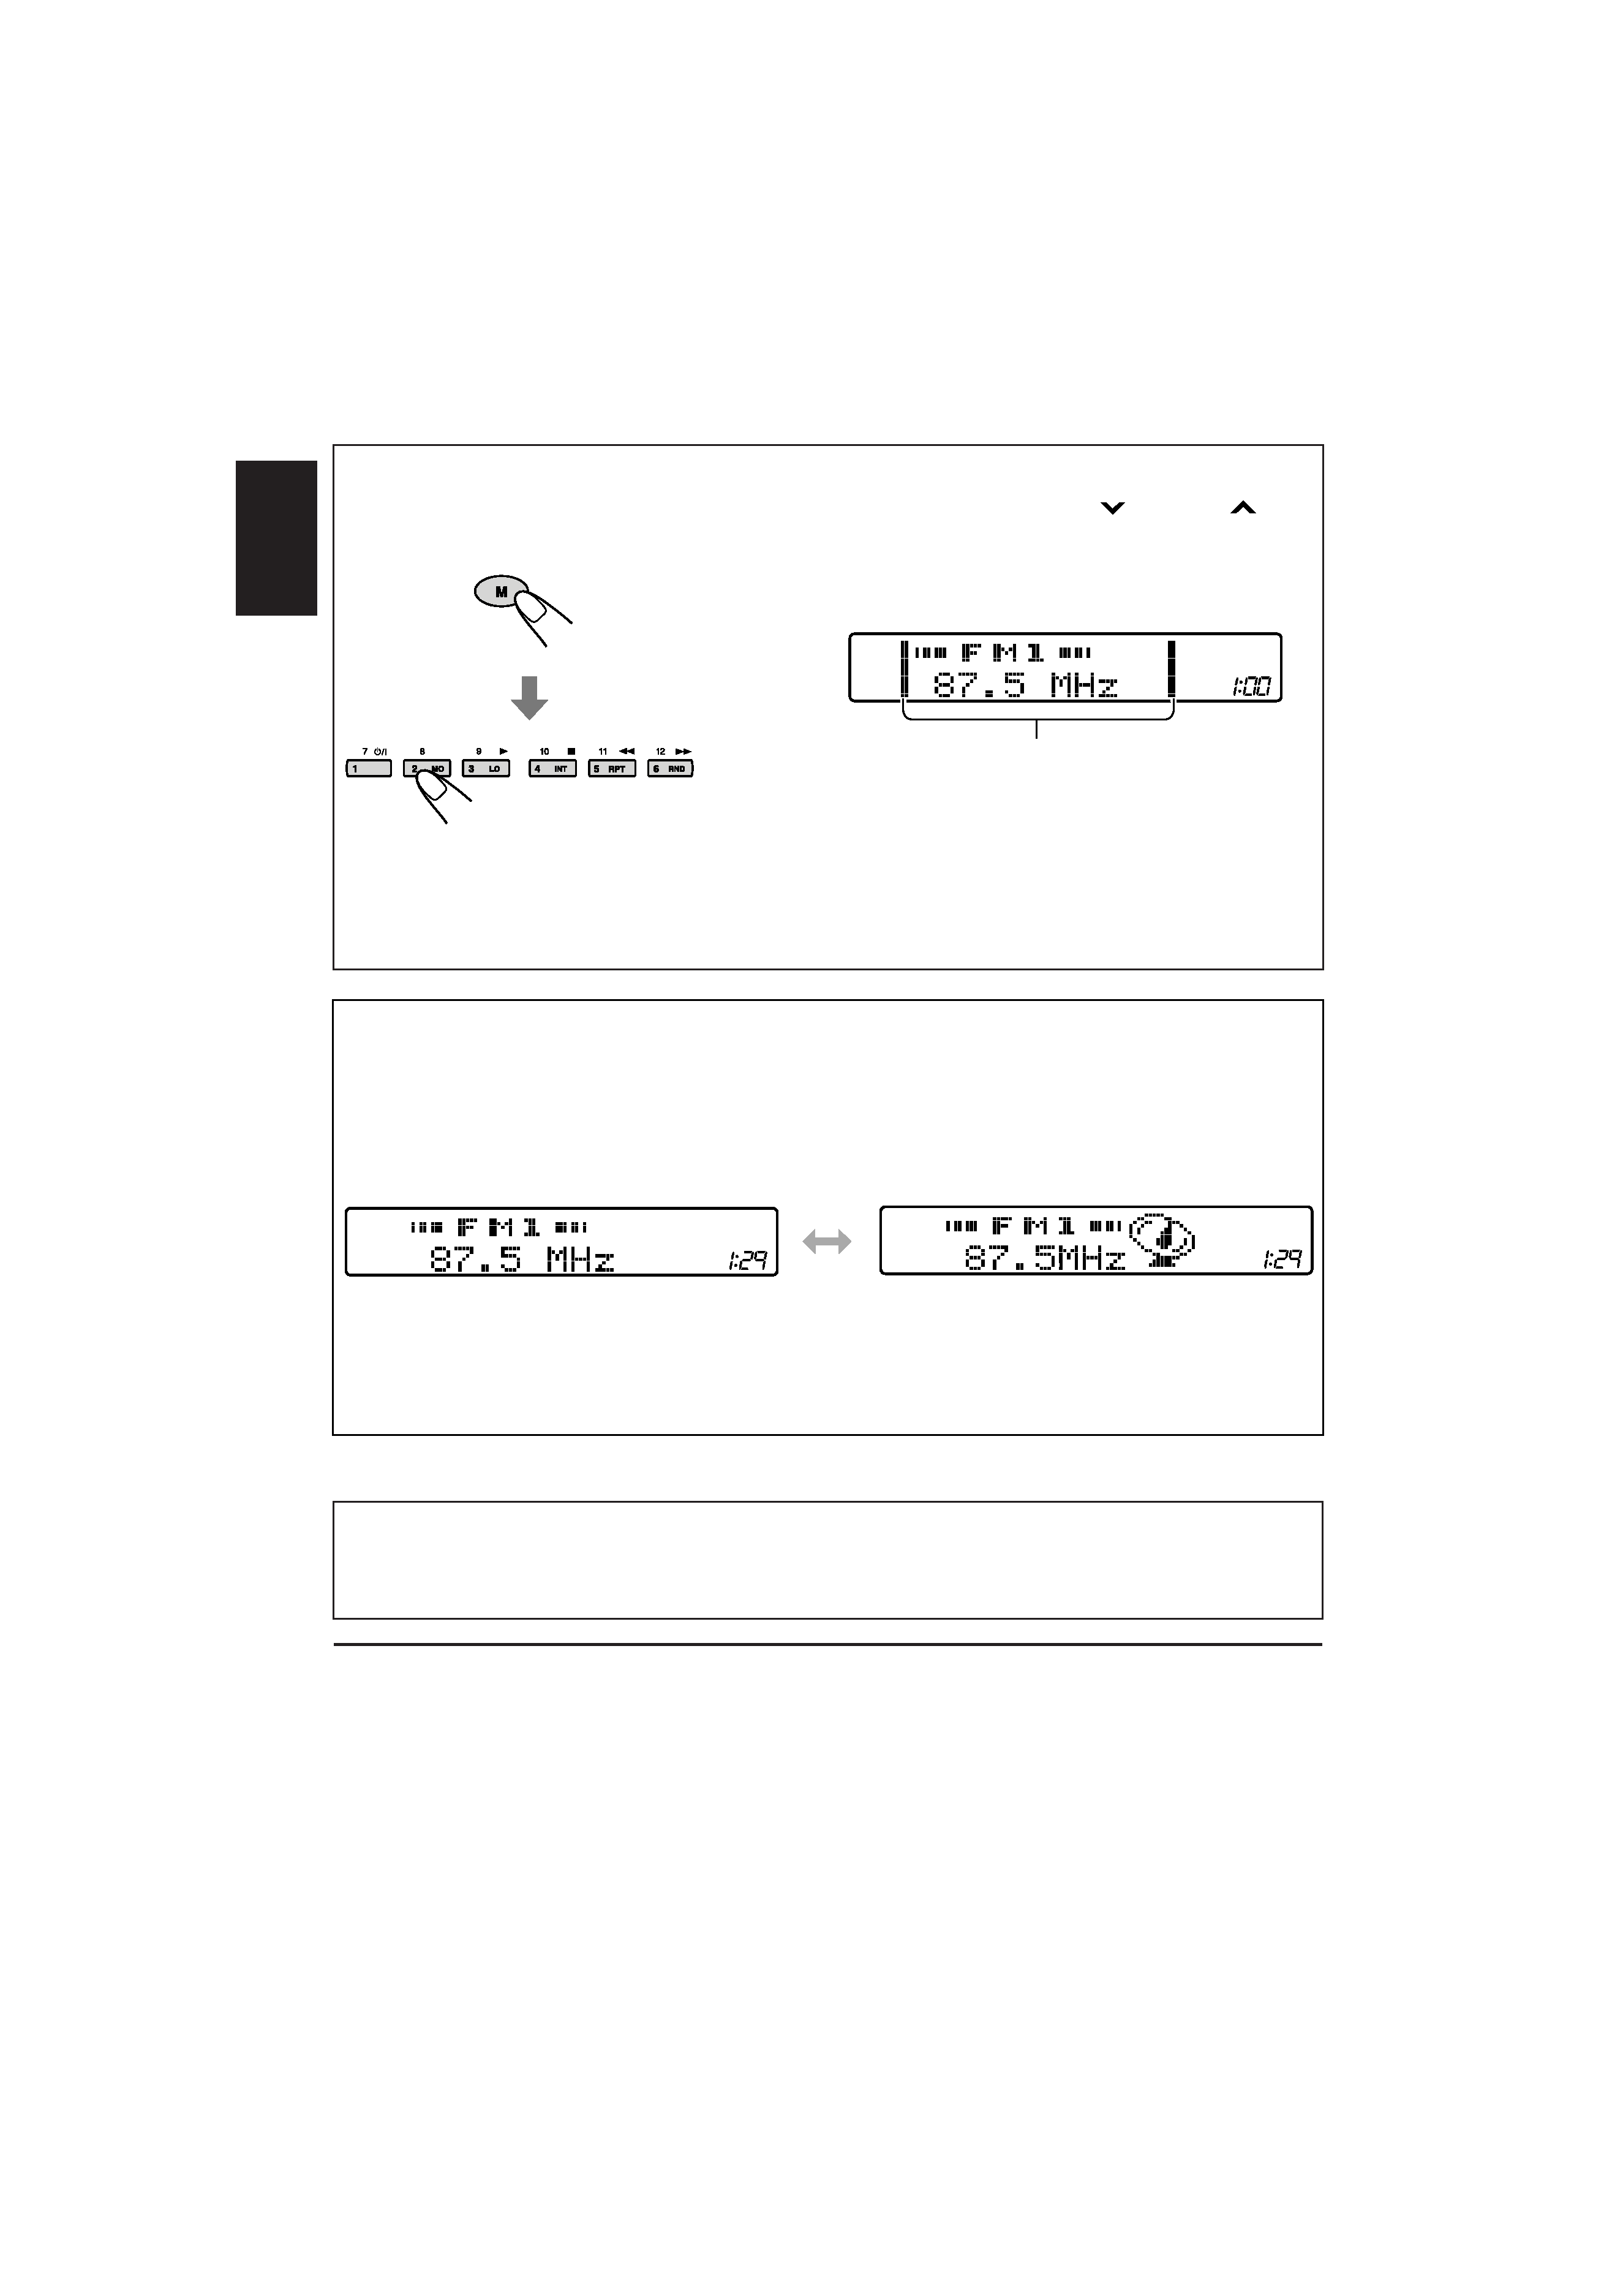
How to change the display patterns:
This unit is equipped with two display indication patterns with or without the source symbol
animation.
To change the display patterns, press M (mode), then press D (display) within 5 seconds.
Each time you press D (display), the display patterns change as follows:
Note:
The display illustrations used in this manual are with the source symbol animations and with "CLOCK" set to
"ON." (See page 38.)
How to use the M (mode) button:
If you press M (mode), the unit goes into functions mode and the number,
4/¢
and
D (display) buttons work as different function buttons.
To use these buttons for their original functions (ex. as the number buttons) again after pressing
M (mode), wait for 5 seconds without pressing any of these buttons until the functions mode is cleared.
· Pressing M (mode) again also clears the functions mode.
During functions mode:
Time countdown indicator lights up
Ex.: While receiving an FM station...
(Initial setting)
EN02_05SH909_707R[E]f.pm5
1/23/02, 11:18 AM
4
5
ENGLISH
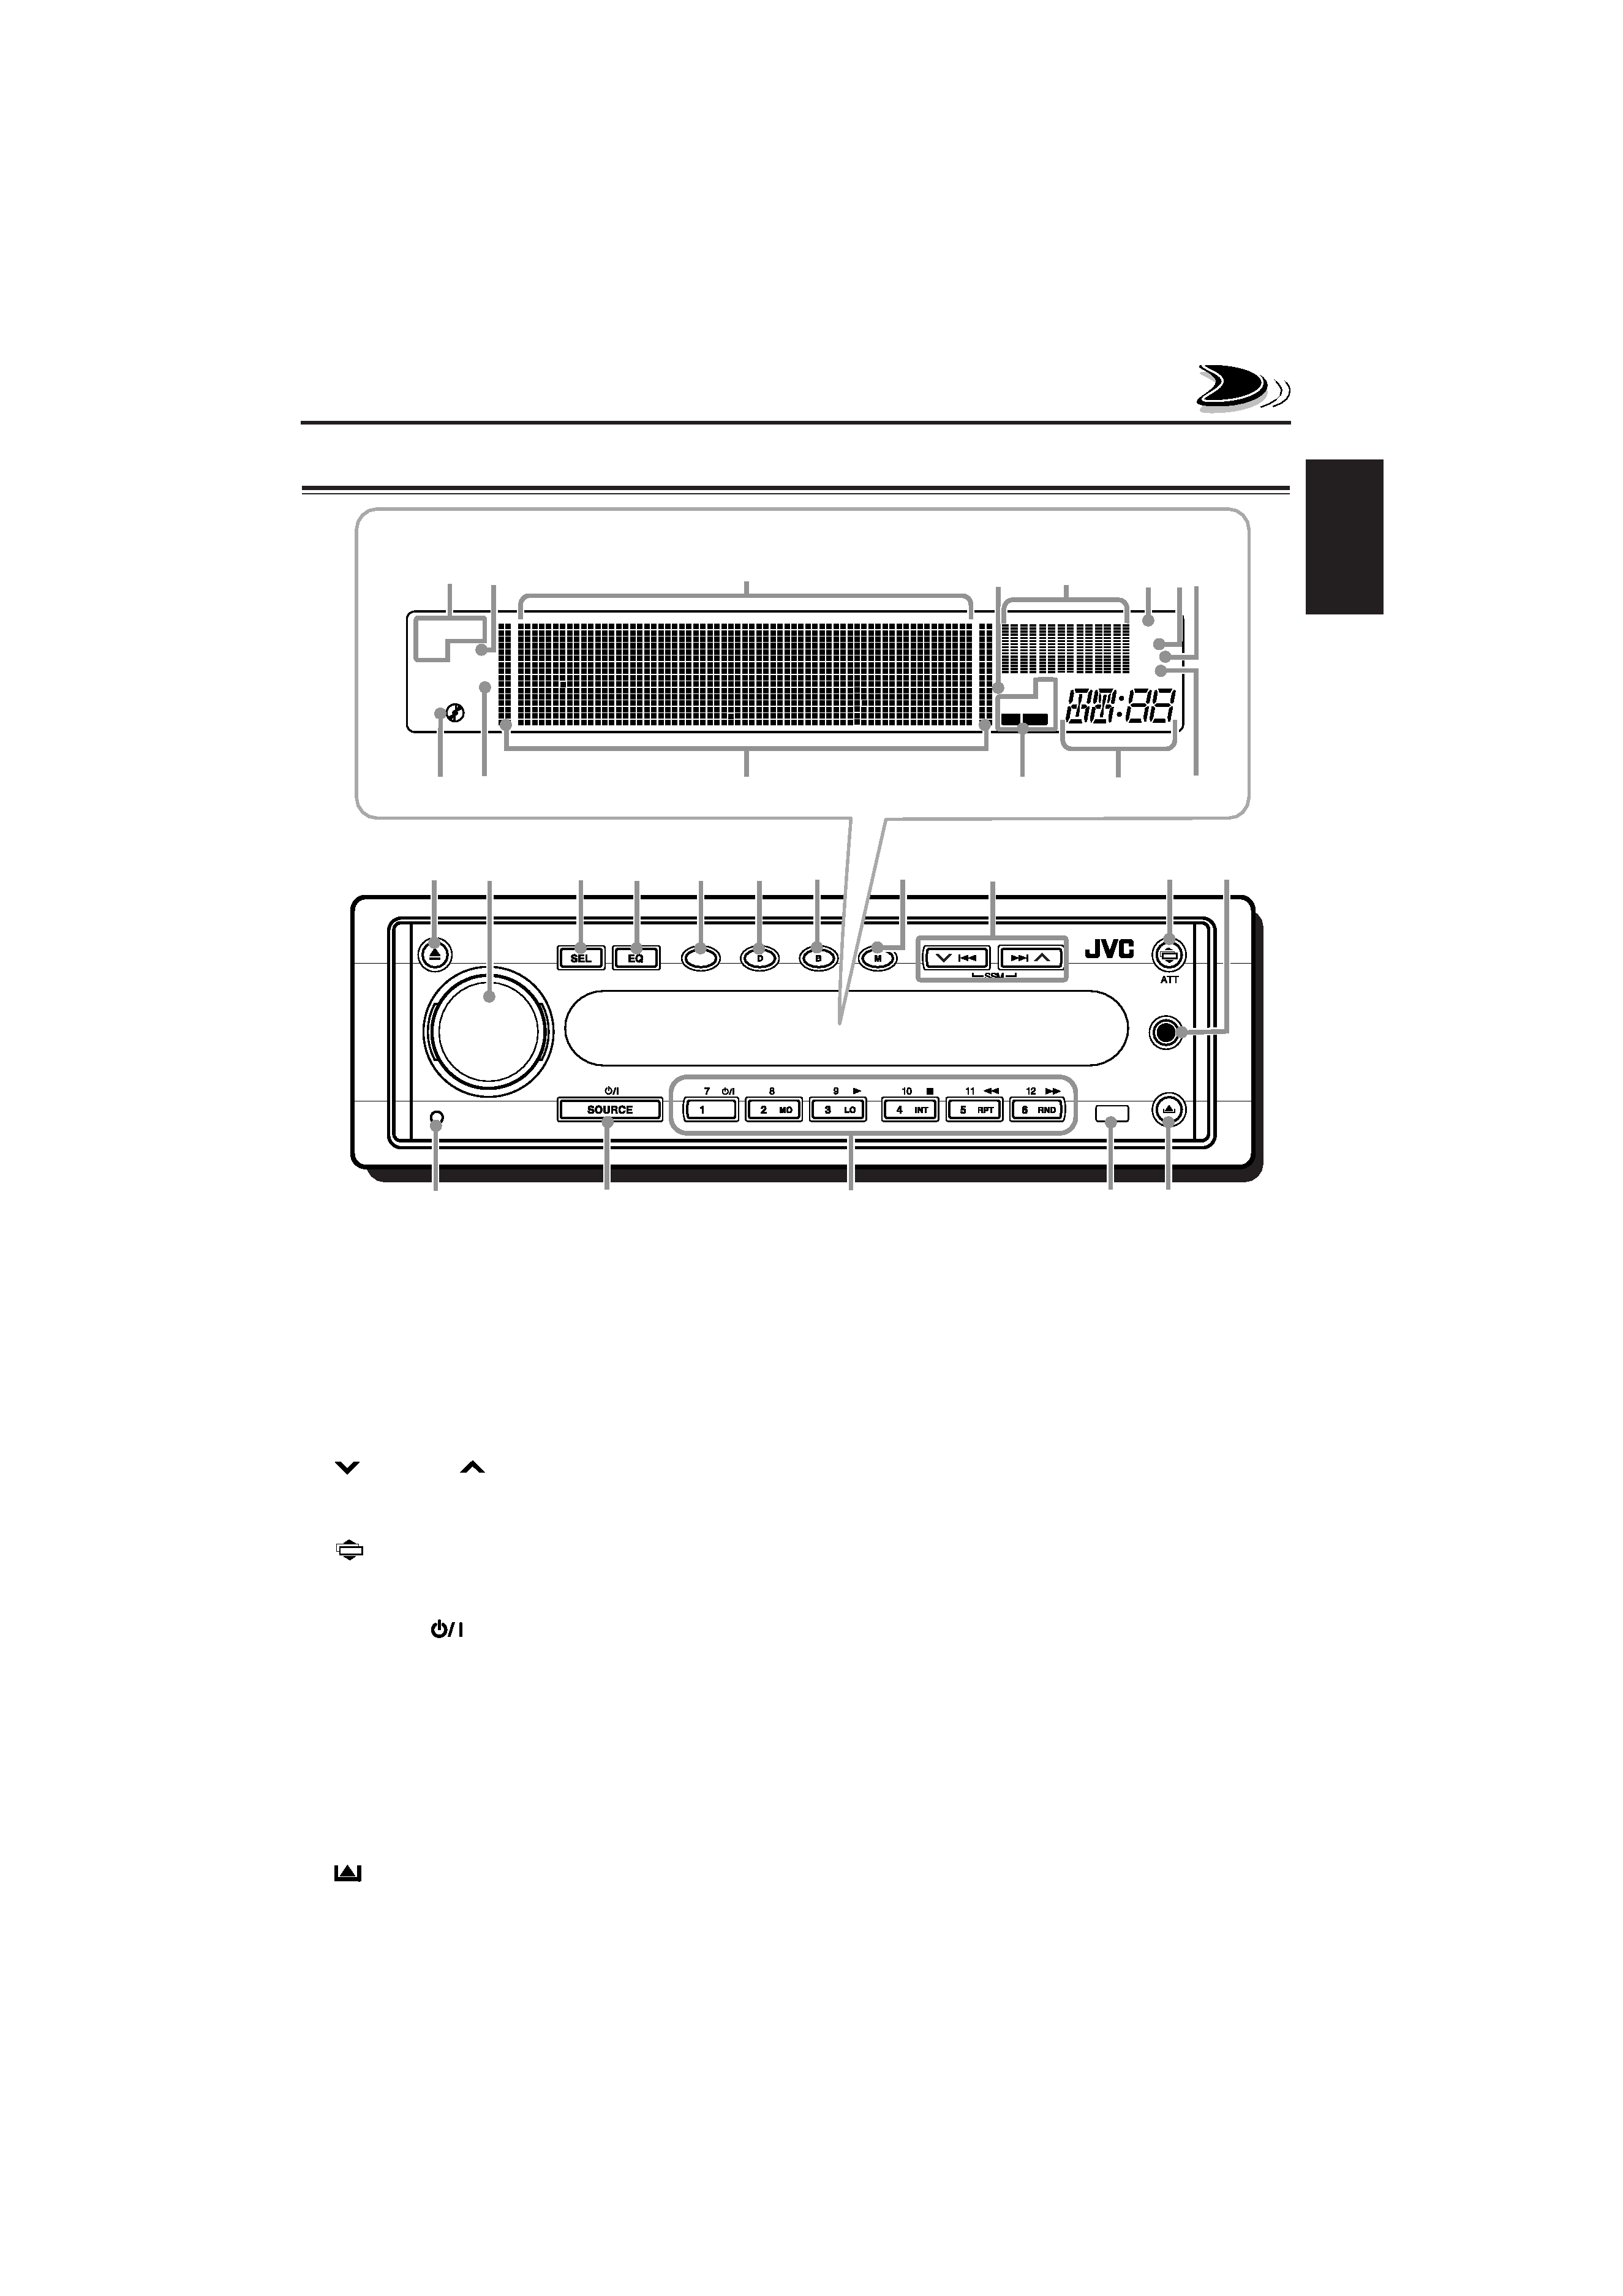
Control panel
LOCATION OF THE BUTTONS
T/P
1
2
3
r
y
t
e
4
5
6
7
8
9
q
p
DIRECTORY
TRACK
FILE DISC
LOCAL
RPT
ST
RND
REG
TP PTY
AF
MO
w
i
g hj
o
kl
;
/
a
sdf
u
Display window
Display window
u MP3 indicators (only for KD-SH909R)
DIRECTORY, FILE
i DISC indicator
o Main display
; LOCAL indicator
a Level display indicator
s RPT (repeat) indicator
d ST (stereo) indicator
f RND (random) indicator
g CDin indicator
h TRACK indicator
j Time countdown indicator
k RDS indicators
AF, REG, TP, PTY
l Source/clock indicator
/ MO (monaural) indicator
1
0 (eject) button
2 Control dial
3 SEL (select) button
4 EQ (equalization) button
5 T/P (traffic/programme type) button
6 D (display) button
7 B (band) button
8 M (mode) button
9
4/¢
buttons
· Also function as SSM buttons when pressed
together.
p
ATT (angle/attenuator) button
q Auxiliary input jack
w Reset button
e SOURCE
(standby/on) button
r Number buttons
· MO (monaural) button
· LO (local) button
· INT (intro scan) button
· RPT (repeat) button
· RND (random) button
· DVD/Video component operation buttons
t Remote sensor
y
(control panel release) button
EN02_05SH909_707R[E]f.pm5
1/23/02, 11:18 AM
5