KA-C76 DOME COVER
INSTRUCTIONS
Thank you for purchasing this product.
Please read this instruction manual carefully before use.
Retain this manual so that you may refer to it when necessary.
For inquiries related to installation, etc., please consult your dealer.
Supplied Accessories
Blind Mask (
2)
INSTRUCTIONS
(This Document)
CAUTION
Remove the dome type camera (TK-C676 or TK-C655) from the ceiling before attach-
ing the dome cover (KA-C76). Otherwise, the dome type camera may drop from the
ceiling and cause an accident.
When using a (KA-C76) dome cover in a dark place, remember that the amount of
light transmission is reduced when a (KA-C76) dome cover is attached.
Due to the dome cover's semispherical shape, near its edge there will be distortion in
the image. The dome camera masks the edge of the semisphere, so when the cam-
era is tilted to the horizontal position the edge of the semisphere enters the picture,
causing the upper edge of the image to appear blacked out or the focus to become
fuzzy.
When replacing a part, take care not to scratch or stain the lens surfaces or the dome
cover.
KA-C76 DOME COVER
Instructions
Thank you for purchasing this product.
Please read this instruction manual carefully before use.
Retain this manual so that you may refer to it when necessary.
For inquiries related to installation, etc., please consult your dealer.
Supplied Accessories
Blind Mask (
2)
Instruction Manual
(This Document)
CAUTION
Remove the dome type camera (TK-C676, TK-C655) from the ceiling before attach-
ing the dome cover (KA-C76). Otherwise, the dome type camera may drop from the
ceiling and cause an accident.
When using a (KA-C76) dome cover in a dark place, remember that the amount of
light transmission is reduced when a (KA-C76) dome cover is attached.
Due to the dome cover's semispherical shape, near its edge there will be distortion in
the image. The dome camera masks the edge of the semisphere, so when the cam-
era is tilted to the horizontal position the edge of the semisphere enters the picture,
causing the upper edge of the image to appear blacked out or the focus to become
fuzzy.
When replacing a part, take care not to scratch or stain the lens surf aces or the dome
cover.
KA-C76.Inst
02.11.29, 9:56 AM
3
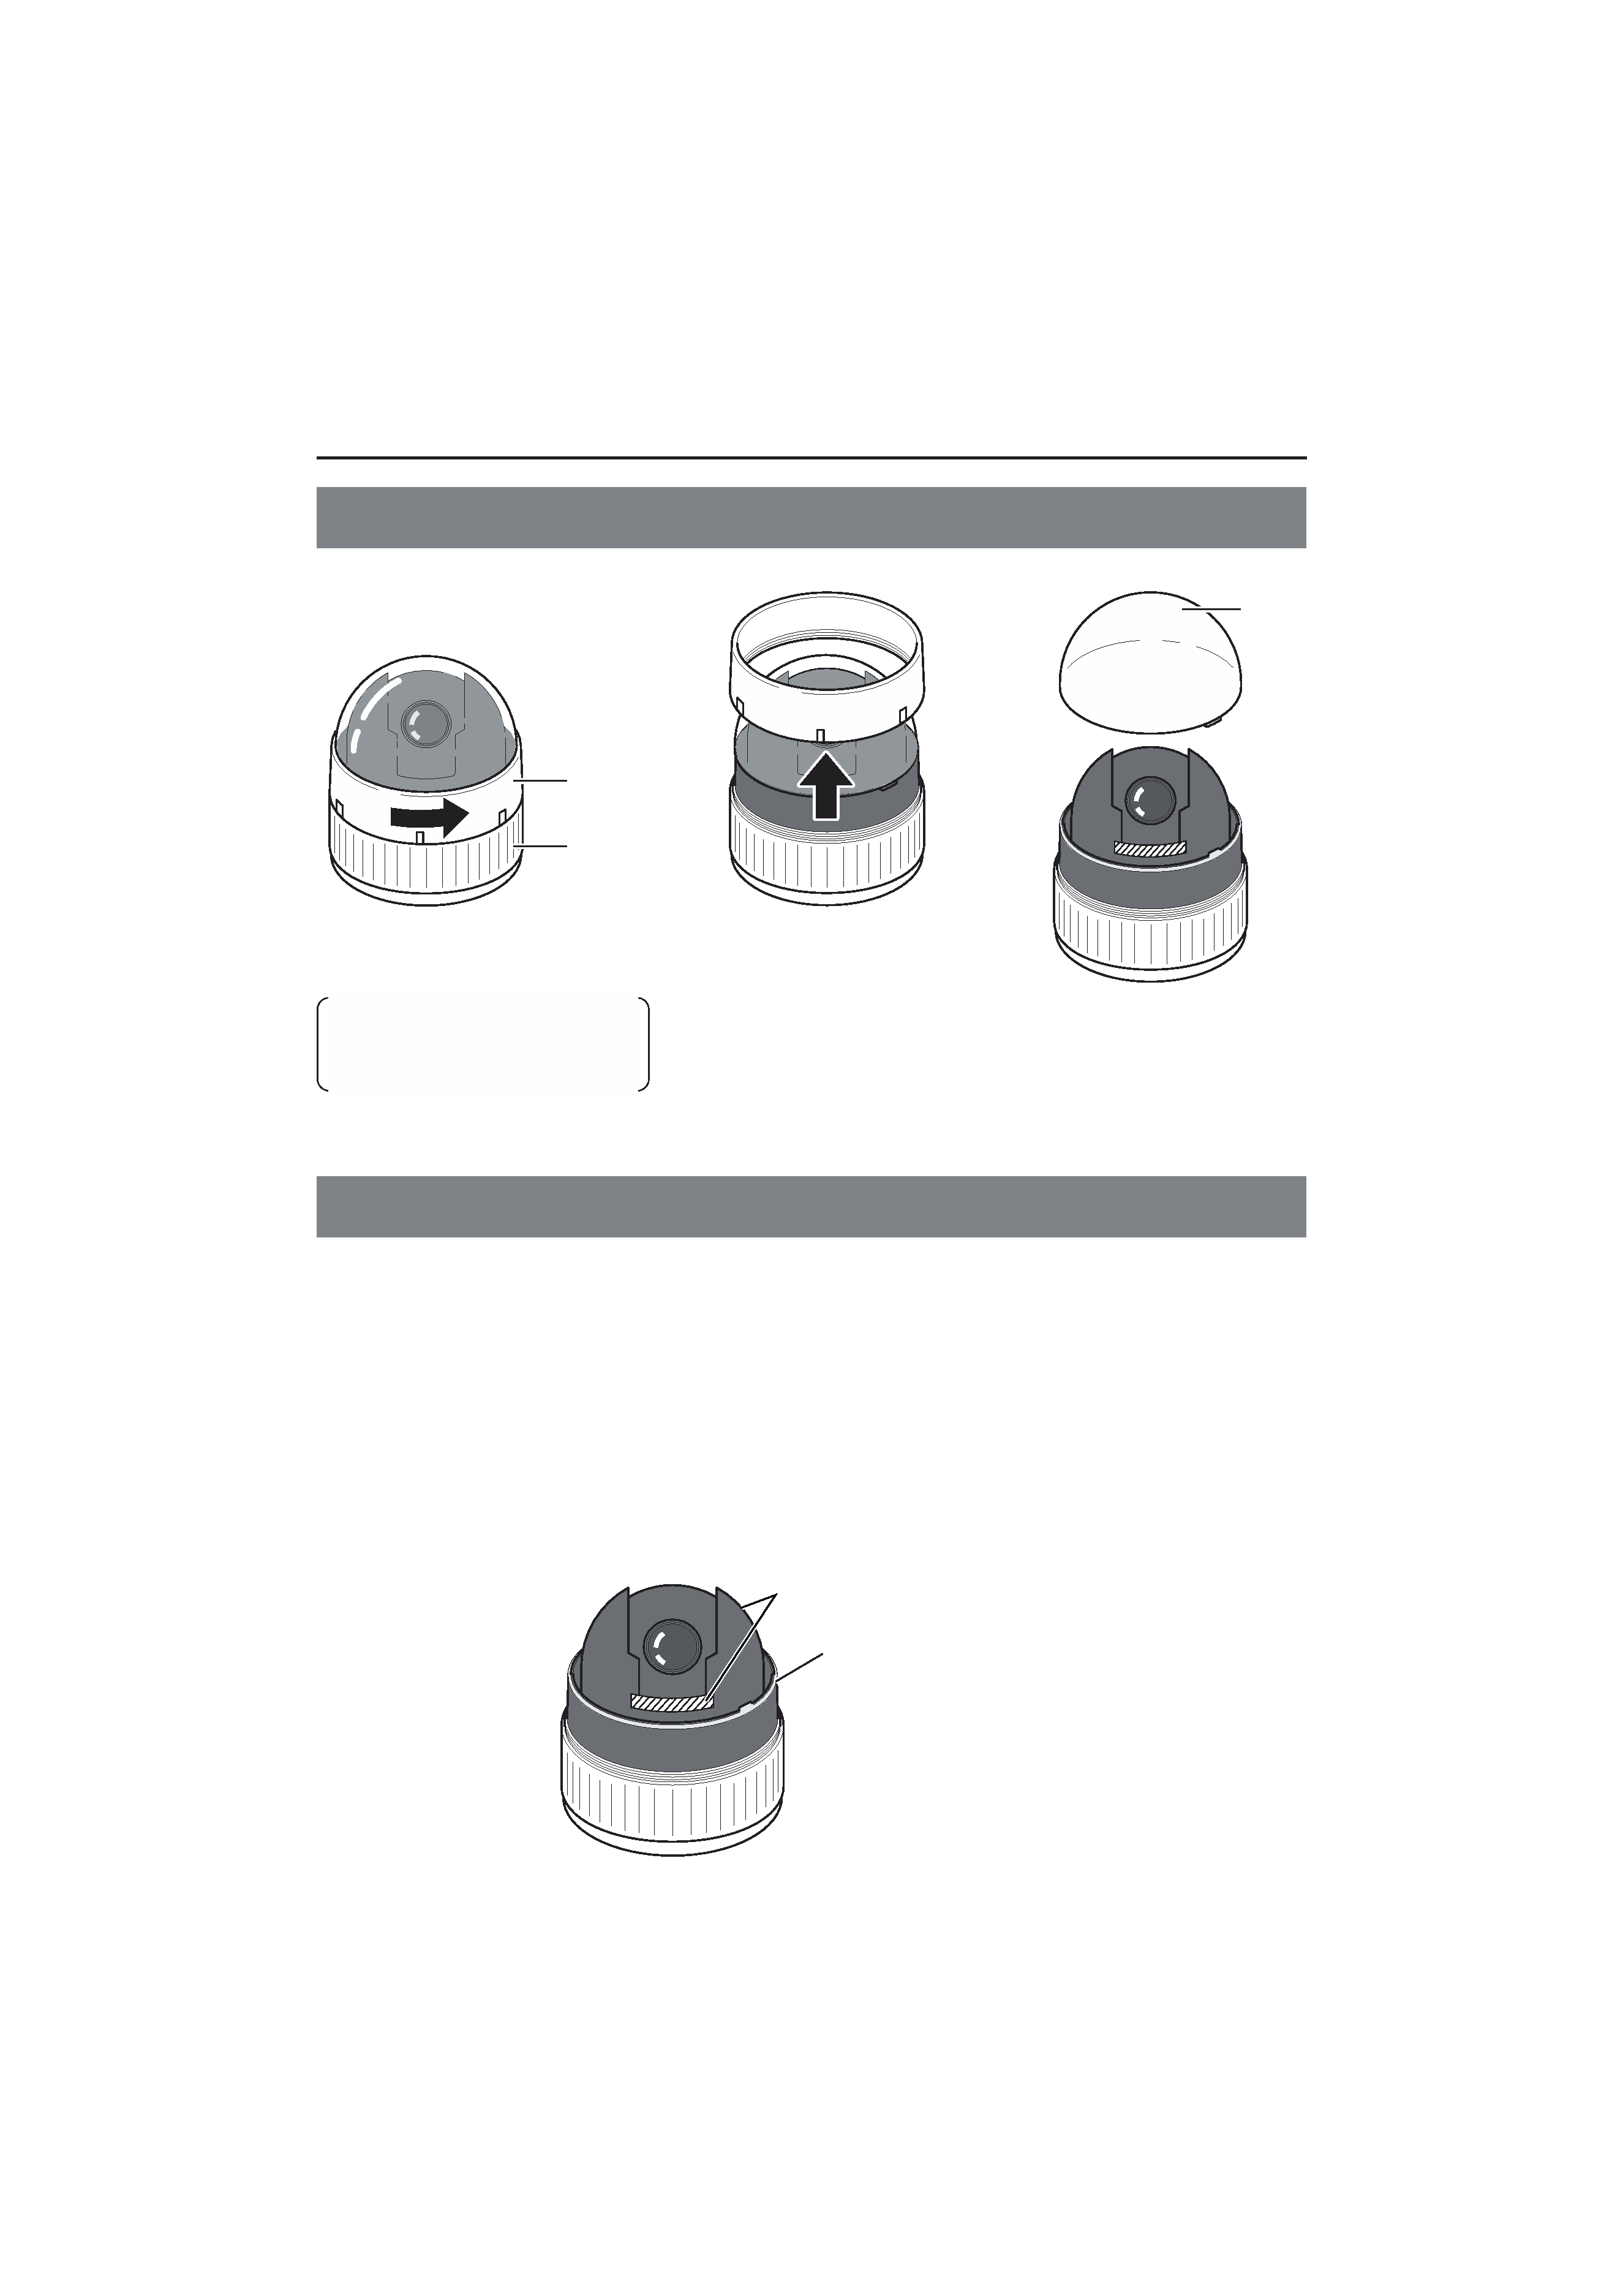
Removing the Dome Cover
How to replace the dome cover
Main body
cover
Main body
Dome
cover
1.
2.
3.
Turn the main body cover to the
direction of the arrow.
If the main body cover is too
tight to turn, turn it after fixing
the main body.
Remove the main
body cover.
Remove the dome cover.
Attaching the Dome Cover (KA-C76)
Make sure before attaching the dome cover (KA-C76)
After making sure that the blind masks (2 places) and rubber packing are in place as
shown in the illustration below, attach the dome cover.
Note: If the blind masks are not located as shown in the illustration below, first complete
the procedures as described in the chapter "Attaching Blind Masks".
Note: If the rubber packing parts are not located as shown in the illustration below, first
complete the procedures as described in the chapter "Attaching the Rubber
Packing".
Blind Mask (x2, front and back)
Rubber Packing
KA-C76.Inst
02.11.29, 9:56 AM
4
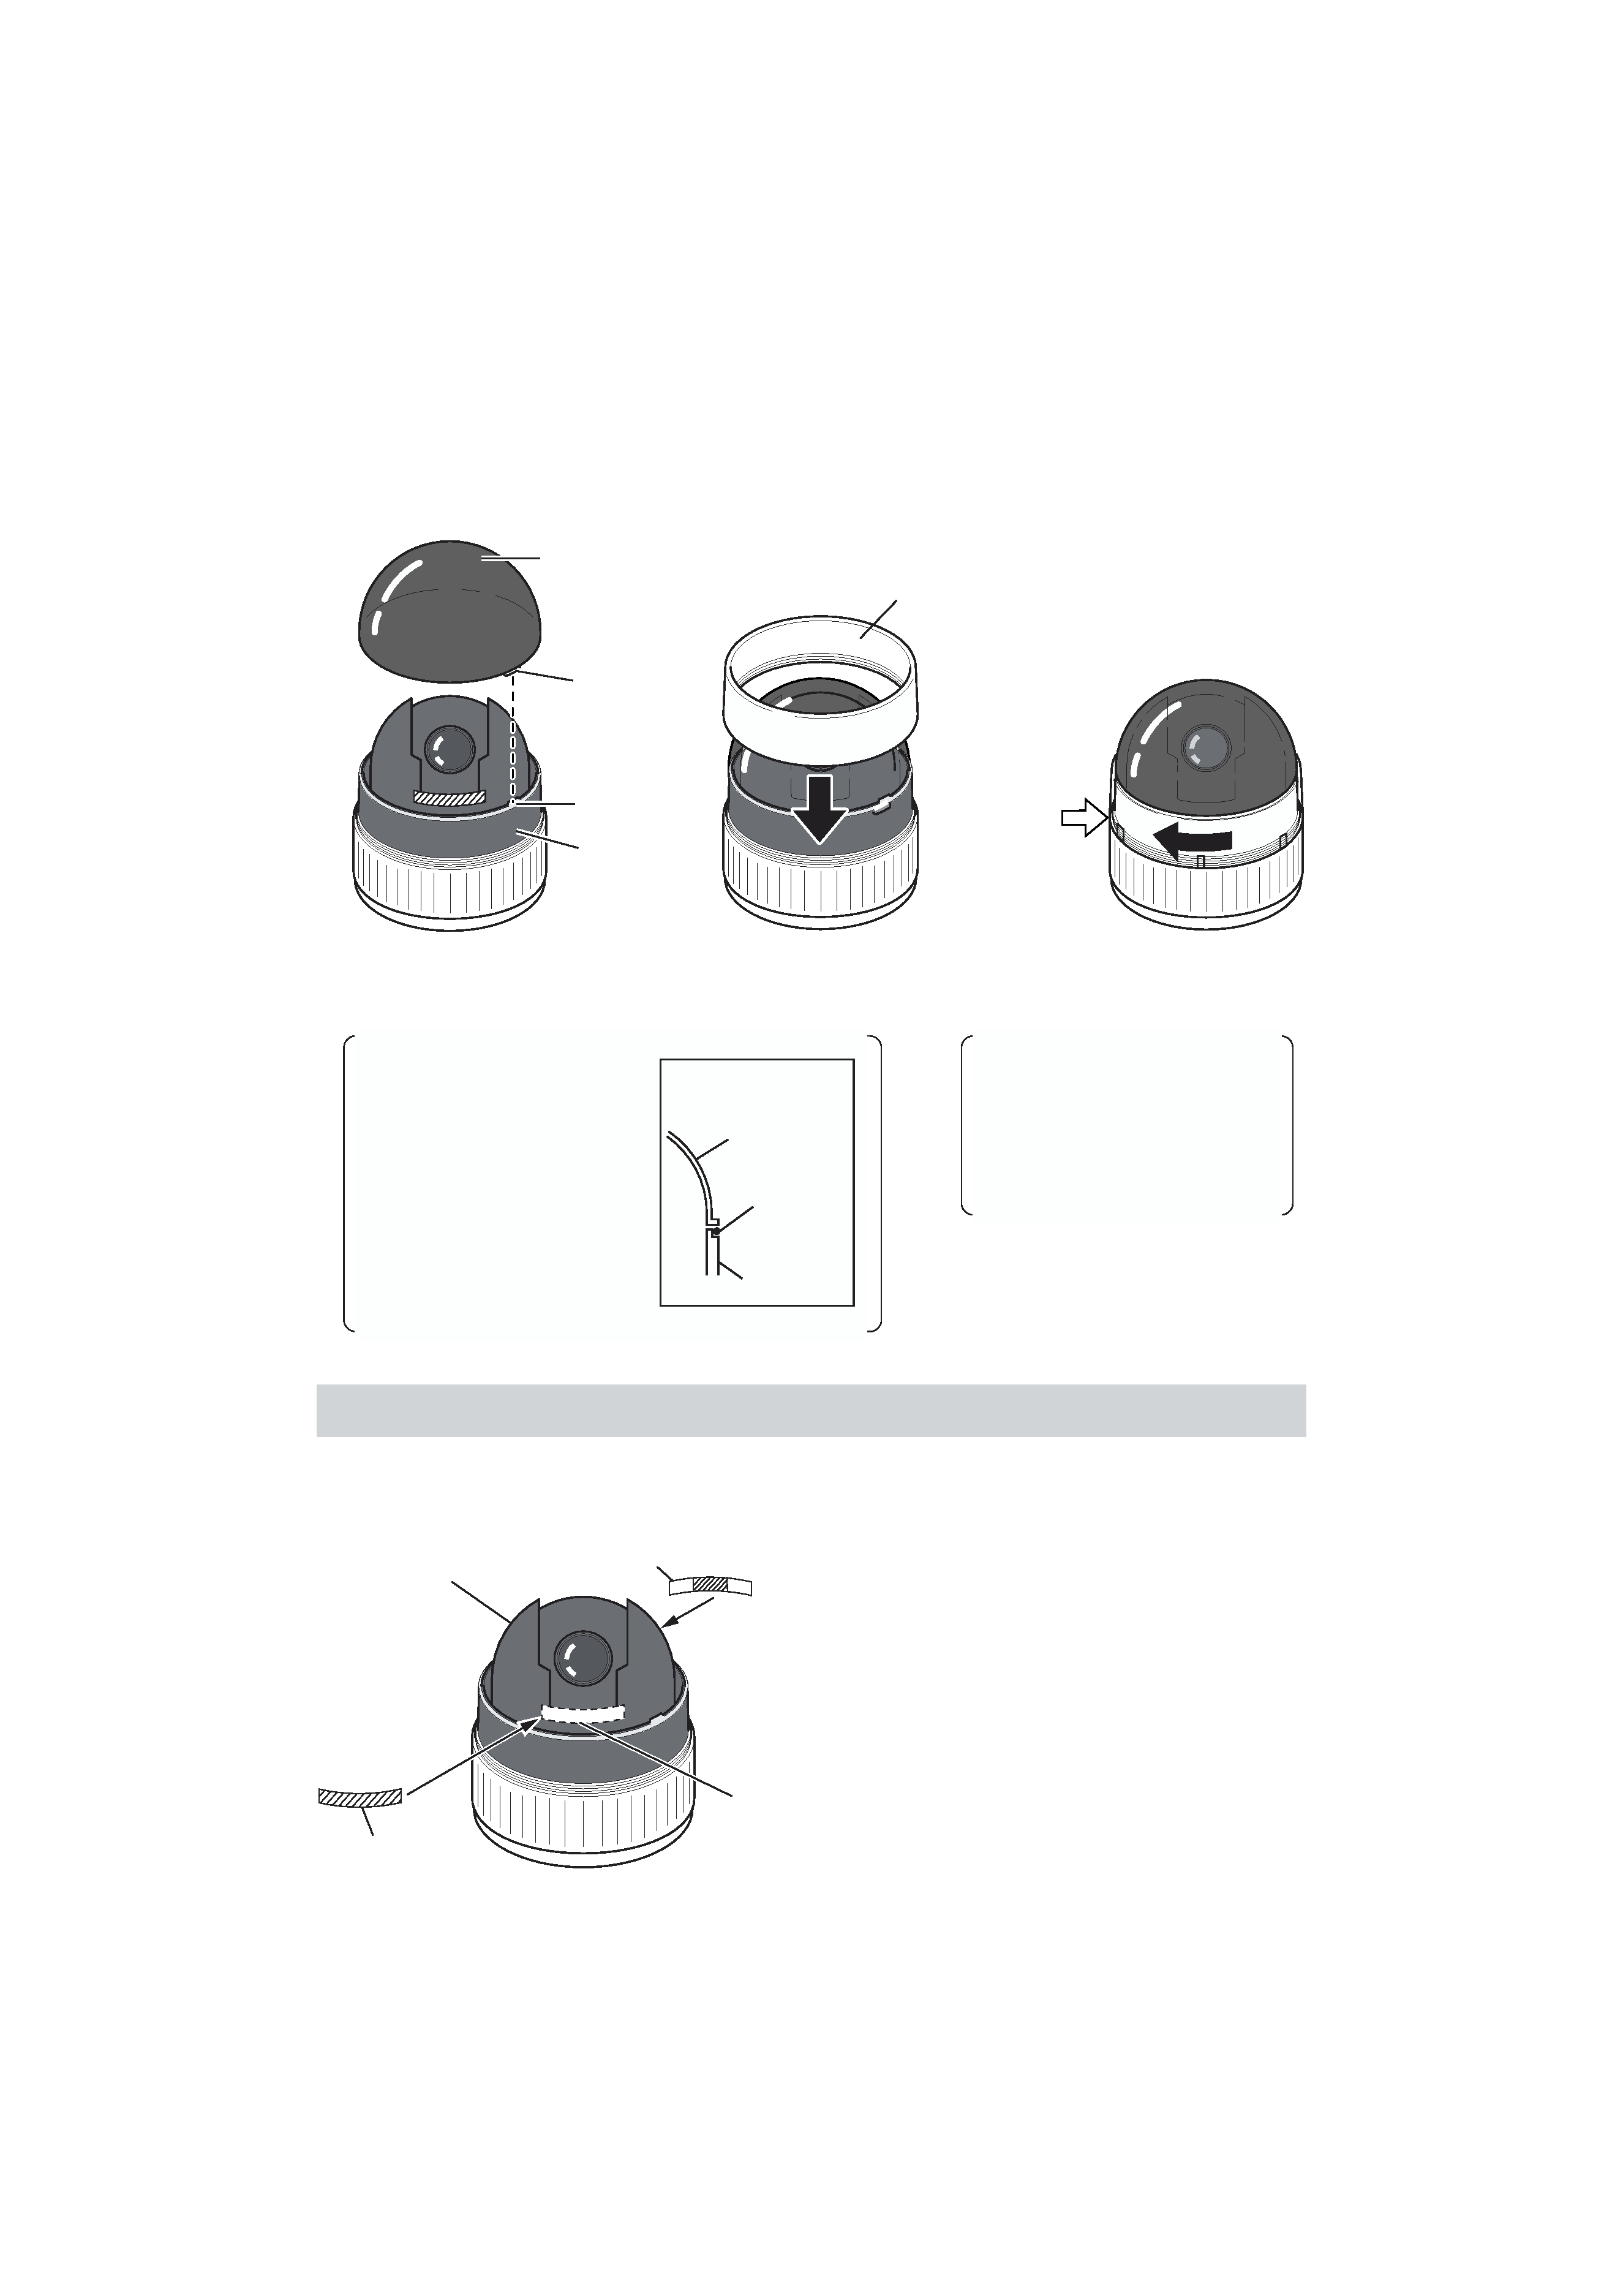
Attach the cover after confirming the blind masks and rubber
packing parts
1.
2.
3.
Dome
Cover (KA-C76)
Tab
Groove
Pipe
Main body
cover
Clearance
Align the tab on the dome cover (KA-
C76) with the groove on the pipe and
fit the dome cover.
In some instances, the rubber
packing parts may be displaced
when removing the dome cover.
Check that the rubber packing
parts are attached correctly. If
they are not correctly attached,
re-attach them so they are
positioned as shown in the
illustration. If they are skewed or
displaced inwards, it will not be
possible to attach the dome
cover correctly.
Attach the main
body cover.
In order to secure the main body
cover, turn it in the direction
indicated.
Secure the dome cover so that the
clearance between the main body
cover and the main body is no
more than 0.5 mm. If it is secured
incompletely, the dust- and drip-
proof performances cannot be
guaranteed.
Dome Cover
Cross-section
Rubber
Packing
Pipe
Attaching Blind Masks (if they are not already attached)
If blind masks are not already attached, attach the provided
ones.
1. Align the blind mask's lower
edge with the edge of the inner
cover Å and affix it. Do the
same for the opposite side.
Note: Make sure that the blind masks are
attached securely so they do not
come off.
Å
Blind Mask
Blind Mask
Inner Cover
KA-C76.Inst
02.11.29, 9:56 AM
5
VICTOR COMPANY OF JAPAN, LIMITED
Printed in Japan
LWT0089-001A
© 2002 VICTOR COMPANY OF JAPAN, LIMITED
is a registered Trademark owned by VICTOR COMPANY OF JAPAN, LTD.
is a registered Trademark in JAPAN, the U.S.A., the U.K. and many other countries.
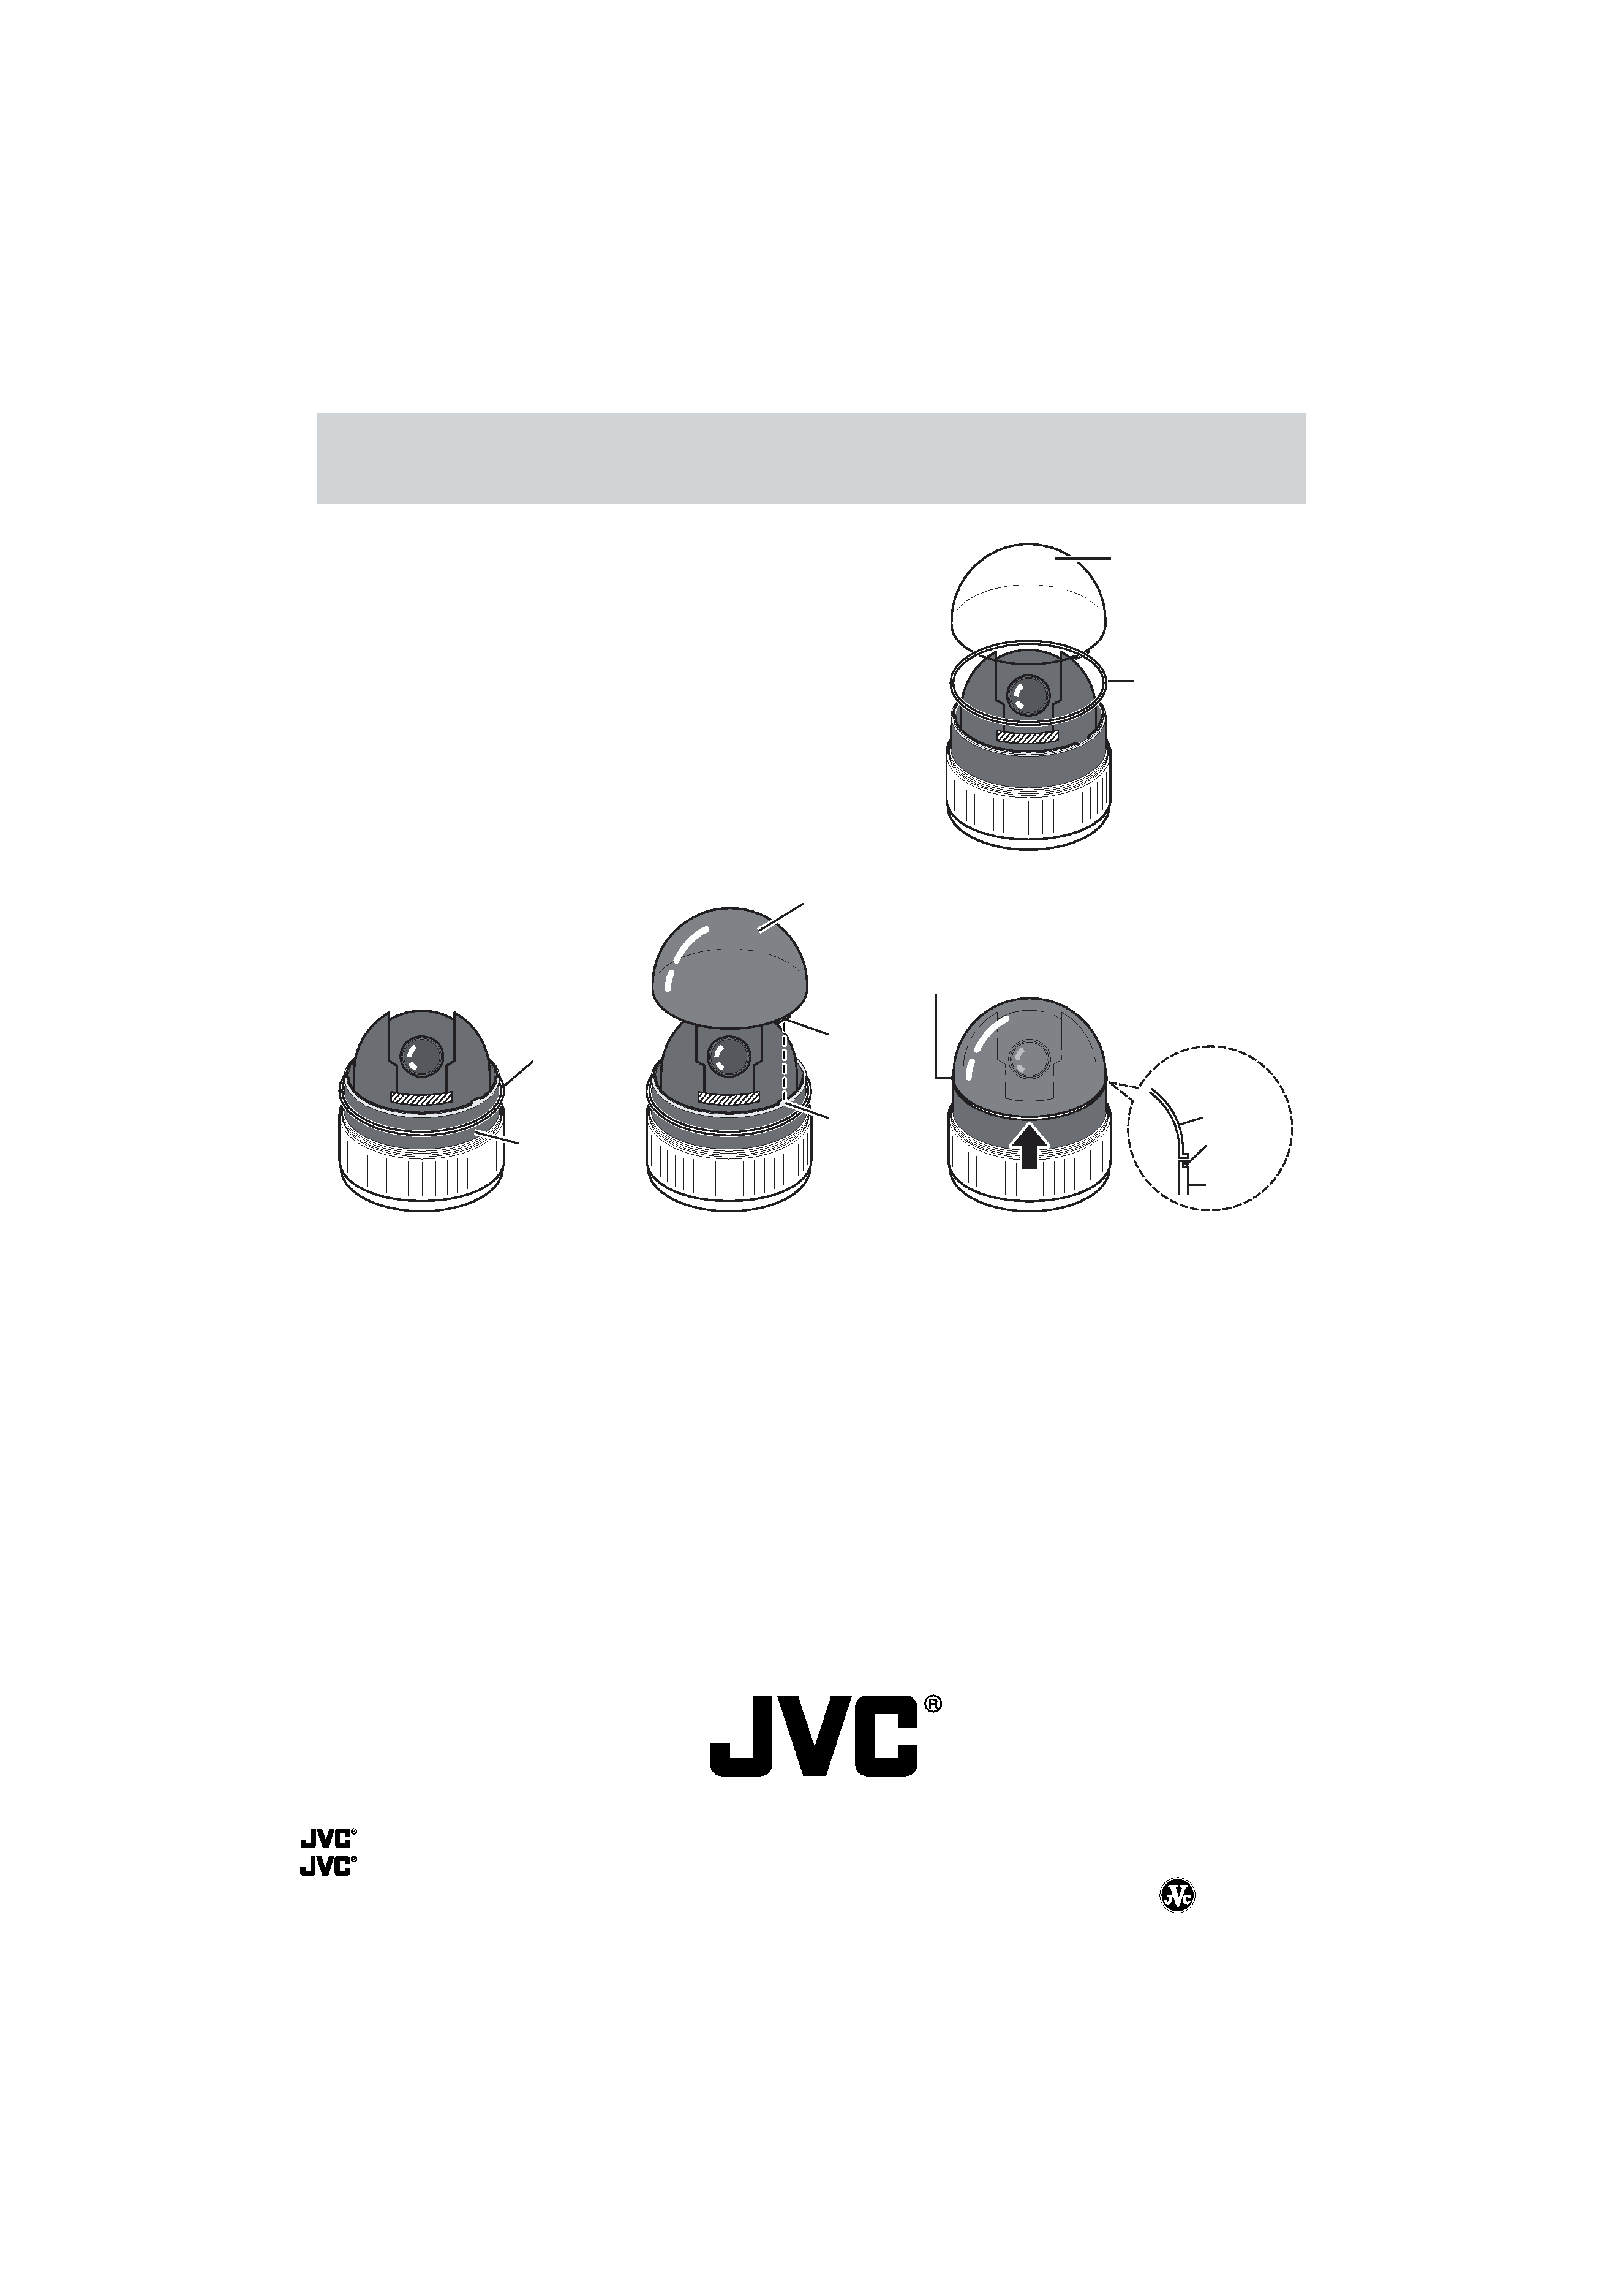
Attaching the Rubber Packing
(if it is not already attached to the camera main unit)
If rubber packing is not attached, it is
necessary to first correctly attach the
rubber packing before attaching the
main unit cover. In this case, attach by
following the procedure described
below.
Dome
Cover
Rubber
Packing
1. Attach the rubber
packing in the
position shown in
the illustration.
Make sure that the rubber
packing is parallel to the
pipe.
2. Align the tab on the
dome cover with the
groove on the pipe
and fit the dome
cover.
3. Move the rubber packing upward
as shown in the cross-section
diagram.
When performing this, do not remove
the installed dome cover from the pipe.
If the dome cover is removed, the
rubber packing will drop inside the
pipe and it will not be possible to
re-attach the dome cover.
If the rubber packing is not correctly
attached, the dust- and drip-proof
performance of the dome cover cannot
be guaranteed.
Pipe
Rubber
Packing
Dome Cover
(KA-C76)
Tab
Groove
Rubber Packing
Dome Cover
Cross-section
Rubber
Packing
Pipe
KA-C76.Inst
02.11.29, 9:56 AM
2