COMPACT COMPONENT SYSTEM
HX-D77
--Consists of CA-HXD77 and SP-HXD77
INSTRUCTIONS
For Customer Use:
Enter below the Model No. and Serial
No. which are located either on the rear,
bottom or side of the cabinet. Retain this
information for future reference.
Model No.
Serial No.
LVT1540-001A
[J]
CA-HXD77
SP-HXD77
SP-HXD77
00-00_Cover[J]_f.fm Page 1 Monday, January 16, 2006 8:17 PM
G-1
Warnings, Cautions and Others
Mises en garde, précautions et indications diverses
CAUTION
To reduce the risk of electrical shocks, fire, etc.:
1 Do not remove screws, covers or cabinet.
2 Do not expose this appliance to rain or moisture.
ATTENTION
Afin d'éviter tout risque d'électrocution, d'incendie, etc.:
1 Ne pas enlever les vis ni les panneaux et ne pas
ouvrir le coffret de l'appareil.
2 Ne pas exposer l'appareil à la pluie ni à l'humidité.
Caution--STANDBY/ON
button!
Disconnect the mains plug to shut the power off
completely (the STANDBY lamp goes off). When
installing the apparatus, ensure that the plug is
easily accessible.
The STANDBY/ON
button in any position does
not disconnect the mains line.
· When the unit is on standby, the STANDBY lamp
lights red.
· When the unit is turned on, the STANDBY lamp
goes off.
The power can be remote controlled.
Attention--Touch STANDBY/ON
!
Déconnectez la fiche d'alimentation secteur pour
mettre l'appareil complètement hors tension (le
témoin STANDBY est éteint). Lors de l'installation
de l'appareil, assurez-vous que la fiche soit
facilement accessible.
La touche STANDBY/ON
, dans n'importe quelle
position, ne déconnecte pas l'appareil du secteur.
· Quand l'appareil est en mode d'attente, le témoin
STANDBY est allumé en rouge.
· Quand l'appareil est sous tension, le témoin
STANDBY est éteint.
L'alimentation peut être télécommandée.
WARNING: TO REDUCE THE RISK OF FIRE
OR ELECTRIC SHOCK, DO NOT EXPOSE
THIS APPLIANCE TO RAIN OR MOISTURE.
CAUTION:
TO REDUCE THE RISK OF ELECTRIC SHOCK,
DO NOT REMOVE COVER (OR BACK).
NO USER SERVICEABLE PARTS INSIDE.
REFER SERVICING TO QUALIFIED SERVICE PERSONNEL.
RISK OF ELECTRIC SHOCK
DO NOT OPEN
The lightning flash with arrowhead symbol,
within an equilateral triangle is intended to
alert the user to the presence of uninsulated
"dangerous voltage" within the product's
enclosure
that
may
be
of
sufficient
magnitude to constitute a risk of electric
shock to persons.
The exclamation point within an equilateral
triangle is intended to alert the user to the
presence
of
important
operating
and
maintenance (servicing) instructions in the
literature accompanying the appliance.
CAUTION
For U.S.A.
This equipment has been tested and found to comply
with the limits for a Class B digital device, pursuant to
part 15 of the FCC Rules.These limits are designed
to provide reasonable protection against harmful
interference in a residential installation.
This equipment generates, uses and can radiate
radio frequency energy and, if not installed and
used in accordance with the instructions, may cause
harmful interference to radio communications.
However, there is no guarantee that interference will
not occur in a particular installation. If this
equipment does cause harmful interference to radio
or television reception, which can be determined by
turning the equipment off and on, the user is
encouraged to try to correct the interference by one
of the following measures:
Reorient or relocate the receiving antenna.
Increase the separation between the equipment
and receiver.
Connect the equipment into an outlet on a circuit
different from that to which the receiver is connected.
Consult the dealer or an experienced radio/TV
technician for help.
CAUTION
Changes or modifications not approved by JVC could
void the user's authority to operate the equipment.
For U.S.A.
For the main unit:
Declaration of Conformity
Model Number:
HX-D77
Trade Name:
JVC
Responsible Party:
JVC Americas Corp.
Address:
1700 Valley Road, Wayne
New Jersey 07470
Telephone Number: 973-317-5000
This device complies with Part 15 of FCC Rules.
Operation is subject to the following two conditions:
(1) This device may not cause harmful interference,
and (2) this device must accept any interference
received, including interference that may cause
undesired operation.
For Canada/pour le Canada
This class B digital apparatus complies with
Canadian ICES-003.
Cet appareil numérique de la classe B est
conforme à la norme NMB-003 du Canada.
Note to CATV system installer:
This reminder is provided to call the CATV system
installer's attention to Section 820-40 of the NEC
which provides guidelines for proper grounding and,
in particular, specifies that the cable ground shall be
connected to the grounding system of the building,
as close to the point of cable entry as practical.
00-00_Safty[J]_f.fm Page 1 Monday, February 13, 2006 3:27 PM
G-2
IMPORTANT FOR LASER PRODUCTS
1 CLASS 1 LASER PRODUCT
2 CAUTION: Do not open the top cover. There are no
user serviceable parts inside the Unit; leave all
servicing to qualified service personnel.
3 CAUTION: Visible and/or invisible class 1M laser
radiation when open. Do not view directly with optical
instruments.
IMPORTANT POUR PRODUITS LASER
1 PRODUIT LASER CLASSE 1
2 ATTENTION: N'ouvrez pas le couvercle supérieur. Il
n'y a aucune pièce réparable par l'utilisateur à
l'intérieur de l'appareil; confiez toute réparation à un
personnel qualifié.
3 ATTENTION: Rayonnement laser visible et/ou
invisible de classe 1M une fois ouvert. Ne pas
regarder directement avec des instruments optiques.
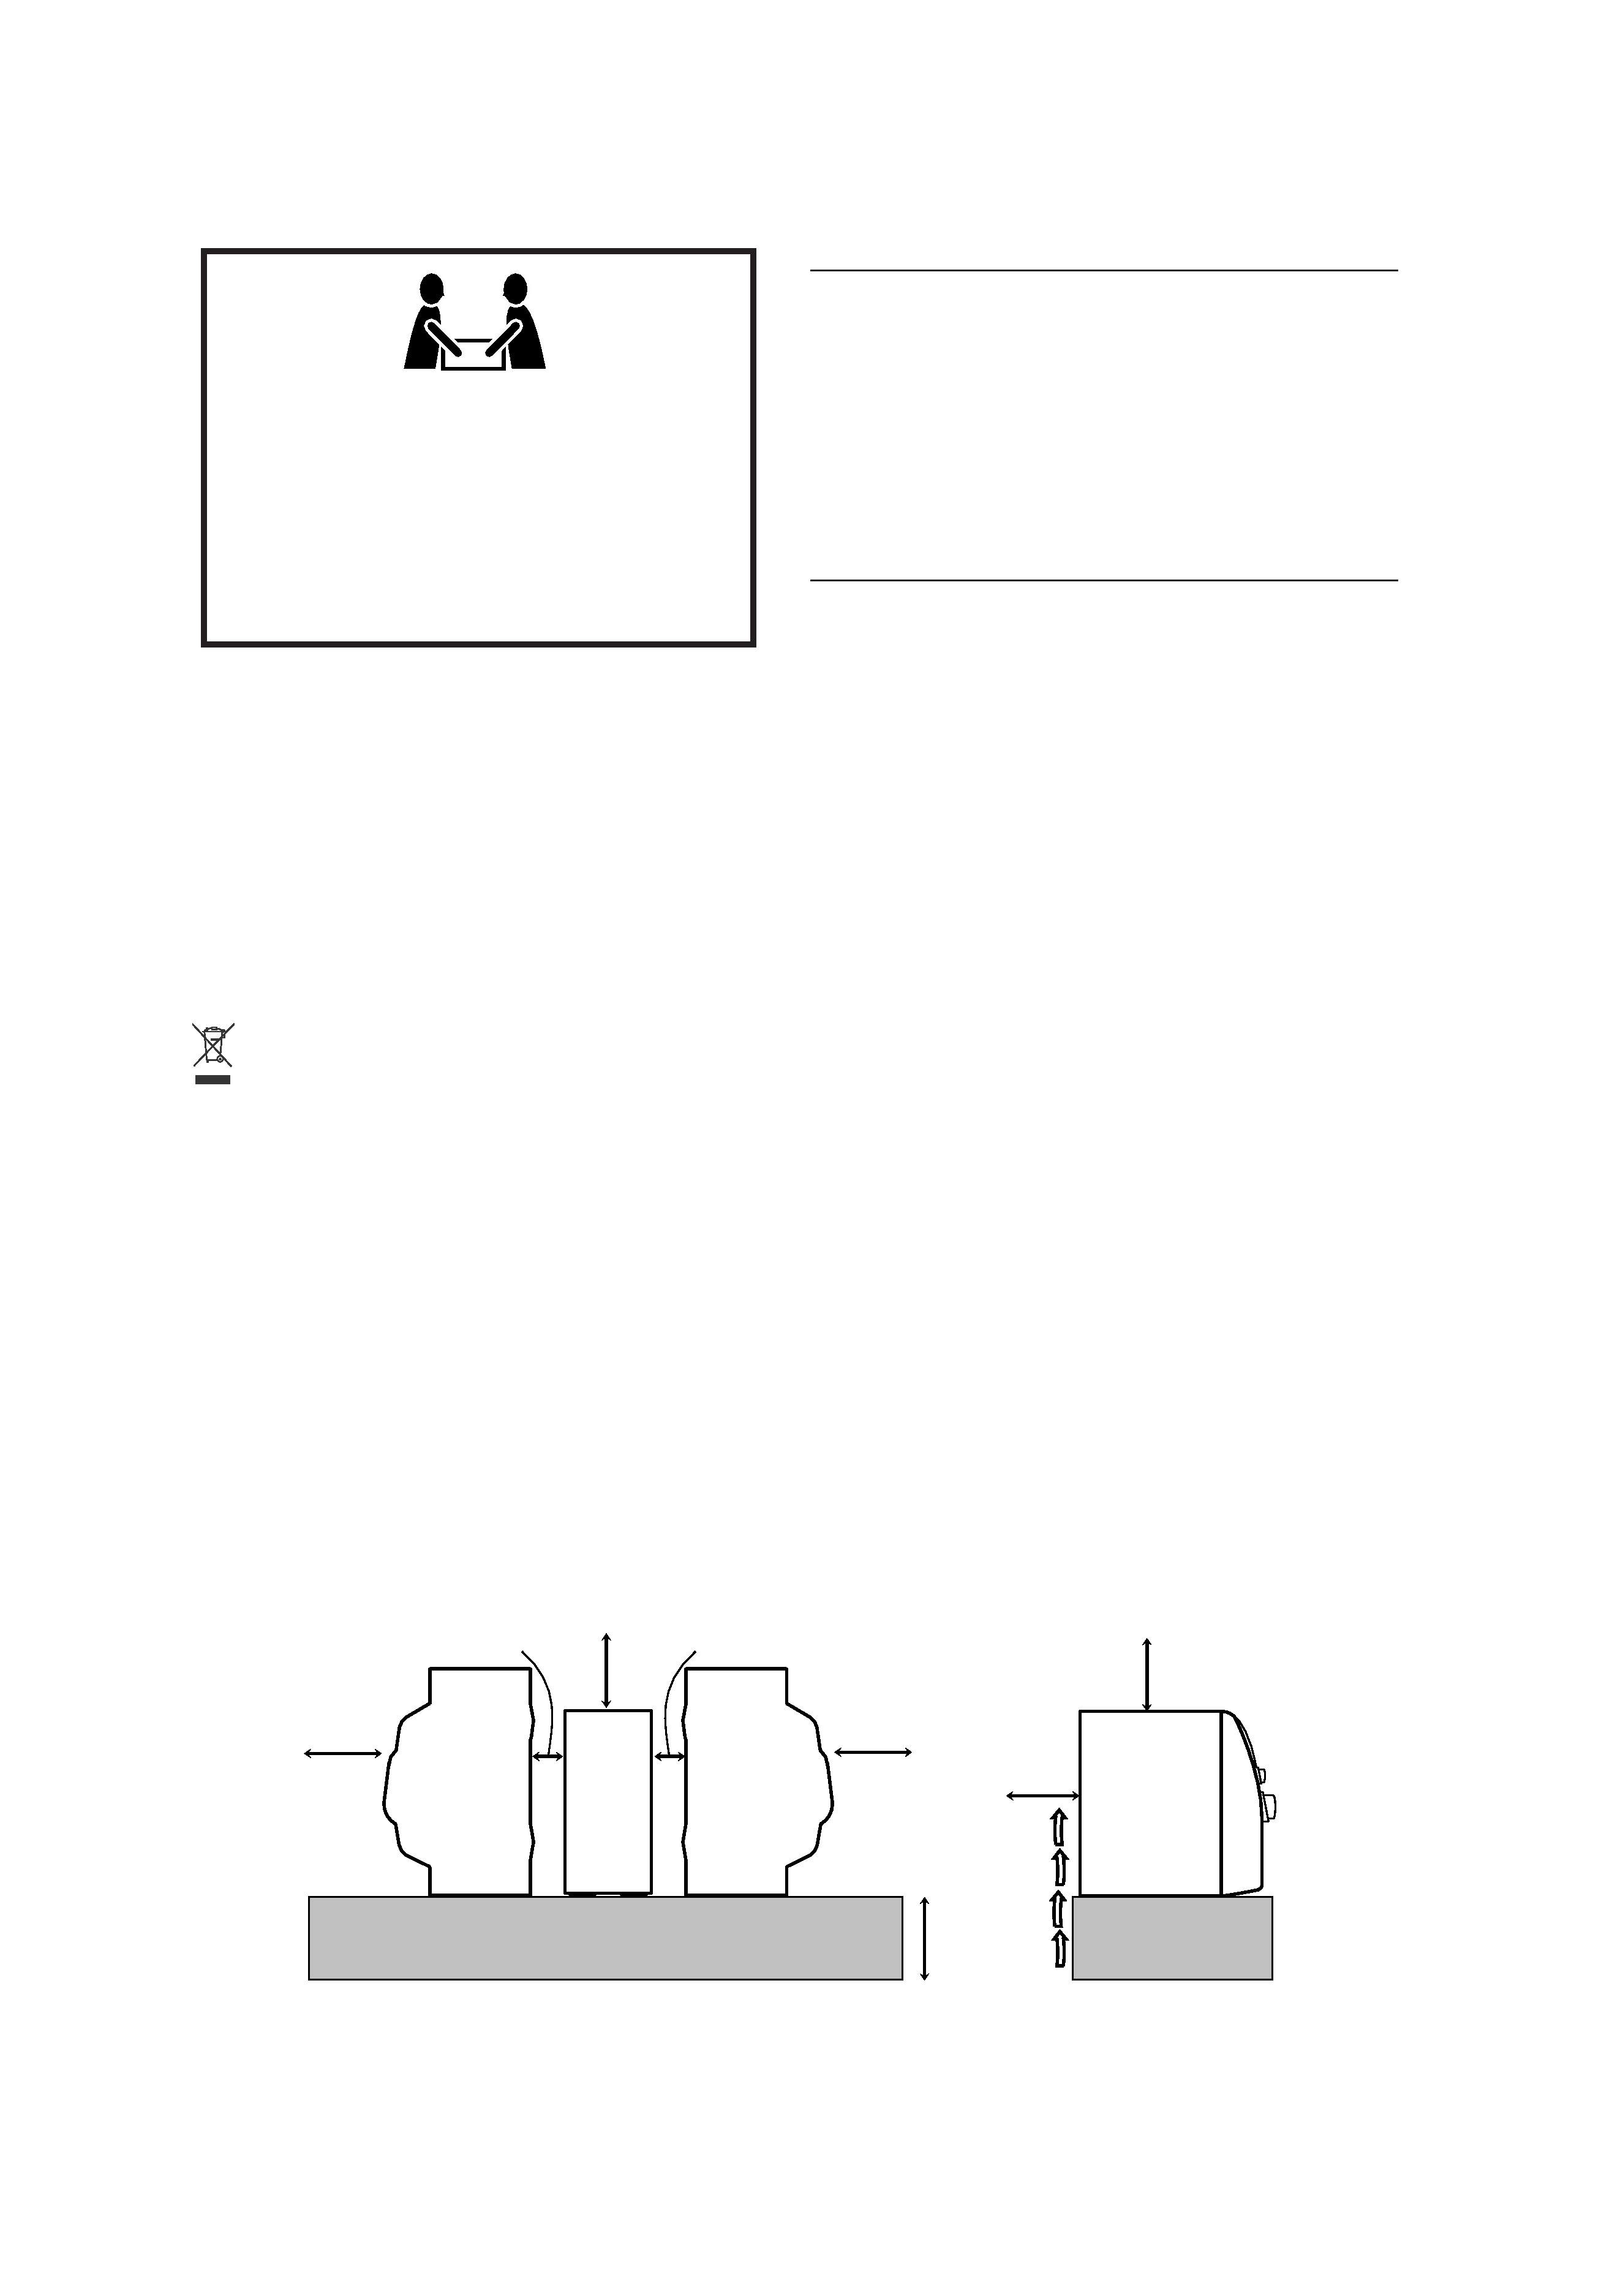
CAUTION: Proper Ventilation
To avoid risk of electric shock and fire, and to prevent damage, locate the apparatus as follows:
1. Front: No obstructions and open spacing.
2. Sides/Top/Back: No obstructions should be placed in the areas shown by the dimensions below.
3. Bottom: Place on a level surface. Maintain an adequate air path for ventilation by placing on a stand with a
height of 10 cm or more.
Attention: Aération correcte
Pour prévenir tout risque de décharge électrique ou d'incendie et éviter toute détérioration, installez l'appareil de
la manière suivante:
1. Avant: Bien dégagé de tout objet.
2. Côtés/dessus/dessous: Assurez-vous que rien ne bloque les espaces indiqués sur le schéma ci-dessous.
3. Dessous: Posez l'appareil sur une surface plane et horizontale. Veillez à ce que sa ventilation correcte puisse
se faire en le plaçant sur un support d'au moins dix centimètres de hauteur.
CAUTION!
To avoid personal injury or accidentally dropping
the unit, have two persons unpack, carry, and install the
unit.
24 kg / 53 lbs.
ATTENTION!
Pour éviter toute blessure personnelle ou chute
accidentelle del'appareil, faites déballer, transporter et
installer l'appareil par deux personnes.
[European Union only]
[Union européenne uniquement]
15 cm
15 cm
10 cm
1 cm
1 cm
15 cm
15 cm
15 cm
CA-
HXD77
CA-HXD77
SP-HXD77
SP-HXD77
Front view
Face
Side view
Côté
00-00_Safty[J]_f.fm Page 2 Monday, February 13, 2006 3:27 PM
1
Introduction
Precautions
Installation
· Install in a place which is level, dry and neither too hot nor
too cold--between 5°C (41°F) and 35°C (95°F).
· Install the System in a location with adequate ventilation to
prevent internal heat buildup in the System.
· Leave sufficient distance between the System and the TV.
· Keep the speakers away from the TV to avoid interference
with TV.
Power sources
· When unplugging the System from the wall outlet, always
pull on the plug, not the AC power cord.
Moisture condensation
Moisture may condense on the lenses inside the System in
the following cases:
· After starting to heat the room
· In a damp room
· If the System is brought directly from a cold to a warm place
Should this occur, the System may malfunction. In this case,
leave the System turned on for a few hours until the
moisture evaporates, unplug the AC power cord, then plug
it in again.
Internal heat
· A cooling fan is mounted on the rear panel to prevent heat
buildup inside the unit.
Others
· Should any metallic object or liquid fall into the System,
unplug the AC power cord and consult your dealer before
operating any further.
· If you are not going to operate the System for an extended
period of time, unplug the AC power cord from the wall
outlet.
If anything goes wrong, unplug the AC power cord and
consult your dealer.
How to Read This Manual
To make the explanations in this manual as simple and
easy-to-understand as possible, we have adapted the
following methods:
· Button and control operations are explained in the table
below. In this manual, the operations using the remote
control are mainly explained; however, you can use the
buttons and controls on the main unit if they have the same
(or similar) name and marks.
· Some related tips and notes are explained later in the
sections "Learning More about This System" and
"Troubleshooting," but not in the same section
explaining the operations (
indicates that the
content has some informations). If you want to know more
about the functions, or if you have a doubt about the
function, go to these sections and you will find your answer
there.
DO NOT install the System in a location
near heat sources, or in a place subject to
direct sunlight, excessive dust or vibration.
DO NOT handle the AC power cord with
wet hands.
For safety, observe the following carefully:
· Make sure there is good ventilation around
the unit. Poor ventilation could overheat
and damage the unit.
· DO NOT block the cooling fan and the
ventilation openings or holes. If they are
blocked by a newspaper or cloth, etc., the
heat may not be able to get out.
DO NOT disassemble the System since
there are no user serviceable parts inside.
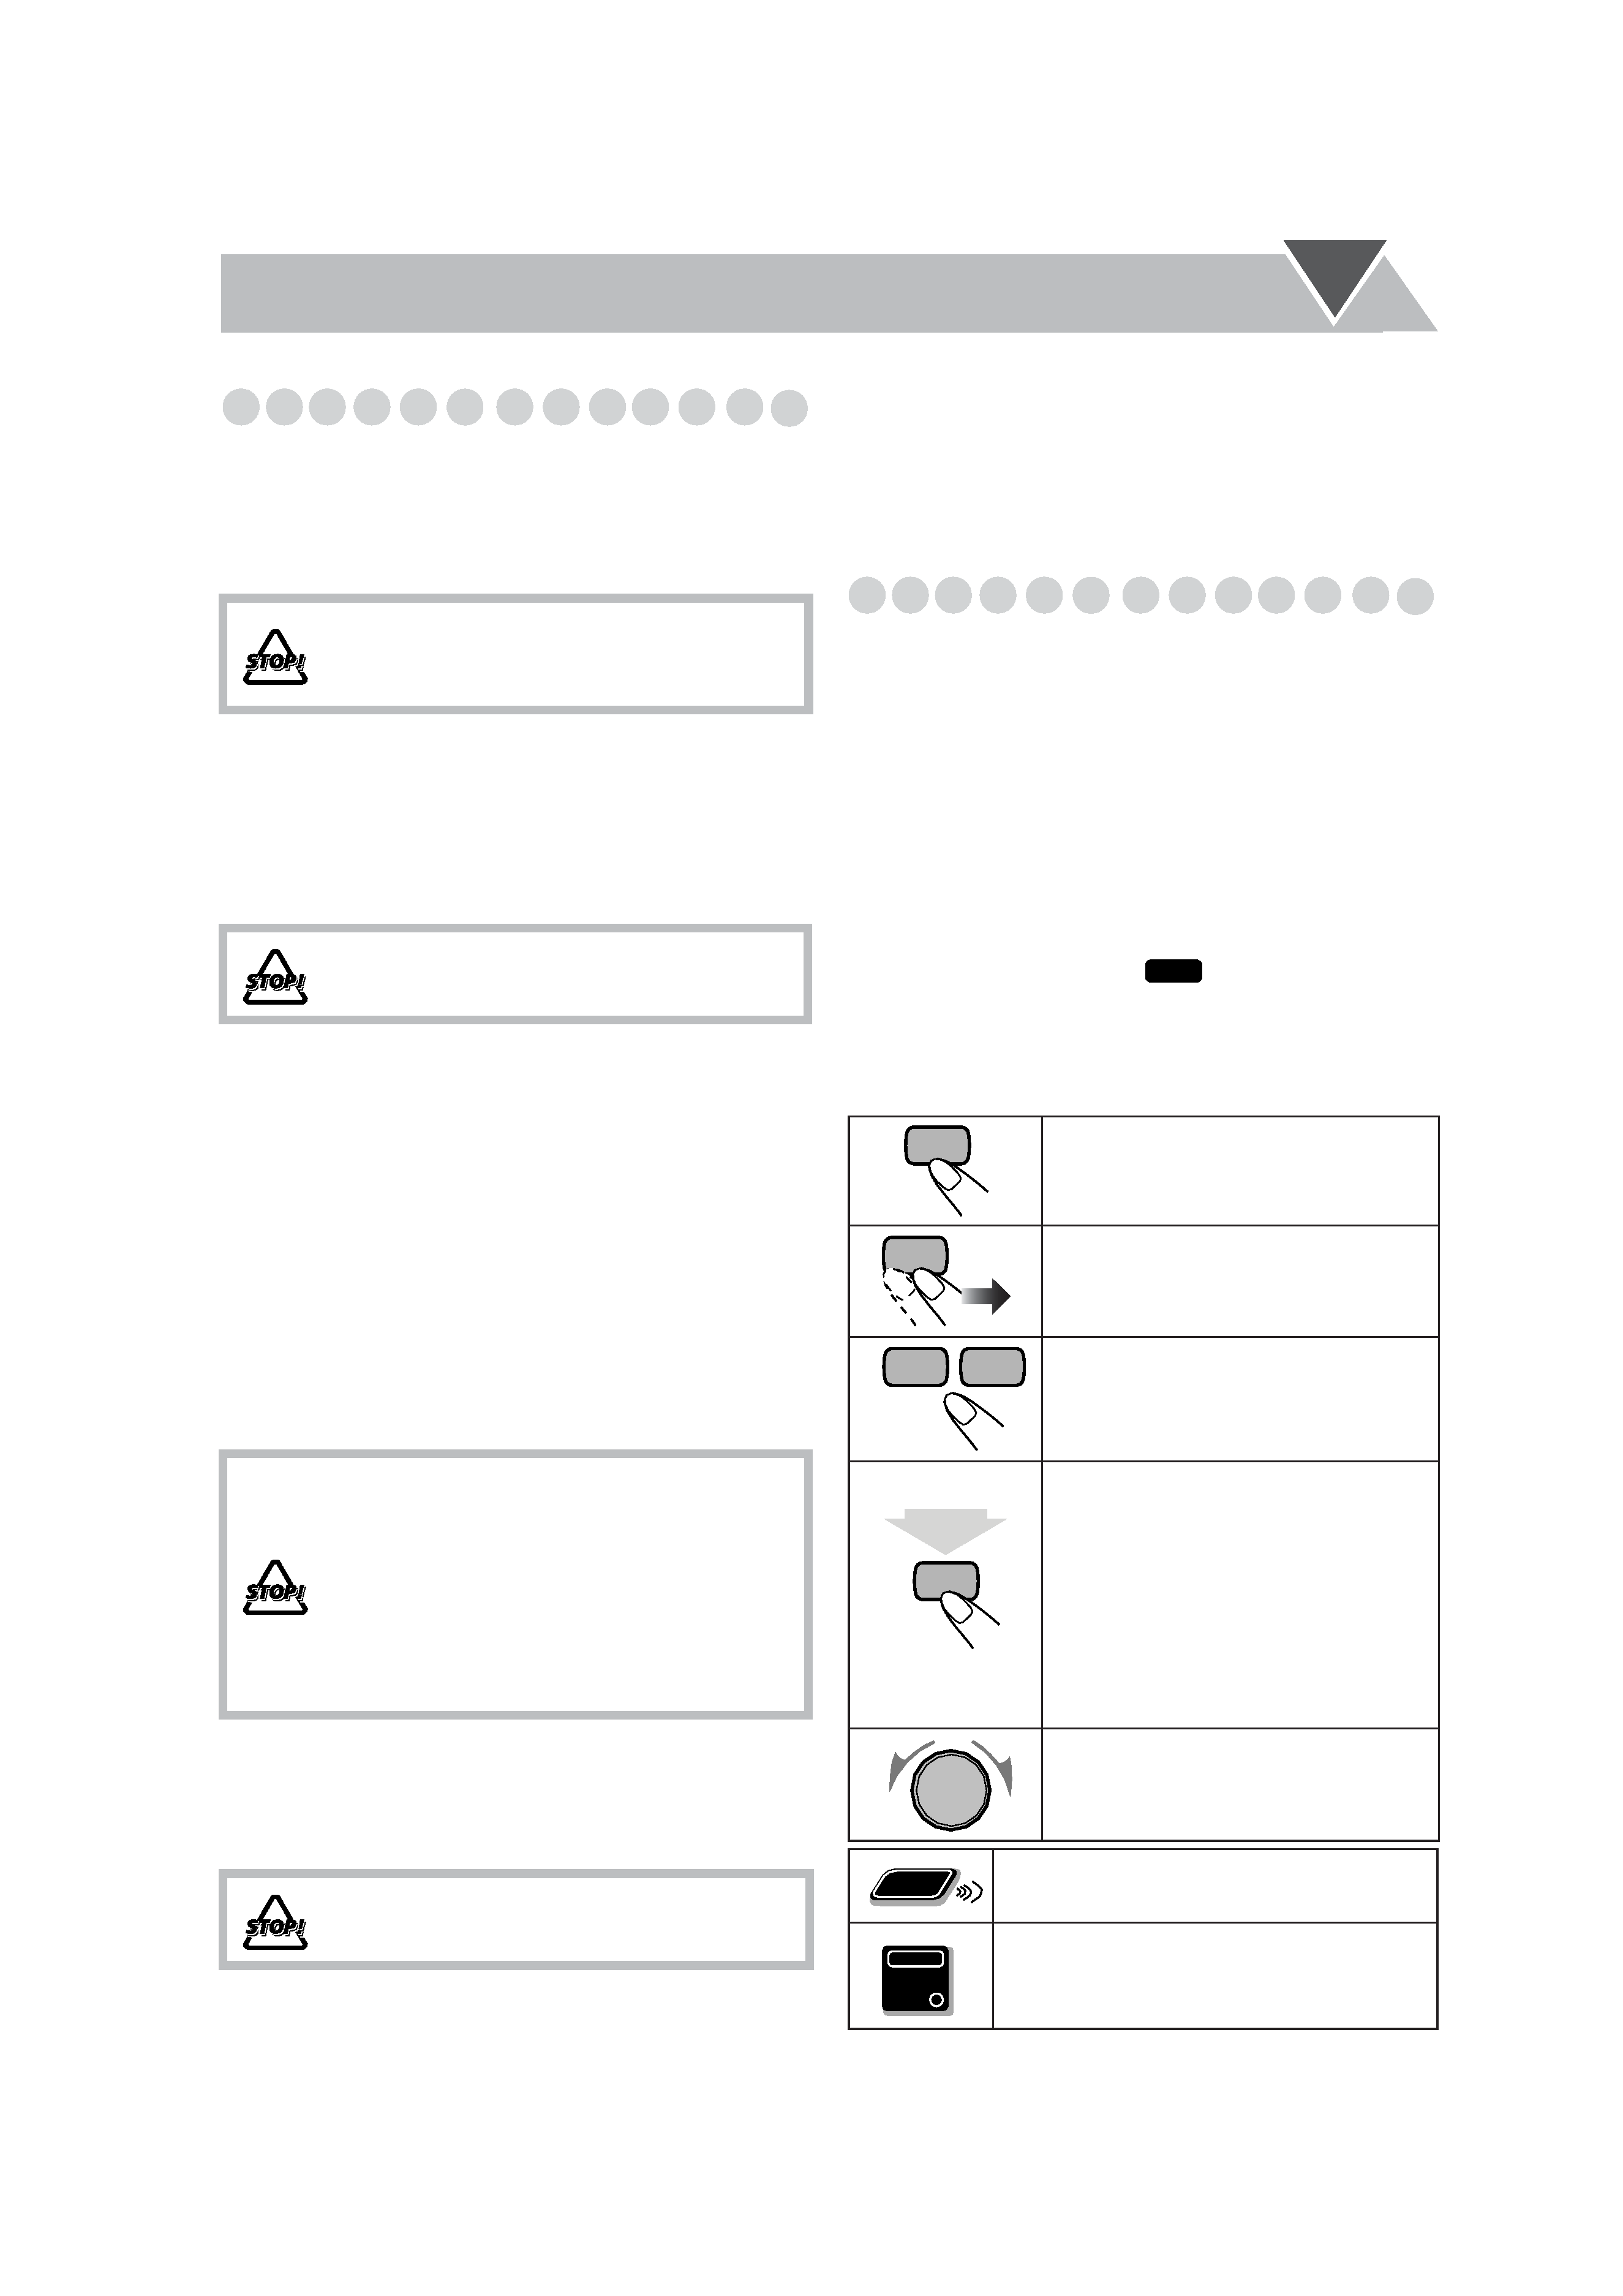
Indicates that you press the button
briefly
.
Indicates that you press the button
briefly and repeatedly until an
option you want is selected.
Indicates that you press one of the
buttons.
Indicates that you press and hold the
button for a specified period.
· The number inside the arrow
indicates the period of press (in this
example, 2 seconds).
· If no number is inside the arrow,
press and hold until the entire
procedure is complete or until you
get a result you want.
Indicates that you turn the control
toward the specified direction(s).
Indicates that this operation is only
possible using the remote control.
Indicates that this operation is only
possible using the buttons and controls on
the main unit.
INFO
2 sec.
Remote
ONLY
Main Unit
ONLY
HX-D7[J]_f.book Page 1 Monday, February 13, 2006 3:31 PM

2
Contents
Before Operating the System....................... 3
Playable Disc Types .................................................... 3
Getting Started.............................................. 4
Step 1: Unpack ............................................................ 4
Step 2: Prepare the Remote Control ............................ 4
Step 3: Hook Up .......................................................... 5
Display Indication......................................... 8
Daily Operations--Playback ..................... 10
Listening to the Radio ............................................... 11
Playing Back a Disc................................................... 12
Playing Back from the PC ......................................... 14
Playing Back from Other External Equipment.......... 15
Daily Operations--Sound and Other
Adjustments ............................................. 16
Adjusting the Volume................................................ 16
Reinforcing the Bass Sound ...................................... 16
Making the Center Channel Sound Clear
--Clear Voice ........................................................ 17
Selecting the Sound Modes ....................................... 17
Selecting 3D Phonic Mode ........................................ 17
Presetting Automatic DVD VIDEO Sound
Increase Level ........................................................ 17
Changing the Picture Tone ........................................ 18
Turning On or Off the Key-Touch Tone ................... 19
Changing the Display Brightness .............................. 19
Setting the Clock ....................................................... 19
Turning Off the Power Automatically....................... 19
Unique DVD/VCD Operations ................. 20
Selecting the Sound Track......................................... 20
Selecting the Subtitle Language ................................ 21
Selecting a View Angle ............................................. 21
Special Picture Playback ........................................... 22
Advanced Disc Operations ........................ 23
Programming the Playing Order--Program Play...... 23
Playing at Random--Random Play........................... 24
Playing Repeatedly--Repeat Play ............................ 25
Prohibiting Disc Ejection--Child Lock .................... 25
On-Screen Disc Operations ....................... 26
About the On-screen Bar........................................... 27
Operations Using the On-screen Bar......................... 27
Operations on the control Screen .............................. 30
Timer Operations ....................................... 33
Setting the Timer ....................................................... 33
Set up Menu Operations ............................ 35
Operating Procedure.................................................. 35
Operating the TV ....................................... 39
Operating TV............................................................. 39
Additional Information.............................. 40
Learning More about This System ............................ 40
Maintenance .............................................................. 42
Troubleshooting ........................................................ 42
OPTICAL DIGITAL OUTPUT Signals ................... 43
Language Code List .................................................. 44
Parts Index................................................................. 45
Specifications ............................................................ 46
HX-D7[J]_f.book Page 2 Monday, February 13, 2006 3:31 PM