INSTRUCTIONS
REAR PROJECTION TELEVISION
HV-53PRO
Contents
Safety precautions
Cautions on screen treatment
Setting up your TV
TV buttons and functions
Remote control buttons
and functions
Using the TV's menu
Basic operation
PICTURE SETTING menu
PICTURE FEATURES menu
SOUND SETTING menu
FEATURES menu
INSTALL menu
Additional preparation
Troubleshooting
Specifications
. . . . . . . . . . . . 2
. . . 3
. . . . . . . . . . . . 4
. . . . . . . 7
. . . 8
. . . . . . . . . . . 16
. . . . . . . . . . . . . 16
. . . . 17
. . . 18
. . . . . . 20
. . . . . . . . . . . 21
. . . . . . . . . . . . . 23
. . . . . . . . . 27
. . . . . . . . . . . . . . 30
. . . . . . . . . Back cover
LCT1078-001A_p01-15
11/2/01, 2:11 PM
1
Black
2
Thank you for buying this JVC colour television.
To make sure you understand how to use your new TV, please read this manual thoroughly
before you begin.
Safety precautions
WARNING:
TO PREVENT FIRE OR SHOCK HAZARD, DO NOT EXPOSE THIS APPLIANCE TO RAIN OR
MOISTURE.
CAUTION:
TO ENSURE PERSONAL SAFETY, OBSERVE THE FOLLOWING RULES REGARDING THE
USE OF THIS TV.
1 Operate only from the power source indicated on the
rear of the TV.
2 Avoid damaging the power cord and mains plug. When
unpluging the TV, grasp the mains plug. Do not pull on
the power cord.
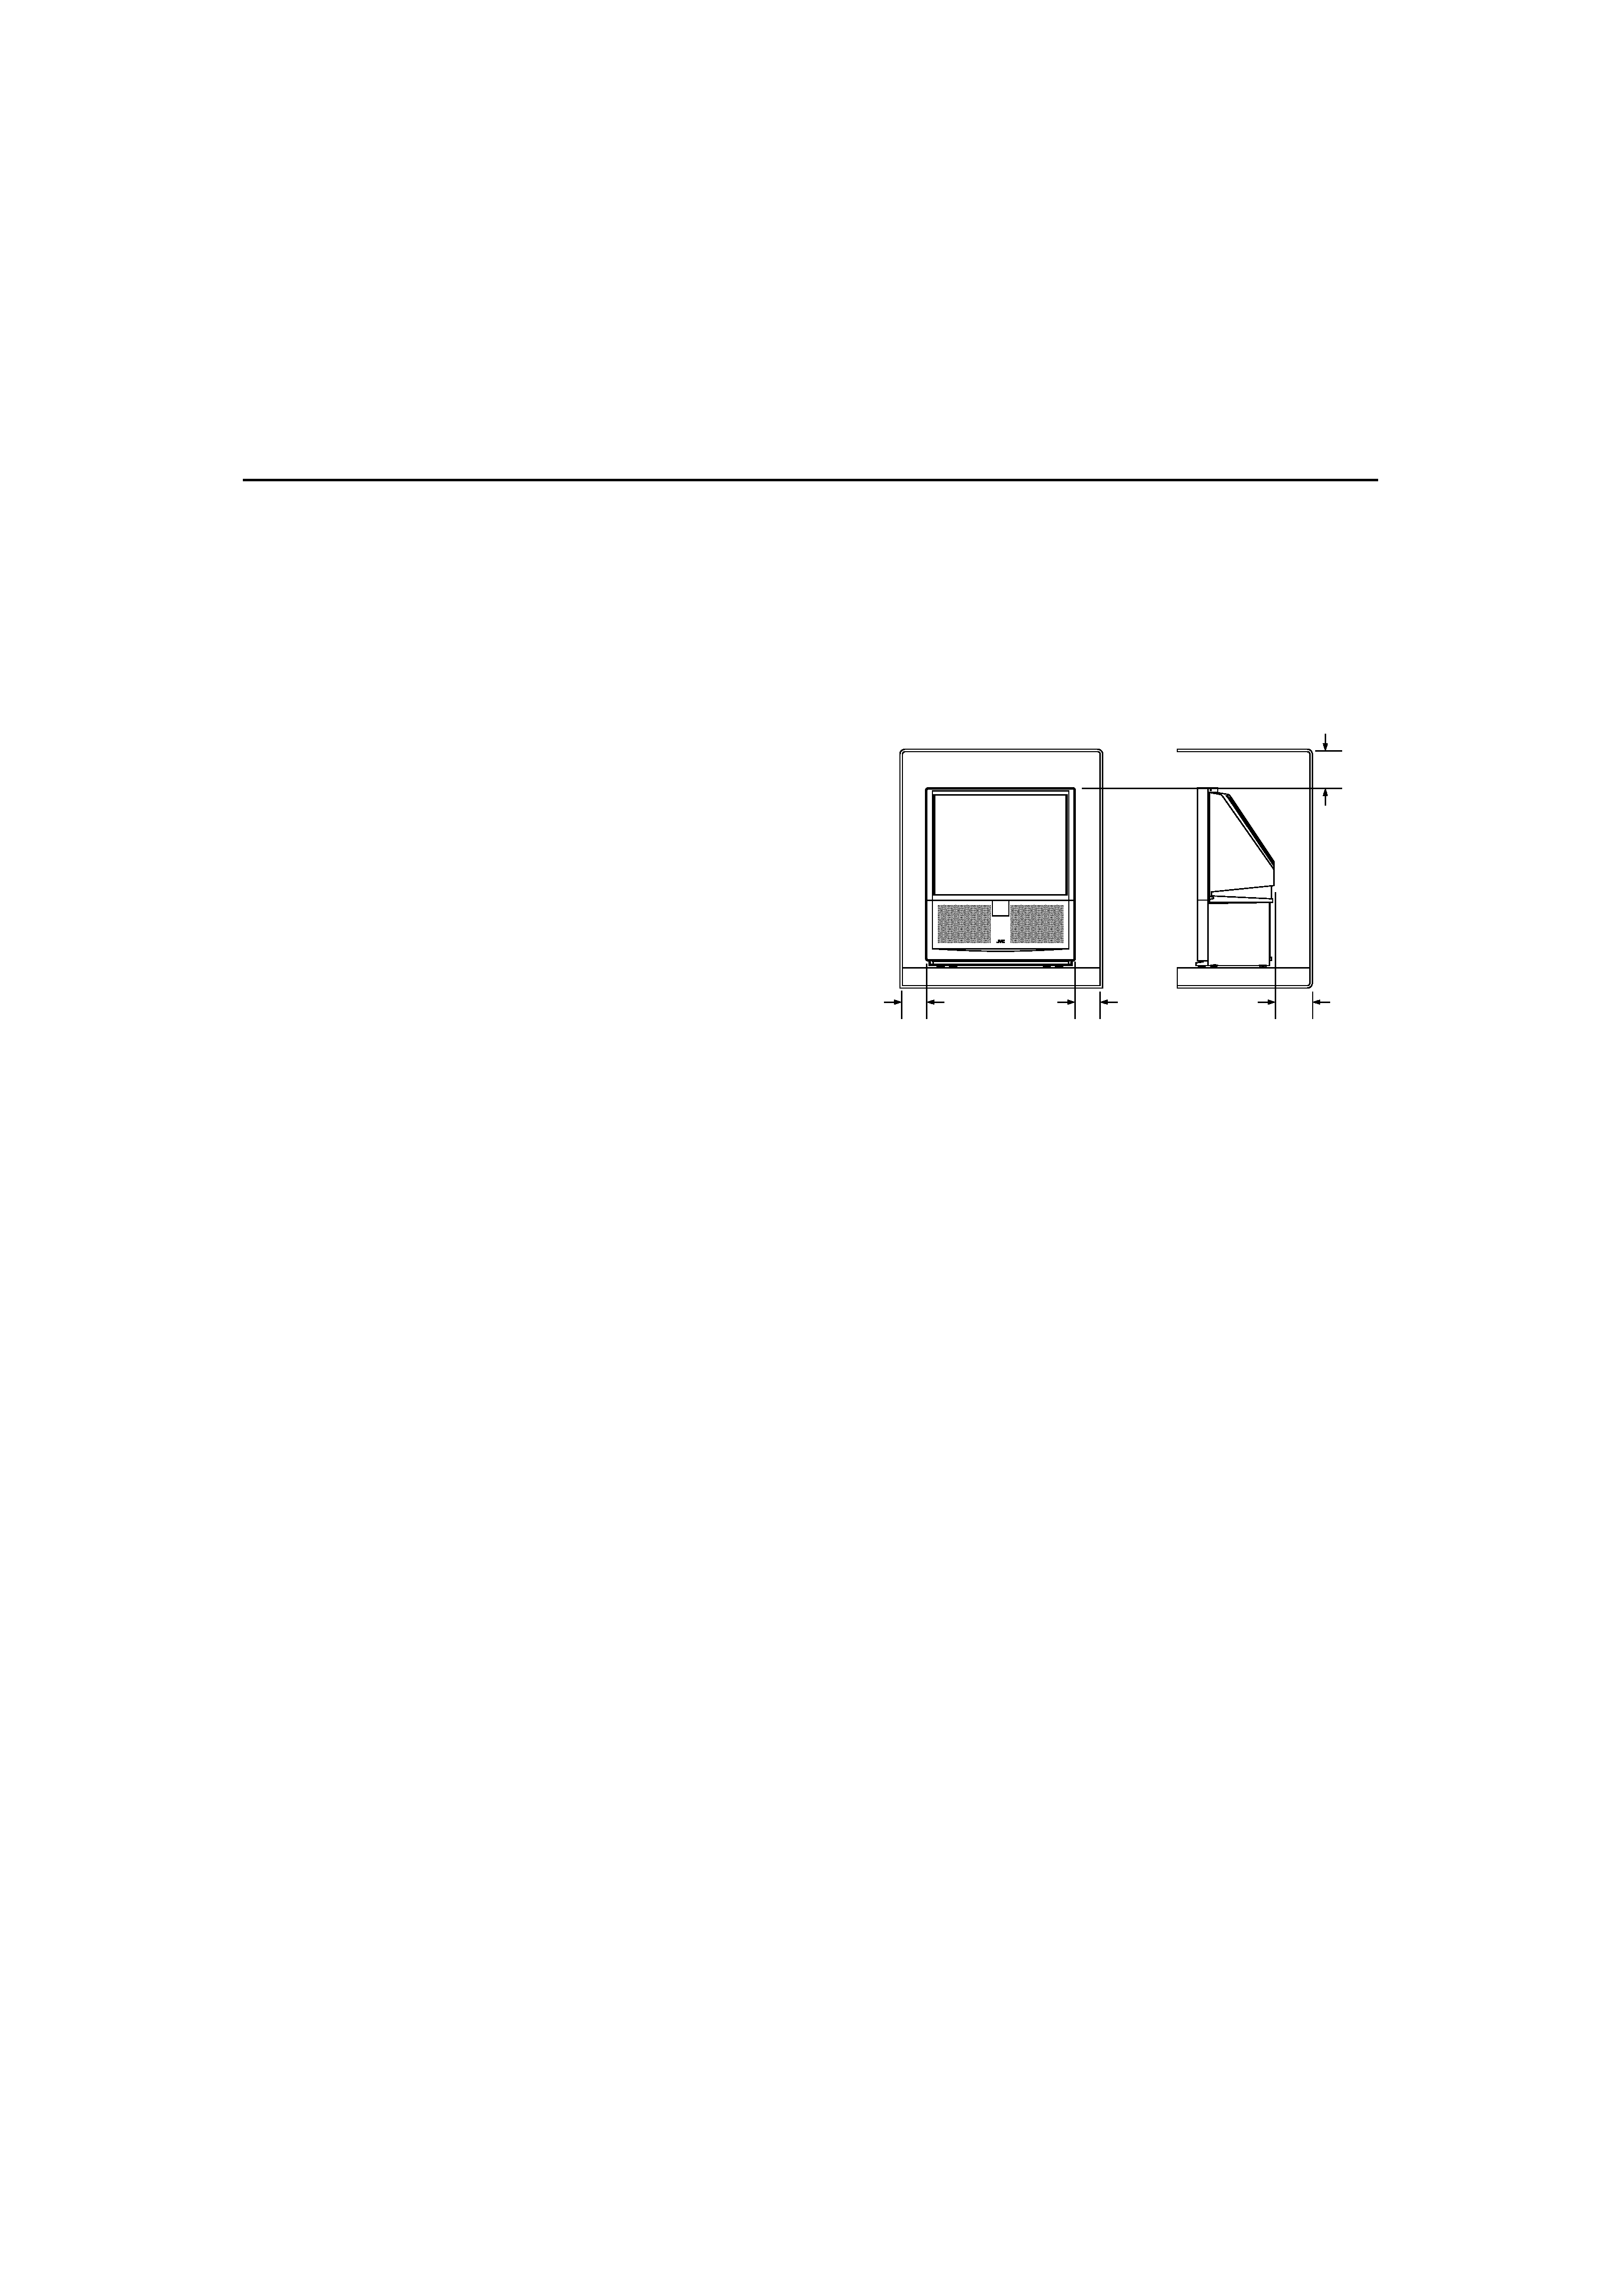
3 Never block or cover the ventilation openings.
Never install the TV where good ventilation is
unattainnable.
When installing this TV, leave spaces for ventilation around the TV of more than the minimum dis-
tances as shown.
4 Do not allow objects or liquid into the cabinet openings.
5 In the event of a fault, unplug the unit and call a service technician.
Do not attempt to repair it yourself or remove the rear cover.
6 If you are not going to use this TV for a long preriod of time, be sure to disconnect the AC plug from
the AC soket.
7 This TV set is mounted on casters which make it easier to move. However, when positioning or
moving the TV, observe the following cautions:
--- Do not position the TV on a slanting or unstable place.
--- Do not use excessive force, which could damage the TV, or even overterm the TV, breaking it and
possibly injuring someone.
--- To avoid overturning the TV, which could injure someone, secure it in place using the method
described next page.
--- Before moving the TV, unplug the plug from the AC socket, and be sure to disconnect ALL of the
cables connecting the TV to external device.
--- There must be at least 8 mm between the bottom of the TV and the floor.
When moving the TV, make sure that the bottom of the TV does not scrape along the floor.
In addition, be careful when moving the TV across thick carpets, bumps in the floor, or other
changes in floor level (such as at the edges of carpets). Be especially careful that the TV or the
caster wheels do not eatch on anything. If the TV falls over, the TV will break and could injure
someone.
15mm
15mm
10mm
10mm
LCT1078-001A_p01-15
11/2/01, 2:11 PM
2
Black
3
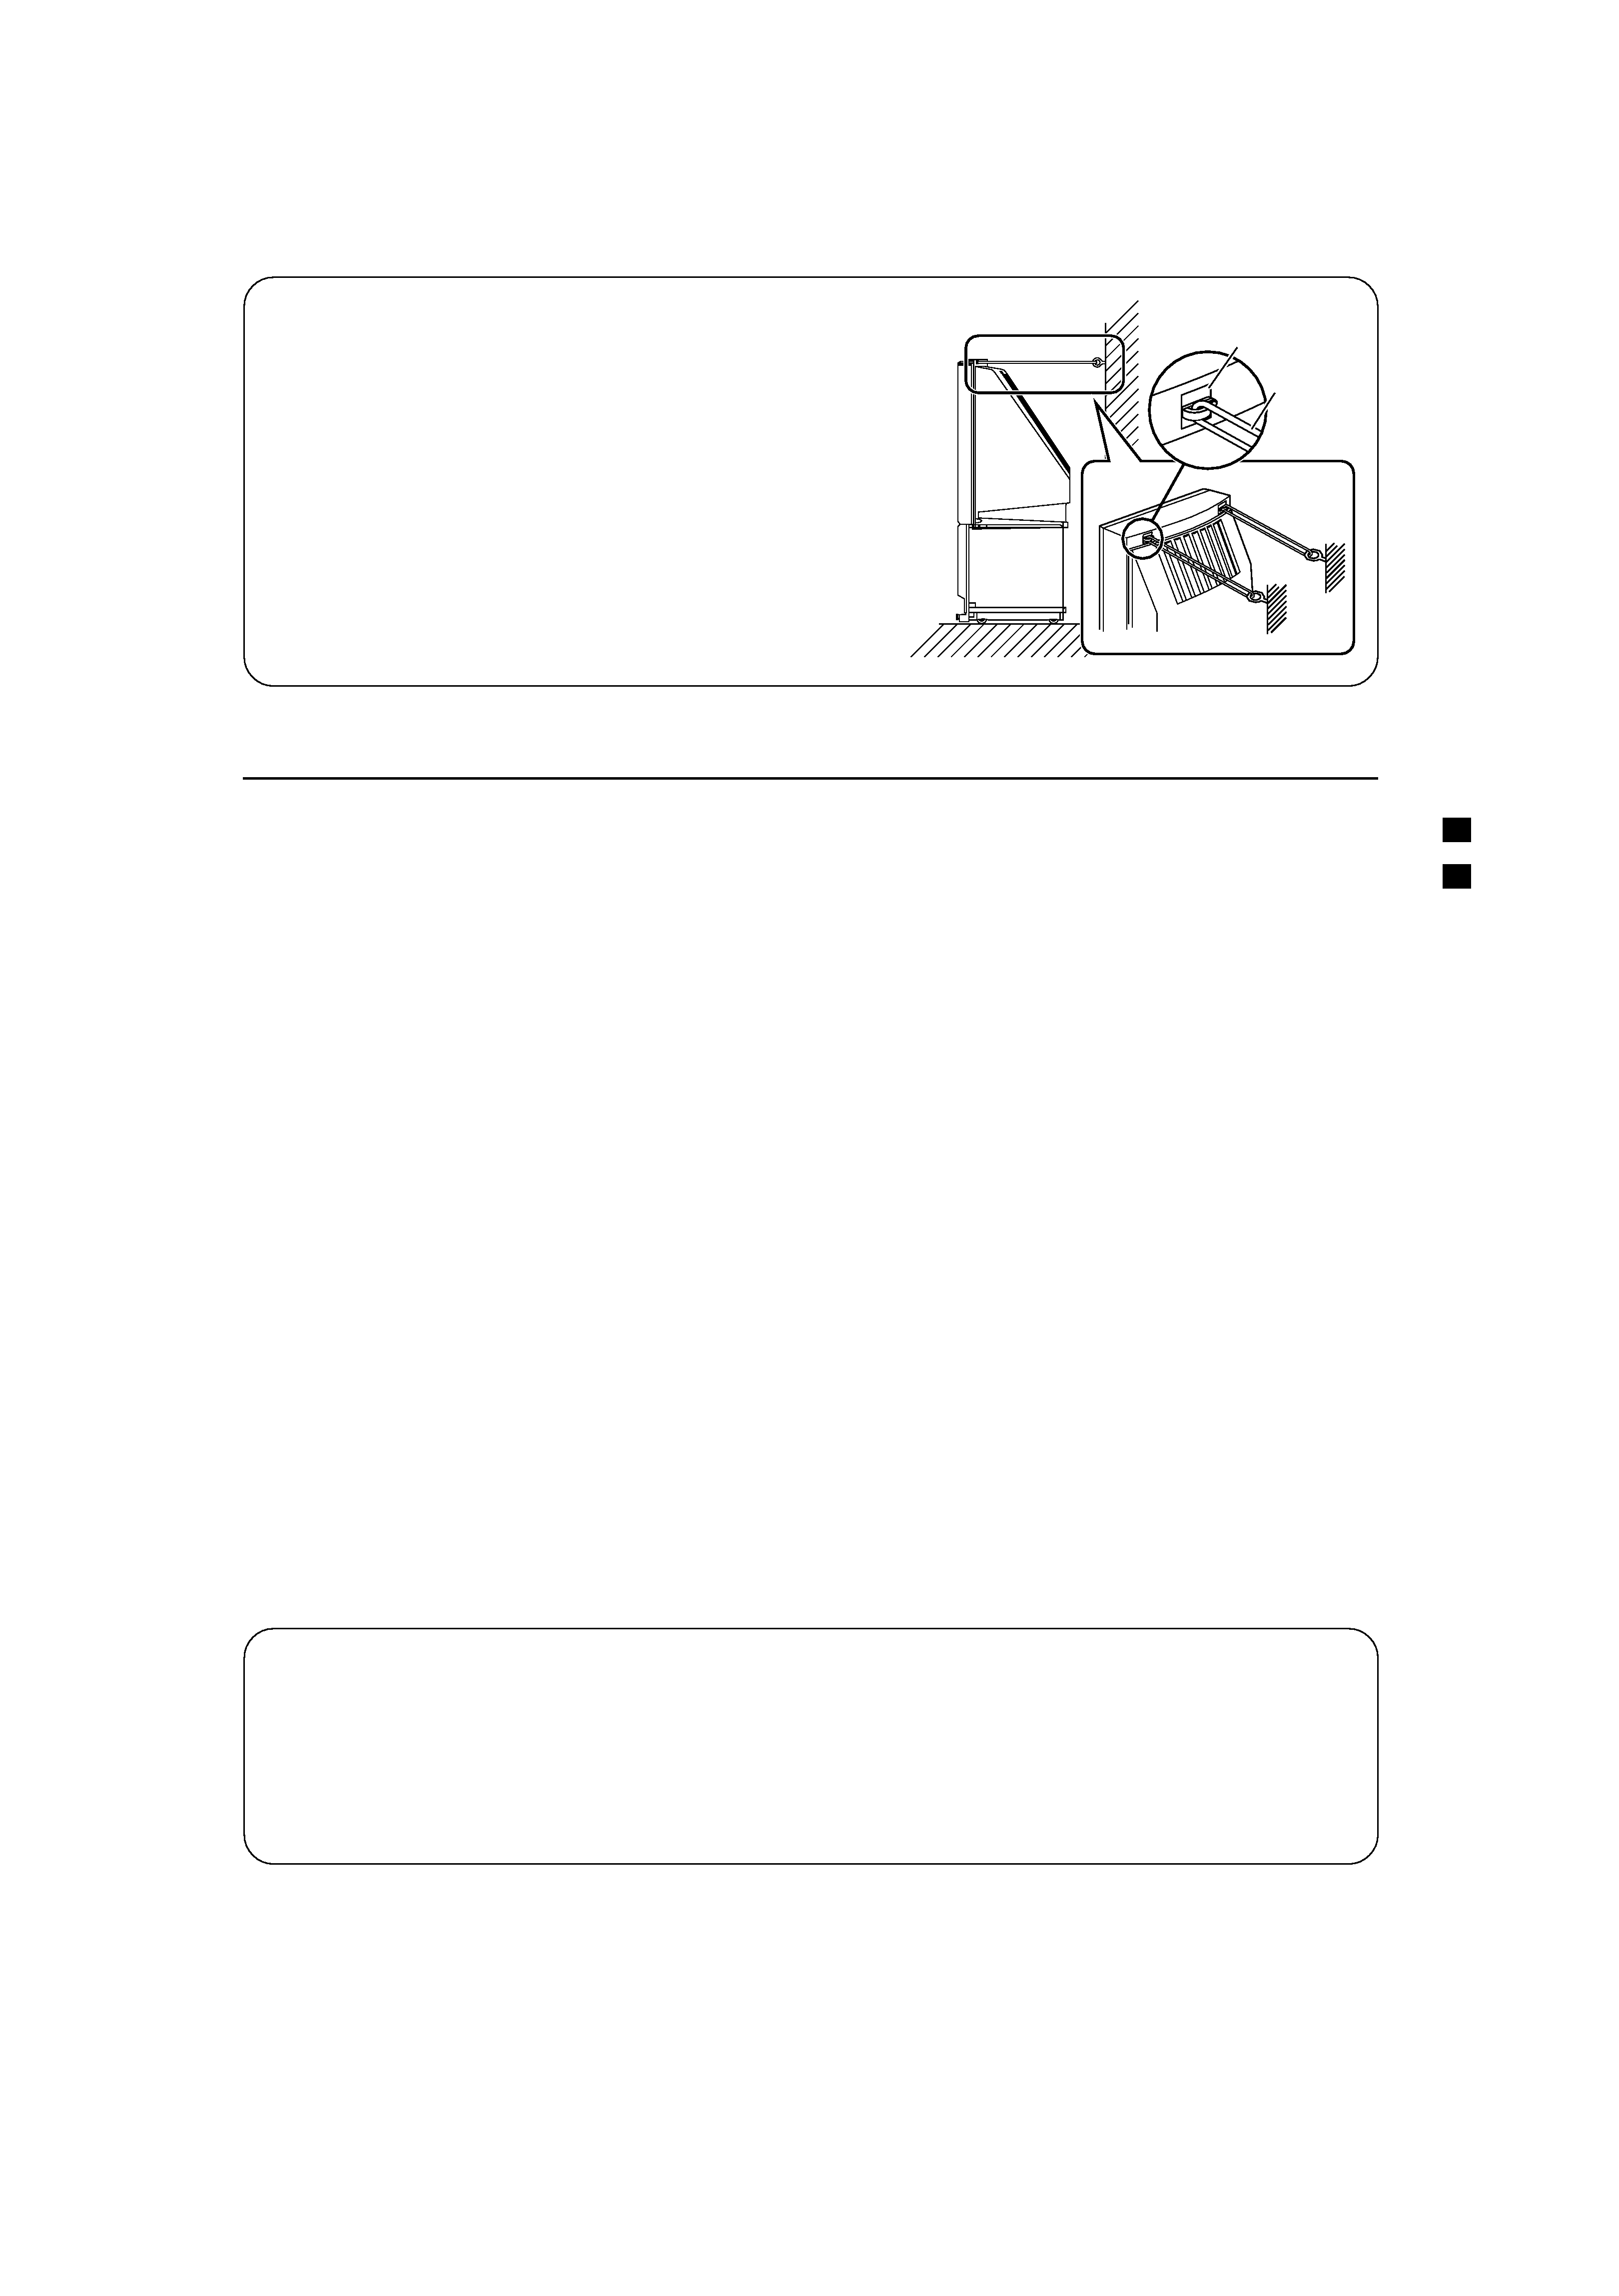
To prevent the TV from falling over:
Use the two small plastic loops on the back of the TV
set, and connect them to a wall or column using two
secure wires or strong cords.
· The wire or strong cord, and wall ring (or similar
attachment), are not supplied with this TV set. Use
commonly available items, but make sure that they are
strong.
· The thread or wire should be straight.
· Make sure that the wire or strong cords is taut and
securety attached to a wall ring (or similar attachment).
Cautions on screen treatment
Screen Burn:
Screen burn will only happen if you misuse the TV, and therefore damage from screen burn is not
covered by the warranty. Screen burn happens when images remain on the screen without moving for
an extended period of time. Screen burn can occur in any projection television made by any
manufacturer.
You may have seen screen burn on ATM bank machines. People who use "screen savers" on their
computer monitors are saving their monitors from screen burn. Especially for projection TV's screen burn
is caused by programmes or images displayed when the TV has a high CONTRAST or BRIGHTNESS
setting.
· Do not play video games, computer programme, or similar programmes that have fixed or repetitive
images.
· Keep contrast and brightness low --- especially on teletext programmes, news programmes, business
reports, and home-shopping (or similar) programmes. To adjust contrast and brightness, see page 17.
· Do not leave fixed images on the screen for long time.
Screen Cleaning:
Your projection television screen is fragile and should be handled with exterme care, especially if you
are forced to touch the screen directly --- i.e. when cleaning it. Be careful not to scratch the screen with
jewellery or fingernails.
The following products will DAMAGE THE SCREEN. Do not use then under any circumstances.
· AMMONIA. NEVER use deterrgents that contain ammonia !
· AEROSOLS AND CHEMICALS. NEVER use aerosol or chemical cleaners !
· GLASS AND WINDOWS CLEANERS. NEVER use glass or windows cleaners !
To clean the screen:
Clean the screen
only with a solution consisting of water and mild dish detergent.
1. Add two to three drops of detergent to one quart of water.
2. Take a soft cloth (such as a cotton tee-shirt), dampen the cloth with the soapy solution, and
gently
wipe the screen from top to bottom.
3. Gently wipe off any soap left on the screen.
Plastic loop
Wire or
strong
cord
LCT1078-001A_p01-15
11/2/01, 2:11 PM
3
Black
4
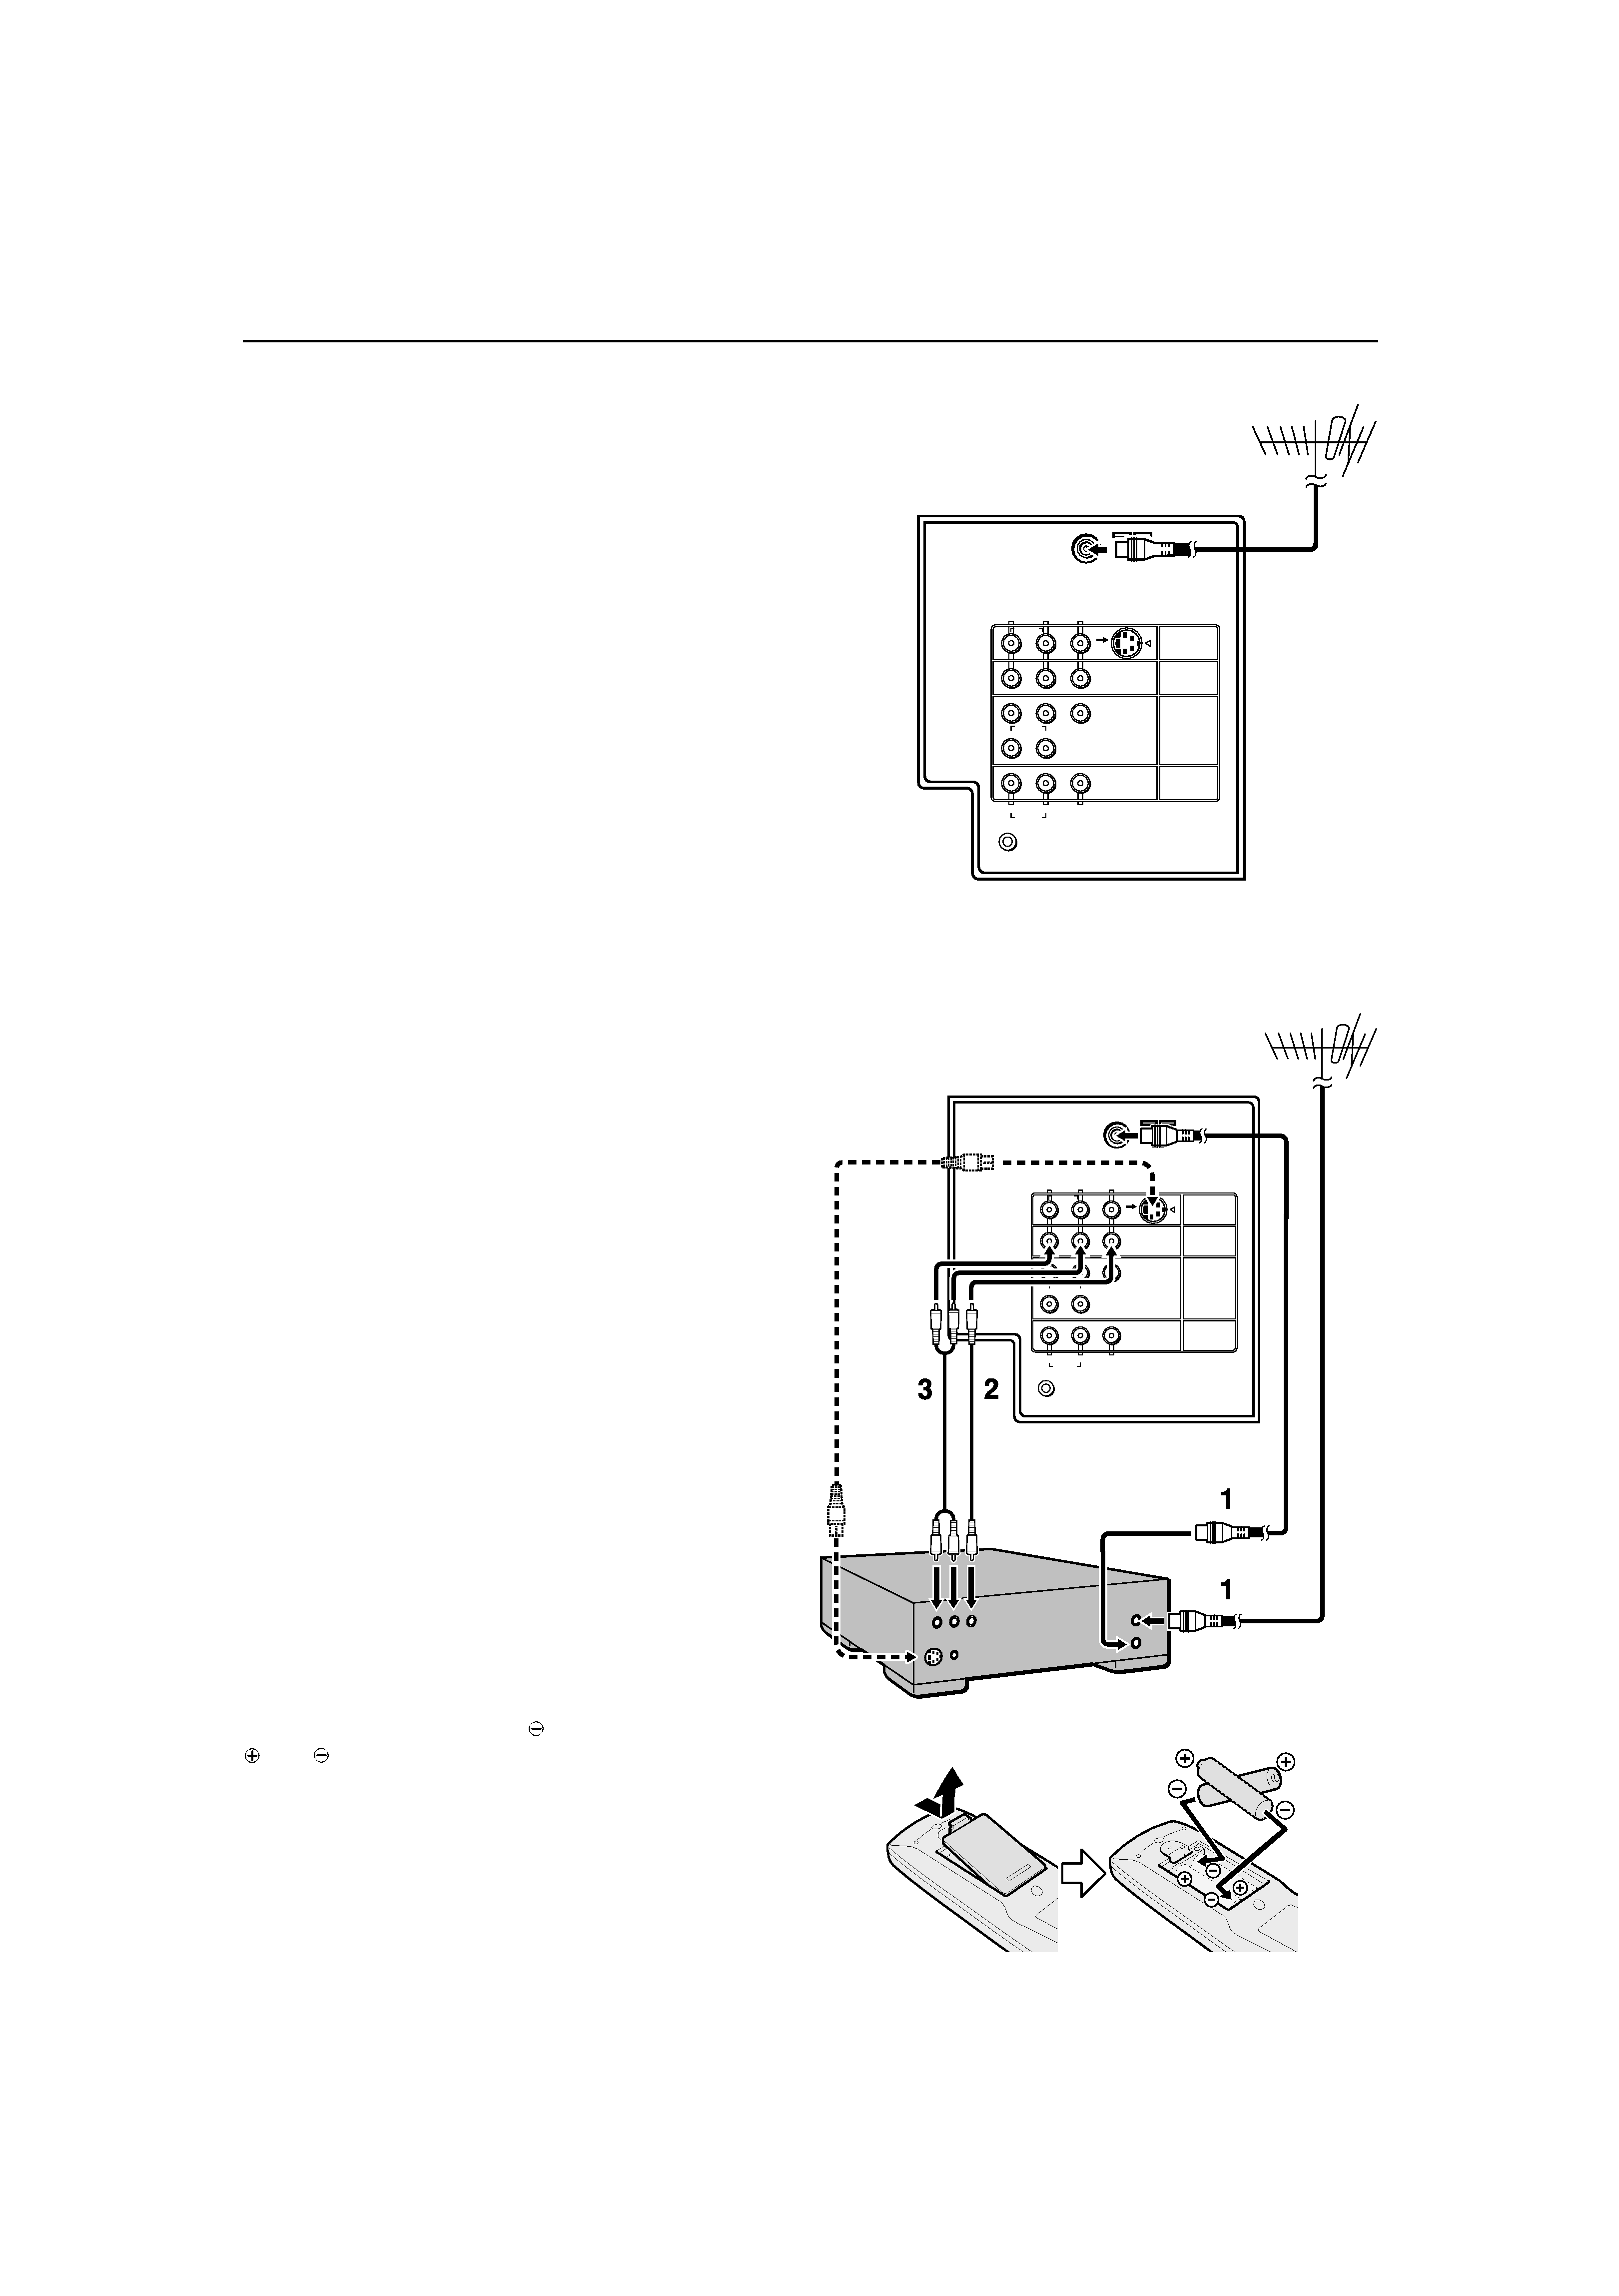
CAUTION
·Turn off all the epuipment including the TV before
connecting anything.
1 Connecting the aerial and VCR
·Aerial cable is not supplied. Use a good quality
75-ohm coaxial cable.
·Read the manual that came with the VCR before
connecting.
If not connecting a VCR (see fig.A) :
Connect an aerial cable to the aerial socket
on this TV .
If connecting a VCR (see fig.B) :
1 Connect the aerial cable to the aerial input
socket on the VCR, and connect the VCR
and TV with another aerial cable.
2 Connect the VCR's VIDEO OUT (video
output) jack and the TV's VIDEO jack with
a video cable.
To connect a VCR to the TV with an S-VIDEO cable:
Connect the VCR's S-VIDEO OUT (S-VIDEO output)
connector and TV's S connector with an S-VIDEO
cable A , instead of connecting with a video cable.
3 Connect the VCR's VIDEO OUT (audio L/R
output) jacks and the TV's AUDIO jacks (L/
MONO and R) with an audio cable.
·If the VCR's audio output is in mono, connect the
VCR's AUDIO OUT (audio output) jack and the
TV's AUDIO L/MONO jack with an audio cable.
·You can use the AV COMPU LINK function if your
VCR has an AV COMPU LINK terminal. For details,
see "Connecting AV COMPU LINK Supported
Devices" on page 29.
2 Connecting the power cord
Connect the mains plug to the AC outlet.
3 Putting the batteries into the
Remote control
Use two AA/R6 batteries.
Insert the batteries from the
end, making sure the
and
polaritiles are correct.
·Follow the warnings printed on the batteries.
·If the remote control does not work properly,
replace the batteries.
·The batteries we supply are only for setting up and
testing your TV. Please replace them as soon as
necessary.
Setting up your TV
Fig.A
R
RL
L/MONO
AUDIO
AUDIO
L/MONO
R
AUDIO
CR
C
Y/VIDEO
B
VIDEO
VIDEO-2
VIDEO
OVER
S
VIDEO-3/
COMPONENT
VIDEO-1
OUTPUT
AV COMPU LINK
Back of the TV
Fig.B
Back of the TV
R
RL
L/MONO
AUDIO
AUDIO
L/MONO
R
AUDIO
CR
C
Y/VIDEO
B
VIDEO
VIDEO-2
VIDEO
OVER
S
VIDEO-3/
COMPONENT
VIDEO-1
OUTPUT
AV COMPU LINK
A
LCT1078-001A_p01-15
11/2/01, 2:11 PM
4
Black
5
4 Making the initial settings
When the TV is first turned on, it enters the initial setting mode,
and the JVC logo is displayed.
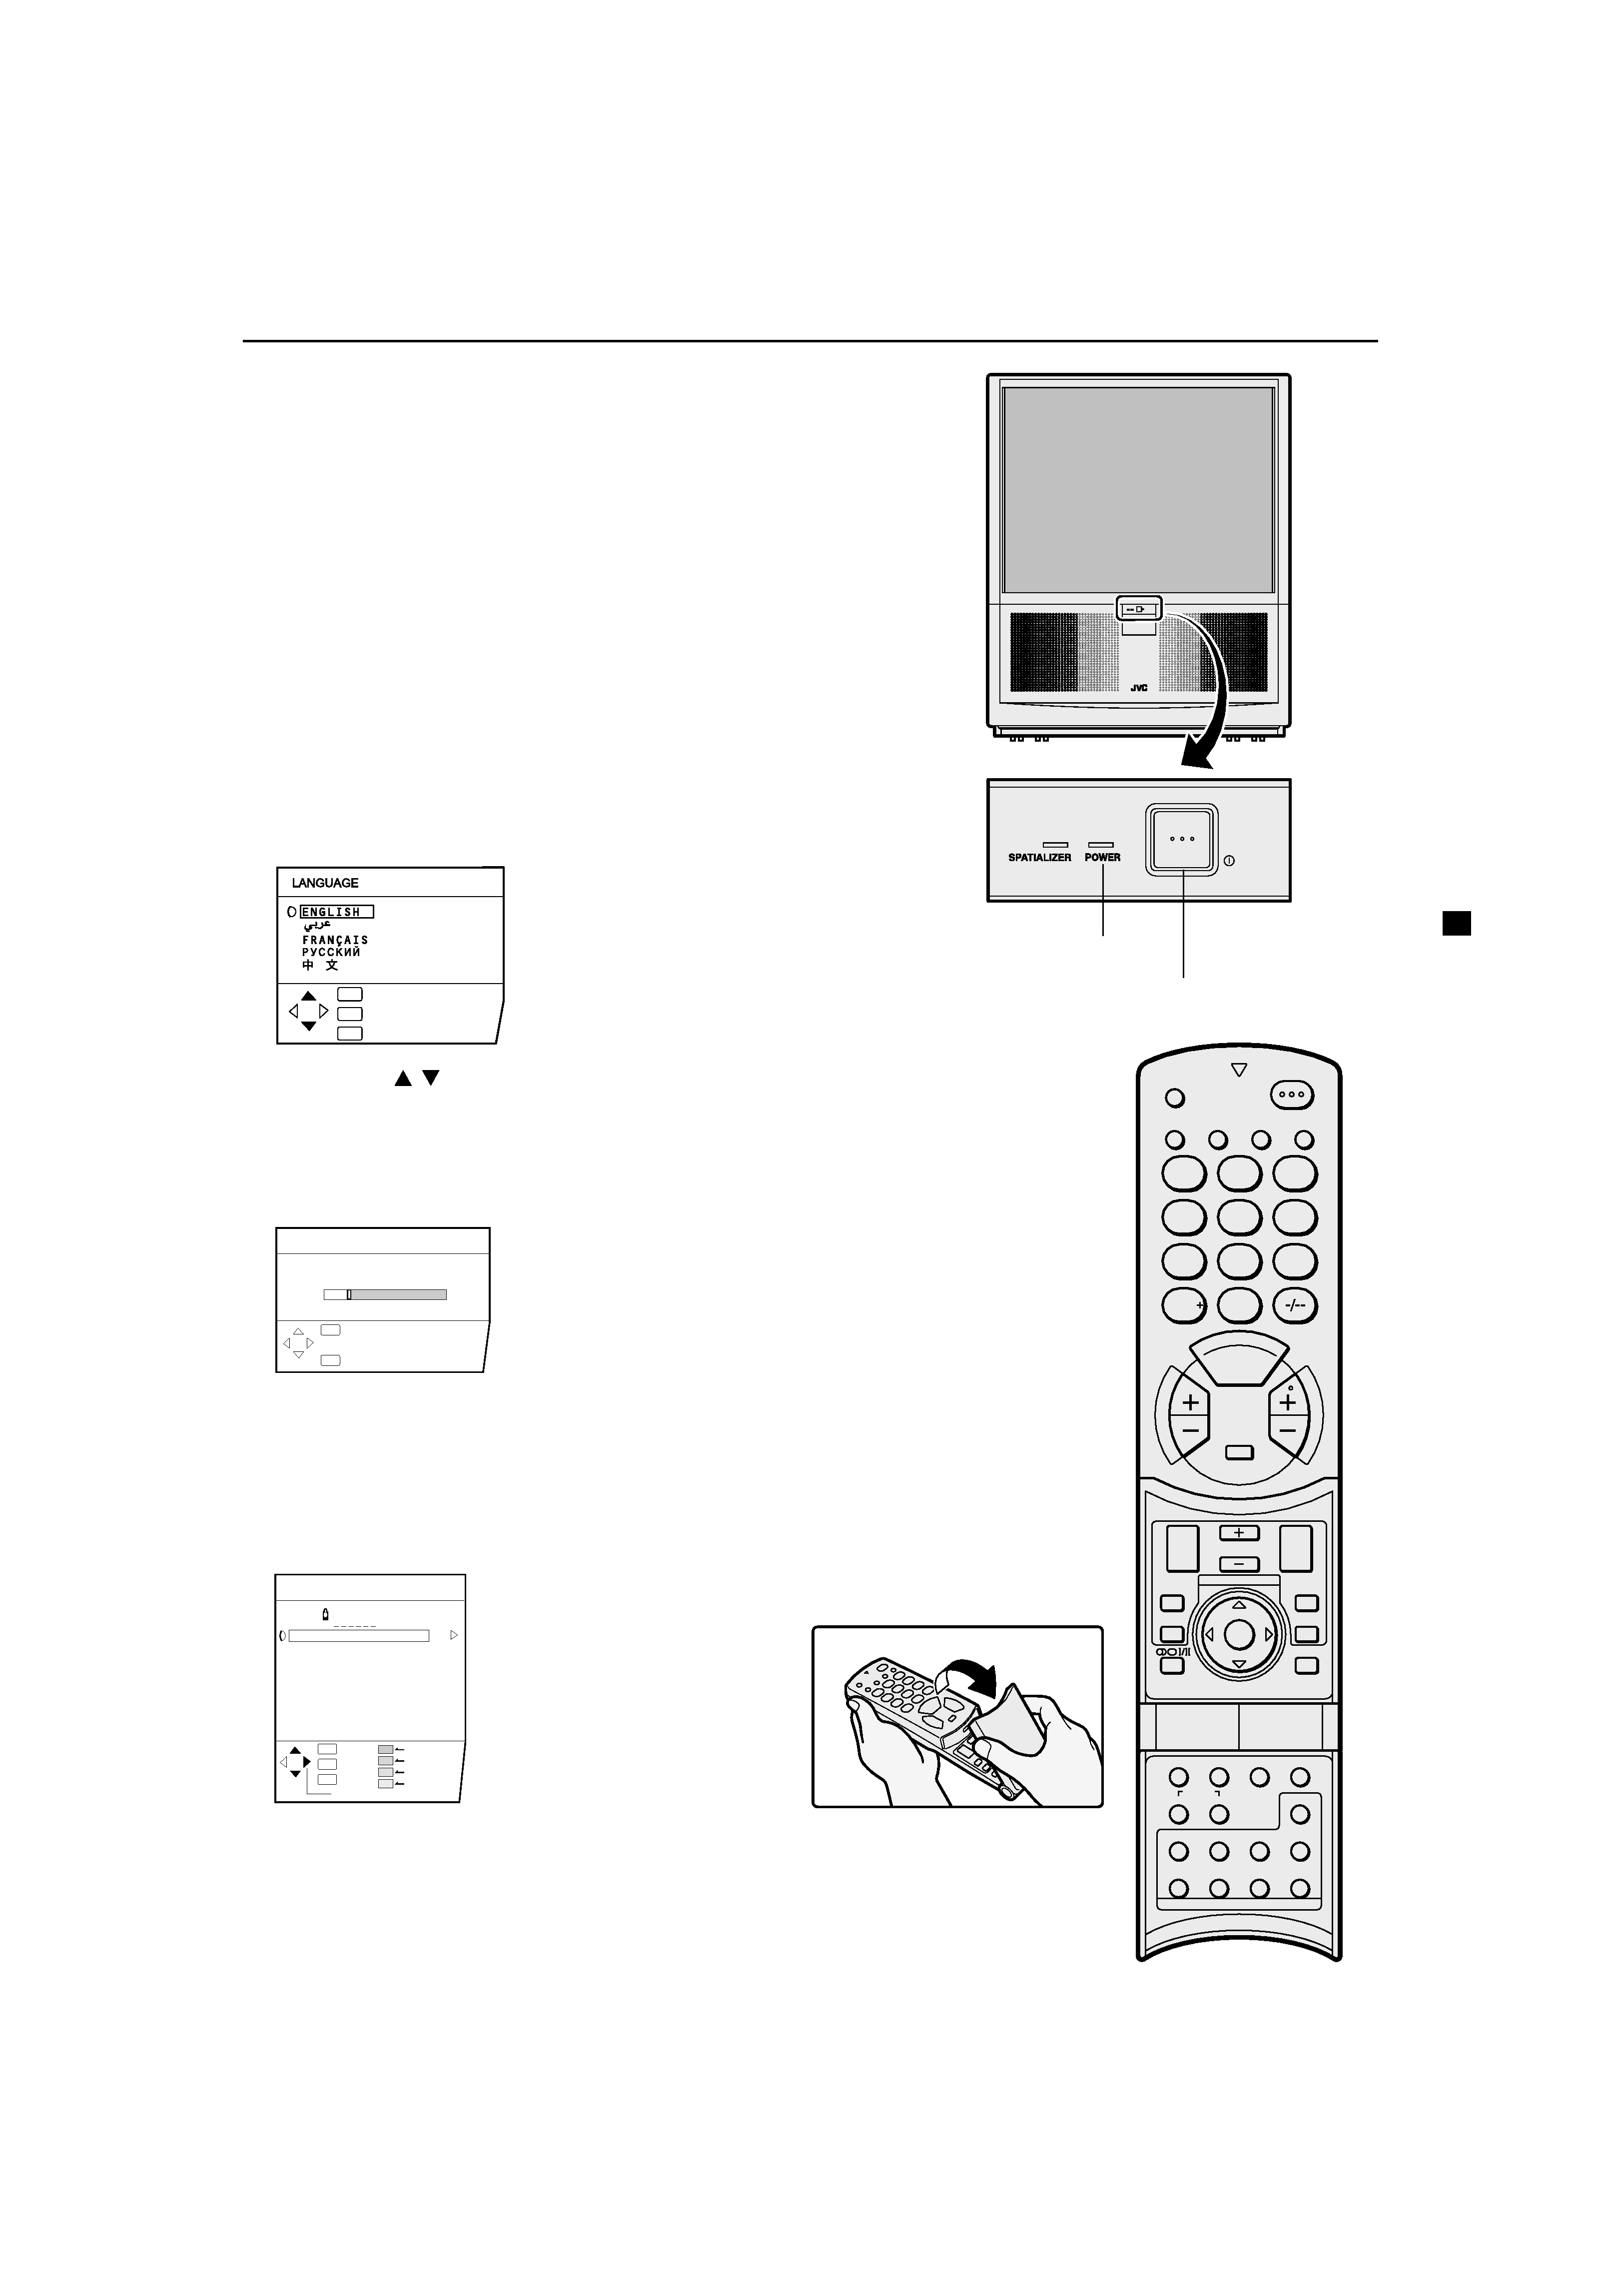
1 Press the main power button on the TV
The TV is turned on, and the JVC logo appears.
·If the power lamp on the TV lights red and does not change
to green, your TV is in the standby mode. Press the POWER
button on the remote control to turn the TV on.
·If the JVC logo does not appear, your TV has already been
turned before. In this case,use the "LANGUAGE" and
"AUTO PROGRAM" functions to make the initial settings.
For details, see "INSTALL menu" on page 23.
2 Press the MENU/OK button
The LANGUAGE menu appears. You can choose a
language for the on-screen language.
3 Press the
/
buttons to choose ENGLISH.
Then press the MENU/OK button.
The AUTO PROGRAM function starts. The TV channels you
receive are automatically stored in the programme numbers
list.
·To cancel the AUTO PROGRAM function, press the
DISPLAY button.
4 After the TV channels have been stored in the
programme number (PR) list, the EDIT menu
appears.
·You can proceed to edit the programme numbers
list using the EDIT/MANUAL function. For details, see
"EDIT/MANUAL" on page 23.
·If a TV cannel you want to view is not stored in the
programme numbers list, you can register it using the
MANUAL function. For details, see "EDIT/MANUAL" on
page 23.
Setting up your TV
CH/CC
PR
ID
AV
01
02
03
04
05
06
07
08
09
CH
CH
CH
CH
CH
CH
CC
CC
CC
21
22
23
24
25
26
01
02
03
ID
INSERT
DELETE
MANUAL
MOVE
EDIT
:EXIT
:OK
OK
TV
:BACK
DISP
:BACK
:OK
OK
DISP
CH
10
AUTO PROGRAM
20%
:EXIT
:OK
OK
TV
:BACK
DISP
C
H
A
N
N
E
L
V
O
L
U
M
E
12
ZOOM
MULTI
MUTING
NEXT
PIP
POSITION
FREEZE
MENU/
OK
SWAP
SUB-P
PIP
TEXT
STROBE
DISPLAY
RETURN
TV/VIDEO
BASS
PICTURE
MODE
POWER
SPATIALIZER
3
456
789
0
COLOUR
SYSTEM
SOUND
TV/TEXT
HOLD
MODE
REVEAL
SIZE
SUBPAGE
STORE
CANCEL
INDEX
Main power button
POWER lamp
LCT1078-001A_p01-15
11/2/01, 2:12 PM
5
Black