INSTRUCTIONS
COLOUR TELEVISION
HV-34LH21
HV-34LH51
HV-34LH71
HV-29VH21
HV-29WH21
HV-29WH51
HV-29WH71
Contents
Setting up your TV
TV buttons and functions
Remote control buttons
and functions
Using the TV's menu
Basic operation
PICTURE SETTING menu
PICTURE FEATURES menu
SOUND SETTING menu
FEATURES menu
INSTALL menu
Additional preparation
Troubleshooting
Specification
. . . . . . . . . . . . . 3
. . . . . . . . 6
. . . 8
. . . . . . . . . . . . 19
. . . . . . . . . . . . . . 19
. . . . . 20
. . . 21
. . . . . . 25
. . . . . . . . . . . 26
. . . . . . . . . . . . . . 29
. . . . . . . . . . 35
. . . . . . . . . . . . . . 37
. . . . . . . . . . . . . . . . . 40
GGT0020-001B-H
0803-CR-JMT
© 2003 VICTOR COMPANY OF JAPAN, LIMITED
HV-34LH&29WH_Eng.book.fm Page 1 Monday, September 1, 2003 7:59 PM
Thank you for buying this JVC colour television.
To make sure you understand how to use your new TV, please read this manual thoroughly
before you begin.
1 Operate only from the power source indicated on the rear of the TV.
2 Avoid damaging the power cord and mains plug. When unplugging the TV, grasp the
mains plug. Do not pull on the power cord.
3 Never block or cover the ventilation openings.
Never install the TV where good ventilation is unattainable.
When installing this TV, leave spaces for ventilation around the TV of more than the
minimum distances as shown.
4 Do not allow objects or liquid into the cabinet openings.
5 In the event of a fault, unplug the unit and call a service technician. Do not attempt to repair
it yourself or remove the rear cover.
6 The surface of the TV screen is easily damaged. Be very careful with it when handling the
TV. Should the TV screen become soiled, wipe it with a soft dry cloth. Never use rub it
forcefully. Never use any cleaner or detergent on it.
7 If you are not going to use this TV for a long period of time, be sure to disconnect the AC
plug from the AC socket.
8 The apparatus shall not be exposed to dripping or splashing and that no objects filled with
liquids, such as vases, shall be placed on the apparatus.
WARNING: TO PREVENT FIRE OR SHOCK HAZARD, DO NOT EXPOSE THIS
APPLIANCE TO RAIN OR MOISTURE.
CAUTION: TO ENSURE PERSONAL SAFETY, OBSERVE THE FOLLOWING
RULES REGARDING THE USE OF THIS TV.
15 cm
10 cm
10 cm
15 cm
HV-34LH&29WH_Eng.book.fm Page 2 Monday, September 1, 2003 7:59 PM
3
HV-34LH21/34LH51/34LH71/29WH21/29WH51/29WH71/29VH21 / GGT0020-001A-H / English
Setting up your TV
CAUTION
· Turn off all the equipment including the
TV before connecting anything.
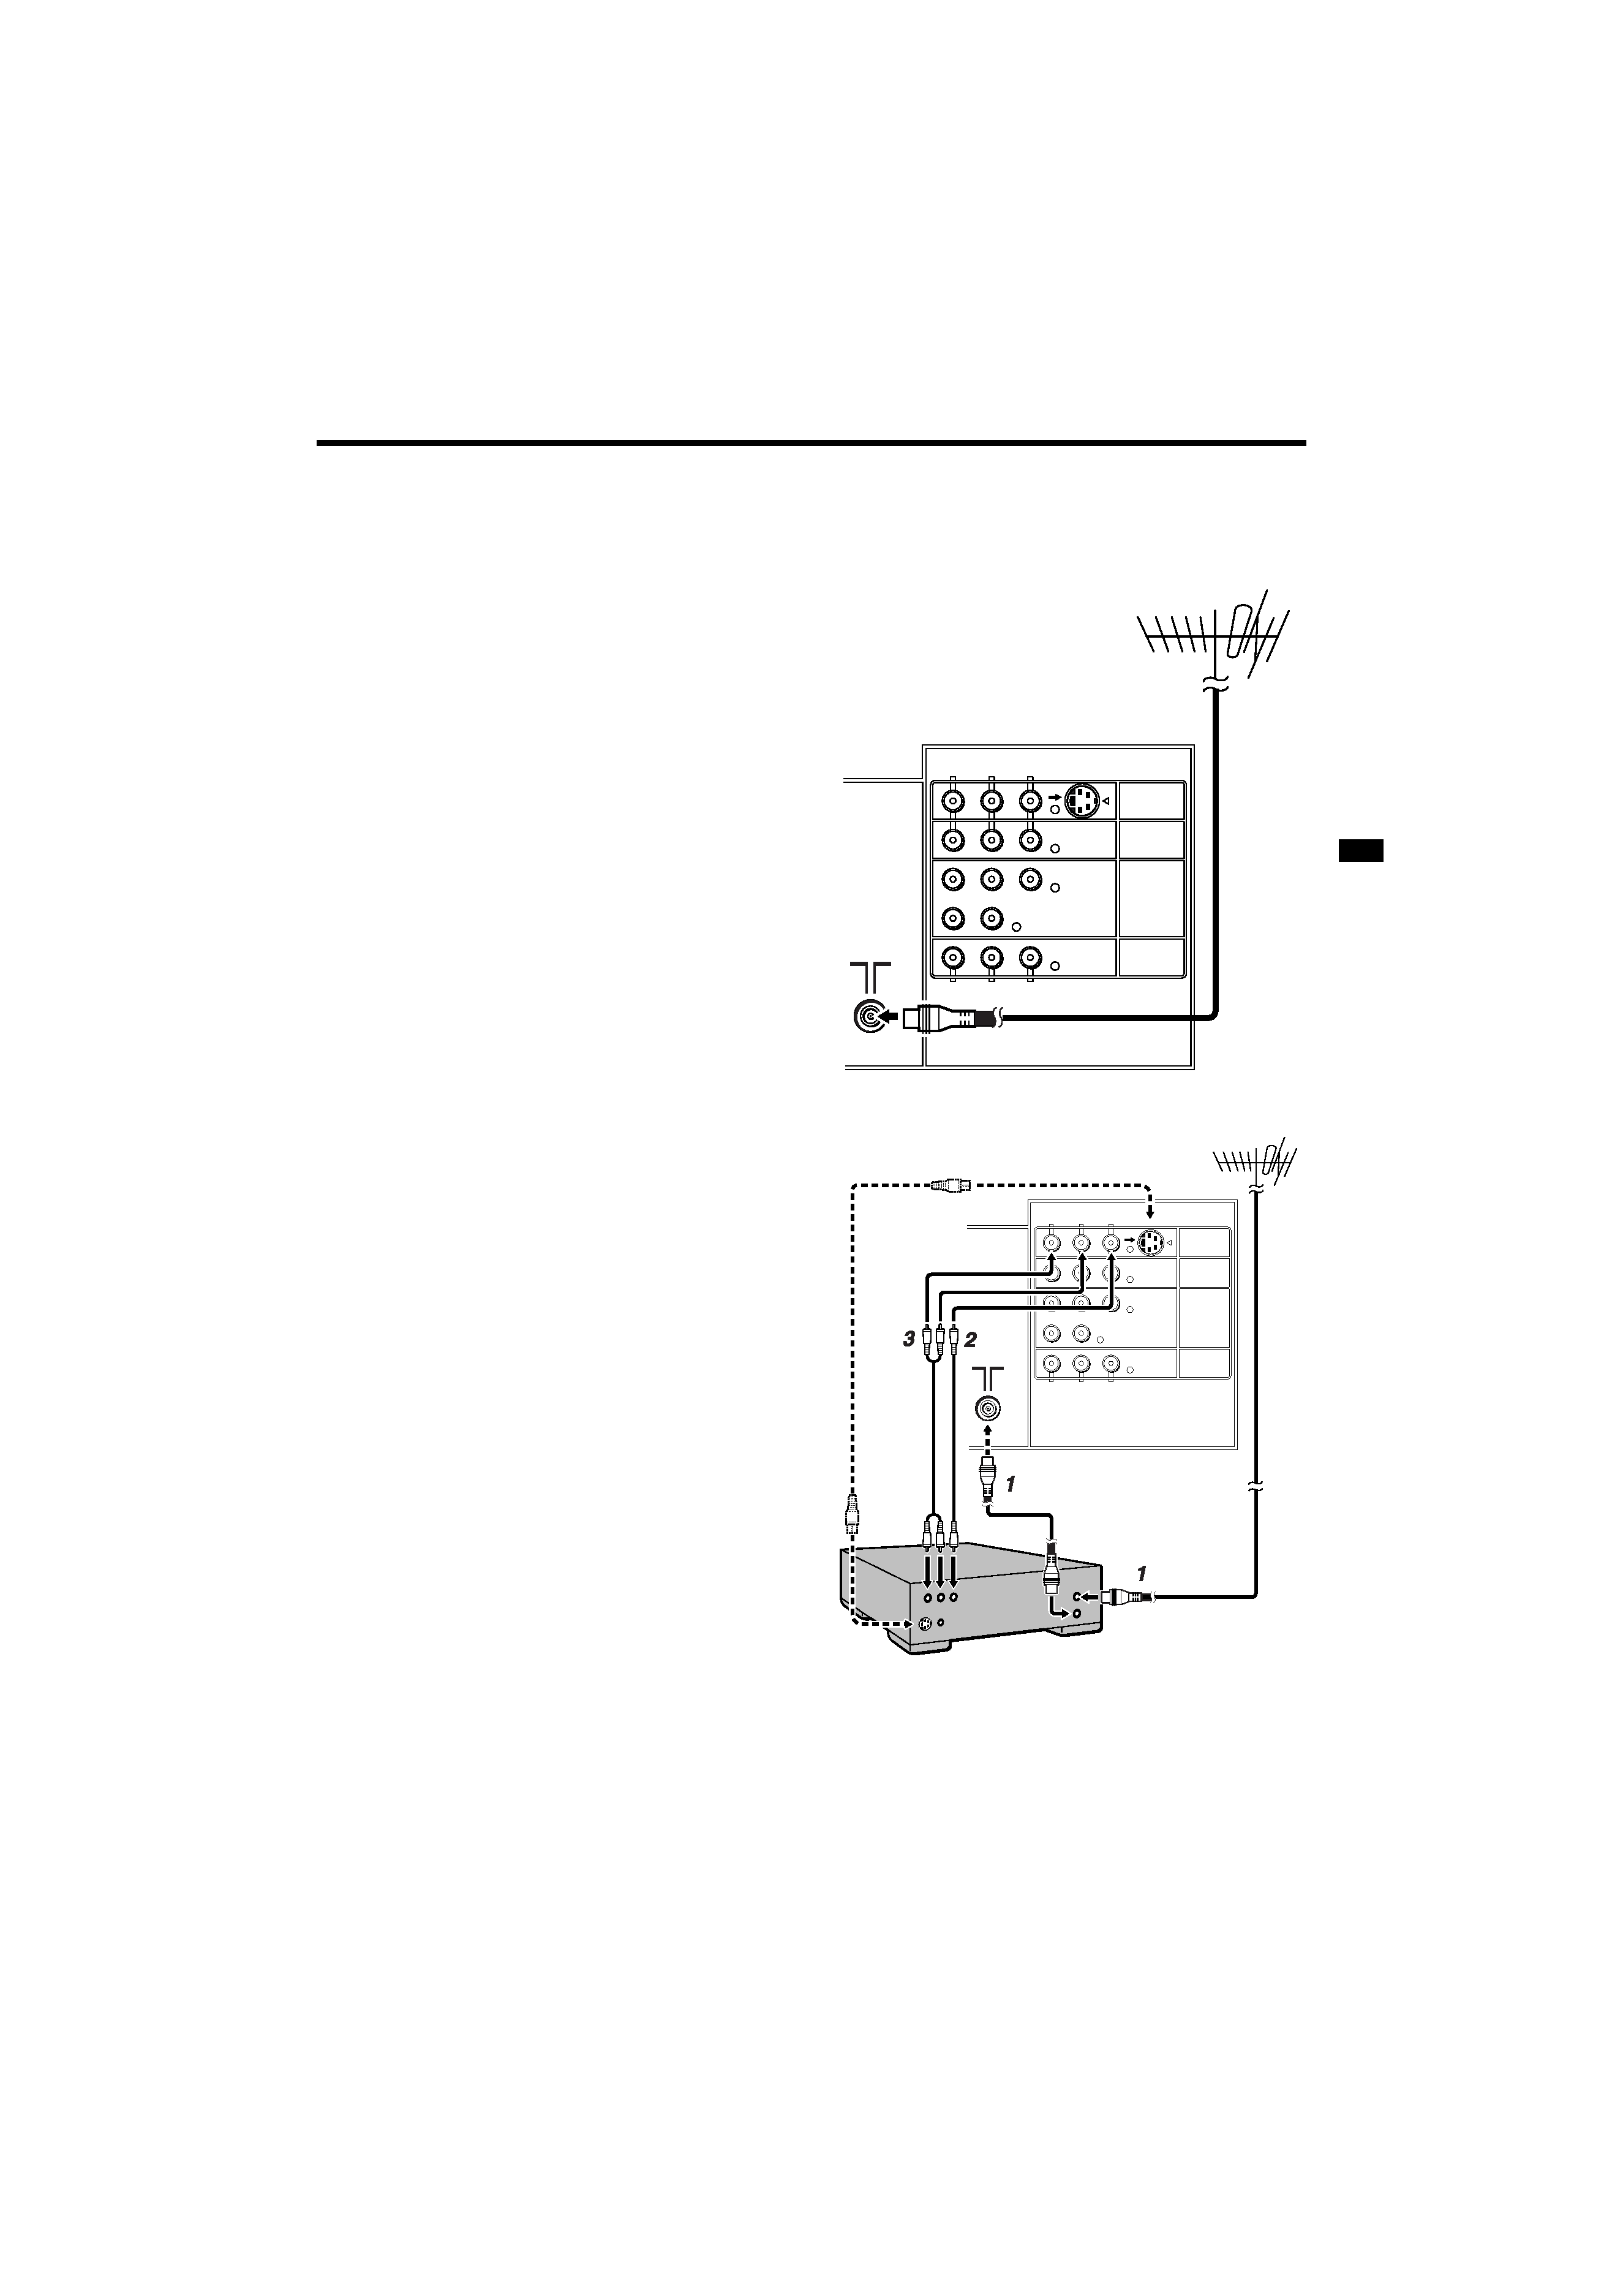
1 Connecting the aerial and VCR
· Aerial cable is not supplied. Use a
good quality 75-ohm coaxial cable.
· Read the manual that came with the
VCR before connecting.
If not connecting a VCR (see Fig. A):
Connect an aerial cable to the aerial socket
on this TV.
If connecting a VCR (see Fig. B):
1 Connect the aerial cable to the aerial
input socket on the VCR, and connect
the VCR and TV with another aerial
cable.
2 Connect the VCR's VIDEO OUT (video
output) jack and the TV's VIDEO jack
with a video cable.
To connect a VCR to the TV with an S-
VIDEO cable:
Connect the VCR's S-VIDEO OUT (S-
VIDEO output) connector and TV's S
connector with an S-VIDEO cable A,
instead of connecting with a video cable.
3 Connect the VCR's VIDEO OUT (audio
L/R output) jacks and the TV's AUDIO
jacks (L/MONO and R) with an audio
cable.
· If the VCR's audio output is in mono,
connect the VCR's AUDIO OUT (audio
output) jack and the TV's AUDIO L/
MONO jack with an audio cable.
R
RL
L/MONO
AUDIO
AUDIO
L/MONO
R AUDIO
CR
C
Y/VIDEO
B
VIDEO
VIDEO-2
VIDEO
OVER
S
VIDEO-3/
COMPONENT
VIDEO-1
OUTPUT
R
RL
L/MONO
AUDIO
AUDIO
L/MONO
R AUDIO
CR
C
Y/VIDEO
B
VIDEO
VIDEO-2
VIDEO
OVER
S
VIDEO-3/
COMPONENT
VIDEO-1
OUTPUT
A
Back of the TV
Fig. A
Back of the TV
Fig. B
HV-34LH&29WH_Eng.book.fm Page 3 Monday, September 1, 2003 7:59 PM
4
HV-34LH21/34LH51/34LH71/29WH21/29WH51/29WH71/29VH21 / GGT0020-001A-H / English
Setting up your TV
2 Connecting the power cord
Connect the mains plug to the AC outlet.
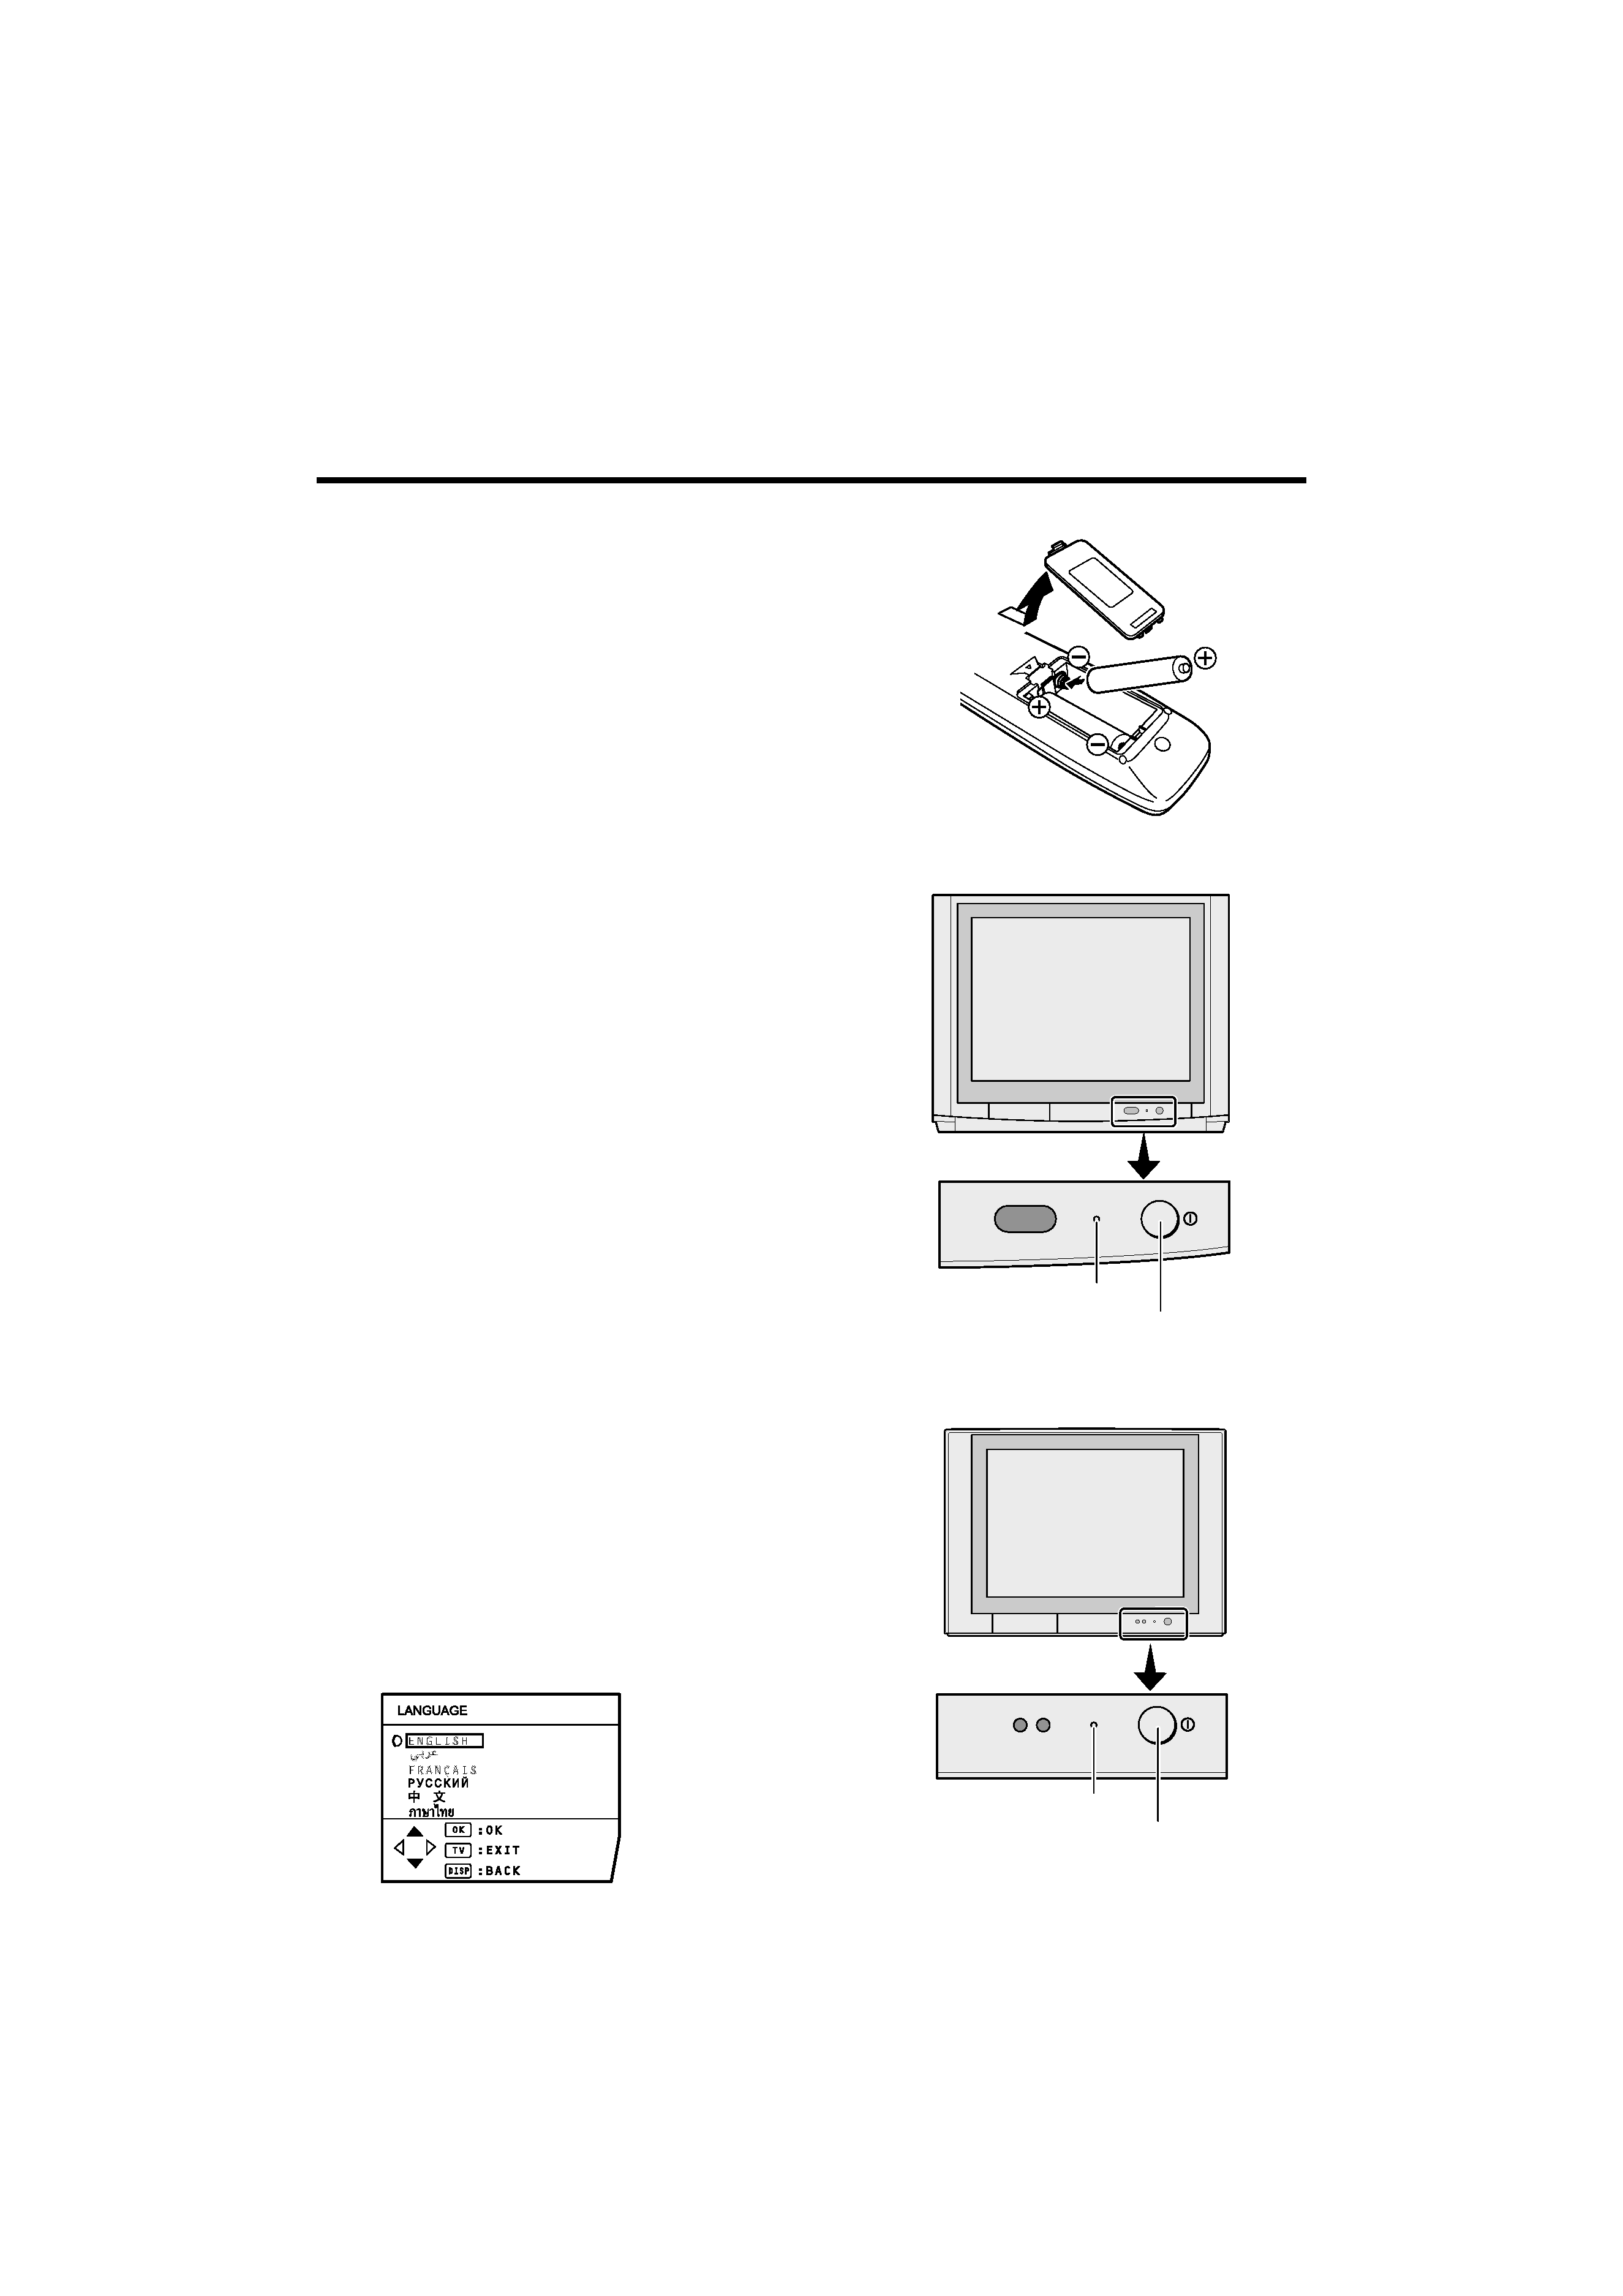
3 Putting the batteries into the
remote control
Use two AA/R6 batteries.
Insert the batteries from the - end, making
sure the + and - polarities are correct.
· Follow the warnings printed on the
batteries.
· If the remote control does not work
properly, replace the batteries.
· The batteries we supply are only for
setting up and testing your TV. Please
replace them as soon as necessary.
4 Making the initial settings
When the TV is first turned on, it enters the
initial setting mode, and the JVC logo is
displayed.
1 Press the main power button on the
TV.
The TV is turned on, and the JVC logo
appears.
· If the POWER lamp on the TV lights
red and does not change to green,
your TV is in the standby mode. Press
the POWER button on the remote
control to turn the TV on.
· If the JVC logo does not appear, your
TV has already been turned before. In
this case, use the "LANGUAGE" and
"AUTO PROGRAM" functions to make
the initial settings. For details, see
"INSTALL menu" on page 29.
2 Press the MENU/OK button.
The LANGUAGE menu appears. You
can choose a language for the on-screen
language.
POWER
HV-34LH21 / HV-34LH51 /
HV-34LH71
POWER
HV-29WH21 / HV-29WH51 /
HV-29WH71 / HV-29VH21
POWER lamp
Main power button
POWER lamp
Main power button
HV-34LH&29WH_Eng.book.fm Page 4 Monday, September 1, 2003 7:59 PM
5
HV-34LH21/34LH51/34LH71/29WH21/29WH51/29WH71/29VH21 / GGT0020-001A-H / English
Setting up your TV
3 Press the 6 buttons to choose
ENGLISH. Then press the MENU/ OK
button.
The AUTO PROGRAM function starts.
The TV channels you receive are
automatically stored in the PR
(programme numbers) LIST.
· To stop the AUTO PROGRAM
function, press the MENU/OK button.
4 After the TV channels have been
stored in the programme numbers
(PR) list, the EDIT menu appears.
· You can proceed to edit the
programme numbers list using the
EDIT/MANUAL function. For details,
see "EDIT/MANUAL" on page 30.
· If a TV channel you want to view is not
stored in the programme numbers list,
you can register it using the MANUAL
function. For details, see "EDIT/
MANUAL" on page 30.
· The AUTO PROGRAM function does
not store a TV channel to the
programme number 0 (AV).
· If you do not need to use the EDIT/
MANUAL function, press the MENU/
OK button to close the EDIT menu.
Now, setting up is complete. Please
enjoy your new JVC TV!
7
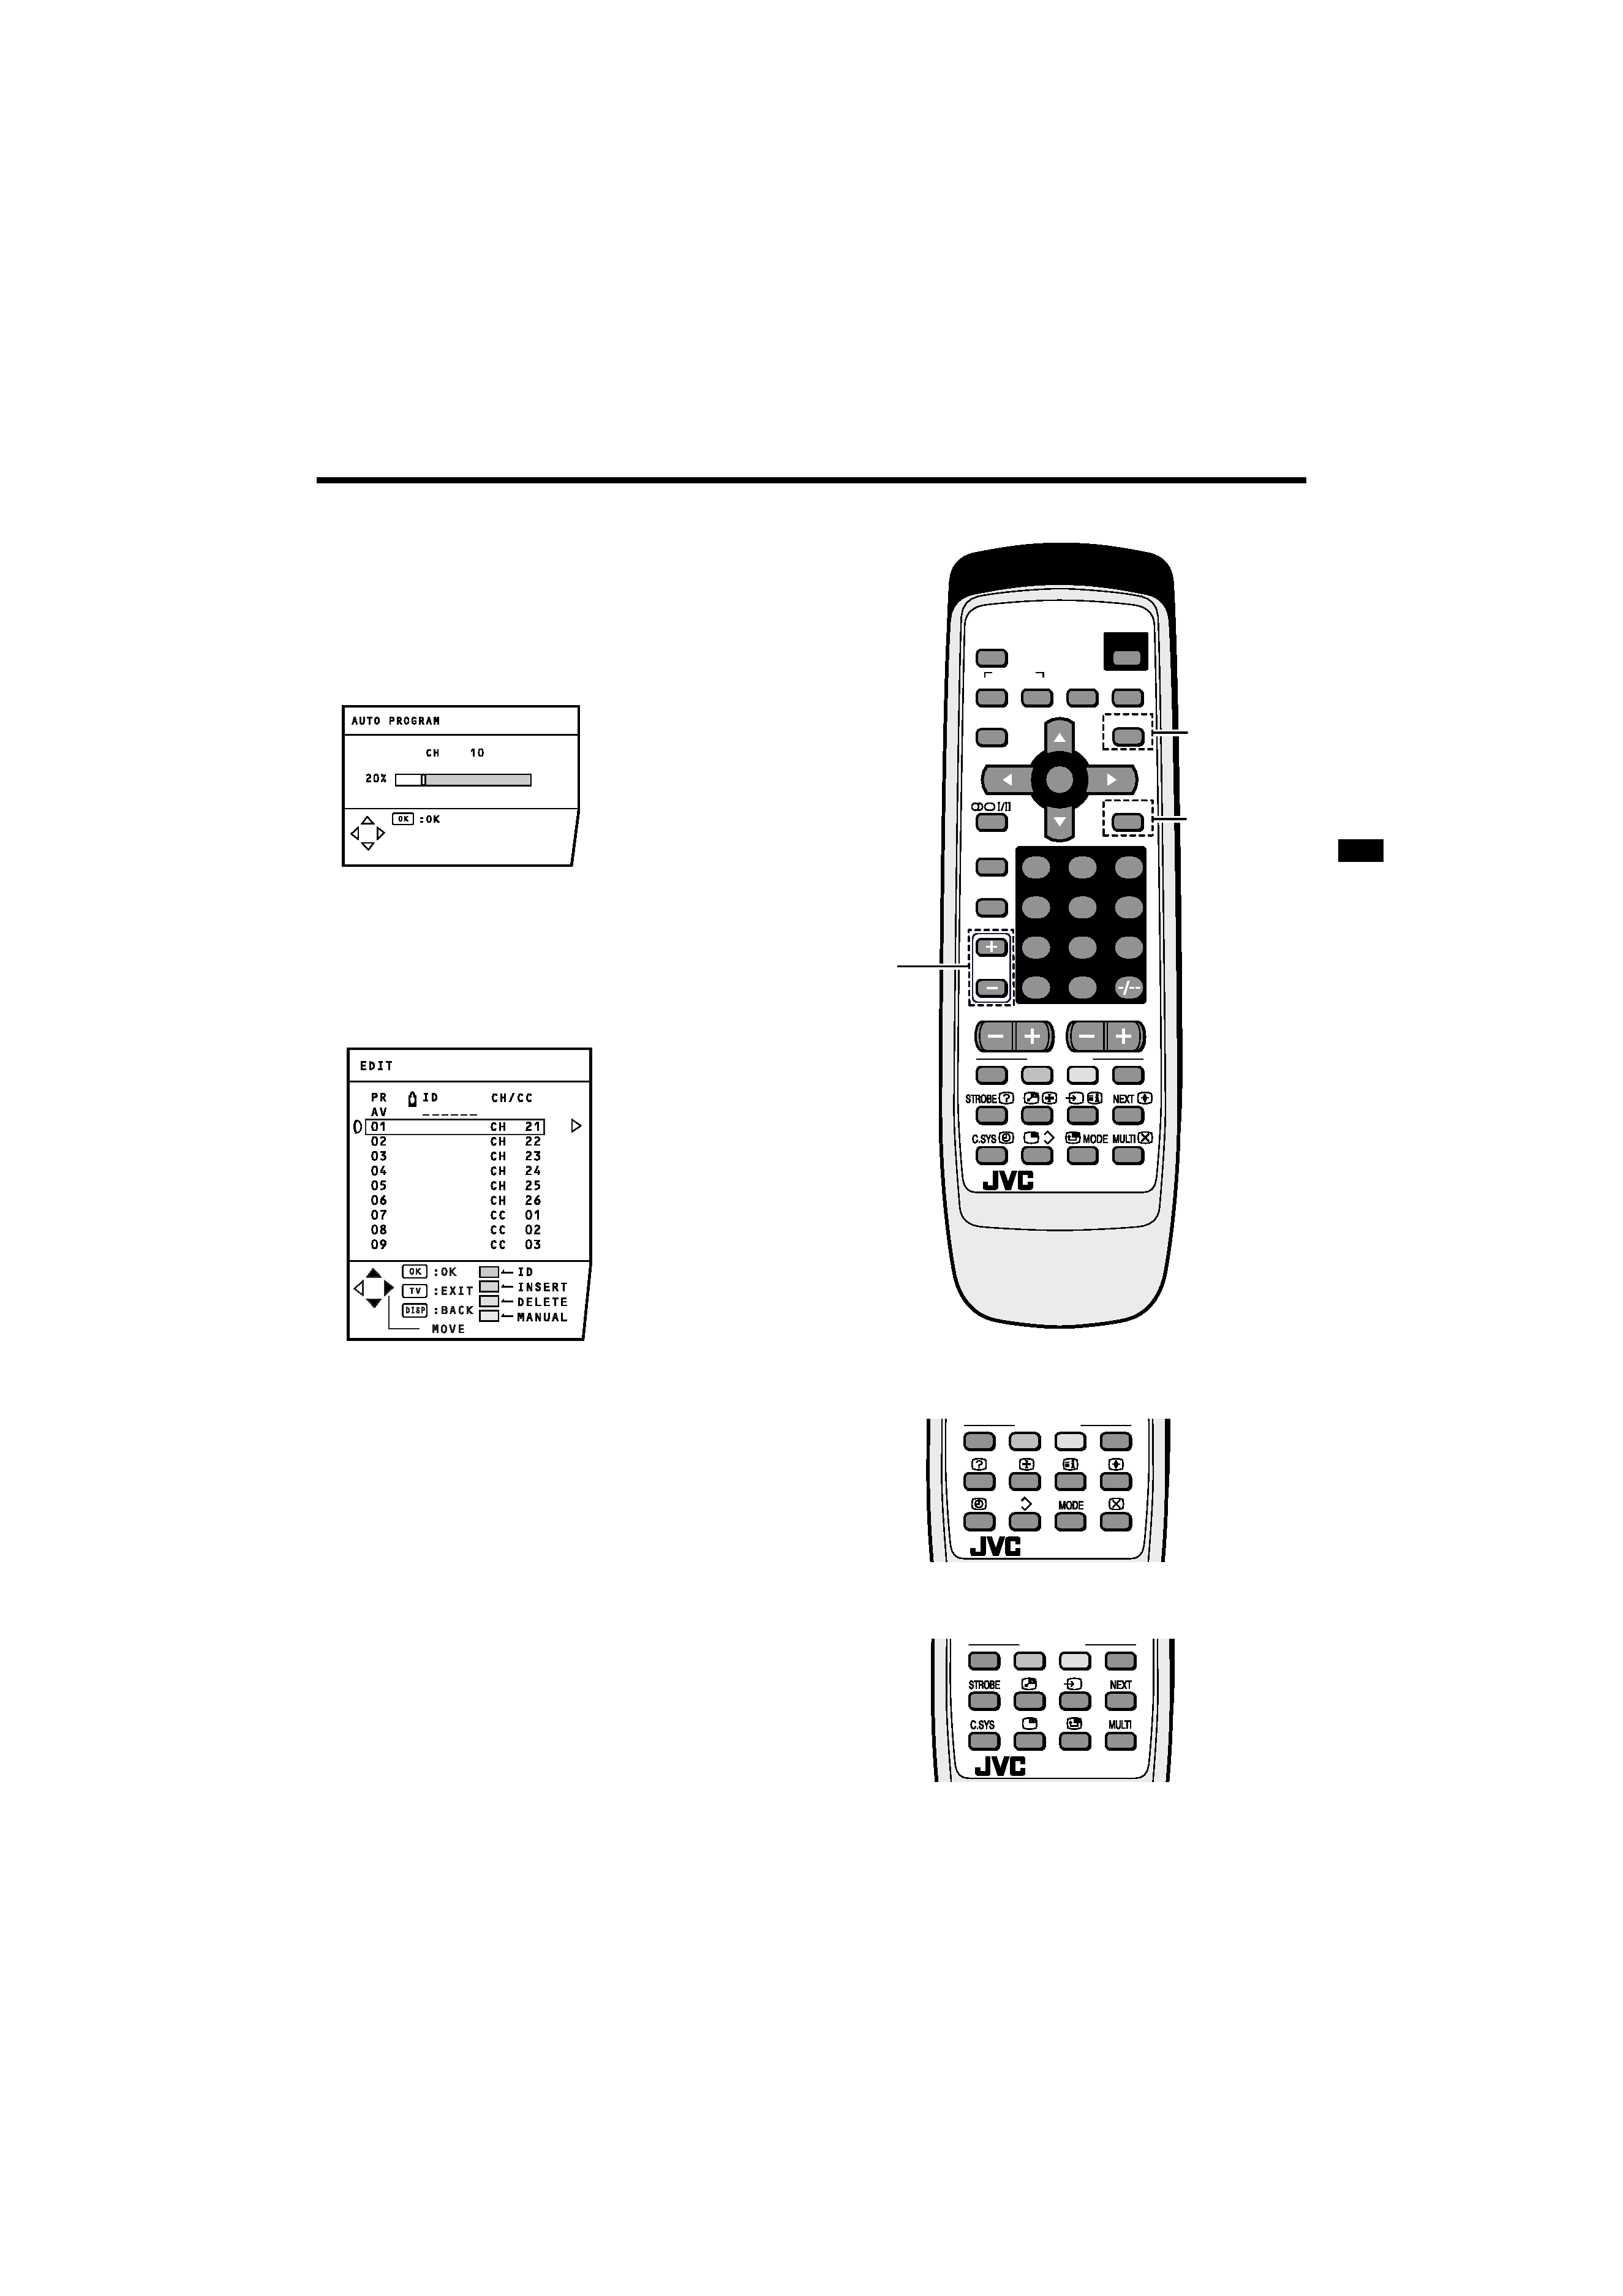
RETURN+
4
1
MENU
0
8
5
2
9
6
3
MUTING
COLOUR
SYSTEM
SOUND
CINEMA
SURROUND
DISPLAY
ZOOM
TV/TEXT
TV/VIDEO
PICTURE
MODE
CHANNEL
VOLUME
RM-C1350
TV
FAVORITE CH
POWER
OK
PIP
SUB-P
RM-C1351
TV
FAVORITE CH
RM-C1353
TV
FAVORITE CH
HV-34LH71 / HV-29WH71
Except
HV-34LH51
HV-29WH51
Except
HV-34LH21
HV-29WH21
HV-29VH21
HV-34LH21 / HV-29VH21 / HV-29WH21
HV-34LH51 / HV-29WH51
Except
HV-34LH21
HV-29WH21
HV-29VH21
HV-34LH&29WH_Eng.book.fm Page 5 Monday, September 1, 2003 7:59 PM