· Cassettes marked "VHS" (or "S-VHS") can be used with this video
cassette recorder. However, S-VHS recording is not possible with
this model.
· This model is equipped with SQPB (S-VHS QUASI PLAYBACK)
that makes it possible to play back S-VHS recordings with
regular VHS resolution.
· HQ VHS is compatible with existing VHS equipment.
VIDEO CASSETTE RECORDER
HR-J4009UM
INSTRUCTIONS
LPT0701-001A
COPYRIGHT © 2002 VICTOR COMPANY OF JAPAN, LTD.
Printed in Thailand
Dear Customer,
Thank you for purchasing the JVC VHS video cassette recorder.
Before use, please read the safety information and precautions to
ensure safe use of your new VCR.
4F11501A
K
UM
CAUTIONS
WARNING: DANGEROUS VOLTAGE INSIDE
WARNING: TO PREVENT FIRE OR SHOCK HAZARD, DO
NOT EXPOSE THIS UNIT TO RAIN OR
MOISTURE.
The POWER
/l button does not completely shut off mains
power from the unit, but switches operating current on and off.
"
" shows electrical power standby and " l " shows ON.
This unit is produced to comply with Standard IEC 60065.
Use the conversion plug (provided) depending on the type of
your AC WALL outlet.
The rating plate and safety caution are on the rear of the unit.
IMPORTANT:
It may be unlawful to record or play back copyrighted material
without the consent of the copyright owner.
CAUTION
s When you are not using the VCR for a long period of time, it is
recommended that you disconnect the power cord from the
AC outlet.
s Dangerous voltage inside. Refer internal servicing to qualified
service personnel. To prevent electric shock or fire hazard,
remove the power cord from the AC outlet prior to
connecting or disconnecting any signal lead or aerial.
s Changes or modifications not approved by JVC could void
user's authority to operate the equipment.
POWER SYSTEM:
This set operates on voltage of AC 110 220V~, 50/60 Hz with
automatic switching.
02/01
4F11501AE Cov-07
16/01/2002, 18:23
1

When the equipment is installed in a cabinet or a shelf, make sure
that it has sufficient space on all sides to allow for ventilation
(10 cm or more on both sides, on top and at the rear).
When discarding batteries, environmental problems must be
considered and the local rules or laws governing the disposal of
these batteries must be followed strictly.
Failure to heed the following precautions may result in damage
to the VCR, Remote or video cassette.
1. DO NOT place the VCR ...
... in an environment prone to extreme temperatures or humidity.
... in direct sunlight.
... in a dusty environment.
... in an environment where strong magnetic fields are generated.
... on a surface that is unstable or subject to vibration.
2. DO NOT block the VCR's ventilation openings or holes.
(If the ventilation openings or holes are blocked by a newspaper
or cloth, etc., the heat may not be able to get out.)
3. DO NOT place heavy objects on the VCR or Remote.
4. DO NOT place anything which might spill on top of the VCR or
Remote.
(If water or liquid is allowed to enter this equipment, fire or electric
shock may be caused.)
5. DO NOT expose the apparatus to dripping or splashing.
6. DO NOT use this equipment in a bathroom or places with water.
Also DO NOT place any containers filled with water or liquids
(such as cosmetics or medicines, flower vases, potted plants, cups,
etc.) on top of this unit.
7. DO NOT place any naked flame sources, such as lighted candles,
on the apparatus.
8. AVOID violent shocks to the VCR during transport.
MOISTURE CONDENSATION
Moisture in the air will condense on the VCR when you move it
from a cold place to a warm place, or under extremely humid
conditions--just as water droplets form on the surface of a glass
filled with cold liquid. Moisture condensation on the head drum will
cause damage to the tape. In conditions where condensation may
occur, keep the VCR's power turned on for a few hours to let the
moisture dry.
How to use the Remote
Before use, insert two AAA size batteries into the Remote with the
polarity (
and
) matched correctly as indicated on the battery
compartment or on the lid.
q Point the Remote toward the remote sensor on the target
component.
q The maximum operating distance of the remote control is about 5 m.
NOTE:
If the Remote does not work properly, remove its batteries, wait for
a few seconds, replace the batteries and then try again.
Video heads cleaning
The heads get dirty in the following cases:
q in an environment prone to extreme temperature or humidity.
q in a dusty environment
q flaw, dirt or mold on video tapes
q continuous usage for a long time
Use a dry cleaning cassette -- TCL-2 -- when:
q Rough, poor picture appears while a tape is played back.
q The picture is unclear or no picture appears.
4F11501AE Cov-07
16/01/2002, 18:23
2
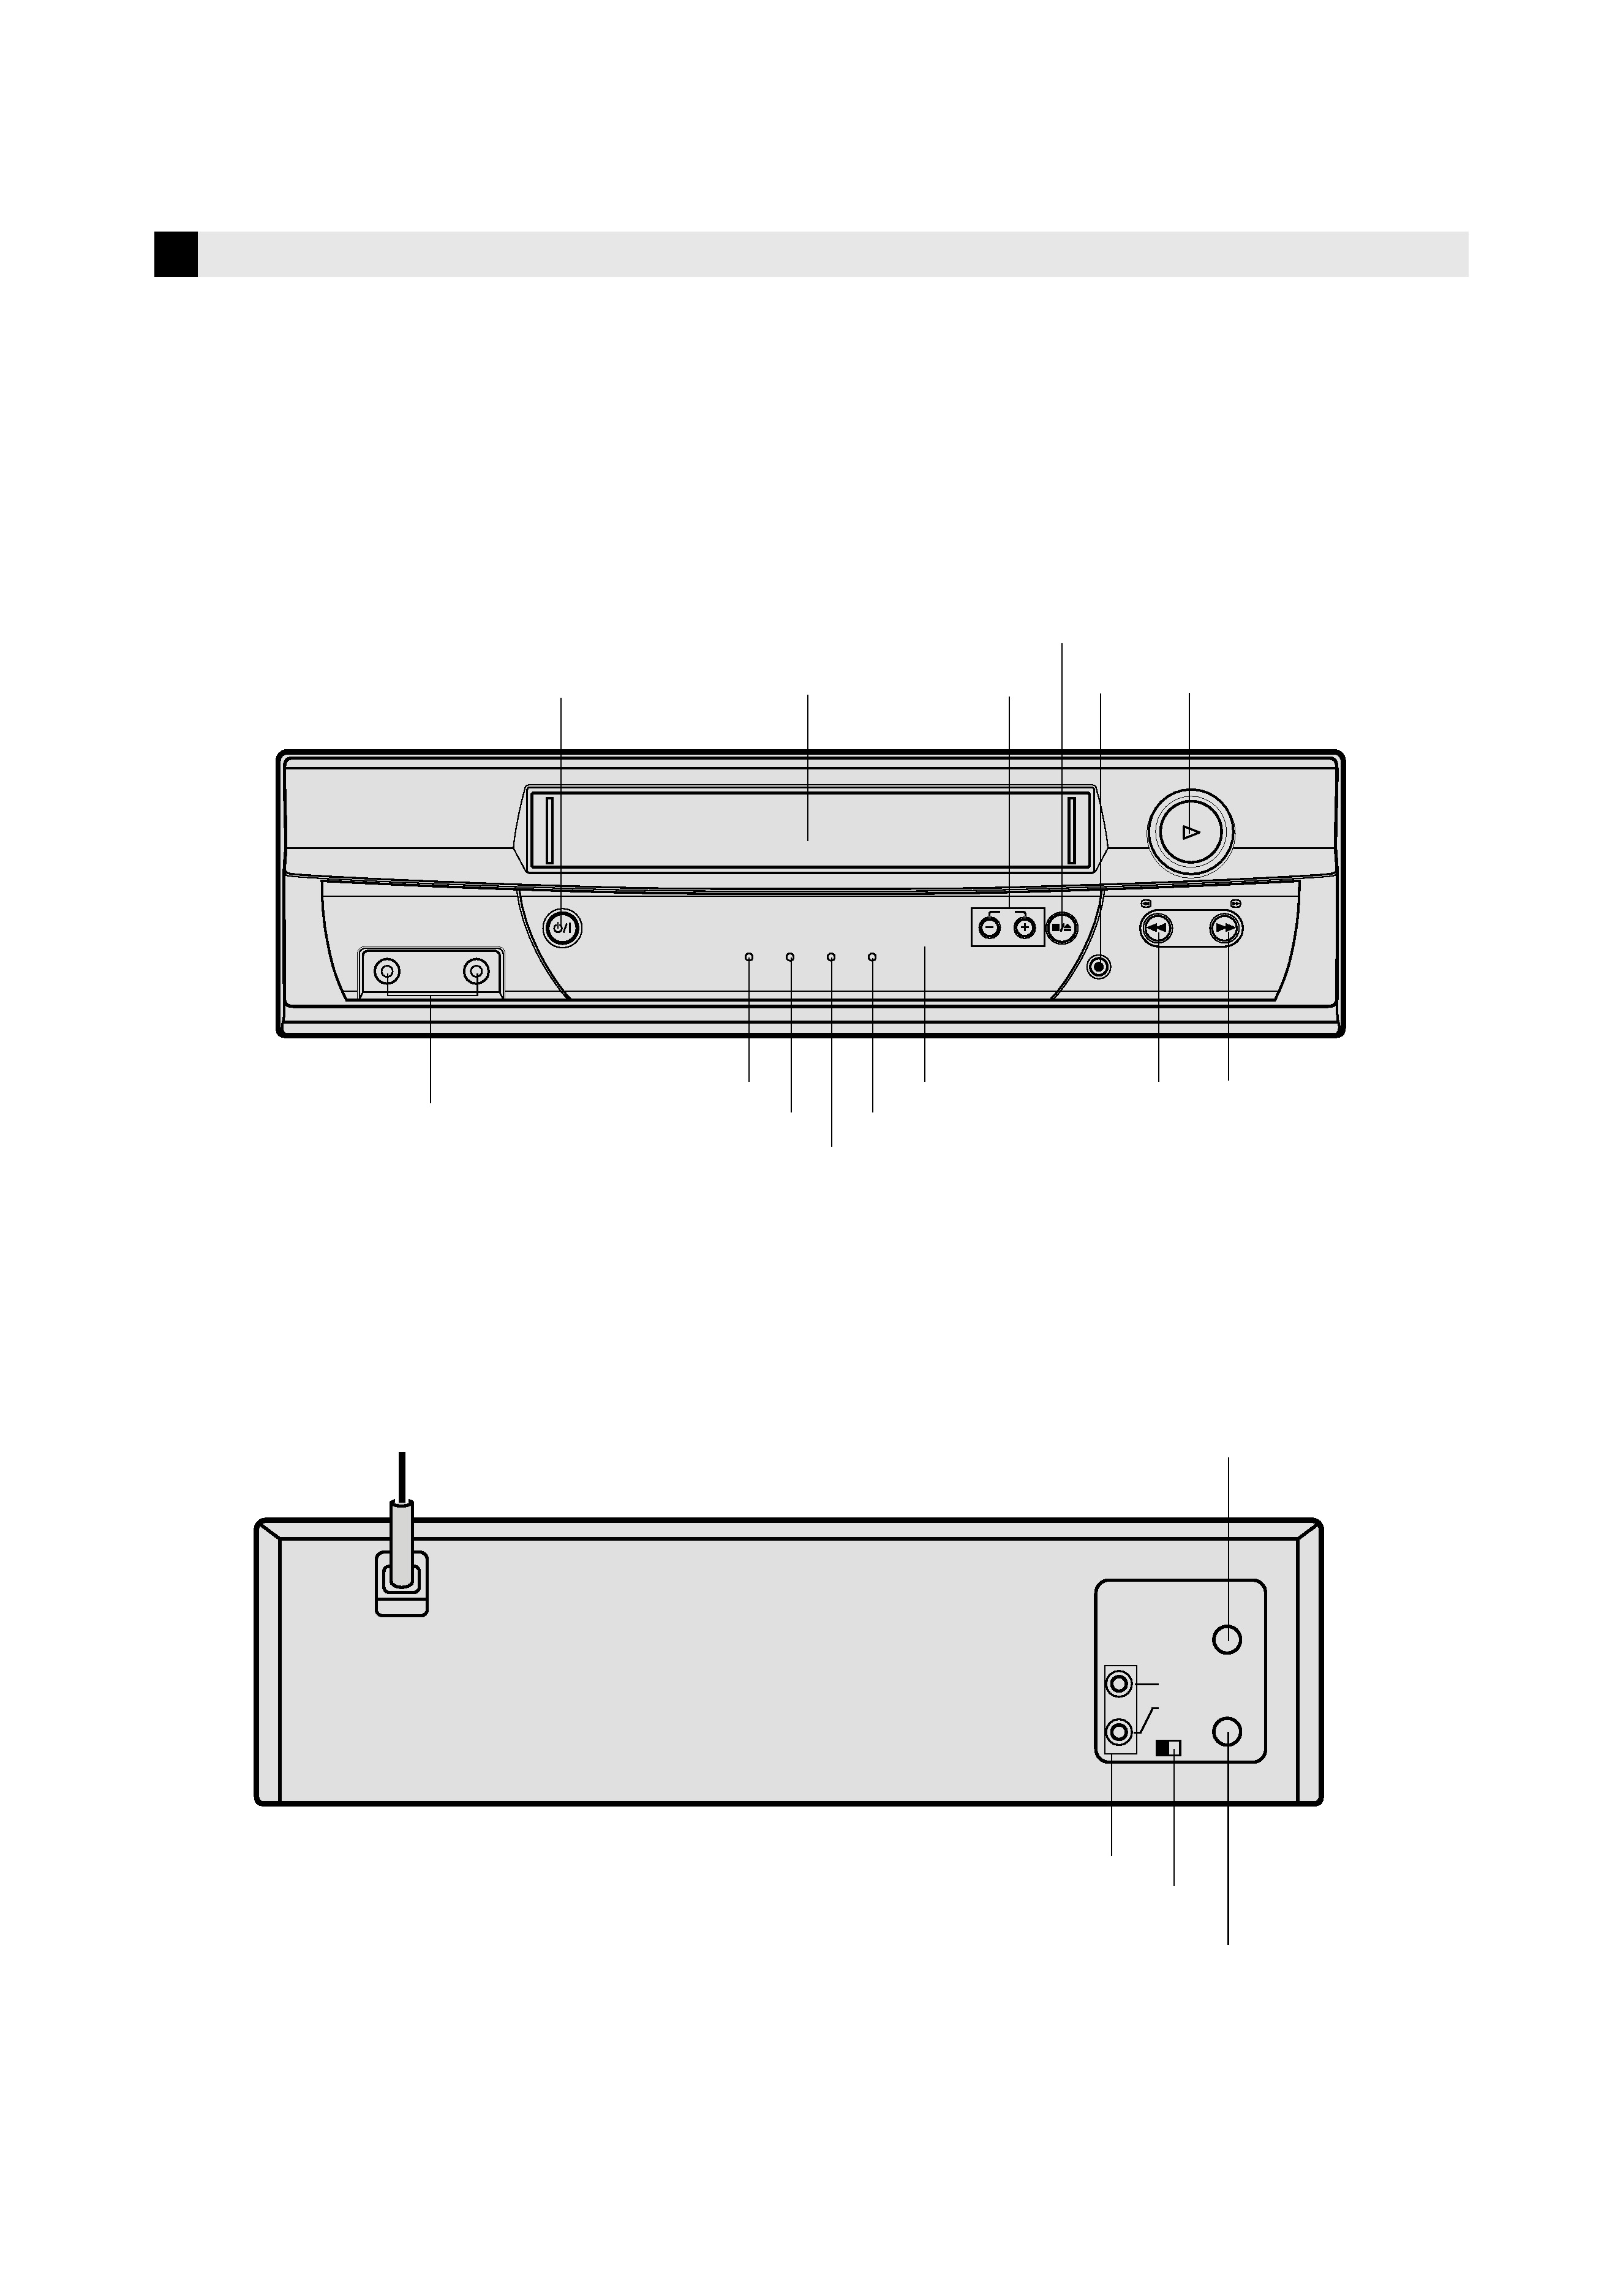
Buttons, Connectors and Indicators
Front Panel
UHF/VHF
OUT(TV)
IN(ANT)
VIDEO
OUT
AUDIO
34
CH
AUDIO
POWER
CH
REC
TV/VCR
TIMER
REC
POWER
REW
PLAY
FF
STOP/EJECT
VIDEO
Cassette loading slot
PLAY
CH/+
STOP/EJECT
REW
FF
REC
VIDEO/AUDIO input
connectors
POWER
Remote sensor
Rear Panel
AC power cord
UHF/VHF IN (ANT)
3/4 CHANNEL
SELECTTOR SWITCH
AUDIO/VIDEO OUT
TV/VCR indicator
TIMER indicator
REC indicator
POWER indicator
UHF/VHF OUT (TV)
4F11501AE Cov-07
16/01/2002, 18:23
3
Remote
Connections and VCR channel
Setting
Check contents
Make sure the package contains all of the accessories listed
in "Specifications".
Situate VCR
Place the VCR on a stable, horizontal surface.
Connect VCR to TV
1
2
3
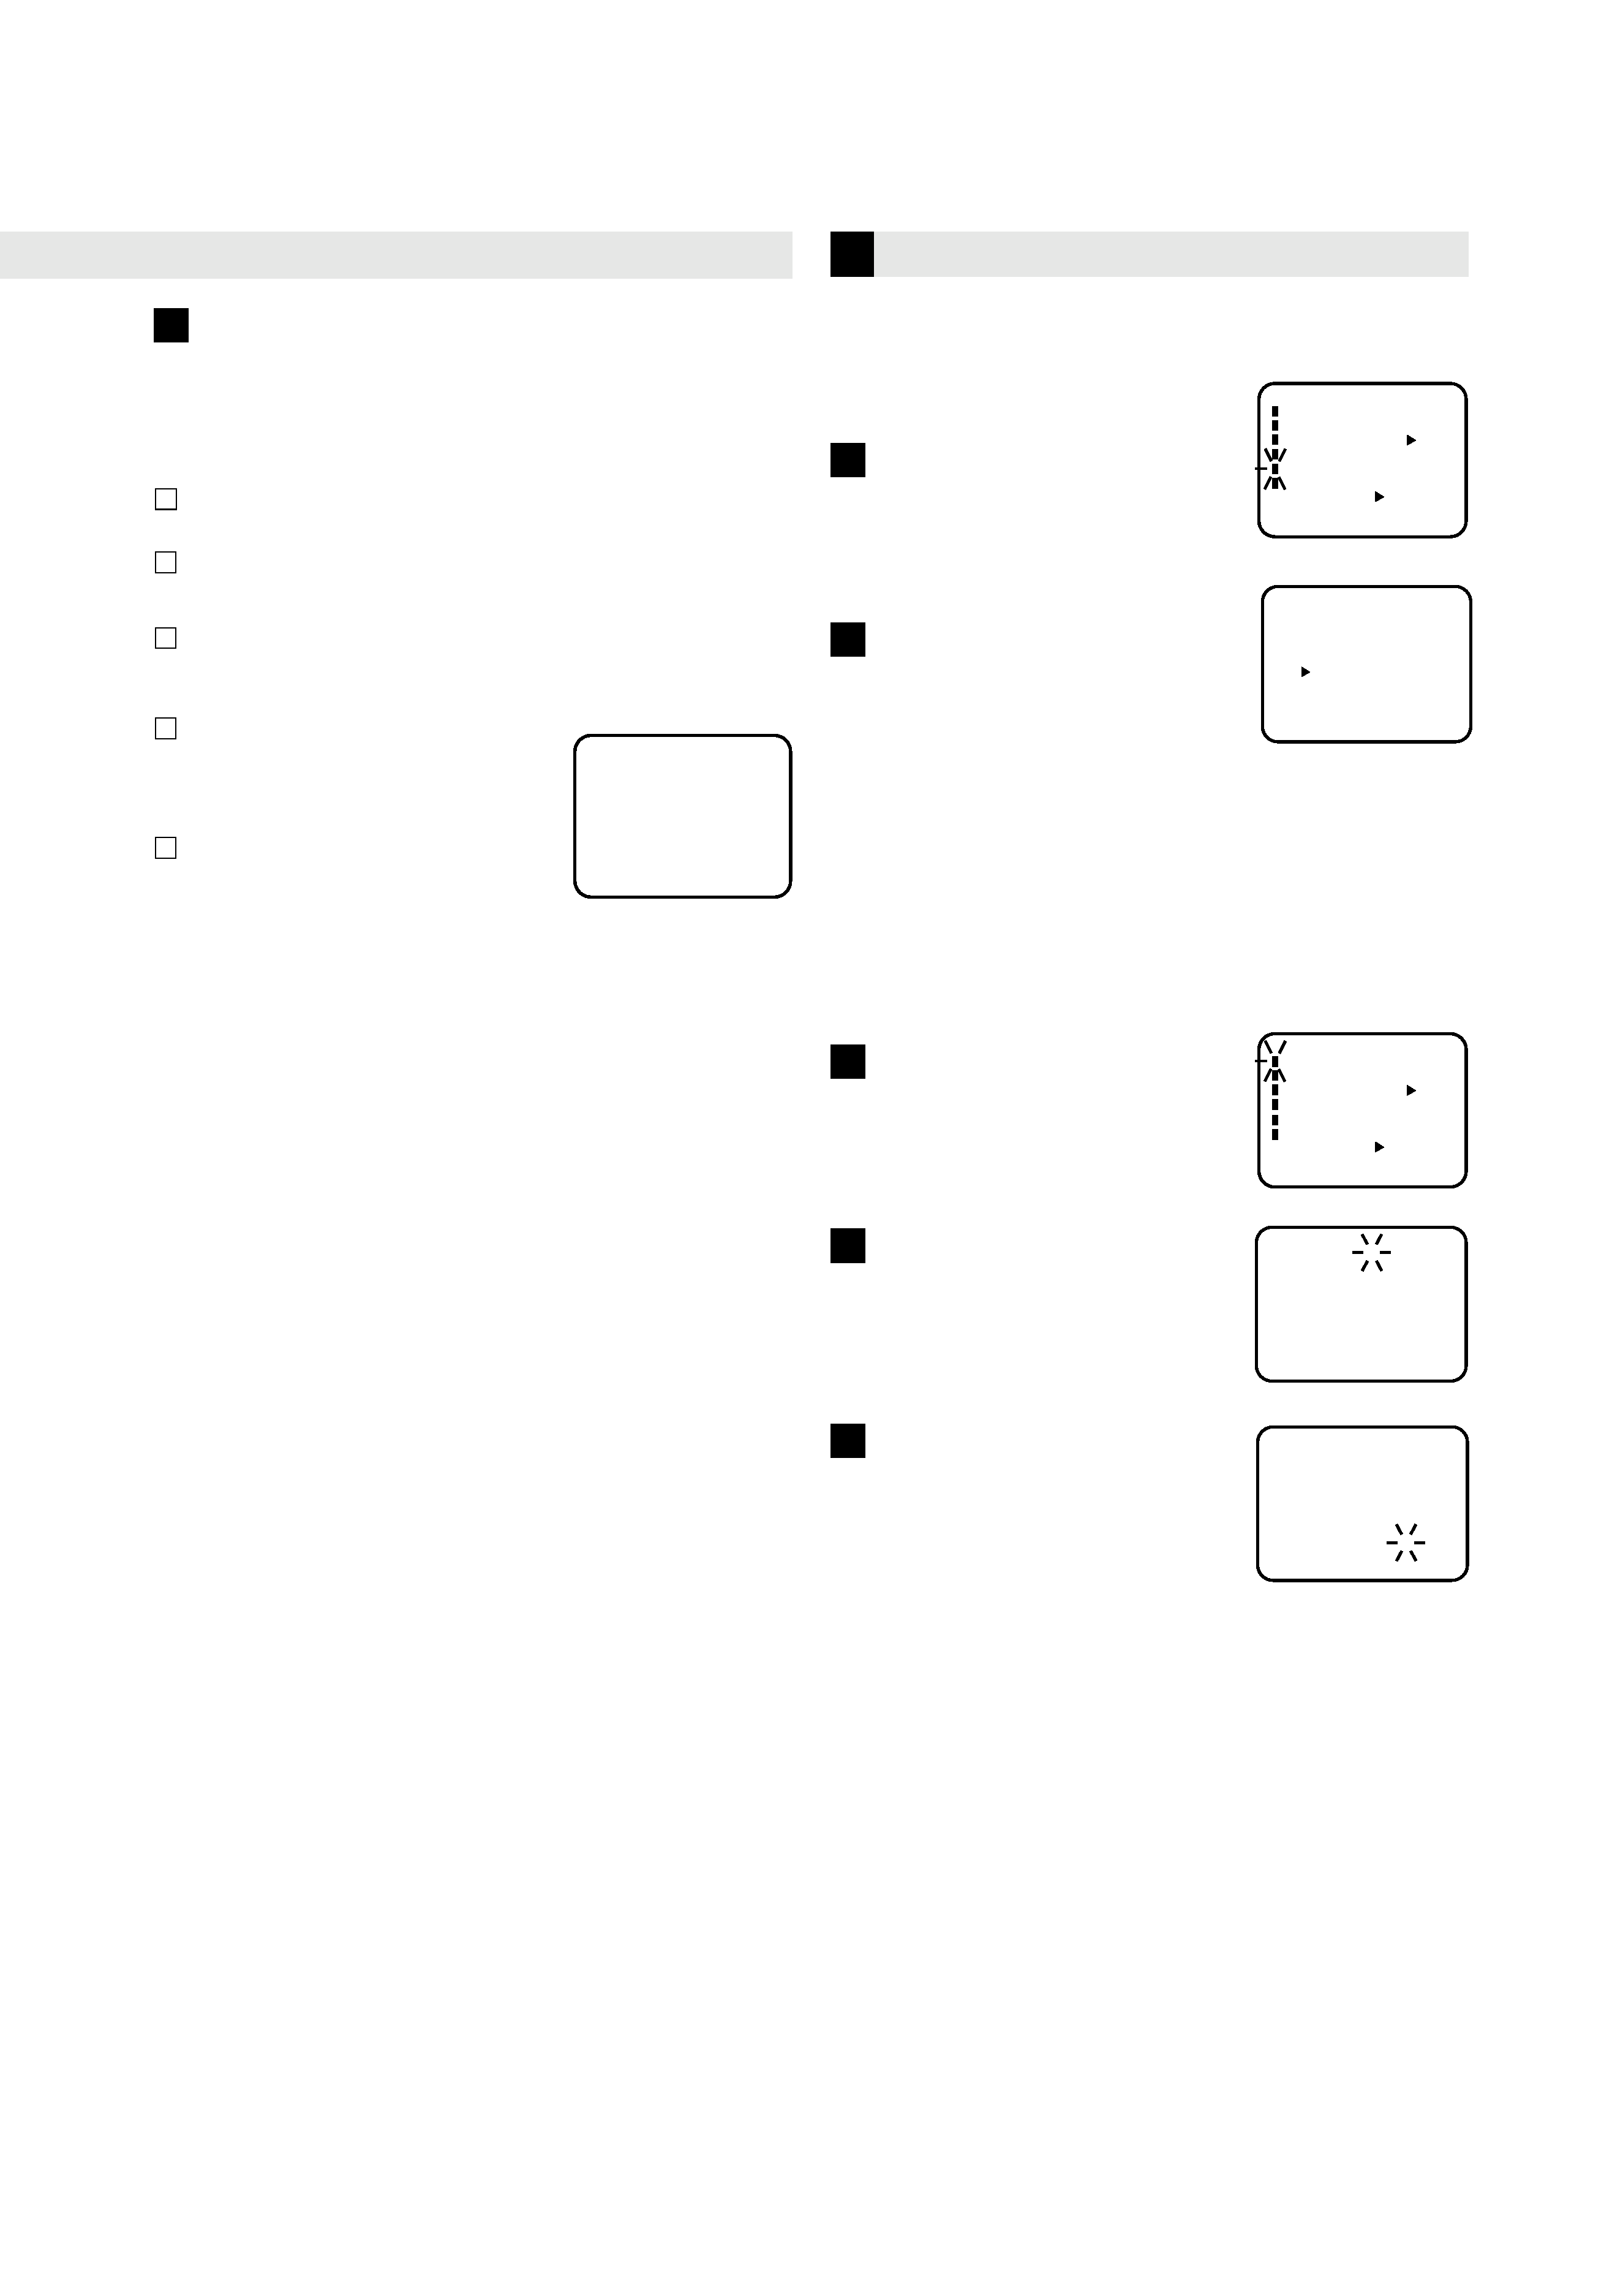
On-screen display
If you press DISPLAY on the Remote, you can see the current VCR
status on the TV screen. Press DISPLAY again to exit on-screen
display.
The indications are not recorded even if the VCR is in the recording
mode.
WHILE OPERATING A TAPE
WHILE WATCHING TV
00 : 00 : 00 SP
CH 125
8 : 30 AM THU
CHANNEL
TAPE
SPEED
REAL TIME COUNTER
DAY AND CLOCK TIME
00 : 00 : 00 SP
AUTO TR.
CH 125
8 : 30 AM THU
OPERATING MODE
TAPE IN
AUTO TRACKING
AUTO REPEAT
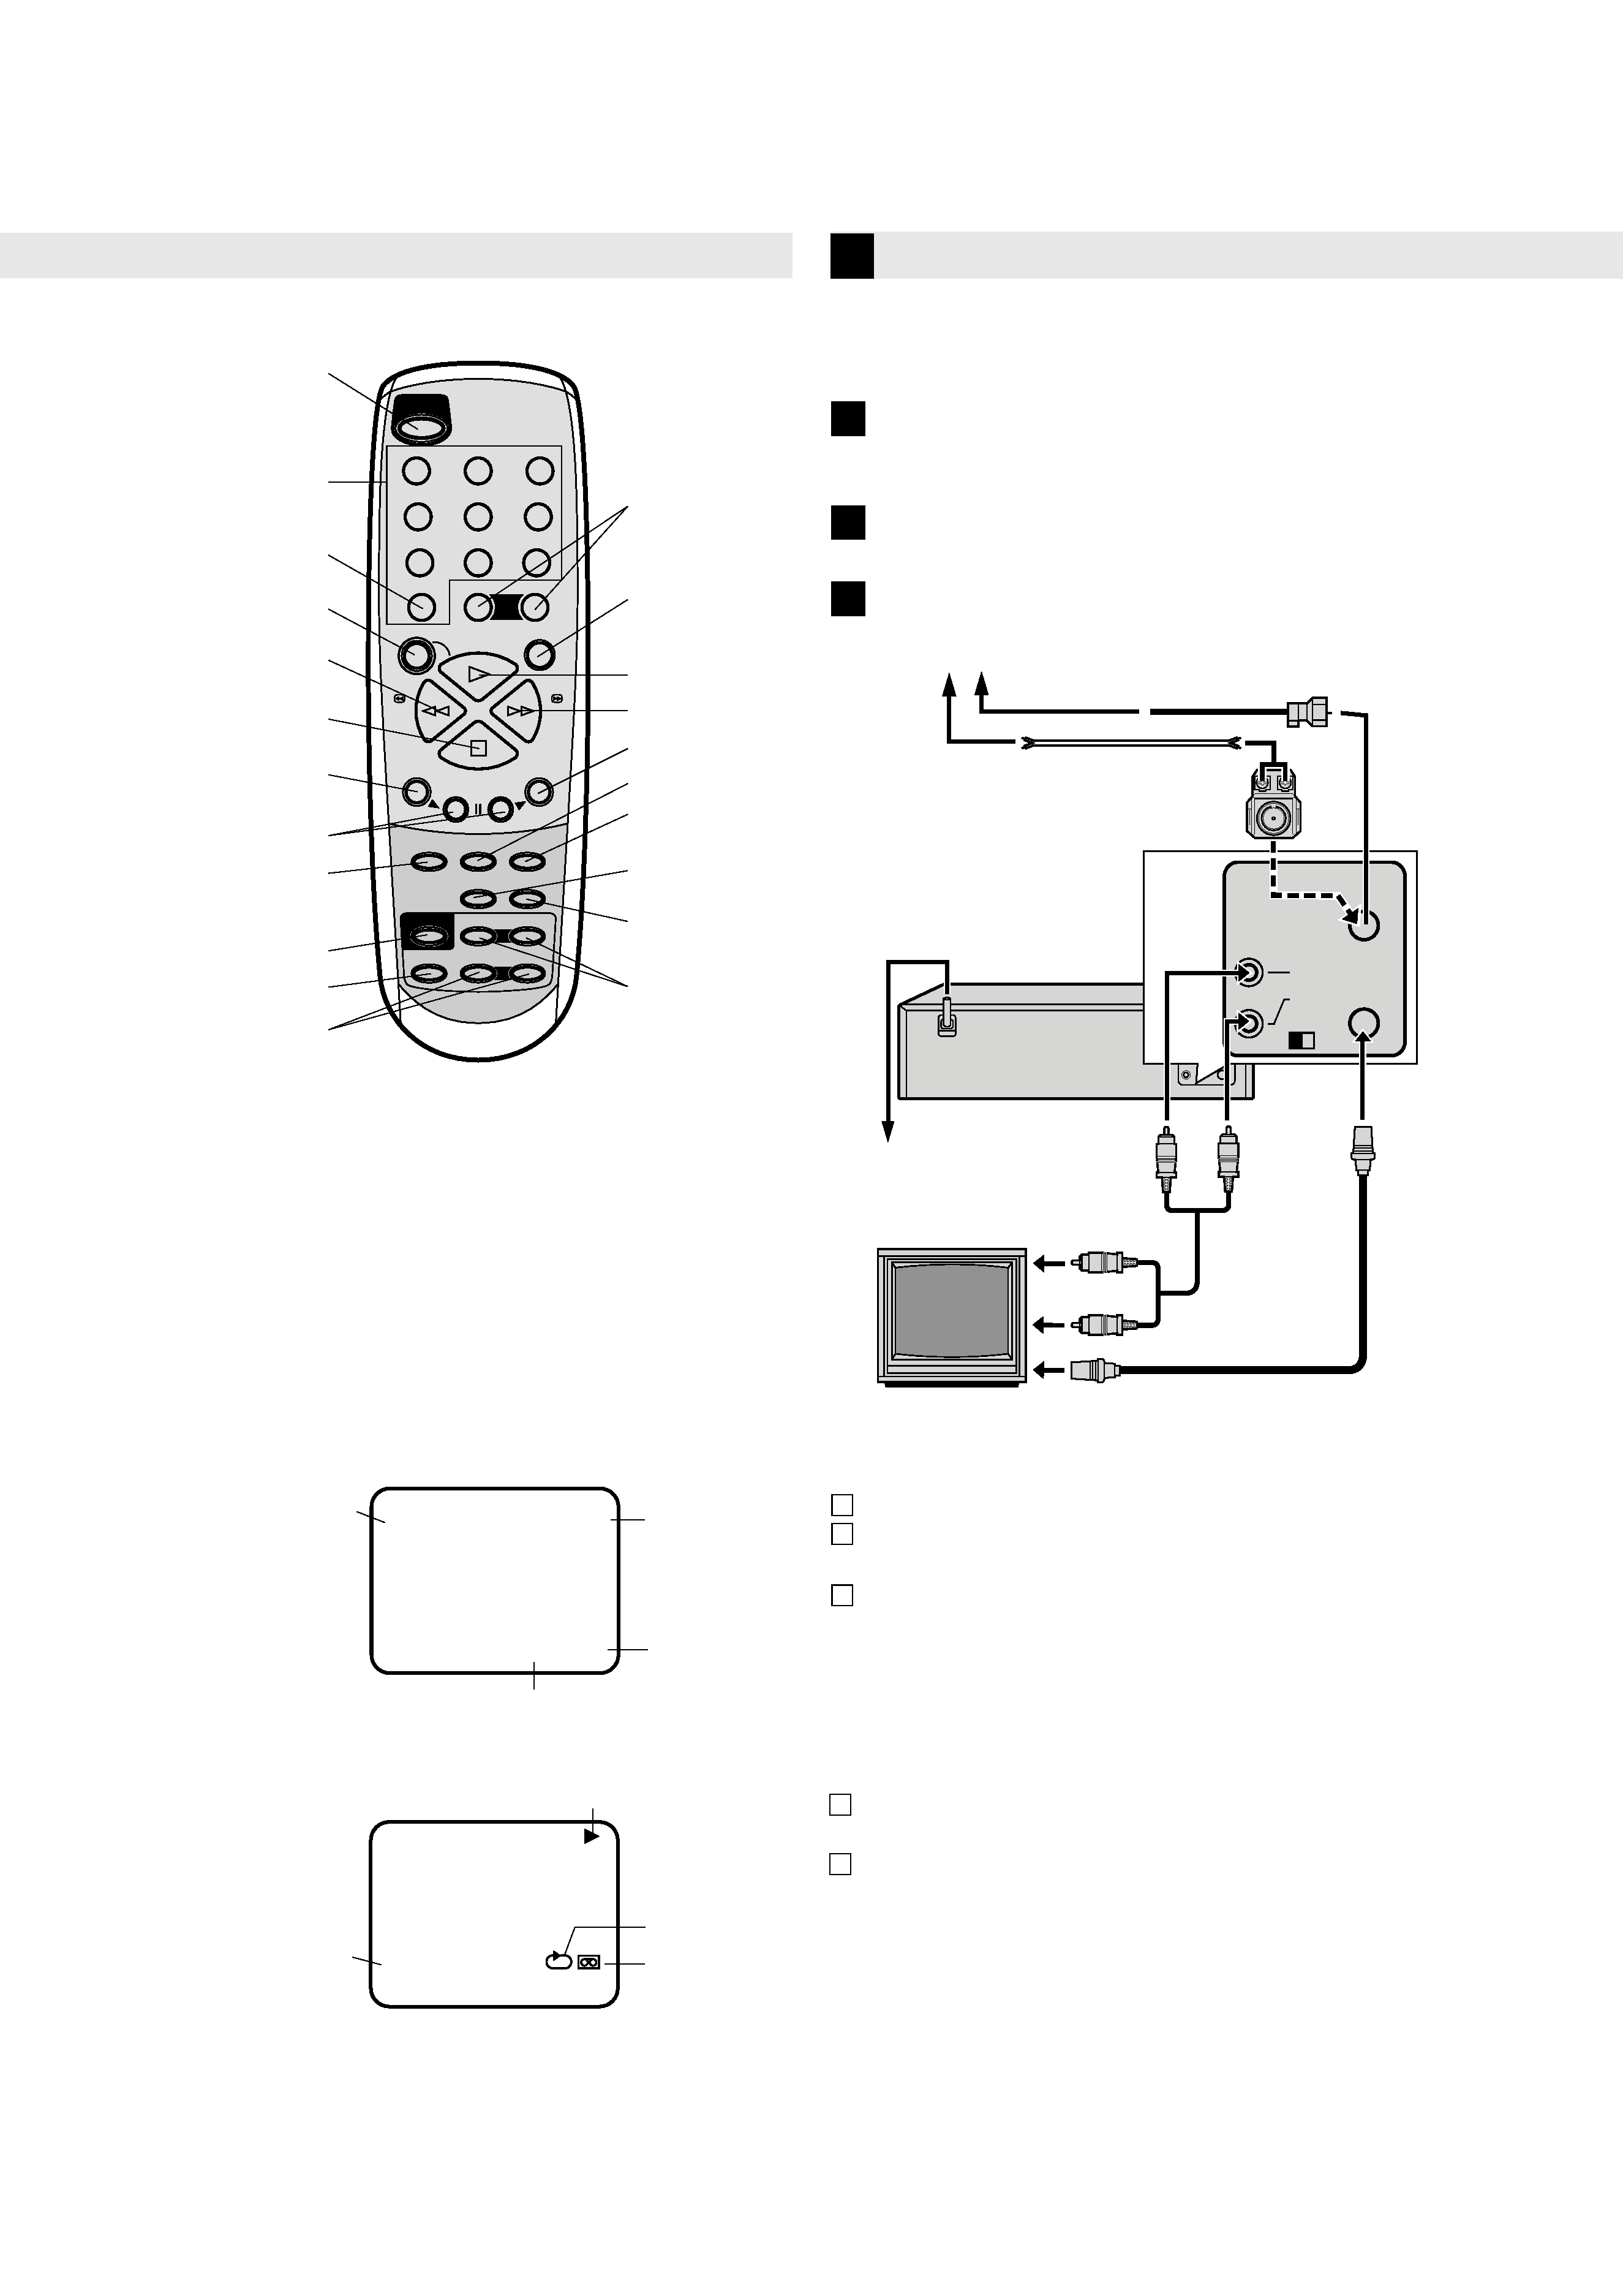
Buttons, Connectors and Indicators
Antenna or cable
UHF/VHF
OUT(TV)
IN(ANT)
VIDEO
OUT
AUDIO
L
R
UHF/VHF
OUT(TV)
IN(ANT)
VIDEO
OUT
AUDIO
34
CH
Coaxial cable
Flat feeder
Matching transformer
(not supplied)
AC power cord
Back of VCR
AC outlet
To audio/video input connectors
Audio/video cable
(not supplied)
To 75
terminal
RF cable
(supplied)
TV
RF Connection
Disconnect the TV antenna from the TV.
Connect the TV antenna cable to the UHF/VHF IN
terminal on the rear of the VCR.
Connect the supplied RF cable between the UHF/VHF
OUT terminal on the rear of the VCR and the TV's
antenna input terminal.
AV Connection
(improves picture quality during tape playback.)
If your TV is equipped with audio/video input connectors
Connect the antenna, VCR and TV as shown in the
illustration.
Connect an audio/video cable between the AUDIO/
VIDEO OUT connectors on the rear of the VCR and the
audio/video input connectors on the TV.
· Even if you are using audio/video cables to connect your
VCR to your TV, you must also connect it using the RF
cable. This will ensure that you can record one show while
watching another.
2
3
1
2
1
This Remote transmit A code
signals only; it is not applicable
to B code signals.
MENU
REC
REW
FF
CH
(AUX)
ENTER
12
3
45
6
7
0
89
SET
TV/VCR
TIMER
SP/EP
DISPLAY
CANCEL
C.RESET
TV CH
TV VOL
INPUT
+
+
+
+
PAUSE
PLAY
STOP
TV POWER
POWER
TV POWER
TV/VCR
Number keys
CANCEL
C.RESET
REW
REC
STOP
MENU
TV CH/+
AUX
TIMER
CH/+
SP/EP
PLAY
FF
PAUSE
ENTER
SET/+
INPUT
POWER
TV VOL/+
DISPLAY
4F11501AE Cov-07
16/01/2002, 18:23
4
+/--/ENTER/MENU
MENU
CLOCK SET
TIMER REC SET
ON
OFF
AUTO REPEAT
CH SET UP
LANGUAGE/IDIOMA/LANGUE
ON OFF
NO NOISE BACKGROUND
Set VCR channel
To view playback of a recorded tape, or to watch a program
selected by the VCR's channel selector, the TV must be set to
channel 3 or 4 (video channel) when a TV is connected with
the 75 ohm coaxial cable only.
Set the 3/4 Channel selector switch (Rear of the VCR) to
CH 3 or 4.
Turn ON the TV and set to CH 3 or 4 to correspond with
the channel selected in 1.
Press POWER to turn on the VCR.
The POWER indicator will light.
Press TV/VCR to select the VCR
position.
The TV/VCR indicator will light.
Select any channel to receive a
TV station in your area.
The channel number will appear
on the screen for about 4 seconds.
CAN 125
4
Language Setting
The default setting is "ESPAÑOL".
Access Menu screen, then
Language screen
Press MENU on the Remote. Press
SET /+
to select "LANGUAGE", then
press ENTER.
Select language
This VCR offers you the language
choice to view menus and some
messages -- in English, Spanish or
French. Press SET /+ to select your desired language, then
press ENTER.
Press MENU twice to return to normal screen.
+//ENTER/MENU
LANGUAGE/IDIOMA/LANGUE
ENGLISH
FRANCAIS
ESPAÑOL
+/--/ENTER/MENU
MENU
CLOCK SET
TIMER REC SET
ON
OFF
AUTO REPEAT
CH SET UP
LANGUAGE/IDIOMA/LANGUE
ON OFF
NO NOISE BACKGROUND
1
2
3
4
Initial Settings
Clock Setting
Access Menu screen, then Clock
Set screen
Press MENU on the Remote. Press
SET /+
to select "CLOCK SET", then
press ENTER.
MONTH
DAY
TIME
YEAR
3
1
12
(WED)
: 00 AM
2000
+/--/ENTER/CANCEL/MENU
3
26
8
(TUE)
: 30 AM
2002
MONTH
DAY
TIME
YEAR
+/--/ENTER/CANCEL/MENU
Set month, day, year and time
Press SET /+ until the desired month
appears, then press ENTER. Set the
day, year and time in the same way.
Start clock
Press MENU twice and normal screen
appears.
To make corrections any time during the process
Press CANCEL repeatedly until the item you want to change
blinks, then press SET /+.
Preparations
1
2
3
Connections and VCR channel Setting
You must set the date and time for timer recording.
NOTE:
After a power failure or disconnection of the power over 18
hours, the timer settings will be lost. In this case, reset the
present time.
1
2
5
4F11501AE Cov-07
16/01/2002, 18:24
5