
DIGITAL CAMCORDER
LYT0275-001A
INSTRUCTIONS
ENGLISH
EN
GR-DVF3
Please visit our CyberCam Homepage on
the World Wide Web and answer our
Consumer Survey (in English only):
http://www.jvc-victor.co.jp/index-e.html
2 EN
Dear Customer,
Thank you for purchasing this digital camcorder. Before use, please read the safety information and
precautions contained in the following pages to ensure safe use of this product.
Using This Instruction Manual
· All major sections and subsections are listed in the Table Of Contents (
pg. 5).
· Notes appear after most subsections. Be sure to read these as well.
· Basic and advanced features/operation are separated for easier reference.
It is recommended that you . . .
.... refer to the Index (
pgs. 62 66) and familiarize yourself with button locations, etc. before use.
.... read thoroughly the Safety Precautions. They contain extremely important information regarding the safe
use of this product.
You are recommended to carefully read the cautions on pages 67 and 68 before use.
SAFETY PRECAUTIONS
WARNING:
TO PREVENT FIRE OR SHOCK
HAZARD, DO NOT EXPOSE
THIS UNIT TO RAIN OR
MOISTURE.
Warning on lithium cell battery (for clock
operation and remote control unit)
The battery used in this device may present a fire
or chemical burn hazard if mistreated. Do not
recharge, disassemble, heat above 100°C or
incinerate.
Replace the battery with Maxell, Panasonic
(Matsushita Electric), Sanyo or Sony CR2025; use
of another battery may present a risk of fire or
explosion.
Dispose of used battery promptly.
Keep away from children.
Do not disassemble and do not dispose of in
fire.
CAUTIONS:
To prevent shock, do not open the cabinet. No
user serviceable parts inside. Refer servicing to
qualified personnel.
When you are not using the AC Power
Adapter/Charger for a long period of time, it is
recommended that you disconnect the power
cord from AC outlet.
NOTES:
The rating plate (serial number plate) and safety
caution are on the bottom and/or the back of
the main unit.
The rating plate (serial number plate) of the AC
Power Adapter/Charger is on its bottom.
This camcorder is designed to be used with PAL-
type colour television signals. It cannot be used
for playback with a television of a different
standard. However, live recording and
viewfinder playback are possible anywhere. Use
the BN-V12U/V20U battery packs and, to
recharge them, the provided multi-voltage AC
Power Adapter/Charger. (An appropriate
conversion adapter may be necessary to
accommodate different designs of AC outlets in
different countries.)
This unit is produced to comply with Standard
IEC Publ. 65.
EN
3
SAFETY PRECAUTIONS
Do not point the lens or the viewfinder directly into
the sun. This can cause eye injuries, as well as lead
to the malfunctioning of internal circuitry. There is
also a risk of fire or electric shock.
CAUTION! The following notes concern possible
physical damage to the camcorder and to the user.
When carrying, be sure to always securely attach and
use the provided shoulder strap. Carrying or holding
the camcorder by the viewfinder can result in
dropping the unit, or in a malfunction.
Take care not to get your finger caught in the cassette
cover. Do not let children operate the camcorder, as
they are particularly susceptible to this type of injury.
Do not use a tripod on unsteady or unlevel surfaces.
It could tip over, causing serious damage to the
camcorder.
CAUTION! Connecting cables (Audio/Video,
S-Video, Editing, DC) to the camcorder and leaving
the unit on top of the TV is not recommended, as
tripping on the cables will cause the camcorder to
fall, resulting in damage.
About Batteries
DANGER! Do not attempt to take the batteries apart,
or expose them to flame or excessive heat, as there is
a risk of fire or explosion.
WARNING! Do not allow the battery terminals, or
the battery itself, to come in contact with metals, as
this can result in a short circuit and possibly start a
fire.
This camcorder is designed exclusively for the digital video cassette. Only cassettes marked
can be used with this unit.
Before recording an important scene . . .
.... make sure you only use cassettes with the Mini DV mark
.
.... remember that this camcorder is not compatible with other digital video formats.
.... remember that this camcorder is intended for private consumer use only. Any commercial use without
proper permission is prohibited. (Even if you record an event such as a show, performance or exhibition for
personal enjoyment, it is strongly recommended that you obtain permission beforehand.)
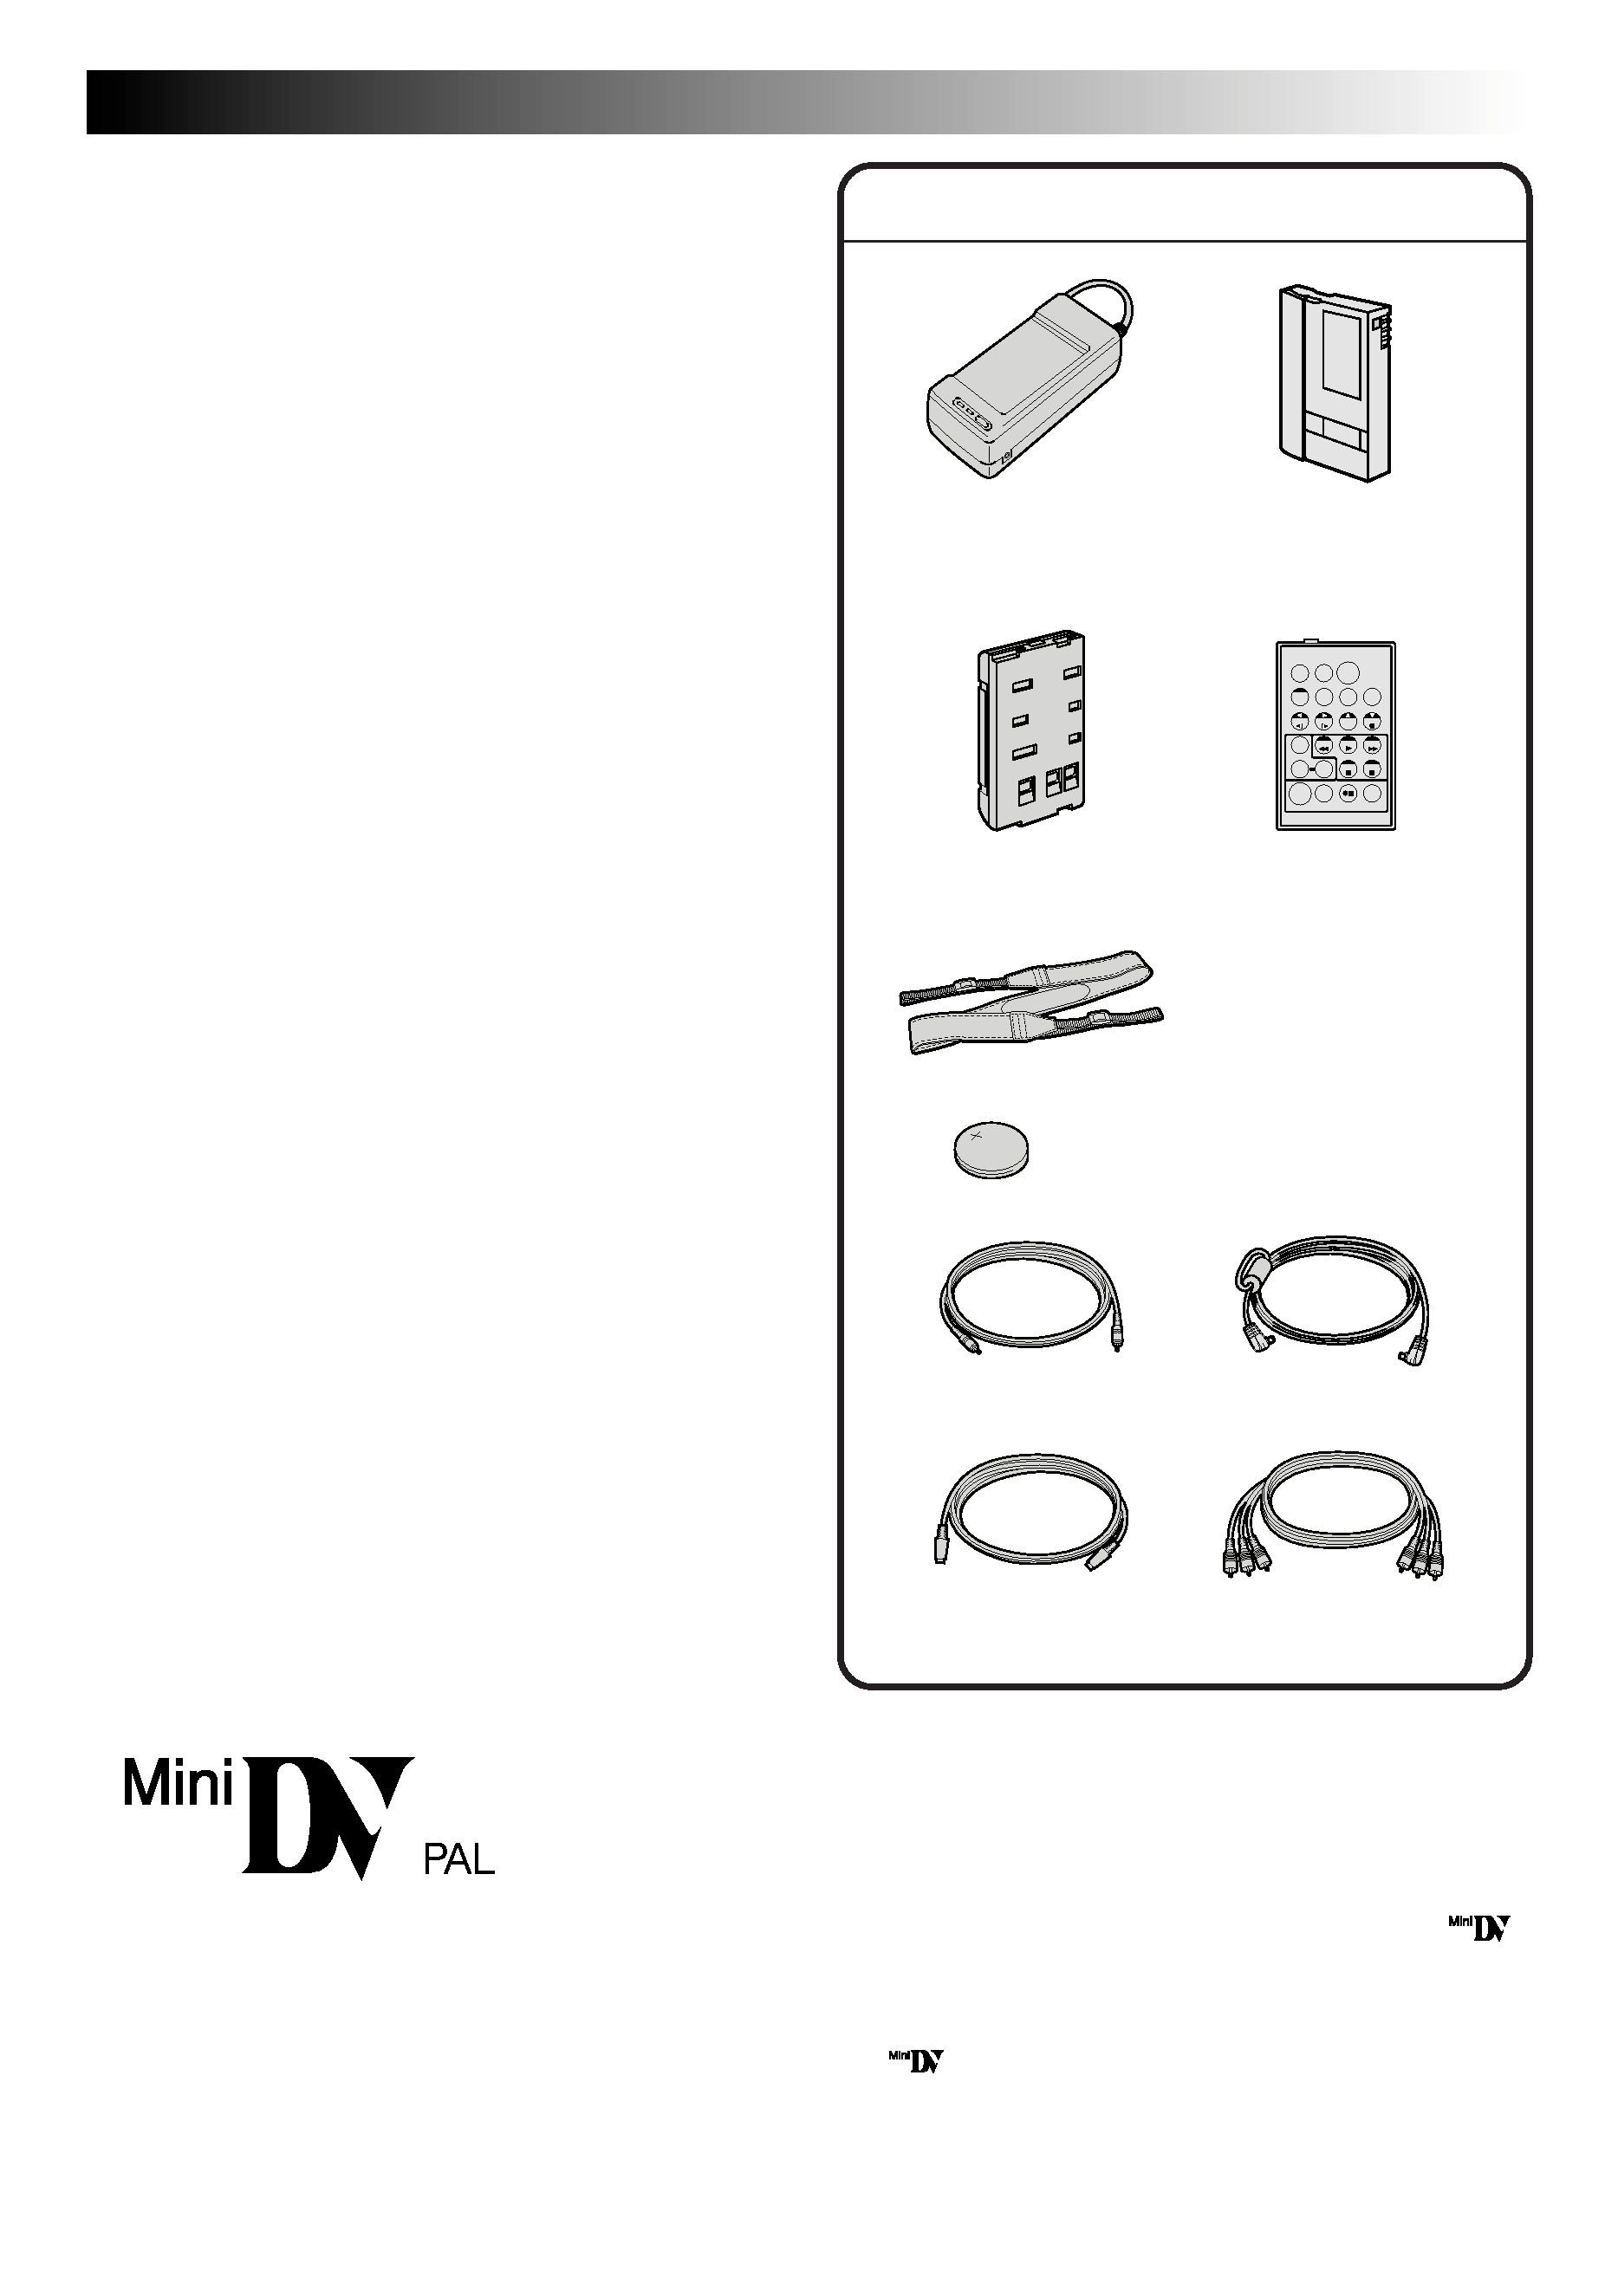
PROVIDED ACCESSORIES
·AC Power Adapter/
Charger AA-V15EG
·Remote Control Unit
RM-V712U
· Shoulder Strap
· Battery Pack
BN-V12U
· DC Cord
· S-Video Cable
·Lithium Battery CR2025 x 2
(for clock operation and
remote control unit)
·MiniDV Cassette Tape
30 Min (DVM-30)
M-DV30ME
TW
· Editing Cable
·Audio/Video
(A/V) cable
4 EN
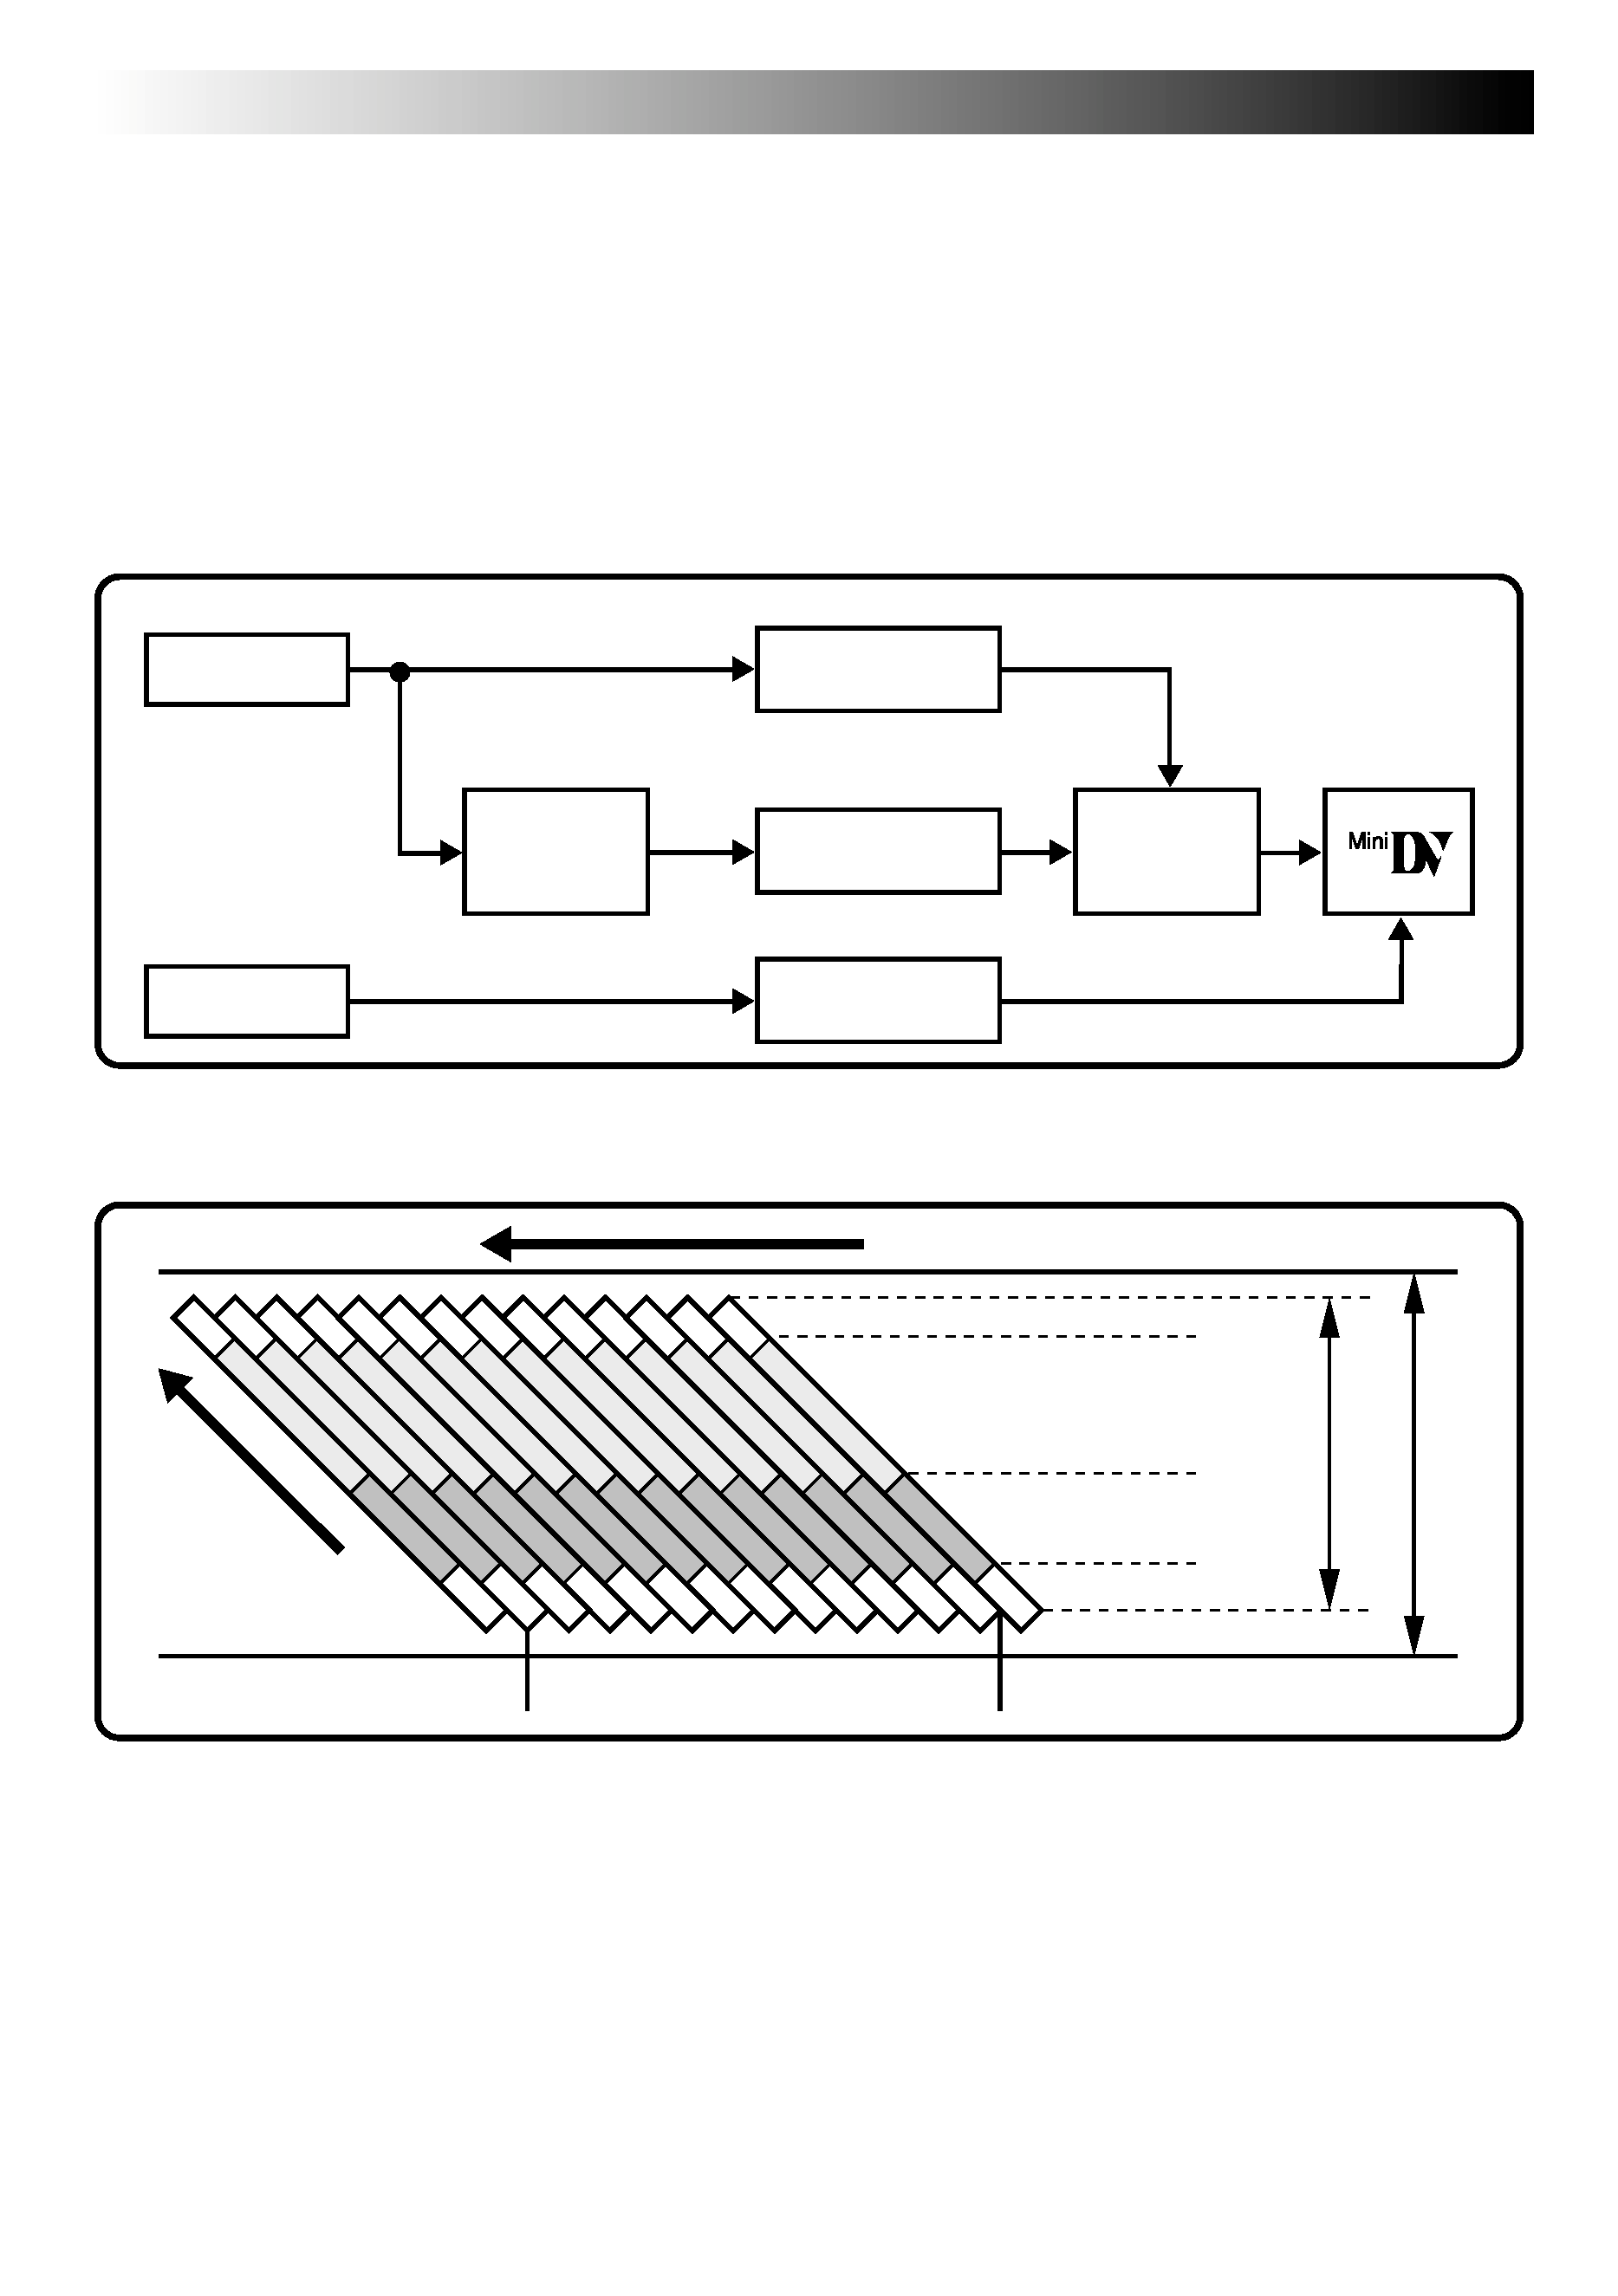
ABOUT DV
The digital camcorder converts incoming audio and video signals into digital form for recording.
A video signal is composed of a luminance signal (Y) and colour signals (R-Y and B-Y). These signals are
identified and recorded digitally (Digital Component Recording). The A/D (Analogue to Digital) converter
samples the Y signal at 13.5 MHz, and R-Y and B-Y at 6.75 MHz, and changes them to an 8-bit quantum
signal.
Sound sampled at 48 kHz is changed to a 16-bit quantum signal, and sound sampled at 32 kHz is converted to
a 12-bit signal.
NOTE:
The data recorded on a tape is digital, but the output of this camcorder is analogue.
3 Audio Area
The digital audio signal is recorded here.
4 ITI (Insert and Tracking
Information) Area
Insert editing and post-recording editing
tracking signals are recorded here.
1 Sub-Code Area
The Time Code and Date/Time data are
written here, separate from the video data.
This enables you to display the date and
time during playback, even if they weren't
displayed while recording.
2 Video Area
The digital video signal is recorded here.
Lens
Mic
A/D
conversion
Chromatic
Analysis
12 tracks/frame
VIDEO
Luminance Signal (Y)
A/D
conversion
A/D
conversion
AUDIO
Recording by
rotating head
helical scan
Tape direction
Sub-Code Area
Video Area
Audio Area
ITI Area
Head tracking
direction
5.24
mm
6.35
mm
Signal
compression
Colour Difference
Signal (R-Y/B-Y)
Chrominance (C)
This camcorder separates the data into blocks, writing one block of each data type on each track of the tape.

EN
5
PROVIDED ACCESSORIES
3
ABOUT DV
4
GETTING STARTED
6 13
Power............................................................................................................ 6
Clock (Lithium) Battery Insertion/Removal ................................................................ 8
Date/Time Settings ............................................................................................ 9
Loading/Unloading A Cassette............................................................................. 10
Recording Mode Setting..................................................................................... 11
Grip Adjustment .............................................................................................. 12
Viewfinder Adjustment ..................................................................................... 12
Shoulder Strap Attachment ................................................................................. 13
Tripod Mounting .............................................................................................. 13
RECORDING
14 35
Basic Recording ............................................................................................... 14
Advanced Features ........................................................................................... 19
PLAYBACK
36 41
Basic Playback ................................................................................................ 36
Advanced Features ........................................................................................... 38
Connections ................................................................................................... 40
TAPE DUBBING
42
USING THE REMOTE CONTROL UNIT
43 55
Random Assemble Editing .................................................................................. 48
For More Accurate Editing .................................................................................. 52
Audio Dubbing ................................................................................................ 54
TROUBLESHOOTING
56 60
USER MAINTENANCE
61
INDEX
62 66
Controls, Connectors And Indicators ...................................................................... 62
Indications..................................................................................................... 64
Terms .......................................................................................................... 66
CAUTIONS
67 68
SPECIFICATIONS
69
CONTENTS