COMPACT COMPONENT SYSTEM
SYSTEME DE COMPOSANTS COMPACT
FS-X5
Consists of CA-FSX5 and SP-FSX5
Se compose de CA-FSX5 et de SP-FSX5
SP-FSX5
CA-FSX5
SP-FSX5
For Customer Use:
Enter below the Model No. and Serial No.
which are located either on the rear, bot-
tom or side of the cabinet. Retain this
information for future reference.
Model No.
Serial No.
INSTRUCTIONS
MANUEL D'INSTRUCTIONS
LVT1041-001B
[C]
FS-X5(C)_Cover1.fm Page 1 Tuesday, April 8, 2003 10:58 AM
G-1
Warnings, Cautions and Others /
Mises en garde, précautions et indications diverses
(For U.S.A)
WARNING: TO REDUCE THE RISK OF FIRE OR
ELECTRIC SHOCK, DO NOT EXPOSE THIS APPLI-
ANCE TO RAIN OR MOISTURE.
Note to CATV system installer:
This reminder is provided to call the CATV system installer's atten-
tion to section 820-40 of the NEC which provides guidelines for
proper grounding and, in particular, specifies that the cable ground
shall be connected to the grounding system of the building, as close
to the point of cable entry as practical.
INFORMATION (FOR U.S.A.)
This equipment has been tested and found to
comply with the limits for a Class B digital device,
pursuant to Part 15 of the FCC Rules. These lim-
its are designed to provide reasonable protection
against harmful interference in a residential instal-
lation. This equipment generates, uses, and can
radiate radio frequency energy and, if not
installed and used in accordance with the instruc-
tions, may cause harmful interference to radio
communications. However, there is no guarantee
that interference will not occur in a particular
installation. If this equipment does cause harmful
interference to radio or television reception, which
can be determined by turning the equipment off
and on, the user is encouraged to try to correct
the interference by one or more of the following
measures:
Reorient or relocate the receiving antenna.
Increase the separation between the equip-
ment and receiver.
Connect the equipment into an outlet on a
circuit different from that to which the
receiver is connected.
Consult the dealer or an experienced radio/
TV technician for help.
The lightning flash with arrowhead symbol,
within an equilateral triangle is intended to
alert the user to the presence of uninsulated
"dangerous voltage" within the product's enclo-
sure that may be of sufficient magnitude to
constitute a risk of electric shock to persons.
The exclamation point within an equilateral tri-
angle is intended to alert the user to the pres-
ence of important operating and maintenance
(servicing) instructions in the literature accom-
panying the appliance.
CAUTION
RISK OF ELECTRIC
SHOCK
DO NOT OPEN
CAUTION: TO REDUCE THE RISK OF ELECTRIC SHOCK
DO NOT REMOVE COVER (OR BACK)
NO USER SERVICEABLE PARTS INSIDE
REFER SERVICING TO QUALIFIED SERVICE PERSONNEL.
FS-X5(C)_E.book Page 1 Friday, April 4, 2003 1:28 PM
G-2
CAUTION
1.
Do not block the ventilation openings or holes.
(If the ventilation openings or holes are blocked by
a newspaper or cloth, etc., the heat may not be
able to get out.)
2.
Do not place any naked flame sources, such as
lighted candles, on the apparatus.
3.
When discarding batteries, environmental prob-
lems must be considered and local rules or laws
governing the disposal of these batteries must be
followed strictly.
4.
Do not expose this apparatus to rain, moisture,
dripping or splashing and that no objects filled with
liquids, such as vases, shall be placed on the
apparatus.
ATTENTION
1.
Ne bloquez pas les orifices ou les trous de ventila-
tion. (Si les orifices ou les trous de ventilation sont
bloqués par un journal un tissu, etc., la chaleur
pent ne pas être évacuée correctement de l'appa-
reil.)
2.
Ne placez aucune source de flamme nue, telle
qu'une bougie, sur l'appareil.
3.
Lors de la mise au rebut des piles, veuillez prendre
en considération les problèmes de l'environnement
et suivre strictement les règles et, les lois locales
sur la mise au rebut des piles.
4.
N'exposez pas cet appareil à la pluie, à l'humidité,
à un égouttement ou à des éclaboussures et ne
placez pas des objets remplis de liquide, tels qu'un
vase, sur l'appareil.
For Canada/pour le Canada
CAUTION: TO PREVENT ELECTRIC SHOCK, MATCH
WIDE BLADE OF PLUG TO WIDE SLOT, FULLY INSERT.
PRECAUTION: POUR EVITER LES CHOCS ELEC-
TRIQUES, INTRODUIRE LA LAME LA PLUS LARGE DE
LA FICHE DANS LA BORNE CORRESPONDANTE DE LA
PRISE ET POUSSER JUSQUAU FOND
For Canada/pour Le Canada
THIS DIGITAL APPARATUS DOES NOT EXCEED THE
CLASS B LIMITS FOR RADIO NOISE EMISSIONS FROM
DIGITAL APPARATUS AS SET OUT IN THE INTERFER-
ENCE-CAUSING EQUIPMENT STANDARD ENTITLED "DIG-
ITAL APPARATUS," ICES-003 OF THE DEPARTMENT OF
COMMUNICATIONS.
CET APPAREIL NUMERIQUE RESPECTE LES LIMITES DE
BRUITS RADIOELECTRIQUES APPLICABLES AUX APPAR-
EILS NUMERIQUES DE CLASSE B PRESCRITES DANS LA
NORME SUR LE MATERIEL BROUILLEUR: "APPAREILS
NUMERIQUES", NMB-003 EDICTEE PAR LE MINISTRE
DES COMMUNICATIONS.
1.
CLASS 1 LASER PRODUCT
2.
CAUTION: Invisible laser radiation when open and interlock
failed or defeated. Avoid direct exposure to beam.
3.
CAUTION: Do not open the top cover. There are no user ser-
viceable parts inside the unit; leave all servicing to qualitied
service personnel.
1.
PRODUIT LASER CLASSE 1
2.
ATTENTION: Radiation laser invisible quand l'appareil est
ouvert ou que le verrouillage est en panne ou désactivé.
Eviter une exposition directe au rayon.
3.
ATTENTION: Ne pas ouvrir le couvercle du dessus. Iln'y a
aucune pièce utilisable à l'intérier. Laisser à un personnel
qualifié le soin de réparer votre appareil.
CAUTION
To reduce the risk of electrical shocks, fire, etc.:
1
Do not remove screws, covers or cabinet.
2.
Do not expose this appliance to rain or moisture.
ATTENTION
Afin d'èviter tout risque d'électrocution, d'lncendie. etc.:
1.
Ne pas enlever les vis ni les panneaux et ne pas ouvrir le
coffret de l'appareil.
2. Ne pas exposer l'appareil à la pluie ni à l'humidité.
Caution --STANDBY/ON
button!
Disconnect the main plug to shut the power off completely.
The STANDBY/ON
button in any position does not dis-
connect the main line. The power can be remote controlled.
· When the unit is on standby, the STANDBY/ON indicator
lights red.
· When the unit is turned on, the STANDBY/ON indicator
lights green.
Attention -- Touche STANDBY/ON
Déconnecter la fiche de secteur poru couper complètement le
courant. La touche STANDBY/ON
ne coupe jamais com-
plètement la ligne de secteur, quelle que soit sa position. Le
courant peut être télécommandé.
· Quand l'appareil est en mode de veillle, le tèmoin
STANDBY/ON est allumè en rouge.
· Quand l'appareil est sous tension, le tèmoin STANDBY/ON
est allumè en vert.
FS-X5(C)_E.book Page 2 Friday, April 4, 2003 1:28 PM
G-3
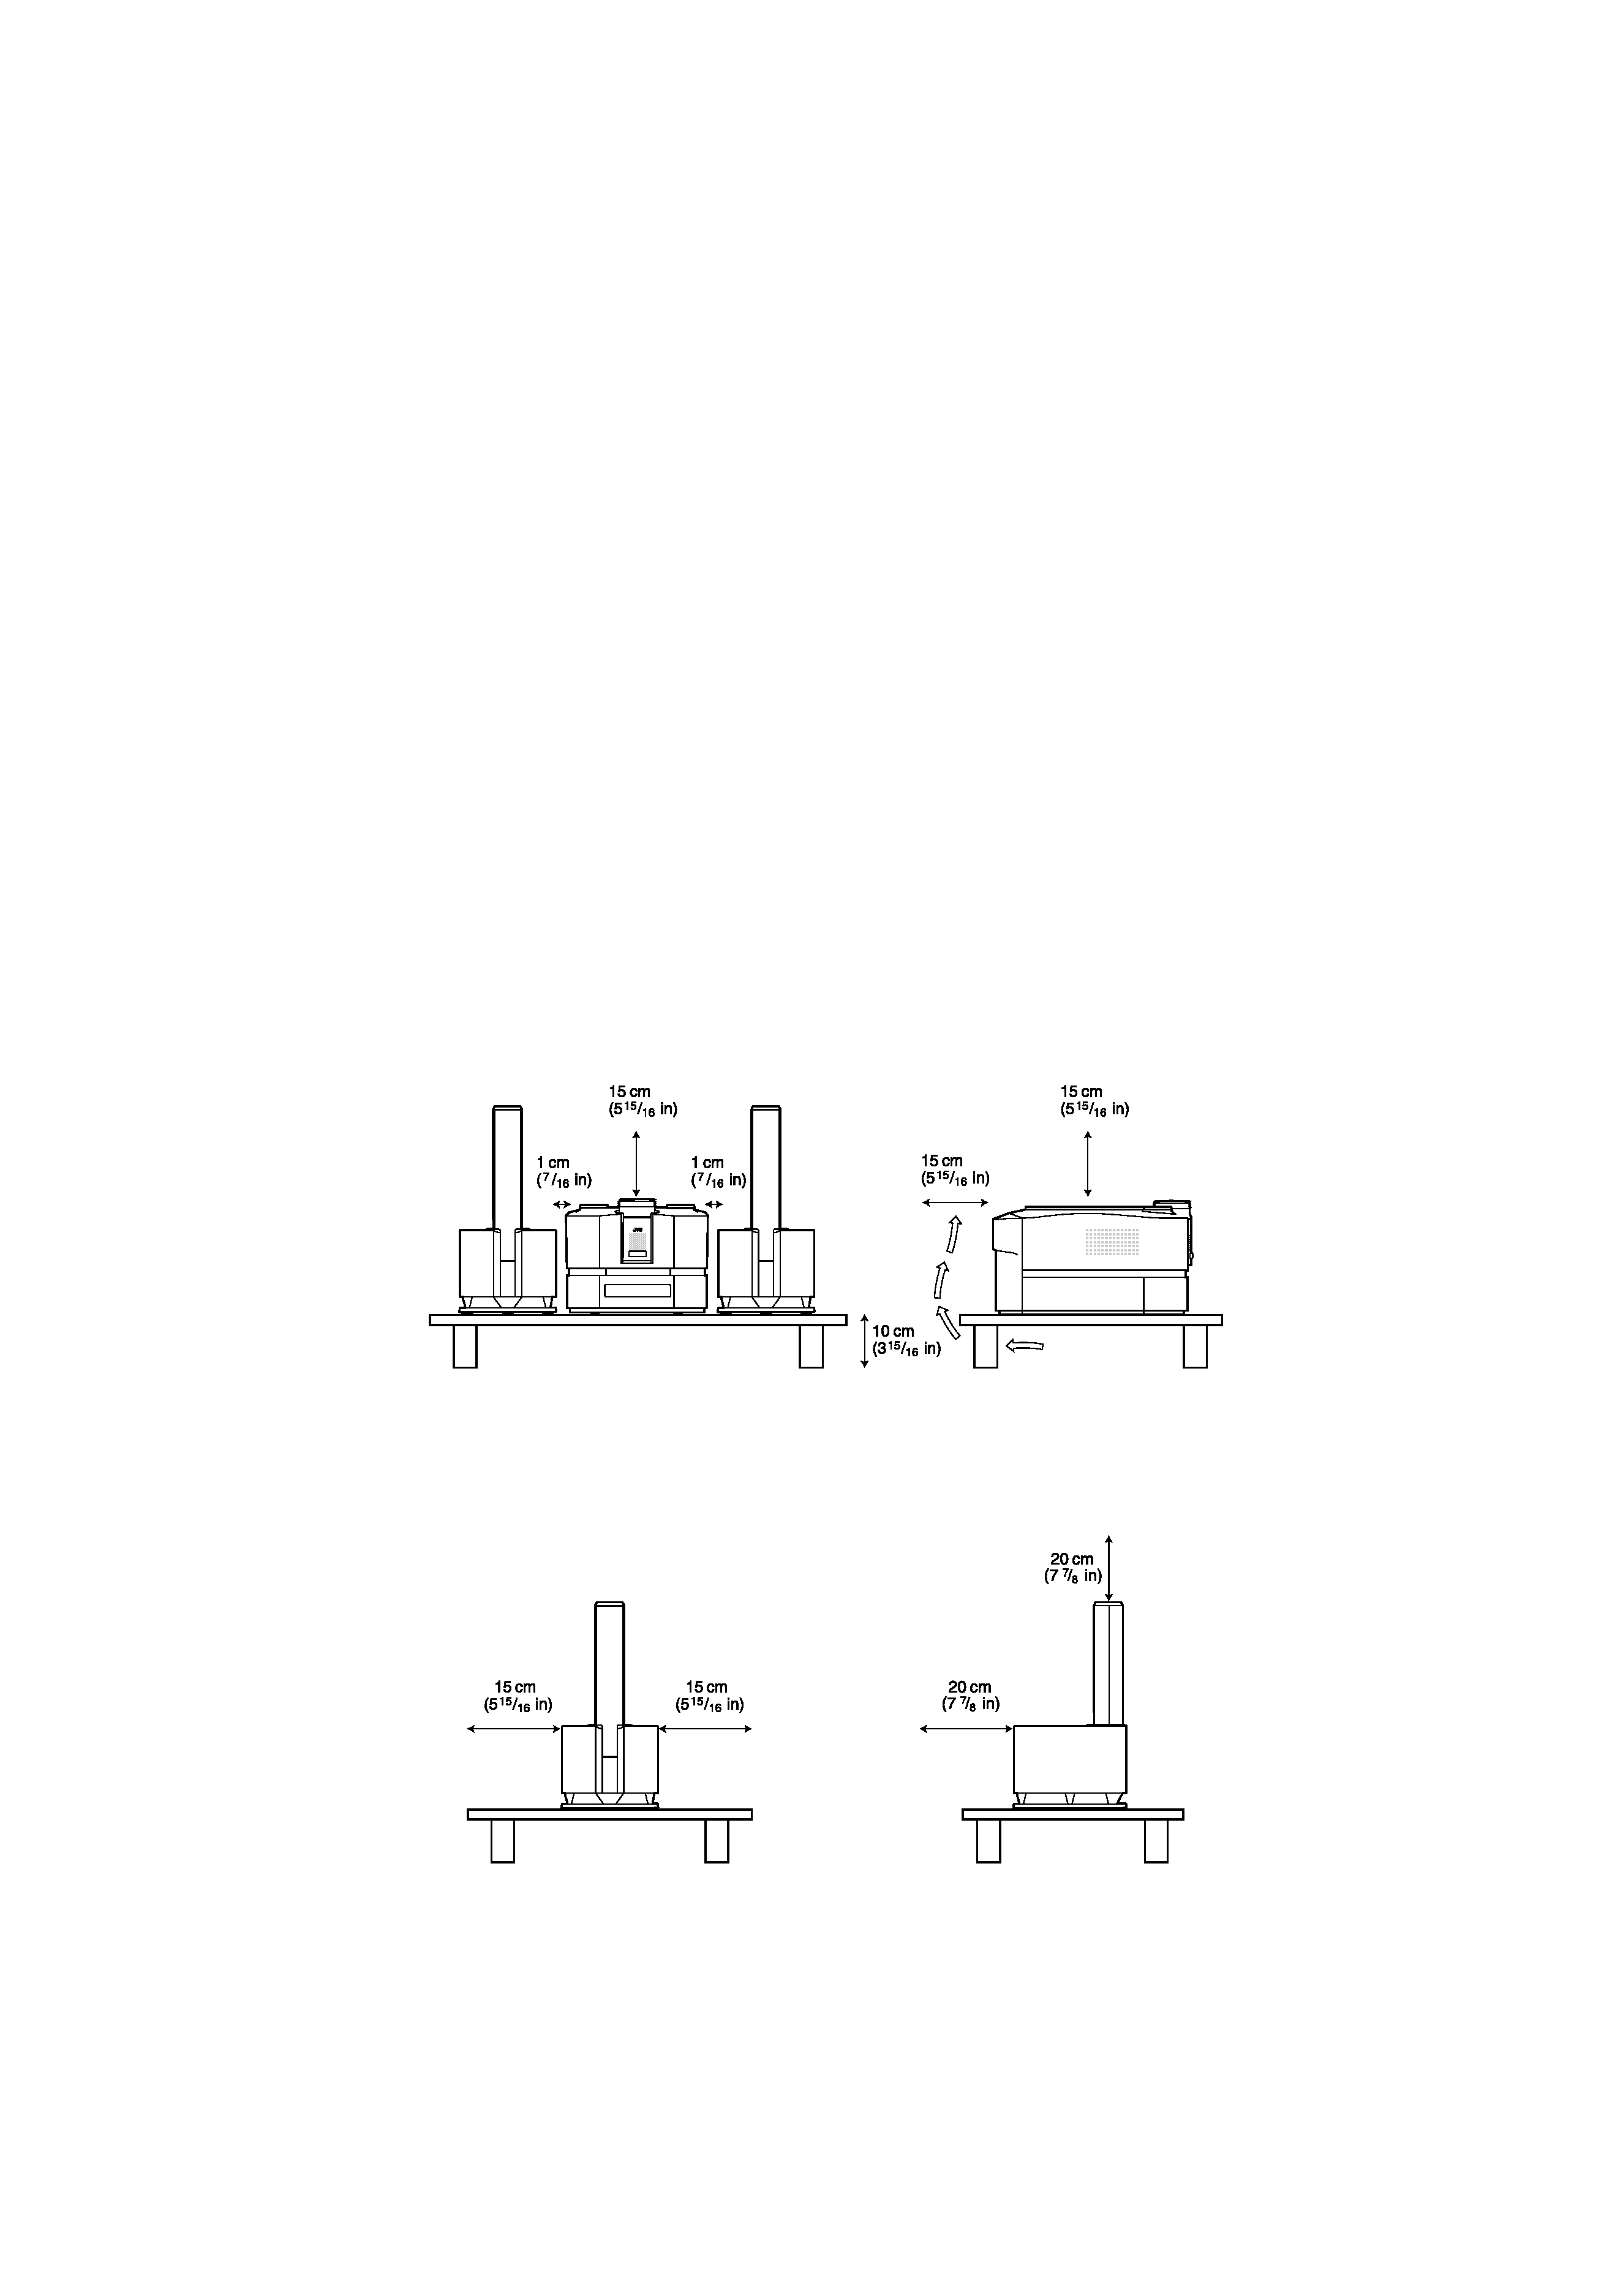
CAUTION
I About the Internal Cooling Fan
This unit includes an internal cooling fan, so as to allow for
high-power operation within a small space.
This fan comes on when the sound level is set high, and may
also come on even at low sound levels if the internal temper-
ature rises. To ensure effective fan operation, please leave
at least 15cm (5-15/16") clearance between the rear of the
unit and the wall, and at least 1cm (7/16") clearance on each
side of the unit.
ATTENTION
I A propos du ventilateur de refroidissement interne
Cet appareil est équipé d'un ventilateur de refroidissement
interne afin de permettre un fonctionnement à haute puis-
sance dans un espace limité.
Ce ventilateur se met en marche quand le niveau sonore est
élevé et peut aussi se déclencher même à un niveau bas si
la température interne augmente. Pour garantir un fonction-
nement effectif du ventilateur, veuillez laisser un espace
libre de 15 cm au moins entre l'arrière de l'appareil et le mur,
et de 1 cm au moins de chaque côté de l'appareil.
Caution: Proper Ventilation
To avoid risk of electric shock and fire, and to prevent damage,
locate the apparatus as follows:
1 Front:
No obstructions and open spacing.
2 Sides/ Top/ Back:
No obstructions should be placed in the areas shown by
the dimensions below.
3 Bottom:
Place on the level surface. Maintain an adequate air path
for ventilation by placing on a stand with a height of 10 cm
(3-15/16") or more.
Attention: Aération correcte
Pour prévenir tout risque de décharge électrique ou d'incendie
et éviter toute détérioration, installez l'appareil de la manière
suivante:
1 Avant:
Bien dégagé de tout objet.
2 Côtés/dessus/dessous:
Assurez-vous que rien ne bloque les espaces indiqués sur
le schéma ci-dessous.
3 Dessous:
Posez l'appareil sur une surface plane et horizontale.
Veillez à ce que sa ventilation correcte puisse se faire en le
plaçant sur un support d'au moins dix centimètres de hau-
teur.
Front view
Face
Side view
Côté
CA-FSX5
CA-FSX5
SP-FSX5
SP-FSX5
FS-X5(C)_E.book Page 3 Friday, April 4, 2003 1:28 PM

1
Table of Contents
English
Introduction ........................................................................................................ 2
Features ...................................................................................................................................... 2
How This Manual Is Organized ................................................................................................. 2
WARNINGS .............................................................................................................................. 2
IMPORTANT CAUTIONS ....................................................................................................... 2
Getting Started ................................................................................................... 3
Accessories................................................................................................................................. 3
How To Put Batteries In the Remote Control ............................................................................ 3
Using the Remote Control.......................................................................................................... 3
Connecting the FM Antenna ...................................................................................................... 4
Connecting the AM Antenna...................................................................................................... 5
Connecting the Speakers (SP-FSX5) ......................................................................................... 6
Connecting an External Equipment............................................................................................ 7
Connecting an MD Recorder, etc (Optical Digital Output) ....................................................... 7
COMPU PLAY .......................................................................................................................... 7
Automatic Power On .................................................................................................................. 7
Basic Operations ............................................................................................... 8
Turning the Power On and Off................................................................................................... 8
Changing the Source .................................................................................................................. 8
Adjusting the Brightness (DIMMER - at Power On)................................................................. 9
Power Saving Mode (DIMMER - at Power Off) ....................................................................... 9
Adjusting the Volume ................................................................................................................ 9
Fade-out Muting (FADE MUTING).......................................................................................... 9
Reinforcing the Bass Sound (Active Hyper Bass Pro.).............................................................. 9
Tone Control (BASS/TREBLE)............................................................................................... 10
Auto Power Off (A.P.off)......................................................................................................... 10
Entering the Number with the Remote Control (Numeric Keys)............................................. 10
Using the Tuner................................................................................................ 11
Tuning In a Station ................................................................................................................... 11
Presetting Stations .................................................................................................................... 12
To Change the FM Reception Mode ........................................................................................ 12
Beat Cut (AM Reception) ........................................................................................................ 12
Using the CD Player......................................................................................... 13
To Insert a CD .......................................................................................................................... 13
To Unload a CD ....................................................................................................................... 14
Basics of Using the CD Player Normal Play......................................................................... 14
Programming the Playing Order of the Tracks Program Play .............................................. 14
Random Play ............................................................................................................................ 15
Repeating Tracks...................................................................................................................... 16
CD DOOR LOCK ....................................................................................................................16
Using External Equipments ............................................................................ 17
Listening to External Equipment.............................................................................................. 17
Changing the Equipment's Name ............................................................................................ 17
Recording the System's Source to External Equipment .......................................................... 18
Adjusting the Input Level......................................................................................................... 18
Using the Timers .............................................................................................. 19
Setting the Clock ...................................................................................................................... 19
Showing the Clock (DISPLAY)............................................................................................... 20
Correcting the Clock ................................................................................................................ 20
Setting the Daily Timer ............................................................................................................ 20
Setting the SLEEP Timer .........................................................................................................23
Timer Priority........................................................................................................................... 23
Troubleshooting............................................................................................... 24
Care And Maintenance .................................................................................... 25
Specifications................................................................................................... 26
FS-X5(C)_E.book Page 1 Friday, April 4, 2003 1:28 PM