1
2
3
1
6
8
4 5
OFF
DSC
P LA
YP
LA
Y
7
2
SNOW & RAIN JACKET
CB-V91U
INSTRUCTIONS
ENGLISH
An exclusive, handy sized jacket to protect the Digital Video Camera from light
rain and snow.
PREPARATION BEFORE INSTALLING THE
SNOW & RAIN JACKET ONTO THE DIGITAL
VIDEO CAMERA
Turn the power of the camera off.
Attach a battery pack.
Insert a video cassette.
Set the Shooting Mode Dial to the desired setting.
NOTES:
Also refer to the digital video camera's instructions.
The flash is disabled.
INSTALLATION
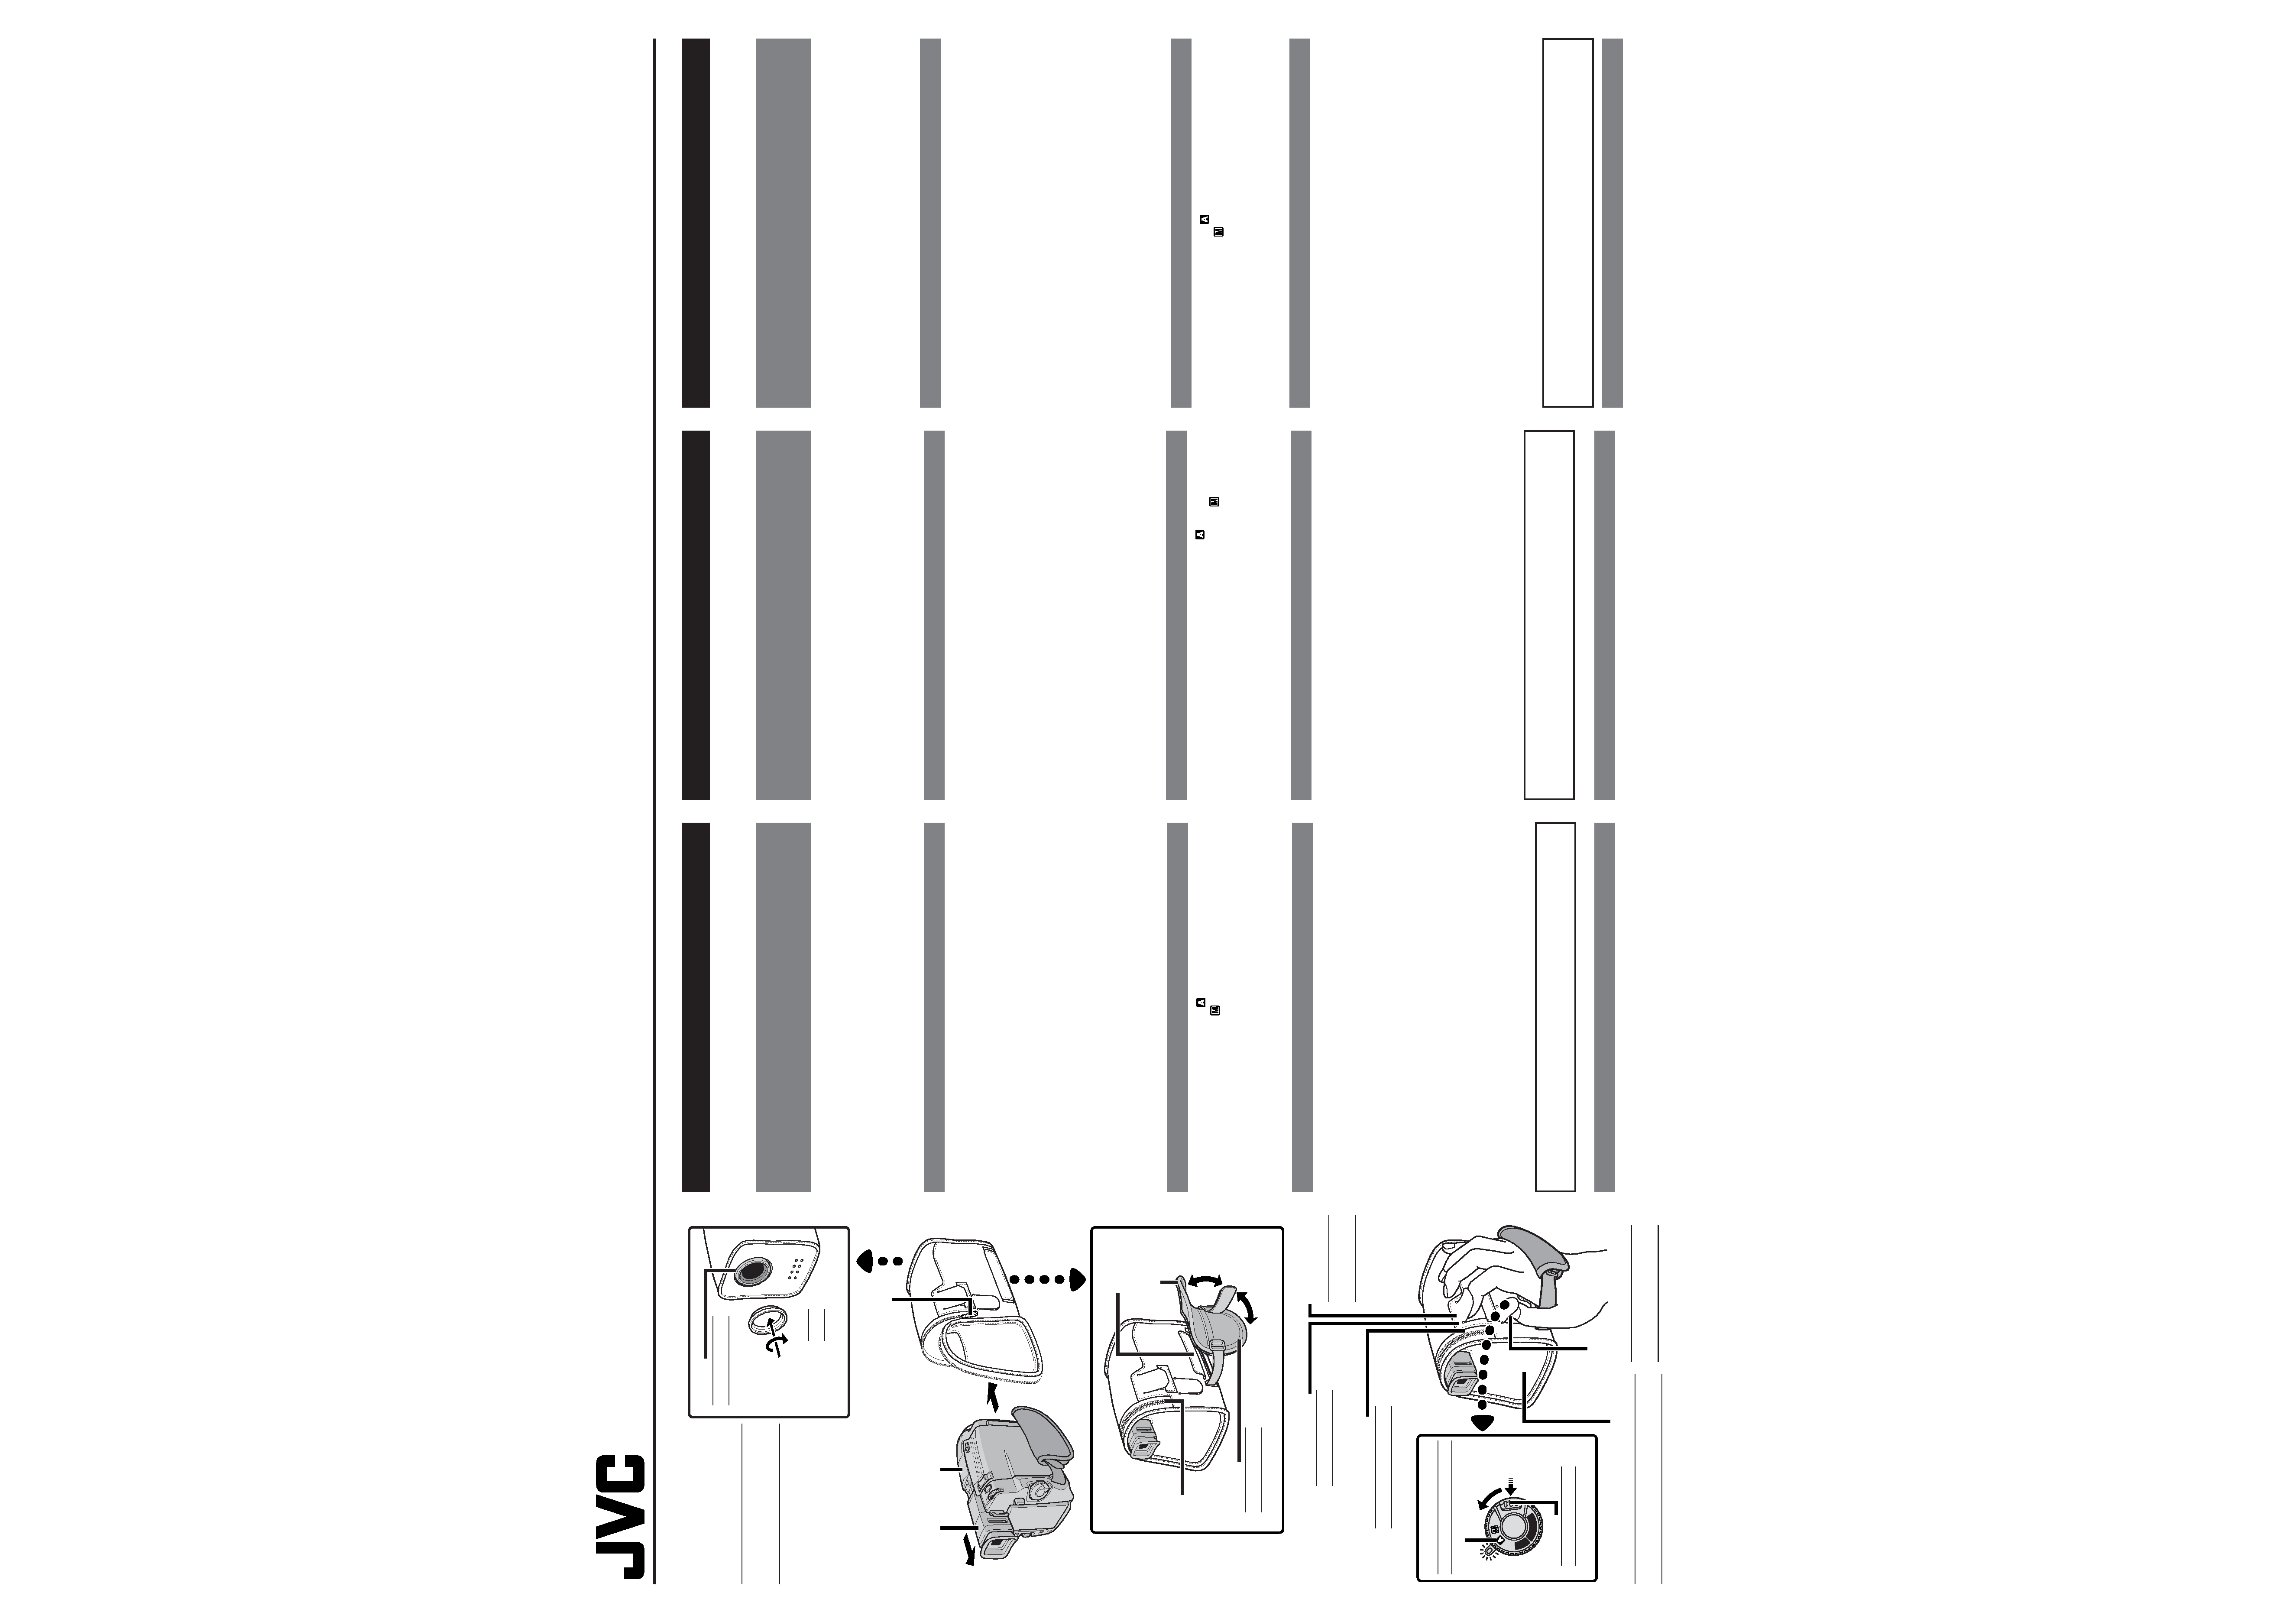
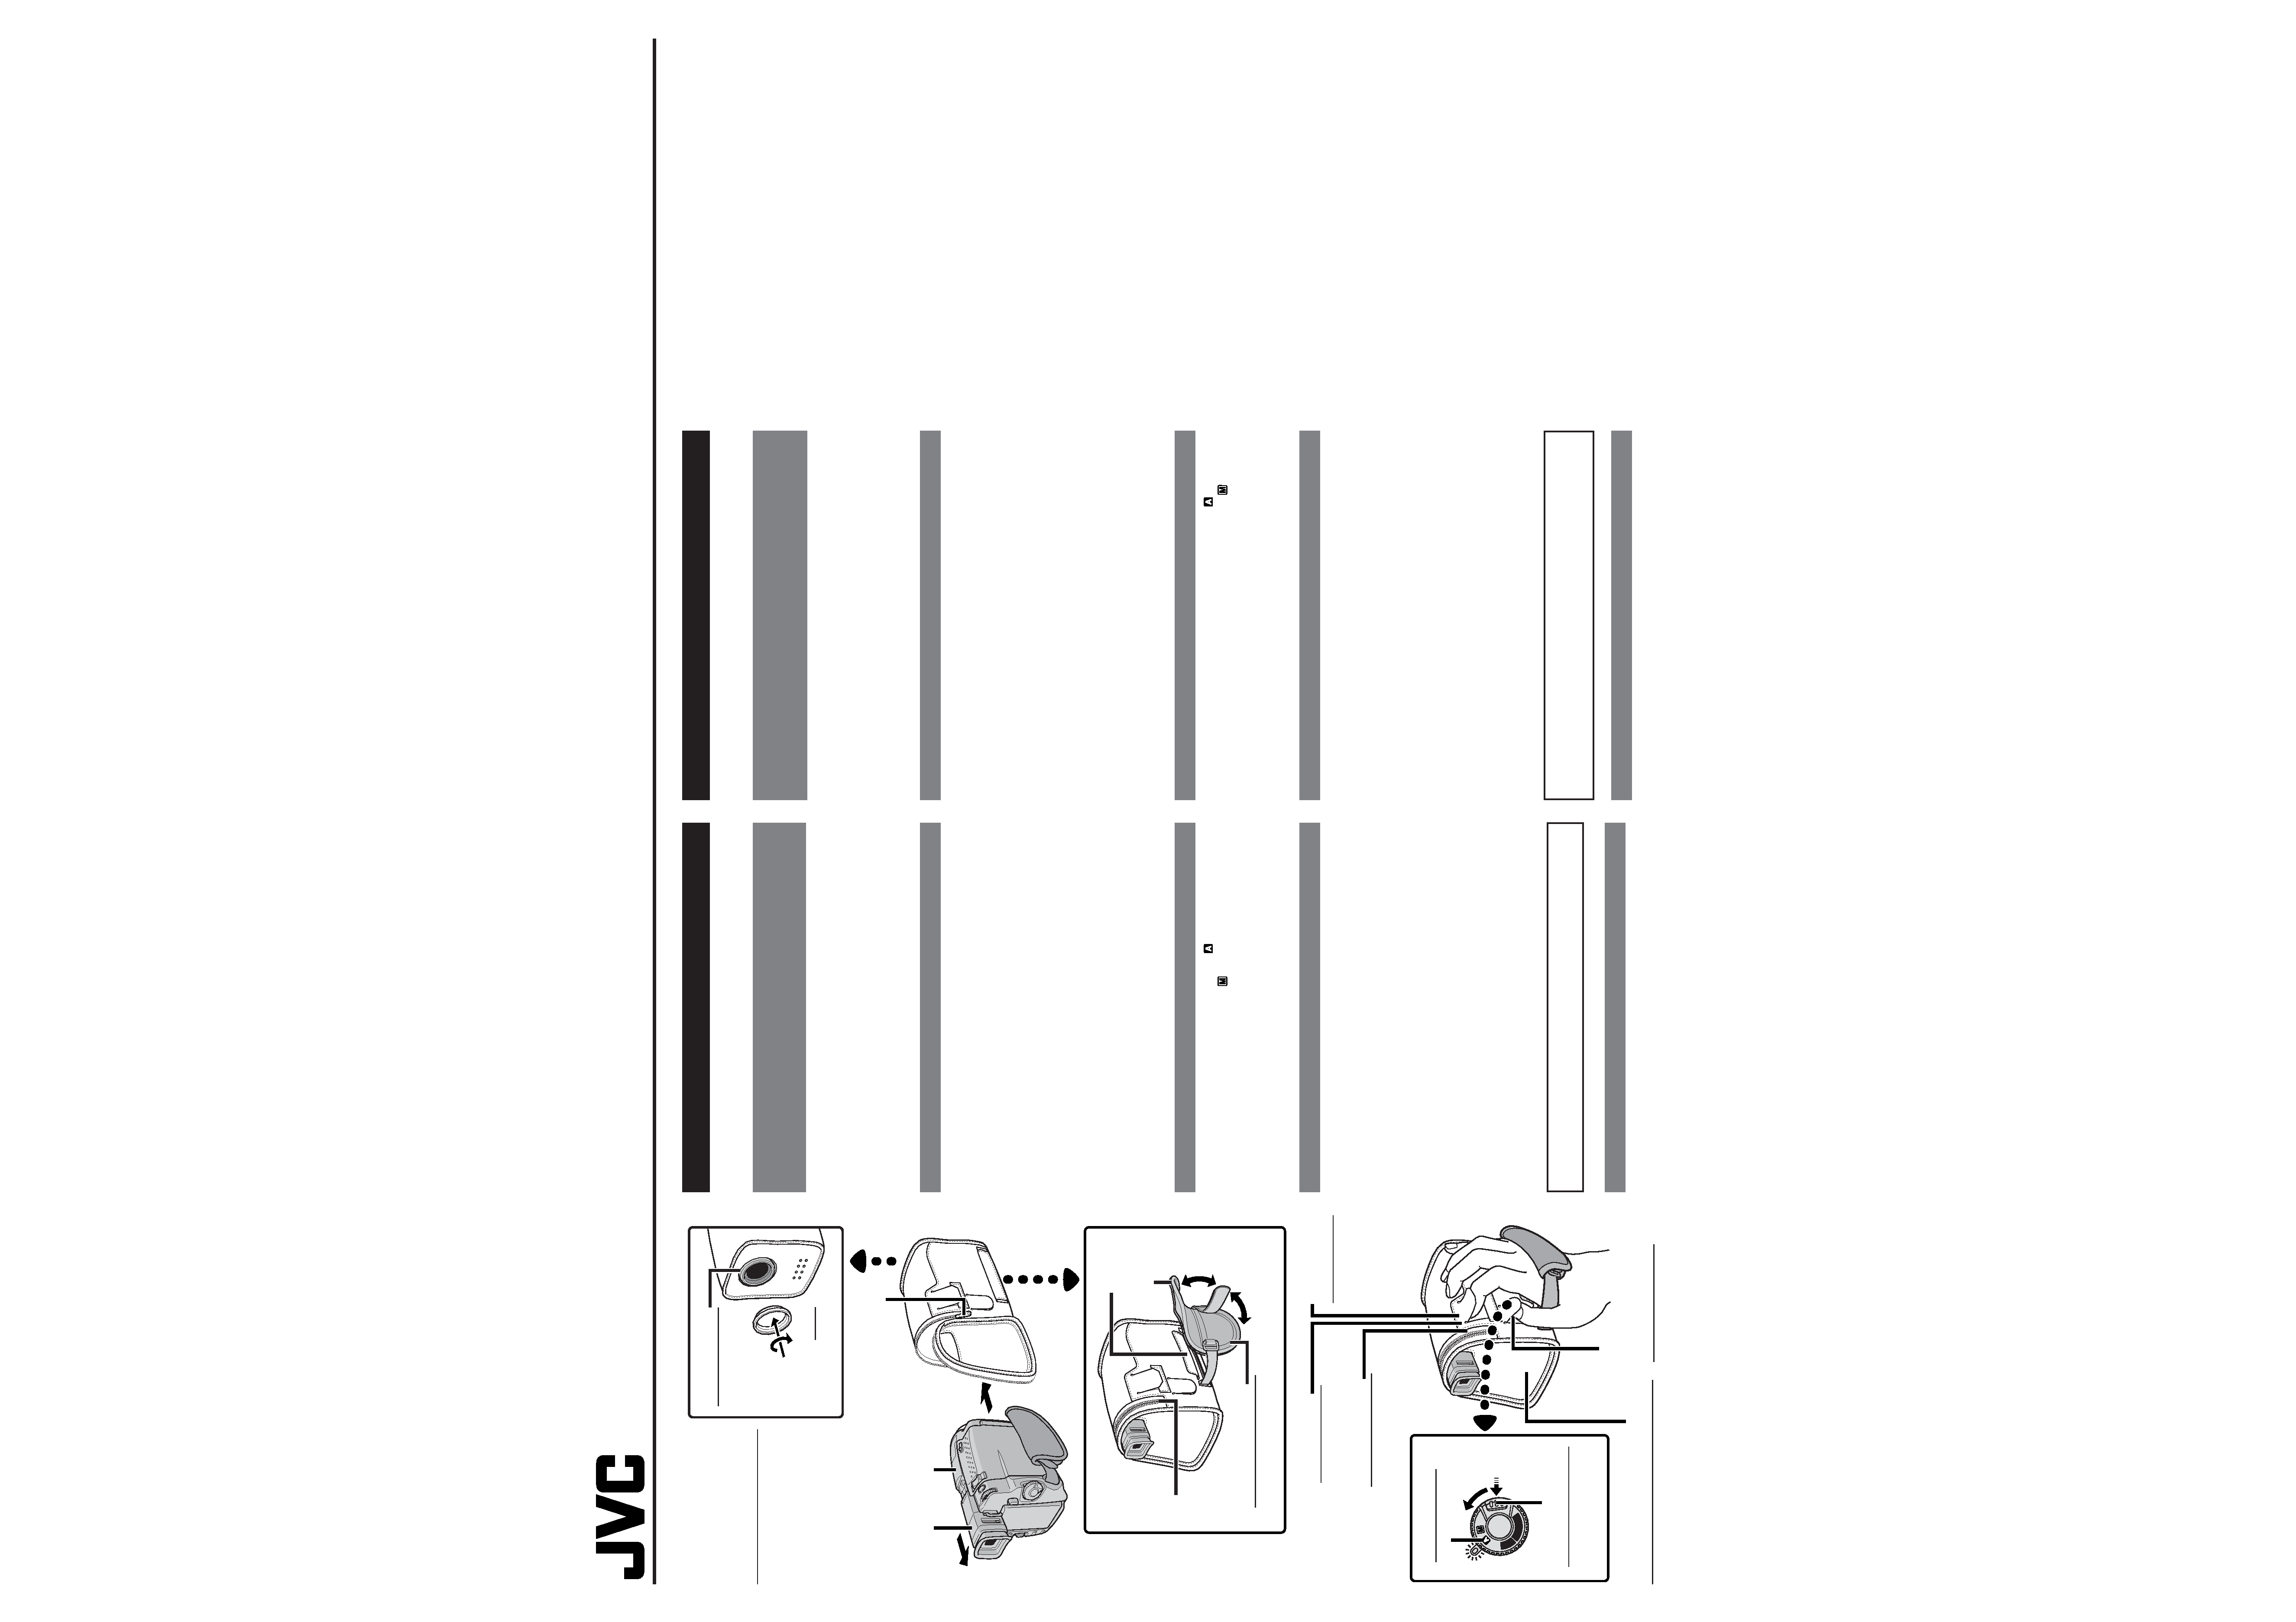
1 Open the zipper.
2 Pull out the viewfinder fully.
3 Slide the camera into the jacket.
·Shooting may be performed while watching the LCD by placing the
camera in the jacket with its LCD facing outward.
4 Remove the Velcro tape and thread the grip strap through the hole on the
jacket to pull it out.
5 Fasten the Velcro tape again.
6 Attach the provided ring to the lens.
·A 43 mm filter can also be attached to the ring.
7 Pass the viewfinder through the hole while tilting it upward. Then, close
the zipper.
8 Open up the pad of the grip strap and adjust it to fit your hand or glove.
RECORDING
1 Set the power dial of the camera to
.
·You can also shoot with it set to
.
2 Push the start/stop button.
·Open the cover on the jacket to operate the zoom lever, SNAPSHOT
button and MENU/BRIGHT Wheel.
·Also refer to the digital video camera's instructions.
OPERATING PRECAUTIONS
The Snow & Rain Jacket is not designed to be waterproof. Do not use it for
long hours in snow or rain.
Do not install or remove the jacket on or from the Digital Video Camera in
grit, snow or rain.
Should rain drops or snow flakes attach to the Digital Video Camera's lens
surface, wipe them off with a soft cloth. Otherwise the water drops or snow
flakes may be brought into focus and the intended subject may thus be out
of focus.
Do not use or leave the Snow & Rain Jacket in a place where the tempera-
ture may rise abnormally, for example near a fire or heater or in a closed
automobile.
To prevent surface deterioration, do not wipe the snow & rain jacket with a
volatile chemical such as benzine, thinner, alcohol or with a chemical cloth.
Be sure to remove the Snow & Rain Jacket from the Digital Video Camera
before storing it after use.
Noise may enter during zoom operation.
Please note that JVC cannot assume liability for any damage or malfunction
to your Digital Video Camera due to rain or grit.
SPECIFICATIONS
Dimensions
: 80 (W) x 110 (H) x 160 (D) mm
Weight
: 56 g
·
Design and specifications are subject to change without notice.
GEBRAUCHSANLEITUNG
DEUTSCH
Exklusiver Schutzmantel in handlicher Größe zum Schutz der Digitalvideokamera
vor leichtem Regen und Schnee.ORE INSTALLING THE
VORBEREITUNGEN FÜR ANBRINGUNG DES
SCHNEE- & REGENSCHUTZMANTELS AN
DER DIGITALVIDEOKAMERA
Auschaltung der Kamera.
Anbrigung eines Batteriesatzes.
Einlegen einer Videokassette.
Den Aufnahmemoduswähler auf die gewünschte Position stellen.
HINWEISE:
Siehe auch die zur Digitalvideokamera gehörige Bedienungsanleitung.
Der Blitz kann nicht eingesetzt werden.
ANBRINGUNG
1 Den Reißverschluß öffnen.
2 Den Sucher vollständig nach außen ziehen.
3 Die Kamera in den Schutzmantel schieben.
·Die Aufnahme ist auch bei LCD-Monitor-Bildüberwachung möglich,
wenn die Kamera mit nach außen weisendem und flach angelegtem
LCD-Monitor in den Schutzmantel eingesetzt wird.
4 Das Velcro-Band entfernen und die Griffschlaufe durch die Öffnung am
Schutzmantel ziehen.
5 Das Velcro-Band wieder befestigen.
6 Den mitgelieferten Ring am Objektiv anbringen.
·Am Ring kann eine 43 mm Filter angebracht werden.
7 Den nach oben geklappten Sucher durch die Öffnung führen und dann
den Reißverschluß schließen.
8 Das Polster der Griffschlaufe öffnen und Ihrer Hand oder Ihrem
Handschuh anpassen.
AUFNAHME
1 Den Hauptschalter der Kamera auf
einstellen.
·Die Aufnahme ist auch bei auf
gestelltem Hauptschalter möglich.
2 Die Start/Stop-Taste betätigen.
·Zur Bedienung von Zoomregler, SNAPSHOT-Taste und MENU/BRIGHT-
Wählrad die Umhüllung des Schutzmantels öffnen.
·Siehe auch die zur Digitalvideokamera gehörige Bedienungsanleitung.
VORSICHTSMASSNAHMEN FÜR BENUTZUNG
Der Schnee- & Regenschutzmantel ist nicht wasserfest. Deshalb sollte er
nicht übermäßig lange bei Schnee oder Regen verwendet werden.
Den Schutzmantel bei Schneeregen, Schnee sowie Regen nicht an der
Digitalkamera anbringen oder von ihr abnehmen.
Sollten Regentropfen oder Schneeflocken an der Objektivoberfläche der
Digitalkamera anhaften, sollten sie mit einem weichen Tuch abgewischt
werden. Sonst könnten Wassertropfen oder Schneeflocken schärfer
hervortreten und der gewünschte Aufnahmegegenstand unscharf werden.
Der Schnee- & Regenschutzmantel sollten nicht an Orten mit hohen
Temperaturen aufbewahrt oder verwendet werden, wie z.B. in Nähe eines
Feuers,einer Heizung oder in einem geschlossenem Fahrzeug.
Um eine Beschädigung der Oberfläche zu verhindern, sollte der Schnee- &
Regenschutzmantel nicht mit angreifenden Chemikalien abgewischt
werden, wie z.B. Benzin, Farbverdünner, Alkohol oder chemischen
Reinigungstüchern.
Vor Aufbewahrung der Digitalkamera nach deren Benutzung unbedingt den
Schnee- & Regenschutzmantel abnehmen.
Beim Zoombetrieb kann Bildrauschen auftreten.
Bitte berücksiehtigen fie, daß JVC keine Verantwortung für jegliche Schäden
oder Störungen an Ihrer Digitalvideokamera übernimmt, die durch Schnee-
oder Regeneinwirkung verursacht wurden.
SPEZIFIKATIONEN
Abmessungen
: 80 (B) x 110 (H) x 160 (T)
Gewicht
: 56 g
·
Änderungen des Designs sowie der Spezifikationen sind jeweils ohne
Vorankündigung vorbehalten.
MODE D'EMPLOI
FRANÇAIS
Cette housse pratique est prévue exclusivement pour protéger le camescope
numérique contre la pluie et la neige.E INSTALLING THE
PRÉPARATIFS AVANT L'INSTALLATION DE LA
HOUSSE ANTI-PLUIE ET NEIGE SUR LE
CAMESCOPE NUMÉRIQUE
Coupez l'alimentation de la caméra.
Fixez une batterie.
Introduisez une cassette vidéo.
Réglez la molette de mode de prise de vues sur le réglage désiré.
REMARQUES:
Se référer également au mode d'emploi de la caméra vidéo numérique.
Le flash est condamné.
INSTALLATION
1 Ouvrez la fermeture éclair.
2 Tirez complètement sur le viseur.
3 Glissez le camescope dans la housse.
·La prise de vue est possible en regardant l'écran LCD si le camescope est
placé dans la housse avec l'écran LCD dirigé vers l'extérieur.
4 Retirez la bande Velcro et passez la courroie poignée par le trou sur la
housse pour la faire sortir.
5 Refermez la bande Velcro.
6 Fixez la bague fournie à l'objectif.
·Un filtre 43 mm peut également être attaché à la bague
7 Passez le viseur par le trou tout en l'inclinant vers le haut. Puis, fermez la
fermeture éclair.
8 Ouvrez le bourrelet de la courroie poignée et insérez-y votre main ou votre
gant.
ENREGISTREMENT
1 Réglez la molette d'alimentation du camescope sur
.
·Vous pouvez également filmer avec la molette réglée sur
.
2 Appuyez sur la touche de marche/arrêt d'enregistrement.
·Ouvrez le cache de la housse pour commander la commande de zoom,
la touche SNAPSHOT et la molette MENU/BRIGHT.
·Se référer également au mode d'emploi de la caméra vidéo numérique.
PRÉCAUTIONS POUR L'UTILISATION
La housse anti-pluie et neige n'est pas étanche à l'eau. Ne l'utilisez pas
pendant de longues heures sous la pluie ou la neige.
Ne montez et ne retirez pas la housse du camescope numérique à des
endroits où des matières étrangères, la pluie ou la neige pourraient pénétrer.
Si des gouttes de pluie ou flocons de neige touchent l'objectif du
camescope numérique, essuyez-les avec un chiffon doux. Sinon ils
pourraient être nets et le sujet prévu flou.
N'utilisez pas et ne laissez pas la housse anti-pluie et neige à un endroit où
la température peut augmenter anormalement, par exemple près d'un feu ou
d'un radiateur ou bien dans une voiture fermée.
Pour éviter toute détérioration de la surface, n'essuyez pas la housse avec
un produit chimique volatil, de la benzine, un diluant, de l'alcool ou avec
un chiffon imprégné de solution chimique.
N'oubliez pas de retirer la housse anti-pluie et neige du camescope
numérique avant de ranger le camescope numérique après l'emploi.
Du bruit peut entrer pendant le fonctionnement du zoom.
Notez que JVC ne peut assumer de responsabilité pour aucun dommage ou
mauvais fonctionnement du camescope numérique dû à la pluie ou à des
matières étrangères.
SPÉCIFICATIONS
Dimensions
: (l/h/p) 80 x 110 x 160 mm
Poids
: 56 g
·
Conception et spécifications sont sujettes à modification sans préavis.
Power Zoom
lever
Commande de
zoom
Motorzoomregler
The BN-V628U extended-use battery pack
can be used.
La batterie BN-V628U longue durée peut
être utilisée.
Batteriesatz BN-V628U (mit Langzeitleistung)
kann angebracht werden.
Recording Start/Stop button
Touche de marche/arrêt
d'enregistrement
Aufnahme Start/Stop-Taste
Grip strap
Courroie poignée
Griffschlaufe
Ring
Baque
Ring
SNAPSHOT button
Touche SNAPSHOT
SNAPSHOT-Taste
Lock button
Touche de verrouillage
Sperrknopf
Full auto (automatic) mode
Mode entièrement automatique
Vollautomatischer Betrieb
MENU/BRIGHT Wheel
Molette MENU/BRIGHT
MENU/BRIGHT-Wählrad
Lens hole
Trou pour objectif
Objektivöffnung
The ring can be attached to the
lens with the lens protector
attached to the lens.
La bague peut être fixée sur
l'objectif avec le protecteur
d'objectif fixé sur l'objectif.
Der Ring kann bei angebrachtem
Objektivschutz am Objektiv
befestigt werden.
LYT0511-001A
1199FOV
*UN*AP
SNOW & RAIN JACKET
CB-V91U
INSTRUCCIONES
ESPAÑOL
Una protección exclusiva y de tamaño conveniente para proteger la cámara de
video digital de la lluvia y de la nieve finas.E INSTALLING THE
PREPARATIVOS ANTES DE INSTALAR LA
PROTECCIÓN CONTRA NIEVE Y LLUVIA EN
LA CÁMARA DE VIDEO DIGITAL
Desconexión de la alimentación de la cámara.
Coloque una batería.
Inserte un cassette de video.
Regule el dial de modo de filmación en el ajuste deseado.
NOTAS:
Refiérase también a las instrucciones de la cámara de video digital.
El flash está inhabilitado.
INSTALACIÓN
1 Abra la cremallera.
2 Retiere el visor completamente.
3 Meta la cámara en la protección.
·La filmación puede hacerse mientras se observa el monitor LCD
colocando la cámara en la protección con su monitor LCD hacia el
exterior.
4 Quite la cinta Velcro y pase la correa de la empuñadura a través del
orificio de la funda de protección para retirarla.
5 Apriete de nuevo la cinta Velcro.
6 Coloque el anillo suministrado en el objetivo.
·En el anillo se puede colocar también un filtro de 43 mm.
7 Pase el visor a través del orificio cuando esté inclinado hacia arriba.
Luego, cierre la cremallera.
8 Abra hacia arriba la almohadilla de la correa de la empuñadura y ajústela
para que se acople a su mano o guante.
GRABACIÓN
1 Ponga el dial de alimentación de la cámara en
.
·También podrá filmar con el ajuste en
.
2 Presione el botón de inicio/parada.
·Abra la cubierta de la protección para emplear el conmutador del zoom
motorizado, Botón SNAPSHOT y disco MENU/BRIGHT.
·Refiérase también a las instrucciones de la cámara de video digital.
PRECAUCIONES OPERATIVAS
La protección para nieve y lluvia no es impermeable. No la emplee durante
muchas horas bajo la nieve o la lluvia.
No coloque ni extraiga la protección de la cámara de video digital cuando
haya polvo, nieve o lluvia.
En caso de que caiga lluvia o copos de nieve sobre la superficie del objetivo
de la cámara de video digital, límpiela con un paño suave. De lo contrario
las gotas de agua o los copos de nieve pueden quedar enfocados y el sujeto
puede quedar desenfocado.
No emplee ni deje la protección para nieve y lluvia en un lugar dónde la
temperatura pueda elevarse anormalmente, por ejemplo cerca del fuego o
calentado o en un automóvil cerrado.
Para evitar el deterioro de la superficie, no limpie la protección para nieve y
lluvia con productos químicos volátiles tales como bencina, solvente,
alcohol o con un paño con productos químicos.
Asegúrese de extraer la protección para nieve y lluvia de la cámara de video
digital antes de almacenarla.
Durante el funcionamiento del zoom puede entrar ruido.
Note que JVC no asume ninguna responsabilidad por cualquier daño o falla
en su cámara de video digital, producido por la lluvia o el polvo.
ESPECIFICACIONES
Dimensiones
: 80 (A) x 110 (Alt.) x 160 (P) mm
Peso
: 56 g
·
El diseño y las especificaciones están sujetos a cambios sin aviso.
COPYRIGHT© 1999 VICTOR COMPANY OF JAPAN, LTD.
ISTRUZIONI PER L'USO ITALIANO
Una copertura di dimensioni ridotte, ad uso esclusivo, per la protezione della
Videocamera Digitale da neve e pioggia di intensità moderata.E THE
PREPARATIVI DA EFFETTUARE PRIMA DEL
MONTAGGIO DELLA COPERTURA SULLA
VIDEOCAMERA DIGITALE
Attivazione della videocamera.
Inserimento del pacco batteria.
Inserimento della videocassetta.
Impostazione della ghiera di modo di ripresa sulla posizione desiderata.
NOTE:
Fare riferimento anche alle istruzioni della videocamera digitale.
Il flash è disabilitato.
MONTAGGIO
1 Aprire la cerniera lampo.
2 Estrarre completamente il mirino.
3 Far scorrere la Videocamera nella copertura.
·Le riprese possono essere effettuate osservandole sullo schermo a cristalli
liquidi se la videocamera è stata posizionata nella copertura con lo
schermo rivolto verso l'esterno.
4 Rimuovere il nastro autoadesivo e far passare il cinturino attraverso il foro
della copertura per tirarlo fuori.
5 Richiudere il nastro autoadesivo.
6 Montare sull'obiettivo l'anello in dotazione.
·Sull'anello si può montare un filtro da 43 mm di diametro.
7 Far passare il mirino attraverso il foro inclinandolo verso l'alto. Quindi
chiudere la cerniera lampo.
8 Slacciare il cinturino e regolarlo in modo che si adatti alla mano, o al
guanto.
RIPRESE
1 Disporre l'interruttore di attivazione della Videocamera su
.
·Le riprese possono anche essere effettuate con la posizione
.
2 Agire sul tasto di avvio ed arresto.
·Per poter agire sulla leva dello zoom, il tasto SNAPSHOT e la ghiera
MENU/BRIGHT aprire la parte superiore della copertura.
·Fare riferimento anche alle istruzioni della videocamera digitale.
PRECAUZIONI PER L'USO
La copertura antineve non è impermeabile. Evitare quindi di usarla per
lungo tempo sotto la neve o la pioggia.
Non procedere all'inserimento della Videocamera nella copertura, o alla sua
estrazione, in luoghi esposti a sabbia, pioggia o neve.
Pulire con un panno soffice ed asciutto eventuali gocce di pioggia o fiocchi
di neve posatisi sull'obiettivo della Videocamera. Lasciandoveli, la
Videocamera può mettersi a fuoco su tali depositi, con il risultato che il
soggetto desiderato viene a trovarsi sfocato.
Non usare e non lasciare la copertura antineve in luoghi soggetti ad
eccessivi aumenti di temperatura, quali le vicinanze di termosifoni e stufe, o
l'interno di un'autovettura chiusa, parcheggiata al sole.
Per evitare il deterioramento della superficie della copertura antineve, non
ripulirla facendo uso di agenti chimici quali benzina, solventi, alcol o panni
trattati chimicamente.
Estrarre sempre la Videocamera dalla copertura antineve prima di porla a
riposo dopo l'uso.
Nel corso dell'uso dello zoom possono prodursi dei rumori.
Si prega di notare che la JVC non può assumersi alcuna responsabilità per
eventuali danni o disfunzioni derivanti alla Videocamera a causa di pioggia
o sabbia.
DATI TECNICI
Dimensioni esterne : 80 (largh.) x 110 (alt.) x 160 (prof.) mm
Peso
: 56 g
·
L'aspetto ed i dati tecnici possono subire modifiche senza preavviso.
1
2
3
1
6
8
4 5
OFF
DSC
P LA
YP
LA
Y
7
2
Conmutador de
zoom motorizado
Leva dello zoom
Es posible usar la batería de larga duración
BN-V628U.
Si può usare il pacco batteria a lunga
durata BN-V628U.
Botón de inicio/parada
de grabación
Tasto di avvio ed arresto
Anillo
Anello
Botón SNAPSHOT
Tasto per istantanee
(SNAPSHOT)
Botón de bloqueo
Tasto di bloccaggio
Disco MENU/BRIGHT
Ghiera MENU/BRIGHT
El anillo puede ser colocado en
el objetivo con el protector de
objetivo colocado.
L'anello può essere attaccato
all'obiettivo con il protettore
obiettivo applicato all'obiettivo.
Orificio del objetivo
Foro per l'obiettivo
Correa de la empuñadura
Cinturino per limpugnatura
Modo completamente
automático
Modalità completamente
automatica