COMPACT
DIGITAL AUDIO
INSTRUCTIONS
BEDIENUNGSANLEITUNG
MANUEL D'INSTRUCTIONS
GEBRUIKSAANWIJZING
MANUAL DE INSTRUCCIONES
ISTRUZIONI
CA-MD70R
For Customer Use:
Enter below the Model No. and Serial
No. which are located either on the rear,
bottom or side of the cabinet. Retain this
information for future reference.
Model No.
Serial No.
LVT0074-002B
[E]
COMPACT COMPONENT MD SYSTEM
MD-KOMPAKT-KOMPONENTEN-SYSTEM
SYSTEME MD DE COMPOSANTS COMPACT
COMPACTO COMPONENT MD-SYSTEEM
SISTEMAS MD DE COMPONENTES COMPACTOS
IMPIANTO A COMPONÈNTI COMPATTO MD
SLEEP
PLAY
MODE
RDS
CONTROL
DISPLAY
/CHARA
CANCEL
SET
ENTER
MARK
ABC
DEF
GHI
JKL
MNO
EON
PTY SEARCH
DISPLAY
TA/NEWS/INFO
PTY SELECT
+
PQRS
TUV
WXYZ
BASS
SOUND
FM MODE
6
5
4
9
8
7
REPEAT
0
10
3
2
1
+10
CD3
AUX
TAPE
FM/AM
CD2
MD
REC PAUSE
CD1
FADE MUTING
REMOTE CONTROL RM-SEM70RU
VOLUME
MD
TITLE
INPUT
MD
CD
CA-MD70R[E].COVER/F
98.11.10, 3:05 PM
1
1
English
Introduction
About This Manual
This manual is organized as follows:
· The manual mainly explains operations using the buttons
and controls on the unit. You can also use the buttons on
the remote control if they have the same or similar
names (or marks) as those on the unit.
If operation using the remote control is different from
that using the unit, it is then explained.
· Basic and common information that is the same for
many functions is grouped in one place, and is not
repeated in each procedure. For instance, we do not
repeat the information about turning on/off the unit,
setting the volume, changing the sound effects, and
others, which are explained in the section "Basic
Settings" and "Common Operations" on pages 10, 11,
and 12.
· The following marks are used in this manual:
Gives you warnings and cautions to prevent
from a damage or risk of fire/electric
shock.
Also gives you information which is not
good for obtaining the best possible
performance from the unit.
Gives you information and hints you had
better know.
Precautions
Installation
· Install in a place which is level, dry and neither too hot
nor too cold -- between 5°C (41°F) and 35°C (95°F).
· Install the unit in a location with adequate ventilation to
prevent internal heat built-up in the unit.
· Leave sufficient distance between the unit and the TV.
· Keep the speakers away from the TV to avoid
interference with TV.
DO NOT install the unit in a location near heat
sources, or in a place subject to direct sunlight,
excessive dust or vibration.
We would like to thank you for purchasing one of our JVC products.
Before operating this unit, read this manual carefully and thoroughly to
obtain the best possible performance from your unit, and retain this manual
for future reference.
Power sources
· When unplugging from the wall outlet, always pull the
plug, not the AC power cord.
DO NOT handle the AC power cord with wet
hands.
Moisture condensation
Moisture may condense on the lens inside the unit in the
following cases:
· After starting heating in the room
· In a damp room
· If the unit is brought directly from a cold to a warm
place
Should this occur, the unit may malfunction. In this case,
leave the unit turned on for a few hours until the moisture
evaporates, unplug the AC power cord, and then plug it in
again.
Others
· Should any metallic object or liquid fall into the unit,
unplug the unit and consult your dealer before operating
any further.
· If you are not going to operate the unit for an extended
period of time, unplug the AC power cord from the wall
outlet.
DO NOT disassemble the unit since there are
no user serviceable parts inside.
If anything goes wrong, unplug the AC power cord and
consult your dealer.
EN01-18.CA-MD70R[E]
98.10.18, 2:43 am
1

2
English
Contents
Location of the Buttons and Controls ........... 3
Front Panel ............................................................. 4
Remote Control ...................................................... 5
Getting Started ................................................ 6
Unpacking .............................................................. 6
Putting the Batteries into the Remote Control ....... 6
Connecting Antennas ............................................. 6
Connecting Speakers .............................................. 7
Connecting Other Equipment ................................ 8
Basic Settings ................................................ 10
Setting the Clock .................................................. 10
Changing the Display Pattern .............................. 10
Common Operations .................................... 11
Turning On the Power and Selecting the Sources .. 11
Adjusting the Volume ........................................... 11
Reinforcing the Bass Sound ................................. 12
Selecting the Sound Modes .................................. 12
Creating Your Own Sound Mode -- MANUAL
Mode .............................................................. 12
Listening to FM and AM Broadcasts .......... 13
Tuning in a Station ............................................... 13
Presetting Stations ................................................ 13
Tuning in a Preset Station .................................... 14
Receiving FM Stations with RDS ................ 15
Changing the RDS Information ........................... 15
Searching for Programs by PTY Codes (PTY
Search) ........................................................... 16
Switching to a Program Type of Your Choice
Temporarily ................................................... 16
Playing Back CDs ......................................... 19
Loading CDs ........................................................ 19
Playing Back the Entire Discs
-- Continuous Play ........................................ 20
Basic CD Operations ........................................... 20
Programming the Playing Order of the Tracks
-- Program Play ............................................ 20
Playing at Random -- Random Play ................... 22
Repeating Tracks or CDs -- Repeat Play ............ 22
Prohibiting Disc Ejection -- Disc Lock .............. 22
Playing Back an MD ..................................... 23
Playing Back the Entire MD
-- Continuous Play ........................................ 23
Basic MD Operations ........................................... 23
Programming the Playing Order of the Tracks
-- Program Play ............................................ 24
Playing at Random -- Random Play ................... 26
Repeating Tracks -- Repeat Play ........................ 26
Recording onto an MD ................................. 27
Things to Know Before You Start Recording ...... 27
Recording FM/AM Broadcasts or from the
Cassette Deck ................................................ 28
Recording from the External (AUX) Equipment ... 29
Recording CDs ..................................................... 30
Editing MDs .................................................. 32
Introducing MD Editing Functions ...................... 32
DIVIDE Function ................................................ 33
JOIN Function ...................................................... 34
MOVE Function ................................................... 35
ERASE Function .................................................. 36
ALL ERASE Function ......................................... 37
Erasing a Portion of a Track ................................ 37
Assigning Titles to MDs ................................ 38
Assigning a Title Using the Unit .......................... 38
Assigning a Title Using the Remote Control ....... 41
Using the Timers ........................................... 43
Using Recording Timer ........................................ 43
Using Daily Timer ............................................... 44
Using Sleep Timer ............................................... 46
Timer Priority ....................................................... 46
Maintenance .................................................. 47
Additional Information ................................ 48
MD Disc Types .................................................... 48
ATRAC (Adaptive TRansform Acoustic Coding) .. 48
UTOC (User Table Of Contents) ......................... 48
Serial Copy Management System (SCMS) .......... 48
Sound Skip Guard Memory ................................. 49
Troubleshooting ............................................ 50
MD Messages ...................................................... 51
Specifications ................................................. 52
EN01-18.CA-MD70R[E]
98.10.18, 2:43 am
2
3
English
Location of the Buttons and Controls
Become familiar with the buttons and controls on your unit.
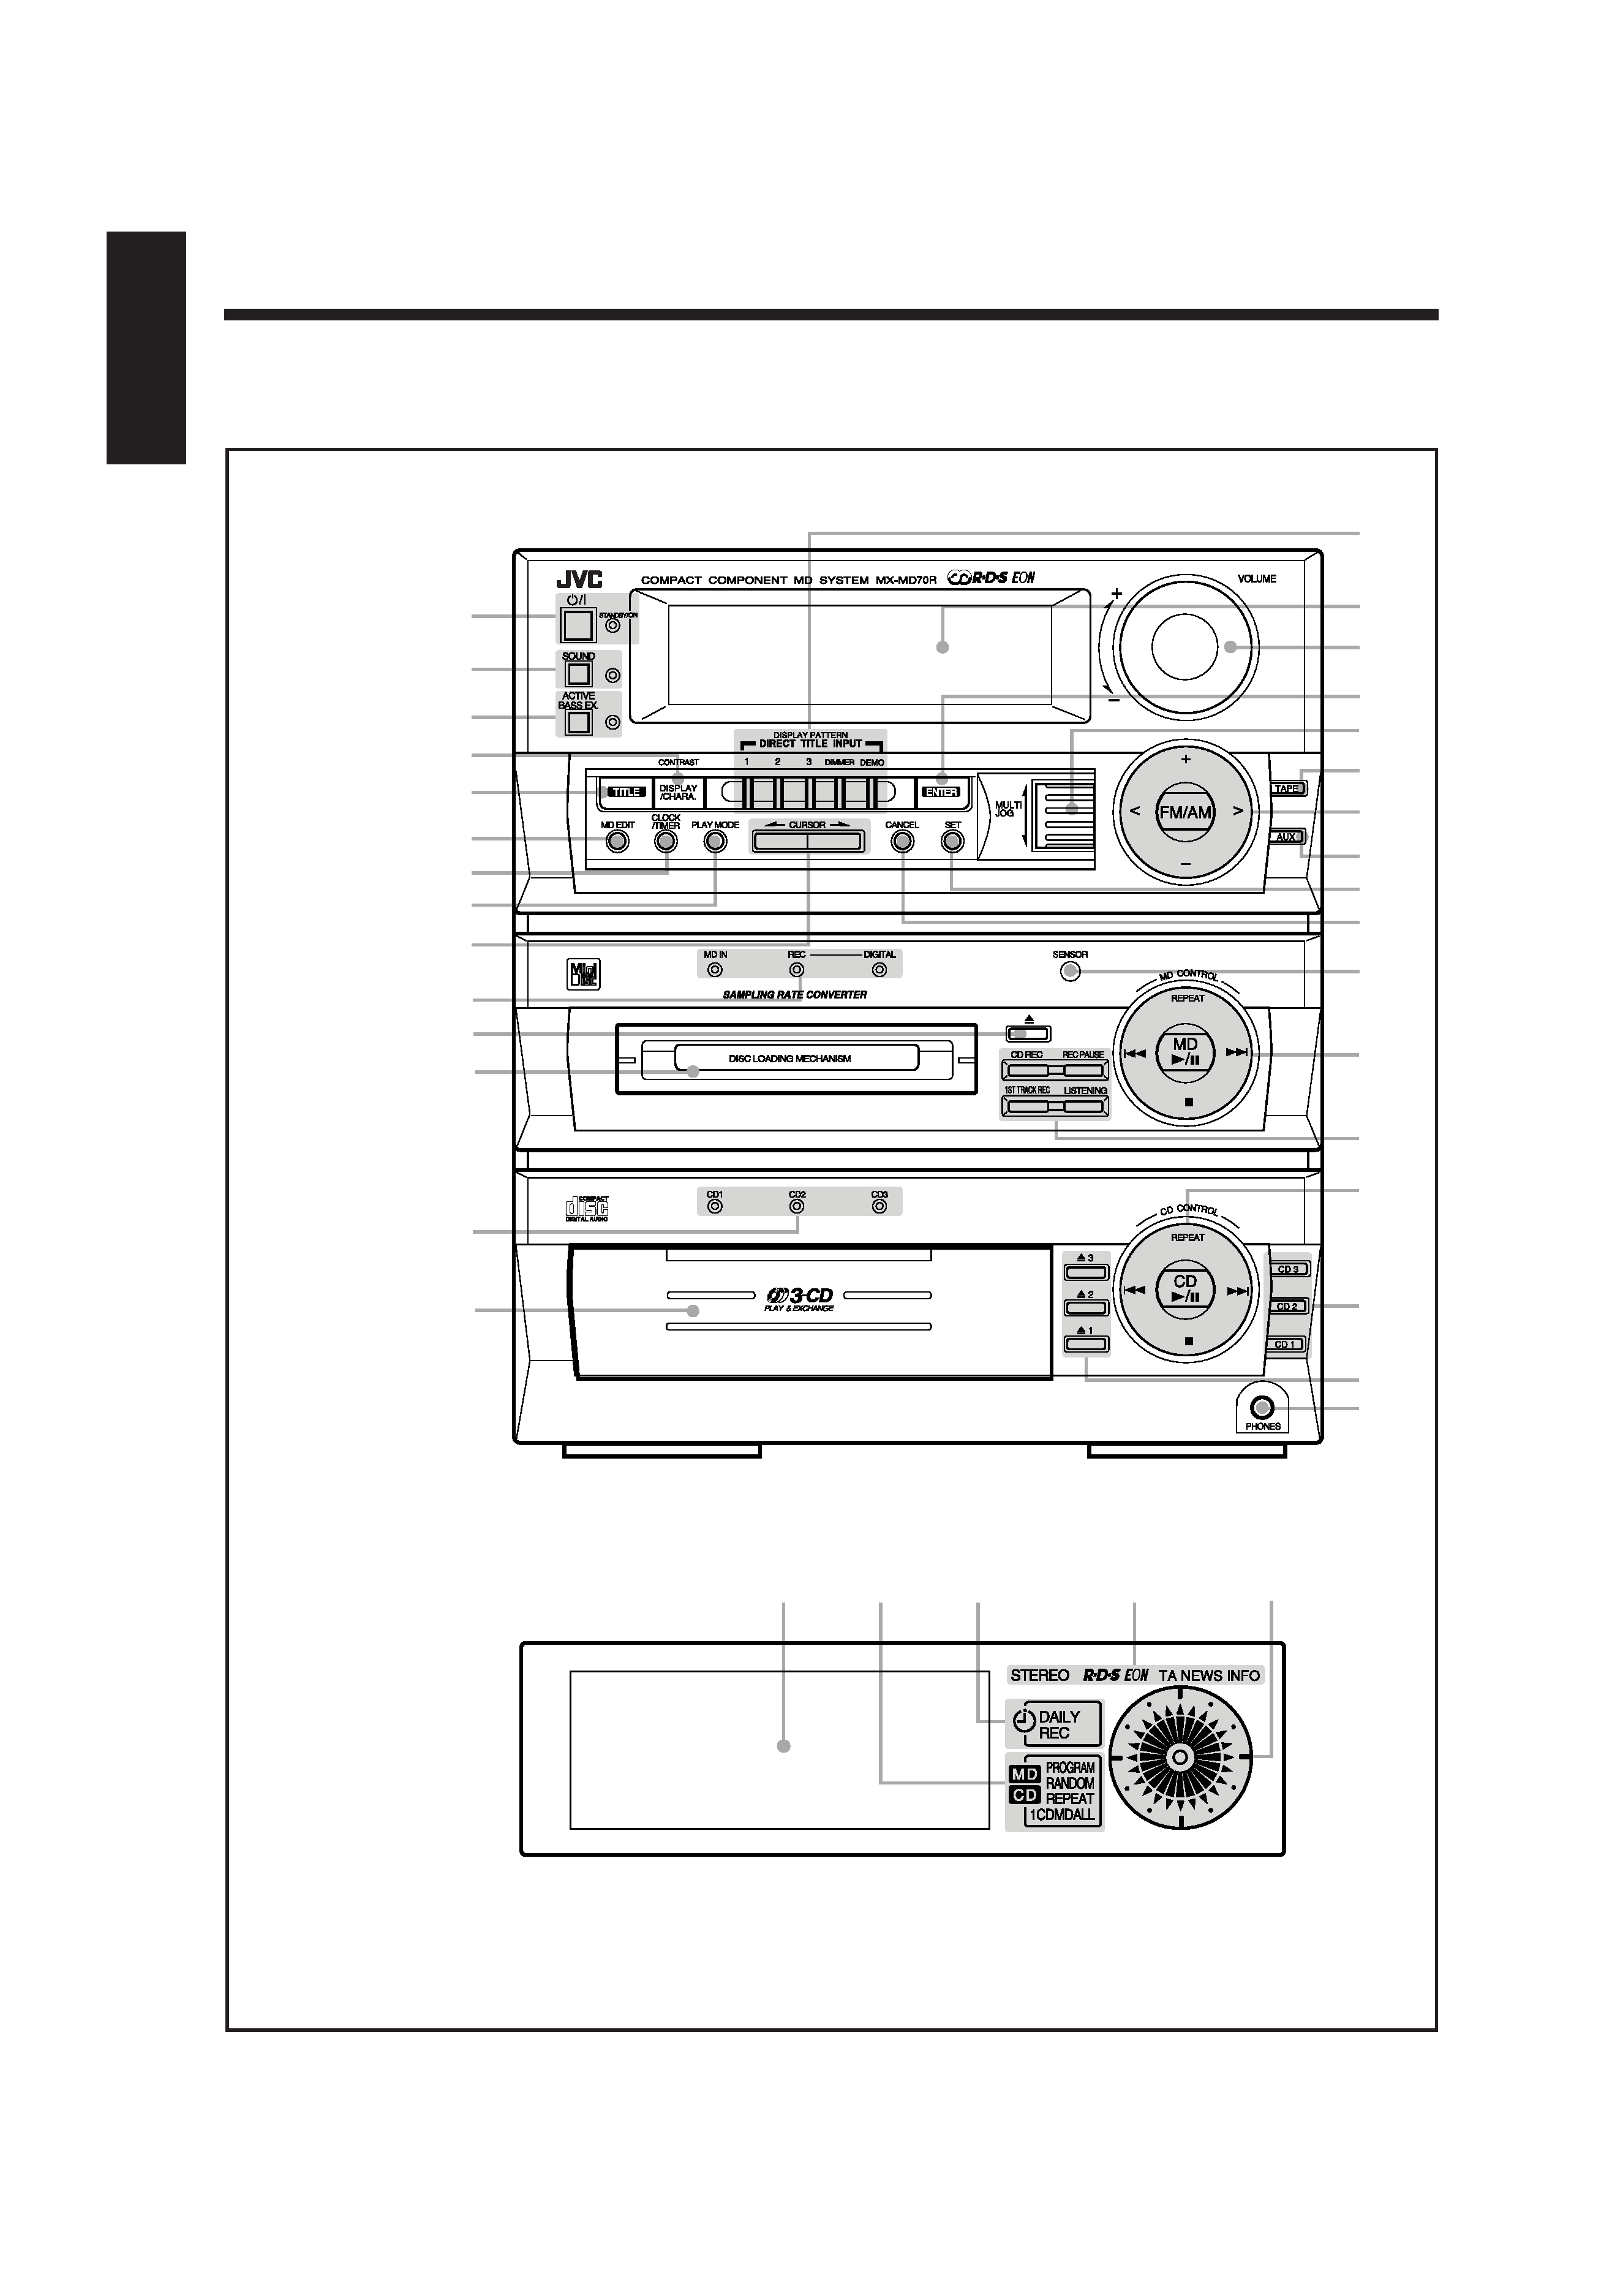
Display Window
Front Panel
Amplifier/
tuner section
MD recorder
section
CD player
section
4
3
5
2
1
q
e
r
f
g
k
l
/
z
1
2
3
4
5
6
7
8
9
;
a
s
h
j
p
w
t
y
u
i
o
d
EN01-18.CA-MD70R[E]
98.10.18, 2:43 am
3
4
English
See pages in the parentheses for details.
Front Panel
Amplifier/tuner section
1
button and STANDBY/ON lamp (11)
2 SOUND button and lamp (12)
3 ACTIVE BASS EX. (extension) button and lamp (12)
4 CONTRAST/DISPLAY/CHARA. (character) button
(10, 24, 38)
5 TITLE button (38)
6 MD EDIT button (33)
7 CLOCK/TIMER button (10, 43)
8 PLAY MODE button (20, 22, 24, 26)
9 CURSOR
ø / Ø buttons (12, 39)
p DISPLAY PATTERN buttons (10)
· 1, 2, 3, DIMMER, and DEMO buttons
Pressing DEMO also turns on the unit.
DIRECT TITLE INPUT buttons (39)
q Display window
w VOLUME control (11)
e ENTER button (39)
r MULTI JOG dial
t TAPE button (11)
Pressing this button also turns on the unit.
y Tuner control buttons (13)
· FM/AM, + / , and < / > buttons
Pressing FM/AM also turns on the unit.
u AUX button (11, 29)
Pressing this button also turns on the unit.
i SET button
o CANCEL button
MD recorder section
; MD recorder operation lamps
· MD IN, REC, and DIGITAL lamps
a
0 (eject) button (23)
Pressing this button also turns on the unit.
s MD loading slot
d SENSOR (remote sensor)
f MD CONTROL buttons (23)
· MD
6, REPEAT, 4 / ¢, and 7 buttons
Pressing MD
6 also turns on the unit.
g Recording buttons (28 31)
· CD REC, REC PAUSE, 1ST TRACK REC, and
LISTENING buttons
Continued
CD player section
h Disc number lamps
· CD 1, CD 2, and CD 3 lamps
j Disc compartment
k CD CONTROL buttons (19)
· CD
6, REPEAT, 4 / ¢, and 7 buttons
Pressing CD
6 also turns on the unit.
l Disc number buttons (20)
· CD 1, CD 2, and CD 3 buttons
Pressing one of these buttons also turns on the unit.
/
0 (open/close) buttons (19)
·
0 1, 0 2, and 0 3 buttons
Pressing one of these buttons also turns on the unit.
z PHONES jack (11)
Display window
1 Main display
2 MD/CD playback mode indicators
· PROGRAM, RANDOM, REPEAT mode indicators
3 Timer mode indicators
· DAILY (daily timer) and REC (recording timer)
indicators
4 Tuner mode indicators
· STEREO, RDS, EON, and TA/NEWS/INFO
indicators
5 Analog clock
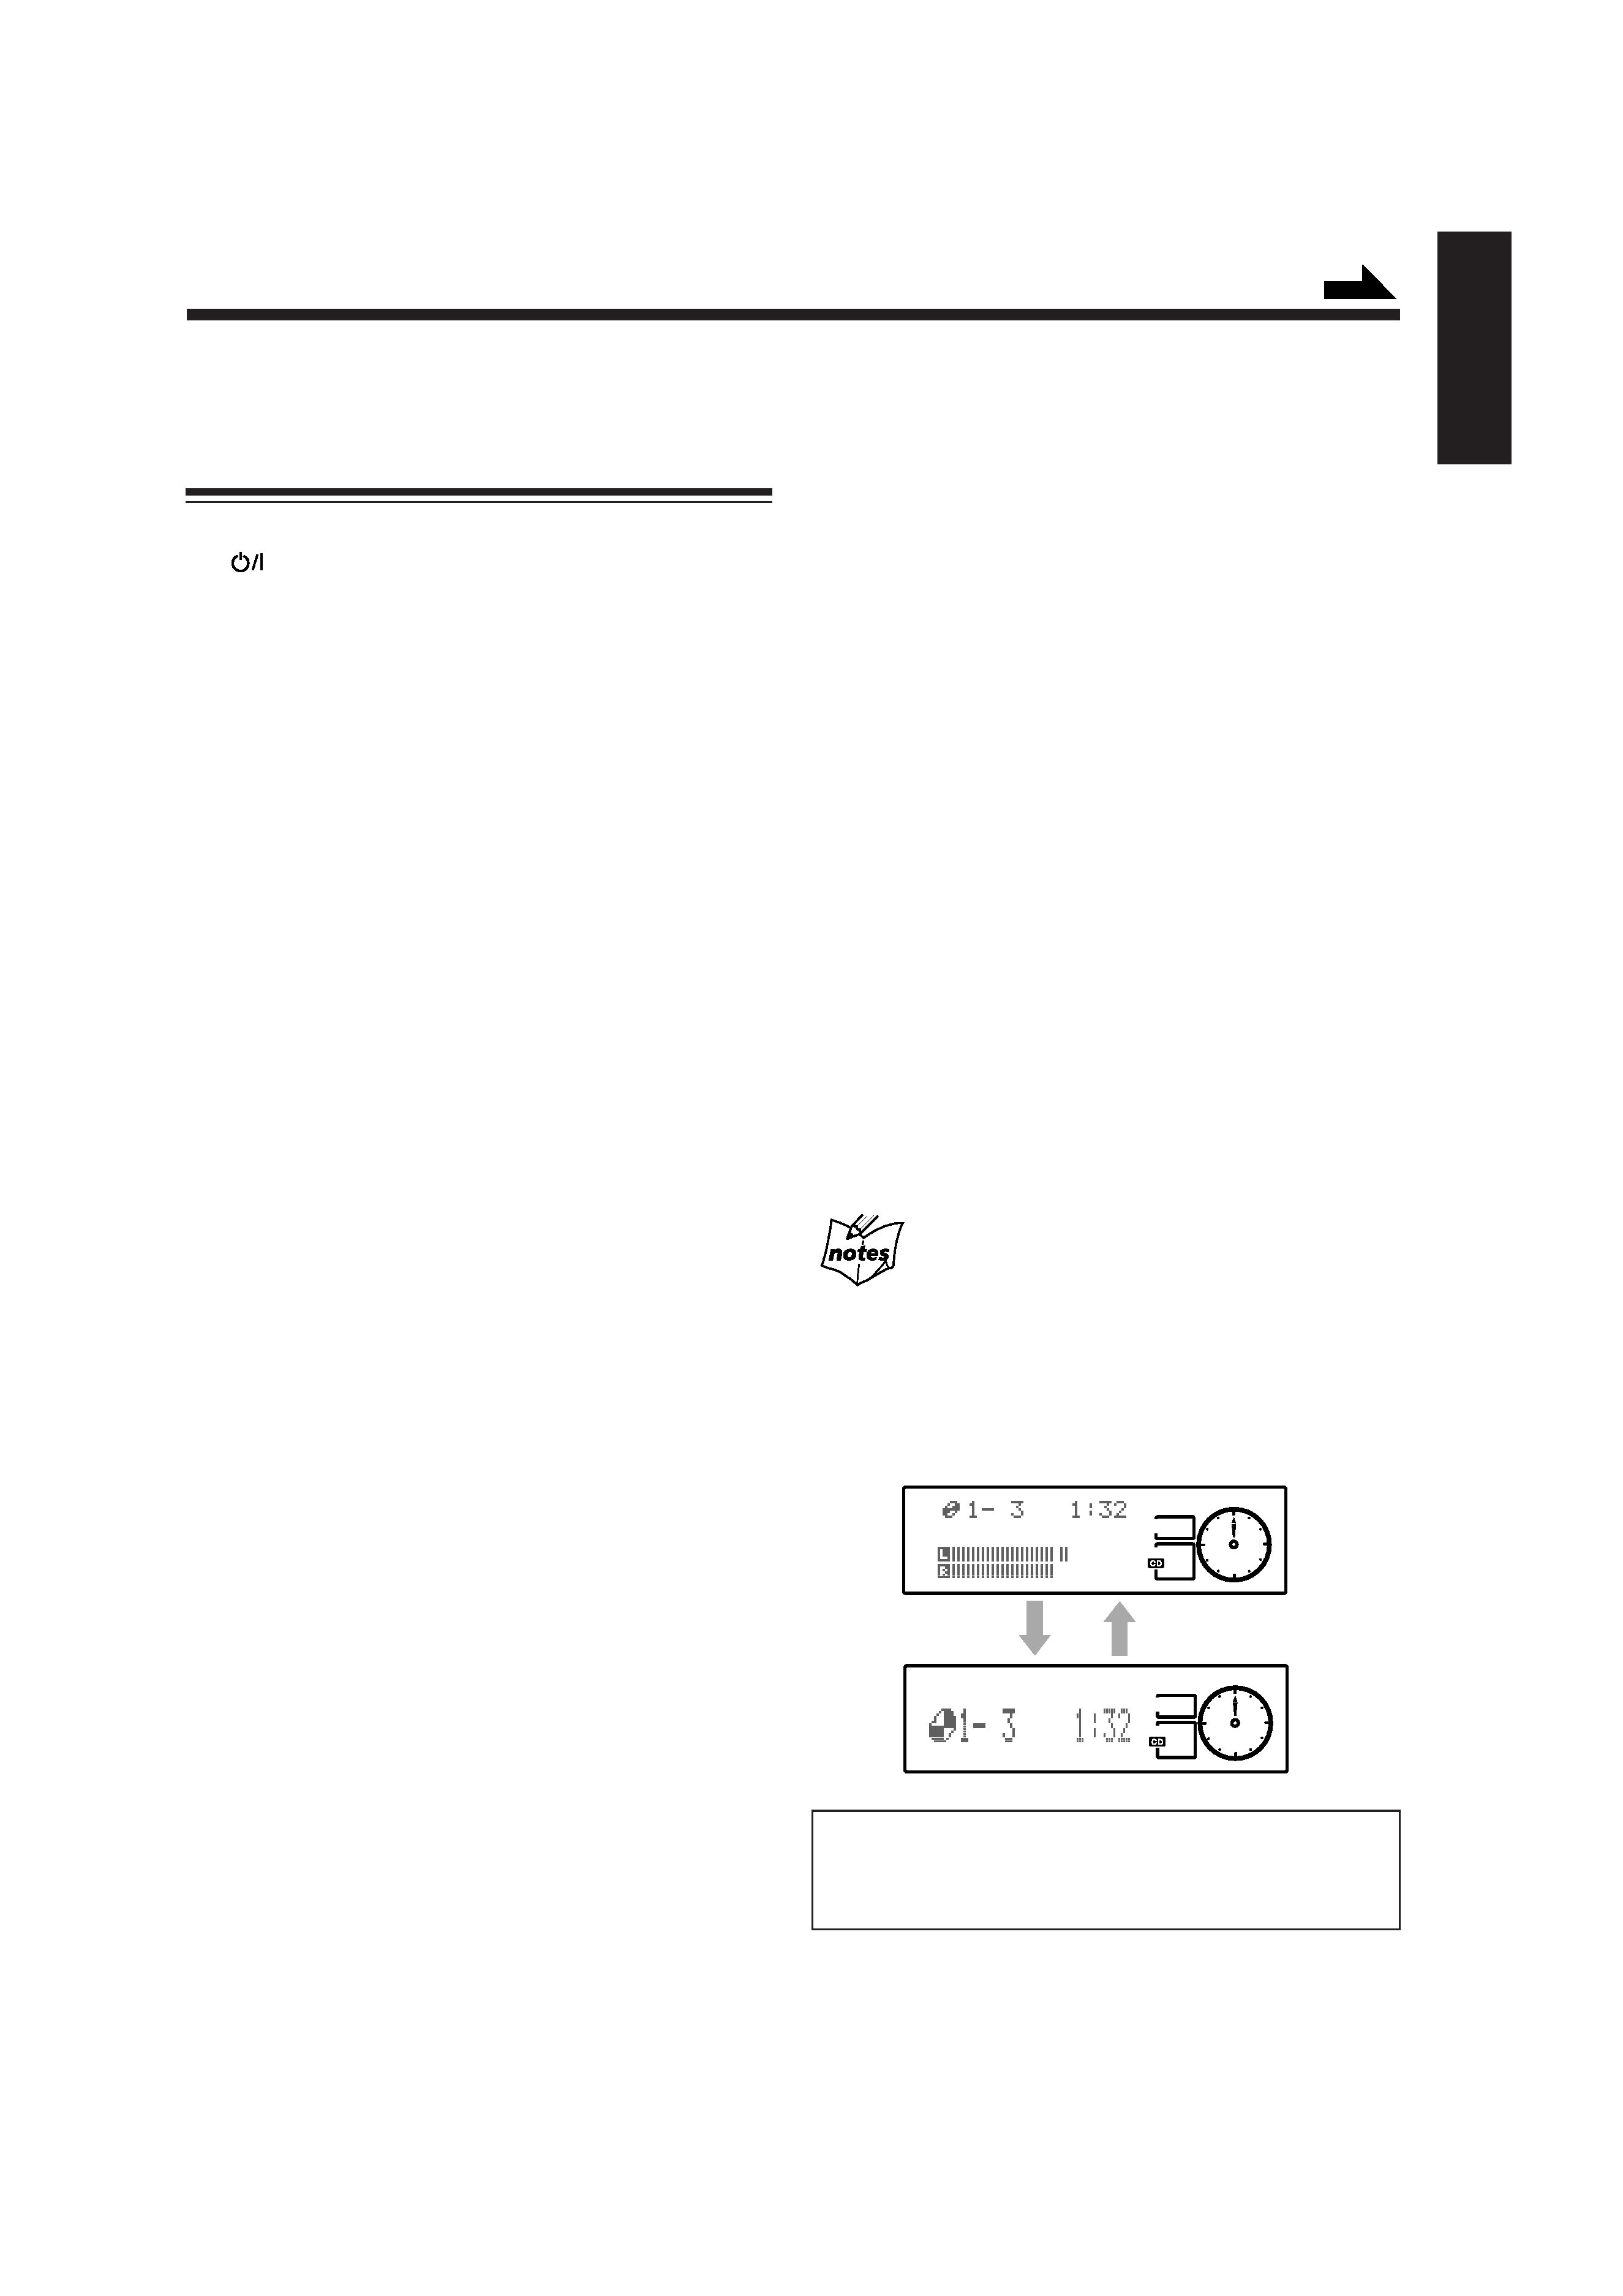
About the indications in the main display
When operating the unit using the remote control, the indications
in the main display appear enlarged (without the audio level
indicator), then become diminished (with the audio level
indicator). On the other hand, they do not appear enlarged when
using the buttons on the unit.
Ex. When using the remote control
The illustrations of the main display used in
this manual are of those shown by using the
buttons on the unit.
EN01-18.CA-MD70R[E]
98.10.18, 2:43 am
4