BR-DV6000U
BR-DV6000U
DV
VIDEO
CASSETTE
RECORDER
INSTRUCTION MANUAL
DV VIDEO CASSETTE RECORDER
BR-DV6000
PROFESSIONAL
MENU
RESET
A.DUB
EJECT
COUNTER
AUDIO
INPUT
SELECT
MONITOR OUTPUT
REMOTE
LOCAL
CTL
L
MIX
R
CH-1/2
MIX
CH-3/4
DV
LINE
Y/C
(CPN)
TC
UB
REW
STOP
FF
REC
OPERATE
PLAY
PAUSE
DISP
SET
SEARCH+
BLANK
CUE UP
HOLD
PHONES
REC LEVEL
CH-1/3
CH-2/4
MIC
SEARCH
Mini
Thank you for purchasing this JVC product.
Before operating this unit, please read the
instructions carefully to unsure the best
possible performance.
VICTOR COMPANY OF JAPAN, LIMITED
is a registered trademark owned by VICTOR COMPANY OF JAPAN, LTD.
is a registered trademark in Japan, the U.S.A., the U.K. and many other countries.
© 2003 VICTOR COMPANY OF JAPAN, LIMITED
®
®
LLT0033-001C-H
Printed in Thailand
LLT0033-001C-H
For Customer Use:
Enter below the Serial No. which is
located on the rear of cabinet. Retain
this information for future reference.
Model No.
BR-DV6000U
Serial No.
AC adapter section
IMPORTANT SAFETY INSTRUCTIONS
1)
Read these instructions.
2)
Keep these instructions.
3)
Heed all warnings.
4)
Follow all instructions.
5)
Do not use this apparatus near water.
6)
Clean only with dry cloth.
7)
Do not block any ventilation openings. Install in accordance with the manufacturer's instructions.
8)
Do not install near any heat sources such as radiators, heat registers, stoves, or other apparatus
(including amplifiers) that produce heat.
9)
Do not defeat the safety purpose of the polarized or grounding-type plug. A polarized plug has two
blades with one wider than the other. A grounding type plug has two blades and a third grounding
prong. The wide blade or the third prong are provided for your safety. If the provided plug does not fit
into your outlet, consult an electrician for replacement of the obsolete outlet.
10) Protect the power cord from being walked on or pinched particularly at plugs, convenience recepta-
cles, and the point where they exit from the apparatus.
11) Only use attachments/accessories specified by the manufacturer.
12) Use only with the cart, stand, tripod, bracket, or the table specified by
the manufacturer, or sold with the apparatus.
When a cart is used, use caution when moving the cart/apparatus com-
bination to avoid injury from tip-over.
13) Unplug this apparatus during lightning storms or when unused for long periods of time.
14) Refer all servicing to qualified service personnel. Servicing is required when the apparatus has
been damaged in any way, such as power-supply cord or plug is damaged, liquid has been spilled or
objects have fallen into the apparatus, the apparatus has been exposed to rain or moisture, does
not operate normally, or has been dropped.
WARNING - To reduce the risk of fire or electric shock, do not expose this apparatus to rain or moisture.
Apparatus shall not be exposed to dripping or splashing and no objects filled with liquids, such as vases,
shall be placed on the apparatus.
CAUTION These servicing instructions are for use by qualified service personnel only. To reduce the
risk of electric shock, do not perform any servicing other than that contained in the operat-
ing instructions unless you are qualified to do so.
S3125A
OTHERS
Supplement
105
2
1. Read all of these instructions.
2. Save these instructions for later use.
3. All warnings on the product and in the operating instructions should be adhered to.
4. Unplug this appliance system from the wall outlet before cleaning. Do not use liquid cleaners or
aerosol cleaners. Use a damp cloth for cleaning.
5. Do not use attachments not recommended by the appliance manufacturer as they may cause hazards.
6. Do not use this appliance near water for example, near a bathtub, washbowl, kitchen sink, or
laundry tub, in a wet basement, or near a swimming pool, etc.
7. Do not place this appliance on an unstable cart, stand, or table. The appliance
may fall, causing serious injury to a child or adult, and serious damage to the
appliance.
Use only with a cart or stand recommended by the manufacturer, or sold with the
appliance.
Wall or shelf mounting should follow the manufacturer's instructions, and should
use a mounting kit approved by the manufacturer.
An appliance and cart combination should be moved with care. Quick stops,
excessive force, and uneven surfaces may cause the appliance and cart
combination to overturn.
8. Slots and openings in the cabinet and the back or bottom are provided for
ventilation, and to insure reliable operation of the appliance and to protect it from overheating, these
openings must not be blocked or covered. The openings should never be blocked by placing the
appliance on a bed, sofa, rug, or other similar surface. This appliance should never be placed near or
over a radiator or heat register. This appliance should not be placed in a built-in installation such as a
bookcase unless proper ventilation is provided.
9. This appliance should be operated only from the type of power source indicated on the marking label.
If you are not sure of the type of power supplied to your home, consult your dealer or local power
company. For appliance designed to operate from battery power, refer to the operating instructions.
10. This appliance system is equipped with a 3-wire grounding type plug (a plug having a third (grounding)
pin). This plug will only fit into a grounding-type power outlet. This is a safety feature. If you are unable
to insert the plug into the outlet, contact your electrician to replace your obsolete outlet. Do not defeat
the safety purpose of the grounding plug.
11. For added protection for this product during a lightning storm, or when it is left unattended and
unused for long periods of time, unplug it from the wall outlet and disconnect the antenna or cable
system. This will prevent damage to the product due to lightning and power-line surges.
12. Do not allow anything to rest on the power cord. Do not locate this appliance where the cord will be
abused by persons walking on it.
13. Follow all warnings and instructions marked on the appliance.
14. Do not overload wall outlets and extension cords as this can result in fire or electric shock.
15. Never push objects of any kind into this appliance through cabinet slots as they may touch dangerous
voltage points or short out parts that could result in a fire or electric shock. Never spill liquid of any
kind on the appliance.
16. Do not attempt to service this appliance yourself as opening or removing covers may expose you to
dangerous voltage or other hazards. Refer all servicing to qualified service personnel.
17. Unplug this appliance from the wall outlet and refer servicing to qualified service personnel under the
following conditions:
a.
When the power cord or plug is damaged or frayed.
b.
If liquid has been spilled into the appliance.
c.
If the appliance has been exposed to rain or water.
d.
If the appliance does not operate normally by following the operating instructions. Adjust only
those controls that are covered by the operating instructions as improper adjustment of other controls
may result in damage and will often require extensive work by a qualified technician to restore the
appliance to normal operation.
e.
If the appliance has been dropped or the cabinet has been damaged.
f.
When the appliance exhibits a distinct change in performance this indicates a need for service.
18. When replacement parts are required, be sure the service technician has used replacement parts
specified by the manufacturer that have the same characteristics as the original part. Unauthorized
substitutions may result in fire, electric shock, or other hazards.
19. Upon completion of any service or repairs to this appliance, ask the service technician to perform
routine safety checks to determine that the appliance is in safe operating condition.
S3125A
3
CAUTION
RISK OF ELECTRIC SHOCK
DO NOT OPEN
CAUTION: TO REDUCE THE RISK OF ELECTRIC SHOCK,
DO NOT REMOVE COVER (OR BACK).
NO USER-SERVICEABLE PARTS INSIDE.
REFER SERVICING TO QUALIFIED SERVICE PERSONNEL
ATTENTION
RISQUE D'ELECTROCUTION
NE PAS OUVRIR
ATTENTION: POUR EVITER TOUT RISQUE D'ELECTROCUTION
NE PAS OUVRIR LE BOITER.
AUCUNE PIECE INTERIEURE N'EST
A REGLER PAR L'UTILISATEUR.
SE REFERER A UN AGENT QUALIFIE EN CAS DE PROBLEME.
Le symbole de l'éclair à l'intérieur d'un triangle
équilatéral est destiné à alerter l'utilisateur sur la
présence d'une "tension dangereuse" non isolée
dans le boîtier du produit. Cette tension est suffisante
pour provoquer l'électrocution de personnes.
Le point d'exclamation à l'intérieur d'un triangle
équilatéral est destiné à alerter l'utilisateur sur la
présence d'opérations d'entretien importantes au
sujet desquelles des renseignements se trouvent
dans le manuel d'instructions.
*Ces symboles ne sont utilisés qu'aux Etats-Unis.
The lightning flash with arrowhead symbol, within an
equilateral triangle, is intended to alert the user to the
presence of uninsulated "dangerous voltage" within
the product's enclosure that may be of sufficient
magnitude to constitute a risk of electric shock to
persons.
The exclamation point within an equilateral triangle is
intended to alert the user to the presence of important
operating and maintenance (servicing) instructions
in the literature accompanying the appliance.
INFORMATION
This equipment has been tested and found to comply
with the limits for a Class B digital device, pursuant to
Part 15 of the FCC Rules. These limits are designed to
provide reasonable protection against harmful
interference in a residential installation. This equipment
generates, uses, and can radiate radio frequency energy
and, if not installed and used in accordance with the
instructions, may cause harmful interference to radio
communications. However, there is no guarantee that
interference will not occur in a particular installation.
If this equipment does cause harmful interference to
radio or television reception, which can be determined
by turning the equipment off and on, the user is
encouraged to try to correct the interference by one or
more of the following measures:
Reorient or relocate the receiving antenna.
Increase the separation between the equipment and receiver.
Connect the equipment into an outlet on a circuit
different from that to which the receiver is connected.
Consult the dealer or an experienced radio/TV
technician for help.
CAUTION
CHANGES OR MODIFICATIONS NOT APPROVED
BY JVC COULD VOID USER'S AUTHORITY TO
OPERATE THE EQUIPMENT.
NOTE:
The rating plate (serial number plate) is on the rear of the unit.
WARNING:
TO REDUCE THE RISK OF FIRE OR
ELECTRIC SHOCK, DO NOT EXPOSE THIS
APPLIANCE TO RAIN OR MOISTURE.
THIS DEVICE COMPLIES WITH PART 15 OF THE
FCC RULES. OPERATION IS SUBJECT TO THE
FOLLOWING TWO CONDITIONS: (1) THIS DEVICE
MAY NOT CAUSE HARMFUL INTERFERENCE, AND
(2) THIS DEVICE MUST ACCEPT ANY INTERFER-
ENCE RECEIVED, INCLUDING INTERFERENCE
THAT MAY CAUSE UNDESIRED OPERATION.
This unit should be used with 120 V AC only.
CAUTION:
To prevent electric shocks and fire hazards, DO
NOT use any other power source.
AVERTISSEMENT:
POUR EVITER LES RISQUES
D'INCENDIE OU D'ELECTROCUTION, NE
PAS EXPOSER L'APPAREIL A
L'HUMIDITE OU A LA PLUIE.
Ce magnétoscope ne doit être utilisé que sur
du courant alternatif en 120 V.
ATTENTION:
Afin d'éviter tout resque d'incendie ou
d'électrocution, ne pas utiliser d'autres
sources d'alimentation électrique.
REMARQUE:
La plaque d'identification (numéro de série) se
trouve sur le panneau arrière de l'appareil.
Cet appareil numérique respecte les limites de
bruits radioélectriques applicables aux appareils
numériques de Classe B prescrites dans la norme
sur le matériel brouilleur: "Appareils Numériques",
NMB-003 édictée par le ministre des Communica-
tions.
This digital apparatus does not exceed the Class B
limits for radio noise emissions from digital
apparatus as set out in the interference-causing
equipment standard entitled "Digital Apparatus",
ICES-003 of the Department of Communications.
WARNING:
The battery used in the BR-DV6000U must be
replaced by a JVC authorized service dealer only.
SAFETY PRECAUTIONS
DV6000U_02-027_Eng.p65e
03/04/03, 3:04 PM
3
4
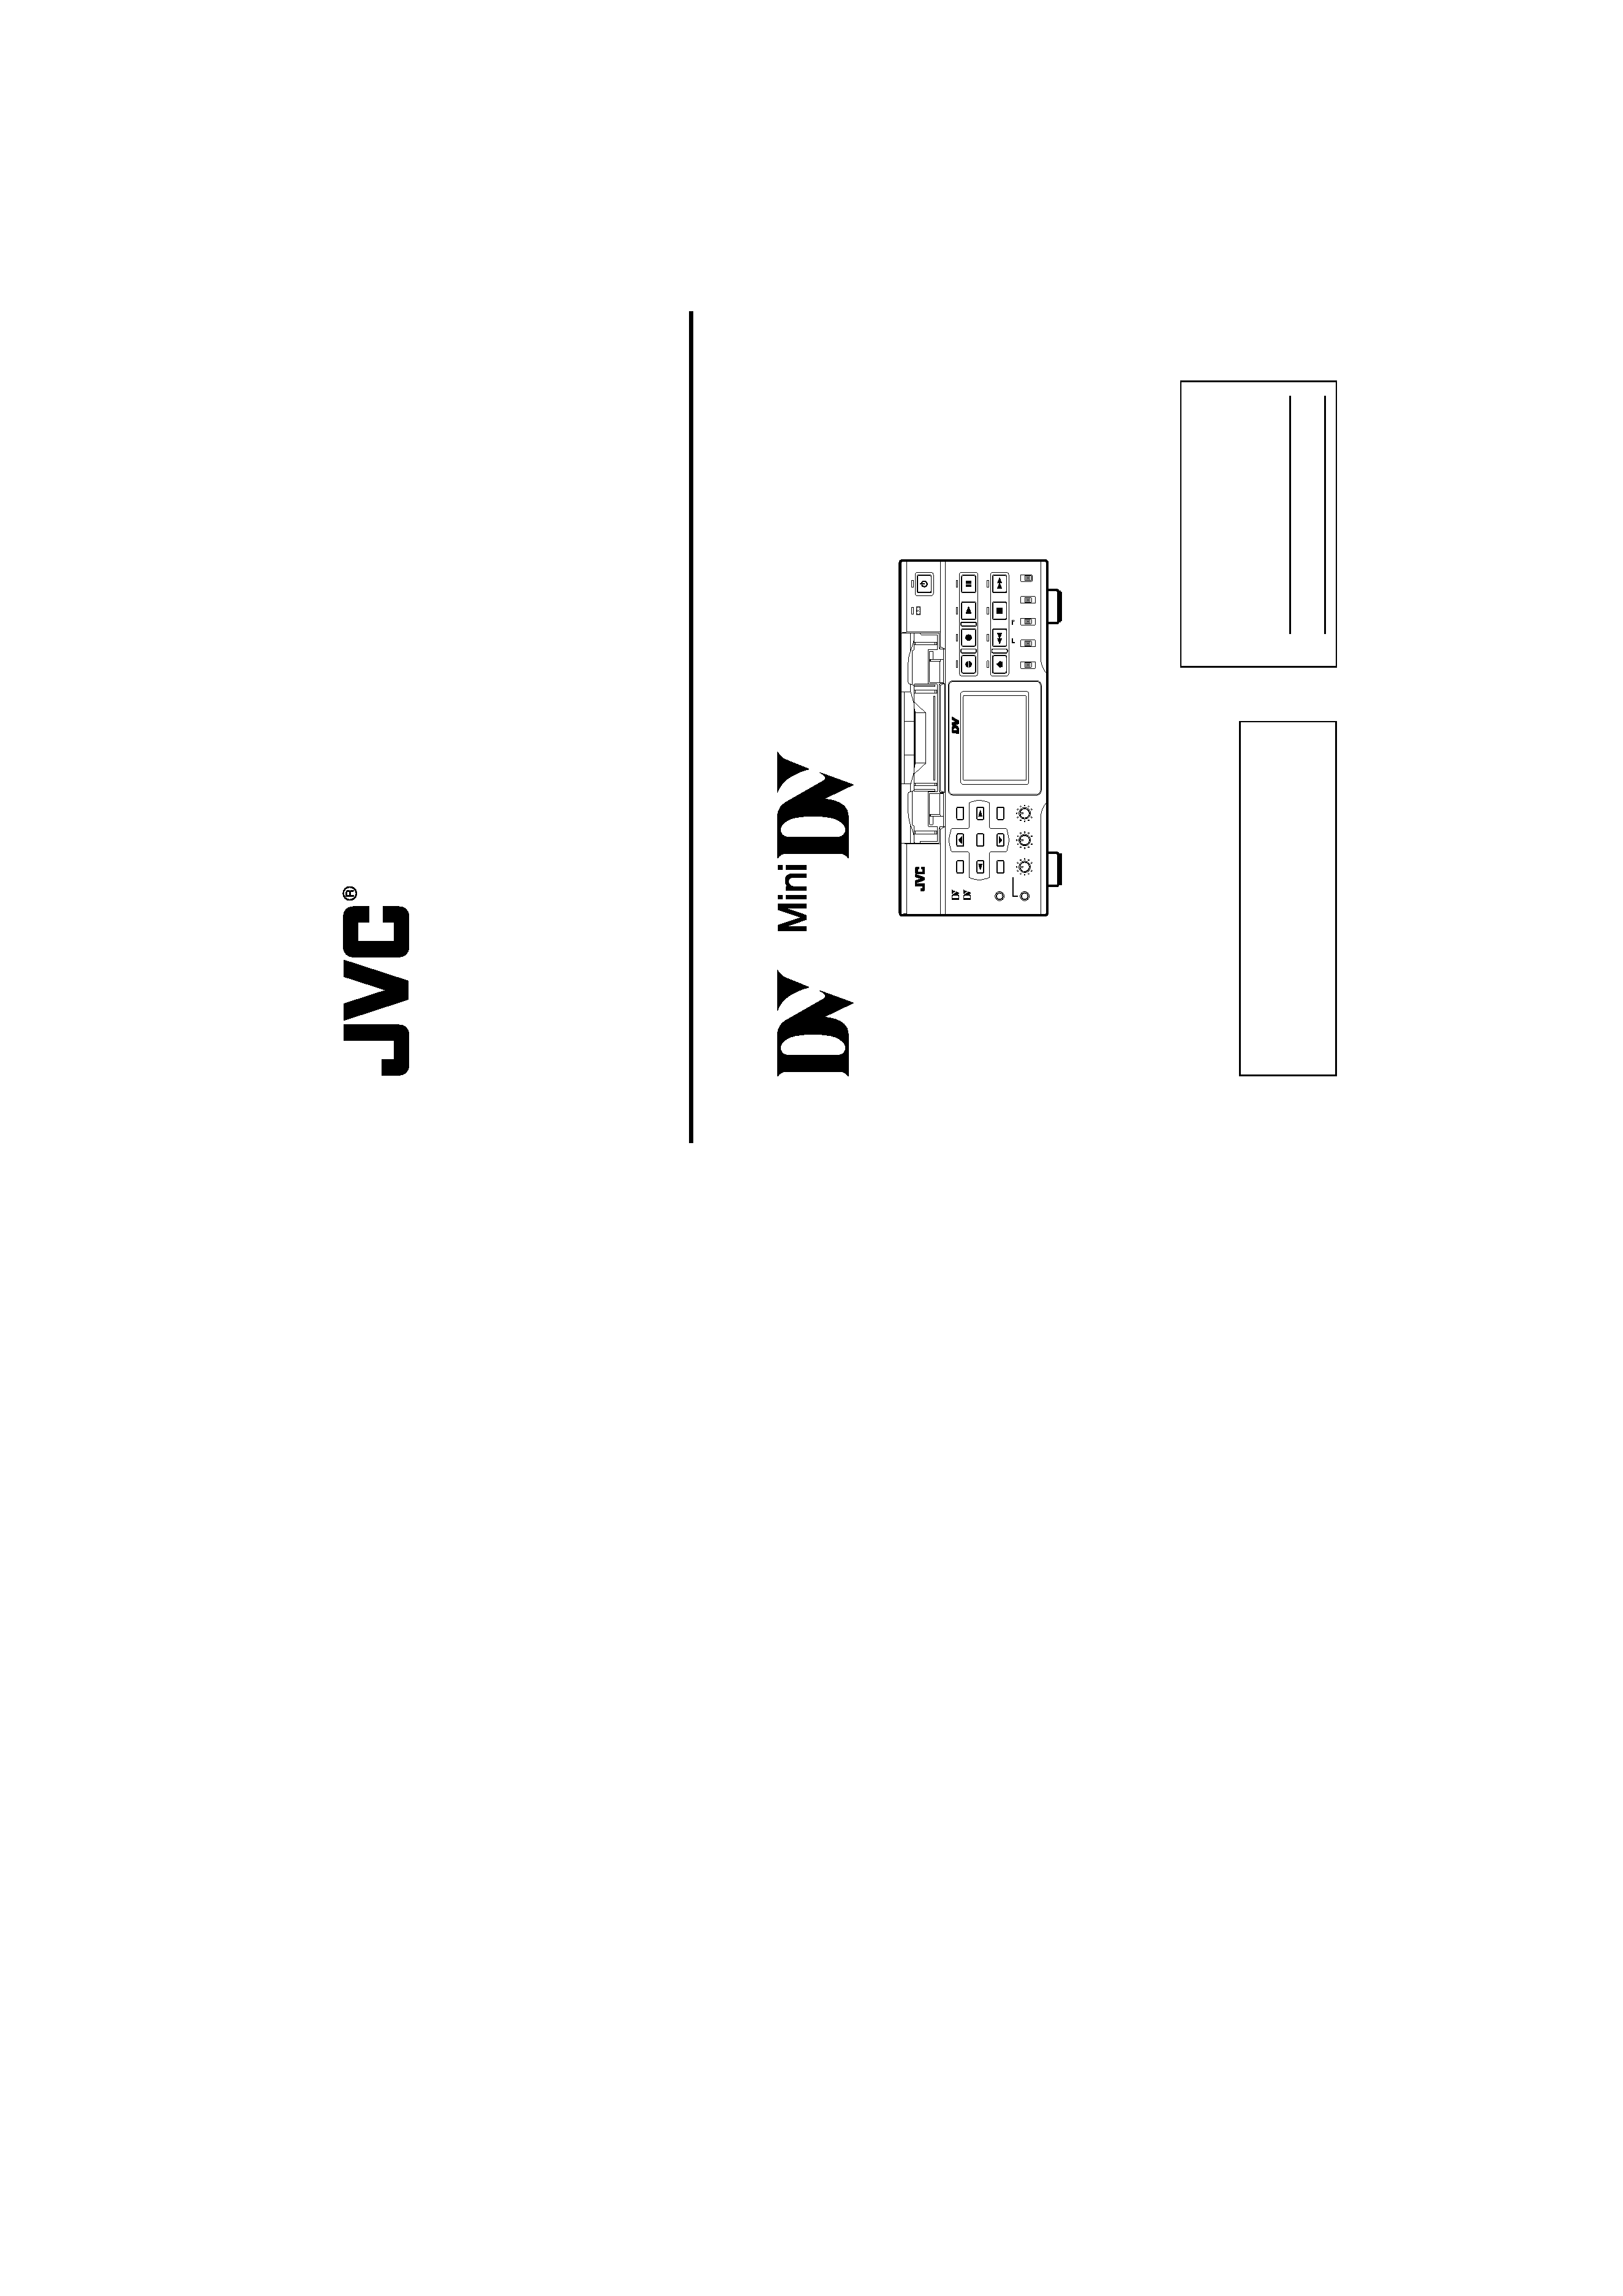
Thank you for purchasing our
DV Video Cassette Recorder
BR-DV6000.
DV format
High picture and sound quality by digital technology.
Compatible mechanisms for standard/mini DV cas-
sette tapes
It records on and plays back DV cassette tapes of the
standard and mini size. (SP mode only)
Recording in the DV format can be performed on
DVCAM cassette tapes.
Only PAL/NTSC DVCAM tapes are detected auto-
matically in playback mode.
Equipped with composite, component and Y/C in-
put & output terminals.
Equipped with DV IN/OUT terminals. (IEEE1394)
It can exchange digital signals with IEEE1394-compat-
ible devices.
Both NTSC and PAL signals supported
BR-DV6000 can playback or record PAL tapes through
the DV input. For PAL, please set the PB/DV IN menu
item to PAL.
For analog signal input, only NTSC is supported.
RS-422A and JVC bus interface supported
RS-422A-compatible edit controller RM-G820 and JVC
bus-compatible edit controller RM-G800/G805 can be
used for editing.
Optionally, the RS-232C interface can be used.
Recording and playback of time codes
Time code I/O terminal
Slave lock is allowed if BR-DV6000 is connected to an
external time code generator.
SYNC IN terminal
External synchronization signals can be input.
Audio-dubbing function (after-recording)
If the sampling frequency is 32 kHz, audio dubbing can
be performed into CH3 and CH4 (except during DV in-
put).
Backup recording function
With the combined use of other DV machines, long-time
continuous recording is possible.
Using the SERIAL REMOTE OUT terminal or DV ter-
minal, dubbing with other recorders is possible only
with playback operation by BR-DV6000. (Replication
function)
Equipped with a 2.5-inch color LCD
Images, status display and menu display can be viewed.
Multi-cue up
Up to 5 points of the tape position can be registered
and cued up.
Index/blank search function
It can search for positions where index signals are re-
corded and unrecorded parts.
Repeat play function
There are 3 types of repeat function.
(INDEX/ VIDEO END/ TAPE END)
Recording/playback with an external timer
With the use of the network board SA-DV6000 (sold
separately), image and audio streaming data can be
recorded on a CF card, and with a LAN card, stream-
ing data can be transmitted to a PC.
With the XLR IN board SA-X61U or XLR OUT board
SA-X62U (sold separately), audio input/output via
the XLR terminal is possible.
As this is a DV-format video cassette recorder,
video cassettes with the
or
logo can
be used with it.
DVCAM cassettes can be recorded in the DV
format.
In order to prevent crumpling due to tape
slack, do not perform important recording
within the first and last 2 3 minute-run of
the tape.
Recorded video (sound) is meant for per-
sonal entertainment only and must not be
used for other purposes without the prior
consent of the copyright owner.
JVC shall not guarantee the quality of re-
cording and playback should BR-DV6000 fail
to function normally due to defects, either
of the unit itself or the video cassette tapes.
MAIN FEATURES
DV6000U_02-027_Eng.p65e
03/04/03, 3:04 PM
4

5
INTRODUCTION
Remarks of usage ......................................... 6
Regular maintenance .................................... 7
Cleaning tape ................................................ 8
Cassette tape ................................................ 8
Condensation ................................................ 9
NAMES AND FUNCTIONS OF PARTS
Front panel .................................................. 10
Rear panel ................................................... 16
ON-SCREEN DISPLAY
On-screen display ....................................... 20
Status display .............................................. 21
Status/Event display .................................... 23
Alarm display ............................................... 24
LCD display ................................................. 26
CONNECTION
Connecting video signals ............................ 28
Connecting audio signals ............................ 30
Connecting to editing system ...................... 32
Connecting with serial remote terminals ..... 34
Connecting the AC adapter ......................... 35
PREPARATION
Turning on/off the power .............................. 36
Operation method (main unit/remote
controller) and operation lock mode ............ 37
Loading/Ejecting cassette ........................... 38
Setting the LCD display ............................... 39
Setting/Displaying date and time ................. 40
RECORDING
Setting ......................................................... 42
Recording procedure ................................... 43
Audio dubbing ............................................. 44
Backup recording function ........................... 45
Recording with serial remote terminals ....... 46
External timer recording .............................. 47
PLAYBACK
Setting ......................................................... 48
Basic playback procedure ........................... 49
Special playback functions .......................... 50
Search function ........................................... 52
Repeat playback .......................................... 53
Multi cue-up ................................................. 54
External timer playback ............................... 56
Dubbing with another machine using the
SERIAL REMOTE OUT/DV terminals ......... 57
TIME CODE
Displaying the time code ............................. 58
Presetting the time code ............................. 59
Recording the time code ............................. 60
Playing back the time code ......................... 63
EDIT
Editing with an RS-422A/JVC bus edit
remote controller ......................................... 64
Using a non-linear editing system ............... 68
MENU SCREENS
Structure of the Menu screens .................... 69
Setting the menus ....................................... 70
Description of the Menu screens ................. 72
RS-232C INTERFACE
Command tables ......................................... 84
RS-232C specifications ............................... 85
RS-232C commands ................................... 86
OTHERS
Warning display ........................................... 97
Troubleshooting ........................................... 99
Checking the hour meter ........................... 100
Optional devices ........................................ 101
Installing SA-K46U RS-232C interface
board ......................................................... 102
Specifications ............................................ 103
Supplement ............................................... 105
Table of Contents
DV6000U_02-027_Eng.p65e
03/04/03, 3:04 PM
5