For Customer Use:
Enter below the Model No. and Serial
No. which are located either on the rear,
bottom or side of the cabinet. Retain this
information for future reference.
Model No.
Serial No.
LVT0236-001A
[E]
AX-V55BK
AV INTEGRATED AMPLIFIER
AV-INTEGRIERTER VERSTÄRKER
AMPLIFICATEUR INTEGRE AV
GEINTEGREERDE A/V- VERSTERKER
AMPLIFICADOR INTEGRADO DE AV
AMPLIFICATORE INTEGRATO A/V
INSTRUCTIONS
BEDIENUNGSANLEITUNG
MANUEL D'INSTRUCTIONS
GEBRUIKSAANWIJZING
MANUAL DE INSTRUCCIONES
ISTRUZIONI
TV
/VIDEO
CH
+
CH
45
6
12
3
TV
VCR
AUDIO
TEST
DELAY
PRESET SEA MODE
SURR MODE
CD
7/P
8
9
10
+10
TAPE
TUNER
SEA
ON/OFF
SURROUND
ON/OFF
VCR
TV
TV CONTROL
RM-SAV5RU REMOTE CONTROL
+
VIDEO
ONE TOUCH
OPERATION
VOLUME
+
CENTER
+
REAR
CD-DISC
AUDIO
CONTROL
/I
VOLUME
PHONO
+
MUTE
PTY SEARCH DISPLAY
PTY SELECT
+
AX-V55
AV INTEGRATED AMPLIFIER
STANDBY
STANDBY/ON
POWER
PHONES
SPEAKERS
MASTER VOLUME
+
PRESET SEA
SOURCE
SURROUND
ADJUST
ONE TOUCH OPERATION
SETTING
12
_ON --OFF
_ON --OFF
ENHANCED COMPULINK CONTROL SYSTEM
Cover.AX-V55BK[E]
99.2.9, 11:17 AM
1

English
Page 1
Table of Contents
Switches, Buttons and Controls ................................................................................................ 2
Getting Started ........................................................................................................................... 3
Before Installation .................................................................................................................... 3
Checking the Supplied Accessories ......................................................................................... 3
Connecting the Speakers .......................................................................................................... 4
Connecting Audio/Video Components .................................................................................... 6
Connecting Audio Components for the COMPU LINK-3 Remote Control System ............... 7
Connecting the Power Cord ..................................................................................................... 8
Putting Batteries in the Remote Control .................................................................................. 8
Basic Operations ........................................................................................................................ 9
Turning the Power On and Off (Standby) ................................................................................ 9
Selecting the Source to Play ..................................................................................................... 9
Selecting the Front Speakers .................................................................................................. 10
Adjusting the Volume ............................................................................................................10
Muting the Sound ................................................................................................................... 10
Recording a Source ................................................................................................................ 11
Listening with Headphones .................................................................................................... 11
Basic Settings ........................................................................................................................... 12
Adjusting the Front Speaker Output Balance ........................................................................ 12
Listening at Low Volume (Loudness) ................................................................................... 12
Using the Sleep Timer ............................................................................................................ 12
Selecting the Center Speaker Size ......................................................................................... 13
One Touch Operation .............................................................................................................. 14
About the One Touch Operation ............................................................................................ 14
Using the One Touch Operation ............................................................................................ 14
Using the Preset SEA Modes .................................................................................................. 15
Selecting Your Favorite SEA Mode ...................................................................................... 15
Using the Surround Processor ................................................................................................ 17
Using JVC's Hall Surround ................................................................................................... 17
Speaker Arrangements for Dolby Surround ........................................................................... 19
Preparing for Dolby Surround ................................................................................................ 20
Using Dolby Surround ........................................................................................................... 23
COMPU LINK Remote Control System ............................................................................... 24
Using the Remote Control ....................................................................................................... 25
Troubleshooting ....................................................................................................................... 27
Specifications ............................................................................................................................ 28
AX-V55BK[E].En
99.2.9, 10:55 AM
1
English
Page 2
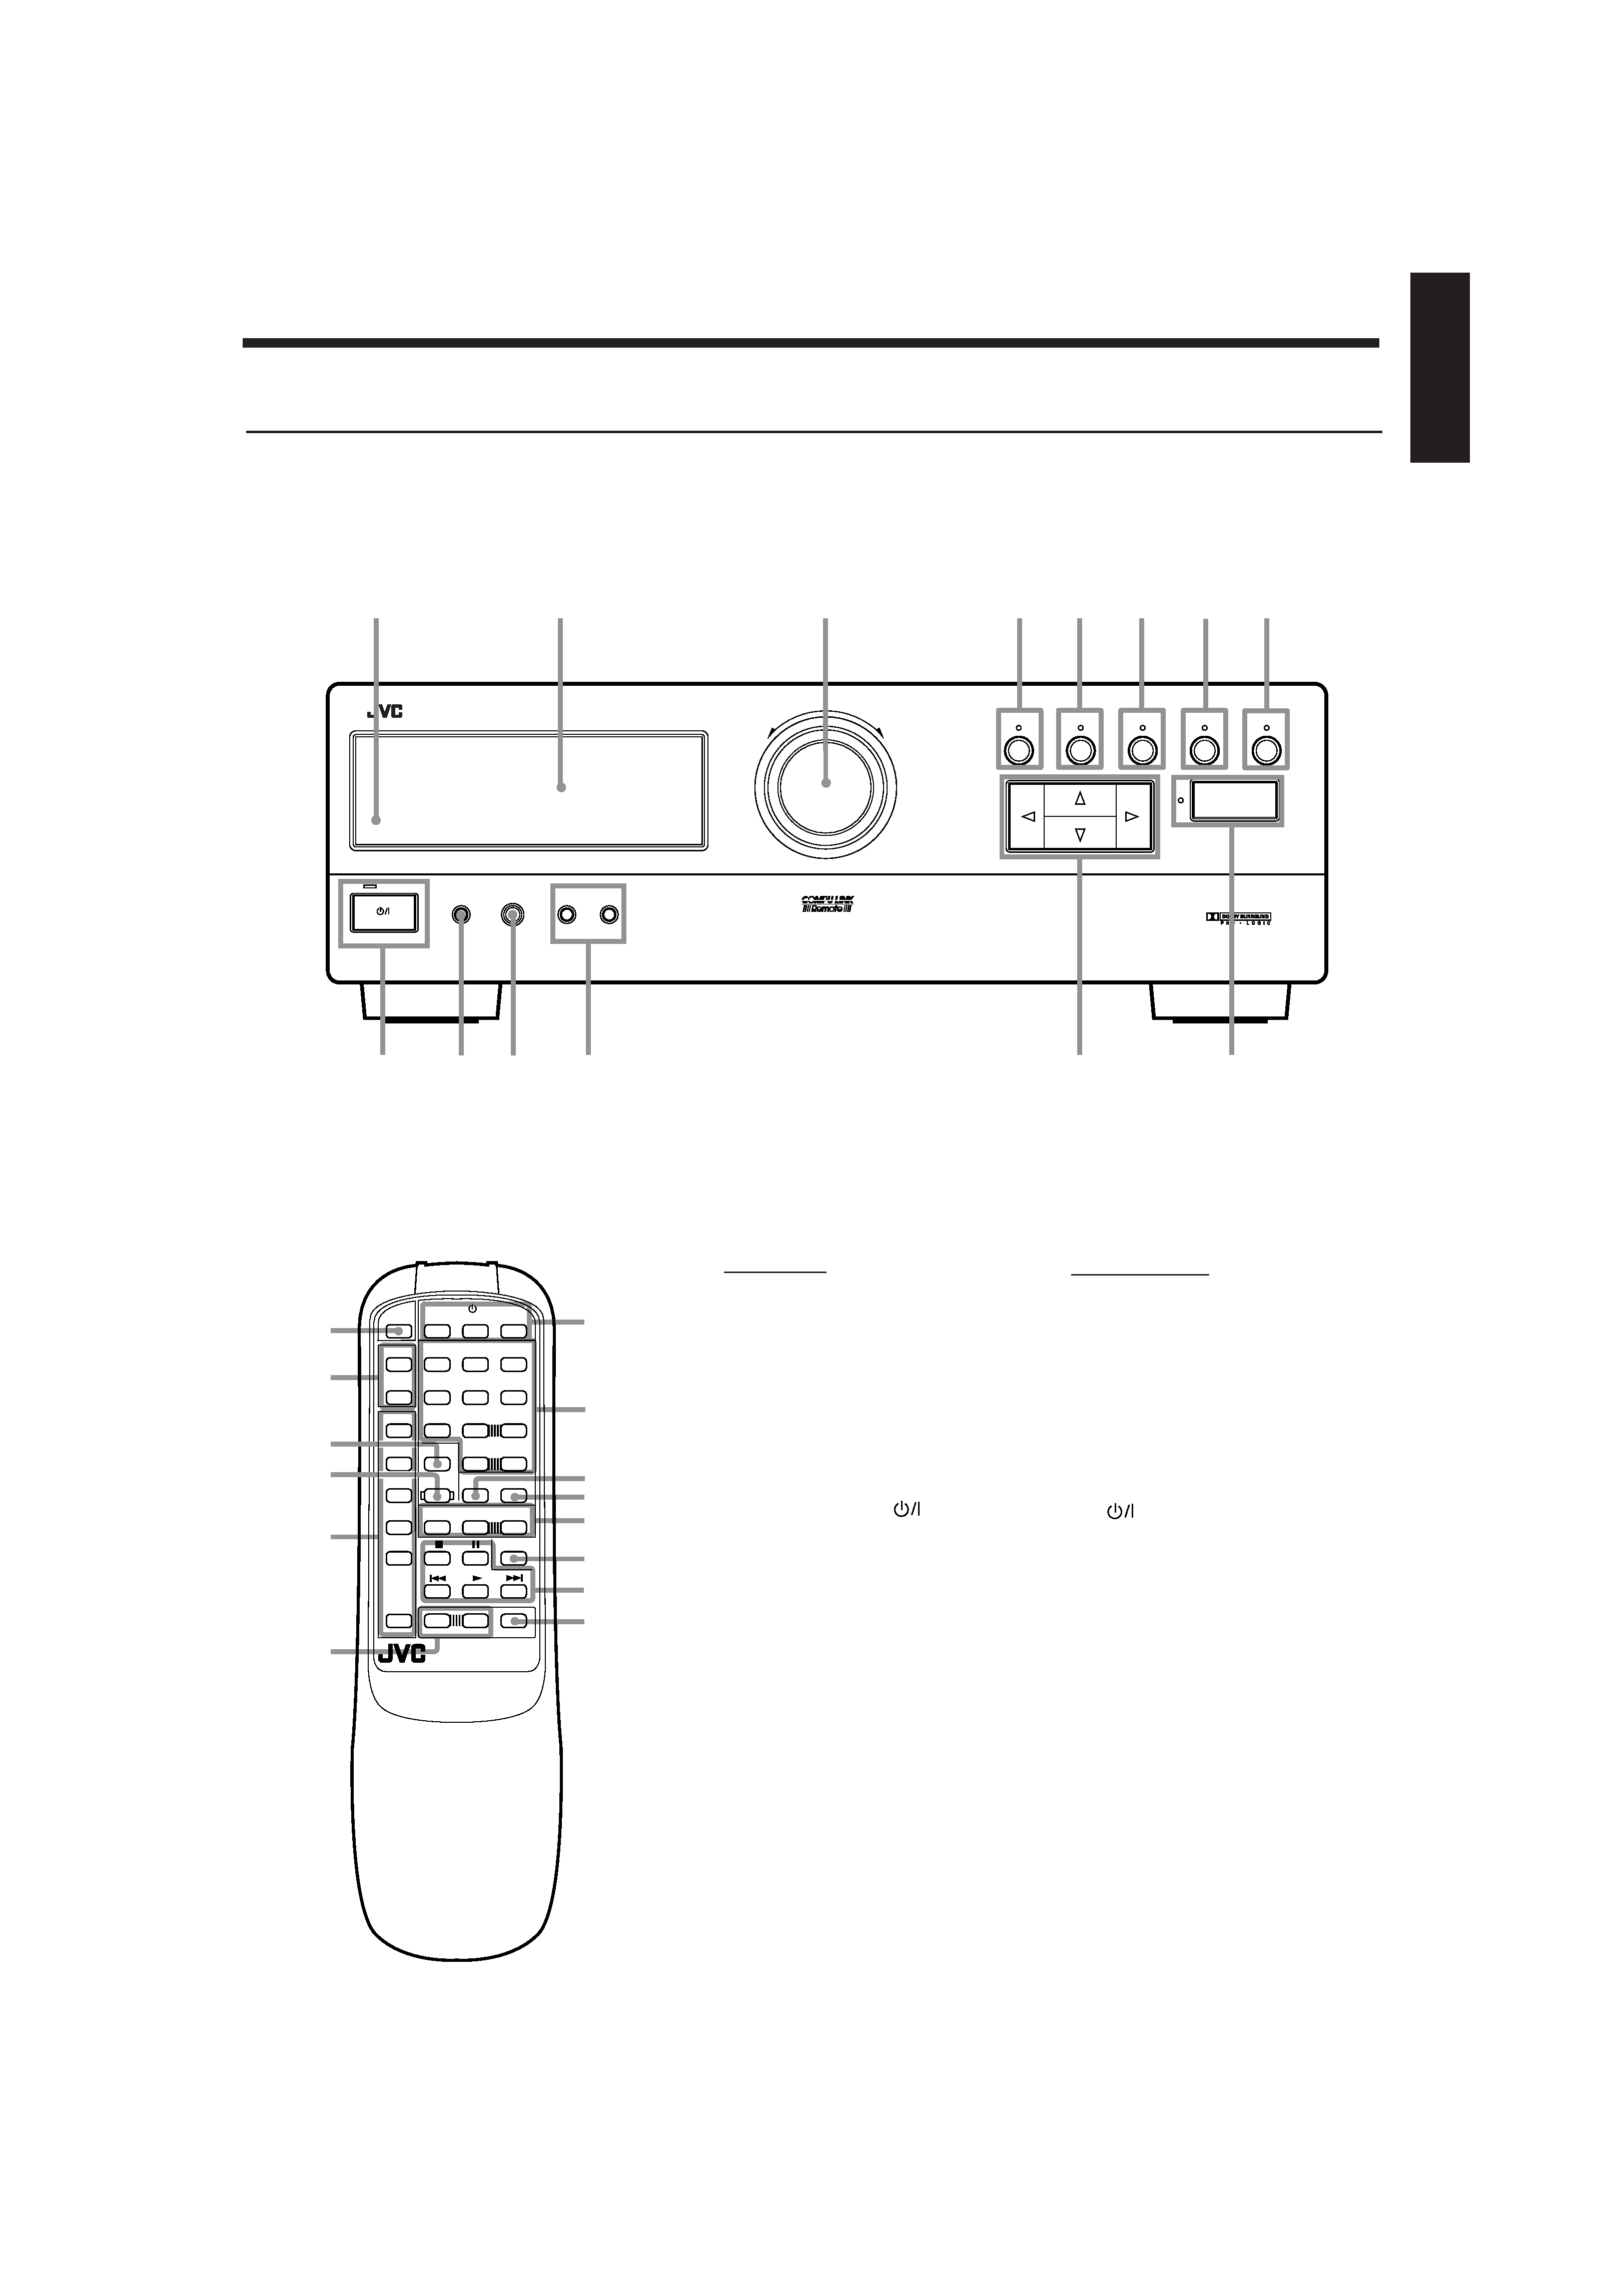
Switches, Buttons and Controls
Become familiar with the buttons and controls on the amplifier before use.
Front Panel
1 Remote sensor
2 Display (9)
3 MASTER VOLUME control (10)
4 PRESET SEA button and lamp (15)
5 SOURCE button and lamp (9)
6 SURROUND button and lamp
(17, 20, 23)
7 ADJUST button and lamp (18, 20)
8 SETTING button and lamp (12)
9 STANDBY/ON
button and
STANDBY lamp (9)
p POWER switch (8)
q PHONES jack (11)
w SPEAKERS 1/2 buttons (10)
e Control
% / fi / @ / # buttons
r ONE TOUCH OPERATION button
and lamp (14)
Remote Control
t TV/VIDEO button (26)
y CH (+/) buttons (26)
u CD-DISC button (25)
i AUDIO CONTROL button
(16, 18, 22, 23)
o Source buttons (CD, TAPE,
TUNER, VCR, VIDEO,
PHONO) (9, 25, 26)
; VOLUME (+/) buttons (10)
a
(Standby/On) buttons (TV,
VCR, AUDIO) (9, 26)
s 10 keys/Audio control buttons
(16, 18, 22, 23, 25)
d SEA ON/OFF button (16)
f SURROUND ON/OFF button
(18, 22, 23)
g TV CONTROL buttons (TV,
VOLUME (+/)) (26)
h ONE TOUCH OPERATION
button (14)
j Operating buttons for JVC audio/
video components (25, 26)
k MUTE button (10)
Refer to the pages in parentheses for details.
TV
/VIDEO
CH
+
CH
45
6
12
3
TV
VCR
AUDIO
TEST
DELAY
PRESET SEA MODE
SURR MODE
CD
7/P
8
9
10
+10
TAPE
TUNER
SEA
ON/OFF
SURROUND
ON/OFF
VCR
TV
TV CONTROL
RM-SAV5RU REMOTE CONTROL
+
VIDEO
ONE TOUCH
OPERATION
VOLUME
+
CENTER
+
REAR
CD-DISC
AUDIO
CONTROL
/I
VOLUME
PHONO
+
MUTE
PTY SEARCH DISPLAY
PTY SELECT
+
2
1
3
4
56
7
8
AX-V55
AV INTEGRATED AMPLIFIER
STANDBY
STANDBY/ON
POWER
PHONES
SPEAKERS
MASTER VOLUME
+
PRESET SEA
SOURCE
SURROUND
ADJUST
ONE TOUCH OPERATION
SETTING
12
_ON --OFF
_ON --OFF
ENHANCED COMPULINK CONTROL SYSTEM
9p
e
r
k
j
h
g
f
d
s
a
o
i
u
y
t
;
w
q
AX-V55BK[E].En
99.2.9, 10:55 AM
2

English
Page 3
Getting Started
This section explains how to connect stereo components and speakers to the amplifier, and how to connect
the power supply.
Before Installation
General
· Be sure your hands are dry.
· Turn the power off to all components.
· Read the manuals supplied with the components you are going to connect.
Locations
· Install the amplifier in a location that is level and protected from moisture.
· The temperature around the amplifier must be between 5° and 35° C (23° and 95° F).
· Make sure there is good ventilation around the amplifier. Poor ventilation could cause overheating and
damage the amplifier.
Handling the amplifier
· Do not insert any metal object into the amplifier.
· Do not disassemble the amplifier or remove screws, covers, or cabinet.
· Do not expose the amplifier to rain or moisture.
Checking the Supplied Accessories
Check to be sure you have all of the following items, which are supplied with the amplifier.
The number in the parentheses indicates quantity of the pieces supplied.
· Remote Control (1)
· Batteries (2)
If anything is missing, contact your dealer immediately.
AX-V55BK[E].En
99.2.9, 10:55 AM
3
English
Page 4
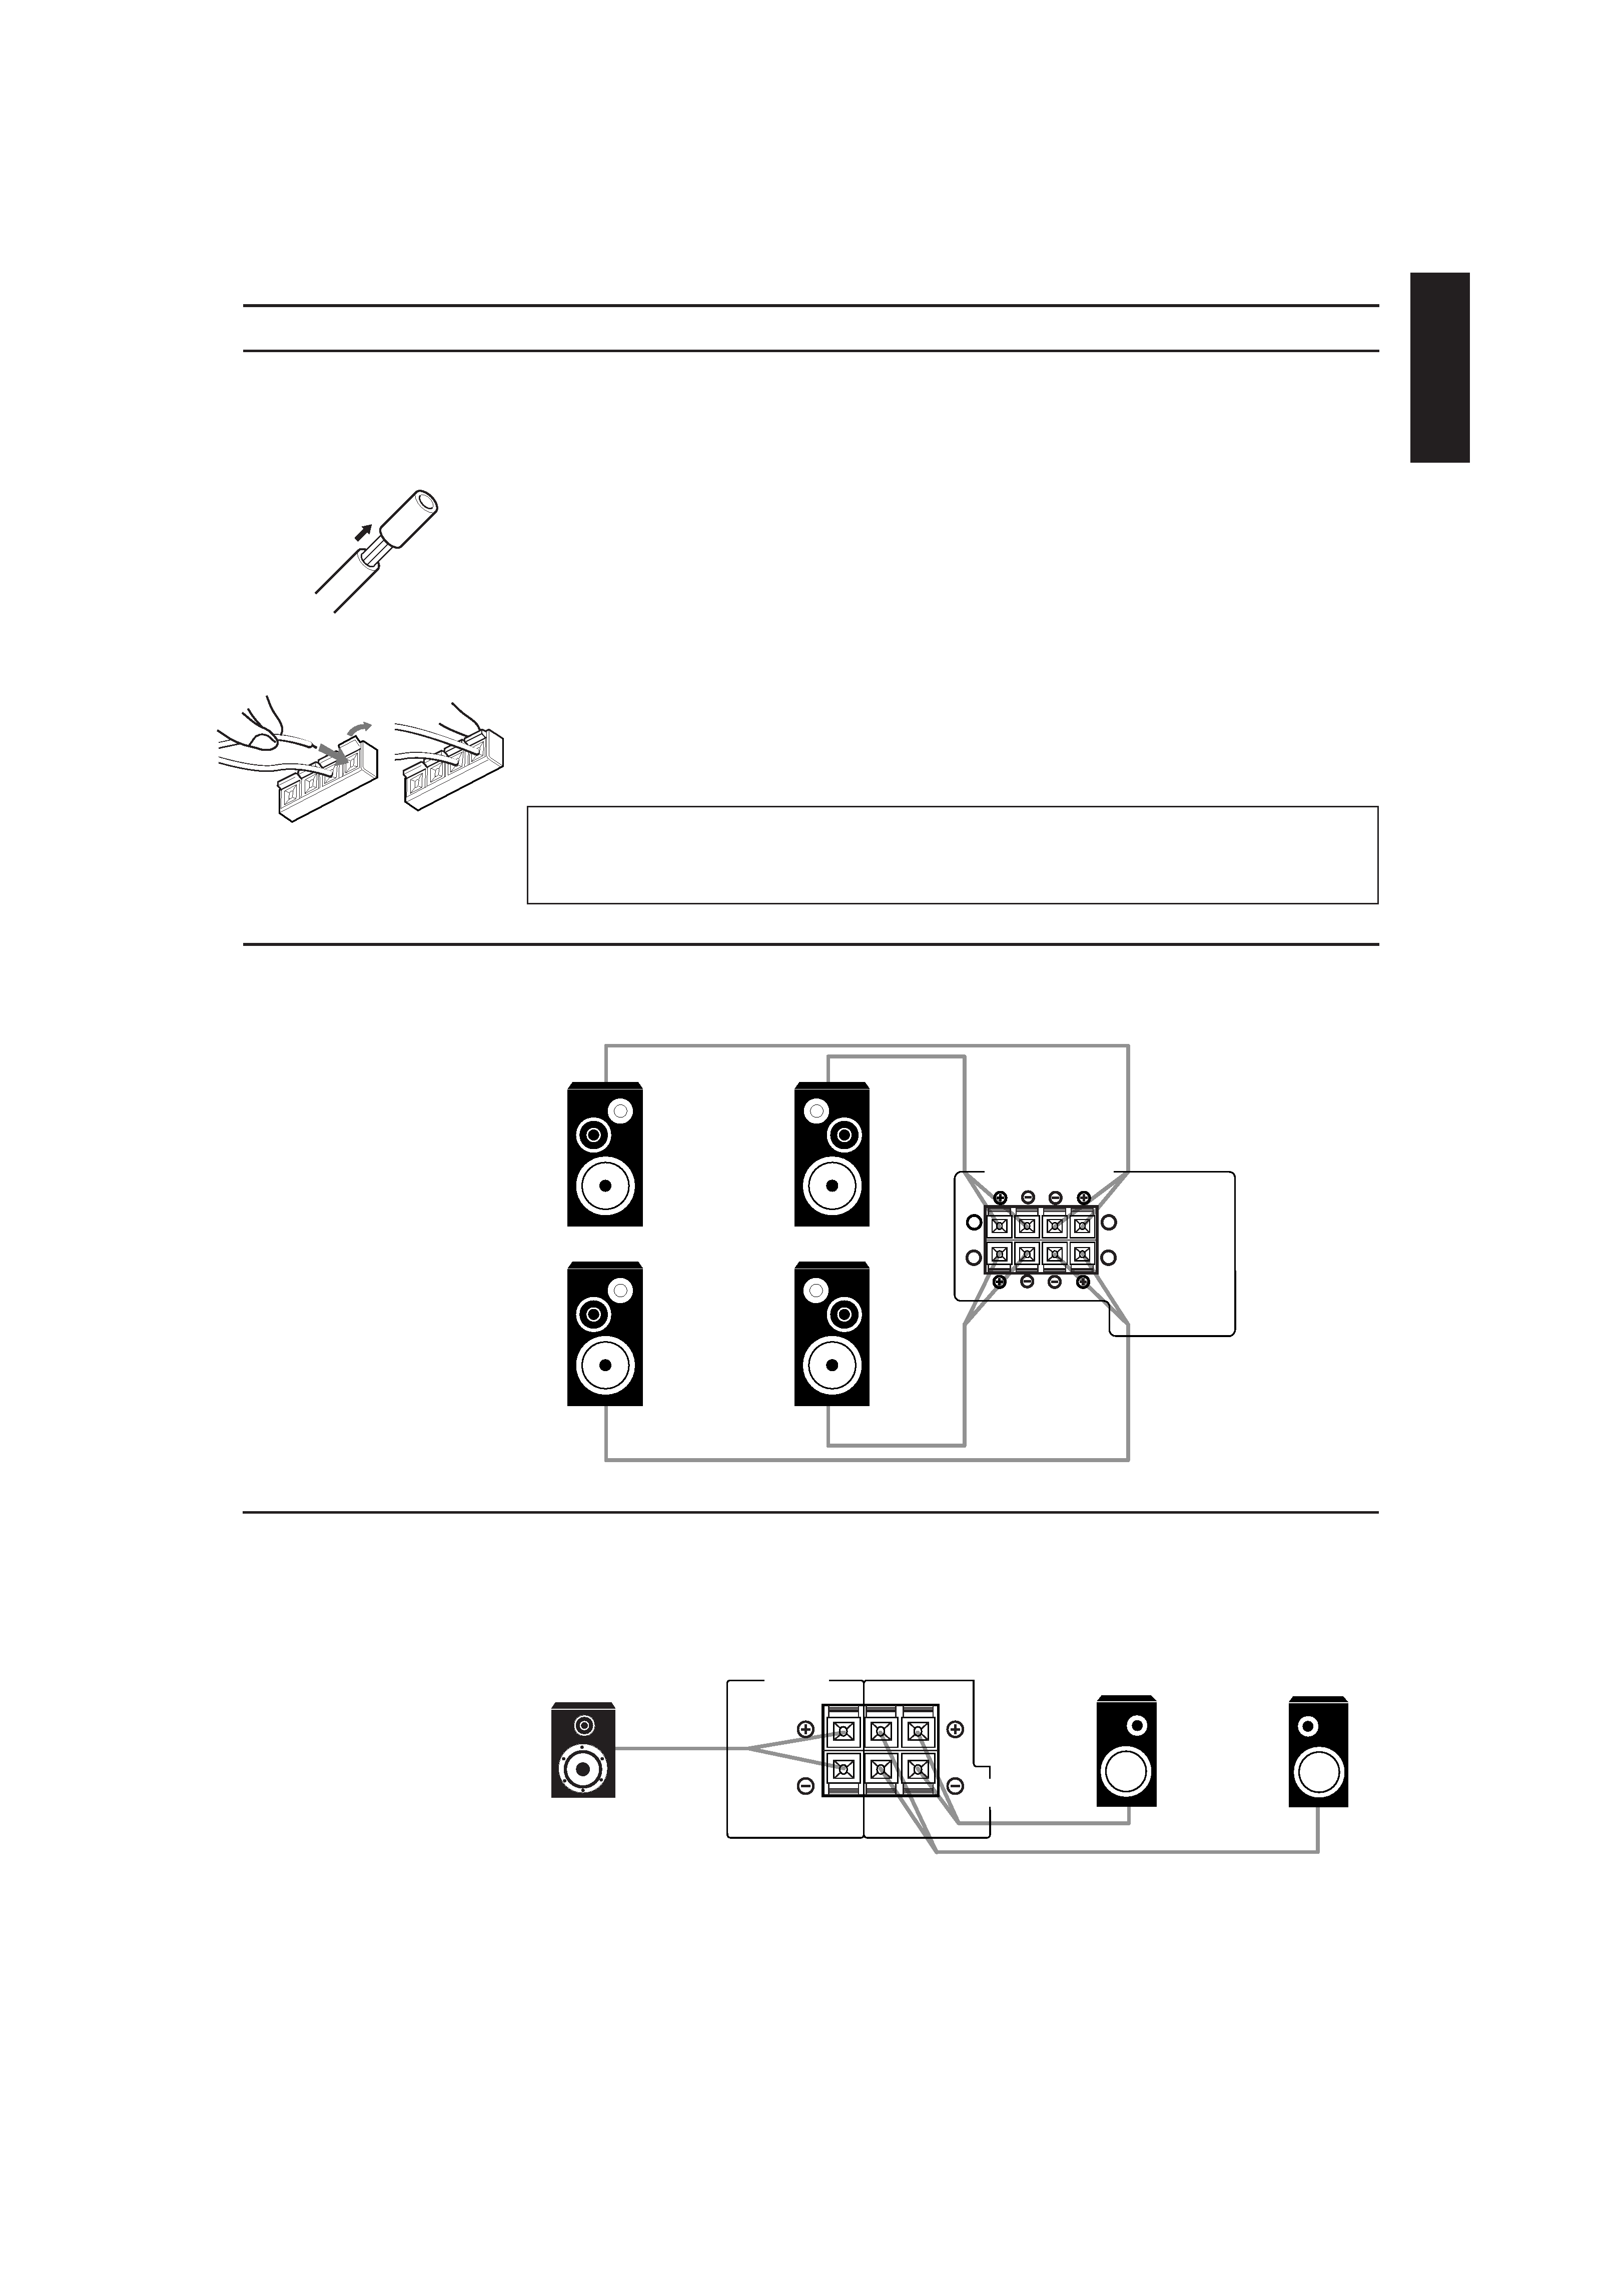
Connecting the rear and center speakers
Connect rear speakers to the REAR SPEAKERS terminals and a center speaker to the CENTER SPEAKER
terminals.
Note:
When you connect rear speakers, make sure that both left and right speakers are connected; otherwise, no
sound will come out of the rear speakers.
FRONT SPEAKERS
1
2
1
2
RIGHT
LEFT
RIGHT
LEFT
CENTER
SPEAKER
REAR
SPEAKERS
Left Speaker
Right Speaker
Left Rear
Speaker
Right Rear
Speaker
Center Speaker
SPEAKERS 1
SPEAKERS 2
Connecting the Speakers
You can connect the following speakers:
· Two sets of front speakers to produce normal stereo sound
· One set of rear speakers to enjoy the surround effect
· One center speaker to produce more effective surround effect (to make human voices outstanding)
· One subwoofer to enhance the bass
For each speaker (except for subwoofer), connect one end of the speaker signal cable (not supplied) to the
speaker terminal on the rear panel and the other end to the speaker. (For connecting a subwoofer, see page 6).
1. Open each terminal.
2. Insert the end of the speaker signal cable as shown (be sure to remove the insulation at the end
of each wire first).
3. Close the terminals to clamp the speaker signal cables firmly in place.
4. Connect the black () and red (+) terminals on the rear panel to the black () and red (+)
terminals marked on the speakers.
CAUTION:
When connecting speakers, use speakers with the same SPEAKER IMPEDANCE indicated by
the speaker terminals.
Connecting the front speakers
Connect the front speakers to the FRONT SPEAKERS terminals.
AX-V55BK[E].En
99.2.9, 10:55 AM
4