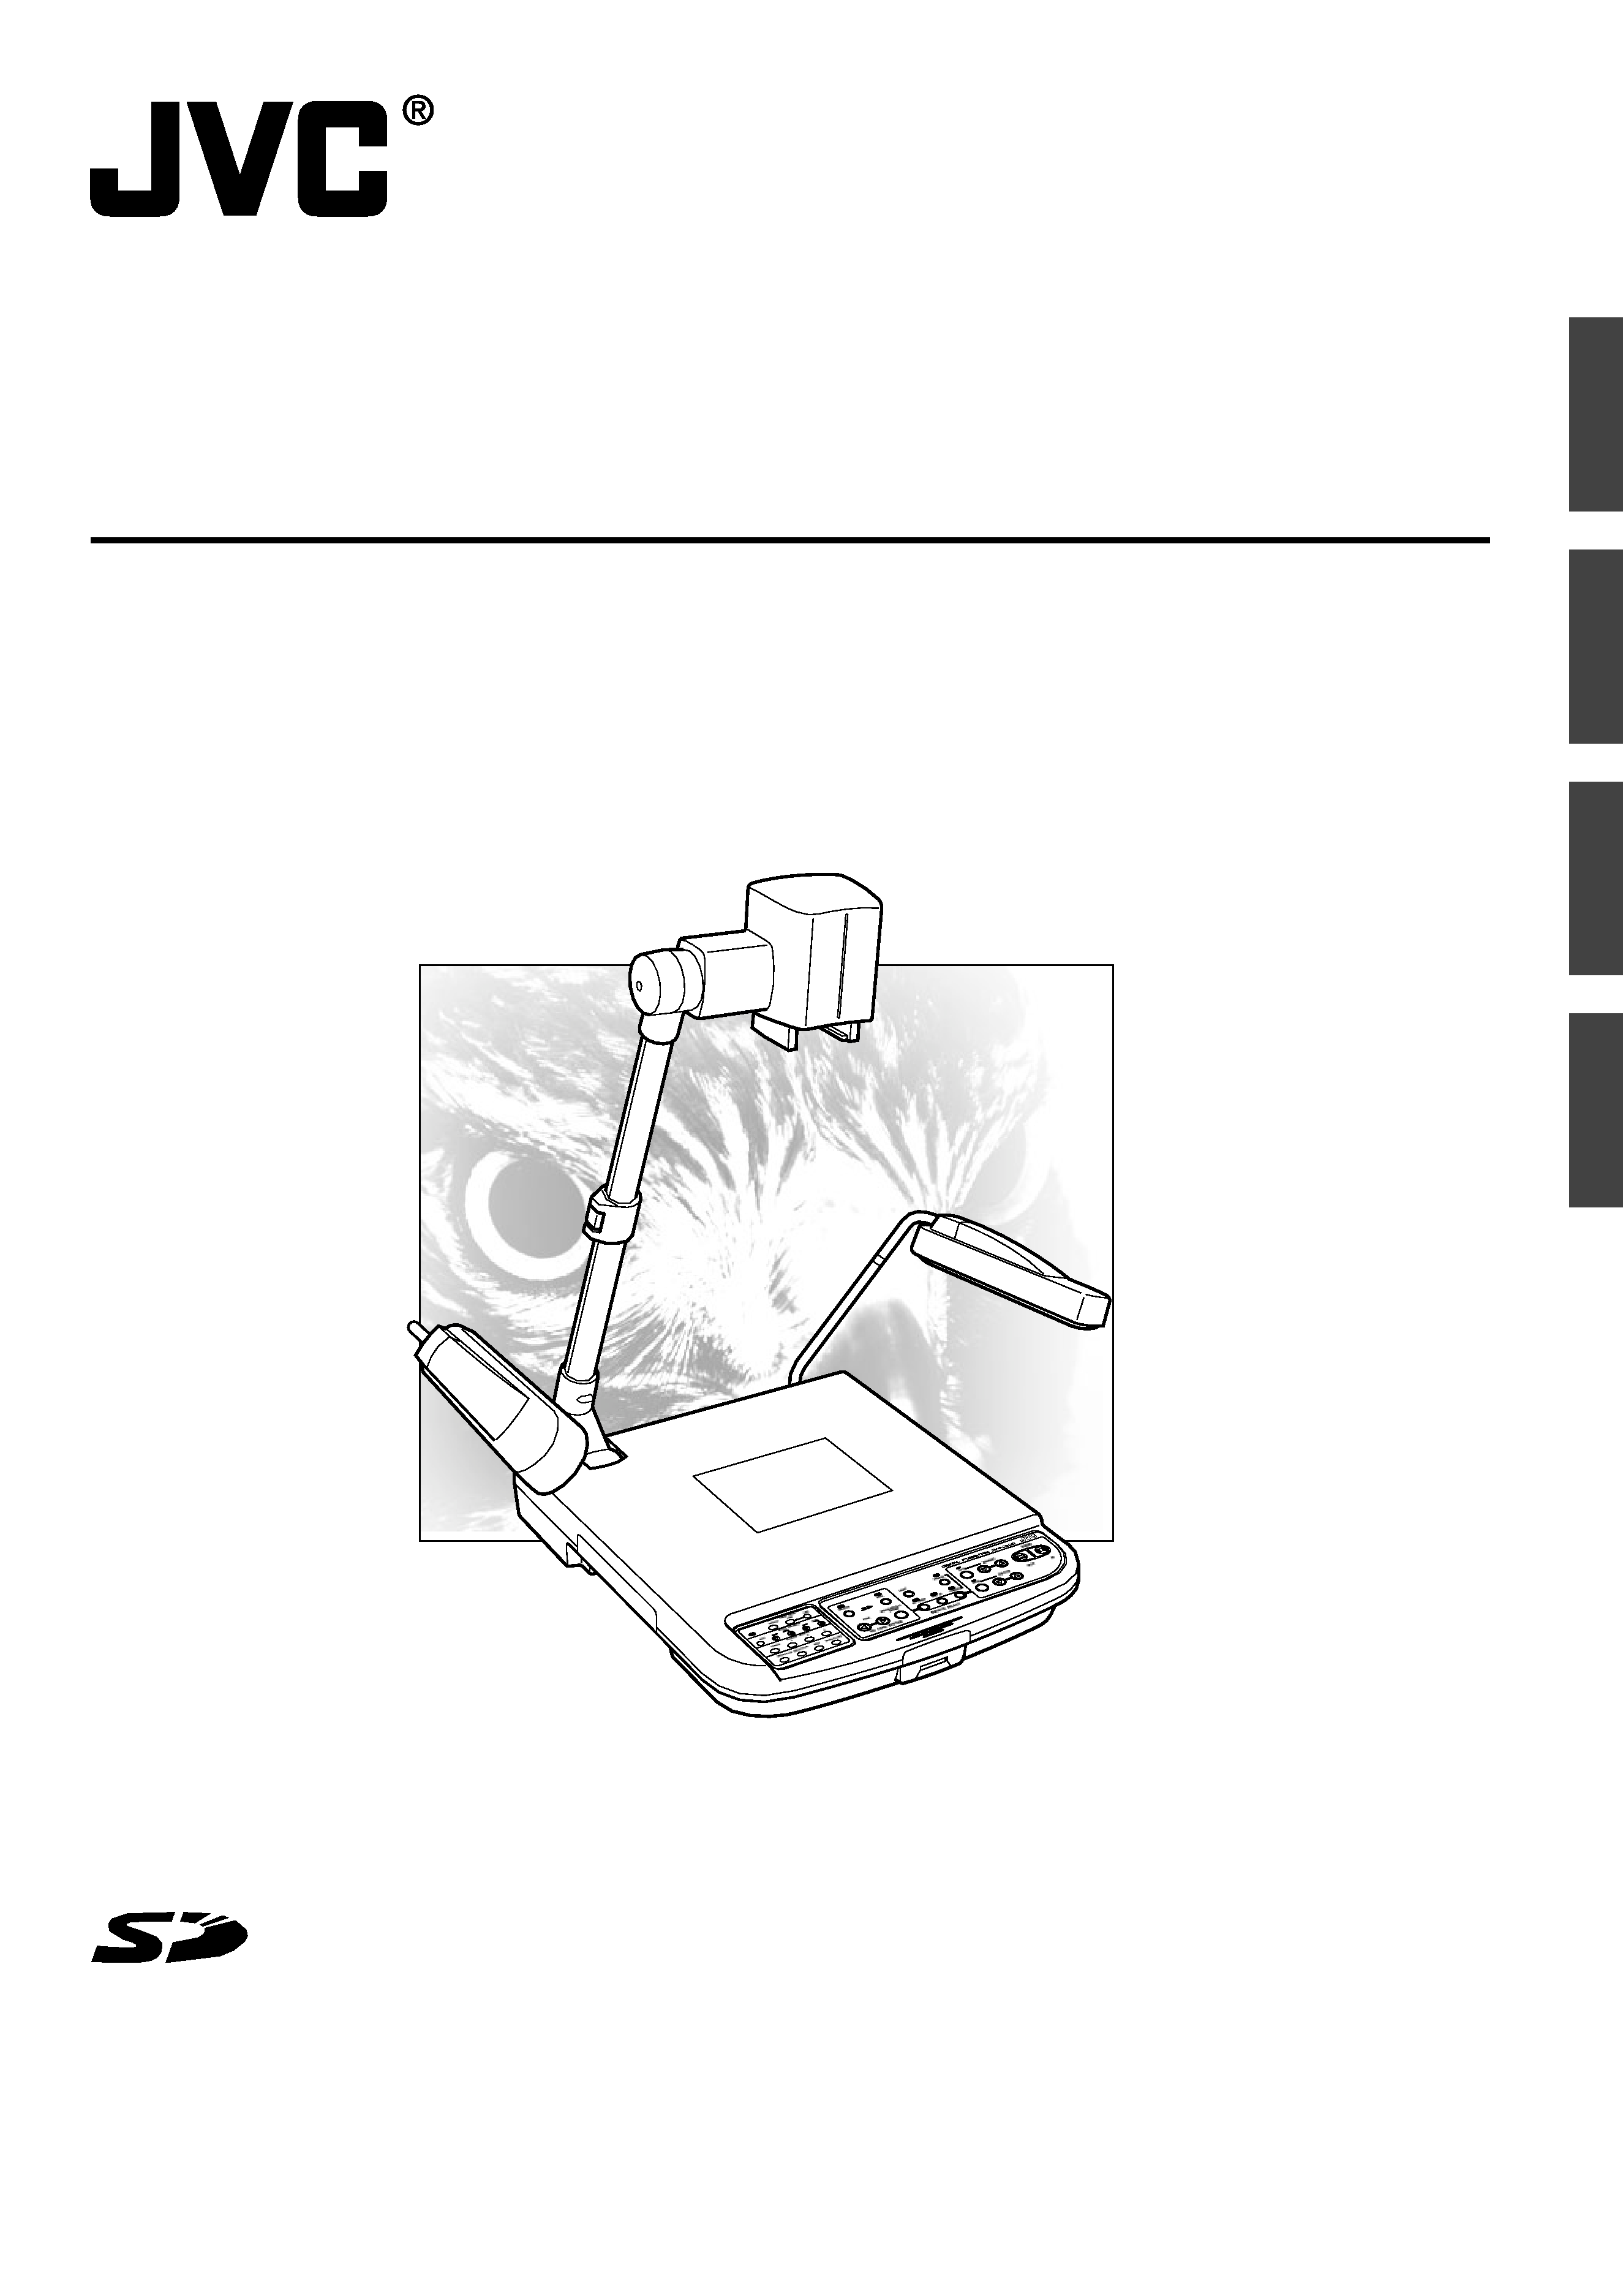
AV-P960E
LWT0149-001A-H
DIGITAL PRESENTER
MANUEL D'INSTRUCTIONS
BEDIENUNGSANLEITUNG
MANUALE DI ISTRUZIONI
: PRESENTOIR NUMERIQUE
: DIGITALEN VORFÜHRERS
: DIGITAL PRESENTER
INSTRUCTIONS
Français
Italiano
English
Deutsch
E-2
Safety Precautions
Smooth, High Resolution Images
XGA output with high frame rate of 20 fps enabling
smooth high resolution image display.
High Definition and High Power Zoom
Built-in 12x Optical Zoom Lens and 4x Digital Zoom.
Small, Lightweight and Slim Design
Depth of less than 50 cm and lightweight at below 6
kg, yet equipped with a field angle equivalent to A3
landscape (376 mm x 282 mm).
Built-in SD Card Slot
Built-in high capacity, high speed SD card compatible
memory slot. (SD Card is sold separately.)
Versatile Interface
Equipped with USB and RS-232 connector.
WARNINGTHIS APPARATUS
MUST BE EARTHED
IMPORTANT
The wires in this mains lead are coloured in accordance
with the following code:
GREEN - and - YELLOW:
EARTH
BLUE:
NEUTRAL
BROWN:
LIVE
As the colours of the wires in the mains lead of this appara-
tus may not correspond with the coloured markings identi-
fying the terminals in your plug, proceed as follows. The
wire which is coloured GREEN-AND-YELLOW must be con-
nected to the terminal in the plug which is marked with the
letter E or the safety earth symbol
or coloured GREEN
or GREEN-AND-YELLOW.The wire which is coloured BLUE
must be connected to the terminal which is marked with
the letter N or which is coloured BLACK. The wire which is
coloured BROWN must be connected to the terminal which
is marked with the letter L or coloured RED.
Warning
This is a Class A product. In a domestic envi-
ronment this product may cause radio inter-
ference in which case the user may be re-
quired to take adequate measures.
WARNING:
TO PREVENT FIRE OR SHOCK HAZARDS, DO NOT EX-
POSE THIS APPLIANCE TO RAIN OR MOISTURE.
For Europe
Features
Thank you for purchasing this JVC product. Before operating this unit, please read these instructions carefully to ensure the best
possible performance.
These instructions are for AV-P960E.
Machine noise information regulation 3. GSGV, 18.01.1991:
The highest sound pressure level amounts to 70 railway
(A) less or in accordance with ISO/EN 7779

E-3
English
Symbols used in this manual
States precautions to be taken during operations.
States restrictions on the functions or use of this equipment. For reference purposes.
Indicates the page numbers or items to refer to.
Contents of this manual
The copyright of this manual belongs to JVC. Unauthorized reproduction of this manual whether in full or in part is
prohibited.
All product names stated in this manual are trademarks or registered trademarks of their respective companies.
Marks such as TM, ® and © are omitted in this manual.
The design, specifications and other contents of this manual are subject to change for improvements without prior
notice.
Windows is the trademark of Microsoft Corporation in the United States.
: SD logo is a trademark.
How to Read this Manual
Safety Precautions .................................................................... 2
Features ..................................................................................... 2
Table of Content ........................................................................ 3
Precautions ................................................................................ 4
Names and Functions ............................................................... 5
Overall View ....................................................................................... 5
Control Panel ..................................................................................... 6
Rear Panel .......................................................................................... 8
Before Using .............................................................................. 9
Connection .............................................................................. 10
Presenting Printed Materials .................................................. 11
Presenting 3-dimensional Objects ........................................ 12
Shooting Surrounding Objects .............................................. 13
Presenting Slide Films ............................................................ 14
Presenting Films and Other Transparent Materials ............. 15
Capturing Images Through a Microscope ............................. 16
Saving Images in the Picture Memory .................................. 17
Adjusting the White Balance .................................................. 18
Saving the Settings (User Setting Registration) .................. 19
Storing Images in SD Card ..................................................... 20
Viewing Image Data Stored in SD Card ................................. 21
Connecting to Computer via the USB Connector ................ 22
Operating the Remote Control Unit ....................................... 23
Installing LCD Monitor ............................................................ 24
Troubleshooting ...................................................................... 25
Specifications .......................................................................... 26
Getting Started
Preparation
Operation
(Basic)
Operation
(Application)
Others
Table of Content
Caution
Note

E-4
Handling of Equipment
Use the handle on the side to carry this unit.
Carrying this unit by its camera head, camera arm or its side illumination lamps might cause them to be deformed or dam-
aged.
Pull out the handle slowly in a straight manner.
Conduct prior functional checks before important shooting events.
Compensation for the shooting contents
JVC will not be in anyway liable for any failure to take or playback images due to problems arising from this product or the card
used, and no compensation will be offered for the loss of contents.
Copyright
You may take pictures for your own leisure or uses. However, you must not use any materials protected by copyright law
without the owner's consent.
SD Card
SD card is made from precision electronic components. Do not attempt to carry out any of the following actions as it may cause
the card to malfunction or damage.
Do not touch the edge of the card with your bare hand or metal.
It may be damaged by static charges produced.
Do not bend, drop or cause the card to suffer great impacts.
When using and storing the card, avoid heat, water, direct sunlight and humid areas.
Do not attempt to disassemble or modify the card.
Routine maintenance
Switch off the power, pull out the plug and perform the following tasks.
Use a dry and soft piece of cloth to wipe off any dirt or stain on the equipment.
For severe stains, immerse a piece of cloth into a diluted cleaning detergent, wring and use it to wipe off the stains on the
equipment. Thereafter, use a piece of dry cloth to wipe off the water drops.
Auto Focus
This unit is equipped with Auto Focus function. However, depending on the object and the camera setting, it might be out of
focus. In this case, please adjust the focus manually.
Objects which are difficult to be focused automatically
When the brightness of the image plane is extremely high (bright).
When the brightness of the image plane is extremely low (dim).
When the brightness of the image plane is constantly changing (for example, a blinking light).
When there is almost no contrasts.
When there are repetitive vertical striped patterns on the image plane.
When there are graphics or printings on both sides or the upper and lower portions of the screen.
Power Cord
Use only the power cord specified (supplied).
Use of power cord other than designated, or damaged power cord may result in fire and electrical shocks.
Do not use the power cord supplied with this unit on other devices.
Power Saving
To save power, turn off the unit when not in use.
Precautions
Do not use benzene or thinner. The equipment may malfunction and its casing may be damaged.
When using a chemical wrap or detergent, read its product brochures carefully and take note of any precautions
stated.
Caution
E-5
English
1
0
2
4
5
7
6
4
89
!
@
3
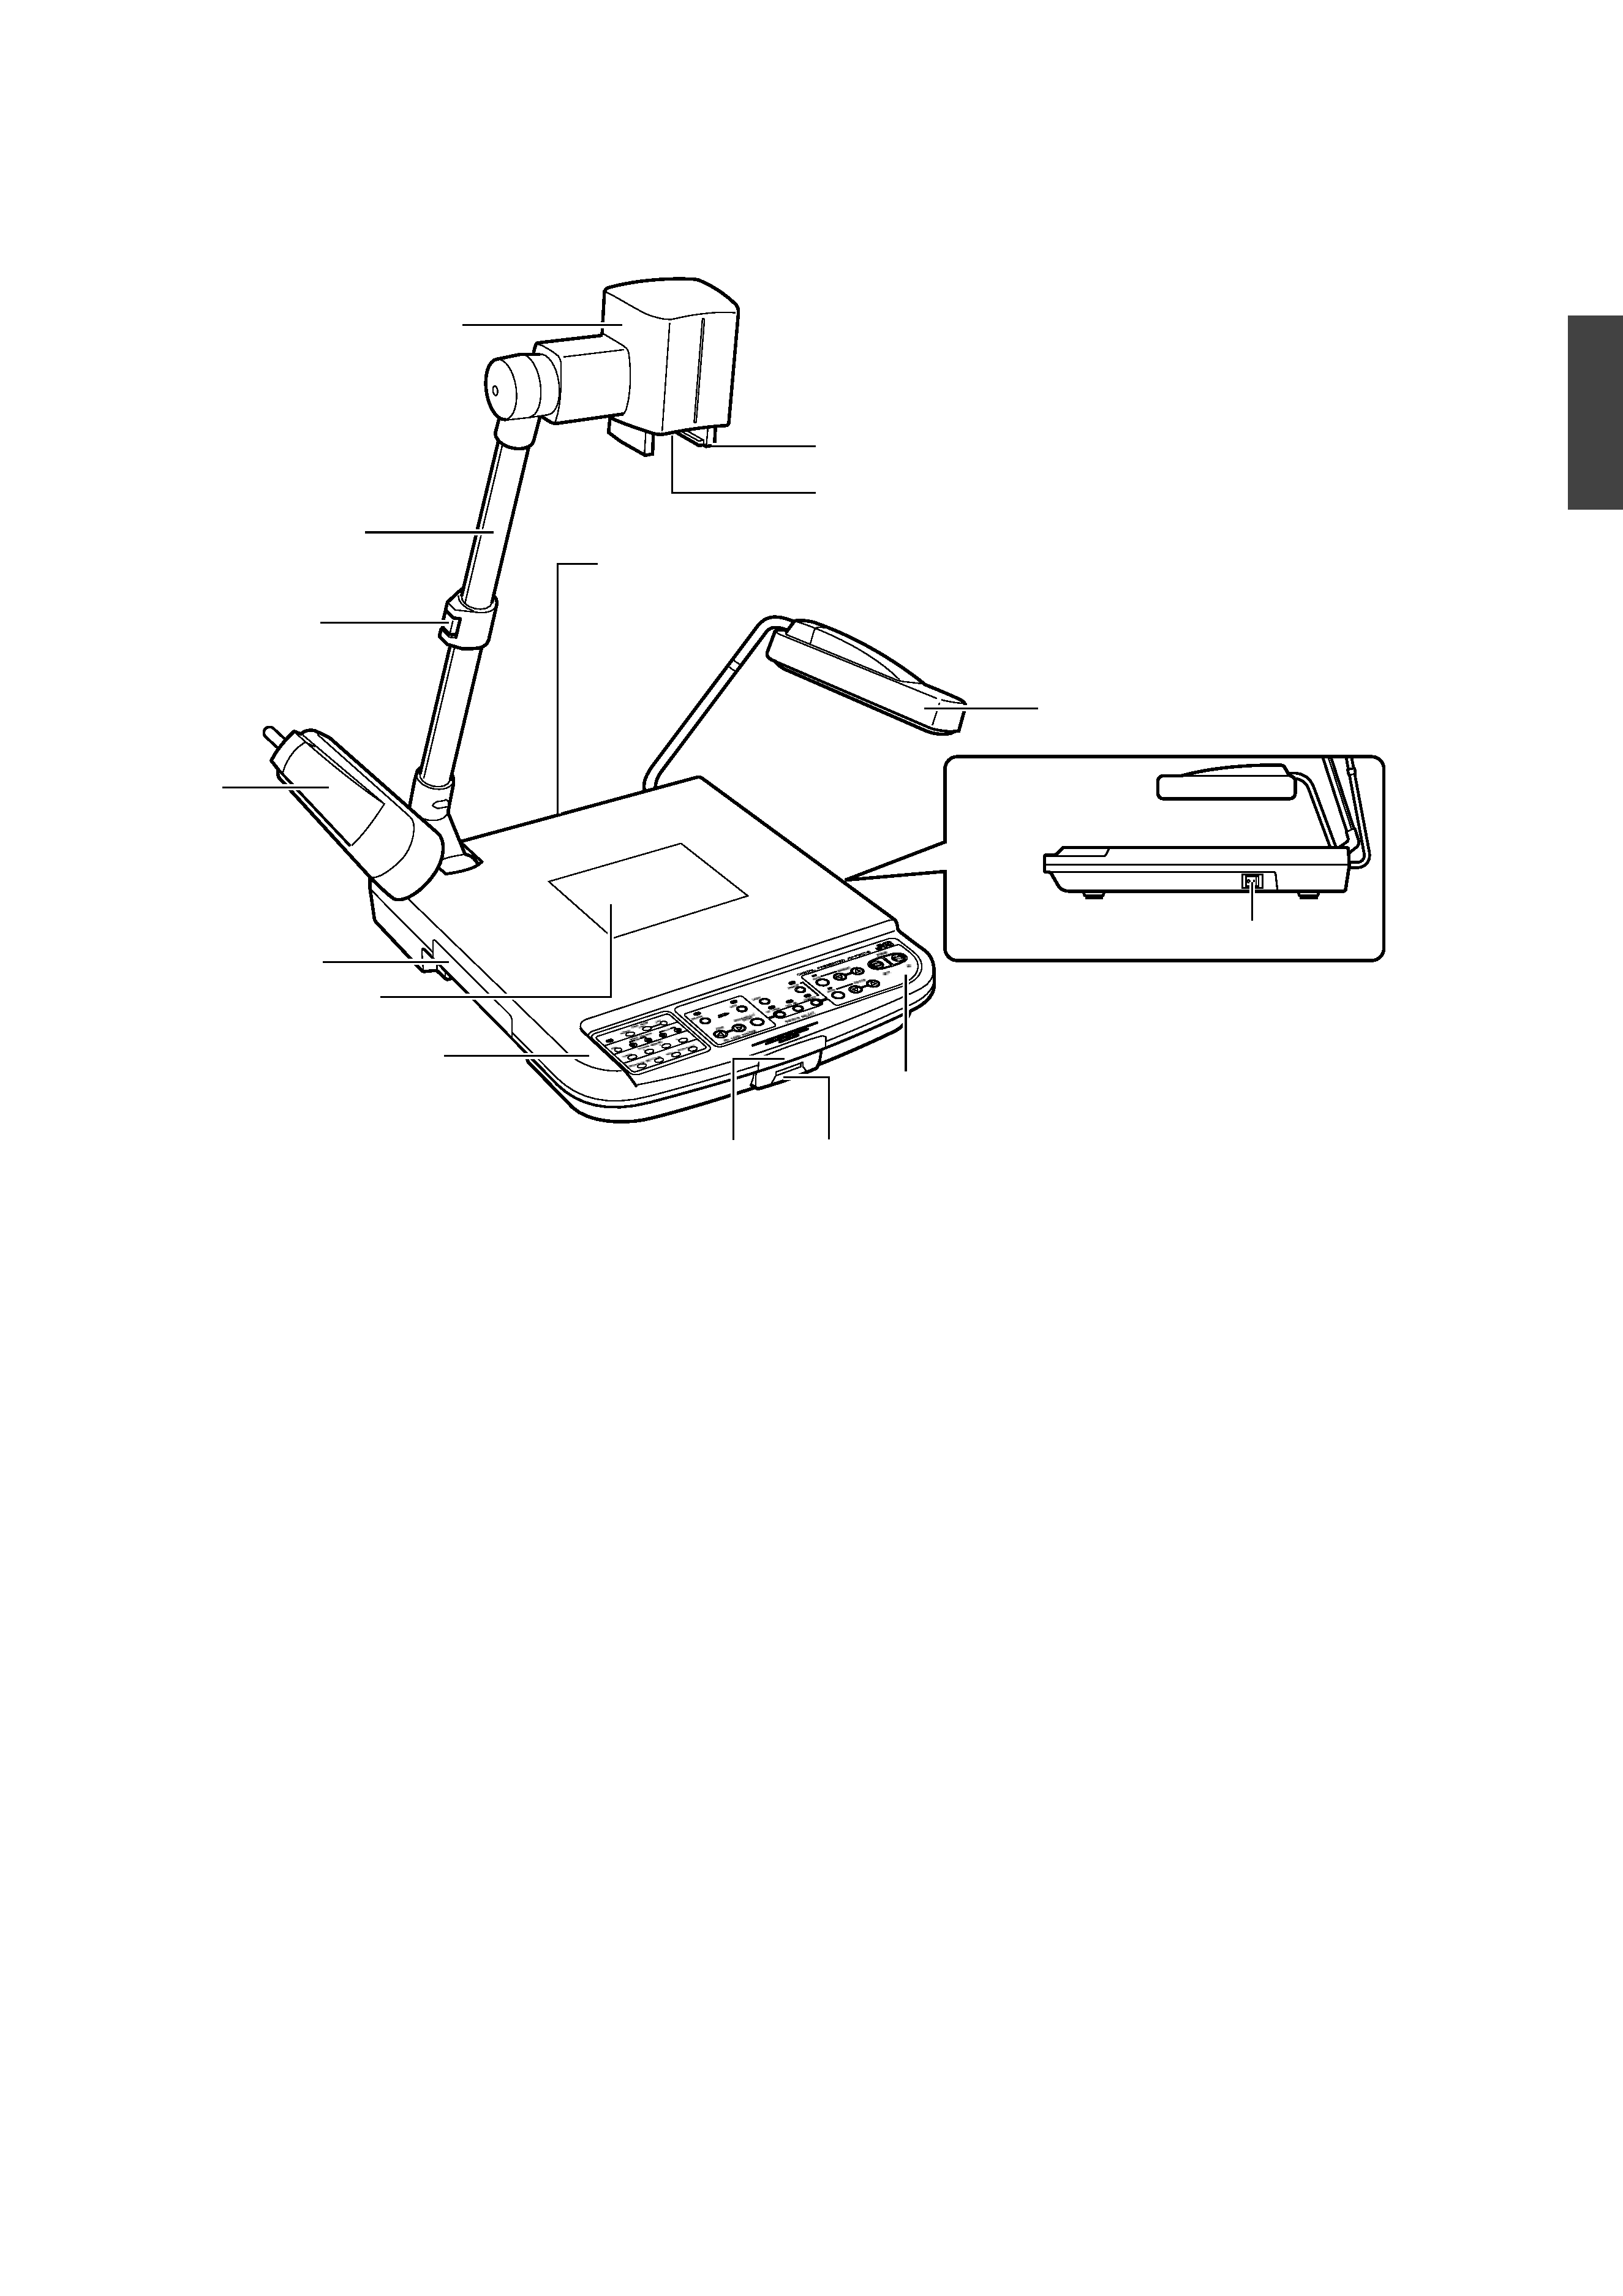
Names and Functions
Overall View
1 Camera Head
For capturing images of objects on the stage or surround-
ing areas.
2 Camera Arm
Supporting arm for the camera head. Adjust its angle when
shooting 3-dimensional objects.
3 Arm Lock
For adjusting the length of camera. Release the lock when
retracting or extending the camera arm and lock it at the
adjusted position.
4 Side Illuminations
Adjust to ensure that the stage is evenly lighted.
5 Handle
Pull out this handle to carry the unit. Put the handle away
when not in use.
6 Back Illumination
Use this lighting when viewing transparent materials such
as films.
Page 15 `Presenting Films and Other Transparent Ma-
terials'
7 Stage
For placing objects (or materials).
Up to A3 landscape equivalent (376 mm x 282 mm) can
be captured.
8 Remote Sensor
For receiving signals from the remote control unit.
Page 23 `Operating the Remote Control Unit'
9 SD Slot
Slot for inserting the SD card.
Page 20 `Storing Images in SD Card'
0 Slide Film Holder
Use this when viewing slide films.
Page 14 `Presenting Slide Films'
! Close-up Lens
Remove this lens when shooting surrounding objects.
Page 13 `Shooting Surrounding Objects'
@ Power Switch
To turn on/off the power.
Right Side
Rear Panel
Page 7
Control Panel
Page 6