
AV-P950E
SS961589-001
© 2001 VICTOR COMPANY OF JAPAN, LIMITED
AV-P950E
DIGITAL
PRESENTER
Printed in Japan
SS961589-001
VICTOR COMPANY OF JAPAN, LIMITED
is a registered Trademark owned by VICTOR COMPANY OF JAPAN, LTD.
is a registered Trademark in Japan, the U.S.A., the U.K. and many other countries.
R
R
R
R
This instruction book is made from 100% recycled paper.
DIGITAL PRESENTER
MANUEL D'INSTRUCTIONS : PRESENTOIR NUMERIQUE
BEDIENUNGSANLEITUNG : DIGITALEN VORFÜHRERS
MANUALE DI ISTRUZIONI : DIGITAL PRESENTER DISPOSITIVO PER PRESENTAZIONI
INSTRUCTIONS
IT
ALIANO
DEUTSCH
FRANCAIS
ENGLISH

2
SAFETY PRECAUTIONS
Due to design modifications, data given in this instruction book
are subject to possible change without prior notice.
WARNING
TO PREVENT FIRE OR HAZARD, DO NOT
EXPOSE THIS APPLIANCE TO RAIN OR
MOISTURE.
· Use only with the rated power supply. To ensure safe opera-
tion, the three-pin plug supplied must be inserted only into a
standard three-pin power point which is effectively grounded
through the normal household wiring.
· Do not modify the unit or operate it with the cover removed.
· Do not allow flammable objects, water or metallic objects to get
inside the unit as this could cause damage and malfunctions.
· When the unit is not to be used for a long period of time, dis-
connect the power cord from the power outlet.
· When there is any abnormality (noise, smoke, etc.), immedi-
ately switch off the unit, disconnect the power cord from the
power outlet, and contact your nearest JVC-authorized serv-
ice agent.
WARNING
This is a Class A product. In a domestic environment this prod-
uct may cause radio interference in which case the user may
be required to take adequate measures at his own expense.

3
ENGLISH
Thank you for purchasing the JVC AV-P950 Digital Presenter. To make the most of this unit's many features, please read this booklet
carefully. After reading, keep it handy for future reference.
Safety precautions .............................................................................................................................................................................. 2
Contents ............................................................................................................................................................................................... 3
Features ............................................................................................................................................................................................... 3
Handling precautions ......................................................................................................................................................................... 3
Before use ............................................................................................................................................................................................ 4
Part names ........................................................................................................................................................................................ 4
Setup ................................................................................................................................................................................................. 4
Operation ............................................................................................................................................................................................. 6
Control panel ..................................................................................................................................................................................... 6
Rear panel ......................................................................................................................................................................................... 8
Menu adjustment ............................................................................................................................................................................. 10
Remote control unit .......................................................................................................................................................................... 11
Presentation (basic) .......................................................................................................................................................................... 12
Printed material and 3-dimensional objects ..................................................................................................................................... 12
Slide presentation ............................................................................................................................................................................ 12
Transparent material such as OHP sheets ...................................................................................................................................... 13
Capturing images of surrounding objects ........................................................................................................................................ 13
Presentation (application) ................................................................................................................................................................ 14
Preview mode .................................................................................................................................................................................. 14
Picture memory ............................................................................................................................................................................... 15
5-position camera angle function ..................................................................................................................................................... 15
External control ................................................................................................................................................................................. 16
Optional book holder ........................................................................................................................................................................ 16
Troubleshooting ................................................................................................................................................................................ 17
Specifications .................................................................................................................................................................................... 18
CONTENTS
HANDLING PRECAUTIONS
Do not expose this unit to direct sunlight or leave it near a heater.
Clean the unit by wiping off dirt with a cloth that has been moistened with detergent solution. Make sure the cloth is well wrung out.
Afterwards wipe dry with a dry cloth. Do not allow the unit to come into contact with volatile liquids such as thinner, benzene or
insecticide. Deformation, discoloration or malfunction may result. Also do not immerse the unit in water as it may be damaged.
FEATURES
High-precision presentation system capable of projecting images of a wide range of physical objects including 3-dimensional objects,
OHP sheets, slides, and printed matter.
XGA-equivalent high-resolution images ideal for input to a high-resolution projector. This unit can be connected to a projector or a
monitor with XGA, SVGA or VGA resolution.
Pictures can be captured by a personal computer via the USB connector.
x20 zoom (x5 optical zoom x x4 digital zoom) capability for presentation of a wide range of material, ranging from B4-size documents
to 35-mm slide film.
Wireless remote control unit for trouble-free operation from a distance.
Useful presentation functions including preview mode, picture memory, 5-position camera angle, zoom preset and text mode, allow-
ing eye-catching presentations.
Flat stage allows magnification of the four corners of an A4 portrait so that image-capturing capability can be optimised.
This unit can be controlled via a personal computer.
4
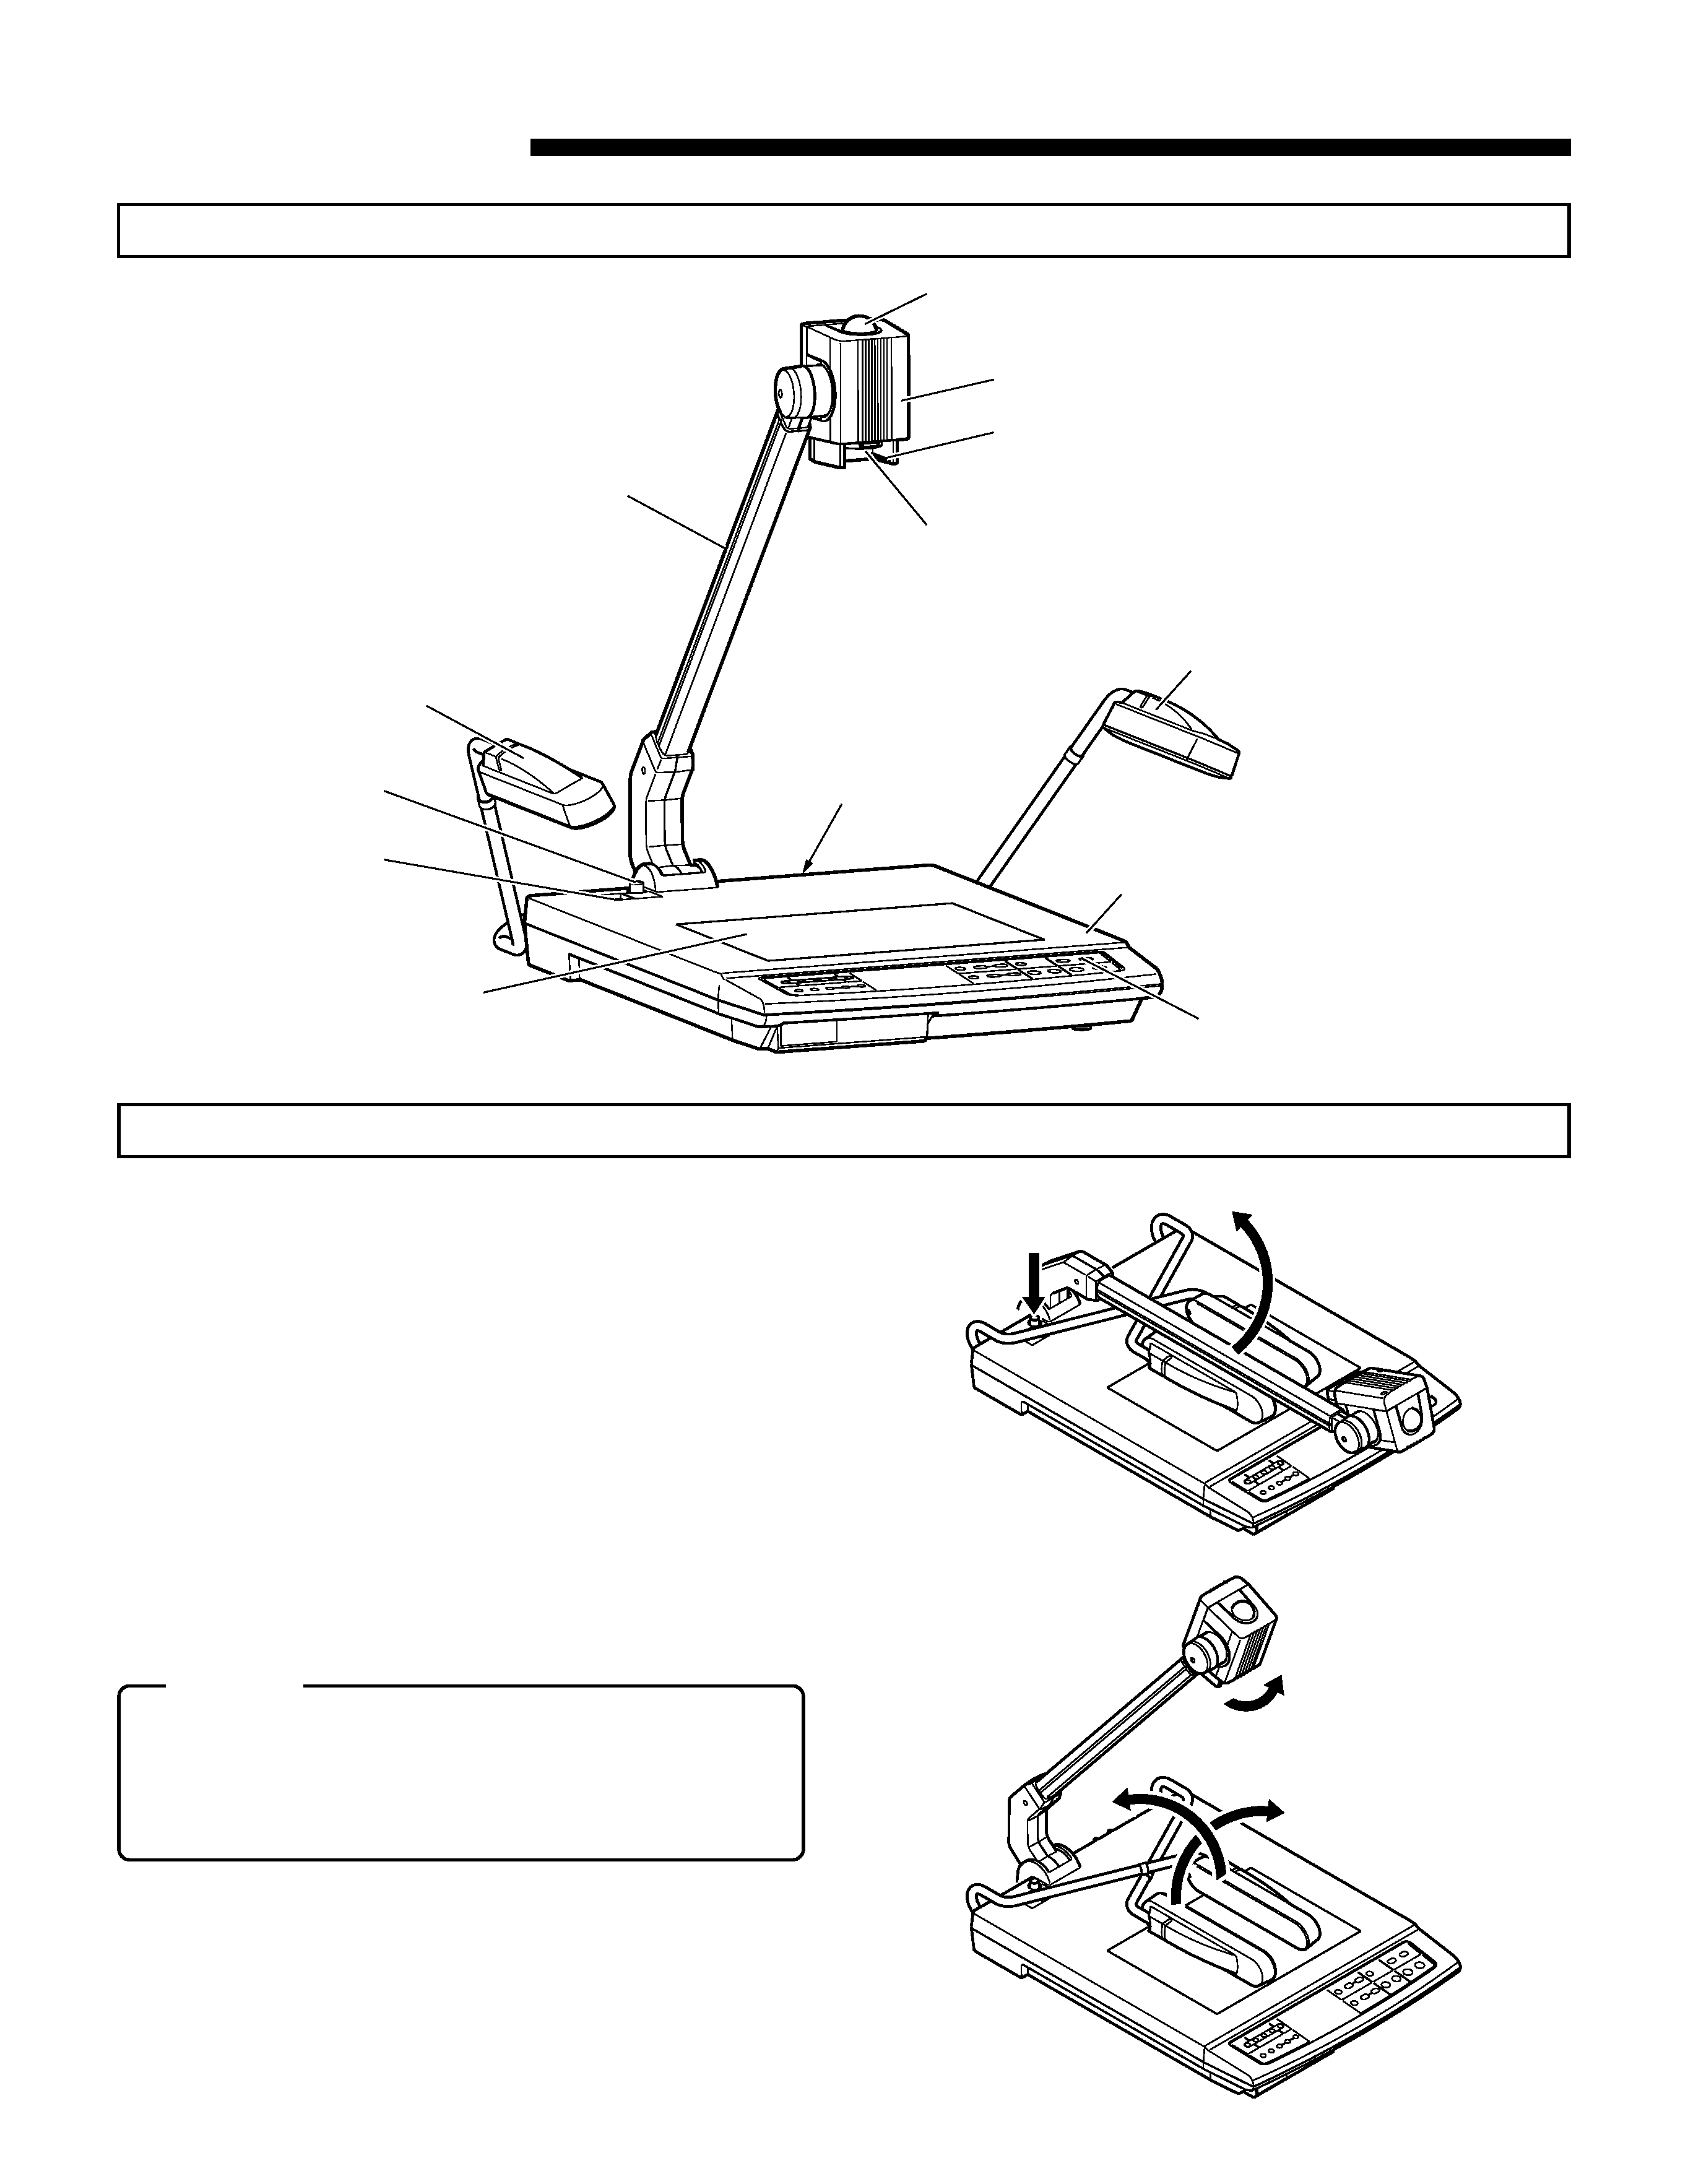
Part names
BEFORE USE
Setup
Side illumination
Camera arm
Remote control light reception section
Side illumination
Stage
Control panel
Rear panel
Camera head
Slide film holder
Close-up lens
Lock release button
(UNLOCK)
POWER switch
Back illumination
1. While pressing the UNLOCK button 1, raise the camera
arm so that it stands in the direction shown 2.
2. When the camera arm is raised all the way, release the
UNLOCK button.
3. When the UNLOCK button returns to its original position
and the camera arm is locked, release the camera arm.
4. Turn the camera head in the direction shown 3 until a click
is heard. The camera head should now be facing the stage.
5. Move the side illumination arms in the directions shown,
first 4 and then 5.
CAUTION
· When using the UNLOCK button, do not release the
camera arm until it is locked. Do not apply exces-
sive force on the side illuminations (arms and lights),
otherwise, a malfunction or injury may result.
2
1
3
5
4
5
ENGLISH
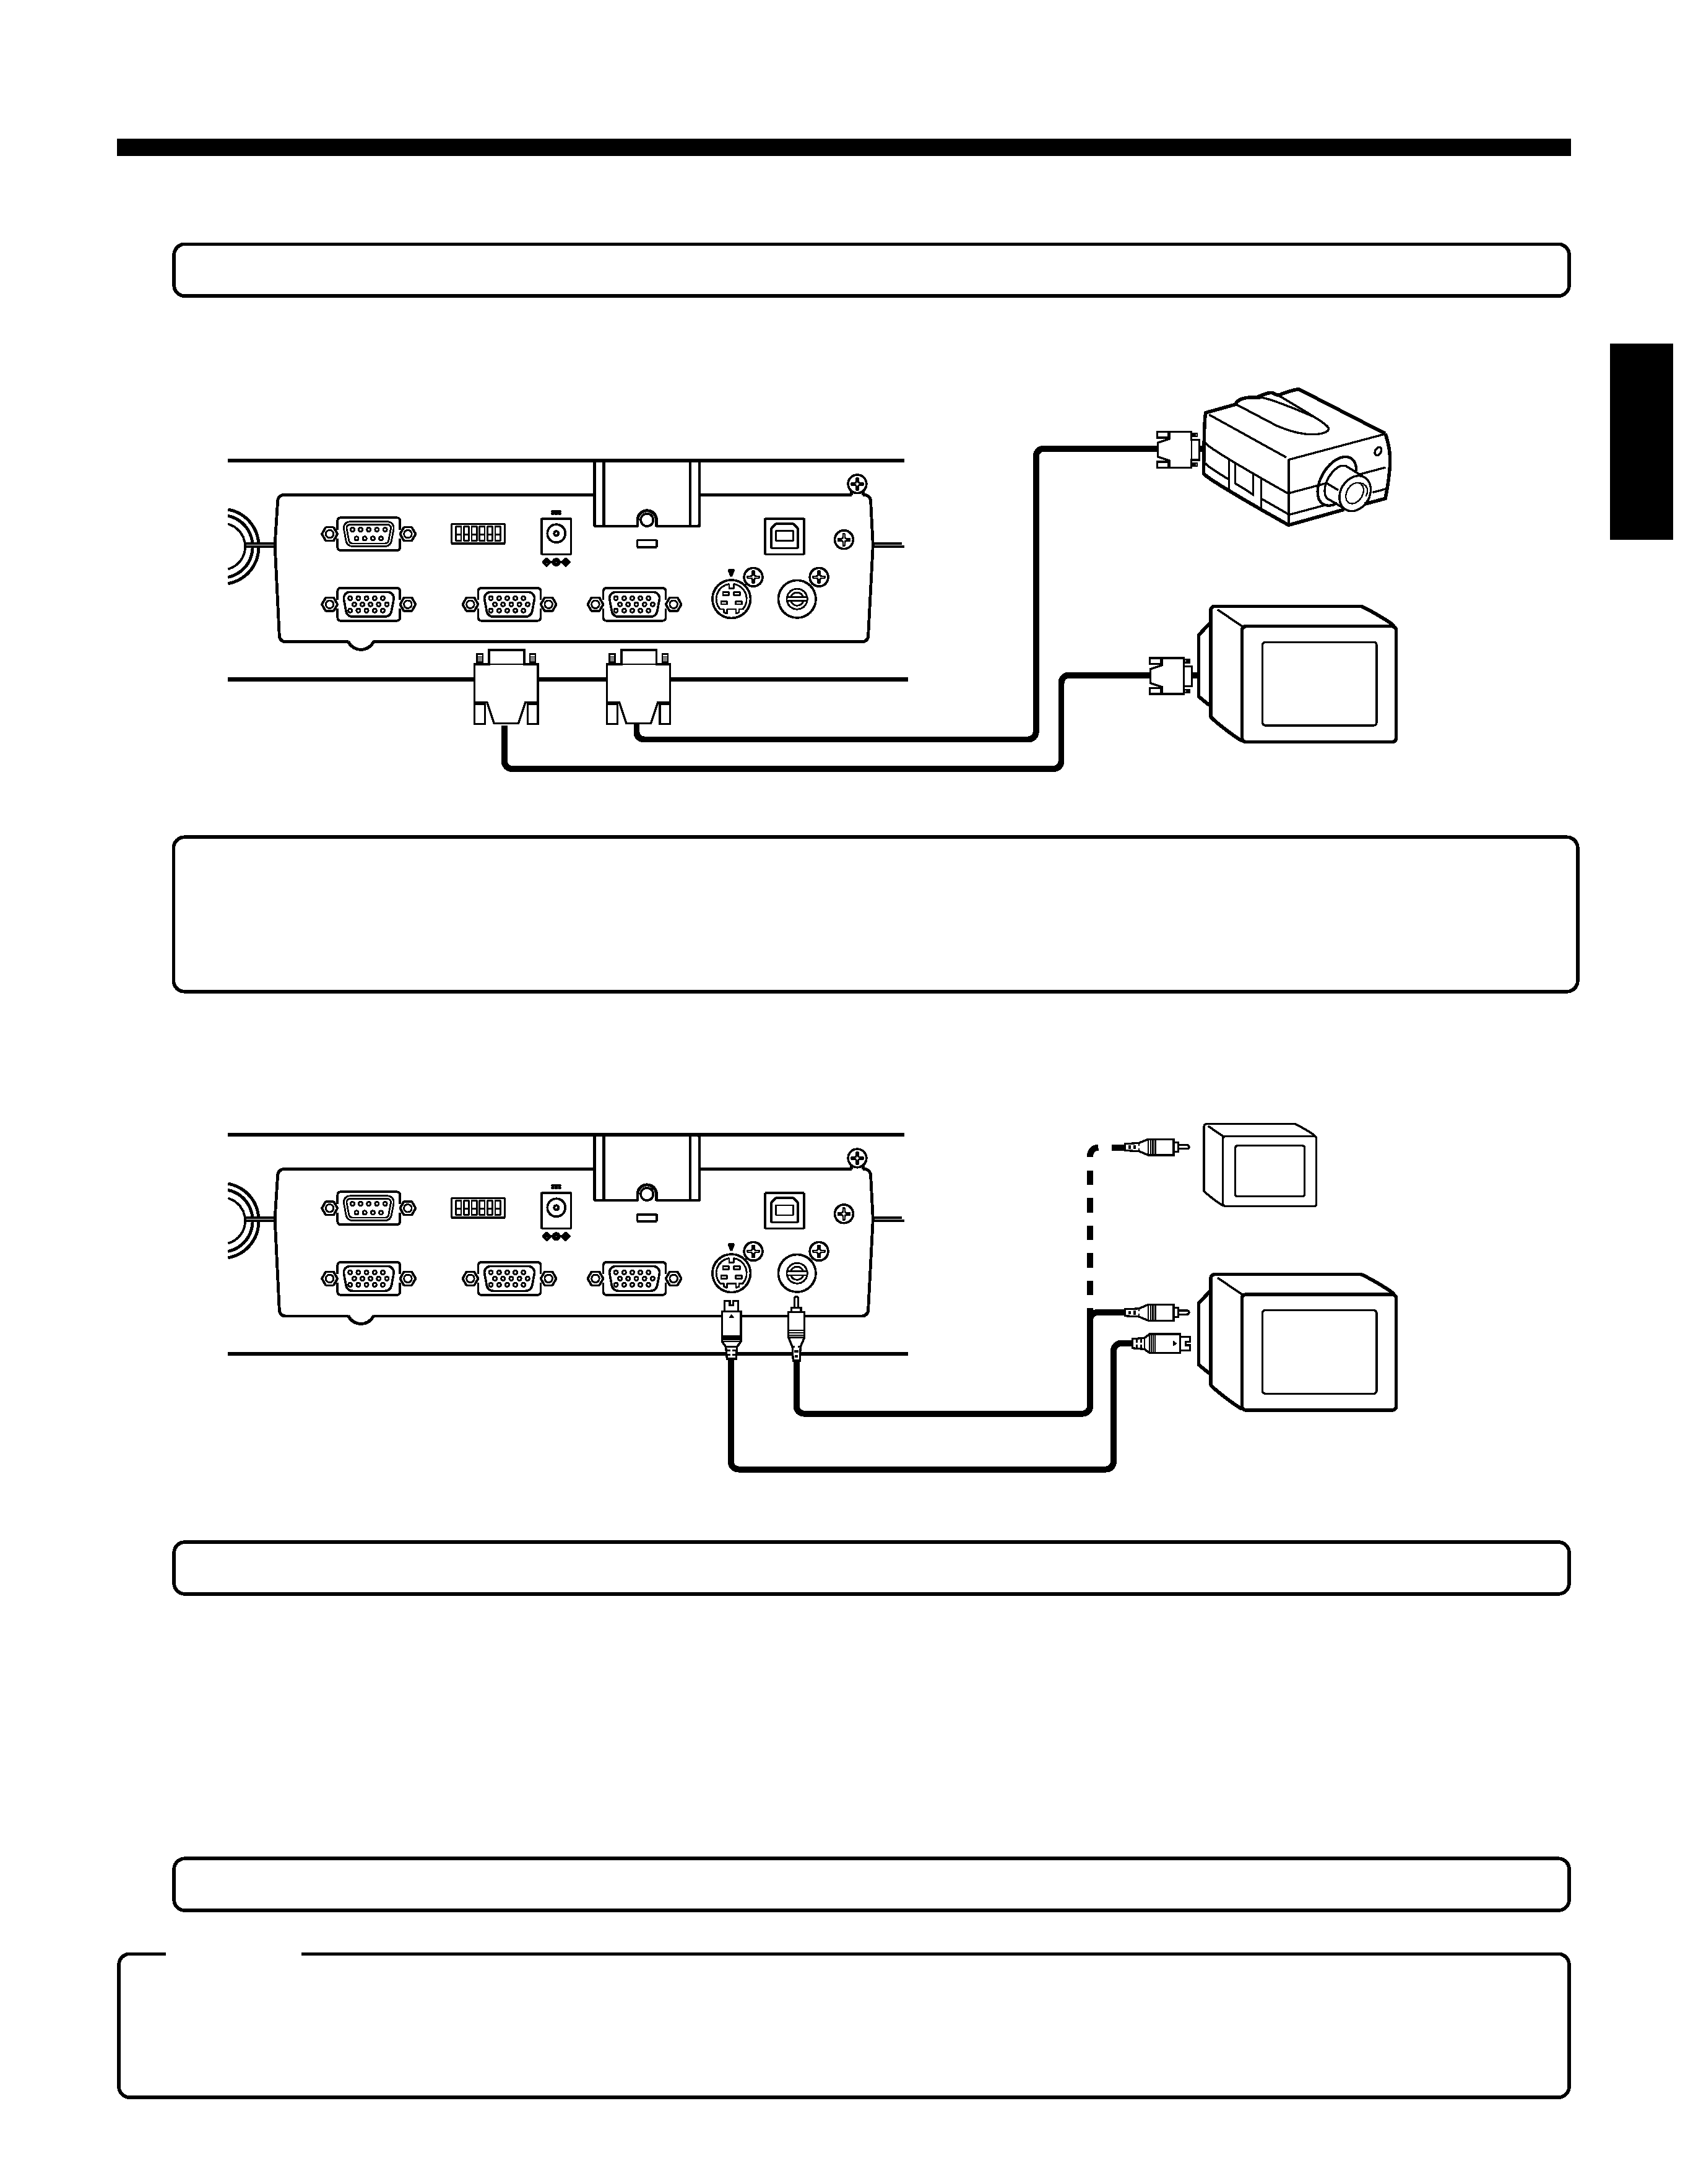
6. Perform the following connections to the input connector of a projector or display.
· To protect this unit and the connected equipment, be sure to turn the POWER switch to OFF before connecting cables.
Connection with the equipment with the D-sub 15-pin input connector (for main picture presented using a projector, etc.
REMOTE INPUT (RS-232C)
USB
EXT INPUT
AB C D E F
1
0
DC12V
400mA
MODE
RGB OUTPUT 1
RGB OUTPUT 2
DC OUTPUT
S-VIDEO
OUTPUT
VIDEO
OUTPUT
Commercially-available D-sub 15-pin cable
Rear panel
Projector
Display
· It is recommended that you use the shortest possible cable (less than 3 m) when connecting equipment to the RGB output
terminal.
· Set the RGB output according to the specifications of the projector or display to be connected.
(For setting, refer to the rear panel "MODE" on page 8.)
USB
AB C D E F
1
0
DC12V
400mA
REMOTE INPUT (RS-232C)
EXT INPUT
RGB OUTPUT 1
RGB OUTPUT 2
DC OUTPUT
S-VIDEO
OUTPUT
VIDEO
OUTPUT
Provided video cable
Rear panel
Commercially-available S-video cable
TV monitor
LCD monitor
Connection with the equipment with the Video or S-Video/ input connector for monitor and preview piduters. D-sub 15-pin input
connector (for main screen)
7. Connect the connector of the provided power cord into AC IN (refer to page 9) and the connect plug to an AC outlet, then turn the
POWER switch ON.
To store this unit, perform the set-up procedure (see page 4) in reverse order:
Fold the side illumination arms first. Then press the UNLOCK button to fold the camera arm.
· Facing the unit, start with the right side illumination arm (the 5 side in the illustration at the bottom of page 4)
Keep the camera head parallel to the camera arm.
· Hold the plug when unplugging the power cord or video cables.
CAUTION
· When storing this unit, do not lean it against a wall, etc. If it falls over, a malfunction or injury may result.
· During transportation, do not hold the camera arm, side illumination (lamp or arm), etc. Doing so could place
excessive force on the unit, resulting in a malfunction or injury.
· For The USB cable connection, refer to the separate "Application software instructions".