DAB KITCHEN RADIO
TRK100DAB
IInnssttrruuccttiioonn M
Maannuuaall
Before operating please read all these instructions thoroughly.
Hitachi A-Team DAB radio.qxd
30/11/2004
17:55
Page 1

Contents
page 2
SSaaffeettyy D
Dooss aanndd D
Doonn''ttss .. .. .. .. .. .. .. .. .. .. .. .. .. .. .. .. .. .. .. .. .. .. .. .. .. .. .. .. .. .. .. .. .. .. .. .. .. ..33
U
UKK G
Guuaarraanntteeee .. .. .. .. .. .. .. .. .. .. .. .. .. .. .. .. .. .. .. .. .. .. .. .. .. .. .. .. .. .. .. .. .. .. .. .. .. .. .. .. .. .. ..44
KKnnoow
w yyoouurr RRaaddiioo .. .. .. .. .. .. .. .. .. .. .. .. .. .. .. .. .. .. .. .. .. .. .. .. .. .. .. .. .. .. .. .. .. .. .. .. .. .. .. .. .. ..55
G
Geettttiinngg SSttaarrtteedd .. .. .. .. .. .. .. .. .. .. .. .. .. .. .. .. .. .. .. .. .. .. .. .. .. .. .. .. .. .. .. .. .. .. .. .. .. .. .. .. .. .. ..66
Batteries or mains adaptor . . . . . . . . . . . . . . . . . . . . . . . . . . . . . . . . . . . . . .6
When you first switch on . . . . . . . . . . . . . . . . . . . . . . . . . . . . . . . . . . . . . . .6
Tuning to DAB stations . . . . . . . . . . . . . . . . . . . . . . . . . . . . . . . . . . . . . . . . .6
Tuning to FM stations . . . . . . . . . . . . . . . . . . . . . . . . . . . . . . . . . . . . . . . . . .6
Scanning for new stations
. . . . . . . . . . . . . . . . . . . . . . . . . . . . . . . . . . . . . .7
No stations available . . . . . . . . . . . . . . . . . . . . . . . . . . . . . . . . . . . . . . . . . .7
Volume . . . . . . . . . . . . . . . . . . . . . . . . . . . . . . . . . . . . . . . . . . . . . . . . . . .7
Mute . . . . . . . . . . . . . . . . . . . . . . . . . . . . . . . . . . . . . . . . . . . . . . . . . . . . .7
Bass boost . . . . . . . . . . . . . . . . . . . . . . . . . . . . . . . . . . . . . . . . . . . . . . . . .7
U
Ussiinngg PPrreesseett SSttaattiioonnss .. .. .. .. .. .. .. .. .. .. .. .. .. .. .. .. .. .. .. .. .. .. .. .. .. .. .. .. .. .. .. .. .. .. .. .. .. .. ..88
Tuning to a preset station . . . . . . . . . . . . . . . . . . . . . . . . . . . . . . . . . . . . . . .8
Assigning a station to a preset button . . . . . . . . . . . . . . . . . . . . . . . . . . . . . .8
C
Chhaannggiinngg tthhee SSttaattiioonn IInnffoorrm
maattiioonn D
Diissppllaayy .. .. .. .. .. .. .. .. .. .. .. .. .. .. .. .. .. .. .. .. .. .. .. ..99
Scrolling information supplied by the radio station (DLS) . . . . . . . . . . . . . . . . .9
Program type . . . . . . . . . . . . . . . . . . . . . . . . . . . . . . . . . . . . . . . . . . . . . . .9
Ensemble name . . . . . . . . . . . . . . . . . . . . . . . . . . . . . . . . . . . . . . . . . . . . .9
Time & date . . . . . . . . . . . . . . . . . . . . . . . . . . . . . . . . . . . . . . . . . . . . . . . .9
Channel & frequency . . . . . . . . . . . . . . . . . . . . . . . . . . . . . . . . . . . . . . . . . .9
Bit-rate & mode
. . . . . . . . . . . . . . . . . . . . . . . . . . . . . . . . . . . . . . . . . . . . .9
Signal error . . . . . . . . . . . . . . . . . . . . . . . . . . . . . . . . . . . . . . . . . . . . . . . .9
U
Ussiinngg tthhee D
DA
ABB SSeettuupp M
Meennuuss .. .. .. .. .. .. .. .. .. .. .. .. .. .. .. .. .. .. .. .. .. .. .. .. .. .. .. .. .. .. .. .. ..1100
Changing the station order
. . . . . . . . . . . . . . . . . . . . . . . . . . . . . . . . . . . .10
Manual tune . . . . . . . . . . . . . . . . . . . . . . . . . . . . . . . . . . . . . . . . . . . . . . .11
Software version . . . . . . . . . . . . . . . . . . . . . . . . . . . . . . . . . . . . . . . . . . . .11
FFaaccttoorryy rreesseett
.. .. .. .. .. .. .. .. .. .. .. .. .. .. .. .. .. .. .. .. .. .. .. .. .. .. .. .. .. .. .. .. .. .. .. .. .. .. .. .. .. .. ..1111
SSppeecciiffiiccaattiioonnss .. .. .. .. .. .. .. .. .. .. .. .. .. .. .. .. .. .. .. .. .. .. .. .. .. .. .. .. .. .. .. .. .. .. .. .. .. .. .. .. .. .. ..1122
Hitachi A-Team DAB radio.qxd
30/11/2004
17:55
Page 2

Safety Dos and Don'ts
This equipment has been designed and manufactured to meet international safety
standards but, like any electrical equipment, care must be taken if you are to obtain
the best results and safety is to be assured.
page 3
DO
read the operating instructions before you attempt to use the equipment.
DO
ensure that all electrical connections (including the mains plug, extension leads and
inter-connections between the pieces of equipment) are properly made and in
accordance with the manufacturer's instructions. Switch off and withdraw the mains
plug before making or changing connections.
DO
consult your dealer if you are ever in doubt about the installation, operation or safety
of your equipment.
DO
be careful with glass panels or doors on equipment.
DO
route the mains lead so that it is not likely to be walked on, crushed, chafed, or
subjected to excessive wear and tear or heat.
DON'T remove any fixed cover as this may expose dangerous voltages.
DON'T obstruct the ventilation openings of the equipment with items such as newspapers,
tablecloths, curtains, etc. Overheating will cause damage and shorten the life of the
equipment.
DON'T allow electrical equipment to be exposed to dripping or splashing, or objects filled with
liquids, such as vases, to be placed on the equipment.
DON'T place hot objects or naked flame sources such as lighted candles or nightlights on, or
close to equipment. High temperatures can melt plastic and lead to fires.
DON'T use makeshift stands and NEVER fix legs with wood screws - to ensure complete safety
always fit the manufacturer's approved stand or legs with the fixings provided
according to the instructions.
DON'T use equipment such as personal stereos or radios so that you are distracted from the
requirements of traffic safety. It is illegal to watch television whilst driving.
DON'T listen to headphones at high volume, as such use can permanently damage your
hearing.
DON'T leave equipment switched on when it is unattended unless it is specifically stated that it
is designed for unattended operation or has a stand-by mode. Switch off using the
switch on the equipment and make sure that your family know how to do this. Special
arrangements may need to be made for infirm or handicapped people.
DON'T continue to operate the equipment if you are in any doubt about it working normally,
or if it is damaged in any way - switch off, withdraw the mains plug and consult your
dealer.
ABOVE ALL
NEVER let anyone especially children push anything into holes, slots or any other opening in
the case - this could result in a fatal electrical shock;
NEVER guess or take chances with electrical equipment of any kind
it is better to be safe than sorry!
Hitachi A-Team DAB radio.qxd
30/11/2004
17:55
Page 3

UK Guarantee
page 4
Your Guarantee of Excellence
Thank you for purchasing this Hitachi product
In the unlikely event that this product should develop a fault, we undertake to replace
or repair any part of the product which fails due to a manufacturing defect within 12
months of the date of purchase provided that:
i) The product has been installed and used only in accordance with the instructions
supplied with the product.
ii) The product has not been repaired, maintained, or modified by any person other
than a Hitachi authorised engineer.
iii) The product serial number has not been removed or altered.
This guarantee does not apply to product acquired second hand or for commercial or
communal use.
This guarantee does not cover the replacement of exhausted batteries, the adjustment
of user controls, or head cleaning and general consumer maintenance tasks.
Any parts replaced under this guarantee shall become the property of Hitachi Europe
Ltd. Any claims made under guarantee must be directed to the dealer from whom the
equipment was originally purchased.
Please note that evidence of the date of purchase will be required before any service
under this guarantee is carried out.
THIS GUARANTEE DOES NOT AFFECT YOUR STATUTORY RIGHTS.
IN ALL CASES OF DIFFICULTY PLEASE CONSULT YOUR HITACHI DEALER
Hitachi A-Team DAB radio.qxd
30/11/2004
17:55
Page 4
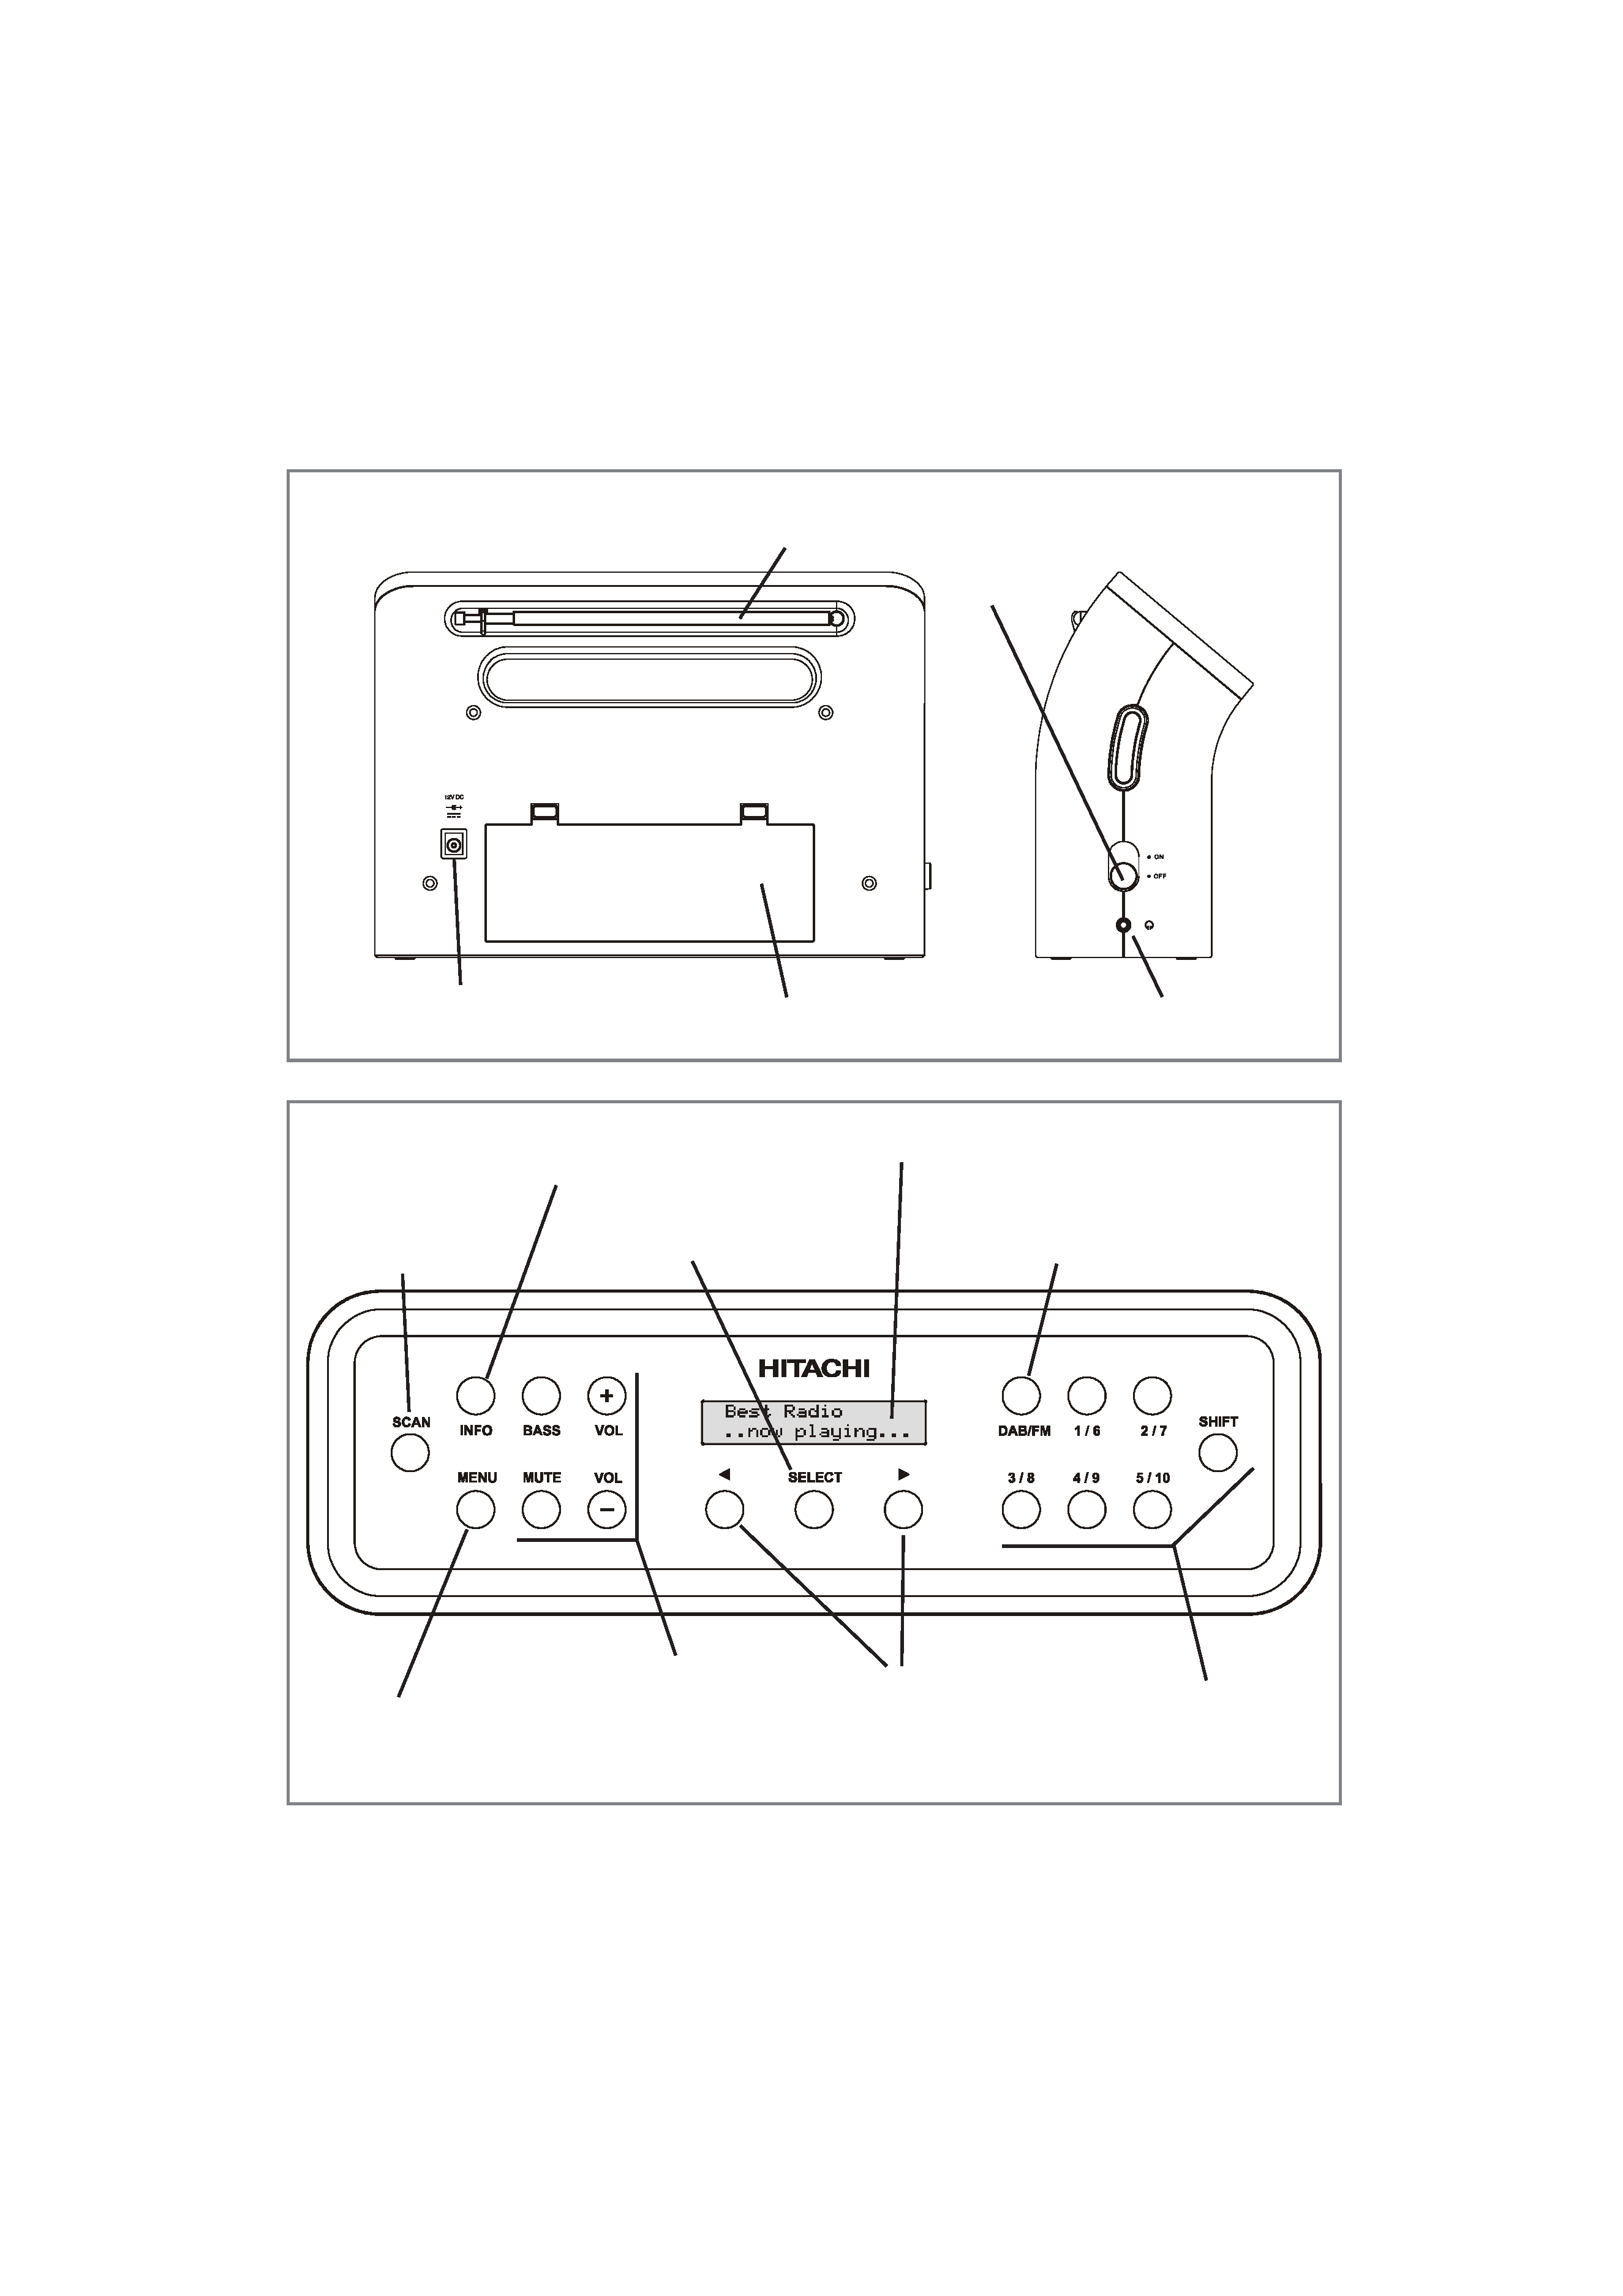
Know your Radio
page 5
LCD screen
TUNING
buttons
(see page 6)
SELECT
button
Sound control
buttons
(see page 7)
DAB
mode
or FM mode
(see page 6)
MENU
button
(see page 10)
INFO
button
(see page 9)
PRESET
buttons
(see page 8)
SCAN
button
(see pages 6 & 7)
Battery compartment
Headphone connector
Mains adaptor
connector
ON/OFF
switch
Aerial
Hitachi A-Team DAB radio.qxd
30/11/2004
17:55
Page 5