DVD DIGITAL THEATER SYSTEM
HTDK160
DVD/VCD/CD PLAYER WITH
AV SURROUND RECEIVER
Instruction manual
Manufactured under license from Dolby laboratories. Dolby , Pro Logic and the double D symbol
are trademarks of Dolby Laboratories.
Confidential Unpublished Words.
1992 - 1997 Dolby Laboratories, Inc. All right reserved.
C
"
" "
"
STAN
DBY
DVD
TUNER
AUX
2
5
8
0
SLEEP
REPEA
T
A-B
N/P
MEN
U/PB
C
SLOW/MEMO
RY
Zoom
EQ
Languag
e
AUDIO
Go
To
Sub
Title
ANGLE
Ret
urn
DISP
LAY
MUT
E
SEL
ECT
ADJ
/VO
L
SET
UP
TITL
E
PLA
Y /P
AUS
E
OPE
N/CL
OSE
PRO
G
LIST
ENIN
G
ENT
POW
ER
REMOTE
CONTROLLE
R
RB-
HTD
K16
0
2
DECLARATION OF CONFORMITY
We declare under our sole responsibility that this product, to which this declaration relates, is in conformity with the following standards:
EN60065, EN55013, EN55020, EN61000-3-2 and EN6100-3-3.
Following the provisions of 73/23/EEC, 89/336/EEC and 93/68/EEC directives.
IMPOR
IMPOR
IMPOR
IMPOR
IMPORT
TT
T
TANT
ANT
ANT
ANT
ANT
The mains lead on this equipment may be supplied with a moulded plug incorporating a fuse, the value of which is indicated on
the pin face of the plug. Should the fuse need to be replaced, an ASTA or BSI approved BS1362 fuse must be used of the same
rating. If the fuse cover is detachable never use the plug with the cover omitted. If a replacement fuse cover is required, ensure
it is of the same colour as that visible on the pin face of the plug. Fuse covers are available from your dealer.
DO NOT cut off the mains plug from this equipment. If the plug fitted is not suitable for the power points in your home or the cable is too
short to reach a power point, then obtain an appropriate safety approved extension lead or consult your dealer.
Should it be necessary to change the mains plug, this must be carried out by a competent person, preferably a qualified electrician.
If there is no alternative to cutting off the mains plug, ensure that you dispose of it immediately, having first removed the fuse, to avoid
a possible shock hazard by inadvertent connection to the mains supply.
IMPORTANT
As these colour may not correspond to the coloured markings identifying the terminals in your plug, proceed as follows:
The wire coloured WHITE must be connected to the terminal marked with the letter FL. The wire coloured RED must be
connected to the terminal marked with the letter FR. The wire coloured GREEN must be connected to the terminal marked with
the letter C. The wire coloured BLUE must be connected to the terminal marked with the letter SL. The wire coloured GREY must
be connected to the terminal marked with the letter SR.
WARNING:
Mains supply:
This DVD player can be used with a power (mains) voltage of 230V.
The OPERATE button is indicated "
"; this button allows you to select operate on or electrical power
standby.
Notice:
The OPERATE button is secondarily connected and does not separate the apparatus from the mains
supply in the switched-off position.
Before Switching on make sure that the voltage of your elec-
tricity supply is the same as that indicated on the rating plate.
Mains Cord
This appliance may be fitted with a non-rewircable plug. If it is
necessary to change the fuse in a non-rewircable plug the
fuse cover must be refitted. If the fuse cover is lost or damaged,
the plug must not be used until replacement available from
the appliance manufacturer is obtained.
It is important that the colour of the replacement fuse cover
corresponds with the rating marking on the base of the plug.
It the plug has to be changed because it is not suitalble for
your socker, or becomes damaged, it should be cut off and
an appropriate plug fitted following the wiring instructions
below, The plug removed must be disposed of safely as in-
sertion into a 13A socket is likely to cause an electrical hazard.
For your own safety read the following instructions carefully
before attempting to connect this unit to mains.
The wires in this mains lead are coloured in accordance with
the following code:
BLUE=NEUTRAL, BROWN=LIVE
CONNECTION TO POWER (For the area of Great Britain)
Important
As the colours of the wires in the mains lead of the appliance
may not correspond with the coloured markings identifying
the terminals in your plug, proceed as follows: The wire which
is marked with the letter N or coloured black.
The wire which is coloured brown must be connected to the
terminal which is marked with the letter L or coloured red.
No connection is to be made to the earth terminal of the plug.
If a 13 Amp (BS 1363) Plug is used, a 3 Amp Fuse must be
fitted, of if any other type of Plug is used a 3 or 5 Amp Fuse
must be fitted, either in the Plug or Adaptor, or on the Distribu-
tion Board.
Mains Supply: 220 - 240 V-50 Hz - AC only
Do not make any connection to the larger pin marked with the
letter "E" or by the symbol
or coloured green or green and
yellow.
3
Español
Svenska
Italiano
Français
Deutsch
English
SOME DO
SOME DO
SOME DO
SOME DO
SOME DO'S
SS
S
S AND DON
AND DON
AND DON
AND DON
AND DON'T ON
T ON
T ON
T ON
T ON THE SAFE USE OF
THE SAFE USE OF
THE SAFE USE OF
THE SAFE USE OF
THE SAFE USE OF Y
Y
Y
Y
YOUR
OUR
OUR
OUR
OUR
EQUIPMENT
EQUIPMENT
EQUIPMENT
EQUIPMENT
EQUIPMENT
This equipment has been designed and manufactured to meet international safety standards but, like any electrical equipment,
care must be taken if you are to obtain the best results and safety is to be assured.
· DO read the operating instructions before you attempt to use the equipment.
· DO ensure that all electrical connections(including the mains plug, extension leads and interconnections between pieces of
equipment) are properly made and in accordance with the manufacturer`s instructions. Switch off and withdraw the mains
plug when making or changing connections.
· DO consult your dealer if you are ever in doubt about the installation, operation or safety of your equipment.
· DO be careful with glass panels or doors on the equipment.
· DON T continue to operate the equipment if you are in any doubt about it working normally, or if it is damaged in any way-switch
off, withdraw the mains plug and consult your dealer.
· DON T remove any fixed cover as this may expose dangerous voltages.
· DON T leave equipment switched on when it is unattended unless it is specifically stated that it is designed for unattended
operation or has a standby mode. Switch off using the switch on the equipment and make sure that your family knows how to
do this. Special arrangements may need to be made for infirm or handicapped people.
· DON T use equipment such as personal stereos or radios so that you are distracted from the requirements of traffic safety. It
is illegal to watch television whilst driving a vehicle.
· DON T listen to headphones at high volume, as such use can permanently damage your hearing.
· DON T obstruct the ventilation openings of the equipment, for example with curtains or soft furnishings. Overheating will cause
damage and shorten the life of the equipment.
· DON T use makeshift stands and NEVER fix legs with wood screws-to ensure complete safety always fit the manufacturer`s
approved stand or legs with the fixings provided according to the instructions.
· DON T allow electrical equipment to be exposed to rain or moisture.
ABOVEALL
- NEVER let anyone especially children push anything into holes, slots or any other opening in the case-this could
result in a fatal electrical shock;
- NEVER guess or take chances with electrical equipment of any kind. It is better to be safe than sorry !
WARNING
WARNING
WARNING
WARNING
WARNING
To prevent fire or shock hazard, do not expose the
unit to rain or moisture.
To avoid electrical shock, do not open the cabinet.
Refer servicing to qualified personnel only.
Mains cord must only be changed at qualified ser-
vice shop.
CLASS 1
LASER PRODUCT
KLASSE 1 LASER PRODUKT
LUOKAN 1 LASER LAITE
KLASS 1
LASER APPARAT
· This appliance is classified as a CLASS 1 LASER product.
· The CLASS 1 LASER PRODUCT MARKING is located on
the rear panel.
· This product contains a low power laser device. To ensure
continued safety do not remove any cover or attempt to gain
access to the inside of the product. Refer all servicing to
qualified personnel only.
CAUTION
The use of optical instrument with this product will increase
eyes hazard. As the laser beam used in this CD/DVD player is
harmful to eyes, do not attempt to disassemble the cabinet.
Refer servicing to qualified personnel only.
The following marking is printed on the rear panel.
This symbol is intended to alert the user of the
presence of uninsulated "dangerous
voltage"within the product's encasement that
may be of sufficient magnitude to constitute a
risk of electric shock to persons.
This symbol is intended to alert the user of the
presence of important operating and mainte-
nance (servicing) instructions in the literature
accompanying the appliance.
W
W
W
W
Welcome!
elcome!
elcome!
elcome!
elcome!
Thank you for purchasing this DVD Compact AV system. Be-
fore operating the unit, please read this operation manual thor-
oughly and then keep it for future reference as it will be useful if
you have any operation problems in the future.
4
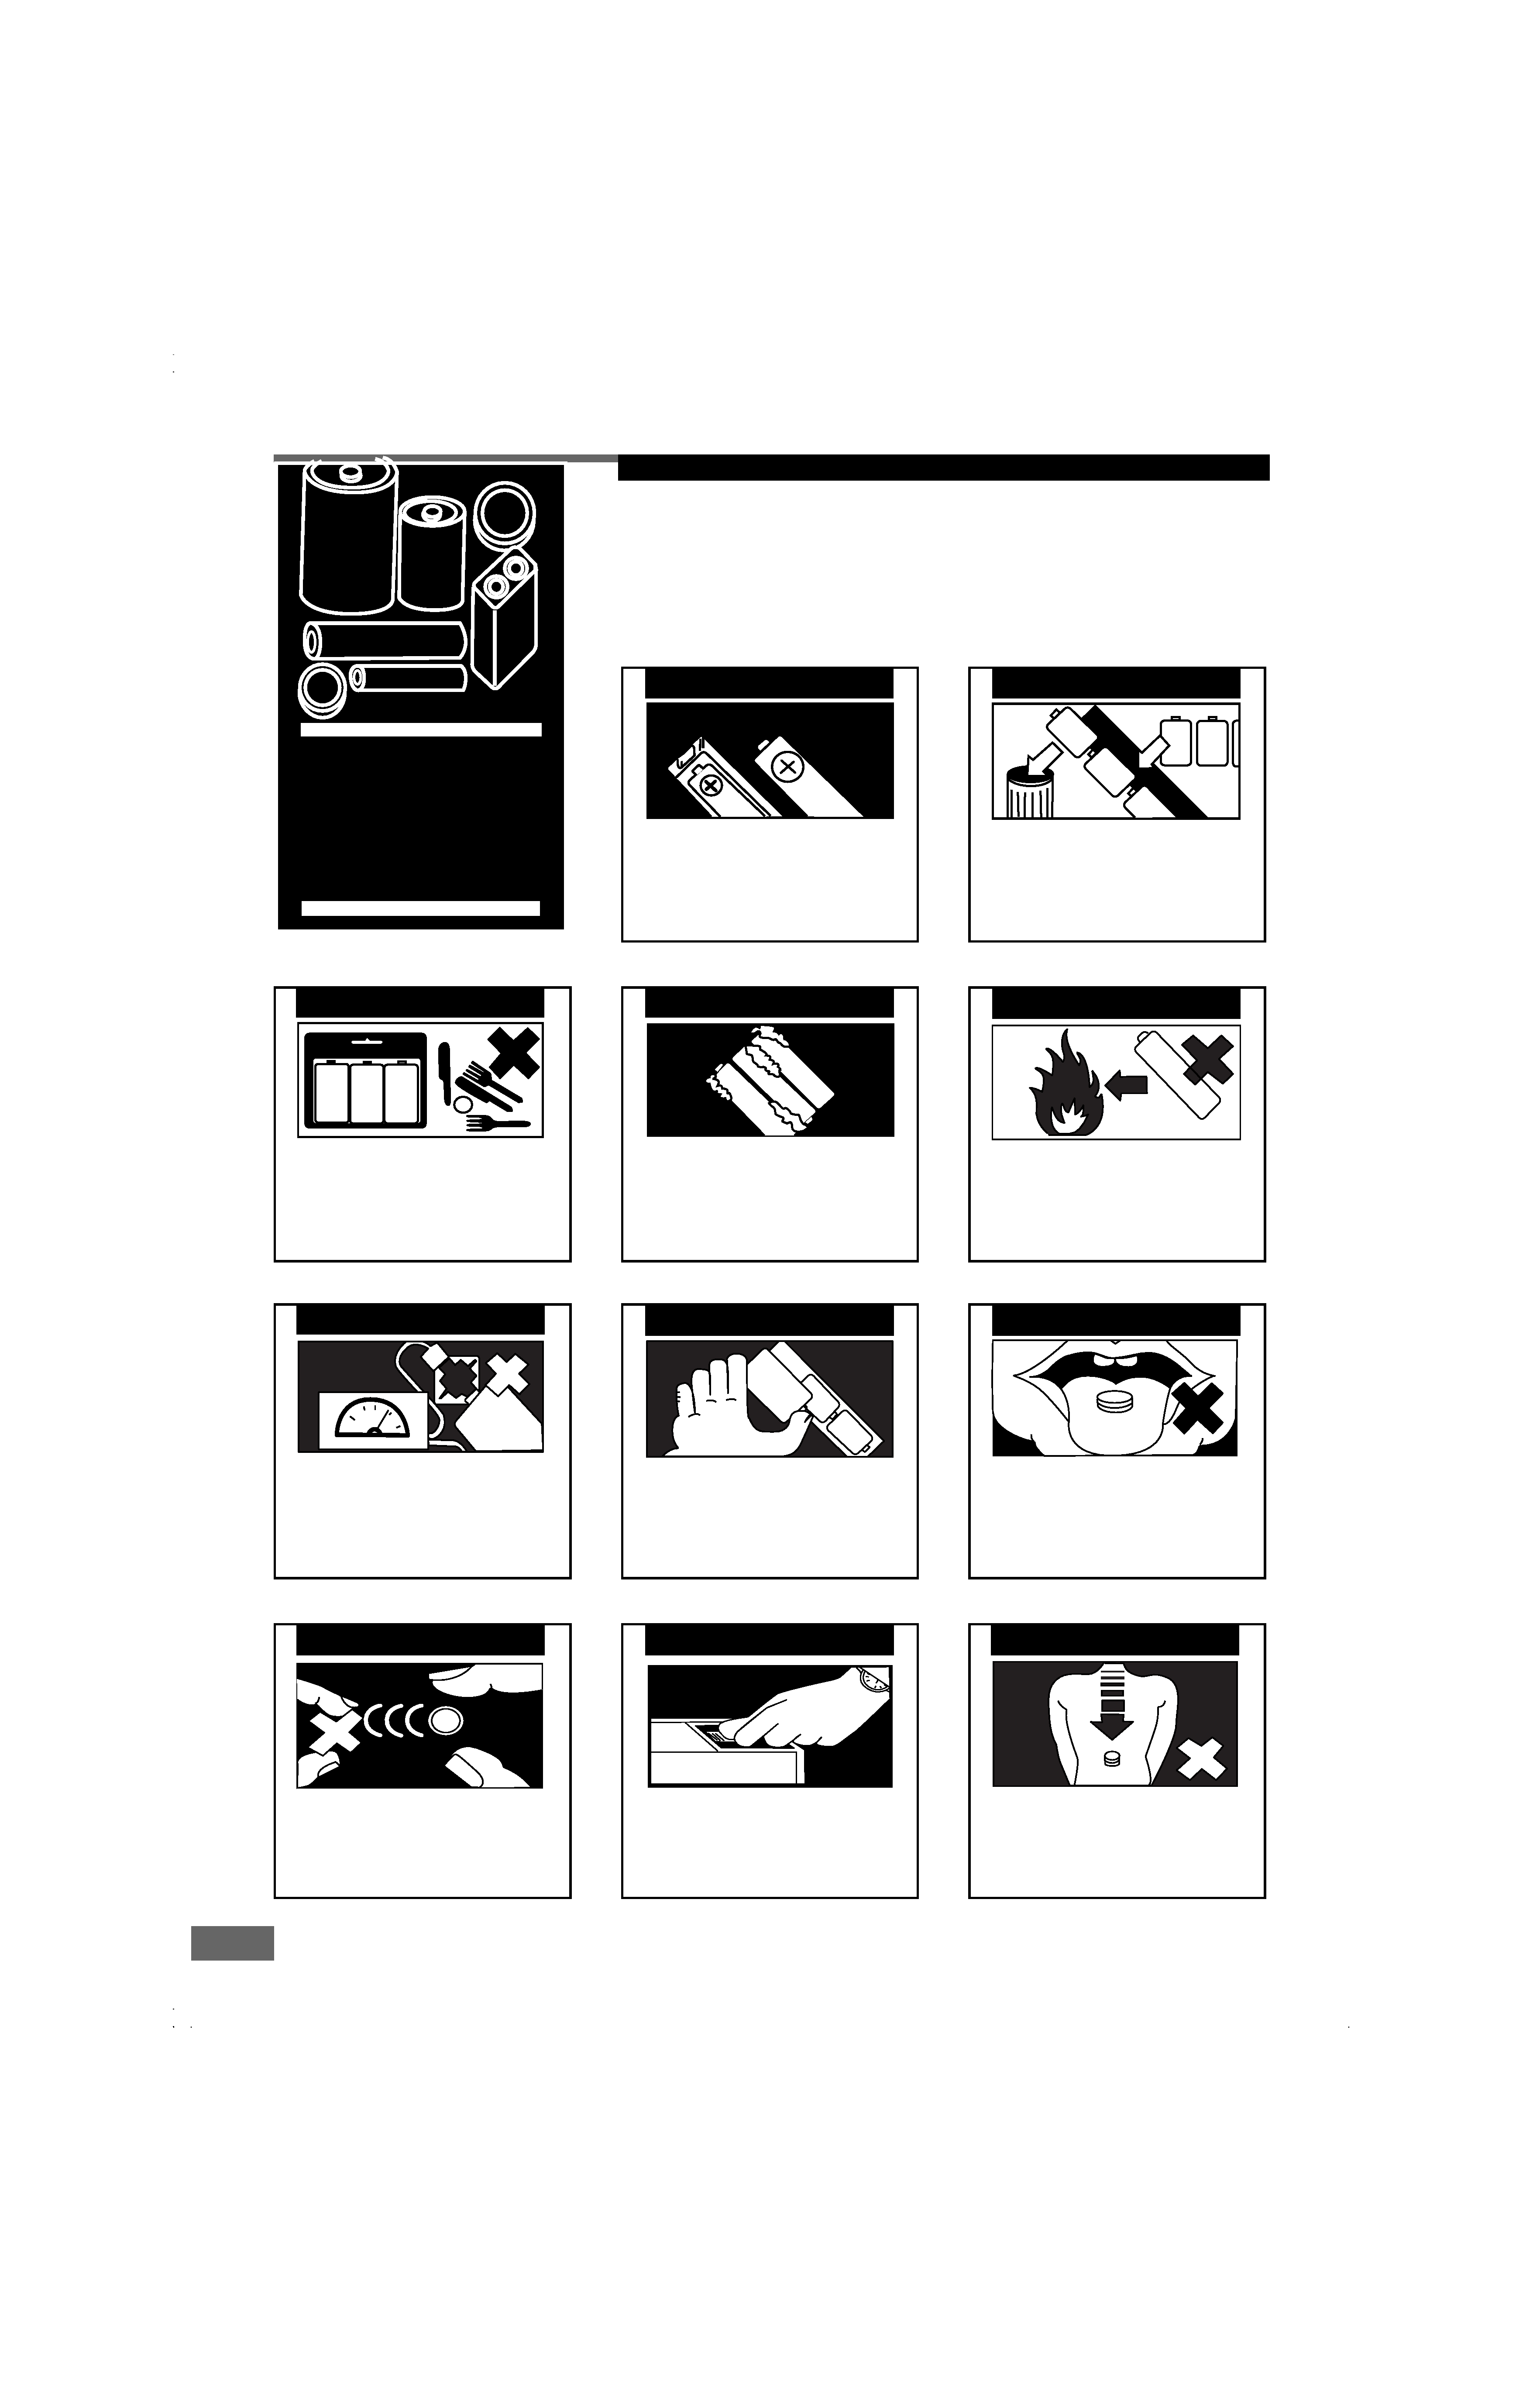
Used correctly, domestic batteries are a safe and dependable source of
portable power. Problems can occur if they are misused or abused -
resulting in leakage or, in extreme cases, fire or explosion.
Here are some simple guidelines to safe battery use designed to eliminate
any such problems.
PLEASE PHOTOCOPY AND DISPLAY
Take care to fit your batteries
correctly,observing the plus and
minus marks on the battery and
appliance. Incorrect fitting can cause
leakage or in extreme cases, fire or
even an explosion.
ALWAYS
Replace the whole set of batteries at
one time,taking care not to mix old
and new batteries or batteries of
different types, since this can result in
leakage or in extreme cases, fire or
even an explosion.
ALWAYS
Store unused batteries in their
packaging and away from metal
objects which may cause a short-
circuit resulting in leakage or, in
extreme cases, fire or even an
explosion.
ALWAYS
Remove dead batteries from
equipmentandallbatteriesfrom
equipment you know you are not
going to use for a long time.Otherwise
the batteries may leak and cause
damage.
ALWAYS
Never dispose of batteries in fire as
this can cause them to explode.
Please put dead batteries in with the
normal household waste.
NEVER
Supervise children if they are replacing
batteries themselves in order to ensure
these guidelines are followed.
ALWAYS
Never attempt to recharge ordinary
batteries, either in a charger or by
applying heat to them. They may leak
cause fire or even explode. There are
special rechargeable batteries which
are clearly marked as such.
NEVER
Rememberthatsmallbuttoncell
batteries such as used in some
hearing aids, toys, games and other
appliances, are easily swallowed by
young children and this can be
dangerous.
NEVER
Make sure battery compartments are
secure.
ALWAYS
Keep loose button cells away from
youngchildren.
ALWAYS
Seek medical advice if you believe a
cell has been swallowed.
ALWAYS
BATTERY
SAFETY
GUIDELINES

5
Español
Svenska
Italiano
Français
Deutsch
English
5
T
TT
T
Taaaaabbbbble of
le of
le of
le of
le of Contents
Contents
Contents
Contents
Contents
Important Safeguards and Precautions ............................ 6~7
Features of This System ....................................................... 7
Conventions about This Manual ............................................ 7
Type of Disc That Can be Played on This System ................. 8
Notes on Discs ..................................................................... 9
Selecting the Type of Disc for the Connected TV ................ 10
Functional Ov
Functional Ov
Functional Ov
Functional Ov
Functional Over
er
er
er
ervie
vie
vie
vie
view
w
w
w
w........11~13
Index to parts and control(Front Panel) ................................ 11
Index to parts and control(Rear Panel) ................................ 12
Index to parts and control(Remote Control) ......................... 13
Installations
Installations
Installations
Installations
Installations .....................................14~17
Unpacking ........................................................................ 14
Inserting Batteries into the Remote Control .................... 14
Speaker System Hookup ................................................. 15
Antenna Hookups ............................................................. 16
TV and Optional Component Hookups ............................ 17
Connecting the AC Power Cord ....................................... 17
Basic Functional
Basic Functional
Basic Functional
Basic Functional
Basic Functional......................18~25
Basic Play ..................................................................... 18~19
Slow-Motion Play ................................................................ 19
Locate a Point Quickly ...................................................... 19
Skip Next or Previous ....................................................... 19
Using the Menu for Each DVD ......................................... 20
Playing Video CDs with PBC ............................................ 21
Repeat Play ...................................................................... 22
A-B Repeat Play ................................................................ 22
Program Play .................................................................... 23
EQ Play ............................................................................. 23
Selecting a Start Point Using the Time Code .................. 24
Selecting a Track Using Number Buttons ....................... 24
Checking Information Using Display ............................... 25
Settings & Adjustments
Settings & Adjustments
Settings & Adjustments
Settings & Adjustments
Settings & Adjustments..26~34
Using the SETUP Menu ............................................. 26~27
SETUP Menu Item List ..................................................... 28
GENERAL SETUP
TV Display Setting ............................................................... 29
TV Type Setting ................................................................... 29
Video Out Setting ................................................................ 29
Angle Mark Setting .............................................................. 30
OSD Language Setting ....................................................... 30
Screen Saver Setting .......................................................... 30
SPEAKER SETUP
Center Delay Setting ........................................................... 31
Rear Delay Setting .............................................................. 31
Test Tone Setting .............................................................. 31
Best Position Setting .................................................. 31~32
AUDIO SETUP
Digital Out Setting ............................................................. 33
Dynamic Setting ............................................................... 33
PREFERENCE SETUP
Audio Setting ....................................................................... 33
Subtitle Setting .................................................................... 33
Disc Menu Setting ............................................................... 34
Parental Setting .................................................................. 34
Password Setting ............................................................... 34
Defaults Setting .................................................................. 44
EXIT SETUP
Exit Setting .......................................................................... 34
Special Functions
Special Functions
Special Functions
Special Functions
Special Functions .................35~37
Picture Zooming .................................................................. 35
Angle Selection ................................................................... 36
Subtitle Language Selection ................................................ 36
Audio Language Selection ................................................... 36
Using Headphones .............................................................. 37
Other Functions
Other Functions
Other Functions
Other Functions
Other Functions.........................38~41
Listening to the Radio ................................................... 38~39
Presetting Radio Stations ................................................... 39
Listening to an External Source ........................................... 40
Selecting Listening Modes ................................................... 40
Using the Sleep Timer ......................................................... 41
Ad
Ad
Ad
Ad
Additional Inf
ditional Inf
ditional Inf
ditional Inf
ditional Infor
or
or
or
orma
ma
ma
ma
mation
tion
tion
tion
tion 42~46
Troubleshooting ............................................................ 42~44
Glossary ....................................................................... 44~45
Specifications ..................................................................... 46