
Users Guide
CL2554AN/CL2854AN

IMPORTANT SAFEGUARDS ................................................................................2
TV INSTALLATION................................................................................................3
· Inserting batteries into the Remote Control ...................................................3
· Aerial connection & Mains connection ..........................................................3
· TV controls.....................................................................................................3
· Switching ON and OFF .................................................................................3
IDENTIFICATION OF REMOTE CONTROL FUNCTIONS .................................4
LANGUAGE SELECTION .....................................................................................4
TUNING IN THE TV CHANNELS .........................................................................5
· Automatic Tuning ..........................................................................................5
· Edit ................................................................................................................5
· Manual Tuning ..............................................................................................6
DAILY TV OPERATION ........................................................................................7
· Selecting a programme number ...................................................................7
· Volume control ..............................................................................................7
· Picture controls .............................................................................................7
· Sound controls ..............................................................................................7
· Features Menu ..............................................................................................7
· Format selection................................................................................7
· Child lock...........................................................................................8
· Clock menu .......................................................................................8
· Wake Time menu ..............................................................................8
· Wake PR menu .................................................................................8
· Sleep - Auto turn off timer setting ..................................................................8
· Recall .............................................................................................................8
TELETEXT ............................................................................................................9
CONNECTING EXTERNAL EQUIPMENT .........................................................10
TROUBLESHOOTING .........................................................................................11
SPECIFICATIONS ...............................................................................................11
TABLE OF CONTENTS
GB

For your own protection, please read these safety instructions completely before operating the appliance, and keep
this manual for future reference.
Carefully observe all warnings, precautions, and instructions on the appliance, and those described in the operating
instructions, and adhere to them.
INSTALLATION
Water and Moisture :
Do not use mains power operated
sets near water, for example near a
bathtub, washbowl, kitchen sink,
laundry tub, in a wet basement, or
near a swimming pool etc.
Accessories :
Do not place the set on an unstable
trolley, stand, tripod, bracket or
table. The set may fall, causing
serious injury to a child or adult and
serious damage to the set. Use only
a trolley, stand, tripod, bracket
or
table recommanded by the manufac-
turer.
Ventilation :
The slots and openings in the
cabinet are provided for necessary
ventilation.
To
ensure
reliable
operation of the set, and to protect it
from overheating, these slots and
openings must never be blocked or
covered.
Never cover the slots and openings
with a cloth or any other materials.
Never block the slots and openings
by placing the set on a bed, sofa, rug
or other similar surface.
Never place the set in a confined
space such as a bookcase, or built-
in cabinet, unless proper ventilation
is provided.
Do not place the set near or over a
radiator, heat source or where it is
likely to be exposed to direct
sunlight.
Power Cord Protection :
Route the power cord so that it is
unlikely to be walked on pinched by
items placed on or against it, paying
particular attention to the plugs,
receptacles, and the point where the
cord exits from the appliance.
USE
Power sources :
This set should be operated only
from the type of power source
indicated on the marking label. If you
are not sure of the type of electrical
power
supplied
at
your
home,
consult your dealer or local power
company. For those sets designed to
operate from battery power, or other
sources, refer to the operating ins-
tructions.
Overloading :
Do
not
overload
wall
outlets,
extension cords or convenience
receptacles beyond their capacity,
since this can result in fire or electric
shock.
Object and Liquid Entry :
Never allow objects or liquid to enter
the interior of the set as this may
result in damage to the set, cause an
electric shock or even cause a fire.
Attachments :
Do not use attachments not recom-
mended by the manufacturer, as
they may cause hazards.
Cleaning :
Unplug the set from the mains
before cleaning. Do not use liquid
cleaners or aerosols. Use a cloth
lightly dampened with water for
cleaning the exterior of the set.
SERVICE
Damage Requiring Service :
Unplug the set from the wall outlet
and refer servicing to qualified
service
personnel
under
the
following conditions.
When the power cord or plug is
damaged or frayed.
If liquid has been spilled or objects
have fallen into the set.
If the set has been exposed to rain
or water.
If the set has been subject to
excessive shock by being dropped
or the cabinet has been damaged.
If the set does not operate normally
when following the operating instruc-
tions. Adjust only those controls that
are specified in the operating ins-
tructions. Improper adjustment of
other controls may result in damage
and will often require extensive work
by a qualified technician to restore
the set to normal operation.
When the set exhibits a distinct
change in performance this indicates
a need for service.
Servicing :
Please do not attempt to repair or
service this set yourself as removal
of the back cover could expose you
to dangerous voltages.
Replacement Parts :
When
replacement
parts
are
required, be sure the service techni-
cian has used replacement parts
specified by the manufacturer that
have the same characteristics as the
original parts. Unauthorized substi-
tutions may result in fire, electric
shock or other hazards.
Safety Check :
Upon completion of any service or
repair to the set, ask the service
technician to perform routine safety
checks (as specified by the manu-
facturer) to determine that the set is
in a safe operating condition.
IMPORTANT SAFEGUARDS
GB
TV INSTALLATION
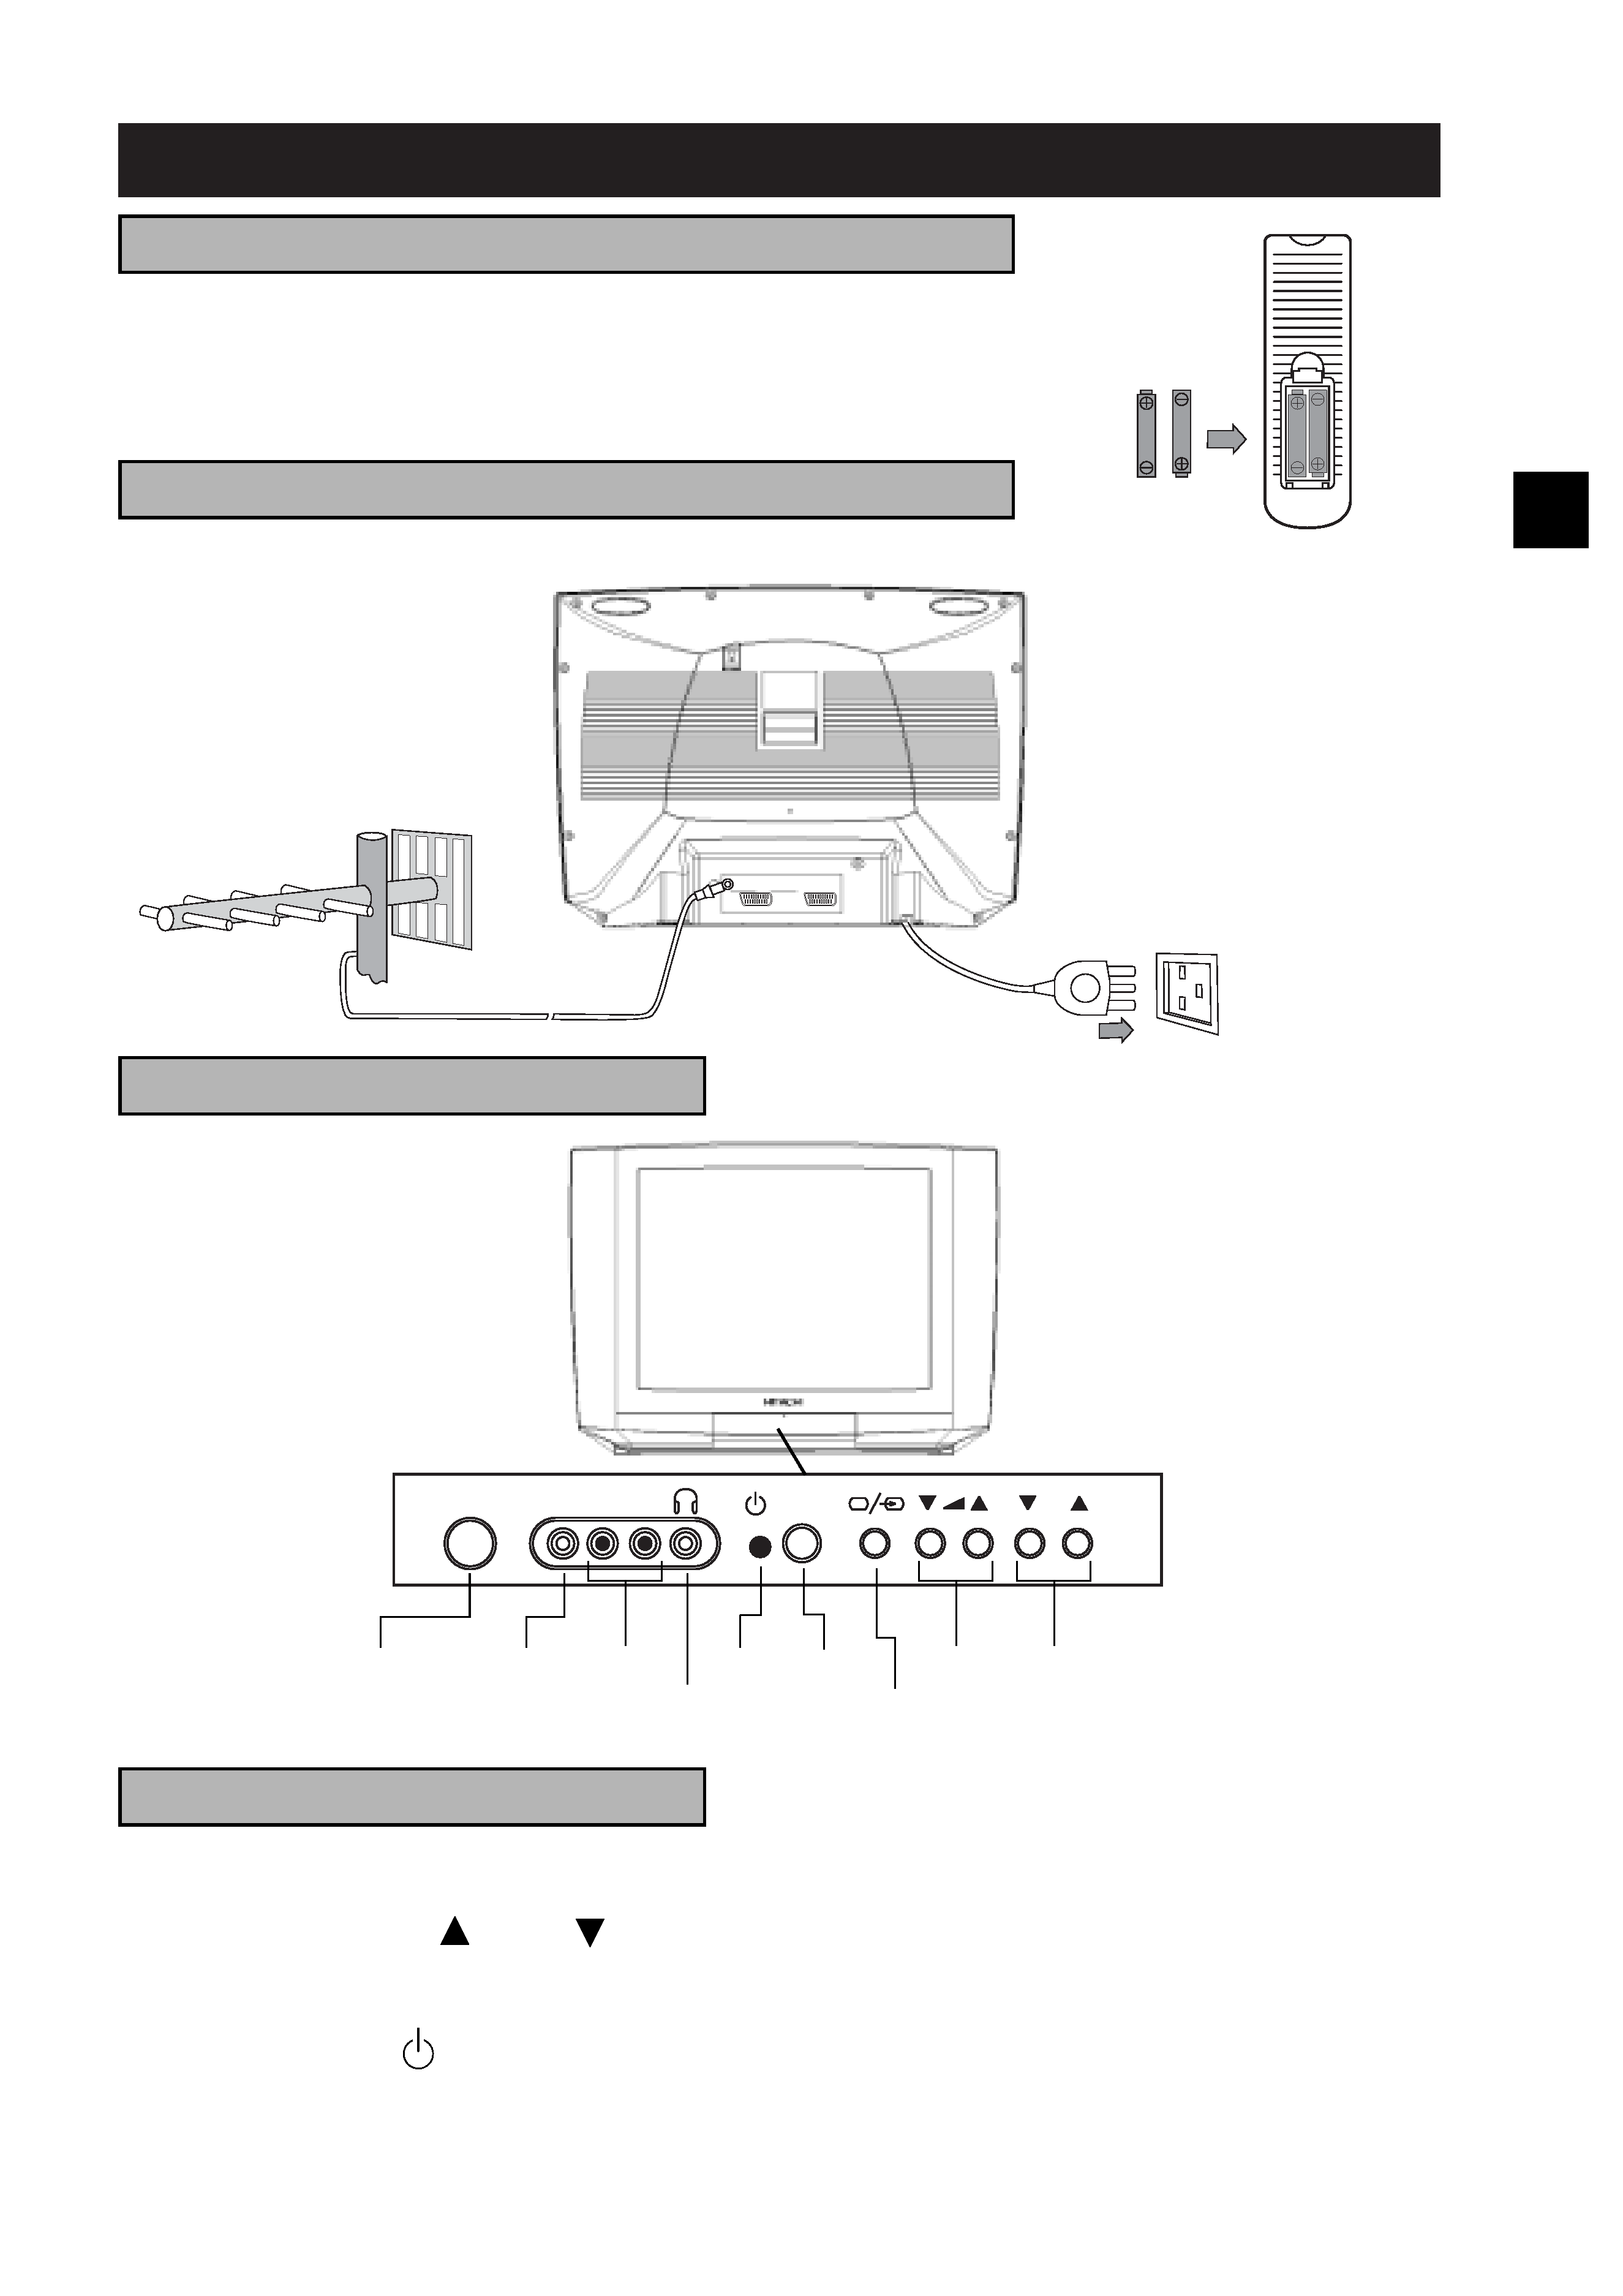
Insert the batteries (two 1.5V type AAA) supplied with the set. Make sure that
the polarity matches with the (+) and (-) marks inside the battery compartment.
Do not forget to Replace the battery cover.
INSERTING BATTERIES INTO THE REMOTE CONTROL
When using an outdoor aerial, it
is usually connected to the set
by means of 75 ohms coaxial
cable.
For
correct
colour
reception an effective aerial ins-
tallation is most important.
Plug the mains cable into the
power socket with 220-240 V /
50Hz AC.
AERIAL CONNECTION & MAINS CONNECTION
AV1
AV2
220-240 V 50 Hz AC
TV CONTROLS
Ì SWITCHING ON
Switch the set on with the power button, (ON/OFF) and then PR UP or DOWN buttons on the front of the set. Or
POWER button or the «PR
and PR
» button or one of the NUMBER buttons on the remote control.
Ì SWITCHING OFF
Press POWER button (
) on the remote control to return the set to its standby mode.
If you don't use the set for an extended period of time turn it off with MAIN POWER button on the set.
SWITCHING ON AND OFF
VIDEO
L AUDIO R
PR
ON/OFF
Mains power
button
Video
input
sockets
Audio
input sockets
Head Phone
socket
Stand-by
indicator
Programme
+/-
buttons
Volume
+/-
buttons
TV/AV
button
Remote
sensor
GB
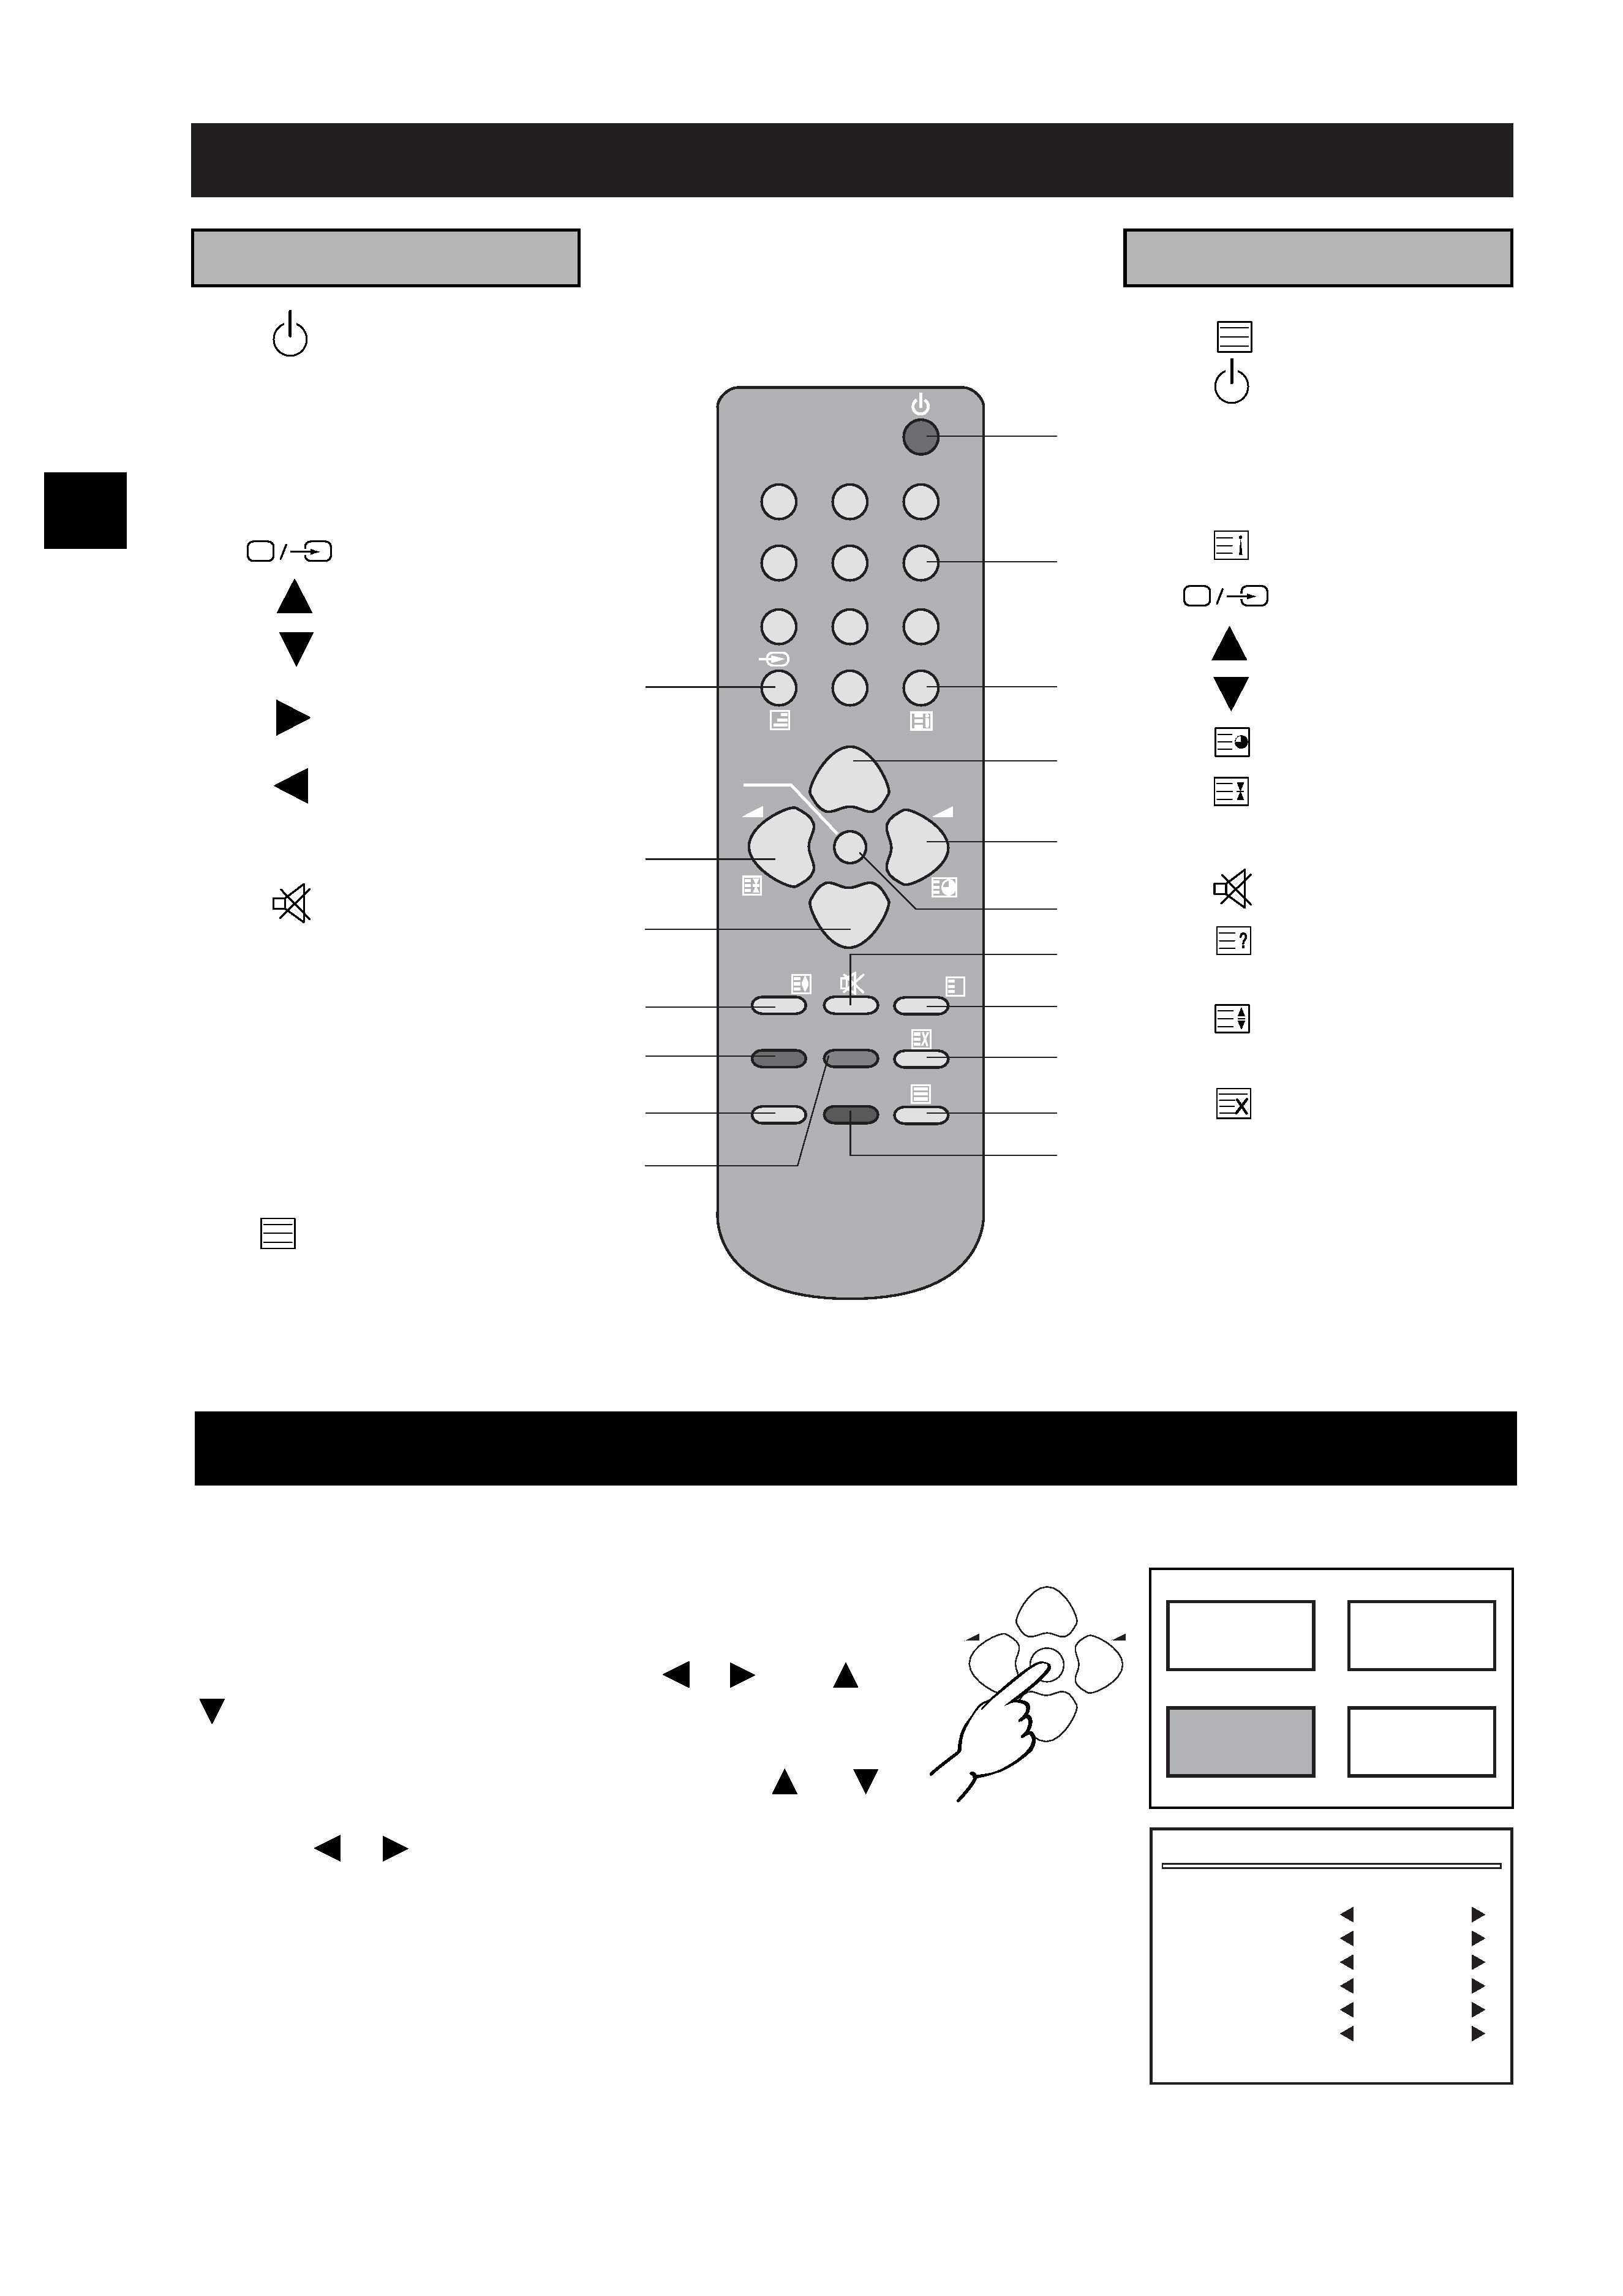
IDENTIFICATION OF REMOTE CONTROL FUNCTIONS
TV MODE
TELETEXT MODE
1
2
3
4
5
6
7
8
9
0
PR
PR
MENU
NORMAL/OK
SLEEP
RECALL
DELETE
SKIP
MOVE
MODE
?
R
Y
G
C
R-40A01
1
2
3
5
7
9
10
11
13
16
18
4
8
6
12
15
17
14
1.
POWER ON/OFF
(stand-by mode)
2.
0 - 9
Channel selector
3.
OK
3.
NORMAL
Picture selection
4.
TV/AV selector
5.
PR (CURSOR) UP
6.
PR (CURSOR)
DOWN
7.
VOLUME UP
(CURSOR RIGHT)
8.
VOLUME DOWN
(CURSOR LEFT)
9.
MENU
Display ON/OFF
10.
MUTE
11.
RECALL
Display status of
viewed channel
12.
SLEEP
TV auto off-time
selection
13.
not used
14.
MOVE
(Edit mode only)
15.
SKIP
(Edit mode only)
16.
TV / TEXT
17.
DELETE
(Edit mode only)
18.
MODE
16.
TV / TEXT
1.
POWER ON/OFF
(stand-by mode)
2.
0 - 9
Teletext page
selector
3.
INDEX page
4.
MIX
5.
PAGE UP
6.
PAGE DOWN
7.
SUBPAGE
8.
HOLD
9.
MENU
10.
MUTE
11.
Revealing hidden
answer
12.
Doubling teletext
character size
13.
Temporary cancela-
tion of teletext
14.
GREEN KEY
15.
RED KEY
17.
CYAN KEY
18.
YELLOW KEY
LANGUAGE SELECTION
The on screen Menu language is set to English at the factory. If you wish to select another language please follow
the instructions below.
Press remote control MENU button to display Main Menu.
Move the cursor to FEATURES by using "
or
" and "
or
" buttons, then press OK button.
Position the cursor at LANGUAGE by using "
or
"
buttons and select country code of the desired language by
pressing "
or
" buttons.
"GB" English
"NL"
Dutch
"D"
German
"N"
Norwegian
"I"
italian
"SF"
Finish
"F"
French
"DK"
Danish
"E"
Spanish
"S"
Swedish
Press MENU button to return to Main Menu for further operations.
PICTURE
SOUND
FEATURES
INSTALL
FEATURES
LANGUAGE
FORMAT
CHILD LOCK
CLOCK
WAKE TIME
WAKE PR
GB
4 : 3
OFF
00 : 00
OFF
01
PR
PR
GB