User's Guide
for the
CRATE
KX-220
Stereo Keyboard Amplifier
Please read this user's
guide before using your
new amplifier!
2
THIS EQUIPMENT HAS BEEN DESIGNED AND
ENGINEERED TO PROVIDE SAFE AND RELIABLE
OPERATION. IN ORDER TO PROLONG THE LIFE
OF THE UNIT AND PREVENT ACCIDENTAL DAM-
AGES OR INJURY, PLEASE FOLLOW THESE PRE-
CAUTIONARY GUIDELINES:
CAUTION: TO REDUCE THE RISK OF ELECTRIC
SHOCK, DO NOT OPEN CHASSIS; DO NOT
DEFEAT OR REMOVE THE GROUND PIN OF THE
POWER CORD; CONNECT ONLY TO A PROPERLY
GROUNDED AC POWER OUTLET.
WARNING: TO REDUCE THE RISK OF FIRE OR
ELECTRIC SHOCK, DO NOT EXPOSE THIS EQUIP-
MENT TO RAIN OR MOISTURE.
CAUTION:
NO
USER-SERVICEABLE
PARTS
INSIDE. REFER SERVICING TO QUALIFIED SER-
VICE PERSONNEL.
CAUTION: OUR AMPLIFIERS ARE CAPABLE OF
PRODUCING HIGH SOUND PRESSURE LEVELS.
CONTINUED EXPOSURE TO HIGH SOUND PRES-
SURE LEVELS CAN CAUSE PERMANENT HEAR-
ING IMPAIRMENT OR LOSS. USER CAUTION IS
ADVISED AND EAR PROTECTION IS RECOM-
MENDED IF UNIT IS OPERATED AT HIGH VOLUME.
CAUTION
RISK OF ELECTRIC SHOCK
DO NOT OPEN
CAUTION: TO REDUCE THE RISK OF ELECTRIC SHOCK,
DO NOT REMOVE COVER.
NO USER-SERVICEABLE PARTS INSIDE.
REFER SERVICING TO QUALIFIED SERVICE PERSONNEL.
"IT IS NECESSARY FOR THE USER TO REFER TO THE INSTRUCTION MANUAL"
"ES NECESARIO QUE EL USUARIO SE REFIERA AL MANUAL DE INSTRUCCIONES."
"REFERREZ-VOUS AU MANUAL D'UTILISATION"
"UNBEDINGT IN DER BEDIENUNGSANLEITUNG NACHSCHLAGEN"
EXPLANATION OF GRAPHICAL SYMBOLS:
EXPLICACION DE SIMBOLOS GRAFICOS:
"DANGEROUS VOLTAGE"
"VOLTAJE PELIGROSO"
"DANGER HAUTE TENSION"
"GEFAHLICHE SPANNUNG"
=
=
PRECAUCION
RIESGO DE CORRIENTAZO
NO ABRA
PRECAUCION PARA DISMINUOIR EL RIESGO DE CORRIENTAZO
NO ABRA LA CUBIERTA
NO HAY PIEZAS ADENTRO QUE EL USARIO PUEDO REPARAR
DEJE TODO MANTENIMIENTO A LOS TECHNICOS CALIFICADOS
ATTENTION
RISQUE D'ELECTROCUTION
NE PAS OUVRIR
ATTENTION: POUR REDUIRE D'ELECTROCUTION NE PAS
ENLEVER LE COUVERCLE. AUCUNE PIECE INTERNE N'EST REPRABLE
PAR L'UTILISATEUR. POUR TOUTE REPARATION, S'ADRESSER A UN
TECHNICIEN QUALIFIE.
VORSICHT
ELEKTRISCHE SCHLAGGEFAHR
NICHT OFFENEN
VORSICHT: ZUR MINIMIERUNG ELEKTRISCHER SCHLAGGEFAHR NICHT
DEN DECKEL ABENHMEN. INTERNE TEILE KONNEN NICHT VOM
BENUTZER GEWARTET WERDEN. DIE WARTUNG IS QUALIFIZIERTEM
WARTUNGSPERSONAL ZU UBERLASSEN.
ESTE APARATO HA SIDO DISENADO Y CON-
STRUIDO PARA PROVEER ANOS DE OPERACION
SEGURA Y CONFIABLE. PARA PROLONGAR LA
VIDA DE ESTA UNIDAD E IMPEDIR DANOS ACCI-
DENTALES POR FAVOR SIGA ESTAS INSTRUC-
CIONES PREVENTIVAS:
PRECAUCION: PARA DISMINUIR EL RIESGO DE
DESCARGAS ELÉLECTRICAS: (1) NO ABRA LA
CUBIERTA,
(2)
NO
ES
RECOMENDABLE
REMOVER O DESACTIVAR LA PATA DEL POLO A
TIERRA DEL CABLE DE CORRIENTE, CONECTE
CORRECTAMENTE A UNA TOMA DE CORRIENTE
A TIERRA.
ADVERTENCIA: PARA EVITAR DESCARGAS
ELECTRICAS O PELIGRO DE INCENDIO, NO DEJE
ESTE APARATO EXPUESTO A LA LLUVIA O
HUMEDAD.
PRECAUCION: NO HAY PIEZAS ADENTRO QUE
EL USUARIO PUEDE REPARAR. DEJE TODO MAN-
TENIMIENTO A LOS TÉCNICOS CALIFICADOS.
PRECAUCION: NUESTROS AMPLIFICADORES
PUEDEN PRODUCIR NIVELES DE PRESION DE
SONIDO ALTO. EXPOSICION CONTINUADA A LOS
NIVELES DE PRESION DE SONIDO ALTO PUEDE
CAUSA DANO PERMANENTE A SU OIDO. ES
ACONSEJADO QUE USE PRECAUCION AL
USUARIO Y ES RECOMENDADO PROTECCION
PARA LOS OIDOS SI LA UNIDAD ES OPERADA A
VOLUMEN ALTO.
THE CHART BELOW SHOWS THE U.S. GOVERNMENT'S OCCUPATIONAL SAFETY AND HEALTH ADMINISTRATION (OSHA) REGULATIONS WHICH WERE IN EFFECT AT THE TIME OF THIS PUB-
LICATION FOR PERMISSIBLE NOISE EXPOSURE, PER 29CFR1910.95, TABLE G-16:
ACCORDING TO OSHA, ANY EXPOSURE IN EXCESS TO THESE AMOUNTS LISTED ABOVE COULD RESULT IN SOME HEARING LOSS.
SOUND LEVEL DBA,
DURATION PER DAY
SOUND LEVEL DBA,
DURATION PER DAY
SOUND LEVEL DBA,
DURATION PER DAY
SLOW RESPONSE
IN HOURS
SLOW RESPONSE
IN HOURS
SLOW RESPONSE
IN HOURS
90
8
97
3
105
1
92
6
100
2
110
1/2
95
4
102
1 - 1 1/2
115
1/4 or less
Congratulations!
You are now the proud owner of one of the most versatile keyboard amplifiers available, the Crate KX-220
Four Channel Stereo Keyboard Amplifier. This incredible unit features Crate's legendary performance and high
quality construction in a rugged and easy to operate package.
Your KX-220 is proudly made in America, using only the best components. Extensive testing and Crate's
Five-Year Warranty assure you that your new amplifier is the absolute best it can be. In order to get the most
out of it, we strongly urge you to read this manual before using the amplifier.
And thank you for choosing
Table of Contents:
Features . . . . . . . . . . . . . . . . . . . . . . . . . . . . . .3
The Top Panel . . . . . . . . . . . . . . . . . . . . . . . . .4
The Back Panel . . . . . . . . . . . . . . . . . . . . . . . .5
Sample Hookup Diagram . . . . . . . . . . . . . . . . .6
System Block Diagram . . . . . . . . . . . . . . . . . . .7
Technical Specifications . . . . . . . . . . .back cover
KX-220 Stereo Keyboard Amplifier

3
KX-220 Stereo Keyboard Amplifier
Features:
Below are some of the outstanding features which set the KX-220 in a class by itself. Additional information on
these features can be found throughout the remainder of this manual.
·Complete stereo circuitry all the way to the internal power amplifier
·Four separate input channels, each with its own level, pan and
reverb/effect send controls
·Three stereo line level channels, each with 1/4" left and right/mono
input jacks
·One "dual mono" channel, with a 1/4" instrument and an XLR
microphone input jack, plus a two band EQ
·Line out select switches (channels 3 and 4) keeps those channels
out of the external mix if desired
·Eight band stereo graphic EQ for total tone control
·Master level, effects return, reverb return, and line out level controls
·Internal spring reverb
·Stereo effects loop for external effects
·Stereo line out jacks for connecting to a mixing board, recording
unit, or PA system
·Stereo preamp out jacks for connecting to additional amplifiers
·Power amp in jack (use two KX-220's for total stereo performance)
· Built in power amp limiter for clean sound at full output
· Rugged construction and easily accessed controls
· Removable casters for greater mobility
· Crate's exclusive Five Year Warranty (where applicable)
4
KX-220 Stereo Keyboard Amplifier
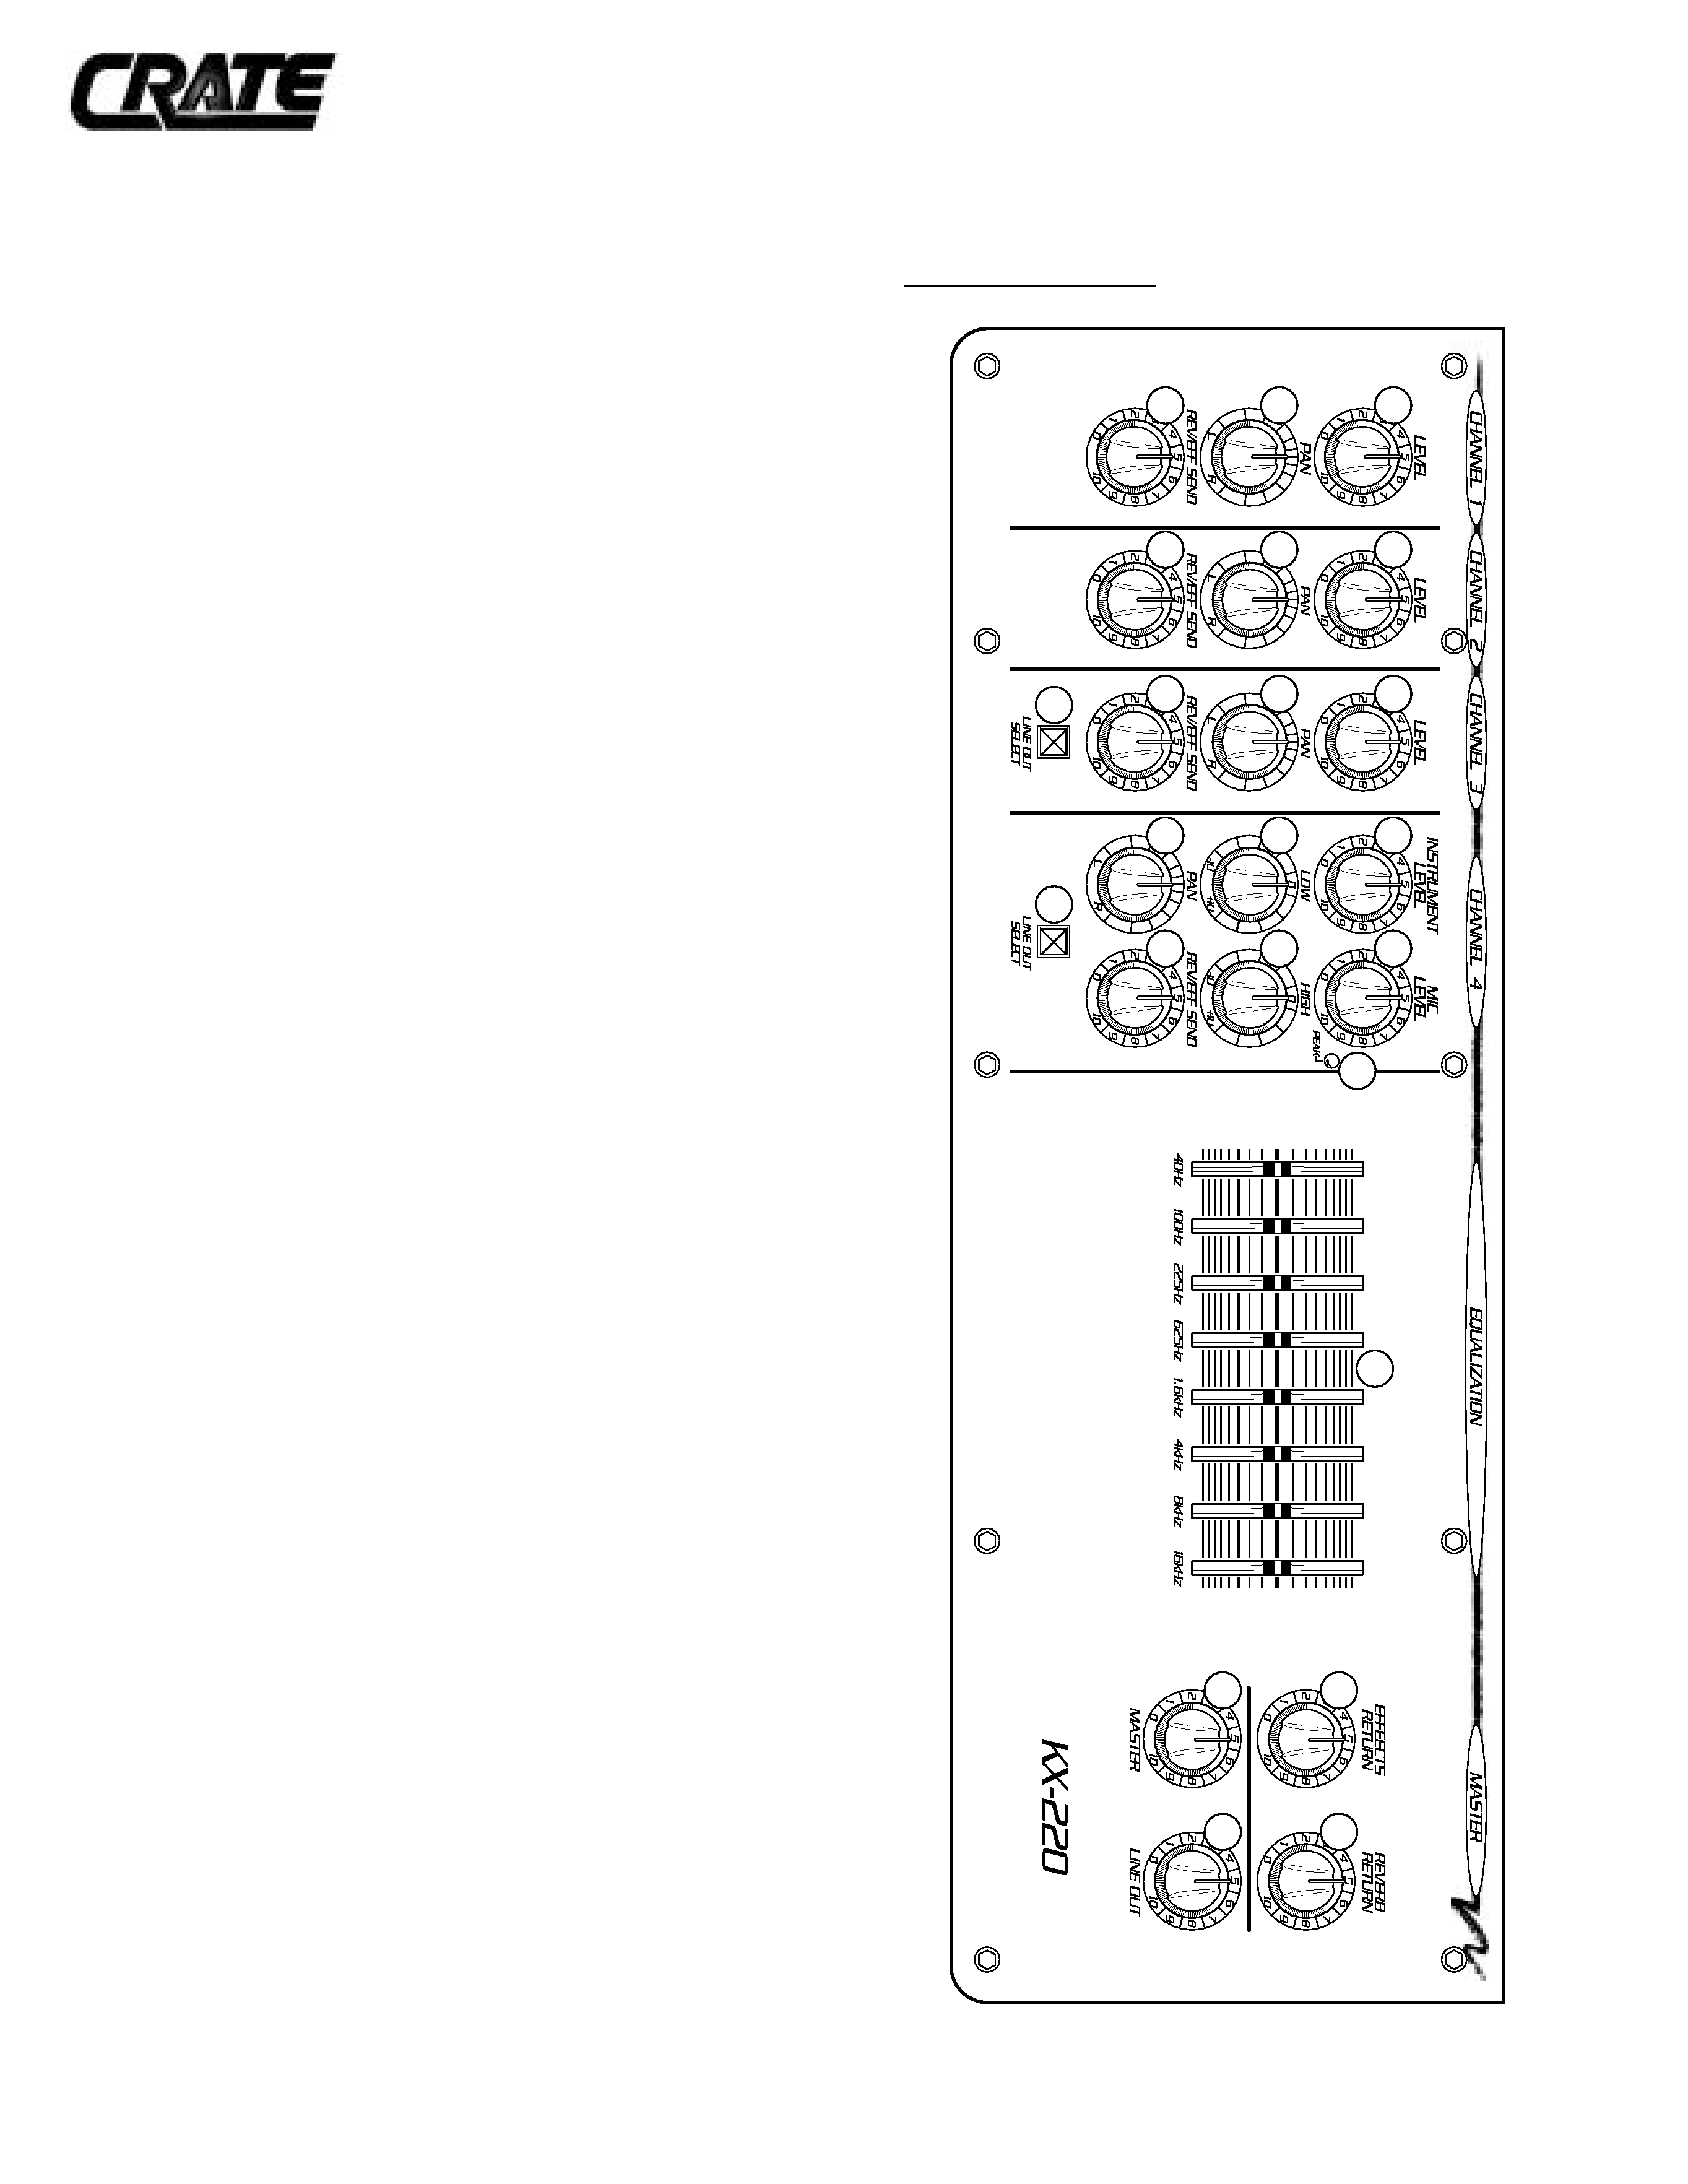
The Top Panel:
3
2
1
3
2
1
3
4
4
2
1
9
8
5
3
13
11
14
12
8
7
10
6
1: Level Control (channel 13): Adjust the input level of the sig-
nal(s) with this control. Each channel's level control governs the
right/mono and left input jacks simultaneously.
2: Pan Control, (channel 13): This control proportions the signal
between the left and right outputs. In stereo applications it acts
as a left/right balance control.
3: Rev/Eff Send Control (all channels): Adjust the amount of signal
sent to the internal reverb and external effect (if used) with this
control.
4: Line Out Select Switch (channels 3 and 4): When this switch is
pressed in, the signal is removed from the line out buss. (For
example, if you want a click track or other signal in your amp but
not in the house mix, press in the switch for that signal's chan-
nel. The signal will still be in your amp, but not in the mix at the
line out jack. You hear it, the house doesn't!)
5: Instrument Level Control (channel 4): An instrument level signal
can be plugged directly into channel 4's instrument jack (#16).
Adjust the level of the instrument with this control.
6: Mic Level (channel 4): A low impedance microphone signal can
be plugged into channel 4's microphone input jack (#17). Adjust
the input level of the microphone signal with this control. The
adjacent peak LED (#7) will light when the signal is too hot.
7: Mic Level Peak LED (channel 4): This LED will light when the
microphone input signal is near clipping. Under normal use, this
LED might flash on peak signals. If the LED stays on, reduce the
mic level control (#6).
8: Low and High EQ: Adjust the low and high frequency levels for
channel 4 with these controls.
9: Pan Control (channel 4): This control proportions the signal
between the left and right outputs.
10: Graphic EQ: Use this eight band stereo graphic equalizer to tai-
lor the output of your amp to best suit your taste and room
acoustics.
11: Effects Return: Adjust the overall amount of external effect (if
used) with this control.
12: Reverb Return: Adjust the overall amount of internal reverb with
this control.
13: Master Level: Adjust the overall output level of the amplifier with
this control.
14: Line Out Level: Adjust the output level of the signal at the line
out jacks (#19) with this control.
5
KX-220 Stereo Keyboard Amplifier
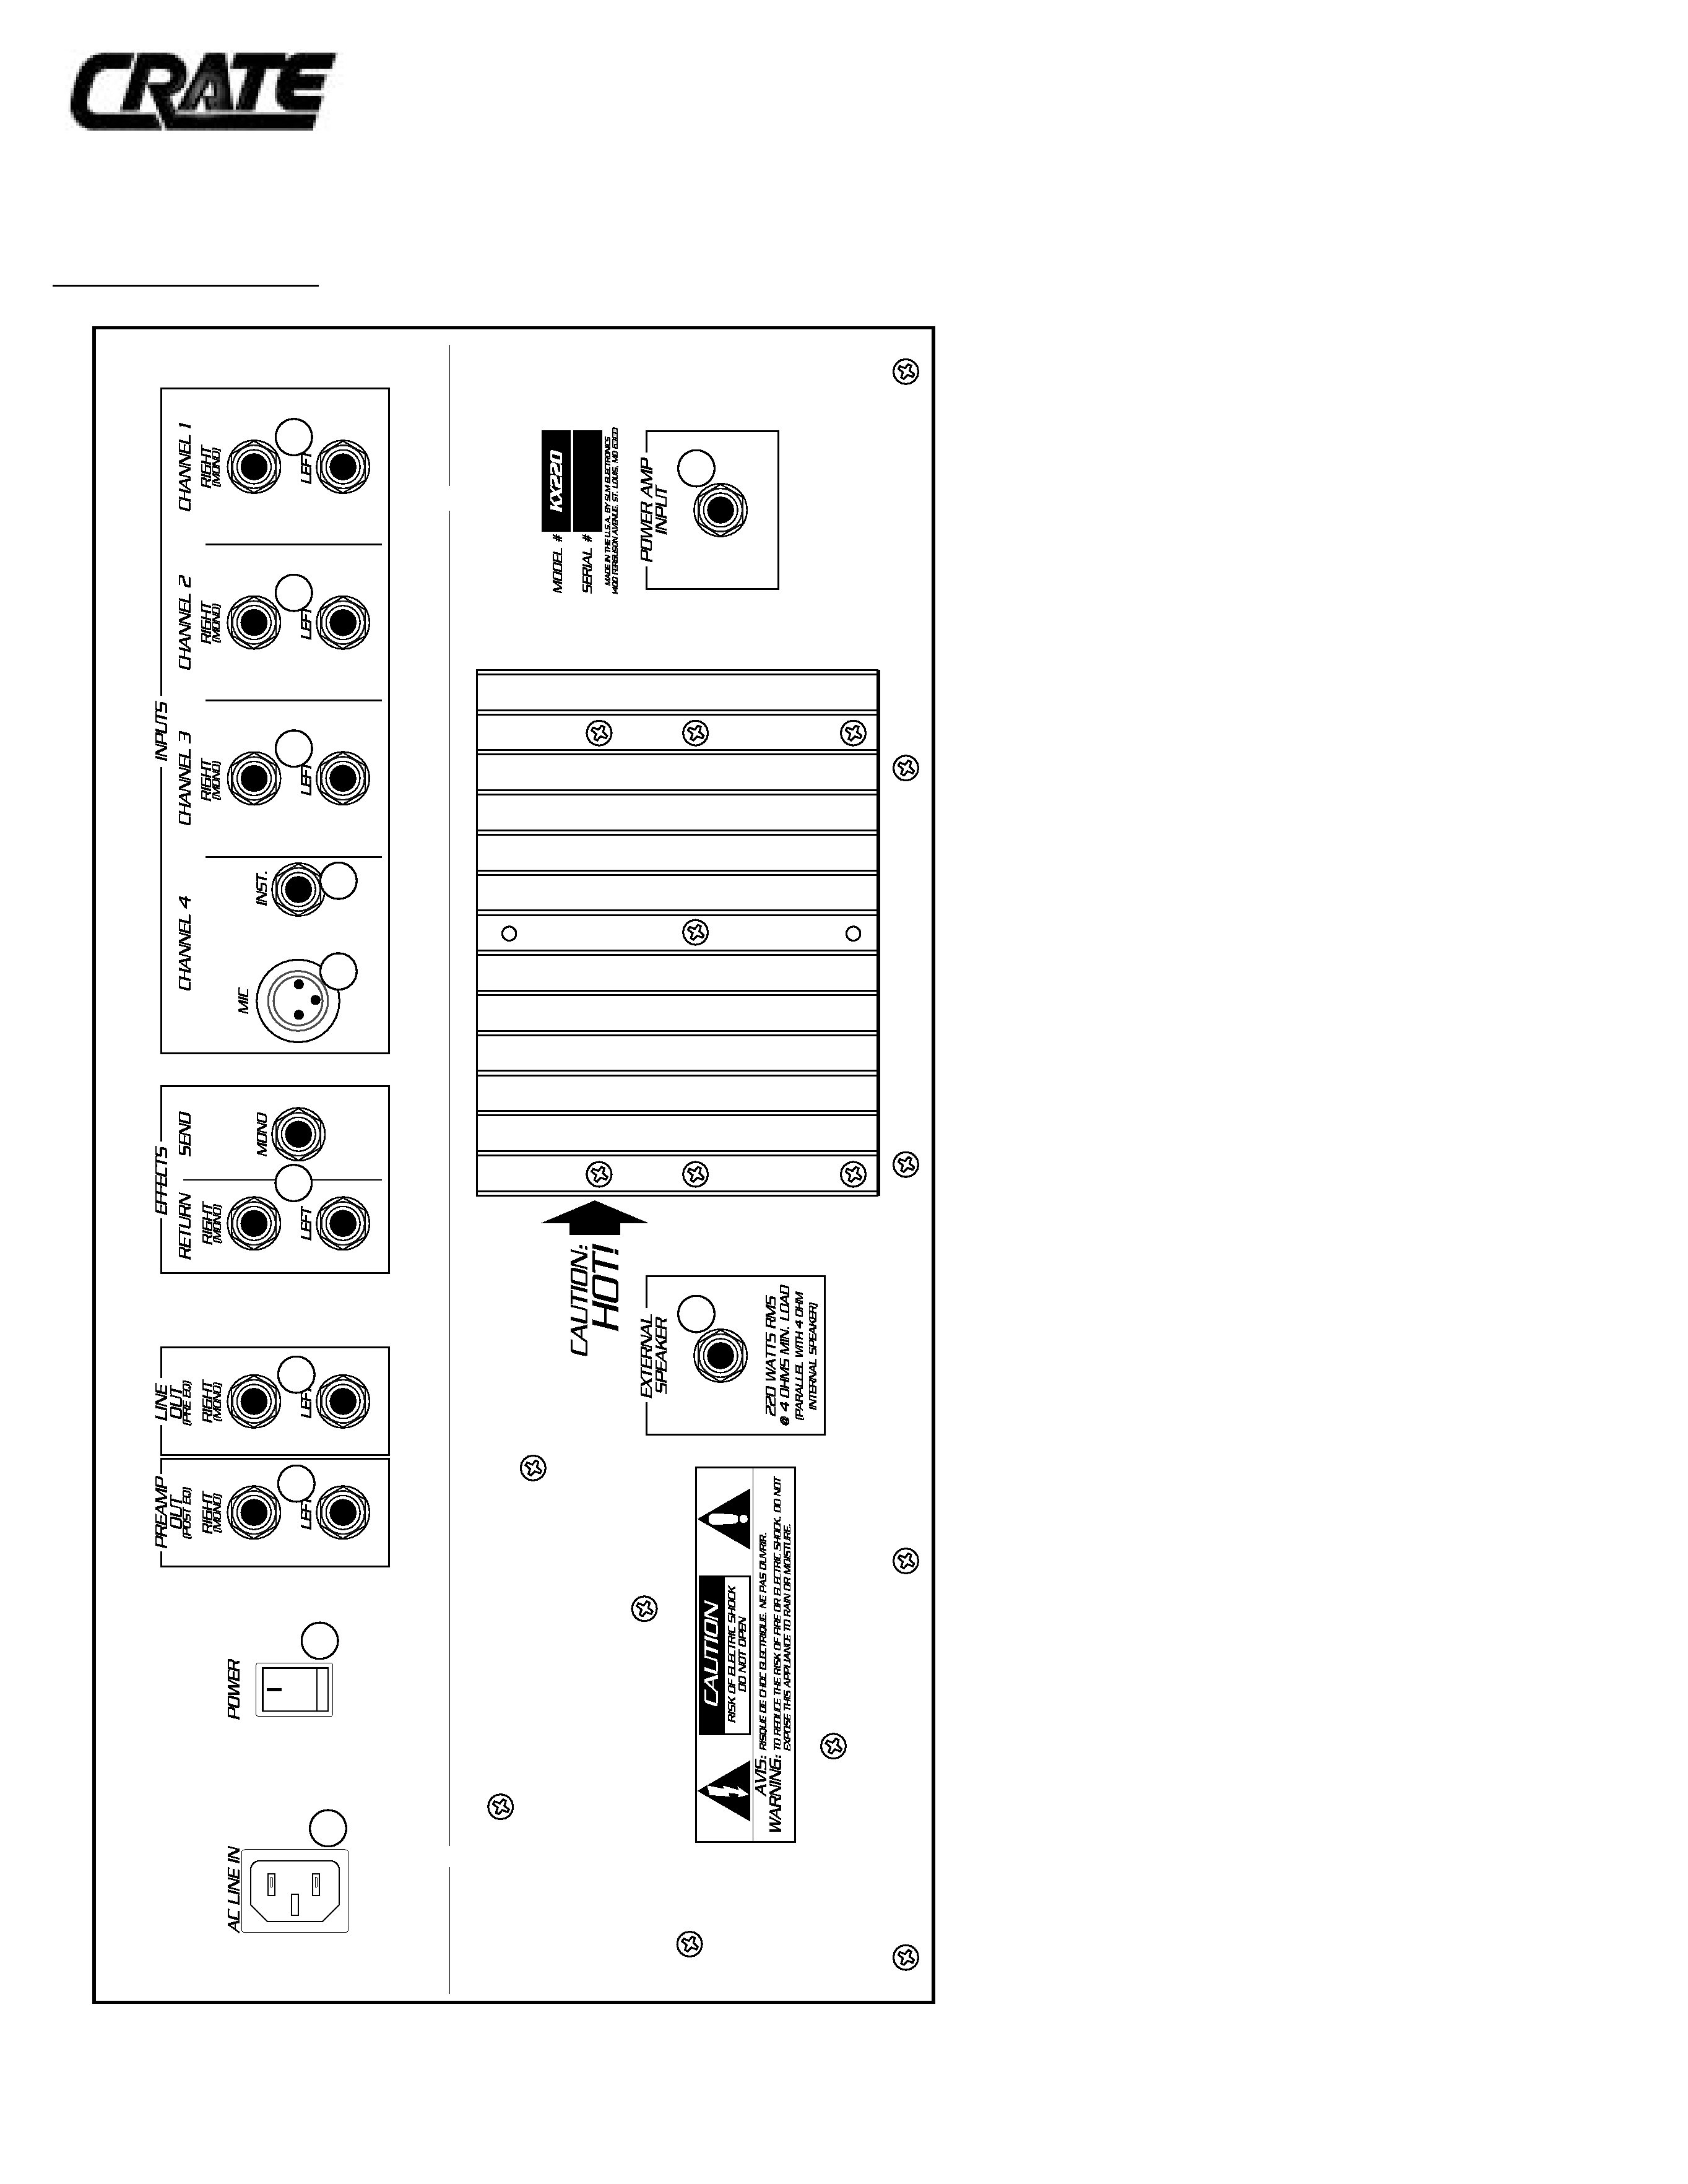
The Rear Panel:
15
15
15
16
17
18
19
23
22
21
24
20
15: Input Jacks (channel 13): Connection of an instrument,
drum machine, tape deck channel, microphone or other
high impedance (balanced or unbalanced) line level signal
with 1/4" plug can be made here. For stereo inputs use the
right/mono jack for the right channel input and the left jack
for the left channel input. For two mono inputs into one
channel, use the right/mono jack for one and the left jack for
the other. For a single mono input into one channel, use the
right/mono jack only.
16: Instrument Input Jack (channel 4): Connection of an instru-
ment (such as a bass guitar) can be made here.
17: Microphone Input Jack (channel 4): Connection of a low
impedance microphone can be made here. This XLR jack
carries +16 volts phantom power on pins 2 and 3.
18: Effects Loop: Connection of an external effects unit can be
made here. Plug a signal cable from the amplifier's send jack
to the unit's input jack. Plug another cable (or, for stereo
effects, a pair of cables) from the effect unit's output jack(s) to
the amplifier's return jack(s). (Mono effects connect into the
jack labeled right/mono.) The level of the effects can be con-
trolled by the channel rev/eff send controls (#3) and the
effects return control (#11).
19: Line Out Jacks: These pre-eq jacks allow connection to a
mixing board, recording unit, or house PA system. (These are
non-balanced output jacks.)
20: Preamp Out Jacks: These post-eq jacks allow connection to
an external power amp. When a plug is inserted into the left
preamp out jack, the amplifier's left channel signal is inter-
rupted from its internal power amp and is routed only
through the jack. This allows you to achieve a true stereo
output if you connect your main KX-220's left preamp out
jack to a second KX-220's power amp input jack (see #21).
21: Power Amp Input Jack: Connection directly into the KX-
220's internal power amplifier is possible through this jack.
The amp will ignore any other input signals, all control set-
tings and any external effects, and will only amplify the sig-
nal sent into the power amp input jack.
22: External Speaker Jack: Connection to an extension speaker
cabinet can be made here. The extension cabinet must have
a minimum impedance of 4 ohms. This jack is in parallel
with the internal speakers and using this jack does not dis-
connect them.
23: Power Switch: Turns the amplifier on (I) and off.
24: AC Line In: Connect the AC power cord here. Be sure the
cord is properly plugged into a safely wired, grounded 120
volt, 60Hz AC power outlet before use. (If your amplifier
was purchased outside the United States, refer to the rear
panel for power ratings.) For your safety, never attempt to
defeat the ground connection on this cord.