2273-1
Module No. 2273
GETTING ACQUAINTED
Congratulations upon your selection of this CASIO watch. To get the most out
of your purchase, be sure to read this manual carefully and keep it on hand
for later reference when necessary.
Warning!
· The measurement functions built into this watch are not intended for
taking measurements that require professional or industrial precision.
Values produced by this watch should be considered as reasonable
representations only.
· When using this watch to take readings while boating or engaging in
any other activity during which losing your way can create a dangerous
or life-threatening situation, always be sure to use a second compass to
confirm direction readings.
· The longitude, lunitidal interval, Moon phase indicator, and tide graph
data that appears on the display of this watch is not intended for
navigation purposes. Always use proper instruments and resources to
obtain data for navigation purposes.
· This watch is not an instrument for calculating low tide and high tide
times. The Tide Graph of this watch is intended to provide a reasonable
approximation of tidal movements only.
· CASIO COMPUTER CO., LTD. assumes no responsibility for any loss,
or any claims by third parties that may arise through the use of this
watch.
About This Manual
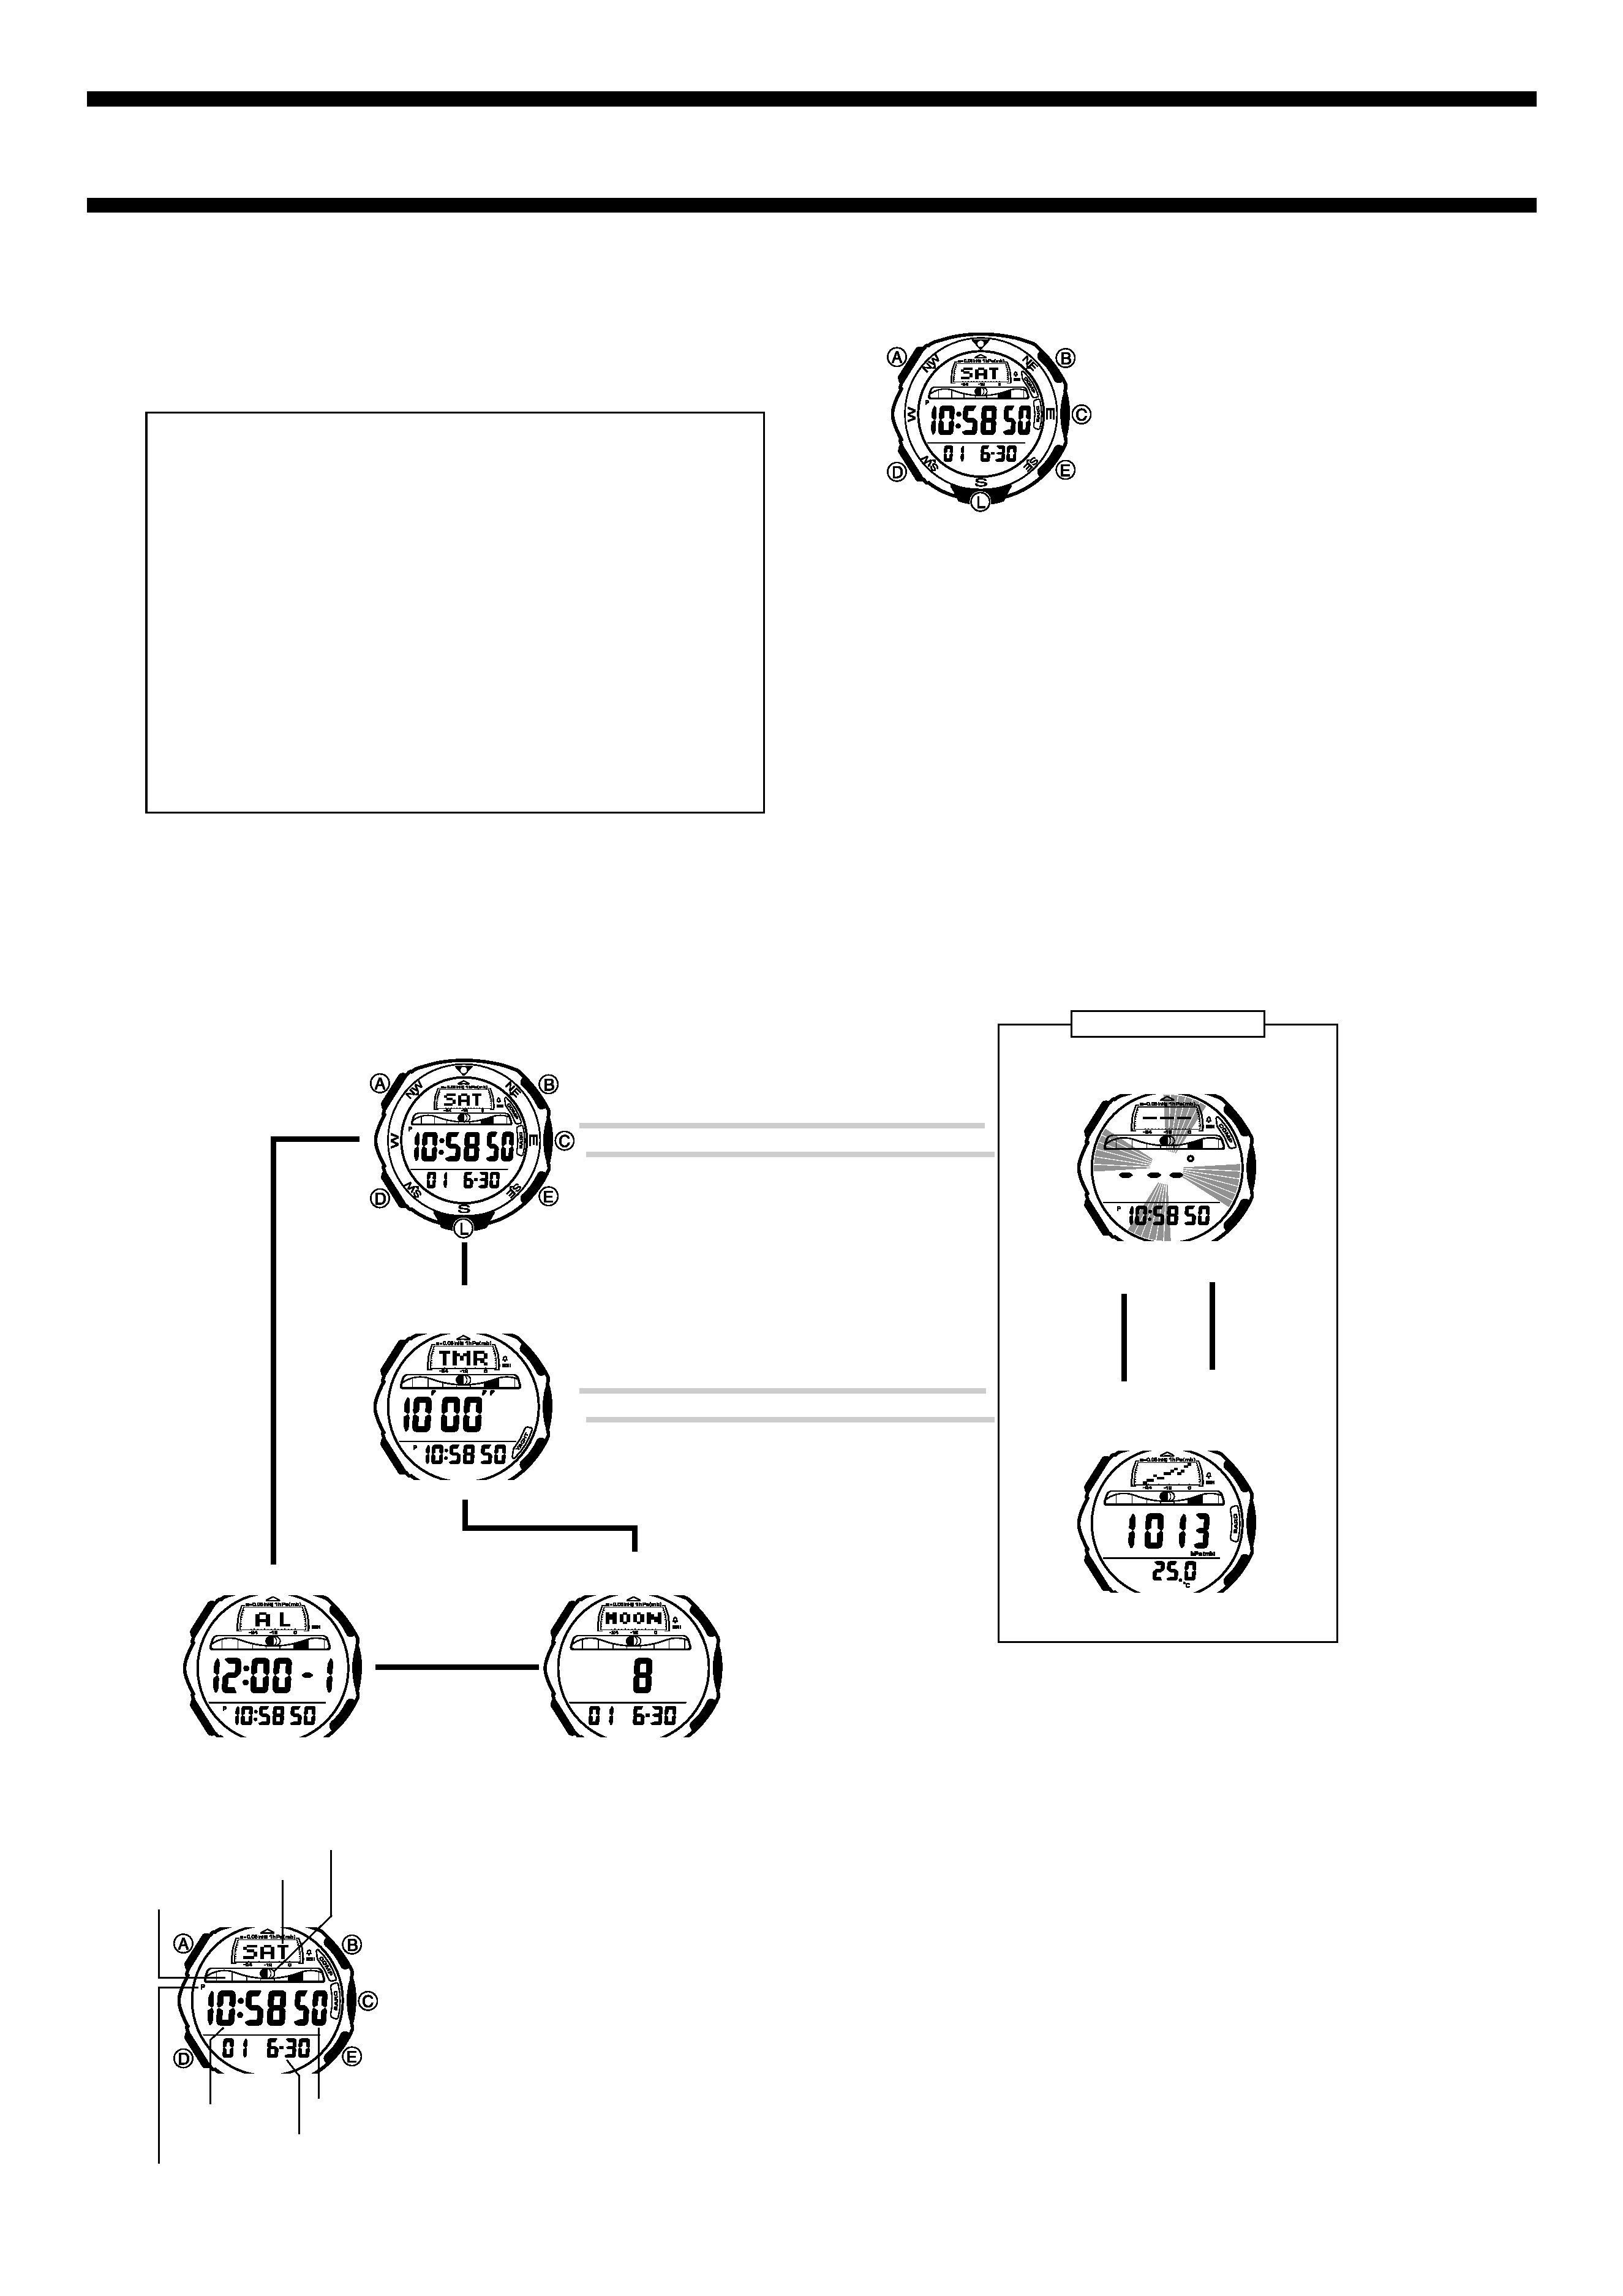
· Button operations are indicated using the
letters shown in the illustration.
· Each section of this manual provides you
with the information you need to perform
operations in each mode. Further details
and technical information can be found in
the "REFERENCE" section.
(Light)
Press D.
Timekeeping Mode
Alarm Mode
Countdown Timer/Stopwatch Mode
Sensor Mode
Digital Compass Mode
Barometer/
Thermometer Mode
Moon/Tide Mode
L
D
L
L
Press B or C.
Press D.
· Press B to enter the Digital Compass Mode or C to enter the Barometer/
Thermometer Mode from the Timekeeping Mode or Countdown Timer/
Stopwatch Mode. To get to a sensor mode from the Moon/Tide or Alarm
Mode, you must go to the Timekeeping Mode first.
L
L
L
D
L
L
Press B or C.
Press D.
L
Press B.
Press C.
D
L
GENERAL GUIDE
· If the digital display of your watch is continuously changing, see
"Auto Display Function" for information on how to stop it.
· The illustration below shows which buttons you need to press to navigate
between modes.
TIMEKEEPING
In addition to normal timekeeping, use the
Timekeeping Mode to set the current time and
date.
· The Moon phase indicator shows the
current Moon phase.
· The tide graph shows the current tidal
movements.
Important!
· The watch cannot produce correct Moon
phase or tide graph data unless the
Timekeeping Mode current time and date
settings, as well as city data settings (GMT
differential, longitudes, and lunitidal interval)
are all correct.
Hour : Minutes
PM indicator
Seconds
Year Month Day
Day of week
Tide graph
Moon phase indicator
· Having the batteries replaced causes the Timekeeping Mode's time/date
and city data settings to revert to their initial factory default settings. Use
the following procedure to set the current time and date, and to make city
data settings.
To reset the seconds count to zero
1. In the Timekeeping Mode, hold down A until the second's digits start to
flash, which indicates the setting screen.
2. Press E to reset the seconds count to 00.
· Pressing E while the seconds count is in the range of 30 to 59 resets
the seconds to 00 and add 1 to the minutes. In the range of 00 to 29,
the minutes count is unchanged.
3. Press A twice to exit the setting screen.
2273-2
To set the time and date
1. In the Timekeeping Mode, hold down A
until the second's digits start to flash, which
indicates the setting screen.
· While the second's digits are flashing,
press E to reset the seconds count to
00.
2. Press D to move the flashing in the
sequence shown below to select other
settings.
Seconds
Hour
Minutes
Day
Month
Year
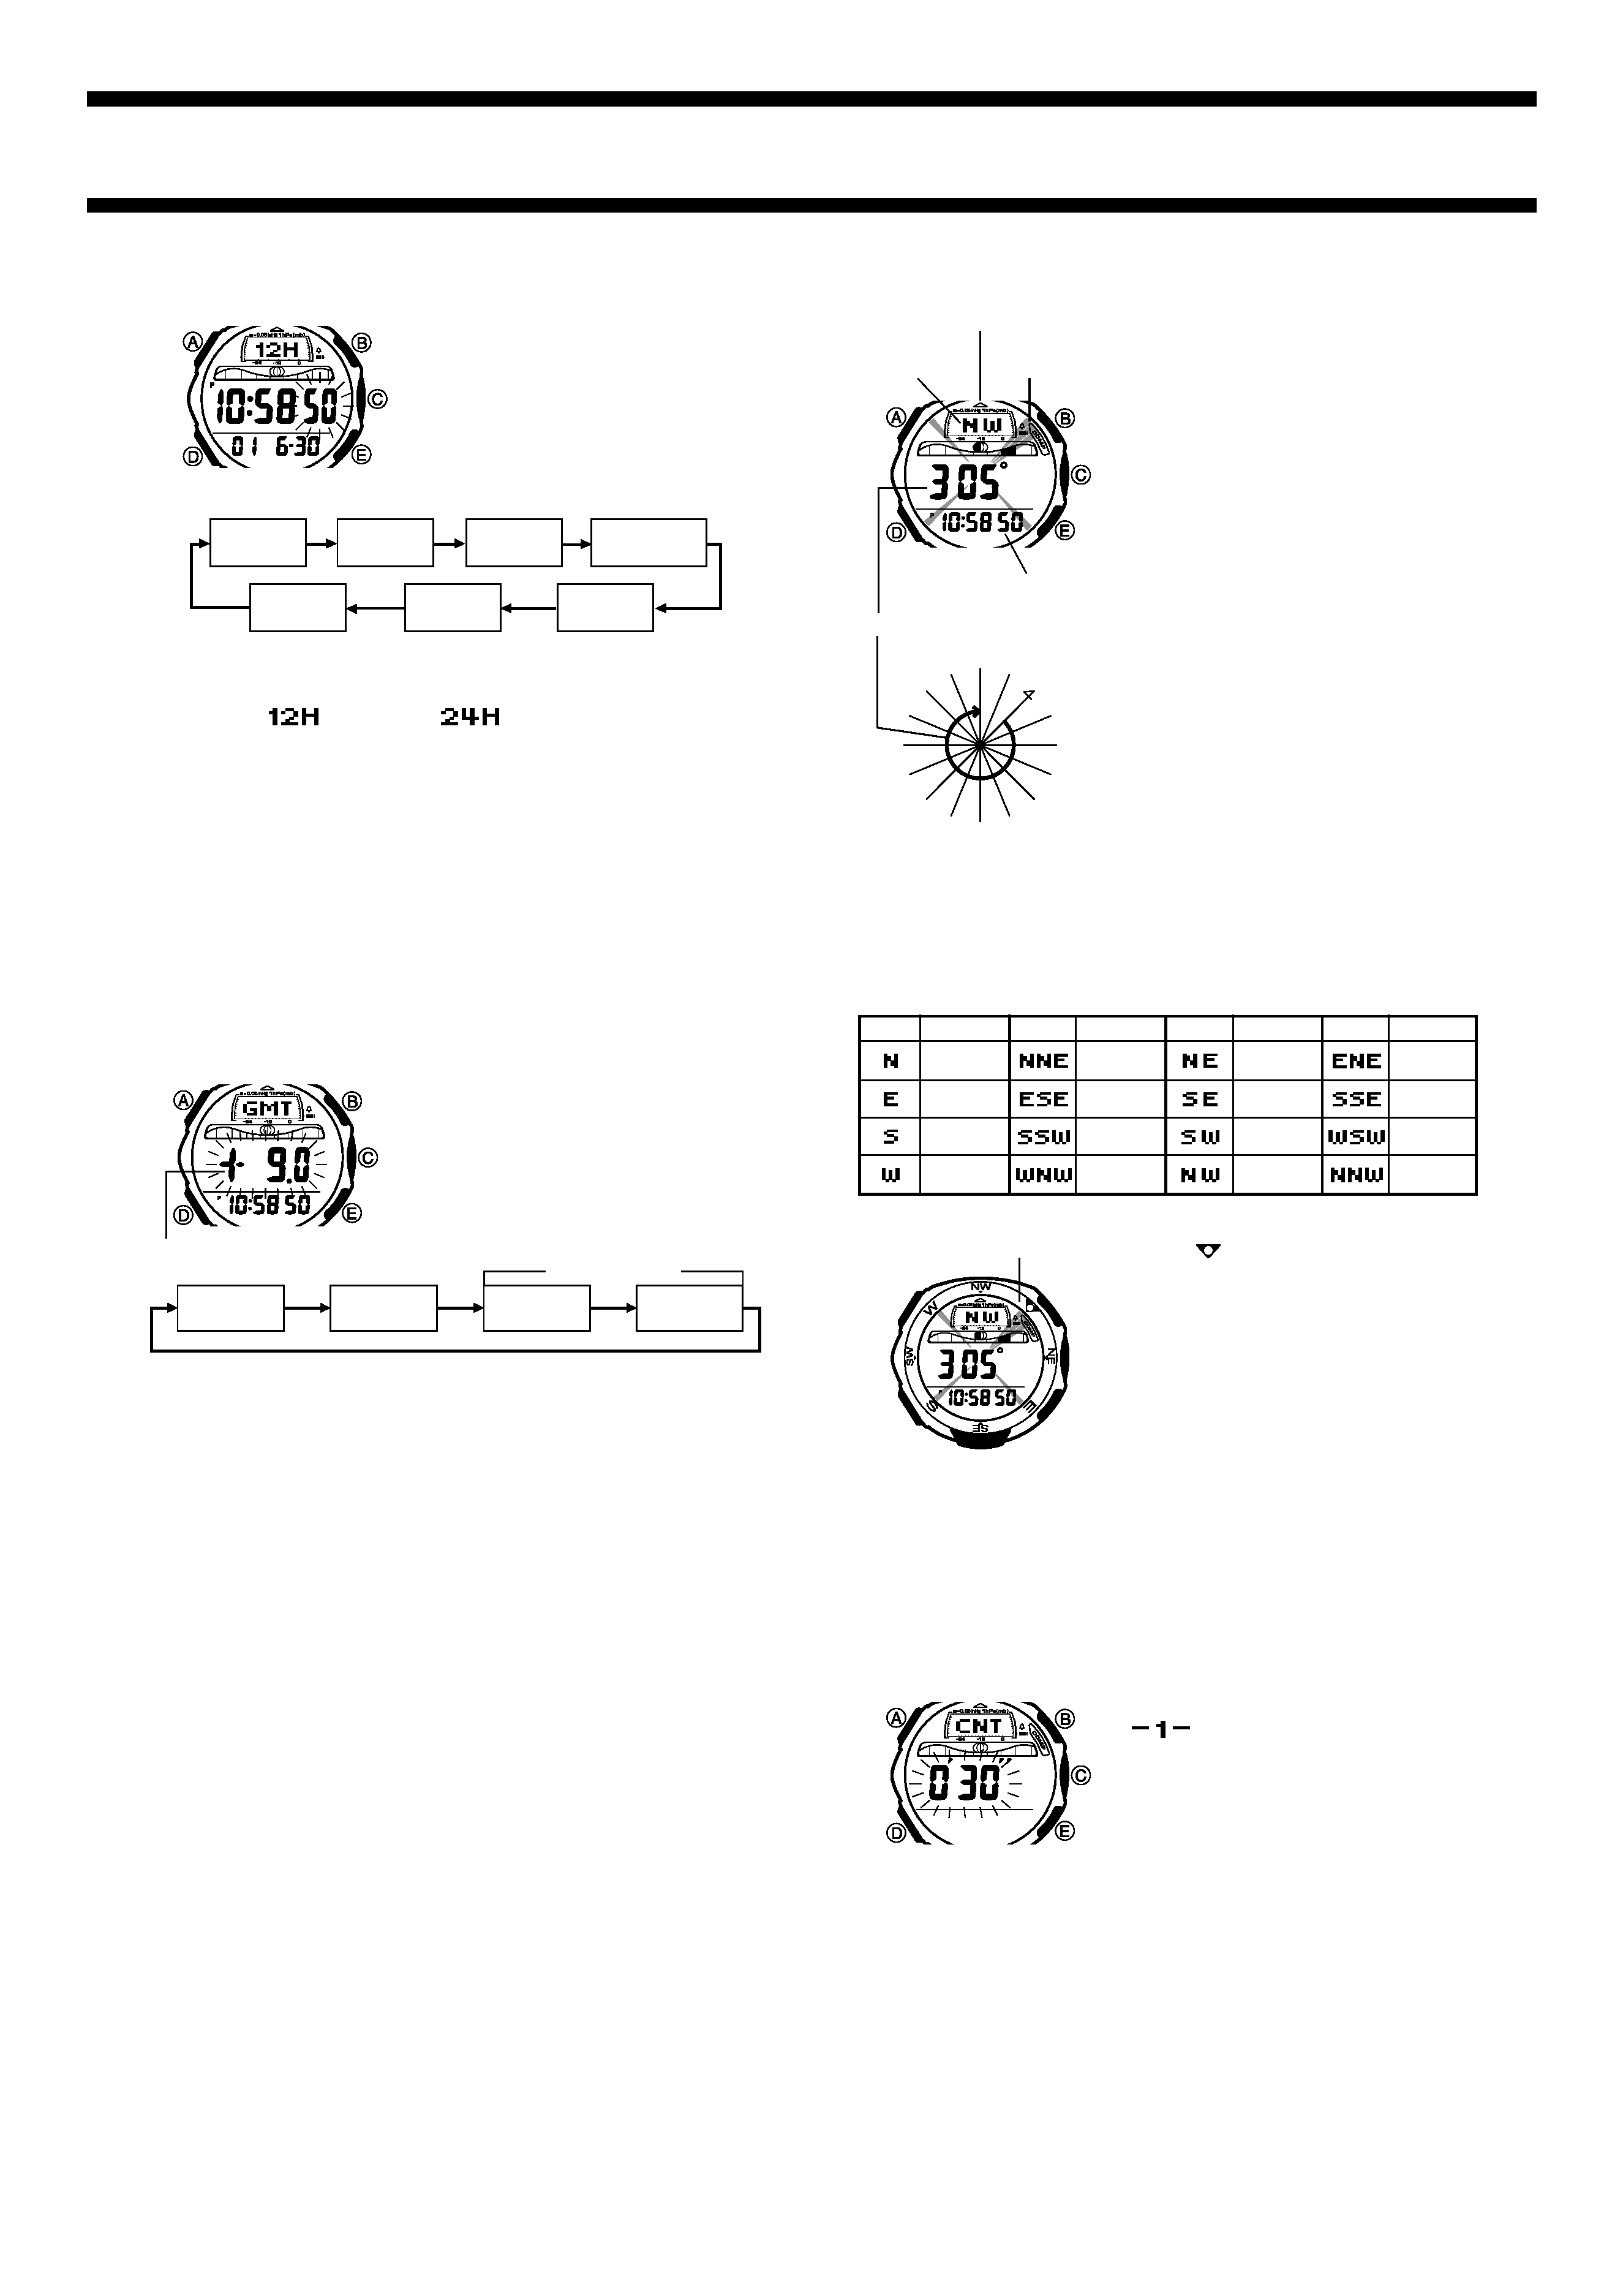
12/24-Hour
Format
3. While the hour, minutes, year, month, or day setting is flashing, use E (+)
and B () to change it.
· When the 12/24-hour setting is flashing, press E to toggle between
12-hour (
) and 24-hour (
) timekeeping.
4. Press A twice to exit the setting screen.
Configuring City Data Settings
The Moon phase and tide graph information displayed by this watch differ
according to your geographic location. Before using this watch to produce
such information, be sure to make the proper city data settings to specify your
current location.
· The lunitidal interval is the time elapsing between the Moon's transit over
the meridian and the next high tide. See "Lunitidal Interval" for more
information.
· This watch displays lunitidal intervals in term of hours and minutes.
· GMT differential is the difference between the time in the displayed time
and Greenwich Mean Time (GMT).
To configure city data settings
1. In the Timekeeping Mode, hold down A
until the second's digits starts to flash,
which indicates the setting screen.
2. Press A again to display the city data
setting screen, with the GMT differential
flashing.
· Press D to move the flashing in the
sequence shown below to select other
settings.
3. Use E (+) and B () to change the setting of the currently selected
(flashing) item.
· The "CITY DATA LIST" provides city data information for a number of
GMT differentials, longitudes, and lunitidal intervals around the world.
· You can change the GMT differential setting in units of 0.5 (half an
hour).
· Longitude can be specified in the range of 179°W to 180°E, in 1-degree
steps.
4. Press A to exit the setting screen.
DIGITAL COMPASS
A built-in bearing sensor detects magnetic north and indicates one of 16
directions on the display. Direction readings are performed in the Digital
Compass Mode.
· You can calibrate the bearing sensor if you suspect the direction reading is
incorrect.
To enter and exit the Digital Compass Mode
While in the Timekeeping, Barometer/Thermometer, or Countdown Timer/
Stopwatch Mode, press B to enter the Digital Compass Mode.
· At this time, the watch immediately starts a Digital Compass operation.
After about two seconds, letters appear on the display to indicate the
direction that the 12 o'clock position of the watch is pointing.
· Press D to return to the Timekeeping Mode.
Longitude
GMT
Differential
Hours
Minutes
Lunitidal Interval
GMT Differential
To take a direction reading
1. Enter the Digital Compass Mode.
2. Place the watch on a flat surface or (if you
are wearing the watch) make sure that your
wrist is horizontal (in relation to the
horizon).
3. Point the 12 o'clock position of the watch in
the direction you want to determine.
4. Press B to start a Digital Compass
reading operation.
· After about two seconds, the direction
that the 12 o'clock position of the watch
is pointing appears on the display.
· Also, four pointers appear to indicate
magnetic north, south, east, and west.
· Direction reading continues for the
amount of time that is currently
specified for the continuous reading
time.
· The COMP indicator flashes on the
display while a reading is in progress.
· The direction value that appears on the
display represents the clockwise angle
formed between magnetic north (which
is 0 degrees) and the displayed
direction.
12 o'clock position
Magnetic
North Pointer
Direction
Direction value (in degrees)
NW
0
°
WNW
W
W
SW
SW
S
S
W
S
SS
E
SE
ES
E
E
E
N
E
NE
N
N
E
N
NNW
Timekeeping Mode time
Direction bezel
Note
· Note that taking a measurement while the watch is not horizontal (in
relation to the horizon) can result in large measurement error.
· Pressing B while in the Digital Compass Mode starts a new direction
measurement operation.
· The following table shows the meanings of each of the direction
abbreviations that appear on the display.
· You can adjust the rotary direction bezel so
that the "
" (or "N") is aligned with the
magnetic north pointer. This correctly aligns
all of the markings on the bezel.
· The Digital Compass operation is
momentarily interrupted while an alarm
(Daily Alarm or Hourly Time Signal) or beep
(progress or time up beeper) is sounding, or
while the backlight is turned on by the Auto
Light Switch. If this happens, start the
Digital Compass operation again from the
beginning.
· See "Digital Compass Precautions" for other
important information about taking direction
readings.
Making Digital Compass Settings
You can set up the watch so it takes continuous direction readings for an
amount of time specified by you.
To configure the Digital Compass Mode
1. In the Digital Compass Mode, hold down
A until the upper display area shows
, which indicates the setting screen.
2. Press D twice to display the continuous
reading time setting screen.
3. While the continuous reading time digits
are selected (flashing), use E (+) and B
() to change the setting in increments of
10 seconds.
· You can specify a continuous reading
time in the range of 0'00'' to 1'00''.
Setting 0'00'' causes digital compass
operation to stop after a single reading.
4. Press A to exit the setting screen.
Direction Meaning
Direction
Meaning
Direction
Meaning
Direction
Meaning
North-
northeast
East-
southeast
South-
southwest
West-
northwest
Northeast
Southeast
Southwest
Northwest
East-
northeast
South-
southeast
West-
southwest
North-
northwest
North
East
South
West
2273-3
Not visible on
the display.
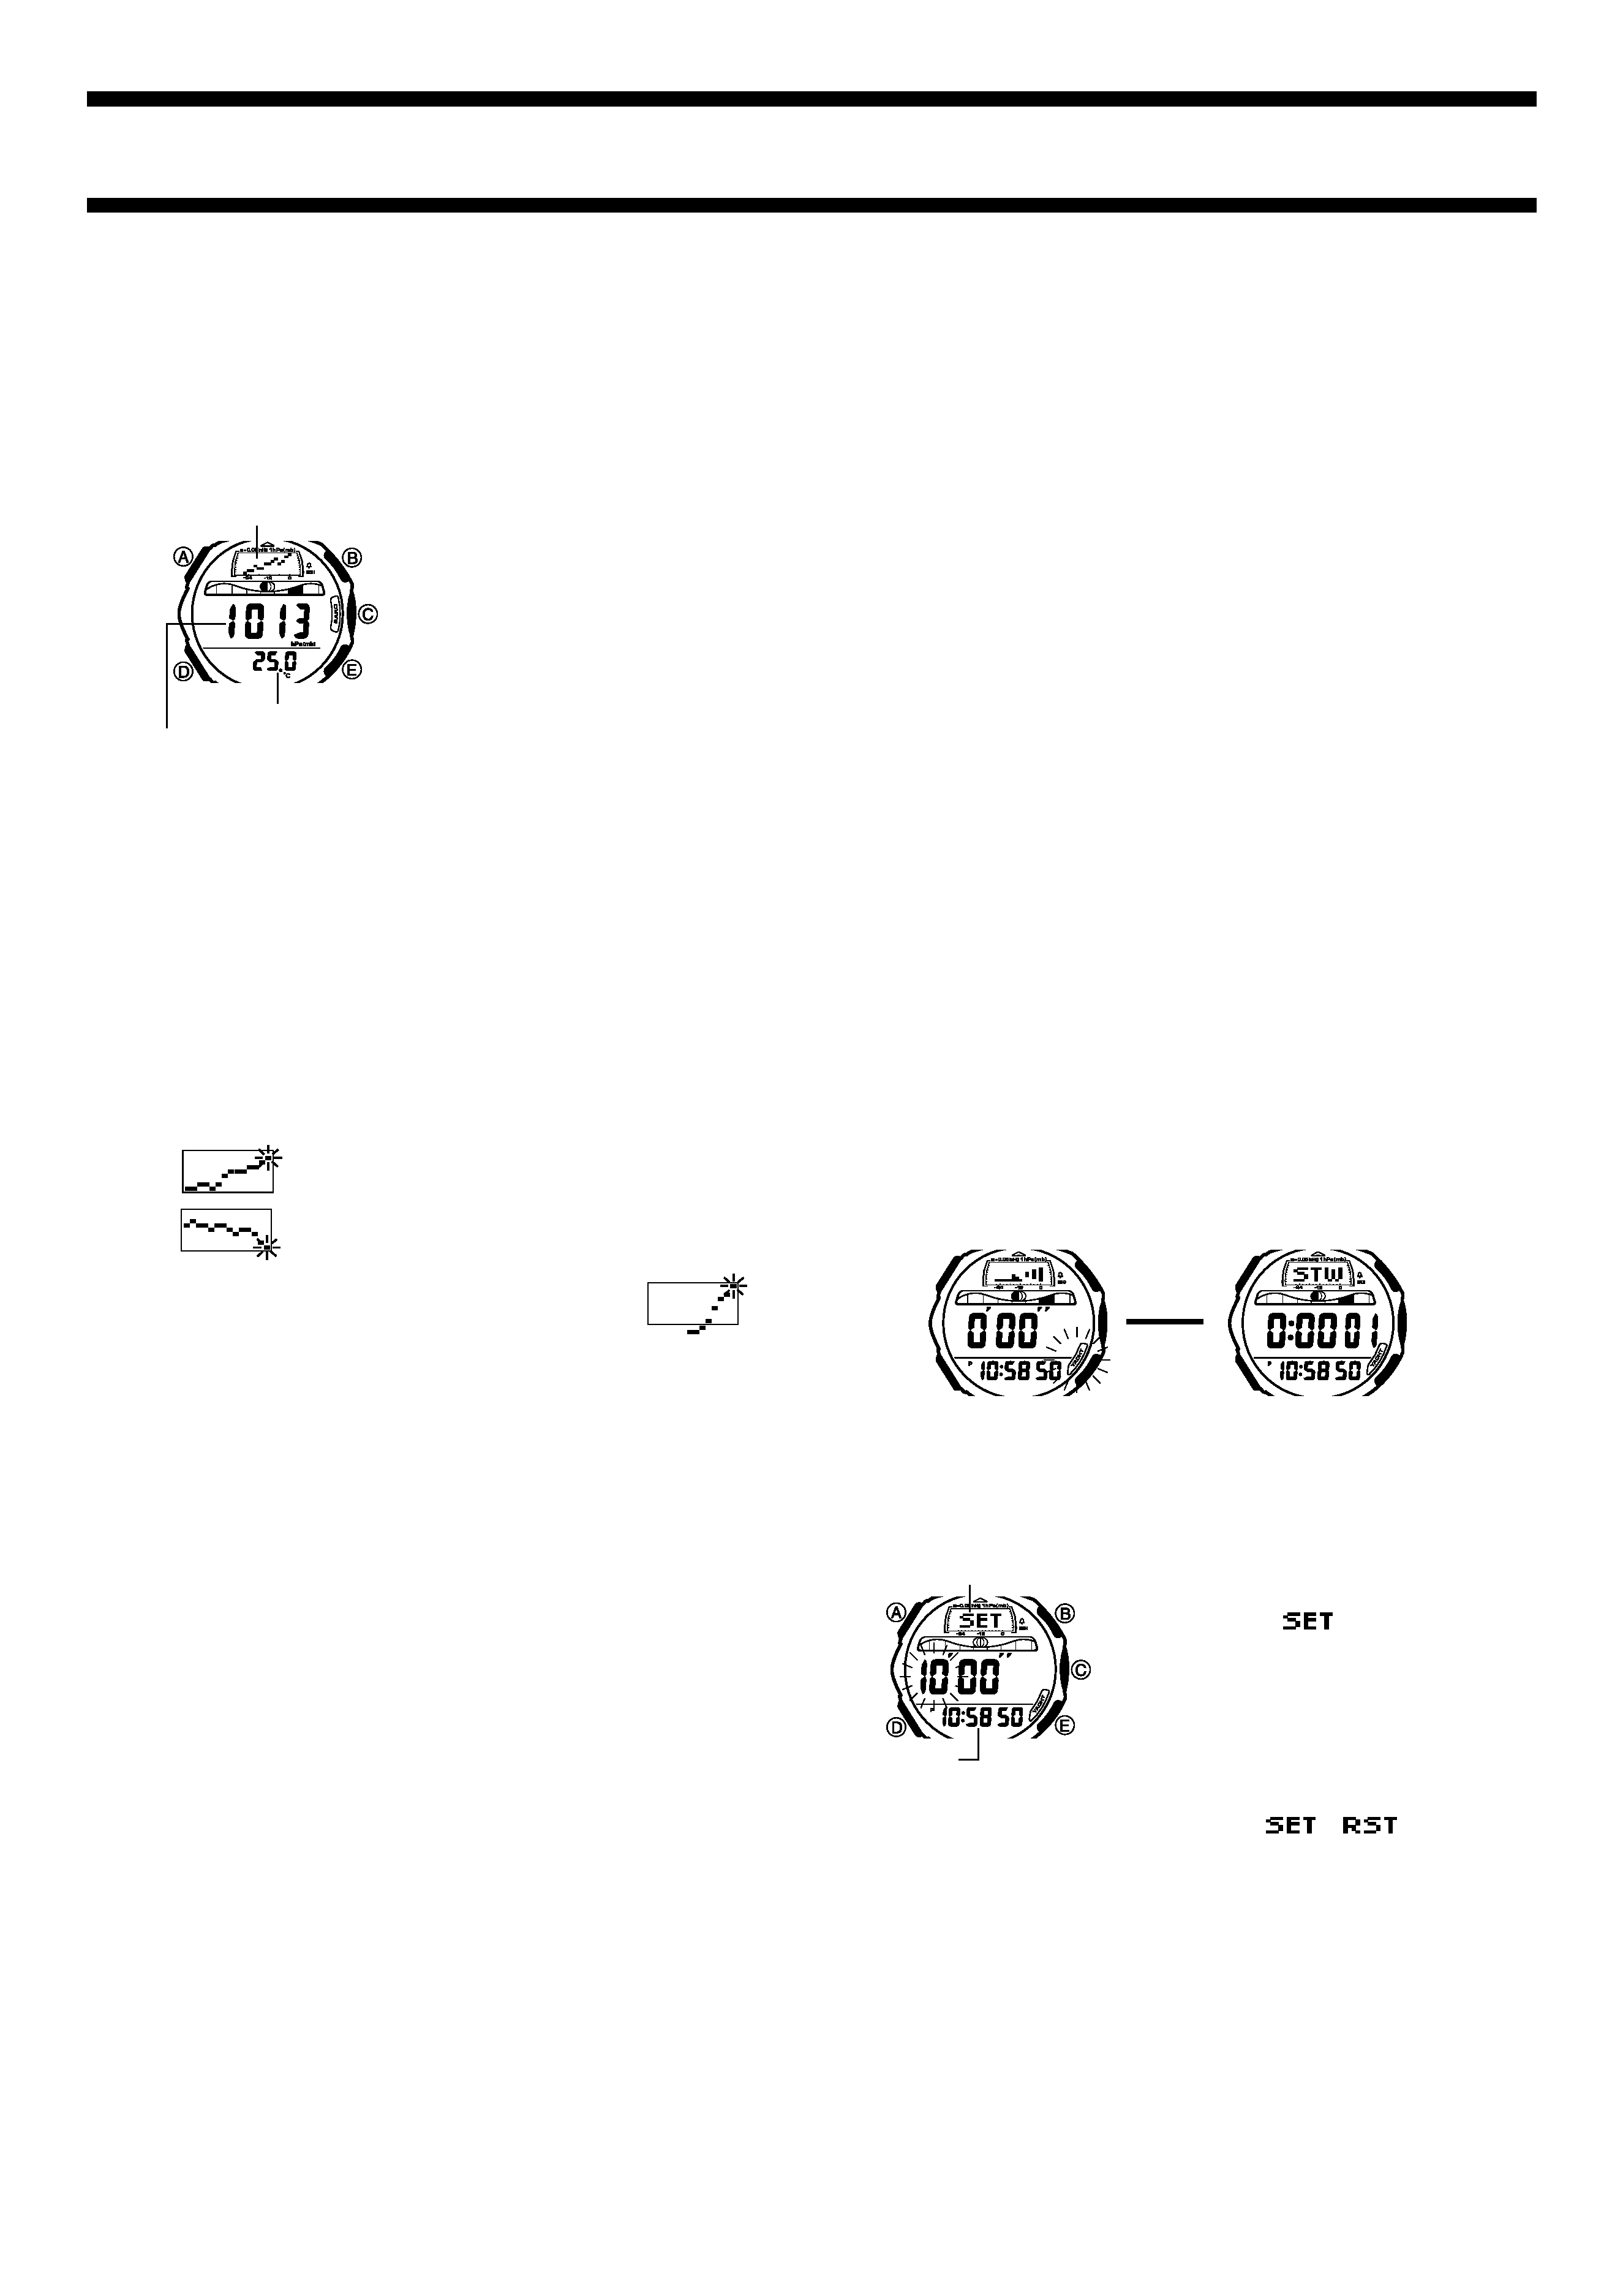
Barometric pressure graph
(unit: 1hPa (mb)/0.05inHg)
Temperature
Barometric pressure
BAROMETER/THERMOMETER
This watch uses a pressure sensor to measure air pressure (barometric
pressure) and a temperature sensor to measure a temperature.
· You can calibrate the temperature sensor and the pressure sensor if you
suspect that readings are incorrect.
Understanding the Barometer/Thermometer Screen
Press C to enter the Barometer/Thermometer
Mode.
· Barometric pressure is displayed in units of
1hPa/mb (or 0.05inHg).
· Temperature is displayed in units of 0.1°C
(or 0.2
°F).
· The displayed barometric pressure value
changes to xxxx hPa/mb (or inHg) if a
measured barometric pressure falls outside
the range of 260hPa/mb to 1100hPa/mb
(7.65inHg to 32.45inHg). The barometric
pressure value will be displayed again as
soon as the measured barometric pressure
is within the allowable range.
· The displayed temperature value changes to xx. x °C (or °F) if a
measured temperature falls outside the range of 10.0
°C to 60.0°C (14.0°F
to 140.0
°F). The temperature value will be displayed again as soon as the
measured temperature is within the allowable range.
· Some countries refer to the barometric pressure unit hecto-pascal (hPa) as
millibars (mb). It really makes no difference, because 1hPa = 1mb. In this
manual, we use hPa/mb or hPa (mb).
Barometric Pressure Graph
Barometric pressure indicates changes in the atmosphere. By monitoring
these changes you can predict the weather with reasonable accuracy. The
barometric pressure graph shows the barometric readings for the past 26
hours. The flashing point on the right of the display is the point for the newest
measurement. Note that pressure graph readings are relative to the newest
measurement point. One dot above the newest point is plus 1hPa(mb)/
0.05inHg, while one dot below is minus 1hPa(mb)/0.05inHg. The following
shows how to interpret the data that appears on the barometric pressure
graph.
A rising graph generally means improving weather.
A falling graph generally means deteriorating weather.
Note that if there are sudden changes in weather or
temperature, the graph line of past measurements may run
off the top or bottom of the display. The entire graph will
become visible once barometric conditions stabilize.
The following conditions cause the barometric pressure
measurement to be skipped, with the corresponding point on
the barometric pressure graph being left blank.
· Barometric reading that is out of range (260hPa/mb to 1100hPa/mb or
7.65inHg to 32.45inHg)
· Sensor malfunction
· Dead batteries
About Barometric and Temperature Measurements
· Barometric pressure and temperature measurement operations are
performed as soon as you enter the Barometer/Thermometer Mode. After
that, temperature measurements are taken every five seconds for the first
three minutes, and then taken every five minutes thereafter.
· The BARO indicator flashes on the display while a measurement is in
progress.
· The barometer automatically takes measurements every two hours
(starting from midnight), regardless of what mode you are in. The results of
these measurements are used for the barometric pressure graph.
· You can also perform a barometric pressure and temperature
measurement at any time by pressing C in the Barometer/Thermometer
Mode.
Barometer and Thermometer Precautions
· The pressure sensor built into this watch measures changes in air
pressure, which you can then apply to your own weather predictions. It is
not intended for use as a precision instrument in official weather prediction
or reporting applications.
· Sudden temperature changes can affect pressure sensor readings.
· Temperature measurements are affected by your body temperature (while
you are wearing the watch), direct sunlight, and moisture. To achieve a
more accurate temperature measurement, remove the watch from your
wrist, place it in a well ventilated location out of direct sunlight, and wipe off
all moisture from the case. It takes approximately 20 to 30 minutes for the
case of the watch to reach the actual surrounding temperature.
· You can change the measured barometric pressure unit between hecto-
pascals/millibars (hPa/mb) and inchesHg (inHg). See "Changing the
Barometric Pressure and Temperature Units" for details.
· You can change the measured temperature value displayed by this watch
between Celsius (
°C) and Fahrenheit (°F). See "Changing the Barometric
Pressure and Temperature Units".
COUNTDOWN TIMER
With the countdown timer, you can set a start time in the range of 1 to 60
minutes, and countdown the time to zero. A beeper sounds each second of
the final 10 seconds of a countdown, and you can also turn on a progress
beeper that beeps at various times during a countdown. All of this makes the
countdown timer a valuable tool for timing the start of a yacht race.
· The countdown timer also can be used as a stopwatch to measure elapsed
time, split time, and two finishes. See "STOPWATCH" for more
information.
· All the operations in this section are performed in the Countdown Timer/
Stopwatch Mode, which you can enter by pressing D.
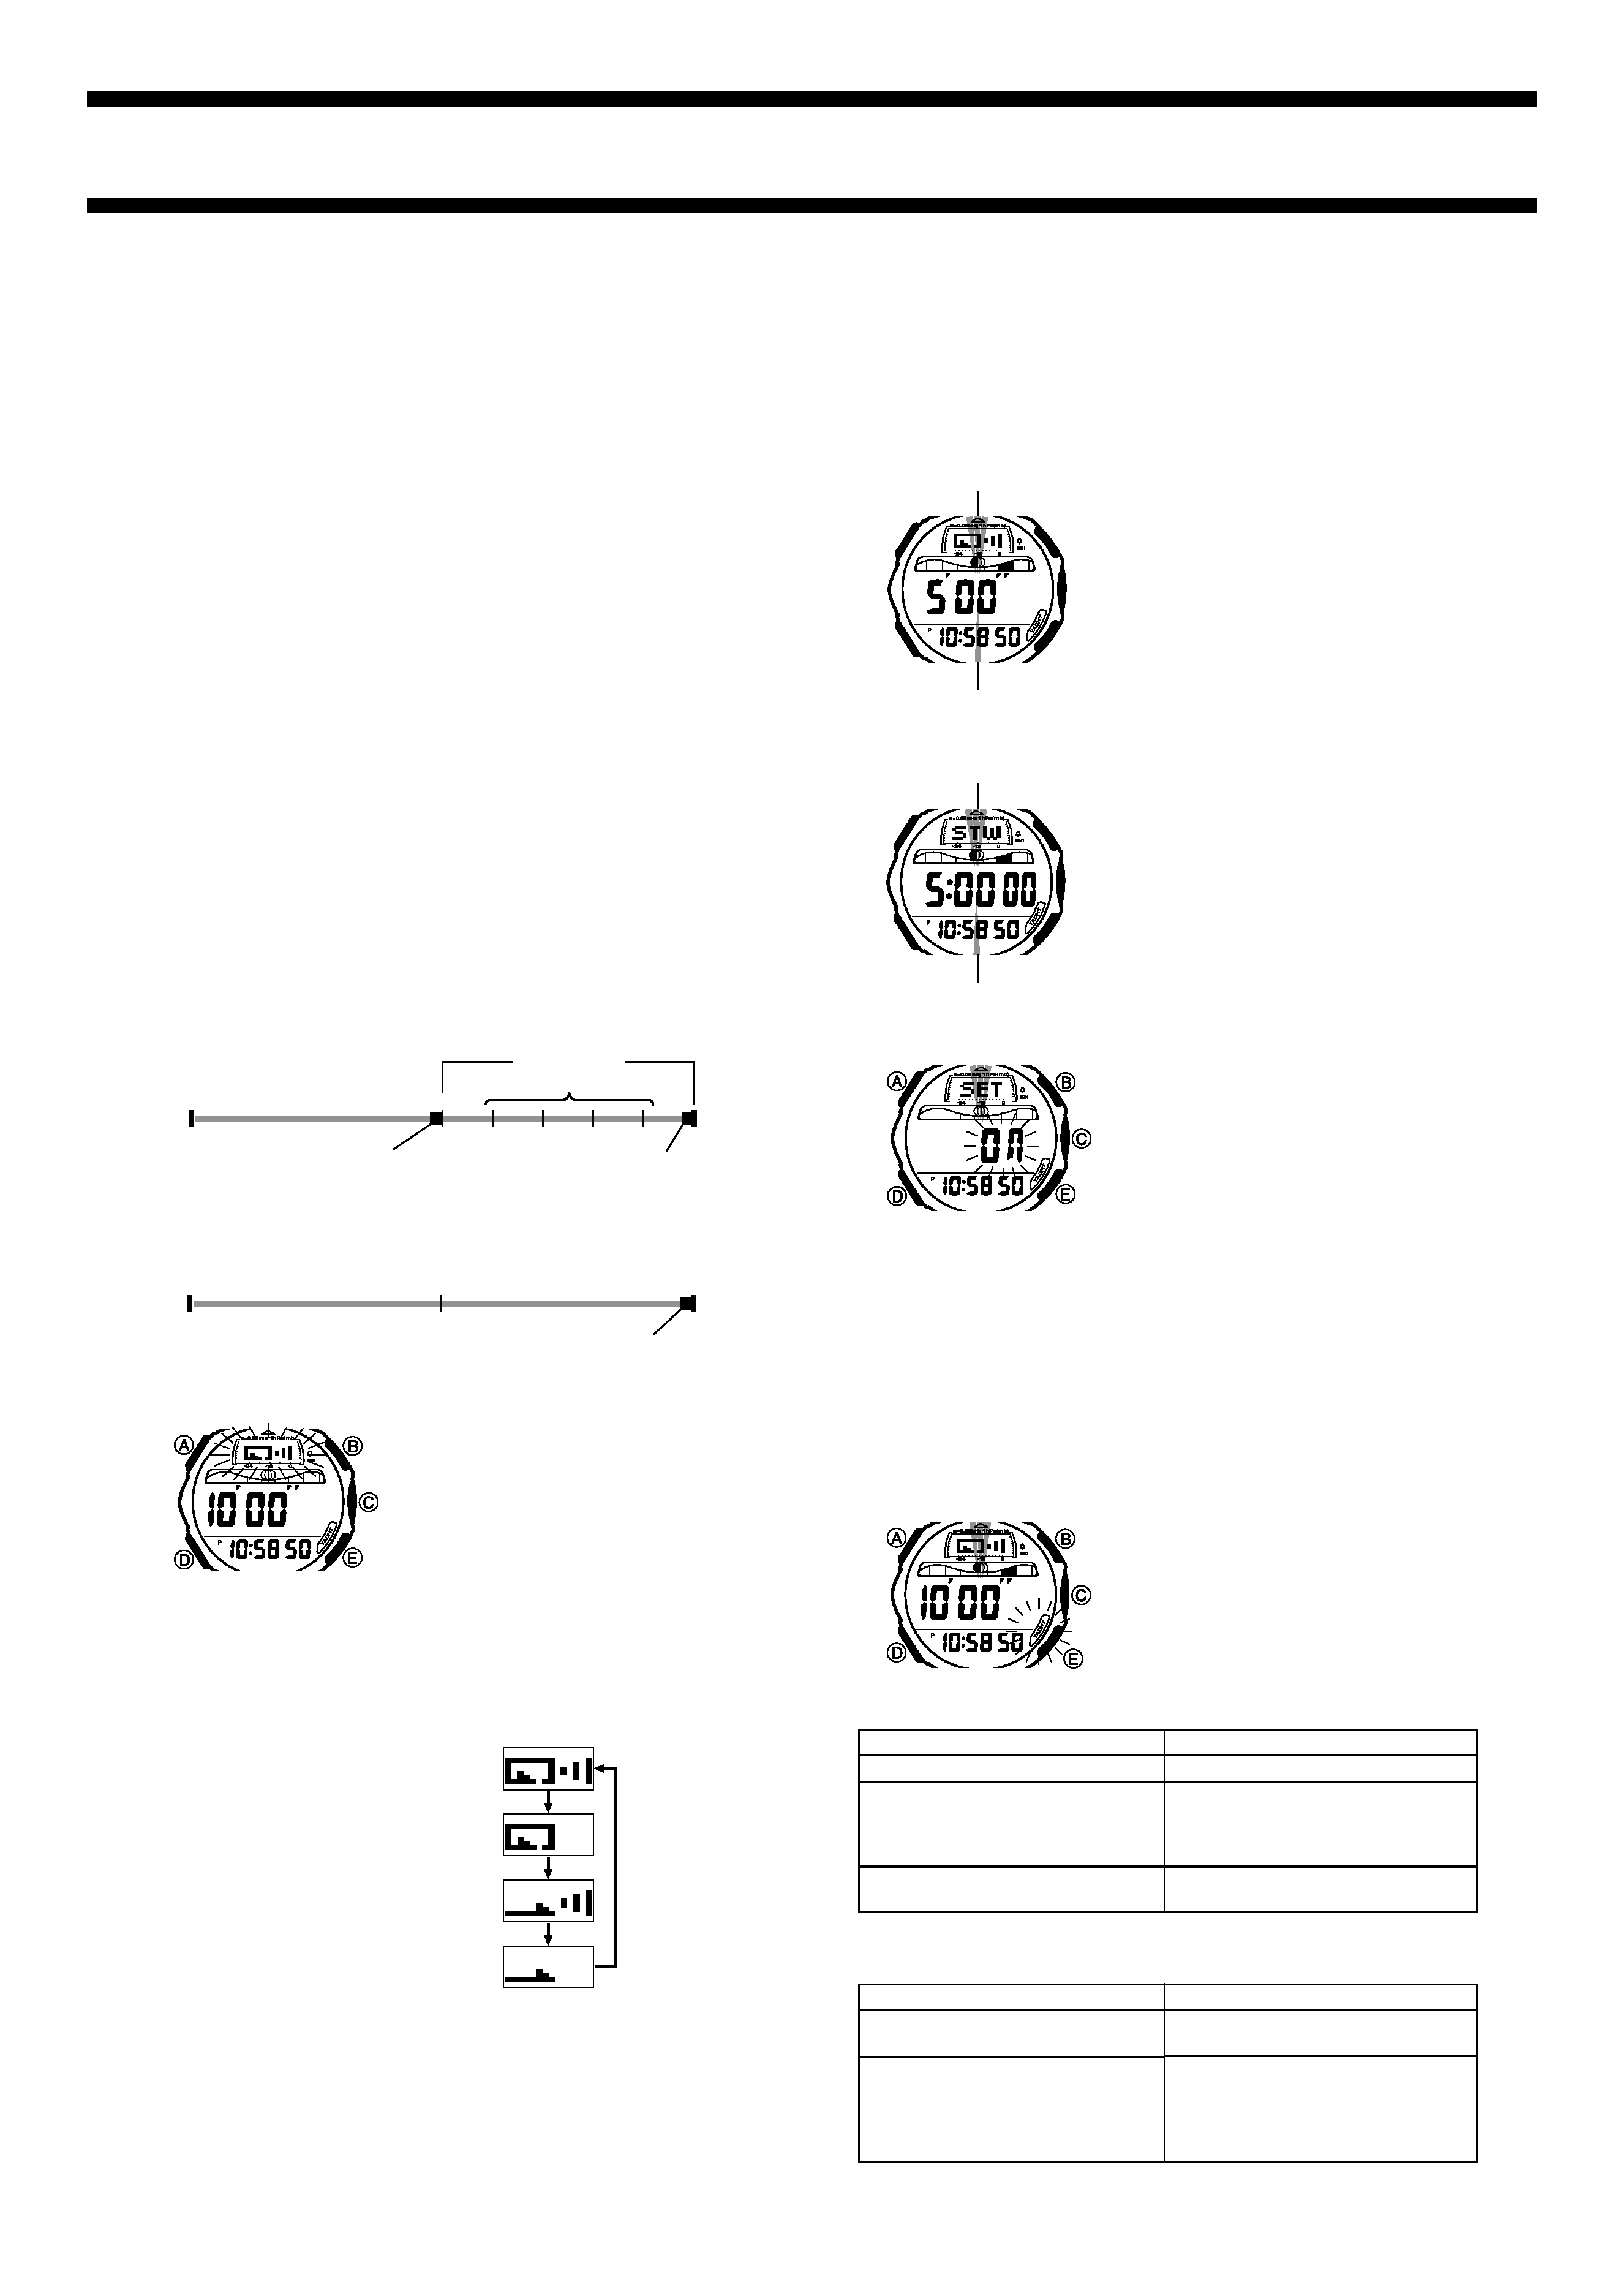
Configuring the Countdown Timer
You need to make the settings listed below before actually using the
Countdown Timer for timing.
· Countdown start time and reset time
· Auto repeat/repeat, progress beeper on/off
· Graphic on/off
Reset time
You can set a "reset time," which is a kind of alternate countdown start time
you can recall with the press of a button any time a countdown operation is in
progress. After recalling the reset time, you can press E to restart the
countdown operation from the recalled reset time.
Auto Repeat and Repeat
The countdown timer gives you a choice of two different repeat modes: auto
repeat and repeat.
Auto Repeat
When auto repeat is turned on, the countdown automatically restarts from the
countdown start time whenever it reaches zero.
Note
· Even if you start a countdown operation from the reset time, the countdown
automatically restarts from the countdown start time whenever it reaches zero.
· Auto repeat timing repeats 100 times or until you press E to stop the
countdown.
· Auto repeat timing is best when timing the starts of match races.
Repeat Timing
When repeat timing is turned on, the watch automatically switches to the
Stopwatch Mode and starts stopwatch timing when the end of the countdown
is reached.
Note
Repeat timing is best when timing the speed of yachts during ocean races.
To set the countdown start time and reset time
1. While in the Countdown Timer/Stopwatch
Mode, hold down A until the time setting
starts to flash, which indicates the setting
screen.
· This causes the
indicator to
appear on the display.
2. While the countdown start time setting is
flashing, use E (+) and B () to change
it in one-minute increments.
· You must set a countdown start time in
the range of 1'00" to 60'00".
3. Press D to display the reset time setting
screen.
· The indicator in the upper display area
changes from
to
to
indicate the reset time setting screen.
4. While the reset time is flashing, use E (+) and B () to change it in one-
minute increments.
· You can set a reset time in the range of 1'00" to 5'00".
5. After making the setting you want, press A to exit the setting screen.
Important!
The reset time setting must be less than the countdown start time setting.
L
Countdown Timer Mode
Stopwatch Mode
Timekeeping
Mode time
Countdown start time
setting indicator
2273-4
Countdown Mode Beeper Operations
The watch beeps at various times during a countdown to keep you informed
about the countdown status without looking at the display. The following
describes the types of beeper operations the watch performs during a
countdown.
Countdown End Beeper
The watch beeps each second of the final 10 seconds before a countdown
reaches zero, and at zero. The first five beeps (seconds 10 through 6) are
higher pitched than the final five beeps (seconds 5 through 1). The watch
emits a longer beep to signal when the countdown reaches zero.
Note
The countdown end beeper always sounds, regardless of the on/off status of
the progress beeper.
Progress Beeper
The term "progress beeper" actually includes two beepers: a
reset time
beeper and a reset period progress beeper.
Note
The reset time beeper and reset period progress beeper sound only while the
progress beeper is turned on.
· Reset Time Beeper
The reset time beeper is similar to the countdown end beeper. When the
progress beeper is turned on, the watch beeps each second of the final 10
seconds before the countdown reaches the reset time.
· Reset Period Progress Beeper
The
reset period is the portion of the countdown between the reset time and
zero. When the progress beeper is turned on, the watch emits fours short
beeps at the top of each minute during the reset period.
Example 1
Countdown Start Time: 10'00"
Reset Time: 5'00"
Progress Beeper: On
10'00"
Start Time
Reset time
0'00"
1'00"
2'00"
3'00"
4'00"
5'00"
Reset Period
Countdown End Beeper
Reset Time Beeper
Reset Period Progress Beeper
Countdown/Stopwatch Graphics
Graphic indicators move in a counter-clockwise direction during countdown
timer operation and clockwise during stopwatch operation.
· The zero point for both the minute's indicator and the second's indicator is
the 12 o'clock position.
· The factory default setting is graphics turned off.
Countdown Graphics
· During a countdown operation, the graphic
indicators move counter-clockwise.
· One revolution of the second's indicator
represents 10 seconds.
· The minute's indicator appears when the
countdown time is 10 minutes or less. The
minute's indicator advances one step with
each full revolution of the second's
indicator. One revolution of the minute's
indicator represents 10 minutes.
Stopwatch Graphics
· During a stopwatch elapsed time operation,
the graphic indicators move clockwise.
· One revolution of the second's indicator
represents 10 seconds.
· The minute's indicator advances one step
with each full revolution of the second's
indicator. One revolution of the minute's
indicator represents 10 minutes.
Example 2
Countdown Start Time: 10'00"
Reset Time: 5'00"
Progress Beeper: Off
10'00"
Start Time
Reset time
0'00"
5'00"
Countdown End Beeper
To turn auto repeat/repeat and the progress beeper on and off
1. While in the Countdown Timer/Stopwatch
Mode, hold down A until the time setting
starts to flash, which indicates the setting
screen.
2. Make sure the setting screen shows a
countdown start time other than zero.
· The next step will not work if the
countdown start time setting is zero. If it
is, use the procedure to change it to
another value (see "To set the
countdown start time and reset time").
3. Press D twice to display the screen for
making auto repeat, repeat, and progress
beeper settings.
4. Each press of E cycles though the
available settings as shown below.
5. After making the setting you want, press A to exit the setting screen.
Note
Even if you turn the progress beeper off, the watch beeps every second for
the last 10 seconds before the end of a countdown is reached.
Auto repeat, Progress beeper on
Auto repeat, Progress beeper off
Repeat, Progress beeper on
Repeat, Progress beeper off
Minute's indicator
Second's indicator
Minute's indicator
Second's indicator
To turn timer graphics on and off
1. In the Countdown Timer/Stopwatch Mode,
hold down A until the time setting starts to
flash, which indicates the setting screen.
2. Display the graphics on/off screen.
· If you started from the Countdown Timer
Mode, press D three times.
· If you started from the Stopwatch Mode,
press D once.
3. Press E to toggle the graphic display on
(ON displayed) and off (OFF displayed).
4. After making the setting you want, press
A to exit the setting screen.
Using Countdown Timer
The following procedure is explained assuming the countdown timer is
configured with the following sample settings.
Progress beeper: On
Countdown Start Time: 10 minutes
Reset Time: 5 minutes
To use the countdown timer
In the Countdown Timer/Stopwatch Mode,
press E to start the countdown timer.
· The indicator YACHT flashes on the display
while a countdown operation is in progress.
· The countdown proceeds in accordance
with the configuration settings you made
using the procedures under "Configuring the
Countdown Timer".
The table below describes the button operations you can perform while a
countdown operation is in progress.
The following describes the operations you can perform while the countdown
operation is stopped (by pressing E).
To do this:
Do this:
Stop the countdown operation
Display the reset time (5 minutes in
this example)
Display the countdown start time
Press E.
Press A.
· Pressing E after displaying the reset
time starts the countdown from the
displayed time.
Press A and E at the same time, or
press A twice.
To do this:
Do this:
Resume the countdown from the
currently displayed time
Display the countdown start time (10
minutes in this example)
Press E.
Press A and E at the same time or
press A.
· Pressing E after displaying the
countdown start time starts the
countdown from the displayed time.
2273-5
To measure times with the stopwatch
Elapsed Time
Split Time
Two Finishes
* Pressing A here normally clears the stopwatch to all zeros. In the case of
a stopwatch operation started automatically by repeat timing when the end
of a countdown is reached, however, pressing A here displays the start
time instead of clearing the stopwatch to all zeros.
STOPWATCH
Using the Stopwatch Mode
The following procedure describes how to enter the Stopwatch Mode from the
countdown timer.
To enter the Stopwatch Mode
1. Press D to enter the Countdown Timer/Stopwatch Mode.
2. Hold down A until the time setting starts to flash, which indicates the
setting screen.
· This causes the
indicator to appear on the display.
3. Use E(+) and B() to change the displayed countdown start time to
0'00".
· Note that you cannot enter the Stopwatch Mode while the countdown
timer start time is any other value besides 0'00".
4. After making the setting you want, press A to exit the setting screen.
· This causes the
indicator to appear on the display, indicating
the Stopwatch Mode.
· The stopwatch lets you measure elapsed
time, split times, and two finishes.
· The display range of the stopwatch is 99
hours 59 minutes 59 seconds.
· The stopwatch measurement operation
continues to run, restarting from zero after it
reaches its limit, until you stop it.
· The stopwatch measurement operation
continues even if you exit the Stopwatch
Mode.
Minutes
Hours
Seconds
Start
Stop
Re-start
Stop
Clear
Split release
Start
Split
Stop
Clear
Start
Split
First runner
finishes.
Display time
of first
runner.
Stop
Second runner finishes.
Split release
Display time of
second runner.
Clear
EE
E
E
A
*
EA
A
E
A
*
EA
E
A
A
*
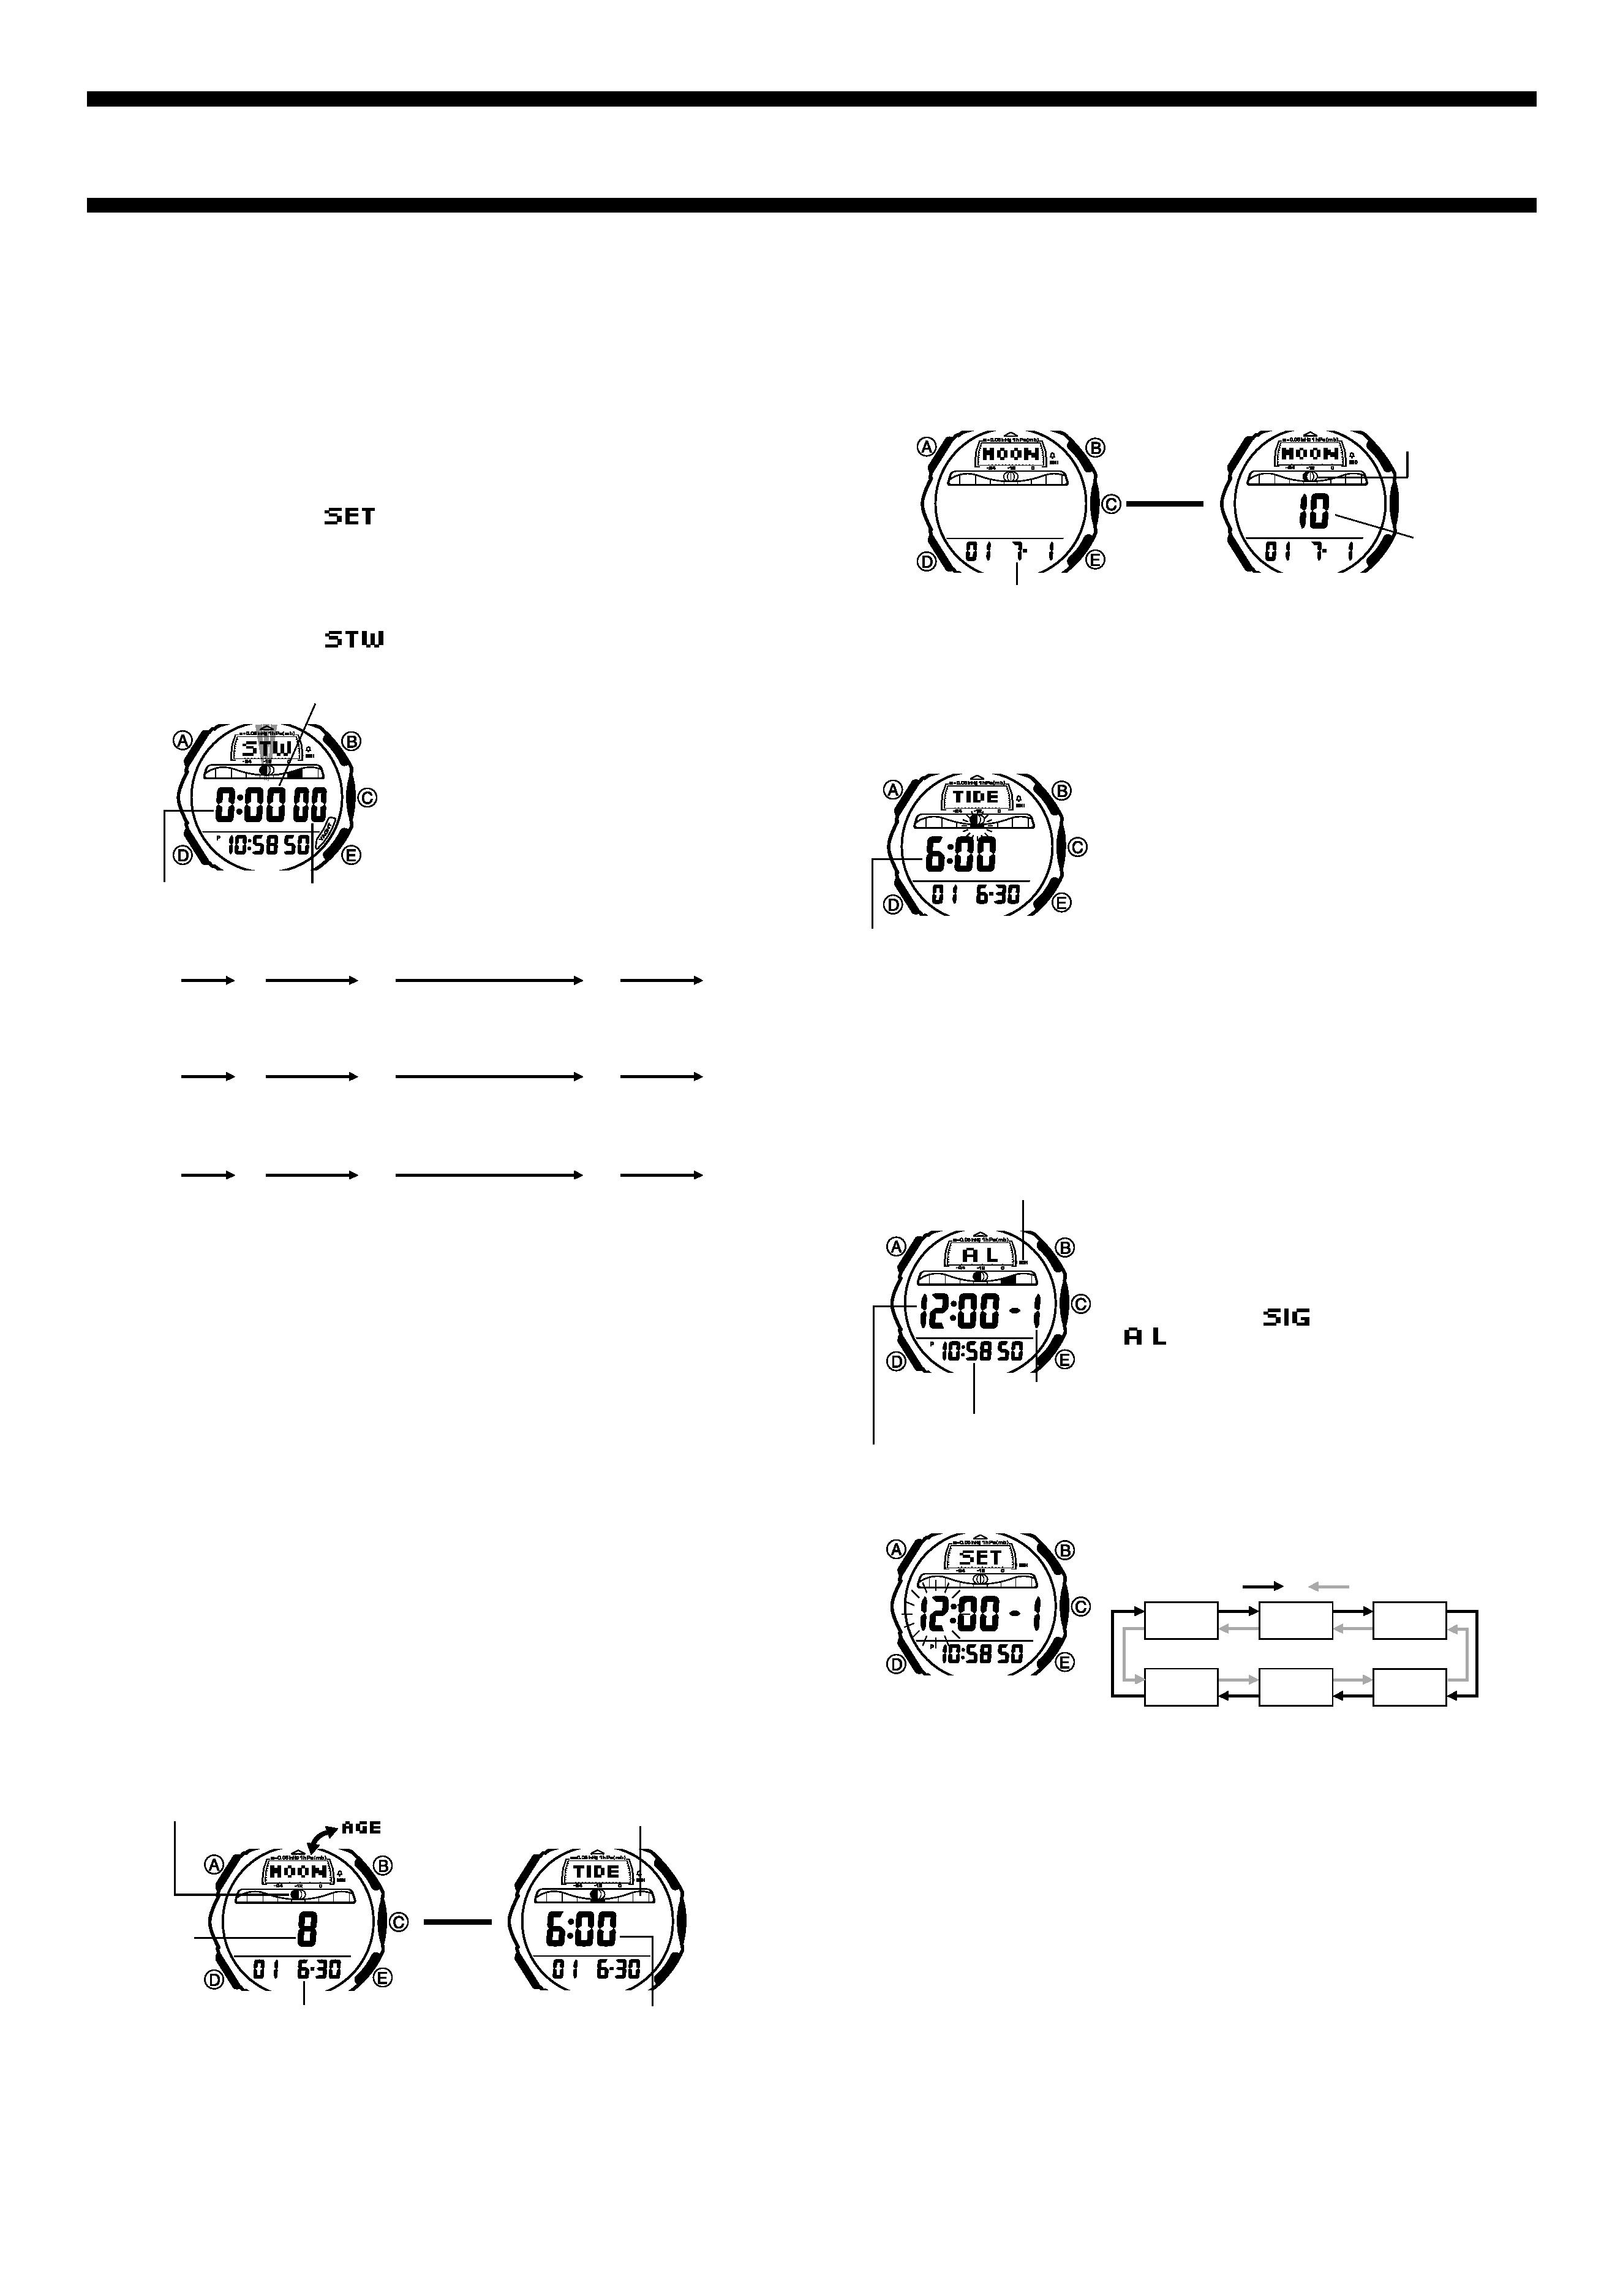
· See "Moon Phase Indicator" for information about the Moon phase
indicator and "Tide Graph" for information about the tide graph.
To view the Moon age for a particular date
1. In the Moon/Tide Mode, press C to display the Moon Age Screen.
2. Use E (+) and B () to change the date.
· You can select a date in the range of January 1, 2000 to December 31,
2039.
· About one second after you display a date, its Moon age and Moon
phase will appear on the display.
To view tide data for a particular time
1. Use the steps under "To view the Moon
age for a particular date" to specify the
date whose data you want to view.
2. Press C to display the Tide Data Screen.
3. Use E (+) and B () to specify the time
whose tide data you want to view.
· You can change the time in one-hour
increments.
· When setting the tide data time using the
12-hour format, take care to set the time
correctly as a.m. (no indicator) or p.m. (P
indicator).
· The area of the tide graph that
corresponds to the specified date and
time flashes.
About one
second
later
L
Date (Year Month Day)
Moon phase
indicator
Tide data time
Moon age
MOON/TIDE MODE
You can use the Moon/Tide Mode to view the Moon age for the current date
and the Moon age, Moon phase, and tidal movements for a particular date.
Important!
Especially when you plan to view the Moon age or tide graph, be sure to
specify the city data as well as the current time/date.
To display Moon and tide data
1. Press D to enter the Moon/Tide Mode.
· The initial date and Moon age are those based on the time, date, and
city code you have set in the Timekeeping Mode.
2. Press C to toggle between the Moon Age Screen and the Tide Data
Screen.
· The initial time setting when you display the Tide Data Screen from the
Moon Age Screen is always 6:00 (AM).
· The Tide Data Screen shows the Moon phase for the current date, with
the area of the tide graph that corresponds to the specified date and
time flashing.
Press C.
L
Moon Age Screen
Tide Data Screen
Tide data time
Moon phase indicator
Moon
Age
Date (Year Month Day)
Tide Graph
L
ALARM
You can set five independent Daily Alarms.
When an alarm is turned on, the alarm tone
sounds when the alarm time is reached. You
can also turn on an Hourly Time Signal that
causes the watch to beep twice every hour on
the hour.
· The alarm number (1 through 5) indicates
an alarm screen.
appears in place of
when the Hourly Time Signal screen
is shown.
· All of the operations in this section are
performed in the Alarm Mode, which you
enter by pressing D.
To set an alarm time
1. In the Alarm Mode, use E and B to
select the alarm whose time you want to
set.
2. Hold down A until the hour digits of the alarm time start to flash, which
indicates the setting screen.
· This automatically turns on the alarm.
3. Press D to move the flashing between the hour and minutes.
4. While a setting is flashing, use E (+) and B () to change it.
· When setting the alarm time using the 12-hour format, take care to set
the time correctly as a.m. (no indicator) or p.m. (P indicator).
5. Press A to exit the setting screen.
Alarm Operation
The alarm sounds at the preset time for about 20 seconds (in all modes), or
until you stop it by pressing any button.
To test the alarm
In the Alarm Mode, hold down C to sound the alarm.
Alarm Time (Hour : Minutes)
Alarm on indicator
Timekeeping Mode time
Alarm number
AL-1
SIG
AL-2
AL-5
AL-3
AL-4
Press E.
Press B.