
(WITHOUT PRICE)
SERVICE MANUAL
& PARTS LIST
REF. NO. S/M-596
APRIL 1998
QW-1848
MODULE NO.
R
DW-285C
INDEX
- 1 -
CONTENTS
1. SPECIFICATIONS : QW-1848
1. SPECIFICATIONS · · · · · · · · · · · · · · · · · · · · · · · · · · 1
2. OPERATION CHART · · · · · · · · · · · · · · · · · · · · · · · · 2
3. DRAWINGS · · · · · · · · · · · · · · · · · · · · · · · · · · · · · · · 4
3-1. BLOCK DIAGRAM · · · · · · · · · · · · · · · · · · · · · · · · 4
3-2. CHECKING TERMINALS AND COMPONENTS · · · · 5
3-3. N1~N4 PADS· · · · · · · · · · · · · · · · · · · · · · · · · · · · 5
4. EXPLODED VIEW · · · · · · · · · · · · · · · · · · · · · · · · · · 6
5. PARTS LIST · · · · · · · · · · · · · · · · · · · · · · · · · · · · · · 7
6. PRECAUTIONS FOR REPAIR · · · · · · · · · · · · · · · · · · 8
6-1. AC (ALL CLEAR) AND REMOVING OF MODULE · · 8
6-2. ACCURACY CHECKING · · · · · · · · · · · · · · · · · · · 8
Function
· Electro-luminescent backlight
· Stopwatch
Measuring capacity: 23:59'59
Measuring unit: 1/100 sec. (for the first 60 min.)
1 sec. (after 60 min.)
Measuring mode: Elapsed time, split time, 1st-2nd place times
· Countdown alarm
Input range: 1 sec. to 24 hr.
Unit: 1 sec.
Other: Auto-repeat function
· Multi-function alarm
· Hourly time signal
· Regular timekeeping: Hr, min, sec, pm, mo, date, day
· Auto-calendar (Pre-programmed to the year 2039)
· 12/24-hour formats
Item
Detail
Item
Detail
Battery
CR2016
Accuracy
±15sec./month
Battery life
Approx. 24 months
Accuracy setting system Trimmer capacitor
Current consumption
0.85
µA maximum
Accuracy checking
See page 8
Alarm system
Piezo plate on Back cover
Accuracy setting
+0.25~+0.35sec./day
- 2 -
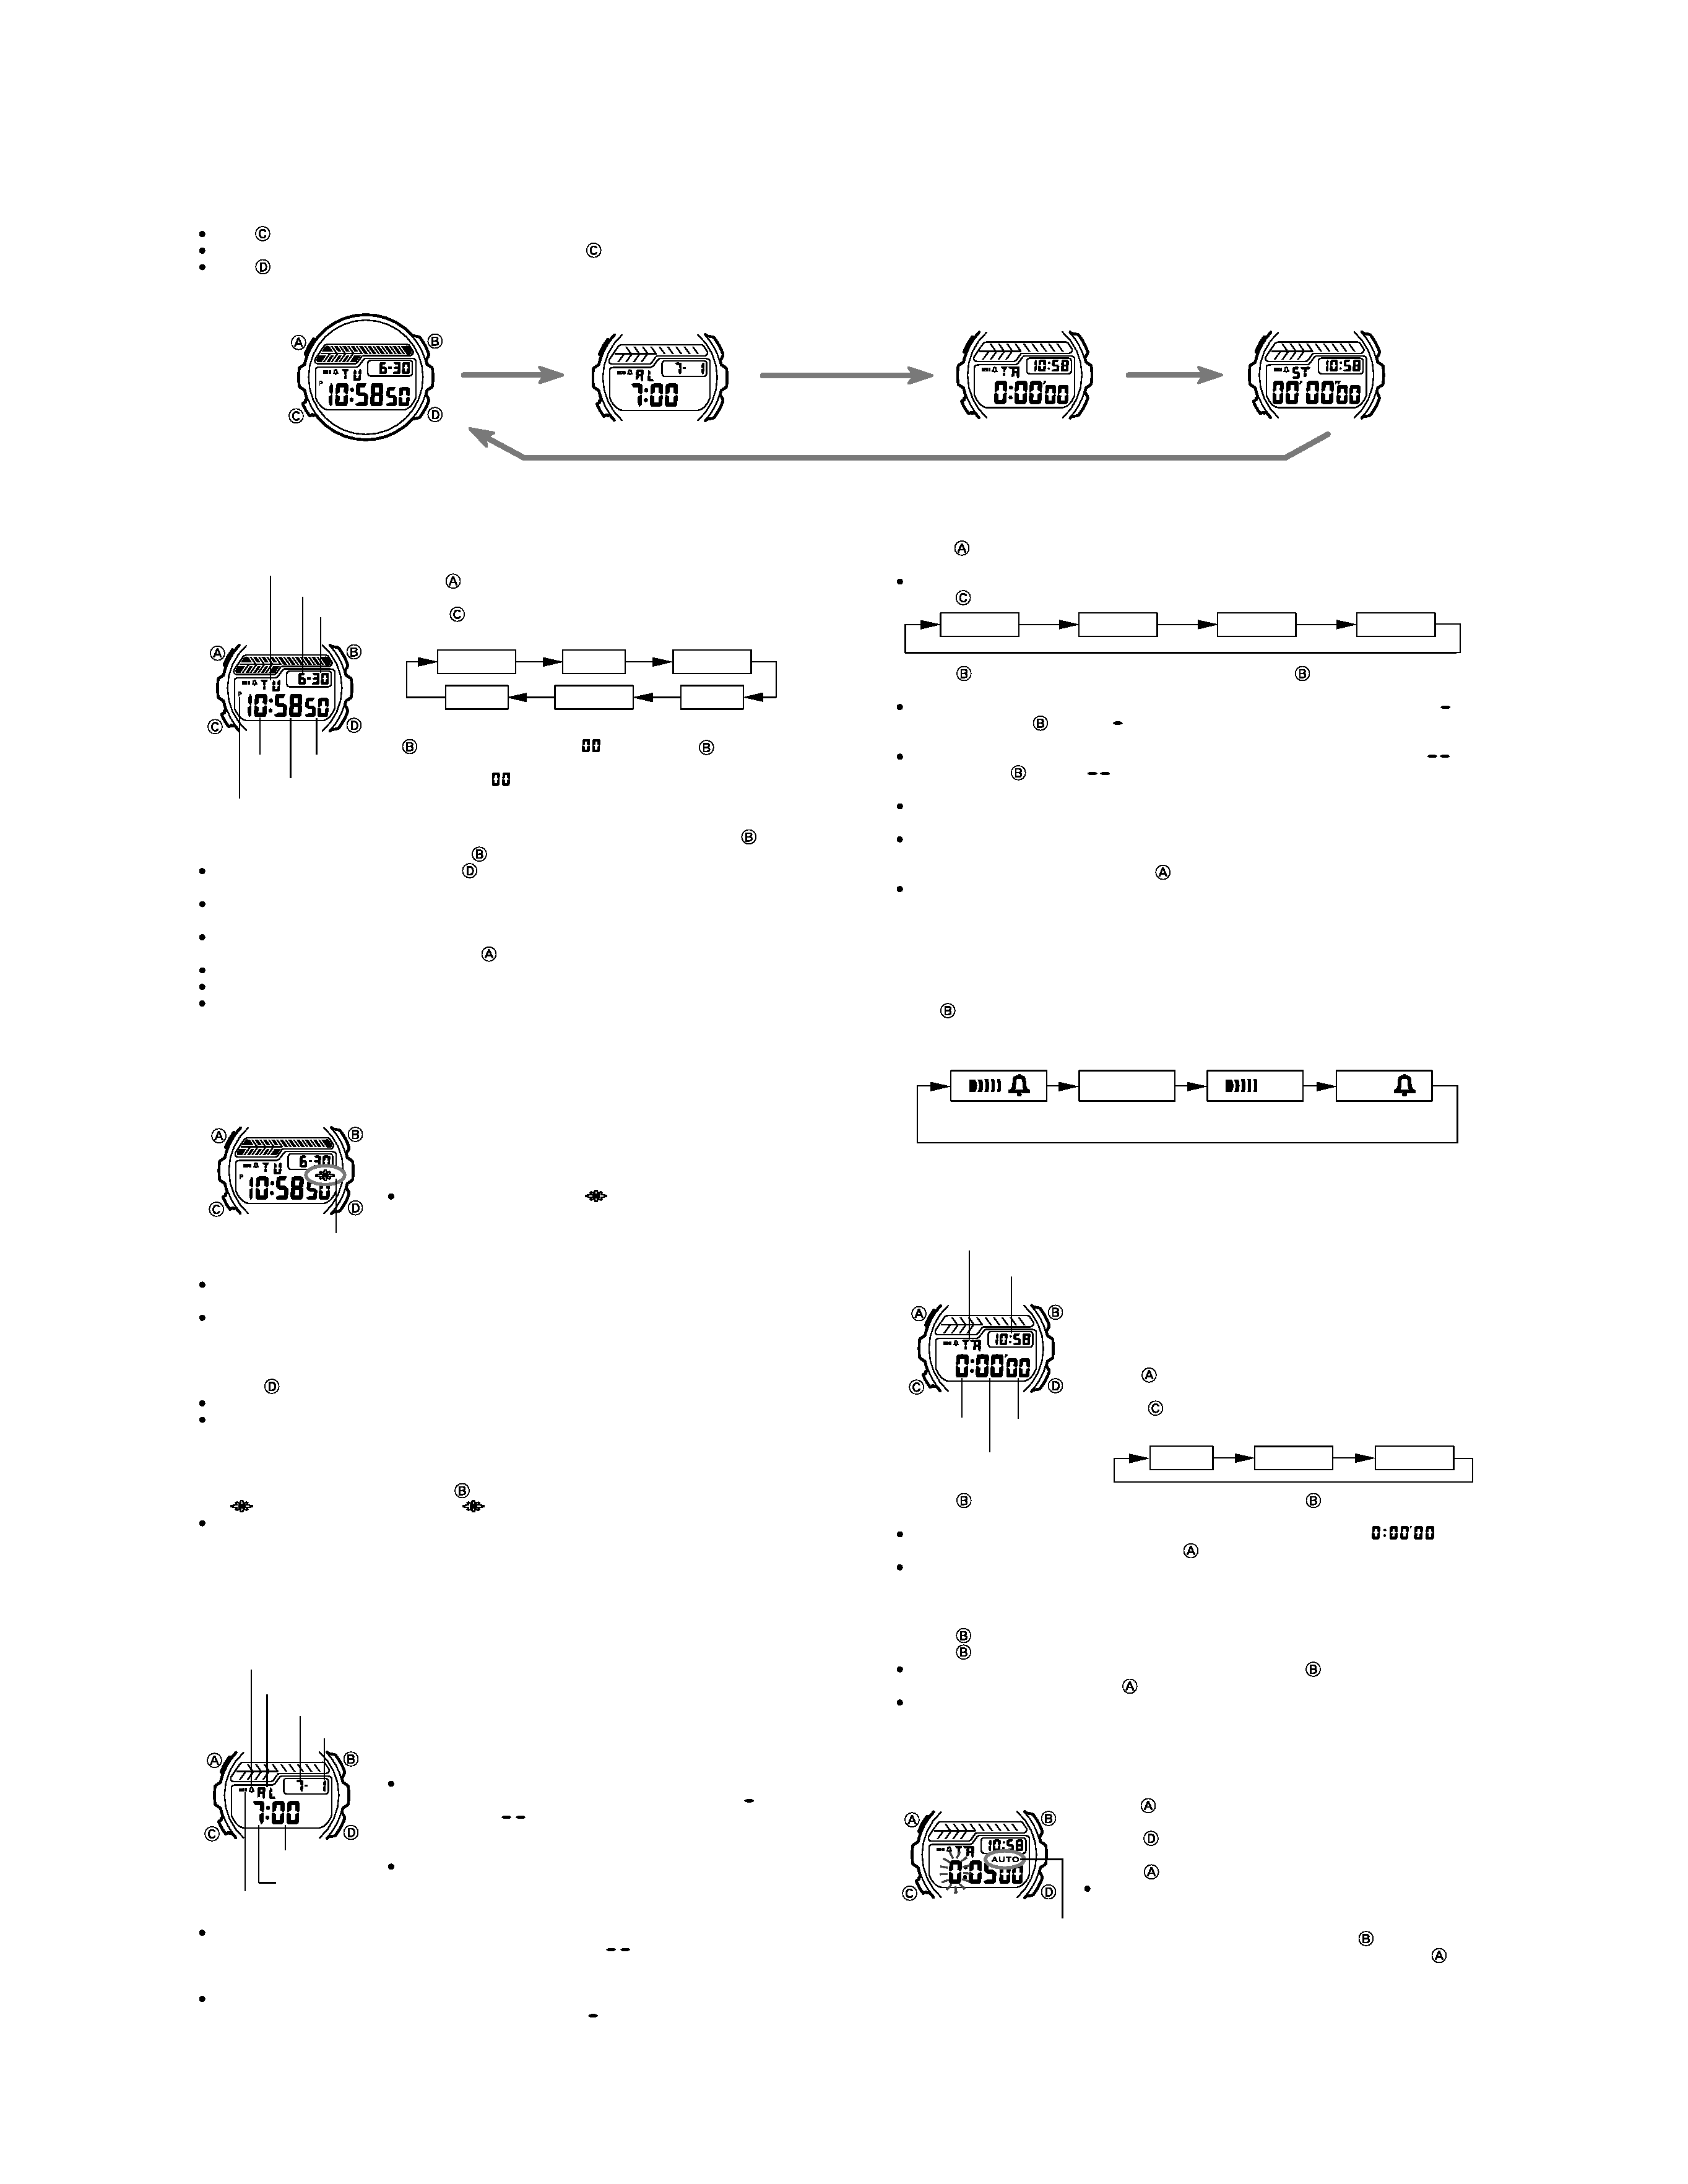
2. OPERATION CHART : QW-1848
Seconds
Minutes
Hours
To set the alarm time
1. Press
while in the Alarm Mode. The hour digits flash on the display because they
are
selected.
This operation automatically turns on the alarm.
2. Press
to change the selection in the following sequence.
3. Press
to increase the selected digits. Holding down
changes the number at
high speed.
To set an alarm that does not include a month (Daily alarm, Monthly alarm), set
for
the month. Press
until the
mark appears (between 12 and 1) while the month
digits are flashing.
To set an alarm that does not include a day (Daily alarm, 1-Month alarm), set
for
the day. Press
until the
mark appears (between 31 and 1) while the day digits
are flashing.
The format (12-hour and 24-hour) of the alarm time matches the format you select
for normal timekeeping.
When setting the alarm time using the 12-hour format, take care to set the time
correctly as morning (no indicator) or afternoon (P).
4. After you set the alarm time, press
to return to the Alarm Mode.
If you do not operate any button for a few minutes while a selection is flashing, the
flashing stops and the watch goes back to the Alarm Mode automatically.
To stop the alarm
Press any button to stop the alarm after it starts to sound.
To turn the alarm and Hourly Time Signal on and off
Press
while in the Alarm Mode to change the status of the alarm and Hourly Time
Signal in the following sequence.
[Alarm On Indicator/Hourly Time Signal On Indicator]
COUNTDOWN ALARM MODE
The countdown timer can be set within a range of 1 second
to 24 hours. When the countdown reaches zero, an alarm
sounds for 10 seconds or until you press any button.
Note that you can also select auto repeat timing that
automatically restarts the countdown from the original
value you set whenever zero is reached.
To set the countdown time
1. Press
while in the Countdown Alarm Mode. The hours
digit flashes on the display because it is
selected.
2. Press
to change the selection in the following
sequence.
3. Press
to increase the selected number. Holding down
changes the selection
at high speed.
To set the starting value of the countdown time to 24 hours, set to
.
4. After you set the countdown time, press
to return to the Countdown Alarm Mode.
If you do not operate any button for a few minutes while a selection is flashing, the
flashing stops and the watch goes back to the Countdown Alarm Mode automatically.
To use the countdown timer
1.Press
while in the Countdown Alarm Mode to start the countdown timer.
2. Press
again to stop the countdown timer.
You can continue countdown timer operation by pressing
.
3. Stop the timer and then press
to reset the countdown time to its starting value.
When the end of the countdown is reached and auto repeat timing is off, the alarm
sounds for 10 seconds or until you stop the alarm by pressing any button. Countdown
timing stops, and the countdown time is automatically reset to its starting value after
the alarm stops.
To turn auto repeat timing on and off
1. Press
while in the Countdown Alarm Mode. The hours
digit flashes on the display because it is
selected.
2. Press
to turn auto repeat on (AUTO displayed) and
off (AUTO not displayed).
3. Press
to return to the Countdown Alarm Mode.
When the end of the countdown is reached while auto
repeat is on, the alarm sounds, but the countdown starts
again automatically whenever the countdown reaches
zero. You can stop timing by pressing
, and manually
reset to the starting countdown time by pressing
.
Hourly Time
Signal Only
Alarm Only
Both OFF
Both ON
Hour
Day
Minutes
Month
Seconds
Day
Hour
Minutes
Year
Month
Day of week
Day
Month
Seconds
Hour
Minutes
PM indicator
GENERAL GUIDE
Press
to change from mode to mode.
After you perform an operation in any mode, pressing
returns to the Timekeeping Mode.
Press
in any mode to illuminate the display.
Timekeeping Mode
Alarm Mode
Stopwatch Mode
Countdown Alarm Mode
TIMEKEEPING MODE
To set the time and date
1. Press
while in the Timekeeping Mode. The seconds
digits flash on the display because they are
selected.
2. Press
to change the selection in the following
sequence.
3. While the seconds digits are selected (flashing), press
to reset the seconds to
. If you press
while the
seconds count is in the range of 30 to 59, the seconds
are reset to
and 1 is added to the minutes. If the
seconds count is in the range of 00 to 29, the minutes
count is unchanged.
4. While any other digits (besides seconds) are selected (flashing), press
to
increase the number. Holding down
changes the number at high speed.
While any digits are selected, press
to switch between the 12-hour and 24-hour
formats.
When the 12-hour format is selected, the P (PM) indicator appears on the display to
indicate "p.m." times. There is no indicator for "a.m." times.
Selecting the 24-hour format causes the 24 indicator to appear on the display.
5. After you set the time and date, press
to return to the Timekeeping Mode.
The day of the week is automatically set in accordance with the date.
The date can be set within the range of January 1, 1995 to December 31, 2039.
If you do not operate any button for a few minutes while a selection is flashing, the
flashing stops and the watch goes back to the Timekeeping Mode automatically.
BACKLIGHT FUNCTION
A backlight that uses an EL (electro-luminescent) panel
causes the entire display to glow for easy reading in the
dark. An EL alarm feature can be turned on so the backlight
flashes whenever an alarm or hourly time signal sounds.
The EL alarm on indicator (
) is shown on the display
in all modes while the EL alarm is on.
Note
The backlight of the watch employs an electro-luminescent (EL) light, which loses
illuminating power after very long use.
The illumination provided by the backlight may be hard to see when viewed under
direct sunlight.
To manually turn on the backlight
Pressing
in any mode causes the backlight to turn on for about three seconds.
The backlight automatically turns off whenever an alarm sounds.
The above operations turn on the backlight, regardless of the current EL alarm
settings.
To turn the EL alarm on and off
In the Timekeeping Mode, hold down
for about two seconds to toggle the EL alarm
on (
indicator displayed) and off (
indicator not displayed).
When the EL alarm is on, the backlight flashes while the alarm and hourly time signal
tones are sounding.
ALARM MODE
You can set an alarm with hour, minutes, month, and day.
When the alarm is turned on, the alarm sounds for 20
seconds at the preset time. When the Hourly Time Signal
is turned on, the watch beeps every hour on the hour.
Alarm Types
The types of alarm you get depends on the information you
set.
To set a Daily alarm
Set the hour and minutes for the alarm time. Set
for
the month and
for the day (see step 3 under "To set
the alarm time"). This type of setting causes the alarm
to sound everyday at the time you set.
To set a Date alarm
Set the month, day, hour and minutes for the alarm time.
This type of setting causes the alarm to sound at the
specific time, on the specific date you set.
To set a 1-Month alarm
Set the month, hour and minutes for the alarm time. Set
for the day (see step
3 under "To set the alarm time"). This type of setting causes the alarm to sound every
day at the time you set, only during the month you set.
To set a Monthly alarm
Set the day, hour and minutes for the alarm time. Set
for the month (see step 3
under "To set the alarm time"). This type of setting causes the alarm to sound every
month at the time you set, on the day you set.
EL alarm on indicator
Day
Month
Minutes
Hour
Hourly time signal on
indicator
Mode indicator
Alarm on indicator
Current time
Minutes
Mode indicator
Seconds
Hours
Auto repeat on indicator

- 3 -
STOPWATCH MODE
The Stopwatch Mode lets you measure elapsed time, split
times, and two finishes. The range of the stopwatch is 23
hours, 59 minutes, 59 seconds.
To measure elapsed time
1. Press
to start the stopwatch.
2. Press
to stop the stopwatch.
You can resume the measurement operation by press-
ing
again.
3. Press
to clear the stopwatch to all zeros.
For the first 60 minutes, the display shows minutes,
seconds, and 1/100 second. After 60 minutes, the dis-
play format changes to show hours, minutes, and sec-
onds.
To record split times
1. Press
to start the stopwatch.
2. Press
to display the timing up to that point. Stopwatch timing continues internally.
3. Press
to clear the split time and to continue time measurement on the display.
You can repeat steps 2 and 3 as many times as you want.
4. Press
to stop the time measurement.
5. Press
to clear the stopwatch to all zeros.
To time first and second place finishes
1. Press
to start the stopwatch.
2. Press
when the first finisher crosses the line, and record the time.
3. Press
when the second finisher crosses the line.
4. Press
to display the finishing time of the second finisher.
5. Press
again to clear the stopwatch to all zeros.
Current time
Seconds
Mode indicator
1/100 second
Minutes
- 4 -
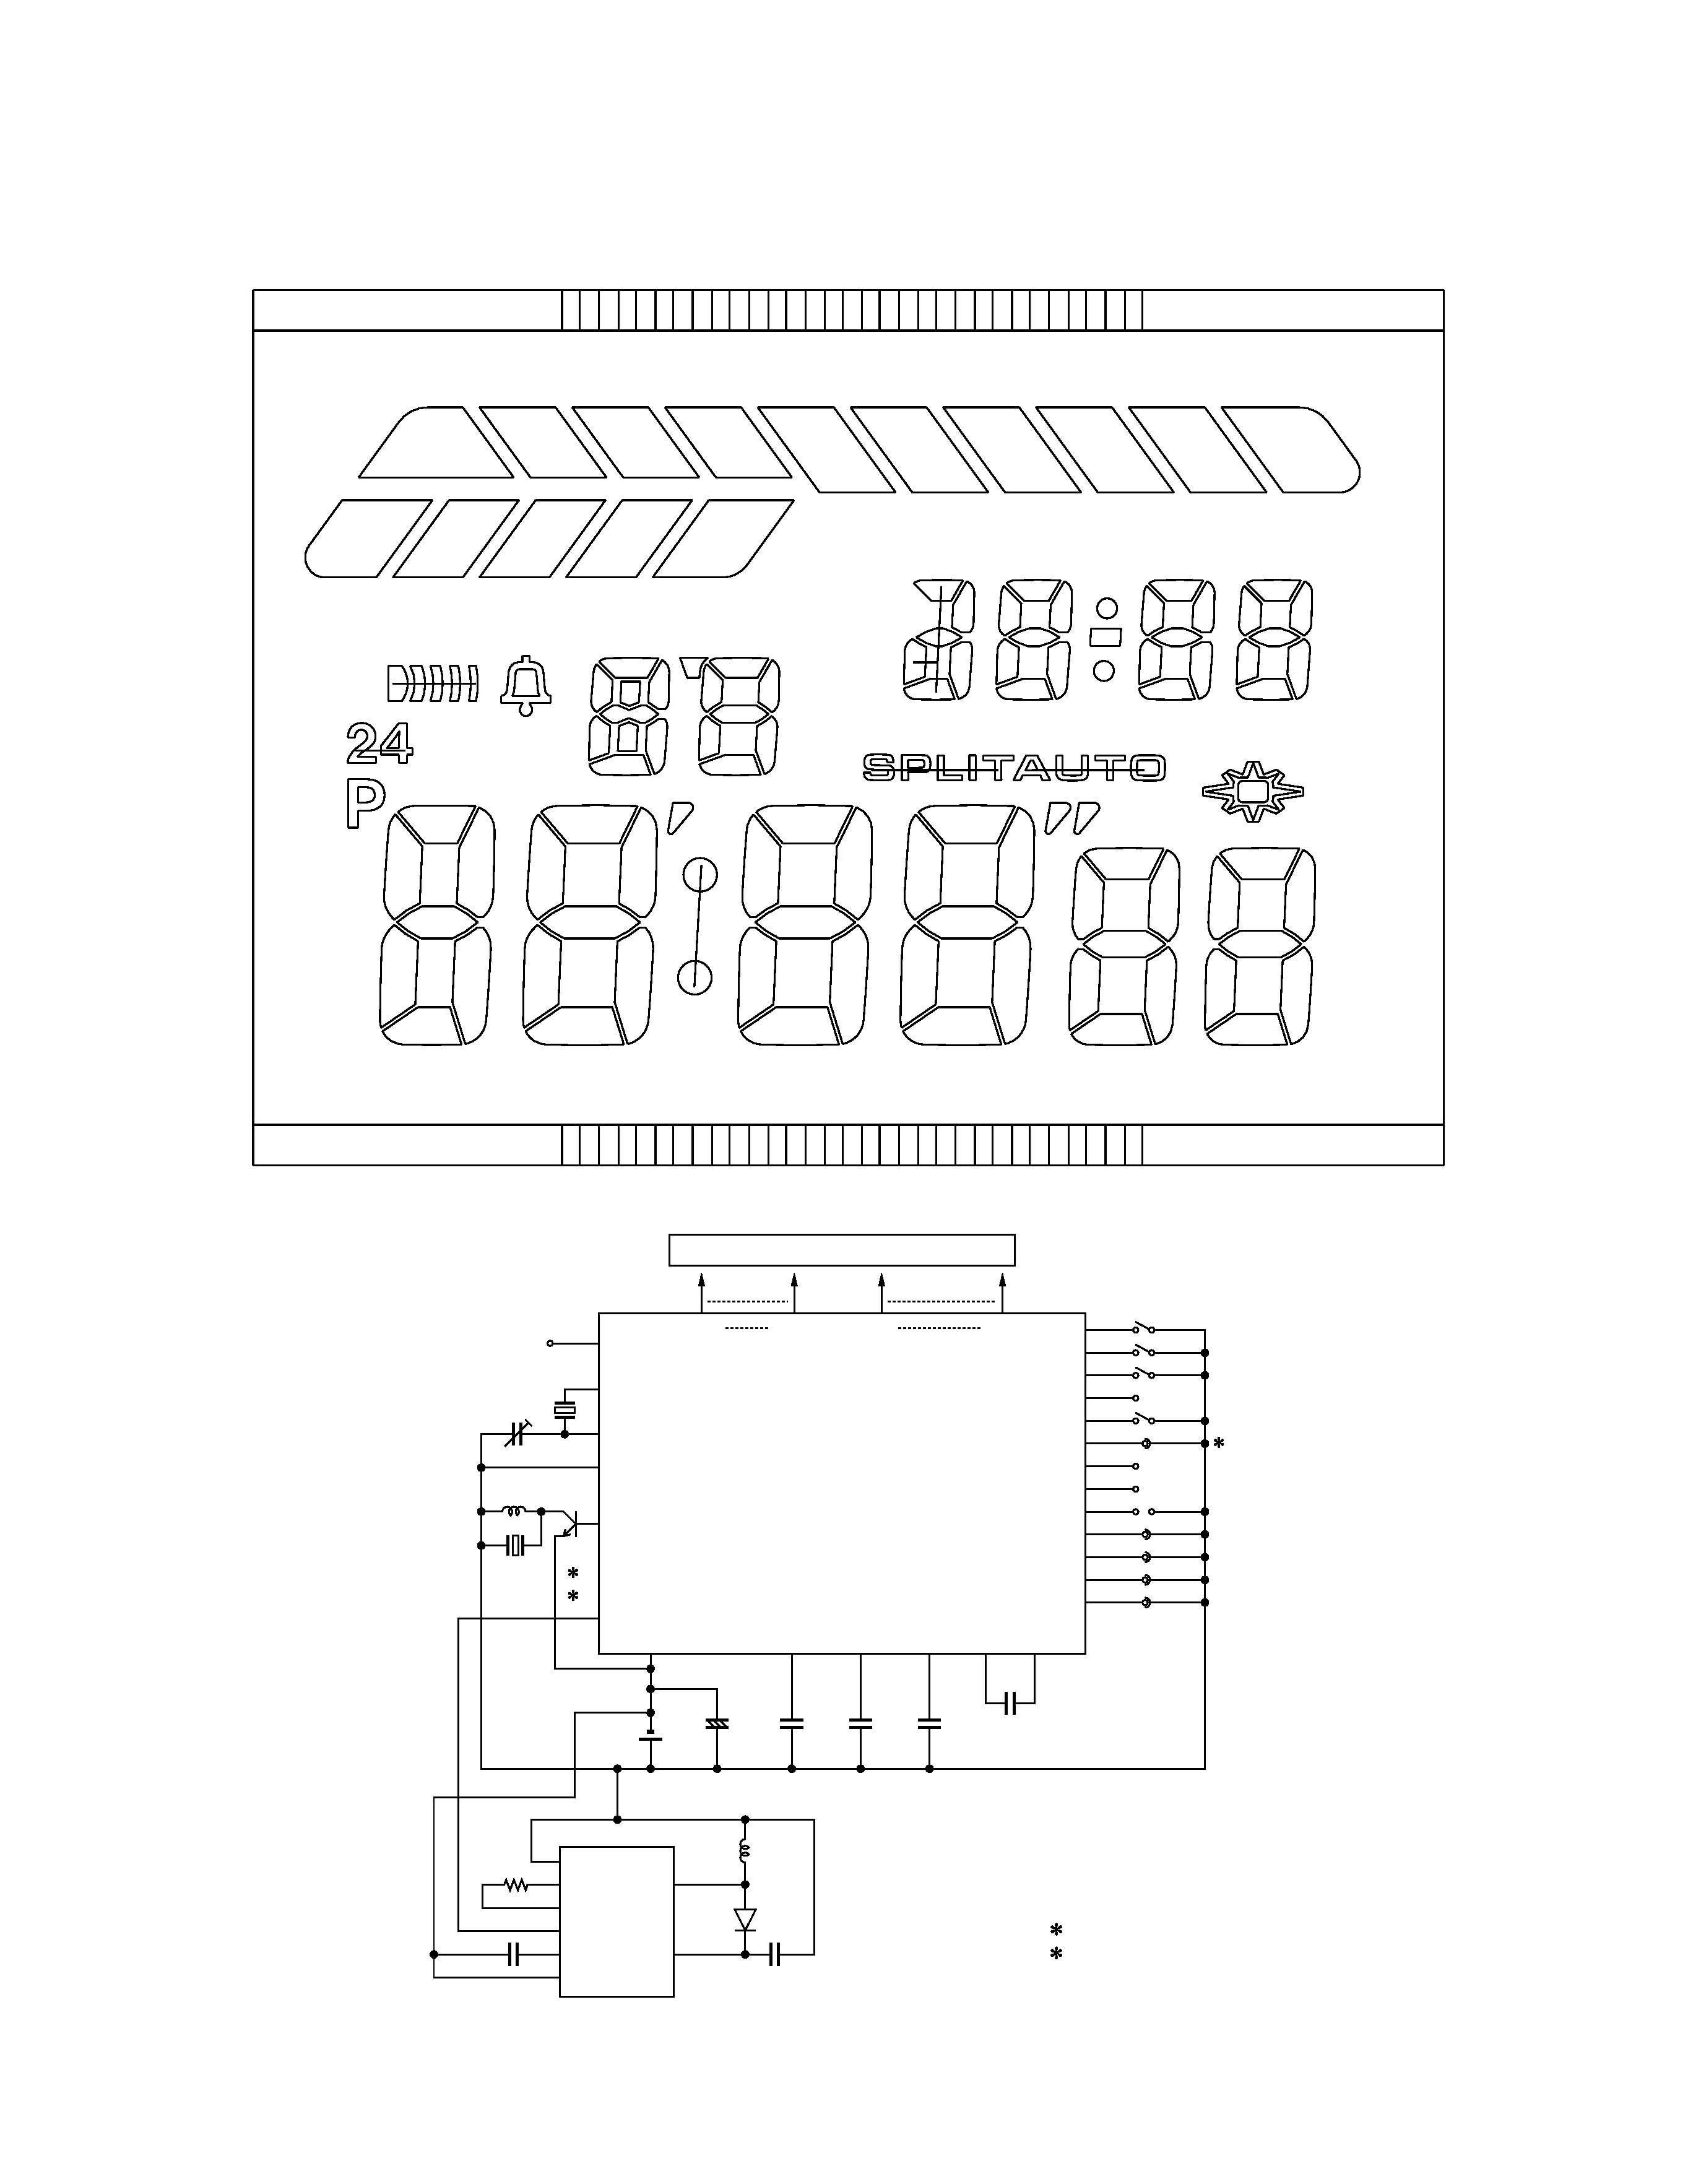
3. DRAWINGS : QW-1848
3-1. BLOCK DIAGRAM
1
1
XTB
Xtal
CT
XT
LD3
LD2
C4
BAT
KI1
KI2
2
KI3
KI4
LD1
VCCE
RT1
LL2
Di
EL
RT2
ENB
VCPE
CIL
ELD
GND
R
C6
VSS2
INV
LC1
LC5
L27
L1
VCH
VSS1
VSS3
LSI
LCD
TOTAL
BONDING
59PINS
57PINS
VC1 VC2
VDD
BD
T
C1
C5
+
C2
C3
SL
S2
S1
S3
KI5
KI6
KI7
KI8
AC
N1
N2
N3
N4
1. Not used.
2. Short (Soldering)
L
PZ
Tr
1C1
20C4
20C2
26C1
24C4
22C4
25C1
2C4
7C5
8C5
9C5
10C5
11C5
3C4
4C4
5C4
6C4
7C4
8C4
9C4
10C4
11C4
24C3
2C1
1C3
25C4
23C4
23C2
24C1
1C4
26C3
25C3
25C2
27C2
2C2
3C1
4C2
4C3
6C3
5C1
3C3
1C2
27C4
23C3
22C3
23C1
24C2
21C3
21C2
21C1
22C2
20C3
20C1
22C1
19C4
19C2
18C1
19C3
18C3
18C2
19C1
17C3
14C4
15C3
16C2
16C1
14C1
17C2
16C3
15C4
15C2
14C3
14C2
12C4
13C2
12C1
13C3
13C1
12C3
12C2
15C1
17C1
27C3
2C3
26C4
26C2
3C2
4C1
6C1
7C3
6C2
5C2
5C3
7C1
7C2
9C3
9C1
8C1
8C2
8C3
10C1
9C2
11C3
11C2
11C1
10C2
13C4
16C4 17C4
18C4
21C4
10C3
L1
L2
L3
L4
L5
L6
L7
L8
L9
L10
L11
LC1
LC2
LC3
LC4
LC5
L27
L26
L25
L24
L23
L22
L21
L20
L19
L18
L17
L16
L15
L14
L13
L12