
(WITHOUT PRICE)
SERVICE MANUAL
& PARTS LIST
REF. NO. S/M-584
JANUARY 1998
QW-1814
MODULE NO.
R
GT-002C
INDEX
- 1 -
CONTENTS
1. SPECIFICATIONS : QW-1814
1. SPECIFICATIONS · · · · · · · · · · · · · · · · · · · · · · · · · ·
1
2. OPERATION CHART · · · · · · · · · · · · · · · · · · · · · · · ·
2
3. DRAWINGS · · · · · · · · · · · · · · · · · · · · · · · · · · · · · · ·
7
3-1. BLOCK DIAGRAM · · · · · · · · · · · · · · · · · · · · · · · ·
7
3-2. CHECKING TERMINALS AND COMPONENTS · · · ·
8
4. EXPLODED VIEW · · · · · · · · · · · · · · · · · · · · · · · · · ·
9
5. PARTS LIST · · · · · · · · · · · · · · · · · · · · · · · · · · · · · · 10
6. PRECAUTIONS FOR REPAIR · · · · · · · · · · · · · · · · · · 11
6-1. AC (ALL CLEAR) AND REMOVING OF MODULE · · 11
6-2. ACCURACY CHECKING · · · · · · · · · · · · · · · · · · · 11
Item
Detail
Item
Detail
Battery
CR2016
Accuracy
±15sec./month
Battery life
Approx. 18 months
Accuracy setting system Trimmer capacitor
Current consumption
3.03
µA maximum
Accuracy checking
See page 11
Alarm system
Piezo plate on Back cover
Accuracy setting
+0.25~+0.35sec./day
Function
· Shock resistant (G-SHOCK)
· Low-temperature resistance (-20 C)
· Electro-luminescent backlight
Auto light switch
· 100 pages of Telememo
8 letters and 12 numbers per page.
Other:Auto sort function, remaining memory display
· 100 pages of Schedule-memo
11-letter message, month, date, hour and minute per page
Other:Auto sort function, Remaining Memory Display
· Vital Statistics / ID function
Name (16 characters), blood type (Rh factor / ABO type),
date of birth (year, month, date),
Credit Card Number (built-in title, 8 characters and 12 digits),
License Number (built-in title, 8 characters and 12 digits),
Passport Number (built-in title, 8 characters and 12 digits),
Two undefined items (8 characters and 12 digits)
· 1/100 sec. stopwatch
Measuring capacity: 23:59'59.99"
Measuring mode: Elapsed time, split time, 1st-2nd place times
· Regular timekeeping: Hr, min, sec, pm, year, month, date, day
· Auto-calendar (pre-programmed until the year 2039)
· 12/24-hour formats
· Daily alarm
· Hourly time signals
* Memories shared between Telememo and Schedule-memo

- 2 -
2. OPERATION CHART : QW-1814
TIME TEL SCH VIT ALM STW
P
TIME TEL SCH VIT ALM STW
TIME TEL SCH VIT ALM STW
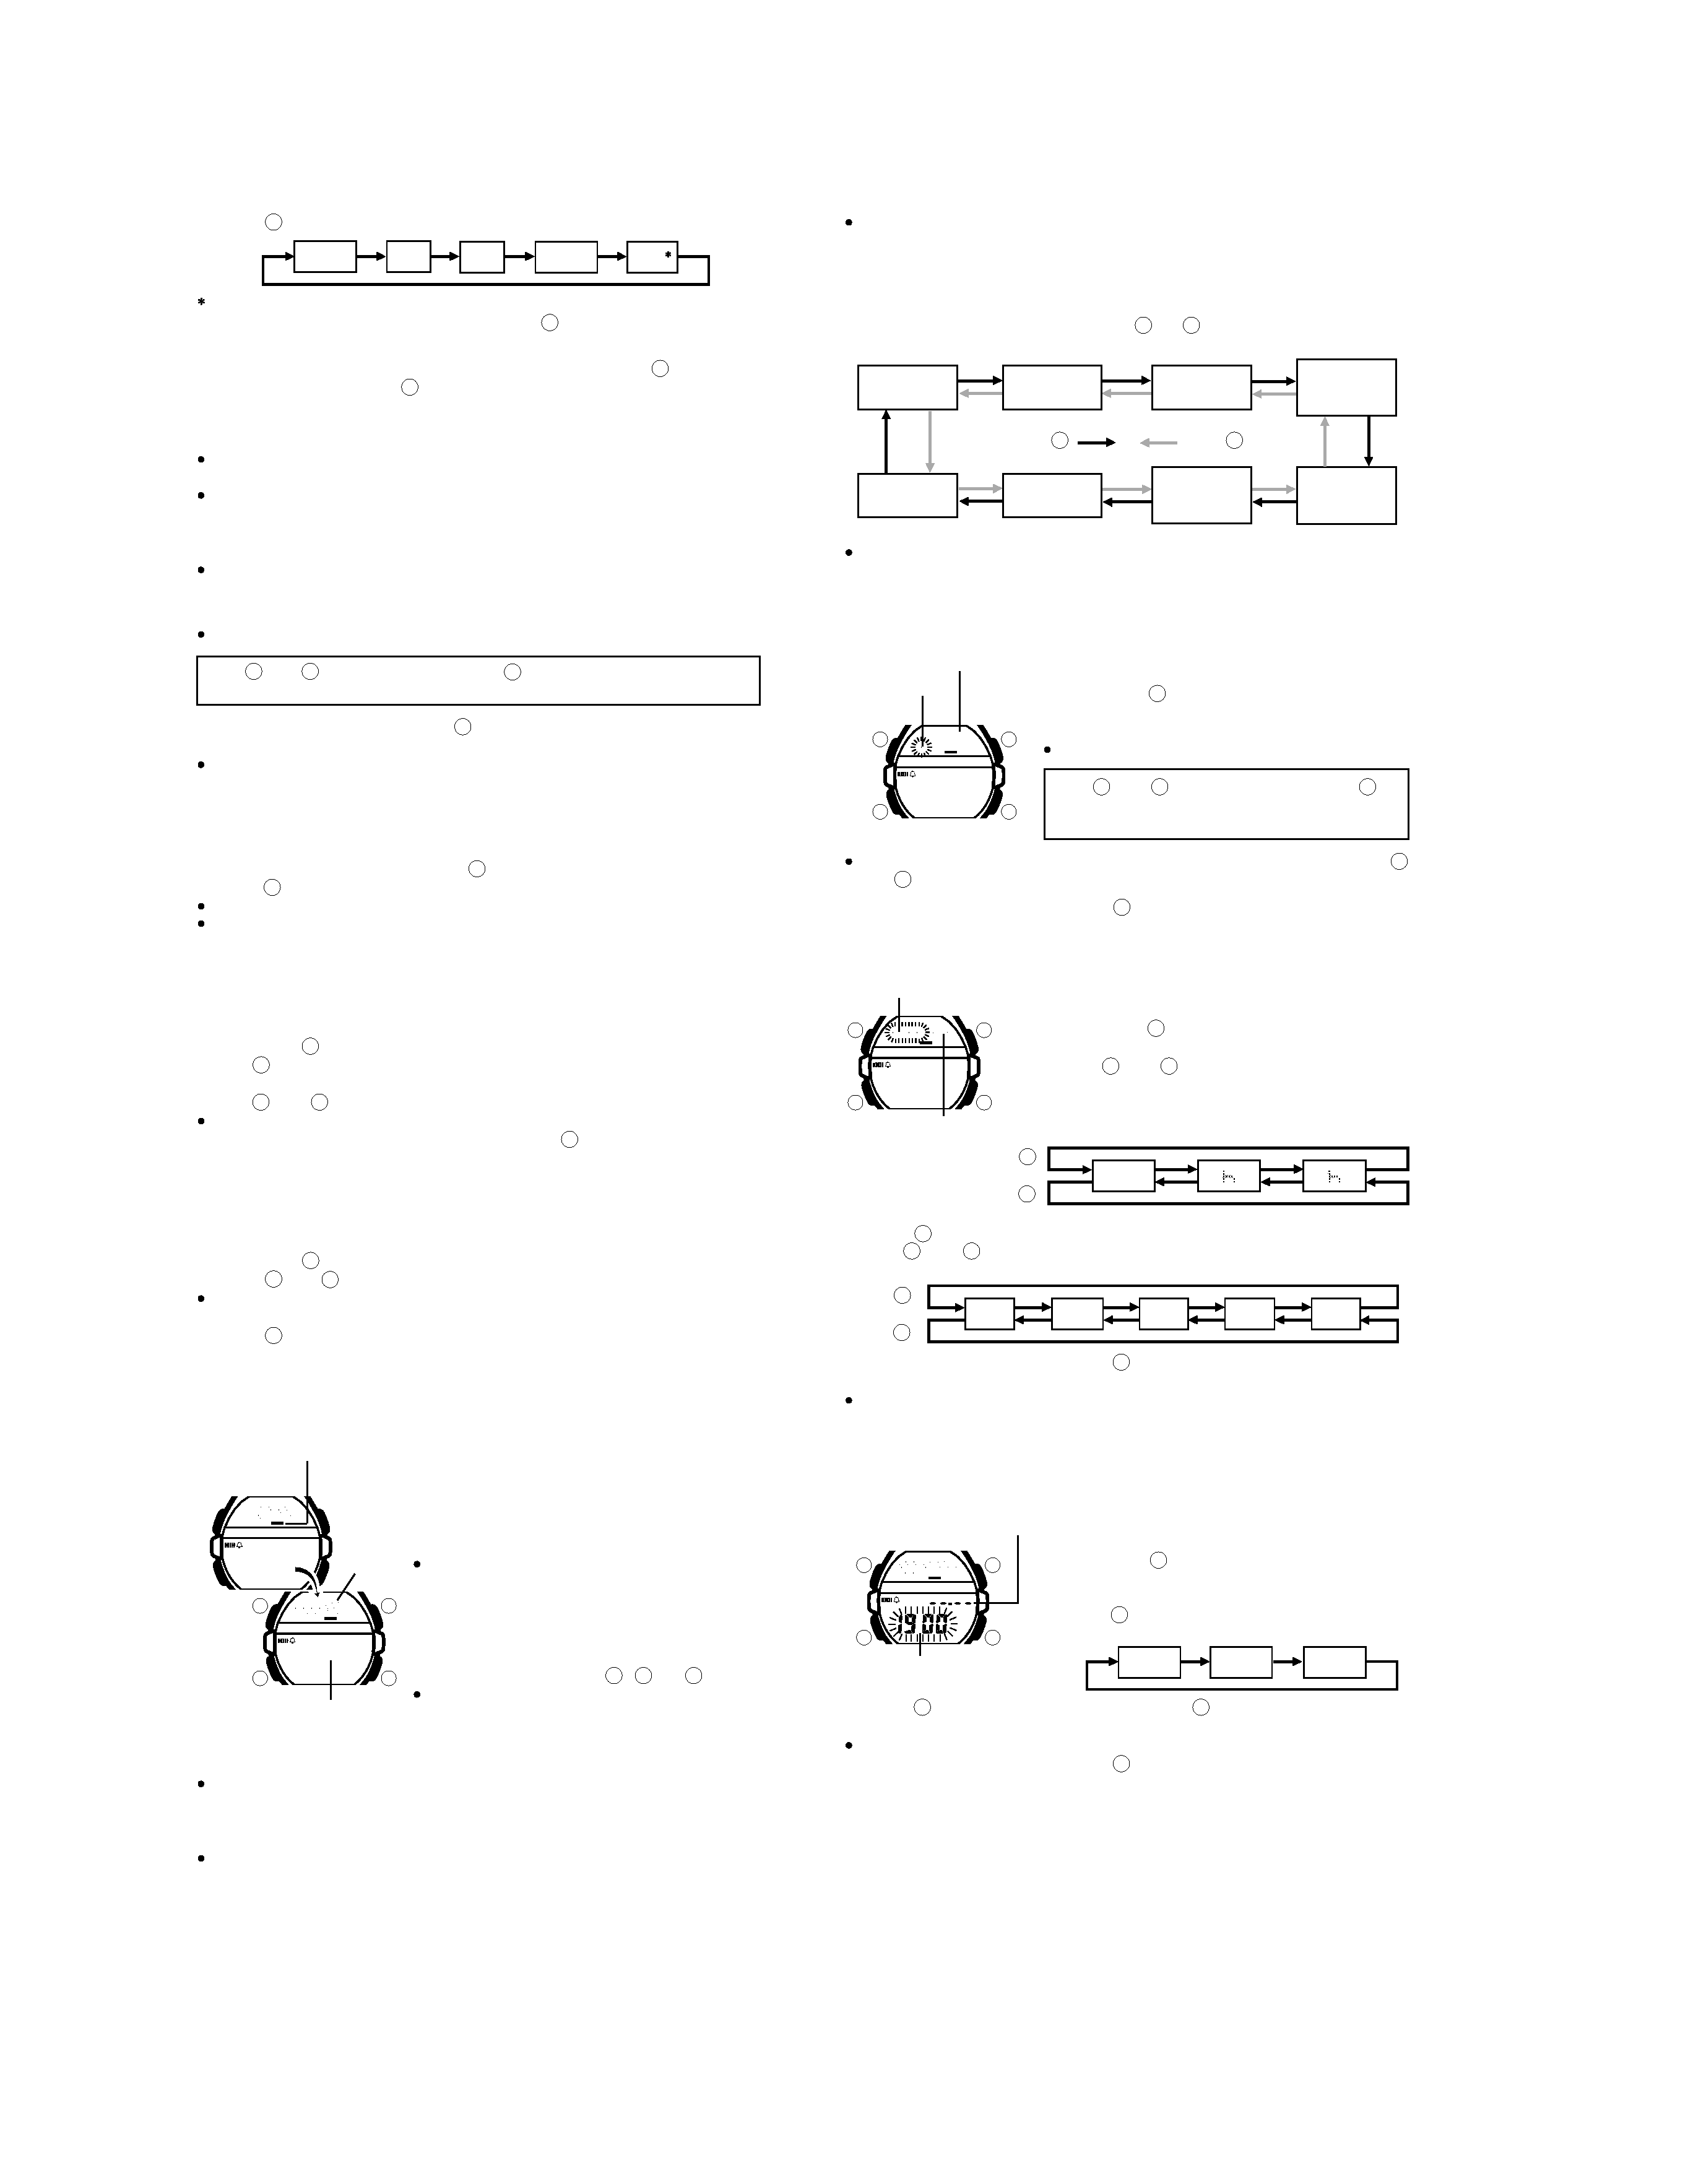
GENERAL GUIDE
Timekeeping Mode
Stopwatch Mode
When the text in the text area of the display contains more than five
characters, it automatically scrolls. Text scrolling in the text area stops
moving whenever an alarm is sounding.
In any mode other than Stopwatch Mode, the watch automatically returns to
the Timekeeping Mode if you do not perform any button operation for two or
three minutes.
w
TIME TEL SCH VIT ALM STW
Alarm Mode
w
TIME TEL SCH VIT ALM STW
w
Schedule-memo Mode
Vital Statistics/ID Mode
w
w
w
Text area
Telememo Mode
TIME TEL SCH VIT ALM STW
Mode
Light
If the contents of the upper part of the display seem to be continually
changing, see "AUTO DISPLAY FUNCTION" for information on how to
stop it.
Press
to change from mode to mode.
Press
in any mode to illuminate the display for about one second.
TIME TEL SCH VIT ALM STW
P
Month Date
Seconds
Year
PM indicator
TIMEKEEPING MODE
In addition to normal timekeeping, the Timekeeping
Mode is also used to set the current time and
date. You can also adjust the seconds count to
"00" at any time by pressing two buttons.
To adjust the seconds count to "00"
In the Timekeeping Mode, press
and
simultaneously to adjust the seconds count to
00
.
If you press
and
at the same time while
the seconds count is in the range of 30 to 59, the
seconds are reset to 00 and 1 is added to the
minutes. If the seconds count is in the range of
00 to 29, the minutes count is unchanged.
To set the time and date
1. Hold down
while in the Timekeeping Mode until the seconds digits start
to flash on the display. The seconds flash because they are
selected.
While the seconds digits are selected (flashing), press
to reset the
seconds to 00 .
2. Press
to change the selection in the following sequence.
Text area
Mode indicator
Day of week
Hour : Minutes
BACKLIGHT
This watch features an electroluminescent (EL)
backlight that helps you easily read the face, even
in total darkness. Its Auto Backlight function
automatically lights the watch face whenever you
turn your wrist towards your face.
Notes
The backlight of the watch employs an
electroluminescent (EL) light, which loses
illuminating power after very long use.
TIME TEL SCH VIT ALM STW
P
Frequent use of the backlight shortens the battery life.
The illumination provided by the backlight may be hard to see when viewed
under direct sunlight.
The watch will emit an audible sound whenever the display is illuminated.
This is caused by a transistor that vibrates when the EL panel lights up. It
does not indicate malfunction of the watch.
The backlight automatically turns off whenever an alarm sounds.
To manually turn on the backlight
In any mode, press
to illuminate the display for about one second.
To switch the Auto Backlight function on and off
In the Timekeeping Mode, hold down
for one or two seconds to turn the
auto backlight function on and off.
TIME TEL SCH VIT ALM STW
P
AUTO
TIME TEL SCH VIT ALM STW
P
The auto backlight indicator is shown on the display in all modes while the
auto backlight function is on.
In order to protect against running down the battery, the auto backlight
function is automatically turned off approximately two hours after you turn it
on. Repeat the above procedure to turn the auto backlight function back on
if you want.
Pressing
in any mode illuminates the display for about one second,
regardless of the auto backlight function on/off setting.
About the Auto Backlight function
While the Auto Backlight function is turned on, the backlight automatically
lights for about one second in any mode whenever you position your wrist as
described below.
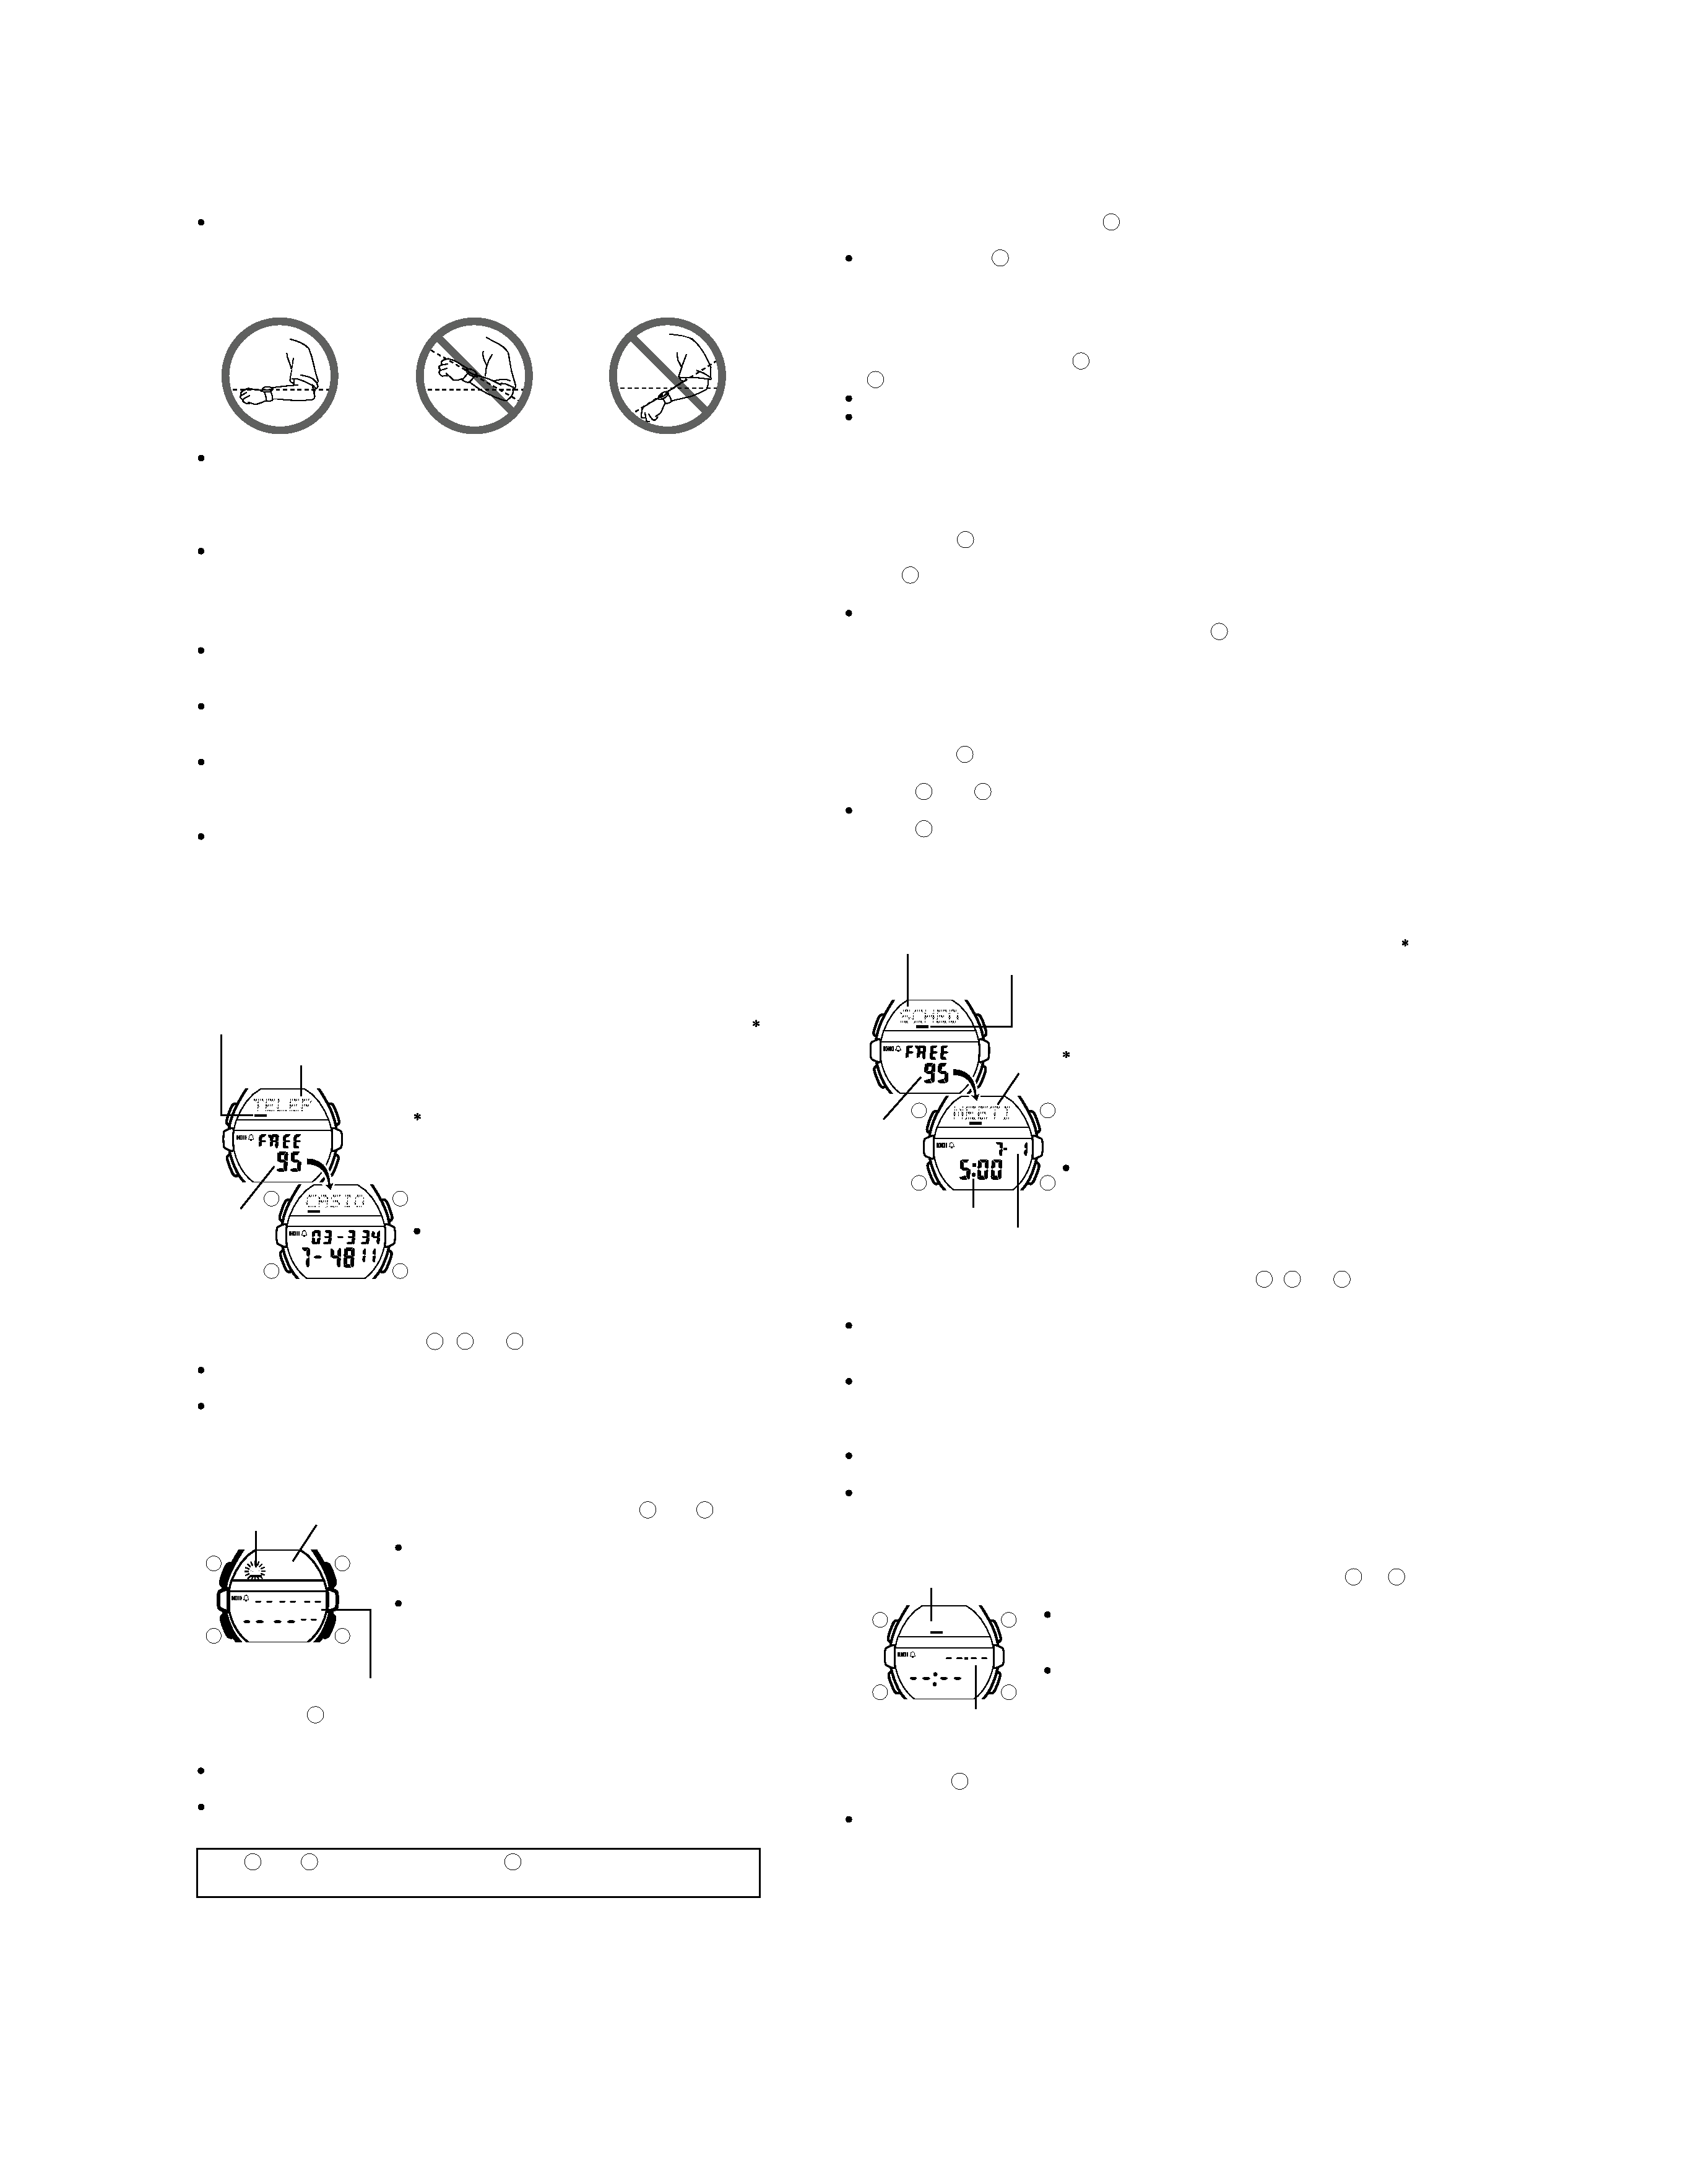
Important!
Avoid wearing the watch on the inside of your wrist. Doing so causes the Auto
Backlight to operate when it is not needed, which shortens battery life.
Auto backlight
indicator
ON
OFF
Moving the watch to a position that is parallel to the ground and then tilting
it towards you more than 40 degrees causes the backlight to illuminate.
Parallel to
ground
More
than
40
Seconds
Hour
Minutes
Year
Month
Date
3. While any other digits (besides seconds) are selected (flashing), press
to increase the number or
to decrease it. Holding down either button
changes the current selection at high speed.
While any digits are selected, press
to switch between the 12-hour and
24-hour formats.
When the 12-hour format is selected, the 12H
indicator appears in the text
area of the display. With the 12-hour format, the P indicator appears on the
display to indicate "p.m." times. There is no indicator for "a.m." times.
Selecting the 24-hour format causes the 24H
indicator to appear in the
text area, and the 24 indicator to appear on the display.
4. After you set the time and date, press
to return to the Timekeeping
Mode.
The day of the week is automatically set in accordance with the date.
The date can be set within the range of January 1, 1995 to December 31,
2039.
If you do not operate any button for a few minutes while a selection is
flashing, the flashing stops and the watch goes back to the Timekeeping
Mode automatically.
C
C
C
C
C
M
L
M
L
L
L
L
B
B
C
B
B
A
A
A
C
M
M
L
B
A
C
M
L
B
A
- 3 -
The backlight may not illuminate if the face of the watch is more than 15
degrees off parallel as shown below. Make sure that the back of your hand
is parallel to the ground.
More than 15 degrees
too high
More than 15 degrees
too low
Parallel to ground
Static electricity or magnetic force can interfere with proper operation of the
auto backlight function. If the auto backlight does not illuminate, try moving
the watch back to the starting position (parallel with the ground) and then tilt
it back toward you again. If this does not work, drop your arm all the way
down so it hangs at your side, and then bring it back up again.
Under certain conditions the backlight may not light until about one second
or less after turn the face of the watch towards you. This does not necessarily
indicate malfunction of the backlight.
Warning!
Never try to read your watch when mountain climbing or hiking in
areas that are dark or in areas with poor footing. Doing so is dangerous
and can result in serious personal injury.
Never try to read your watch when running on a roadside or in any
other location where there might be vehicular or pedestrian traffic.
Doing so is dangerous and can result in serious personal injury.
Never try to read your watch when riding on a bicycle or when
operating a motorcycle or any other motor vehicle. Doing so is
dangerous and can result in a traffic accident and serious personal
injury.
When you are wearing the watch, make sure that its auto backlight
function is turned off before riding on a bicycle or operating a
motorcycle or any other motor vehicle. Sudden and unintended
operation of the auto backlight can create a distraction, which can
result in a traffic accident and serious personal injury.
TIME TEL SCH VIT ALM STW
TIME TEL SCH VIT ALM STW
TELEMEMO MODE
The Telememo Mode lets you store up to 100
pairs of name and telephone number data.
Stored data is sorted automatically into
alphabetic sequence based on the text area
text.
The Telememo Mode shares memory with
the Schedule-memo Mode. This means that
the maximum number of Telememo Mode
entries you can store is reduced by one each
time you store a Schedule-memo Mode data
item.
Whenever you enter the Telememo Mode,
the text TELEPHONE
scrolls across the
text area of the display once. Next, Telememo
data appears on the display. You can interrupt
scrolling of the initial text and immediately
display Telememo data at any time by pressing
,
, or
.
See the "CHARACTER LIST" at the back of this manual for details on how
the watch sorts data.
The data item that appears on the display when you enter the Telememo
Mode is the same one that was displayed the last time you exited the
Telememo Mode.
Remaining
memory
Mode indicator
Text area
TIME TEL SCH VIT ALM STW
To input new Telememo data
1. In the Telememo Mode, press
and
at the
same time to display the new data display.
If there is no Telememo data stored in memory
yet, the new data display appears as soon as
you enter the Telememo Mode.
If the message FULL
appears in the text area
of the display, it means that memory is full. To
store more data, you will first have to delete
some of the data stored in memory.
2. Hold down
until the flashing cursor appears in the text area of the
display.
3. Input a name in the text area and a telephone number in the number area.
You can input up to eight characters in the text area, and 12 digits in the
number area.
You can input only hyphens, numbers and spaces in the number area (you
cannot input text).
Use
and
to input characters, and
to move the cursor around the
display. For details, see "INPUTTING TEXT".
Text area
Number area
[New Data Display]
Cursor
4. After inputting your data, press
to store it and return to the Telememo
Mode.
When you press
to store data, the message SORT
appears on the
display for a few seconds. After the sort operation is complete, the normal
Telememo Mode display (without the cursor) appears.
To recall Telememo data
In the Telememo Mode, press
to scroll forward through stored data items
or
to scroll in reverse.
Holding down either button scrolls through the data at high speed.
The new data display appears whenever scrolling reaches the beginning or
the end of data currently stored in memory.
To edit Telememo data items
1. In the Telememo Mode, scroll through the data items and display the one
you want to edit.
2. Hold down
until the flashing cursor appears in the text area of the
display.
3. Use
to move the cursor to the character you want to change.
4. Change the character.
See "INPUTTING TEXT" for details.
5. After making the changes that you want, press
to store them and return
to the Telememo Mode.
To delete Telememo data
1. In the Telememo Mode, scroll through the data items and display the one
you want to delete.
2. Hold down
until the flashing cursor appears in the text area of the
display.
3. Press
and
at the same time to delete the Telememo data item.
At this time the cursor appears in the text area, ready for input.
4. Press
to return to the Telememo Mode.
TIME TEL SCH VIT ALM STW
TIME TEL SCH VIT ALM STW
P
Text area
Text
Month Date
Hour : Minutes
Mode indicator
SCHEDULE-MEMO MODE
Schedule-memo Mode lets you store up to 100
Schedule-memo data items (appointment date
and time, and text). Whenever a time you set is
reached, an alarm sounds and the text you
input for the data scrolls across the text area of
the display.
The Schedule-memo Mode shares memory
with the Telememo Mode. This means that
the maximum number of Schedule-memo
Mode entries you can store is reduced by one
each time you store a Telememo Mode data
item.
Whenever you enter the Schedule-memo
Mode, the text SCHEDULE
scrolls across
the text area of the display once. Next,
Schedule-memo data appears on the display.
You can interrupt scrolling of the initial text
and immediately display Schedule-memo data
at any time by pressing
,
, or
.
Notes
A Schedule-memo Alarm sounds whenever a time you set is reached. It
continues for about 20 seconds or until you interrupt it by pressing any
button.
Remaining
memory
The Schedule-memo text scrolls across the text area of the display only if
the watch is in the Timekeeping Mode when the Schedule-memo time is
reached. The text continues to scroll for about 25 seconds, or until you stop
it by pressing any button after you press a button to interrupt the alarm.
Schedule-memo Mode data items are automatically sorted into chronological
order.
Entering the Schedule-memo Mode causes data for the next scheduled
appointment to appear on the display.
To input new Schedule-memo data
1. In the Schedule-memo Mode, press
or
until the new data display appears.
If there is no Schedule-memo data stored in
memory yet, the new data display appears as
soon as you enter the Schedule-memo Mode.
If the message FULL
appears in the text area
of the display, it means that memory is full. To
store more data, you will first have to delete
some of the data stored in memory.
2. Hold down
until the month setting starts to flash in the number area of
the display. The month setting flashes because it is
selected.
The initial Schedule-memo time setting is always midnight, which is indicated
as 12:00 with the 12-hour timekeeping format and 0:00 in the 24-hour
format. You can select the timekeeping format in the Timekeeping Mode.
TIME TEL SCH VIT ALM STW
Text area
[New Data Display]
Number area
C
B
A
C
M
B
A
C
M
B
A
C
M
B
A
C
M
B
A
C
C
C
C
C
M
M
B
B
B
B
C
B
B
A
A
A
A
A
A
A
A
A
- 4 -
3. Press
to change the flashing selection in the following sequence.
11 spaces are provided for the text. This means that if you input only five
characters for the text, so you have to press
6 times to reach the month
setting.
4. While the month, date, hour or minutes is flashing, press
to increase
the selected setting or
to decrease it. Holding down either button
changes the current selection at high speed.
Important!
Correct storage of Schedule-memo data is impossible if you do not input a
month and date.
The date you can specify must be within one year from the current date.
This means that if the current date (in the Timekeeping Mode) is June 30,
1997, you will be able to specify any date up to June 29, 1998 for a
Schedule-memo date.
When setting the time using the 12-hour format, take care to set the time
correctly as morning (no indicator) or afternoon (P).
5. Input text in the text area of the display.
You can input up to 11 characters for the text.
Use
and
to input characters, and
to move the cursor around the
display. For details, see "INPUTTING TEXT".
Month
Date
Minutes
Hour
Text
6. After inputting your data, press
to store it and return to the Schedule-
memo Mode.
Schedule-memo data remains in memory until you delete it. Be sure to
delete old Schedule-memo data whenever you no longer need it. See " To
delete Schedule-memo data".
To recall Schedule-memo data
In the Schedule-memo Mode, press
to scroll forward through stored data
items or
to scroll in reverse.
Holding down either button scrolls through the data at high speed.
The new data display appears whenever scrolling reaches the beginning or
the end of data currently stored in memory.
To edit Schedule-memo data items
1. In the Schedule-memo Mode, scroll through the data items and display the
one you want to edit.
2. Hold down
until the month setting starts to flash in the number area.
3. Use
to move the flashing to the part of the Schedule-memo data item
you want to change.
4. Use
and
to change the data.
See "To input new Schedule-memo data" for details on inputting data.
5. After making the changes that you want, press
to store them and return
to the Schedule-memo Mode.
To delete Schedule-memo data
1. In the Schedule-memo Mode, scroll through the data items and display the
one you want to delete.
2. Hold down
until the month setting starts to flash in the number area.
3. Press
and
at the same time to delete the Schedule-memo data item.
The message CLEAR
appears for a short while. Next, the month setting
starts to flash on the display, ready for input of new data.
4. Press
to return to the Schedule-memo Mode.
TIME TEL SCH VIT ALM STW
TIME TEL SCH VIT ALM STW
VITAL STATISTICS/ID MODE
The Vital Statistics/ID Mode provides a handy
place to store data about your vital statistics
(name, blood type, date of birth) and personal
identification (ID) data (credit card number,
license number, passport number, and two
undefined items).
Whenever you enter the Vital Statistics/ID
Mode, the text VITAL STATS./ID
scrolls across the text area of the display
once. Next, the name screen appears on the
display. You can interrupt scrolling of the initial
text and immediately display the name screen
at any time by pressing
,
, or
.
The name screen always appears first
whenever you enter the Vital Statistics/ID
Mode.
Important!
Once you input your vital statistics, take care that the watch is not borrowed
by another person. Otherwise, emergency medical personnel may assume
that the data in the Vital Statistics/ID Mode applies to the person who is
currently wearing the watch.
Note that storing important personal identification data in the watch's
memory runs the risk of it being misused should you lend the watch to
someone or should the watch become lost or stolen. Because of this, the
manufacturer strongly recommends that you input such important information
in coded form that cannot be deciphered by others.
Text area
Number area
Mode indicator
Note that CASIO COMPUTER CO., LTD. shall not be held liable to you or
any third party for any losses or damages suffered through the misuse of
data stored in the memory of this watch.
To recall Vital Statistics/ID data
In the Vital Statistics/ID Mode, press
or
to change the data on the
display in the following sequence.
The titles of the each data item appear in the text area of the display. In the
case of the undefined items, you can specify titles that appear in the text
area whenever you later display that item.
NAME
(Name)
BLOOD
(Blood type)
CREDI
(Credit card
number)
BIRTH
(Date of birth)
(Undefined)
(Undefined)
LICEN
(License
number)
PASSP
(Passport
number)
Press
Press
To input your name
1. In the Vital Statistics/ID Mode, display the
NAME
screen.
2. Hold down
until the flashing cursor appears
in the text area of the display.
3. Input your name into the text area.
You can input up to 16 characters for your name.
Use
and
to input characters, and
to
move the cursor around the display. For de-
tails, see "INPUTTING TEXT".
You can clear the characters currently input for the name by pressing
and
at the same time.
4. After inputting your data, press
to store it and return to the normal
NAME
screen (without cursor).
TIME TEL SCH VIT ALM STW
Text area
Cursor
TIME TEL SCH VIT ALM STW
To input your blood type
1. In the Vital Statistics/ID Mode, display the
BLOOD
screen.
2. Hold down
until the Rh factor setting flash in
the text area of the display.
3. Use
and
to scroll through the available
Rh factor settings in the following sequence.
4. Press
to advance to the blood type.
5. Use
and
to scroll through the available blood type settings in the
following sequence.
6. After inputting your data, press
to store it and return to the normal
BLOOD
screen (no flashing characters).
Select ---
if you do not want to specify an Rh factor and --
if you do not
want to select a blood type in the above sequence. When neither an Rh
factor nor blood type is specified, the blood data screen shows -----
on
the watch's display.
---
R
+
R
-
Press
Press
--
A
B
AB
O
Press
Press
Rh factor
Blood type ABO
TIME TEL SCH VIT ALM STW
To input the date of your birth
1. In the Vital Statistics/ID Mode, display the
BIRTH
screen.
2. Hold down
until the year digits start to flash
on the display. The year digits flash because
they are
selected.
3. Press
to change the selection in the following
sequence.
4. Press
to increase the selected digits and
to decrease them. Holding
down either button changes the selected digits at high speed.
The year can be set in the range of 1900 to 2039.
5. After inputting your data, press
to store it and return to the normal
BIRTH
screen (no flashing digits).
Year
Month
Date
Year
Month Date
C
M
B
A
C
M
B
A
C
M
B
A
C
M
B
A
C
C
C
C
C
C
C
C
C
C
C
C
C
C
M
M
M
M
M
M
M
B
B
B
C
B
B
B
B
B
B
B
B
B
B
B
B
A
A
A
A
A
A
A
A
A
A
A
A