SERVICE MANUAL
& PARTS LIST
(WITHOUT PRICE)
QW-1668
MODULE NO.
R
REF. NO. S/M-567
SEPTEMBER 1997
BG-390D
INDEX
-- 1 --
1. SPECIFICATIONS: QW-1668
CONTENTS
1. SPECIFICATIONS: QW-1668 ........................................................................ 1
2. OPERATION CHART: QW-1668 ................................................................... 2
3. DRAWINGS
3-1. BLOCK DIAGRAMS: QW-1668 ........................................................................
3
3-2. CHECKING TERMINALS AND COMPONENTS: QW-1668 ............................
4
4. EXPLODED VIEW: QW-1668 ........................................................................ 5
5. PARTS LIST: QW-1668 ................................................................................. 6
6. PRECAUTIONS FOR REPAIR: QW-1668
6-1. AC (ALL CLEAR) AND REMOVING OF MODULE ..........................................
7
6-2. ACCURACY CHECKING ..................................................................................
7
Battery
SR621W (for EL), SR1120W (for watch)
Battery life
Approx. 15 months
Current consumption
4.8 µA maximum
Alarm system
Piezo plate on Cover/Back
Accuracy
±15 sec./month
Accuracy setting system
Capacitor/Trimmer
Accuracy checking
See page 7
Accuracy setting
+0.25 ~ +0.35 sec./day
Functions
· Shock resistant (G-SHOCK)
· Electro-luminescent backlight
· 1/100 sec. stopwatch
Measuring capacity: 23:59'59.99"
Measuring mode: Net time, split time, 1st-2nd place times
· Regular timekeeping: Hr, min, sec, am/pm, month, date, day
· Auto-calendar (pre-programmed until the year 2039)
· Daily melody alarm (3 melodies and beep)
· Hourly time signals
· 12/24-hour formats
Detail
Item
-- 2 --
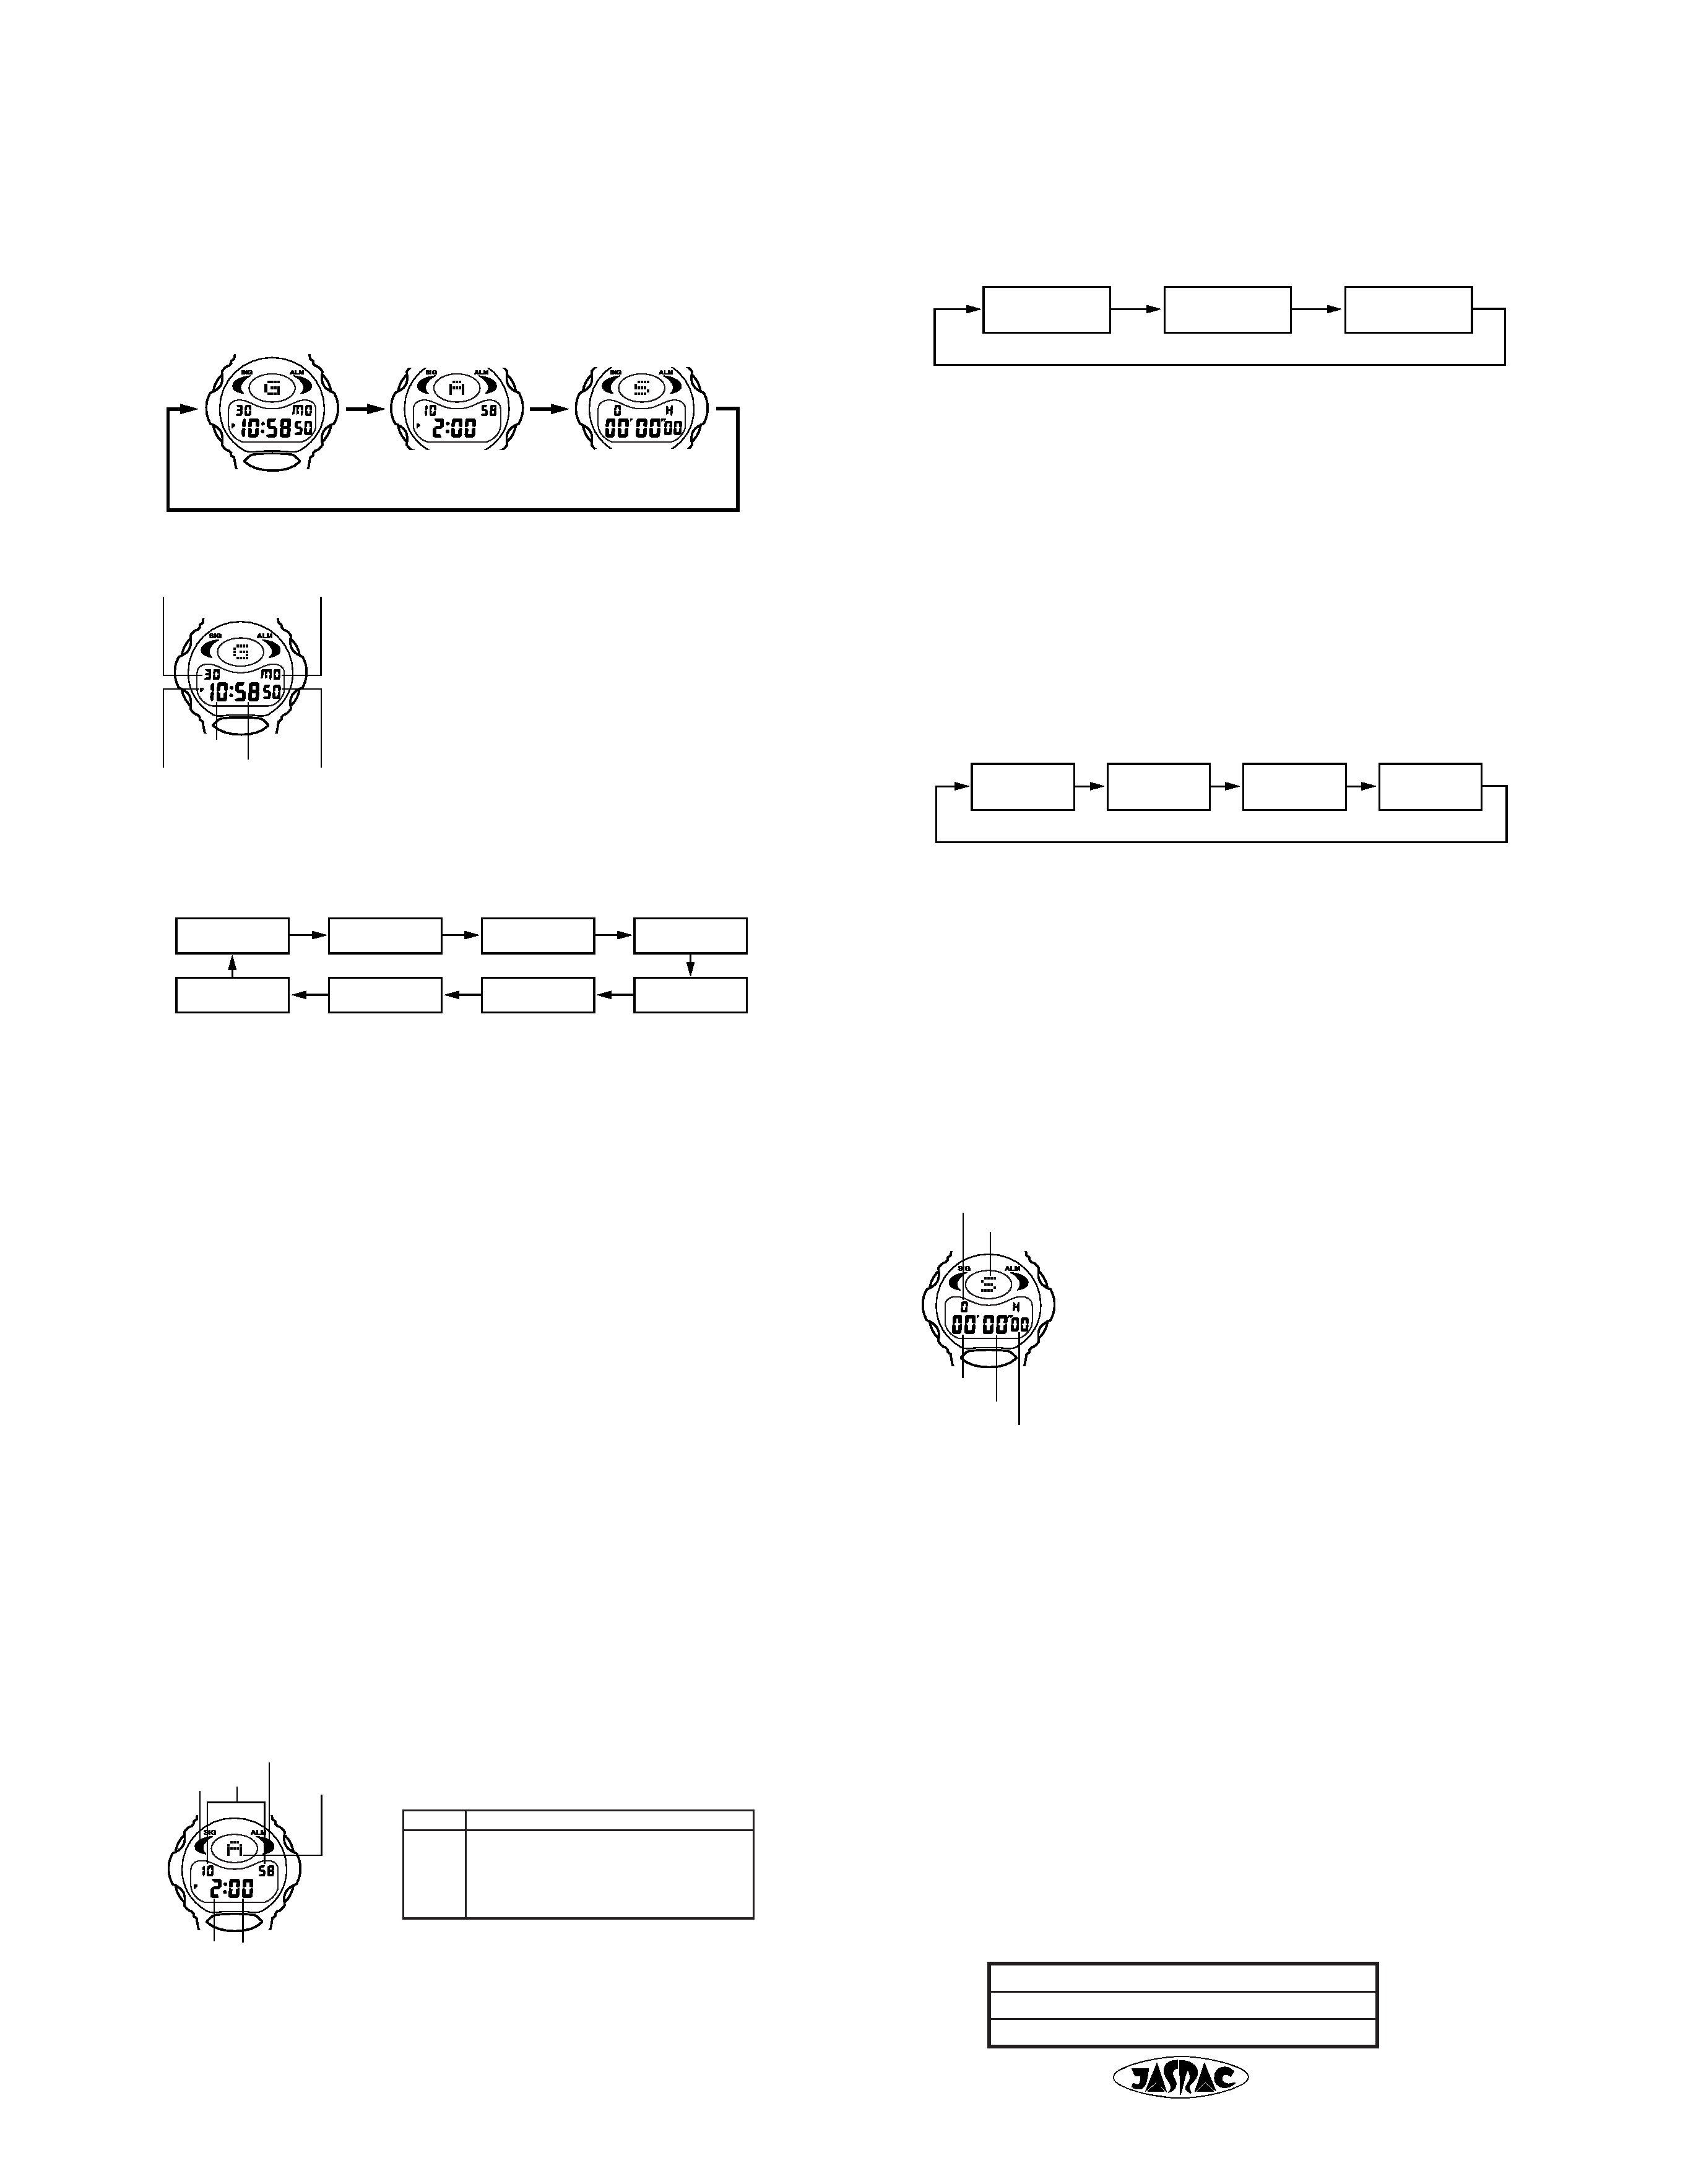
2. OPERATION CHART: QW-1668
Setting
Alarm Sound
0.
Random play of melodies 1, 2, and 3
1.
Melody 1
2.
Melody 2
3.
Melody 3
4.
Beeper
This watch include three built-in melodies, which
you can use in any of the following five settings to
sound when an alarm time is reached.
3.Press E to increase the selected digits and B to decrease them.
Holding down either button changes the selection at high speed.
· The format (12-hour and 24-hour) of the alarm time matches the format you
select for normal timekeeping.
· When setting the alarm time using the 12-hour format, take care to set the
time correctly as morning or afternoon.
4. After you set the alarm time, press A to return to the Alarm Mode.
· If you do not operate any button for a few minutes while a selection is flash-
ing, the flashing stops and the watch goes back to the Alarm Mode auto-
matically.
· If you do not operate any button for a few minutes in the Alarm Mode, the
watch goes back to the Timekeeping Mode automatically.
To switch the Daily Alarm and Hourly Time Signal on and off
Press E while in the Alarm Mode to change the status of the Daily Alarm and
Hourly Time Signal in the following sequence.
ALM: Daily Alarm
SIG: Hourly Time Signal
To test the Alarm
Pressing B sounds the currently selected alarm sound.
It takes about 10 seconds for the alarm sound to finish. You can stop it manu-
ally by pressing any key.
· Note that if 0 is set as the alarm sound, pressing B randomly selects one of
the melodies. The sound that is randomly selected when the next alarm
time is reached will probably be different from the one that sounds when
you press B.
STOPWATCH MODE
The Stopwatch Mode lets you measure elapsed
time, split times, and two finishes. The range of
the stopwatch is 23 hours, 59 minutes, 59.99 sec-
onds.
· Animated figures appear on the display while the
stopwatch is measuring an elapsed time.
· If you do not perform any key operation while in
the Stopwatch Mode, the watch automatically
returns to the Timekeeping Mode (except when
an elapsed time measurement is in progress).
To measure elapsed time
1.Press E to start the stopwatch.
2.Press E to stop the stopwatch.
· You can resume the measurement operation by
pressing E again.
3.Press B to clear the stopwatch to all zeros
(0H00'00"00).
· See the Melody List at the back of this manual for the names of melodies.
· When the Daily Alarm is switched on, the alarm sounds for about 20 sec-
onds at the preset time each day. Press any button to stop the alarm after it
starts to sound. When the Hourly Time Signal is switched on, the watch
beeps every hour on the hour.
GENERAL GUIDE
· The configuration of this watch may differ somewhat from that shown in the
illustration.
· Press C to change from mode to mode.
· In any mode, press D to illuminate the display for about two seconds.
· The animated figures perform a variety of different actions, depending on
the mode the watch is in.
TIMEKEEPING MODE
· Use E to switch the display between month/date
and date/day of the week.
· Press B to play a melody for about 10 seconds.
Pressing any key while a melody is play stops
the melody. The melody that plays depends on
when you press B.
To set the time and date
1.Hold down A while in the Timekeeping Mode. The seconds digits flash
on the display because they are selected.
2.Press C to change the selection in the following sequence.
To record split times
1.Press E to start the stopwatch.
2.Press B to display the timing up to that point. Stopwatch timing contin-
ues internally.
3.Press B to clear the split time and to continue time measurement on
the display.
· You can repeat steps 2 and 3 as many times as you want.
4.Press E to stop the time measurement.
5.Press B to clear the stopwatch to all zeros.
To time first and second place finishes
1.Press E to start the stopwatch.
2.Press B when the first finisher crosses the line, and record the time.
3.Press E when the seconds finisher corsses the line.
4.Press B to display the finishing time of the second finisher.
5.Press B to clear the stopwatch to all zeros.
3.While the seconds digits are selected (flashing), press E to reset the
seconds to "00". If you press E while the seconds count is in the range
of 30 to 59, it is reset to "00" and 1 is added to the minutes. If the
seconds count is in the range of 00 to 29, the minutes count is un-
changed.
4.While any other digits (besides seconds), are selected (flashing), press
E to increase the number or B to decrease it. Holding down either
button changes the current selection at high speed.
· While the day of the week is selected, pressing E advances to the next
day, while pressing B returns to the previous day.
· While the 12/24-hour setting is selected, press E to switch between the
two formats.
5. After you set the time and date, press A to return to the Timekeeping
Mode.
· The date can be set within the range of January 1, 1995 to December 31,
2039.
· If you do not operate any button for a few minutes while a selection is flash-
ing, the flashing stops and the watch goes back to the Timekeeping Mode
automatically.
ABOUT THE BACKLIGHT
A
C
D
B
E
Timekeeping Mode
Alarm Mode
Stopwatch Mode
· Pressing D at any time illuminates the display for about two seconds and
causes an animated figure to appear. The type of animation that appears
depends upon when you press D.
· The backlight of this watch employs an electro-luminescent (EL) light, which
loses its illuminating power after very long term use.
· The watch will emit an audible sound whenever the display is illuminated.
This is caused by a transistor that vibrates when the EL panel lights up. It
does not indicate malfunction of the watch.
ALARM MODE
To set the alarm time
1.Hold down A while in the Alarm Mode. The hour digits flash on the
display because they are selected.
· At this time the Daily Alarm is switched on automatically.
2.Press C to change the selection in the following sequence.
Hour
Minutes
Alarm Sound
Both OFF
Daily Alarm
Hourly Time
Both ON
Only
Signal only
Seconds
Hour
Minutes
Year
12/24-Hour
Day of
Date
Month
Format
the week
A
C
D
B
E
Date
Day of the week
PM
indicator
Minutes
Hour
Seconds
A
C
D
B
E
Mode
indicator
Hourly
time
signal on
indicator
Minutes
Hour
Cur-
rent
time
Alarm on
indicator
A
C
D
B
E
Minutes
Seconds
Hours
Mode indicator
1/100 seocnds
1
I love rock'n roll
2
Never
3
The wild one
T-9750085
1668

-- 3 --
3C3
46C3
SEG58
SEG16
SEG15
SEG14
SEG13
SEG12
SEG11
SEG10
SEG9
SEG8
SEG7
SEG6
SEG5
SEG4
SEG3
SEG2
SEG1
SEG0
COM4
COM3
COM2
COM1
SEG59
SEG39
SEG40
SEG41
SEG42
SEG43
SEG44
SEG45
SEG46
SEG47
SEG48
SEG49
SEG50
SEG51
SEG52
SEG53
SEG54
SEG55
SEG56
SEG57
SEG45
SEG44
SEG43
SEG7
SEG6
SEG5
SEG4
SEG51
SEG52
SEG53
SEG54
SEG55
SEG56
SEG57
COM4
COM3
COM2
COM1
COM1
COM4
COM3
42C3
47C4
48C3
47C1
47C3
47C2
48C4
48C2
49C1
50C2
49C2
50C3
49C3
49C4
50C4
2C4
2C2
1C1
1C3
1C2
2C3
2C1
59C1
0C2
59C2
0C3
59C3
59C4
0C4
58C3
58C2
58C4
1C4
11C4
11C1
10C2
10C4
9C1
9C4
8C2
8C4
10C3
10C1
11C2
8C3
8C1
9C2
13C2
12C2
13C1
12C1
12C4
13C4
12C3
39C2
16C4
16C1
40C1
39C1
39C4
40C4
39C3
40C3
42C1
40C2
42C2
41C2
41C1
41C4
41C3
42C4
15C2
14C2
15C1
14C1
15C4
14C3
14C4
3. DRAWINGS
3-1. BLOCK DIAGRAMS: QW-1668
+
C1
C3
C7
C2
C4
C5
BAT1
BAT2
VSS2
VSSL
VSS1
VSS3 C1
C2
VDD
OSC0
OSC1B
TST3
R1
R3
V
PZ
LL1
R2
C8
TST2
TST1
COM1
COM4
SEG0
SEG59
P2.0
P2.1
P2.2
P6.0
P6.1
RESET
S4
S1
F0
S2
S3
P4.0
MD0
LSI
TOTAL
BONDING
99PINS
84PINS
LCD
C6
CT
Xtal
Tr1
Tr2
VCCE
RT1
RT2
VCPE
GND
ENB
CIL
LL2
Di
EL
INV
ELD
-- 4 --
,,
,
,
,
R1
MD0
VSSL
VDD
ELD
GND
VCPE
RT1
RT2
ENB
GND
P2.0
P2.1
P2.0
P4.0
P2.1
P6.0
P6.1
P2.2
P2.2
P2.2
C1
P6.0
P6.1
VDD
VDD
VDD
VDD
P4.0
P4.0
GND
GND
GND
R1
VSS1
VSS1
VSSL
RESET
VDD
OSC1B
L
VDD
CIL
CIL
CIL
ELD
ELD
ENB
VCPE
VDD
ENB
RT1
RT2
ELD
GND
CIL
GND
GND
VDD
OSC0 OSC0 OSC1B
VDD
VDD
L
L
L
VSS1 VDD
VDD
GND
VSS3 VDD
VDD
VSS2
C1
C2
R1 16. Resistor/Chip carbon film
(2791 0742)
C4 5. Capacitor/Chip
(7103 8123)
C2 5. Capacitor/Chip
(7103 8123)
C3 5. Capacitor/Chip
(7103 8123)
C1 5. Capacitor/Chip
(7103 8123)
C5
3. PCB ass'y
(7240 9915)
C7 7. Capacitor/Tantalum
(7911 1260)
R3 14. Resistor/Chip
(2791 0777)
R2 15. Resistor/Chip carbon film
(2797 1372)
C8 4. Capacitor/Chip
(7103 7443)
20. Cushion/506
(7211 9631)
20. Cushion/506
(7211 9631)
LL1 9. Coil
(7020 5854)
LL2 10. Coil
(7020 5693)
V 19. Varistor
(7101 1178)
Tr1 18. Transistor/Mold
(7101 1151)
Di 11. Diode
(7101 5609)
12. Inverter
(7100 8470)
INV
Tr2 17. Transistor
(7101 5899)
21. Cushion 6
(7211 0064)
Xtal 13. Oscillator/Quartz
(7110 6309)
CT 8. Capacitor/Trimmer
(7103 8124)
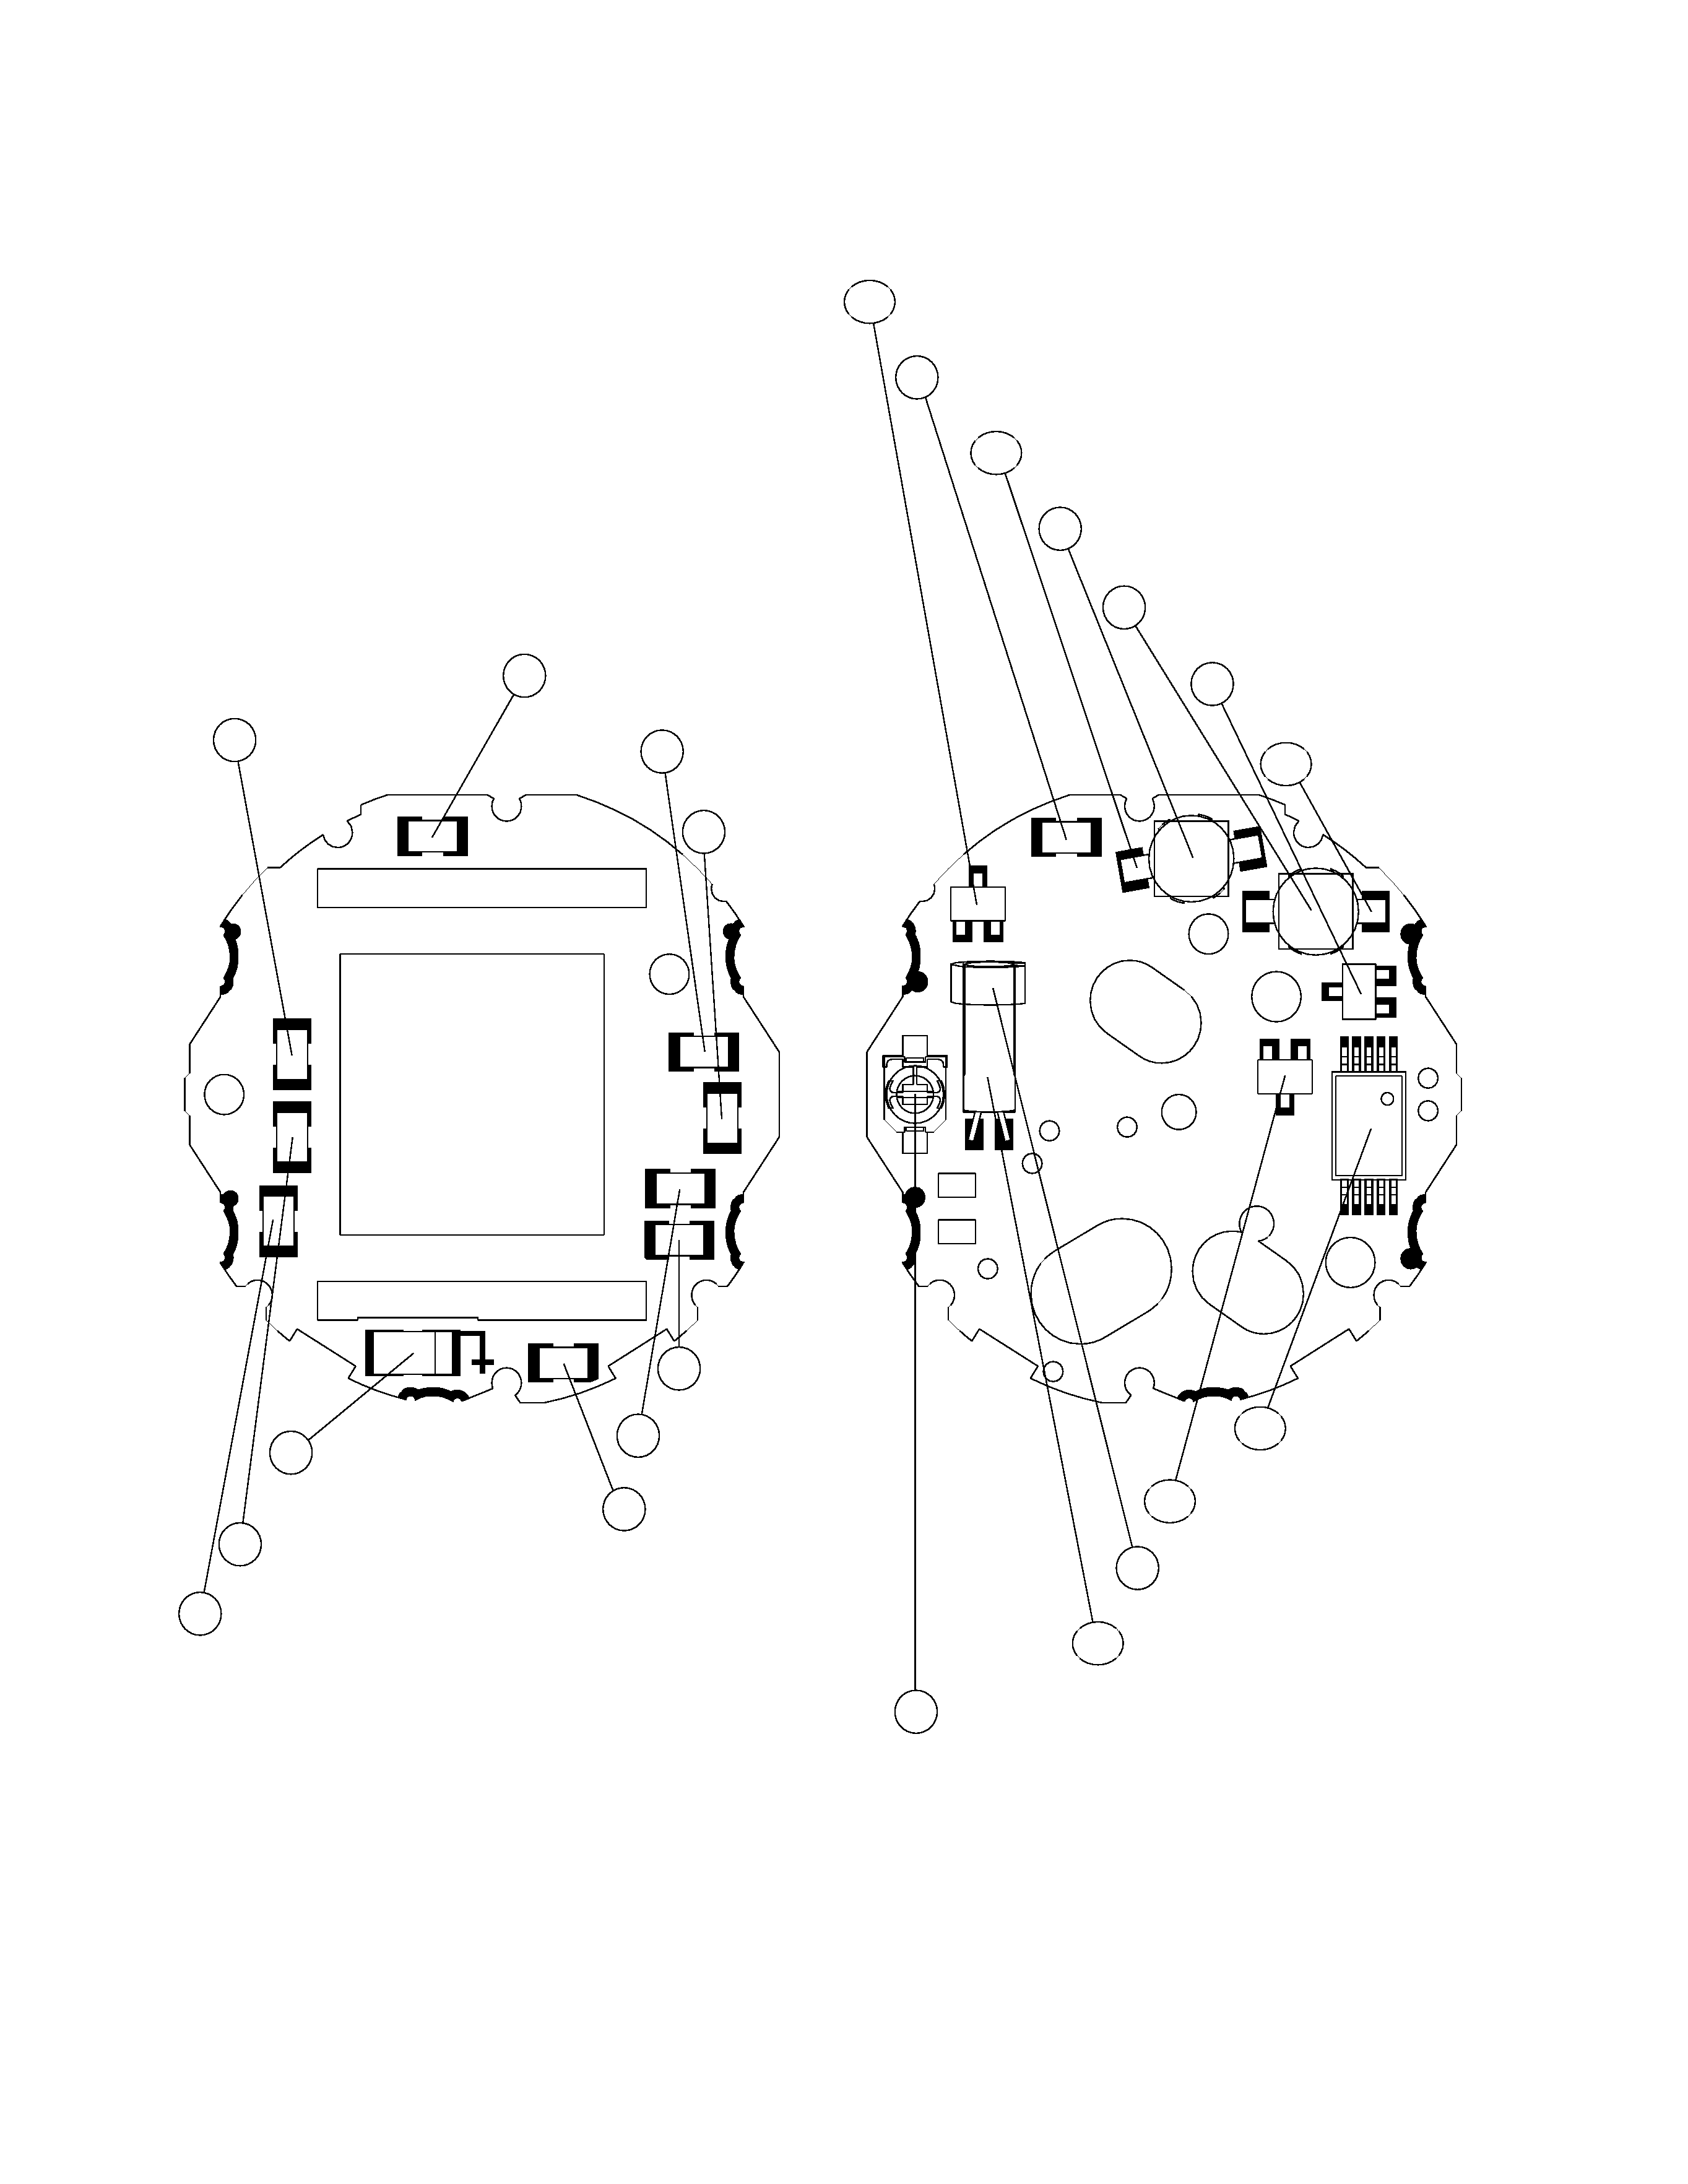
3-2. CHECKING TERMINALS AND COMPONENTS: QW-1668
Top view of P.C.B. ass'y
Bottom view of P.C.B. ass'y