(WITHOUT PRICE)
SERVICE MANUAL
& PARTS LIST
REF. NO. S/M-569
SEPTEMBER 1997
QW-1645
MODULE NO.
R
PRL-10V
INDEX
- 1 -
CONTENTS
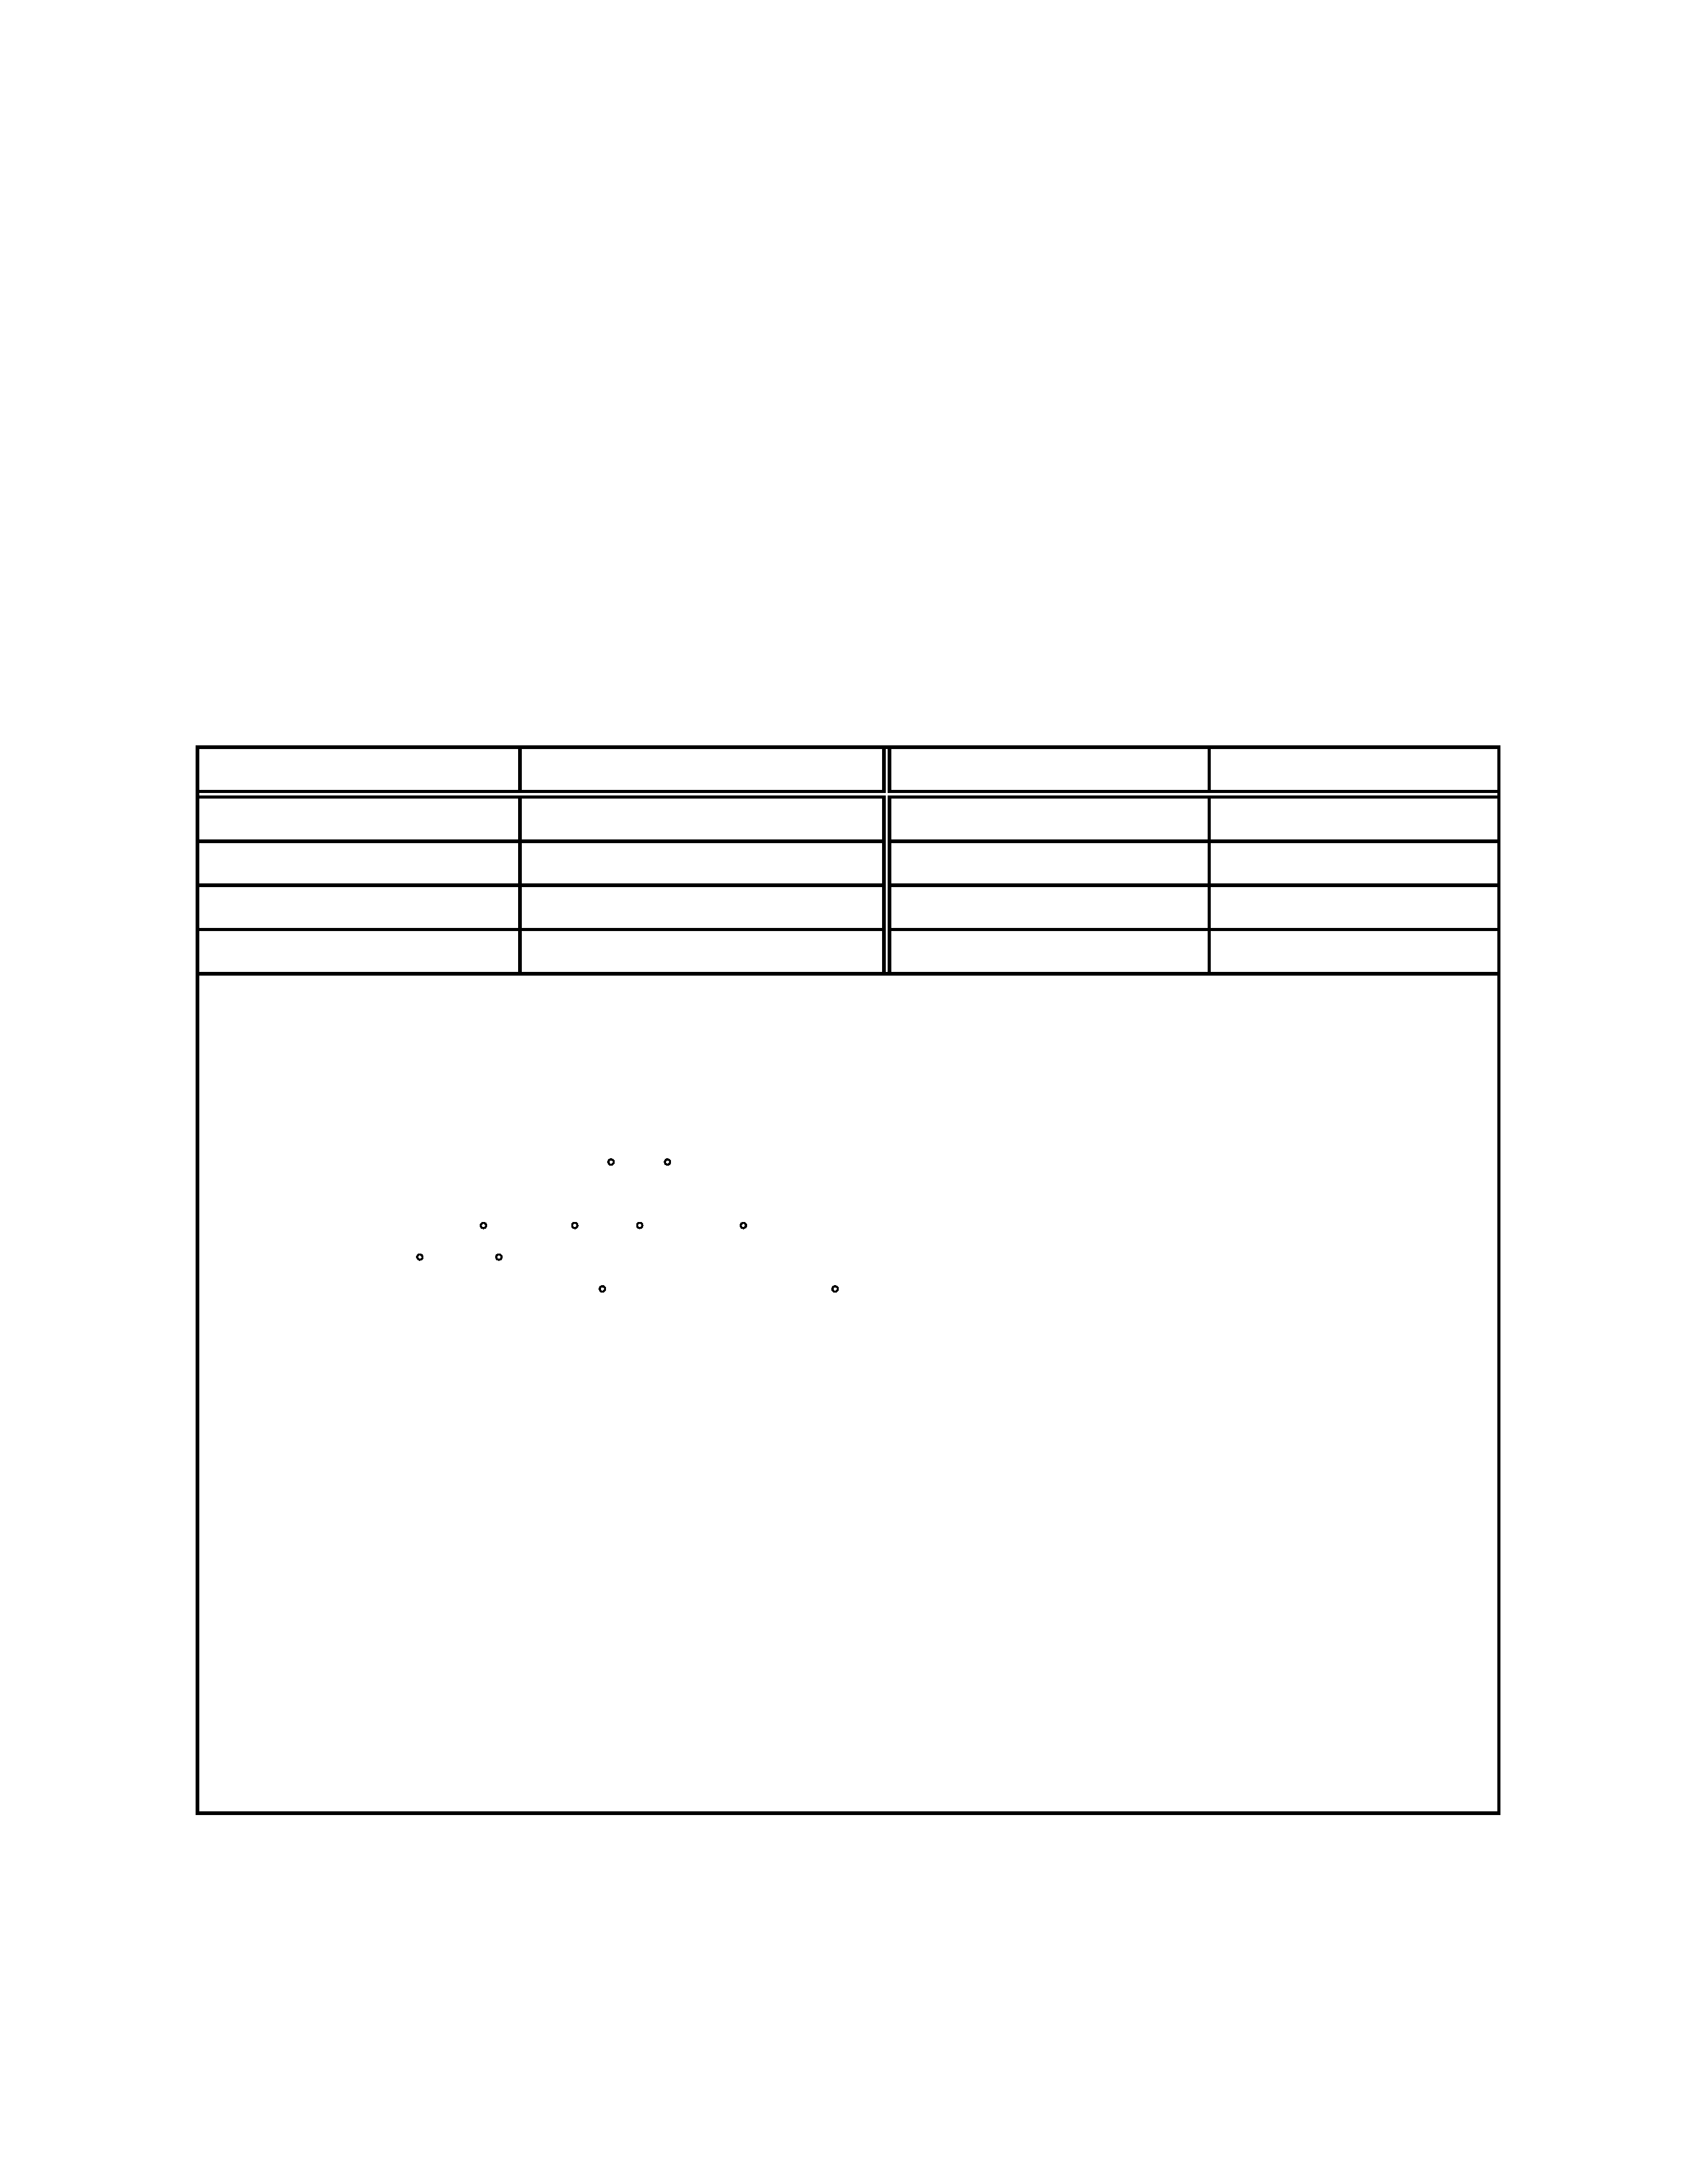
1. SPECIFICATIONS : QW-1645
1. SPECIFICATIONS · · · · · · · · · · · · · · · · · · · · · · · · · · · 1
2. OPERATION CHART · · · · · · · · · · · · · · · · · · · · · · · · · 2
3. DRAWINGS · · · · · · · · · · · · · · · · · · · · · · · · · · · · · · · · 4
3-1. BLOCK DIAGRAM · · · · · · · · · · · · · · · · · · · · · · · · · 4
3-2. CHECKING TERMINALS AND COMPONENTS · · · · 5
3-3. N1~N4 PADS · · · · · · · · · · · · · · · · · · · · · · · · · · · · 5
4. EXPLODED VIEW · · · · · · · · · · · · · · · · · · · · · · · · · · · 6
5. PARTS LIST · · · · · · · · · · · · · · · · · · · · · · · · · · · · · · · 7
6. PRECAUTIONS FOR REPAIR · · · · · · · · · · · · · · · · · · · 8
6-1. AC (ALL CLEAR) AND REMOVING OF MODULE · · · 8
6-2. ACCURACY CHECKING · · · · · · · · · · · · · · · · · · · · 8
Item
Detail
Item
Detail
Battery
CR2016
Accuracy
±15sec./month
Battery life
Approx. 24 months
Accuracy setting system Trimmer capacitor
Current consumption
2.26
µA maximum
Accuracy checking
See page 8
Alarm system
Piezo plate on Back cover
Accuracy setting
+0.25~+0.35sec./day
Function
· Electro-luminescent backlight
· Auto light switch
· Low temperature resistance (-20 C/-4 F)
· Thermometer
Measuring range: -20 C to 60 C (-4 F to 140 F)
Display unit: 0.1 C (0.2 F)
*Changeover between Celsius ( C) and Fahrenheit ( F)
· Countdown alarm
Input range: 1 min. to 60 min.
Unit: 1 sec.
· Daily alarm
· Hourly time signals
· Regular timekeeping: Hr, min, sec, pm, mo, date, day
· Auto-calendar (Pre-programmed until the year 2039)
· 12/24-hour formats
- 2 -
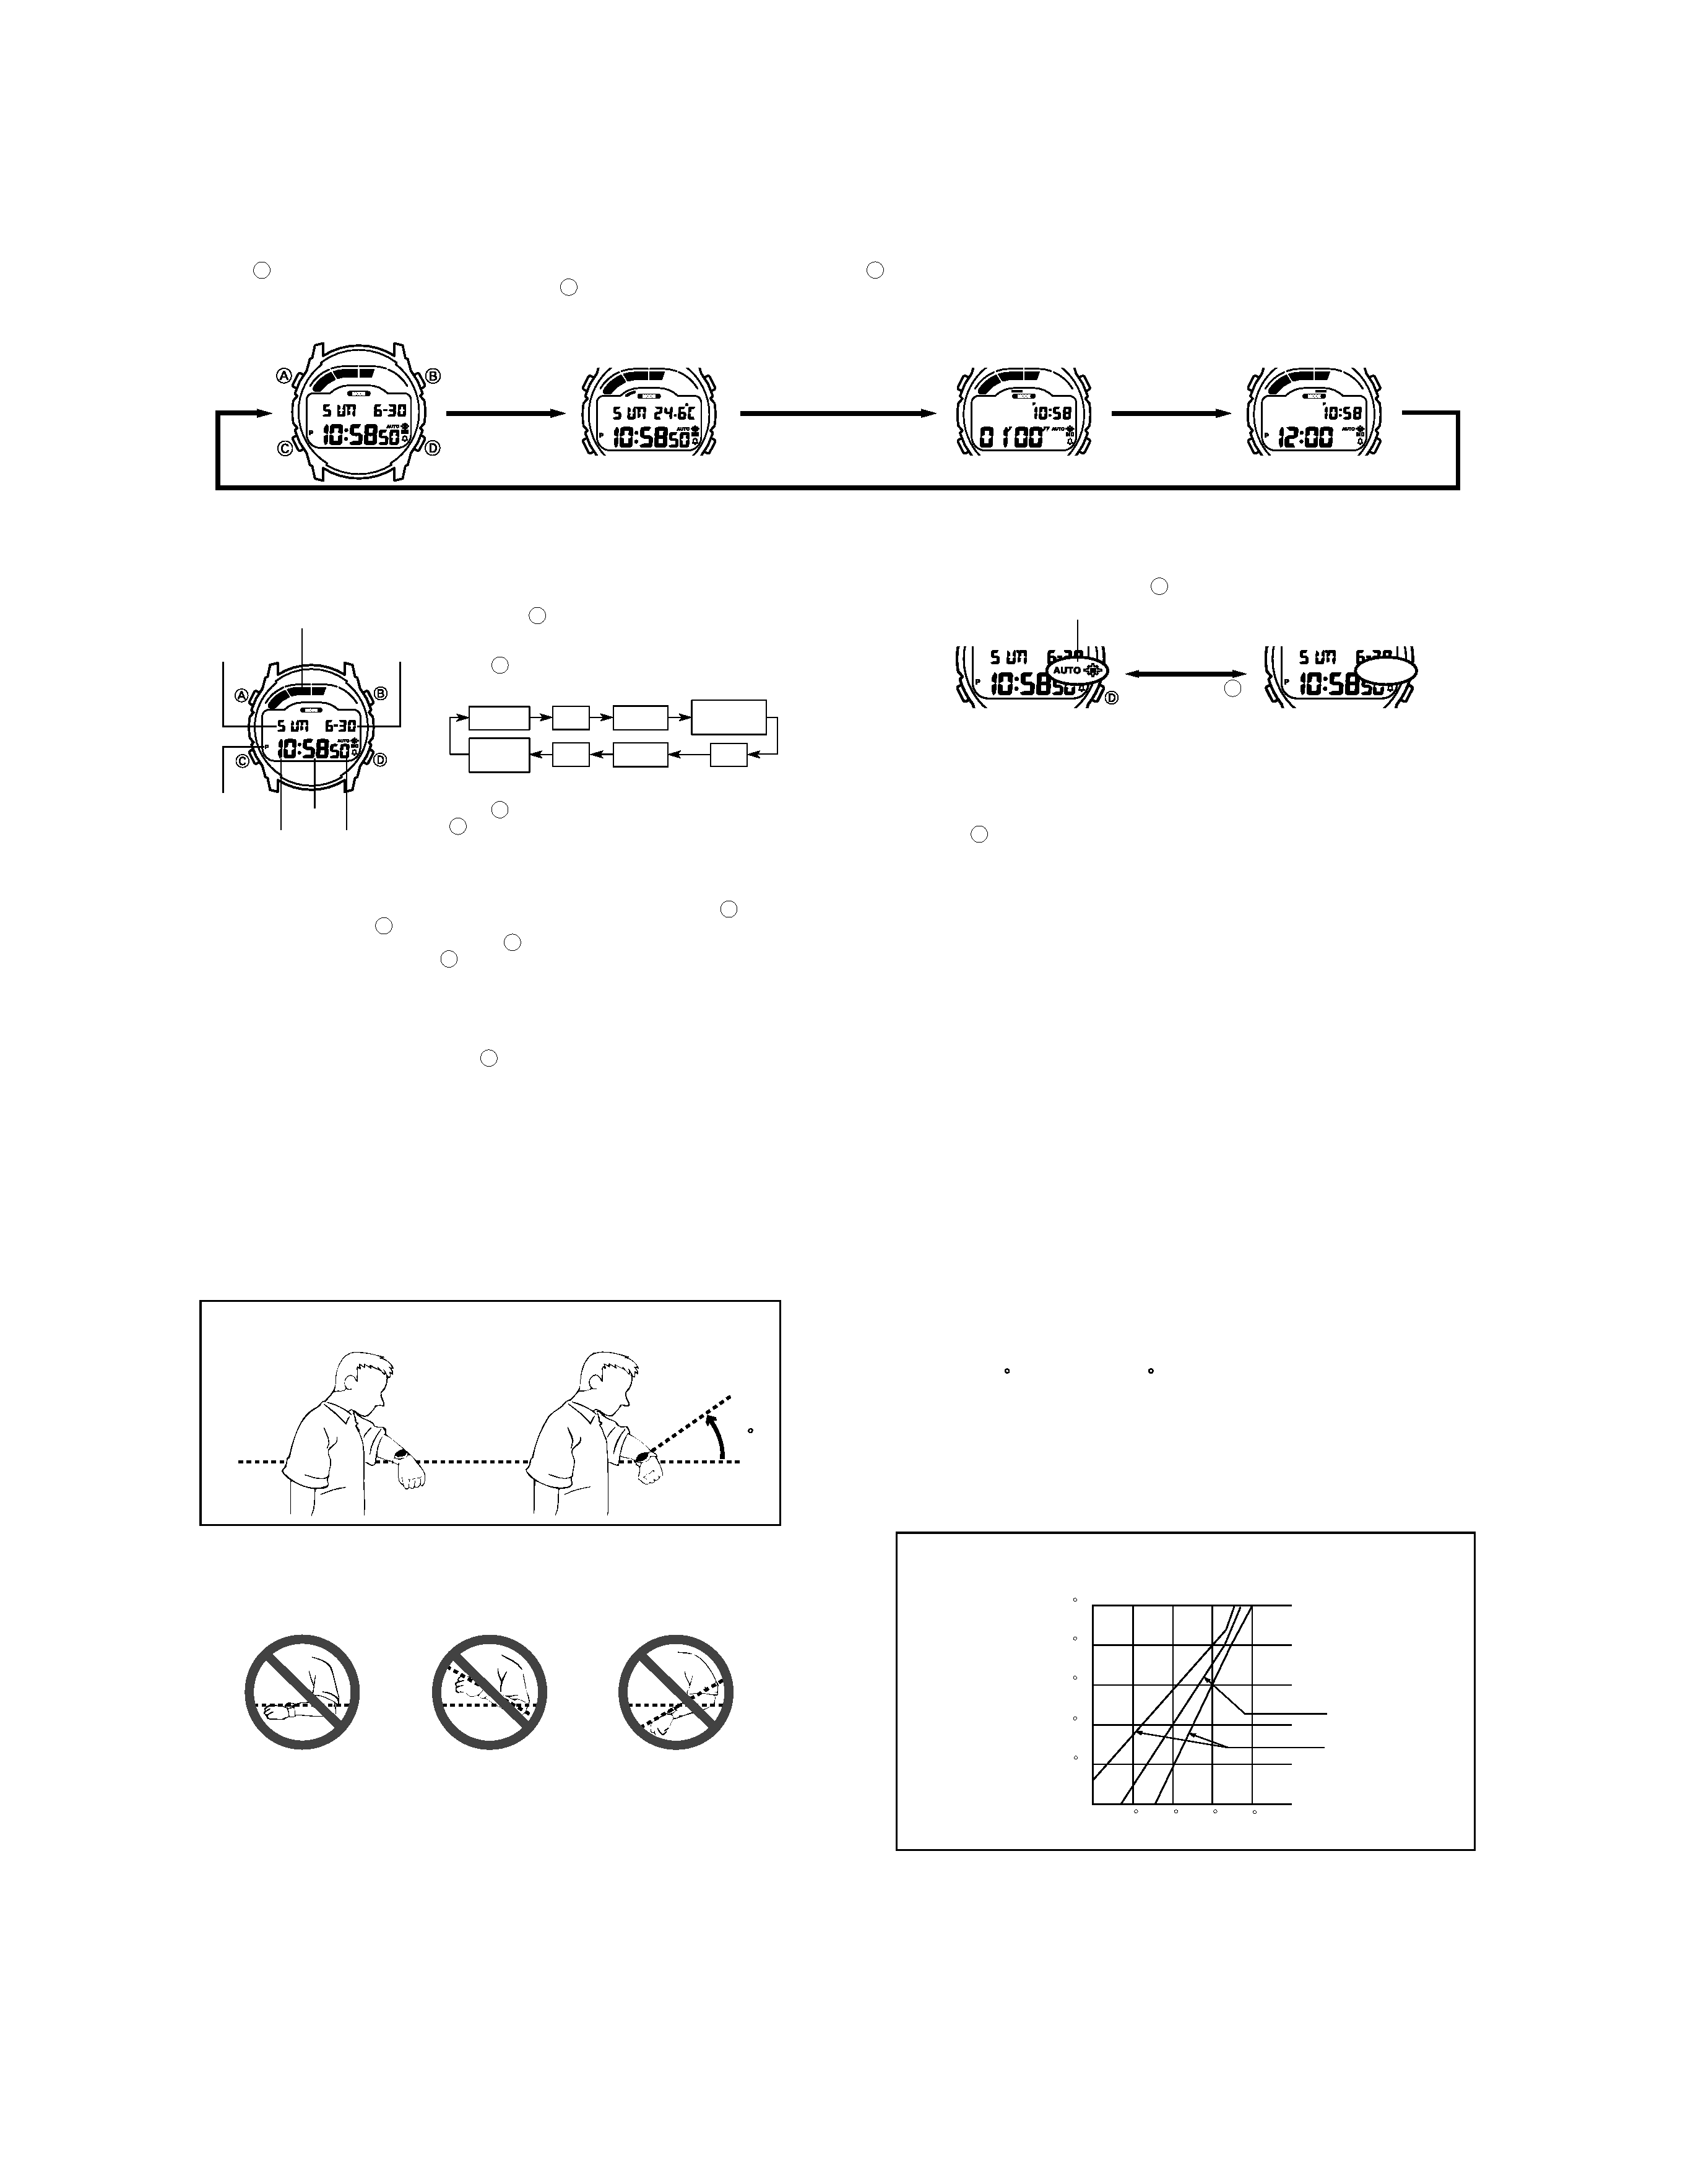
2. OPERATION CHART : QW-1645
GENERAL GUIDE
· Press
to change from mode to mode. After you perform an operation in any mode, pressing
returns to the Timekeeping Mode.
· In any mode (except when making settings) press
to illuminate the display for about two seconds.
TIMEKEEPING MODE
To set the time and date
1. Hold down
while in the Timekeeping Mode
until the seconds digits flash on the display be-
cause they are selected.
2. Press
to change the selection in the following
sequence.
3. While the seconds digits are selected (flashing),
press
to reset the seconds to 00. If you press
while the seconds count is in the range of 30
to 59, the seconds are reset to 00 and 1 is add-
ed to the minutes. If the seconds count is in the
range of 00 to 29, the minutes count is un-
changed.
4. While any other digits (beside seconds) are selected (flashing), press
to in-
crease the number or
to decrease it. While the day of the week is selected,
press D to advance to the next day and
to move back. While the 12/24-hour
format setting is selected, press
to toggle it between 12 and 24.
· Except for when adjusting the seconds or setting the 12/24-hour format, holding
down a button changes the current selection at high speed.
· When the 12-hour format is selected, the indicator A appears on the display to
indicate "A.M." times or indicator P appears on the display to indicate "P.M." times.
Selecting the 24-hour format causes the indicator 24 to appear on the display.
5. After you set the time and date, press
to return to the Timekeeping Mode.
· The date can be set within the range of January 1, 1995 to December 31, 2039.
· If you do not operate any button for a few minutes while a selection is flashing, the
flashing stops and the watch goes back to the Timekeeping Mode automatically.
ABOUT THE BACKLIGHT
About the Auto Backlight Function
When the auto backlight function is turned on, the backlight automatically turns on for
two seconds under the conditions described below. Avoid wearing the watch on the
inside of your wrist. Doing so causes the auto backlight to operate when not needed,
which shortens battery life.
Moving the watch to a position that is parallel to the ground and then tilting it towards
you approximately 40 degrees causes the backlight to illuminate.
· The backlight may not illuminate if the face of the watch is more than 15 degrees off
parallel to the left or right. Make sure that the back of your hand is parallel to the
ground.
· Static electricity or magnetic force can interfere with proper operation of the auto
backlight function. If the auto backlight does not illuminate, try moving the watch
back to the starting position (parallel with the ground) and then tilt it back toward
you again. If this does not work, drop your arm all the way down so it hangs at your
side, and then bring it back up again.
· Under certain conditions the backlight may not light until about one second or less
after turn the face of the watch towards you. This does not necessarily indicate
malfunction of the backlight.
Timekeeping Mode
Thermometer Mode
Countdown Alarm Mode
Alarm Mode
To switch the auto backlight function on and off
In the Timekeeping Mode, hold down
to turn the auto backlight function on and off.
· The auto backlight indicator is shown on the display in all modes while the auto
backlight function is on.
· In order to protect against running down the battery, the auto backlight function is
automatically turned off approximately three hours after you turn it on. Repeat the
above procedure to turn the auto backlight function back on if you want.
· Pressing
at any time illuminates the display for about two seconds, regardless of
the auto backlight's on/off setting.
Caution
· The backlight of this watch employs an electro-luminescent (EL) light, which loses
its illuminating power after very long term use.
· Frequent use of the backligfht shortens the battery life.
· The watch emits an audible sound whenever the display is illuminated. This is be-
cause the EL light vibrates slightly when lit. It does not indicate malfunction of the
watch.
Warning!
· Never try to read your watch when mountain climbing or hiking in areas that
are dark or in areas with poor footing. Doing so is dangerous and can result
in serious personal injury.
· Never try to read your watch when running on a roadside or in any other
location where there might be vehicular or pedestrian traffic. Doing so is dan-
gerous and can result in serious personal injury.
· Never try to read your watch when riding on a bicycle or when operating a
motorcycle or any other motor vehicle. Doing so is dangerous and can result
in a traffic accident and serious personal injury.
· When you are wearing the watch, make sure that its auto backlight function is
turned off before riding on a bicycle or operating a motorcycle or any other
motor vehicle.
Sudden and unintended operation of the auto backlight can create a distrac-
tion, which can result in a traffic accident and serious personal injury.
THERMOMETER MODE
A built-in temperature sensor measures temperature and shows the measured value
on the display. The readout from the temperature sensor can also be switched be-
tween Celsius ( C) and Fahrenheit ( F). The thermometer can be calibrated to cor-
rect for errors.
Important
Temperature measurements are affected by your body temperature (while you are
wearing the watch), direct sunlight, and moisture. To achieve a more accurate tem-
perature measurement, remove the watch from your wrist, place it in a well ventilated
location out of direct sunlight, and wipe off all moisture from the case. It takes ap-
proximately 20 to 30 minutes for the case of the watch to reach the actual surround-
ing temperature.
Accurate temperature measurements cannot be achieved while you are wearing the
watch. The following graph illustrated affects of body temperature on actual
temperature.
Parallel to ground
More than 15 degrees
too high
More than 15 degrees
too low
Approximate
Differences caused
by individual body
temperature or
clothing
Temperature
Temperature measured when watch is worn on wrist
40 C
30 C
20 C
10 C
0C
10 C
20 C
30 C
40 C
Day of week
Temperature graph
Month
and Date
PM
indicator
Hour
Minutes
Seconds
Seconds
Hour
Minutes
12/24-Hour
Format
Day of
week
Month
Date
Year
Parallel to
ground
40
Auto backlight indicator
Holding down
ON
OFF
C
C
B
C
A
D
D
D
D
B
B
A
D
D
B
- 3 -
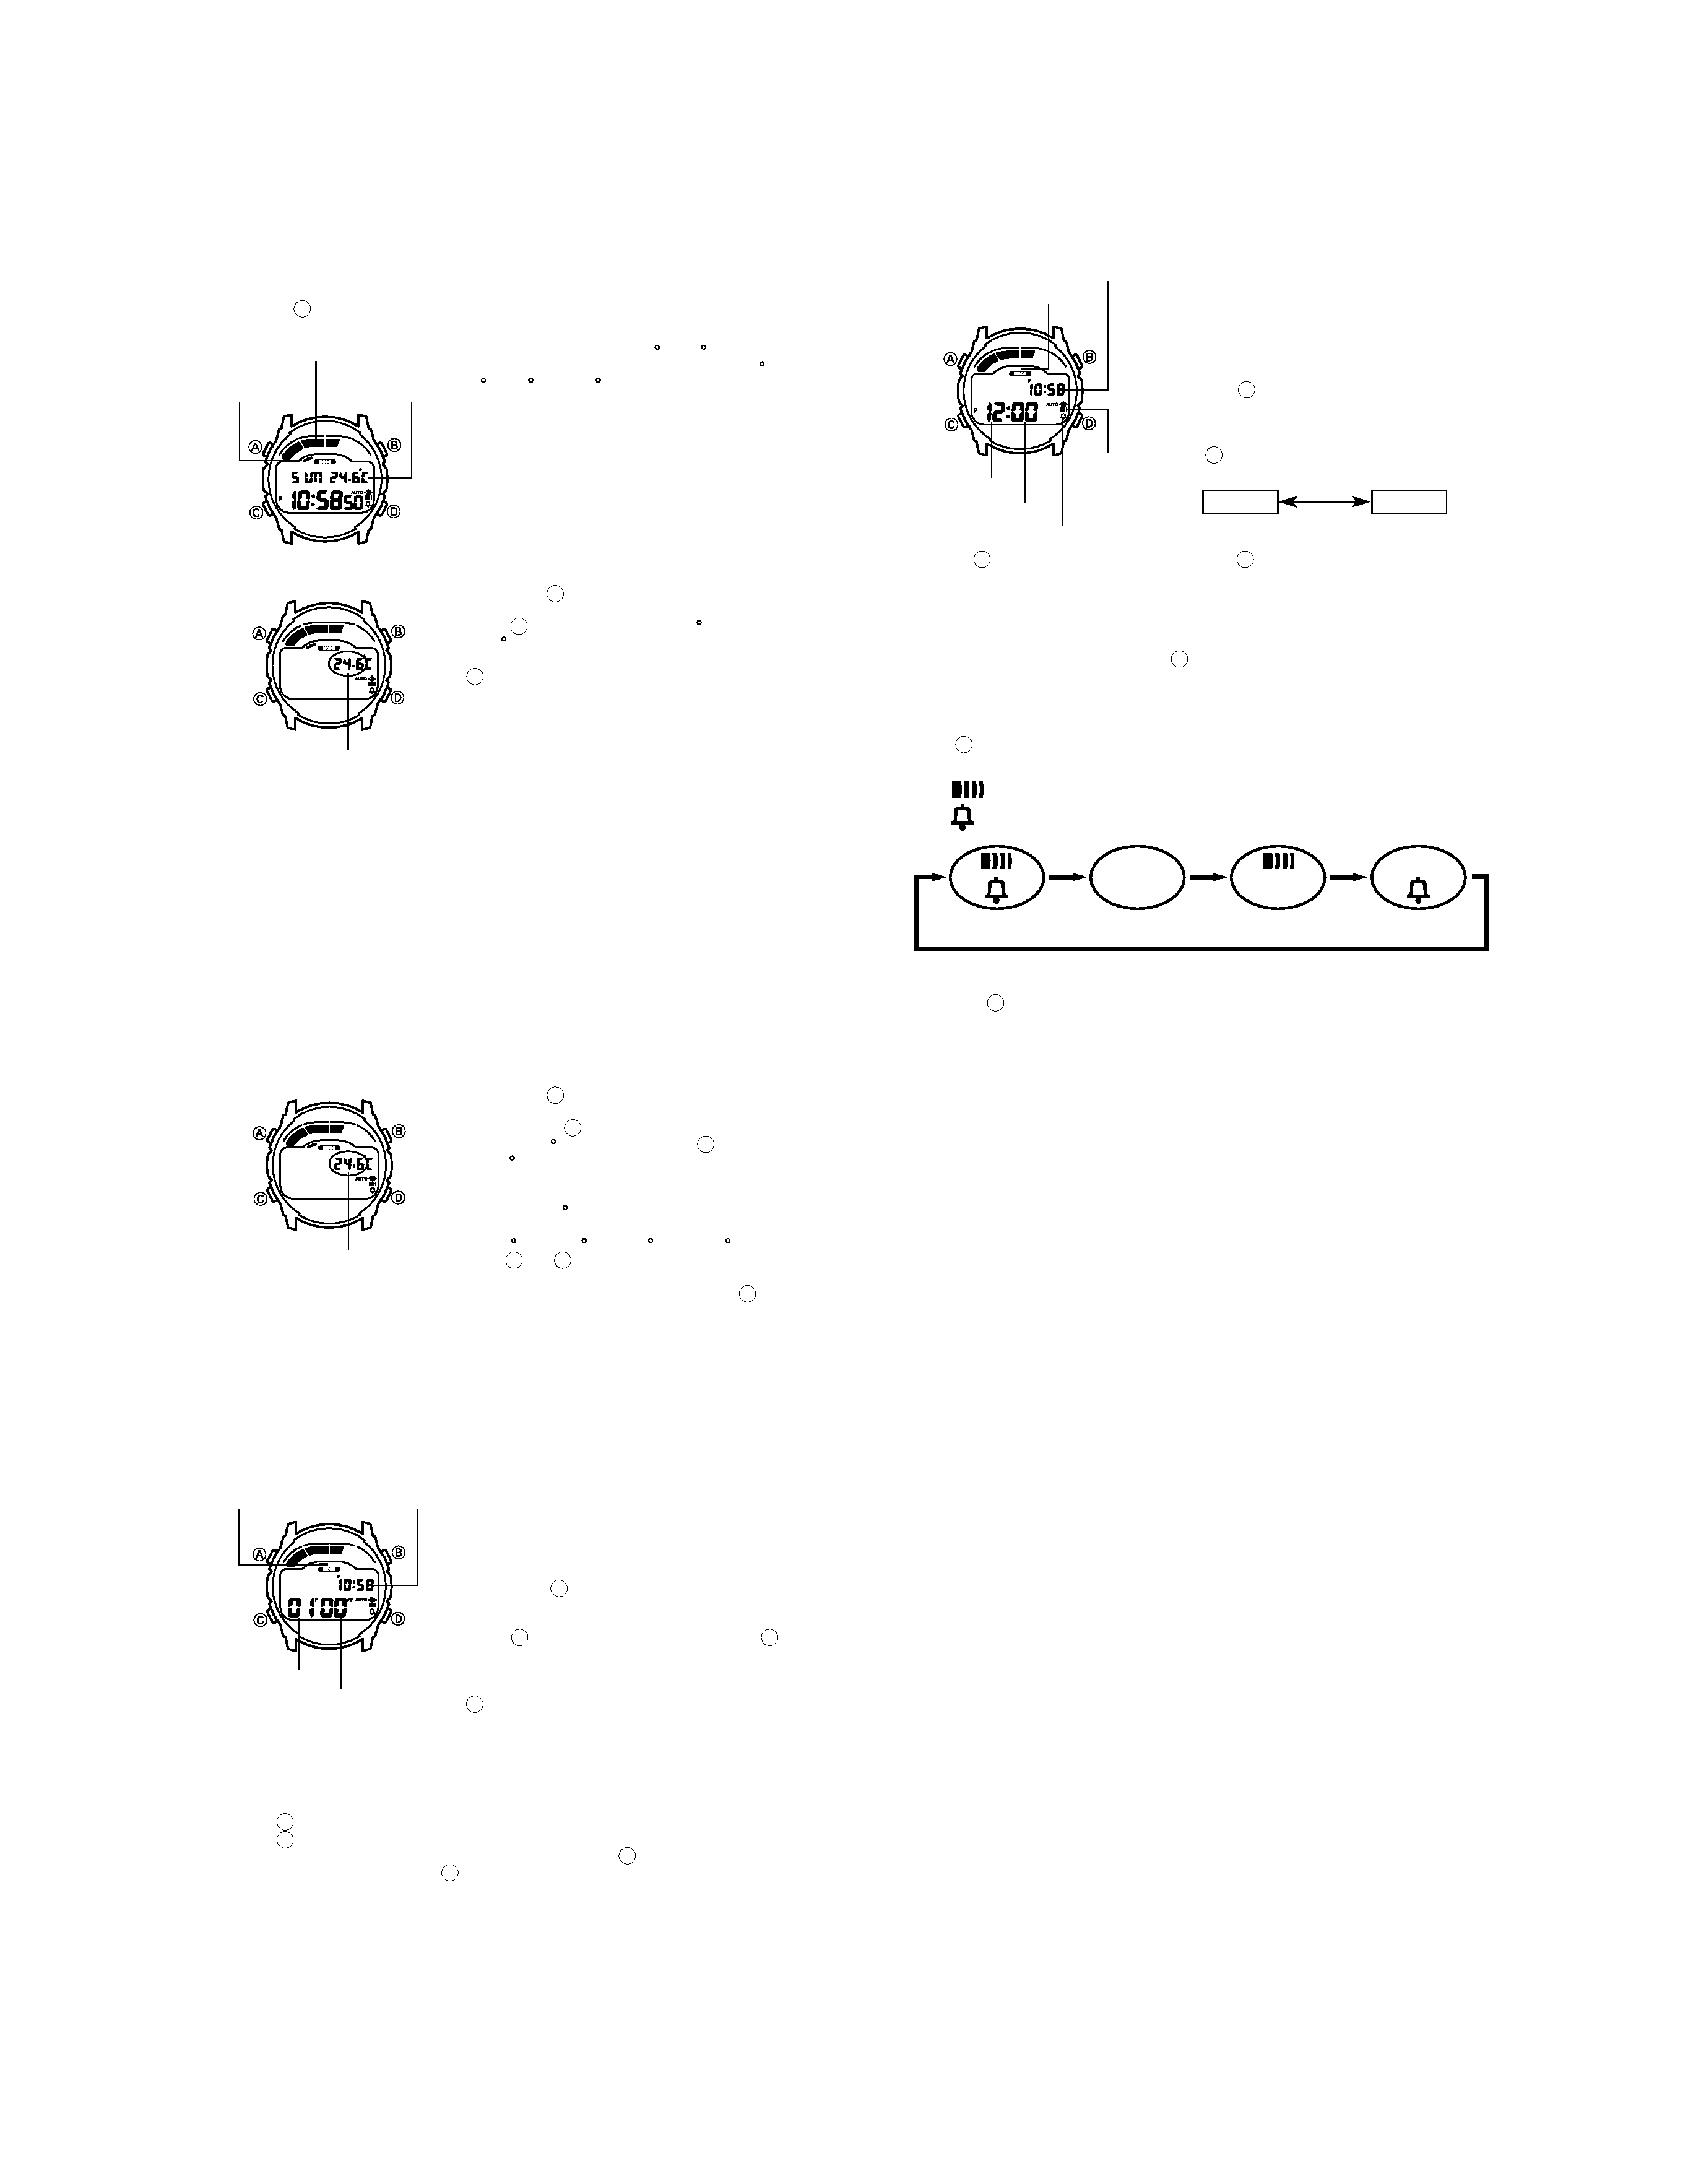
About Temperature Measurement
· A temperature graph which is automatically updated every five minutes, is shown
on the display in all modes (except when making settings). Measured temperature
values can be viewed in the Thermometer Mode only.
· Pressing
while in the Thermometer Mode performs temperature measurement
and causes the measured value to appear on the display.
* The display shows " . C (or F)" if a mea-
sured value falls outside the range of 20 C to
60 C (4 F to 140 F). The normal display will
return as soon as the temperature returns within
the allowable range.
Switching between Celsius and Fahrenheit
1. Hold down
while in the Thermometer Mode
and the current temperature digits flash.
2. Press
to select either Celsius "C" or Fahren-
heit "F".
3. After you select the Celsius or Fahrenheit, press
to return to the Temperature Display.
· If you do not operate any button for a few min-
utes while a selection is flashing, the flashing
stops and the watch goes back to the Thermom-
eter Mode automatically.
Calibrating the Temperature Measurement
The temperature sensor of this watch is calibrated at the factory before shipment and
further adjustment is normally not required. If noticeable error is found in the temperature
readings produced by the watch, you can adjust it to correct the error.
Important
Incorrectly calibrating the temperature measurement of this watch can result in incor-
rect readings. Carefully read the following before doing anything.
· Compare the readings produced by the watch with those of another reliable, accu-
rate thermometer.
· If calibration is required, remove the watch from your wrist and wait for 20 or 30
minutes to give the temperature of the watch time to stabilize.
· Perform the temperature calibration as quickly as possible to avoid the temperature
of the watch being affected by your body temperature.
· You can also perform temperature calibration underwater, if the water temperature
is stable.
To calibrate the temperature
1. Hold down
while in the Thermometer Mode
and the current temperature digits flash.
2. Each press of
increase the displayed temper-
ature by 0.1 C, and pressing the
decrease it
by 0.1 C.
· If you have selected Fahrenheit as your unit of
measurement, the above operations change the
reading by 0.2 F.
· You can calibrate the temperature within a range
of 9.9 C to +9.9 C (18.0 F to +18.0 F).
· Press
and
at the same time to rest the tem-
perature calibration to the factory setting.
3. After calibrating the temperature, press
to re-
turn to the Temperature Display.
· If you do not operate any button for a few min-
utes while a selection is flashing, the flashing
stops and the watch goes back to the Thermom-
eter Mode automatically.
COUNTDOWN ALARM MODE
The countdown timer can be set within a range of
1 minute to 60 minutes. When the countdown
reaches zero, an alarm sounds for 10 seconds or
until you press any button.
To set the countdown time
1. Hold down
while in the Countdown Alarm
Mode. The minutes digits flash on the display
because they are selected.
2. Press
to increase the minutes digits or
to
decrease them. Holding down either button
changes the setting at high speed.
3. After you set the countdown alarm time, press
to return to the Countdown Alarm Mode.
· If you do not operate any button for a few min-
utes while a selection is flashing, the flashing
stops and the watch goes back to the Countdown
Alarm Mode automatically.
To use the countdown timer
1. Press
while in the Countdown Alarm Mode to start the countdown timer.
2. Press
again to stop the countdown timer.
· You can resume countdown timer operation by pressing
.
3. Stop the timer and then press
to reset the countdown time to its starting value.
Hourly time signal on indicator
Current time
Both ON
Both OFF
Daily Alarm
only
Hourly Time
Signal only
ALARM MODE
When the Daily Alarm is turned on, the alarm
sounds for 20 seconds at the preset time each day.
Press any button to stop the alarm after it starts to
sound. When the Hourly Time Signal is turned on,
the watch beeps every hour on the hour.
To set the alarm time
1. Hold down
while in the Alarm Mode. The hour
digits flash on the display because they are se-
lected. At this time the Daily Alarm is turned on
automatically.
2. Press
to change the selection in the following
sequence.
3. Press
to increase the selected digits or
to decrease them. Holding down
either button changes the selection at high speed.
· The format (12-hour and 24-hour) of the alarm time matches the format you select
for normal timekeeping.
· When setting the alarm time using the 12-hour format, take care to set the time
correctly as morning (A) or afternoon (P).
4. After you set the alarm time, press
to return to the Alarm Mode.
· If you do not operate any button for a few minutes while a selection is flashing, the
flashing stops and the watch goes back to the Alarm Mode automatically.
To switch the daily alarm and hourly time signal on and off
Press
while in the Alarm Mode to change the status of the daily alarm and hourly
time signal in the following sequence.
Alarm on indicator
Hourly time signal on indicator
To test the alarm
Hold down
while in the Alarm Mode to sound the alarm.
Mode indicator
Alarm on
indicator
Hour
Minutes
Mode
indicator
Current
temperature*
Temperature graph
Flashes
Flashes
Mode
indicator
Current
time
Seconds
Minutes
Hour
Minutes
C
D
A
A
D
B
A
D
B
A
D
B
A
A
D
D
D
A
D
D
C
D
B
A
A
- 4 -
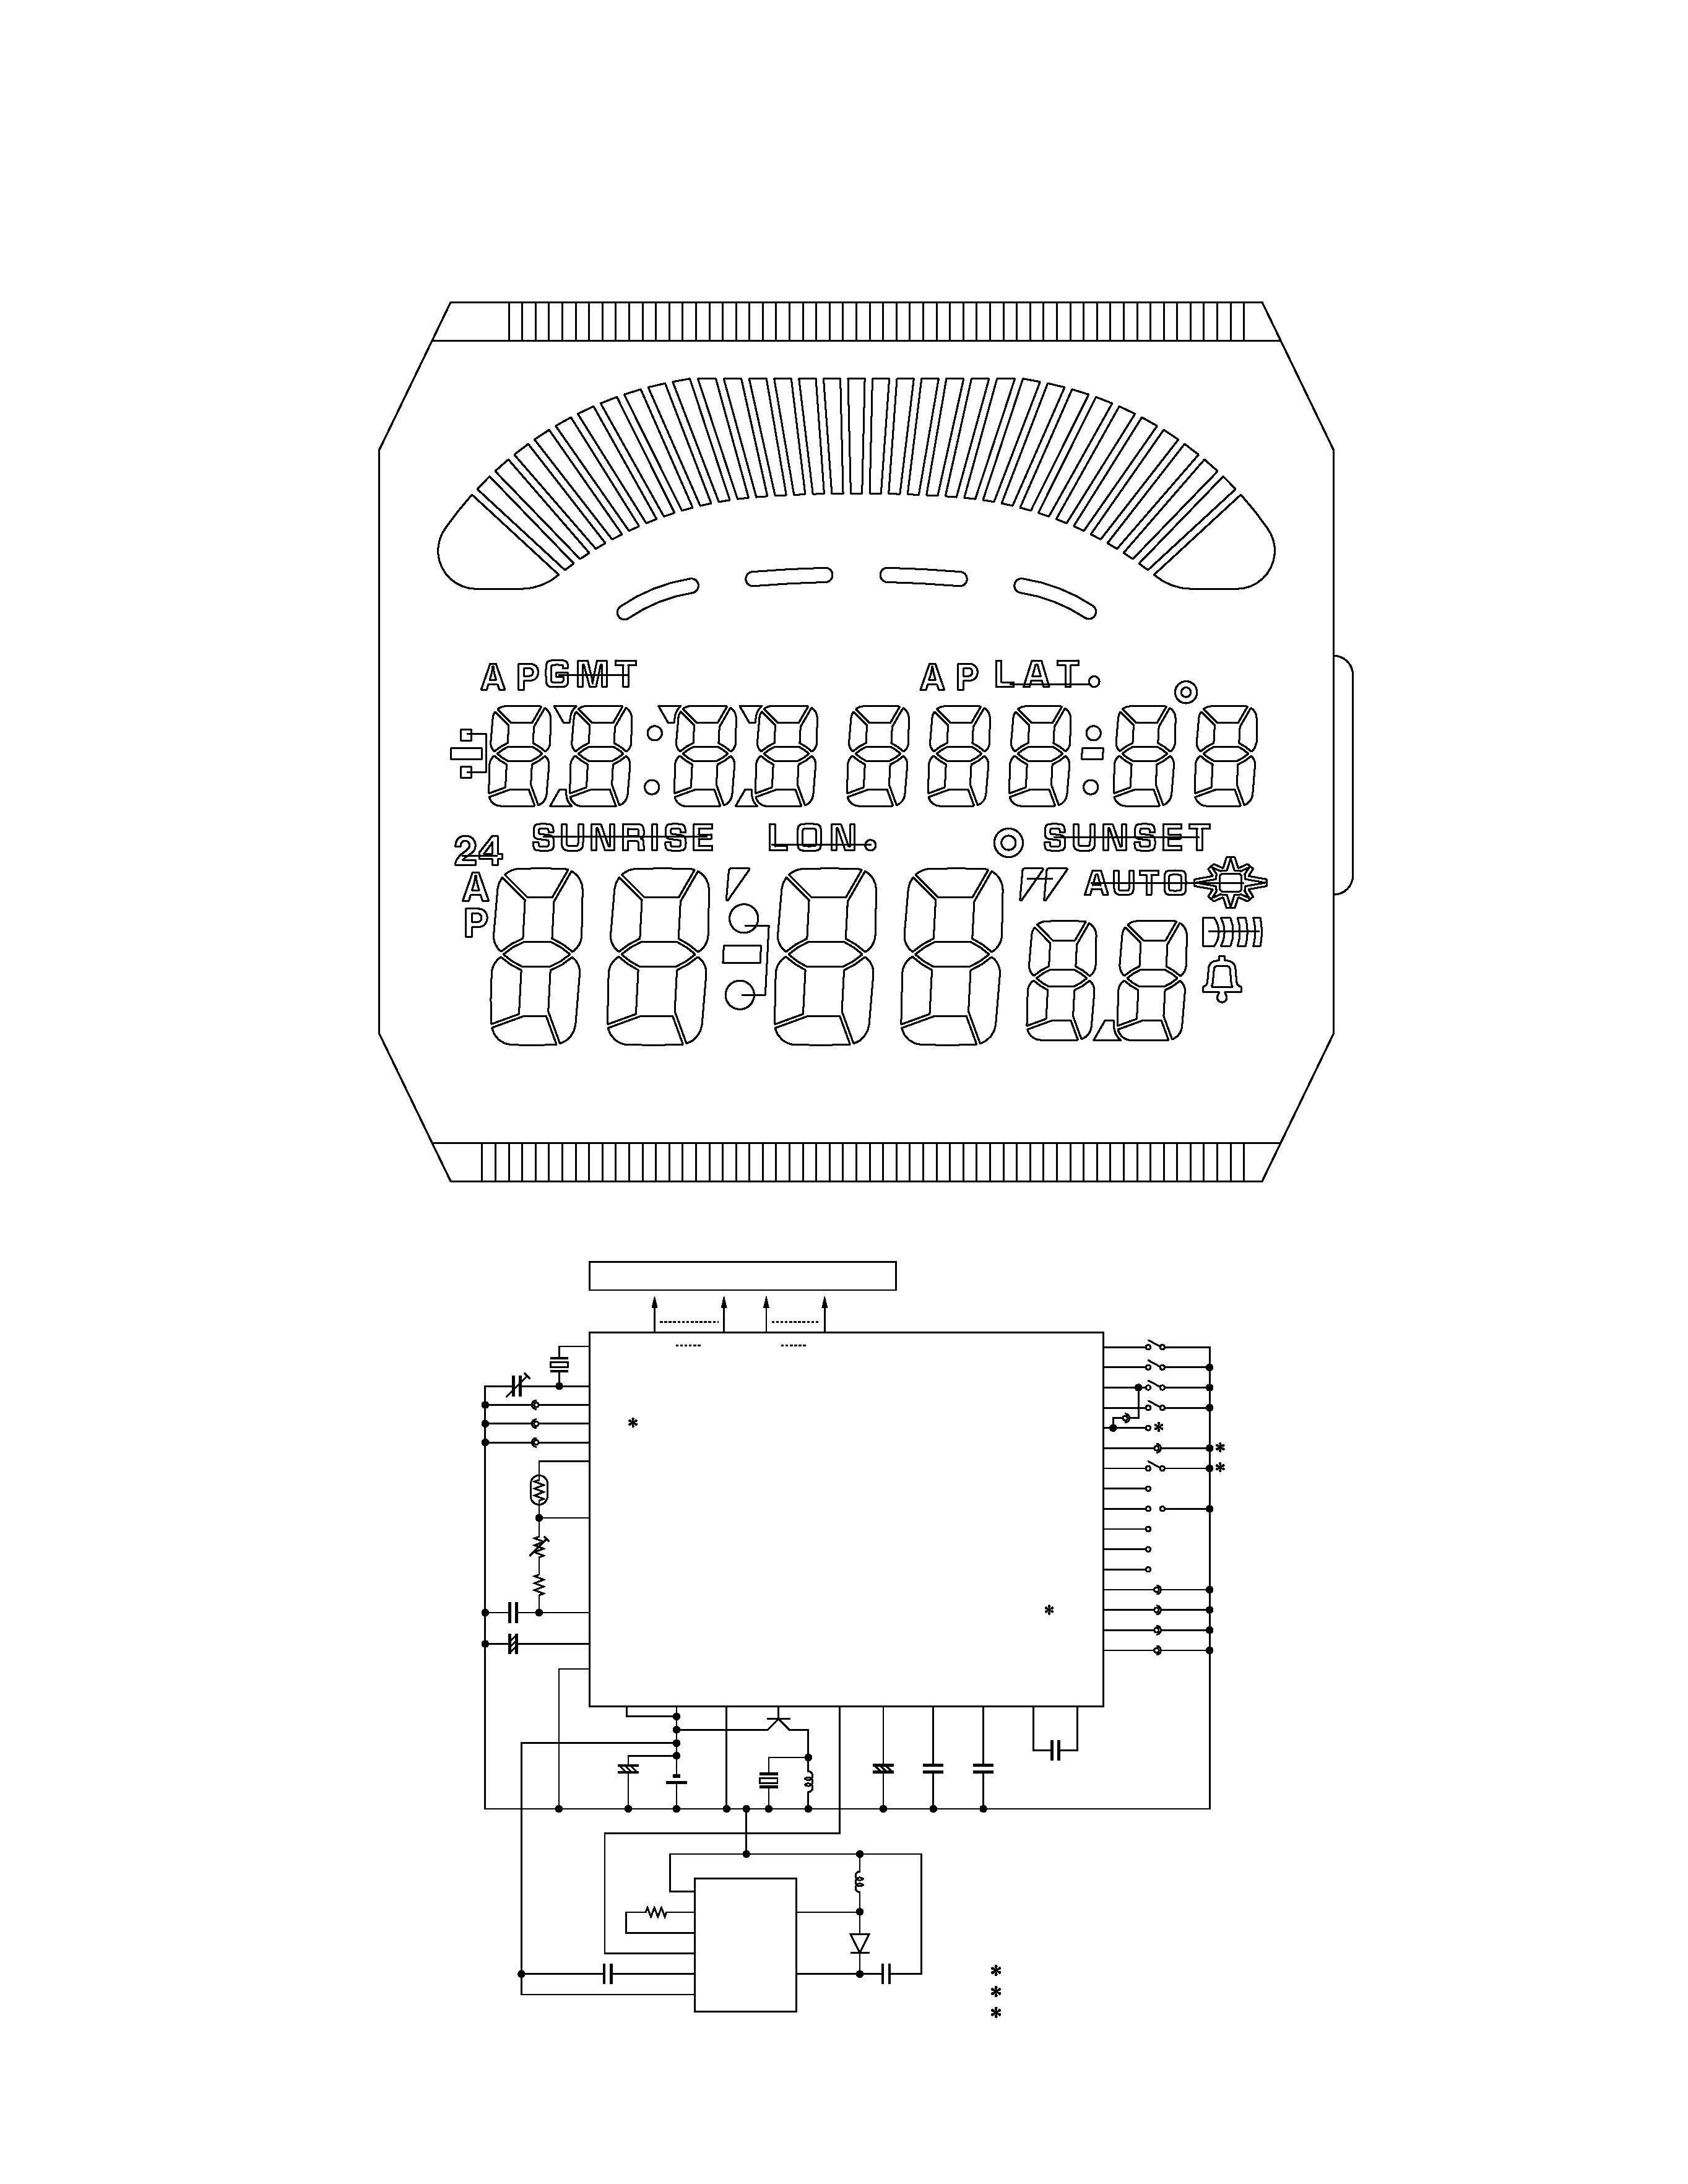
3. DRAWINGS : QW-1645
3-1. BLOCK DIAGRAM
52C2
1C2
1C1
1C3
2C3
3C3
4C3
5C3
6C3
7C3
8C3
9C3
10C3
11C3
12C3
13C3
14C3
15C3
16C3
17C3
18C3
19C3
20C3
21C2
21C3
22C3
22C2
23C2
23C3
24C3
24C2
25C2
25C3
26C3
27C3
5C2
26C2
13C2
51C2
52C4
48C2
48C1
48C4
50C1
50C3
48C3
50C5
48C5
2C4
50C2
2C1
4C2
4C1
47C4
47C1
5C4
47C2
5C1
7C2
7C1
45C4
45C1
8C4
45C2
8C1
51C1
51C4
50C4
33C4
28C4
31C5
31C3
34C1
44C4
18C4
51C5
51C3
2C2
3C1
6C2
12C2
12C1
43C4
43C1
13C4
43C2
13C1
41C2
41C1
41C4
14C1
40C4
14C2
40C1
38C2
38C1
38C4
15C1
16C4
15C2
16C1
37C2
27C1
37C4
20C4
20C2
20C1
18C1
19C4
18C2
19C1
35C2
35C1
35C4
26C1
28C1
27C2
27C1
33C5
33C3
33C1
34C3
32C3
34C5
32C5
36C5
36C3
36C1
37C3
35C3
37C5
35C5
29C2
30C1
31C4
31C1
30C4
30C2
29C1
10C2
6C1
6C4
3C4
49C5
49C3
49C1
47C3
45C3
47C5
45C5
46C5
46C3
46C1
43C3
41C3
43C5
41C5
42C5
42C3
42C1
40C3
38C3
40C5
38C5
39C5
39C3
39C1
10C1
44C5
44C3
44C1
3C2
40C2 16C2
19C2
31C2
36C4
17C2
L1
L2
L3
L4
L5
L6
L7
L8
L9
L10
L11
L12
L13
L14
L15
L16
L17
L18
L19
L20
L21
L22
L23
L24
L25
LC1
LC2
LC3
L52
L51
L50
L49
L48
L47
L46
L45
L44
L43
L42
L41
L40
L39
L38
L37
L36
L35
L34
L33
L32
L31
L30
L29
L28
L27
L26
LC4
LC5
XTB
Xtal
CT
XT
C4
BAT
C
ST
R
ST
R
VR
R
TH
KI1
KI2
2
KI3
KI4
VCCE
RT1
L2
Di
EL
RT2
ENB
VCPE
CIL
ELD
GND
R
C7
VSS2
INV
LC1
LC5
L52
L1
VCH VSS1 VSS3
LSI
LCD
TOTAL
BONDING
93PINS
93PINS
VC VCC
VDD
A1
A2
A3
CRMS
CRST
CRST
VAN
C1
LD
VDD
BD1
C5
+
VSS2
C2
C3
+
S1
S2
SL
S3
KI5
KI6
KI7
KI8
AC
T1
T2
T3
N1
N2
N3
N4
1. Short pad.
2. Short (solder) both KI5 and KI6.
3. Tilt sensor.
L1
PZT
Tr1
1
1
3
2
C8
+