1600/1827-1
Module No.1600/1827
· You can input up to eight characters in the text area, and 12 digits in the number area.
· Make sure that you distinguish between the letter O and the number 0 (zero).
Inputting a zero for the letter
O will affect automatic sorting.
4. After inputting your data, press A to store it and return to the Telememo Mode.
· When you press A to store data, the message SORT appears on the display for
a few seconds. After the sort operation is complete, the normal Telememo Mode
display (without the cursor) appears.
· The text area of the display can show only six characters at a time, so longer text
scrolls continuously from right to left.
· If the message
FULL appears in the text area of the display, it means that
memory is full. To store more data, you will first have to delete some of the data
stored in memory.
To recall Telememo data
In the Telememo Mode, press E to scroll forward through stored data items or D to
scroll in reverse.
· Holding down either button scrolls through the data at high speed.
To edit Telememo data items
1. In the Telememo Mode, scroll through the data items and display the one you want
to edit.
2. Press A and a cursor appears in the text area.
3. Use B to move the cursor to the character you want to change.
4. Change the character.
· See "How to input characters" for details.
5. After making the changes that you want, press A to store it and return to the
Telememo Mode.
To delete Telememo data
1. In the Telememo Mode, scroll through the data items and display the one you want
to delete.
2. Press A and a cursor appears in the text area.
3. Press D and E at the same time to delete the data item.
· At this time the cursor appears in the text area, ready for input.
4. Input data or press A to return to the Telememo Mode.
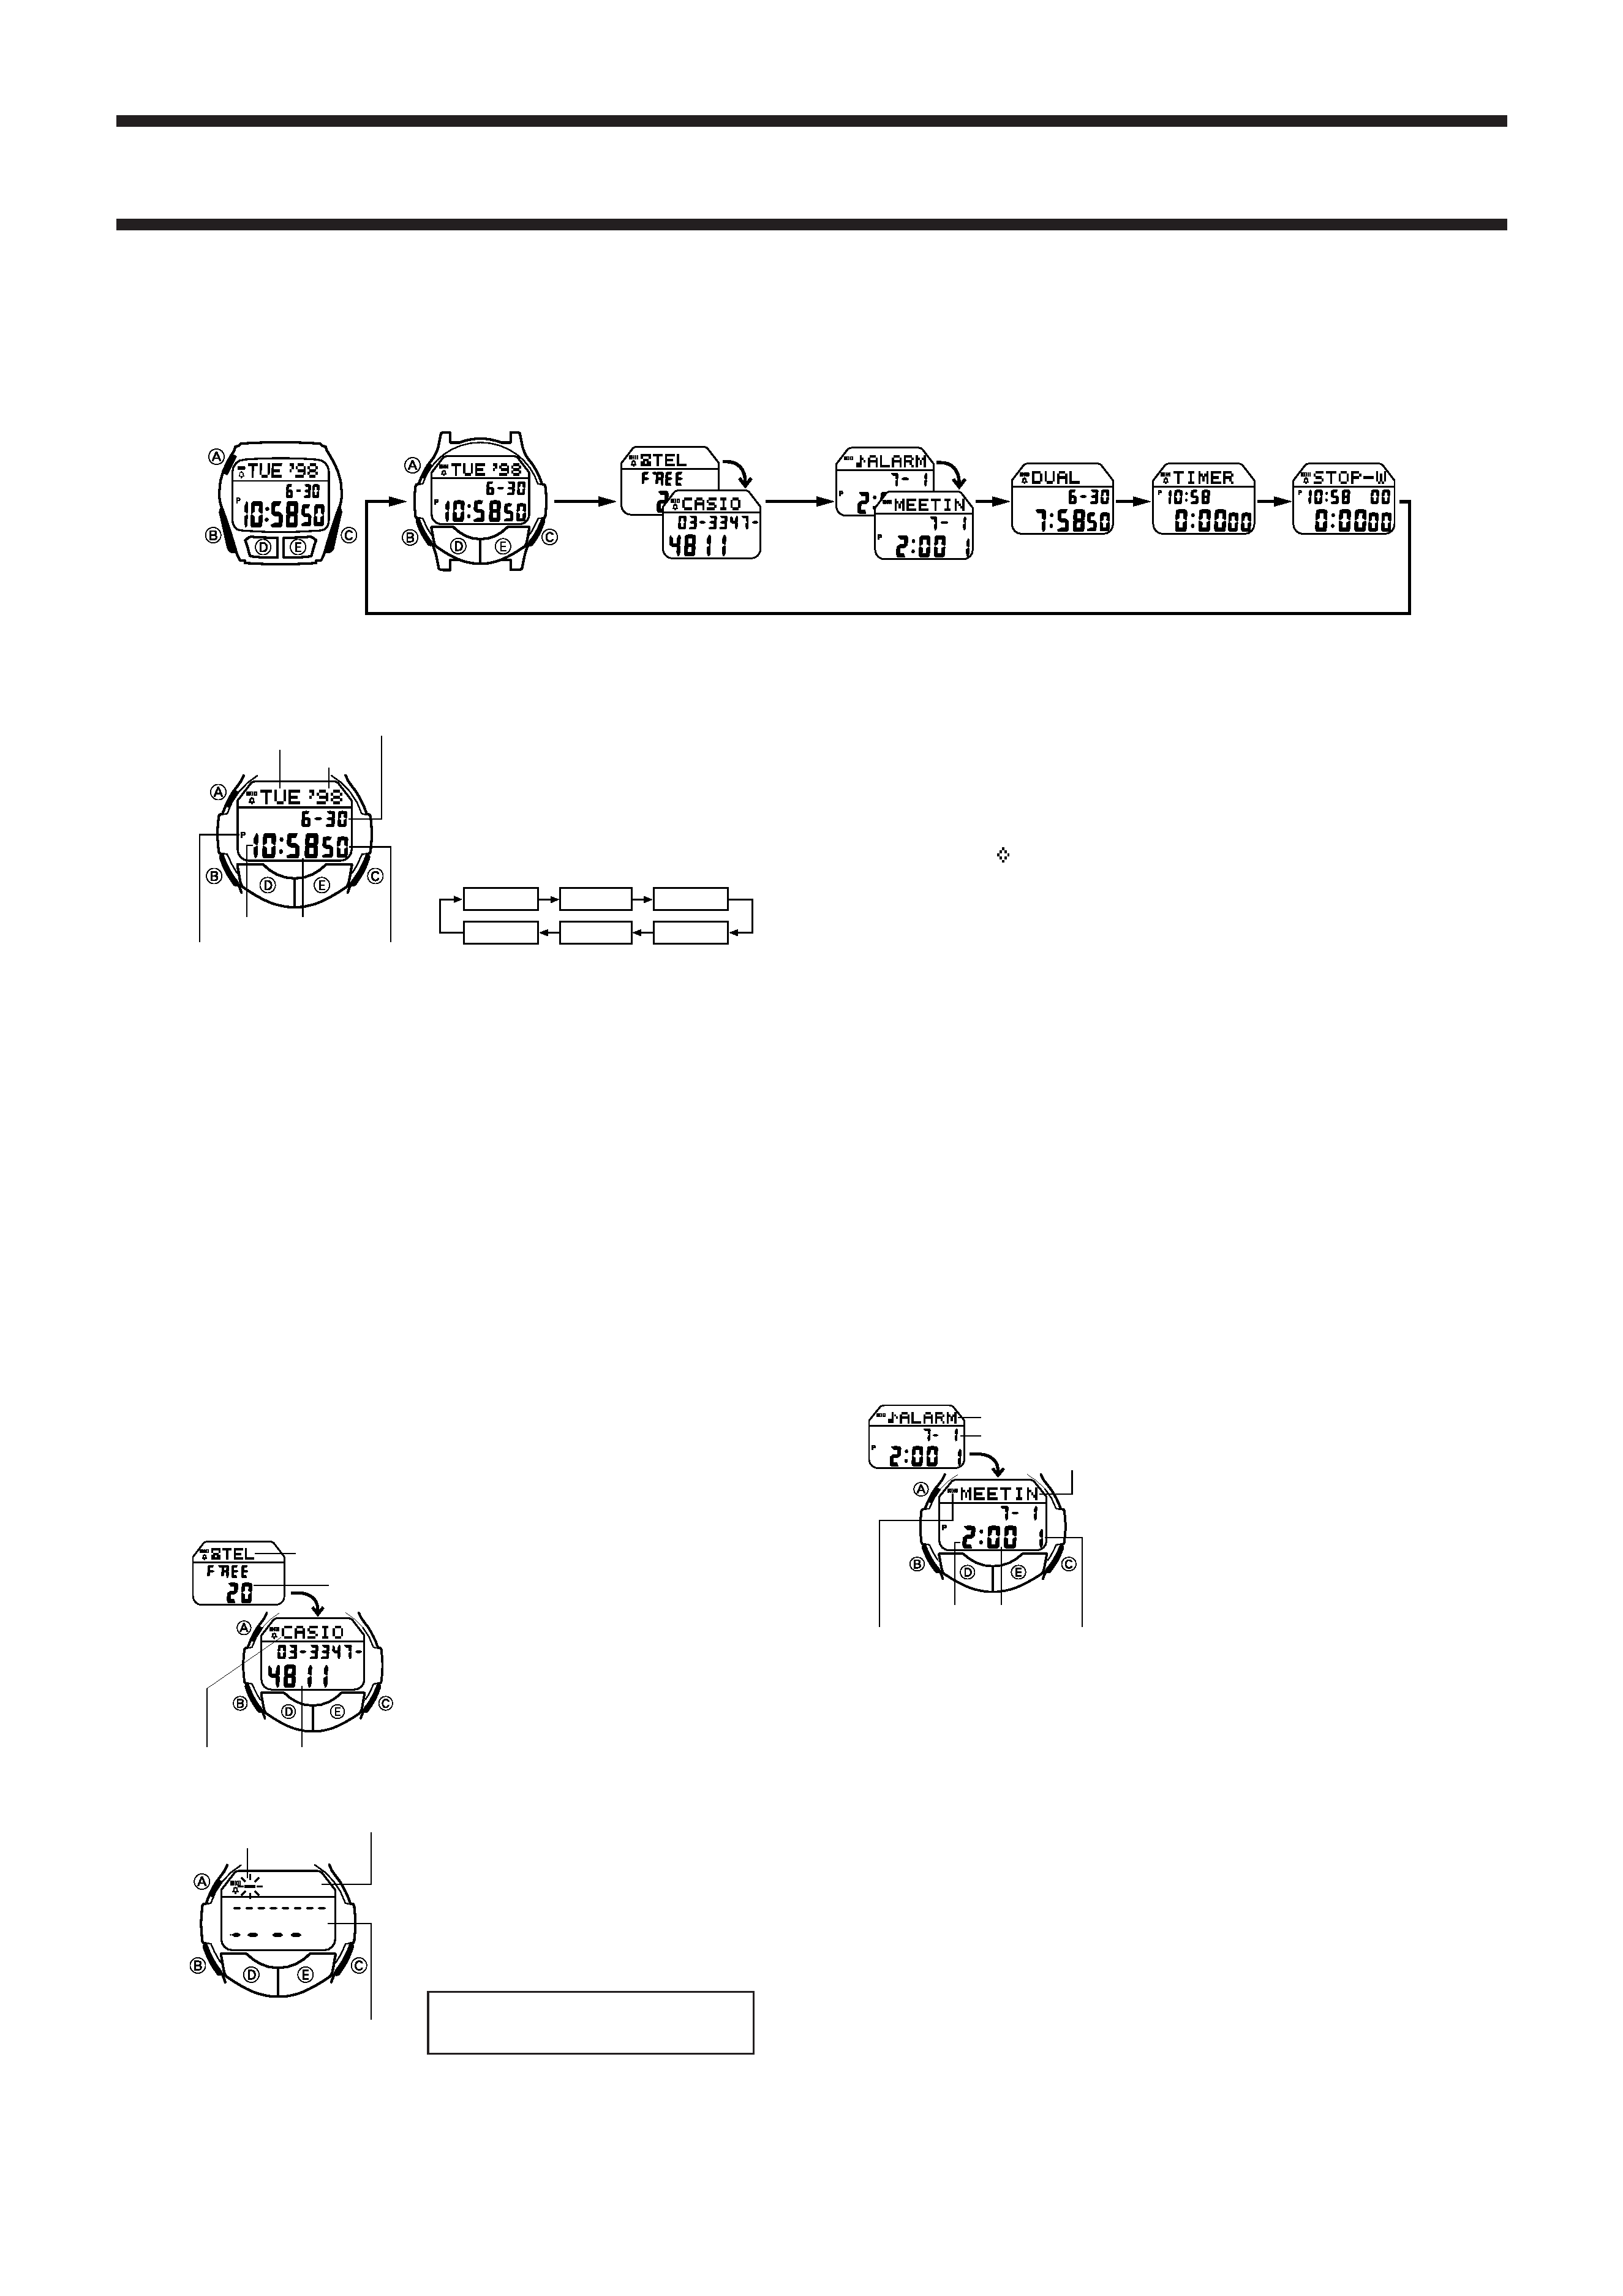
ALARM MODE
You can set five independent alarms with the
hour, minutes, month and date. You can even
input text that appears on the display to remind
you of the purpose of each alarm. Use the Alarm
Mode to turn the alarm and the Hourly Time
Signal on and off.
· When an alarm is turned on, an alarm tone
sounds for 20 seconds when the preset time
is reached.
· When the Hourly Time Signal is turned on,
the watch beeps every hour on the hour.
Alarm Types
The types of alarm you get depends on the information you set.
· To set a Daily alarm
Set the hour and minutes for the alarm time. Set
xx for the month and date (see step
4 under "To set alarms"). This type of setting causes the alarm to sound everyday at
the time you set.
· To set a Date alarm
Set the month, date, hour and minutes for the alarm time. This type of setting causes
the alarm to sound at the specific time, on the specific date you set.
· To set a 1-Month alarm
Set the month, hour and minutes for the alarm time. Set
xx for the date (see step 4
under "To set alarms"). This type of setting causes the alarm to sound every day at the
time you set, only during the month you set.
· To set a Monthly alarm
Set the date, hour and minutes for the alarm time. Set
xx for the month (see step 4
under "To set alarms"). This type of setting causes the alarm to sound every month at
the time you set, on the date you set.
Cursor
Text area
Number area
[New Data Display]
Name
Telephone number
Mode indicator
Remaining
memory
Seconds
Hour
Minutes
Date
Month
Year
Month-Date
Year
Day of week
Hour
Minutes
Seconds
PM indicator
Stopwatch Mode
Dual Time Mode
Alarm Mode
Telememo Mode
Timekeeping Mode
[Module 1827]
Countdown
Alarm Mode
[Module 1600]
TIMEKEEPING MODE
· In the Timekeeping Mode, press D to switch
between the 12-hour and 24-hour formats.
To set the time and date
1. Press A while in the Timekeeping Mode.
The seconds digits flash on the display
because they are
selected.
2. Press B to change the selection in the
following sequence.
3. While the seconds digits are selected (flashing), press E to reset the seconds to
00. If you press E while the seconds count is in the range of 30 to 59, the seconds
are reset to 00 and 1 is added to the minutes. If the seconds count is in the range
of 00 to 29, the minutes count is unchanged.
4. While any other digits (besides seconds) are selected (flashing), press E to
increase the number or D to decrease it.
· Holding down either button changes the current selection at high speed.
· When the 12-hour format is selected, the indicator P appears on the display to
indicate "p.m." times. There is no indicator for "a.m." times. Selecting the 24-hour
format causes the indicator 24 to appear on the display.
5. After you set the time and date, press A to return to the Timekeeping Mode.
· The day of the week is automatically set in accordance with the date.
· The date can be set within the range of January 1, 1995 to December 31, 2039.
· If you do not operate any button for a few minutes while a selection is flashing, the
flashing stops and the watch goes back to the Timekeeping Mode automatically.
About the backlight
In any mode, press C to illuminate the display for about two seconds.
· The backlight of the watch employs an electro-luminescent (EL) light, which loses
illuminating power after very long use.
· The illumination provided by the backlight may be hard to see when viewed under
direct sunlight.
· The watch will emit an audible sound whenever the display is illuminated. This is
caused by a transformer that vibrates when the EL panel lights up. It does not
indicate malfunction of the watch.
· If the alarm time you set in the Alarm Mode is reached while the backlight is turned
on, the alarm tone will not start to sound until the backlight turns off.
TELEMEMO MODE
The Telememo Mode lets you store up to 30
pairs of name and telephone number data. Data
is automatically sorted based on the characters
of the name. You can recall data by scrolling
through it on the display.
· See the "CHARACTER LIST" at the back of
this manual for details on how the watch sorts
data.
· The data item on the display when you exit
the Telememo Mode appears first the next
time you enter the Telememo Mode.
To input new Telememo data
1. In the Telememo Mode, press D or E until
the new data display appears.
· The new data display is the one that is blank
(contains no name and telephone number).
· If there is no Telememo data stored in
memory yet, the new data display appears as
soon as you enter the Telememo Mode.
2. Press A and a cursor appears in the text area.
3. Input a name in the text area and a telephone
number in the number area.
Use D and E to input characters, and B to
move the cursor around the display.
For details, see "How to input characters".
GENERAL GUIDE
· The operational procedures for Module 1600 and 1827 are identical. All of the illustrations in this manual show Module 1600.
· Press B to change from mode to mode. After you perform an operation in any mode, pressing B returns to the Timekeeping Mode.
· In any mode press C to illuminate the display for about two seconds.
Hour
Minutes
Alarm on indicator
Alarm No.
Mode indicator
Month-Date
Text area
1600/1827-2
Hour
Date
Minutes
Month
To set alarms
1. Press E while in the Alarm Mode to select Alarm 1 through Alarm 5.
2. After you select an alarm, press A. The hour digits flash on the display because
they are
selected.
· At this time, the alarm is automatically switched on.
3. Press B to change the selection in the following sequence.
* There are eight spaces in the text, so you have to press B eight times to move to
the Hour setting.
4. Press E to increase the selected digits and D to decrease them. Holding down
either button changes the selection at high speed.
· To set an alarm that does not include a month (daily alarm, monthly alarm), set xx
for the month. Press E or D until the xx mark appears (between 12 and 1) while
the month digits are flashing.
· To set an alarm that does not include date (daily alarm, 1-month alarm), set xx for
the date. Press E or D until the xx mark appears (between 31 and 1) while the
date digits are flashing.
· The format (12-hour and 24-hour) of the alarm time matches the format you select
for normal timekeeping.
· When setting the alarm time using the 12-hour format, take care to set the time
correctly as morning (no indicator) or afternoon P.
5. If you want to input reminder text, first use B to move the cursor to the text area of
the display and then input text.
Use D and E to input characters, and B to move the cursor around the display.
For details, see "How to input characters".
· You can input up to eight characters in the text area.
· Anytime while the cursor is on the display, you can press D and E at the same
time to clear it.
6. After you finish inputting data, press A to return to the Alarm Mode.
· If you input reminder text, the text appears on the display when the alarm time is
reached.
· Note that reminder text appears only if the watch is in the Timekeeping Mode when
the alarm time is reached. Otherwise, only the alarm tone sounds (without the
reminder text).
To stop an alarm once it starts to sound
Press any button to stop an alarm when it starts to sounds. The reminder text for the
alarm (if any) will remain in the text area of the display for about 20 seconds.
To switch an Alarm and Hourly Time Signal on and off
1. In the Alarm Mode, press E to select an alarm or the Hourly Time Signal.
2. When the alarm or Hourly Time Signal you want to is selected, press D to switch it
on and off.
x Indicates alarm is ON
y Indicates Hourly Time Signal is ON
· If any alarm is on, the Alarm On Indicator is shown on the display when you change
to another mode.
To test the alarm
Hold down E while in the Alarm Mode to sound the alarm.
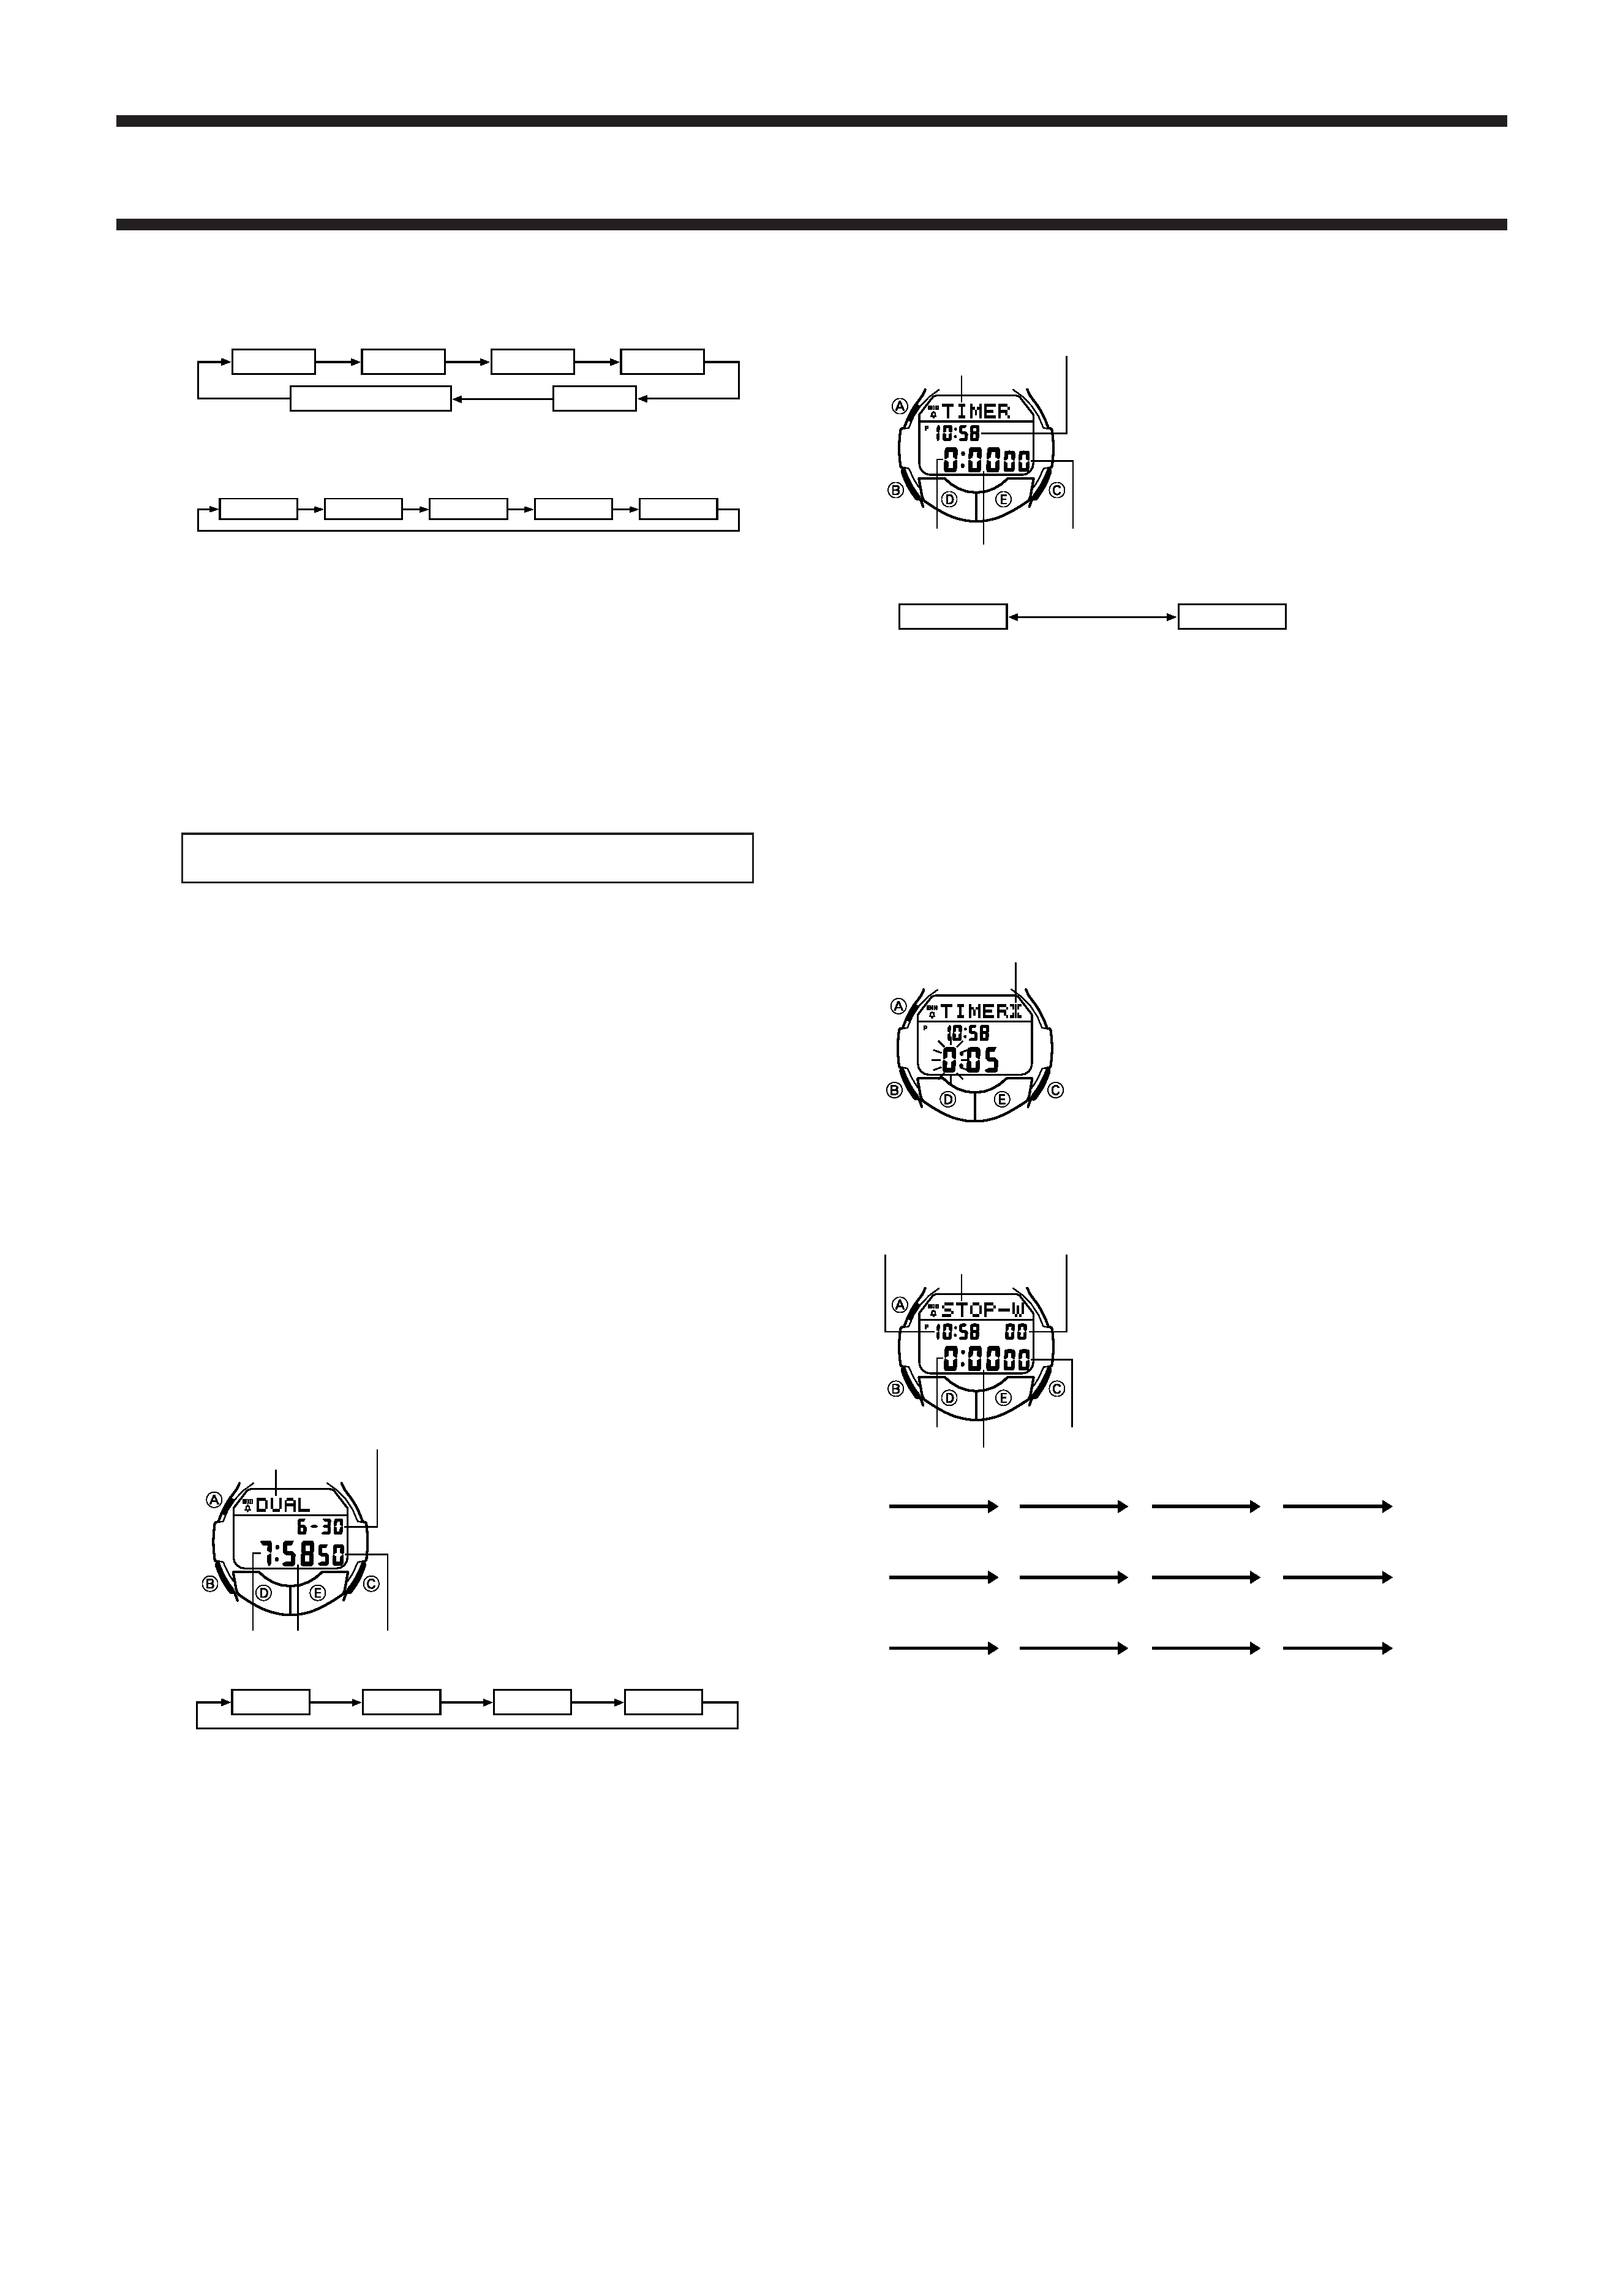
DUAL TIME MODE
The Dual Time function of this watch lets you
keep track of time in a different time zone.
· In the Dual Time Mode, the seconds count is
synchronized with the seconds count of the
Timekeeping Mode.
· In the Dual Time Mode, press D to switch
between the 12-hour and 24-hour formats.
To set the Dual Time
1. Press A while in the Dual Time Mode. The
hour digits flash on the display because they
are
selected.
2. Press B to change the selection in the following sequence.
3. Press E to increase the selected digits and D to decrease them. Holding down
either button changes the selection at high speed.
4. After you set the time, press A to return to the Dual Time Mode.
Mode indicator
Current time
Hours
Minutes
1/100 second
Seconds
Auto repeat on indicator
COUNTDOWN ALARM MODE
The countdown timer can be set within a range
of 1 minute to 24 hours. When the countdown
reaches zero, an alarm sounds for 10 seconds
or until you press any button.
Note that you can also select auto repeat timing
that automatically restarts the countdown from
the original value you set whenever zero is
reached.
To set the countdown start time
1. Press A while in the Countdown Alarm Mode.
The hours digit flashes on the display
because it is
selected.
2. Press B to change the selection in the following sequence.
3. Press E to increase the selected number. Holding down E changes the selection
at high speed.
· To set the starting value of the countdown time to 24 hours, set 0:00.
4. After you set the countdown start time, press A to return to the Countdown Alarm Mode.
To use the countdown timer
1. Press E while in the Countdown Alarm Mode to start the countdown timer.
2. Press E again to stop the countdown timer.
· You can continue countdown timer operation by pressing E.
3. Stop the timer and then press D to reset the countdown time to its starting value.
· When the end of the countdown is reached and auto repeat timing is off, the alarm
sounds for 10 seconds or until you stop the alarm by pressing any button.
Countdown timing stops, and the countdown time is automatically reset to its
starting value after the alarm stops.
To switch auto repeat timing on and off
1. Press A while in the Countdown Alarm Mode.
The hours digit flashes on the display
because it is
selected.
2. Press D to switch auto repeat on and off.
3. Press A to return to the Countdown Alarm
Mode.
· When the end of the countdown is reached
while auto repeat is on, the alarm sounds, but
the countdown restarts from the beginning
without stopping. You can stop the countdown
by pressing E and manually reset to the start
time by pressing D.
STOPWATCH MODE
The Stopwatch Mode lets you measure elapsed
time, split times, and two finishes. The range of
the stopwatch is 23 hours, 59 minutes, 59.99
seconds.
(a) Elapsed time measurement
EEE
ED
Start
Stop
Re-start
Stop
Clear
(b) Split time measurement
EDD
ED
Start
Split
Split release
Stop
Clear
(c) Split time and 1st-2nd place times
EDE
DD
Start
Split
Stop
Split release
Clear
First runner
Second runner
Record time
finishes.
finishes.
of second
Record time of
runner.
first runner.
Current time
Mode indicator
Hours
Minutes
Hours
Minutes
Seconds
Hour
Minutes
Month
Text
*
Date
Alarm 1
Alarm 2
Alarm 3
Alarm 4
Hourly Time Signal
Alarm 5
Mode indicator
Month-Date
Hour
Minutes
Seconds
1600/1827-3
Continuously scrolls
Text area
Last letter of text
Separator (inserted automatically)
MEETING<MEE
INPUTTING TEXT
The following describes how to input text in the Telememo Mode and Alarm Mode. It
also provides details of how text is produced in the text area of the display.
How to input characters
1. When the cursor is blinking in the text area,
use E and D to scroll through the available
letters, numbers and symbols, in the following
sequence.
· Holding down either button scrolls through at
high speed.
2. When the character you want at the cursor position is shown, press B to move the
cursor to the right.
3. Repeat steps 1 and 2 until your text is complete.
· The text area in the Telememo Mode can hold up to eight characters. When the
cursor is located at the eighth space of the text area in this mode, moving the
cursor to the right causes it to jump down to the first digit in the number area. When
the cursor is at the 12th digit of the number area, moving it to the right causes it to
jump back up to the first character of the text area.
· You can input only numbers and spaces in the number area. Each press of E or D
changes the input at the current cursor location in the following sequence:
· If you do not perform any button operation for about two or three minutes while the
cursor is on the display, the watch automatically returns to the normal data display
(the cursor disappears).
How the text display scrolls
The text area of the display can show only six characters at the time, so longer text
scrolls continuously from right to left.
Cursor
Text area
Number area
(space)
A to Z0 to 9
-
.
E
D
0 to
(space)
Press E
Press D
9
x
CHARACTER LIST
1
(space)
11
J
21
T
31
3
2
A
12
K
22
U
32
4
3
B
13
L
23
V
33
5
4
C
14
M
24
W
34
6
5
D
15
N
25
X
35
7
6
E
16
O
26
Y
36
8
7
F
17
P
27
Z
37
9
8
G
18
Q
28
0
38
-
9
H
19
R
29
1
39
.
10
I
20
S
30
2