(without price)
LABEL PRINTER
KL-8100(LX-254)
R
JAN. 1998
KL-8100
INDEX

CONTENTS
1. SPECIFICATIONS ........................................................................................................ 1
2. GENERAL GUIDE
2-1.
General ........................................................................................................................... 2
2-2.
Cleaning the printer head and roller ........................................................................... 3
3. RESET OPERATION .................................................................................................... 3
4. DATA COMMUNICATION
4-1.
General ........................................................................................................................... 4
4-2.
Data communication between PC and KL-8100 ......................................................... 4
4-3.
Data communication between a KL-8100 and another KL-8100 ............................... 6
5. ADJUSTMENT
5-1.
Setting the thermal head .............................................................................................. 8
5-2.
Adjustment for power supply voltage to LCD ............................................................ 8
5-3.
Adjustment for VP terminal voltage ............................................................................ 8
6. MEASUREMENT........................................................................................................10
7. OPERATION CHECK ................................................................................................. 11
8. MESSAGES ............................................................................................................... 13
9. LSI PIN FUNCTION ................................................................................................... 15
10. CIRCUIT EXPLANATION
10-1. Block diagram ............................................................................................................. 16
10-2. Power supply ...............................................................................................................17
11. SCHEMATIC DIAGRAMS
11-1. Main block .................................................................................................................... 19
11-2. Key block ..................................................................................................................... 20
11-3. Power block ................................................................................................................. 21
11-4. Sub block ..................................................................................................................... 22
12. DISASSEMBLY PROCEDURE ..................................................................................23
13. PARTS LIST
13-1. PCB ASSY and COMPONENTS .................................................................................. 24
13-2. CHASSIS ASSY ........................................................................................................... 27
14. EXPLODED VIEW
14-1. PCB ASSY and COMPONENTS .................................................................................. 26
14-2. CHASSIS ASSY ........................................................................................................... 28

-- 1 --
1. SPECIFICATIONS
s Model: KL-8100
Input
Keyboard layout:
Typewriter (QWERTY)
Character Types
Alpha (English and other languages):
52 (A~Z, a~z) 99 (Á, ß, Ç, Z etc.)
Numbers:
10
Symbols/Greek and Russian Characters: 306
Illustrations:
50
Display
Type:
Liquid crystal display
Columns:
12
Lines:
2
Printing
Type:
Thermal transfer
Speed:
Approximately 12 mm/second
Width:
4 mm (6 mm tape); 8 mm (9 mm tape); 10 mm (12 mm
tape); 16 mm (18/24 mm tape)
Character matrix:
48
× 48 dots
Character fonts:
New Sans-serif, New Sans-serif Italic, New Roman, New
Roman Italic, Courier, Logo Style, Rich Stroke, Stencil, Bold
Script, Black Letter
Character spacing:
NONE, NARROW, MEDIUM, WIDE
Tape length:
0.0 cm to 99.9 cm (FIX); longer lengths possible with
AUTO
Block length:
0.0 cm to 99.9 cm (FIX); longer lengths possible with
AUTO
Character effects:
Shading, underline, box
Character styles:
Normal, bold, outline, shadow, raised
Character sizes:
72 from 1
× 1 to 5 × 8 and 1 × 1S to 4 × 8S
Number of lines:
6 mm tape: 2 lines
9 mm tape: 4 lines
12 mm tape: 5 lines
18 mm or 24 mm tape: 8 lines
Frames:
55 types
Preset formats:
74 types
Preset phrases:
8 types
Memory
Text:
Up to 2,500 characters
General
Main power supply:
Specified for the AD-A12070 AC adapter or eight AA-
size alkaline batteries
Battery life :
Approximately 3 tape cartridge (continuous printing)
Memory back-up battery :
Built-in
Battery life:
Marked on the sticker on the back of the label printer.
Be sure to have the battery replaced by the date noted on
the sticker on the back of the label printer. Have the battery
replaced by the retailer where you purchased the label printer
or by an authorized CASIO service provider. Note that you
will be charged for battery replacement.
-- 2 --
Power consumption:
12 W
Auto power off:
Approximately six minutes after last key operation
Ambient temperature:
10
°C ~ 35 °C (50 °F ~ 95 °F)
Dimensions:
63.5 (H)
× 196 (W) × 195 (D) mm
(5/16" (H)
× 7 23/32" (W) × 1/16" (D))
Weight:
580 g (20.5 oz) (except main batteries)
Threshold of voltage detection
Low battery:
Vbat = 6.4 V
Forced power off:
Vbat = 5.5 V
Note:
Vbat = power source (Batteries or AC adapter)
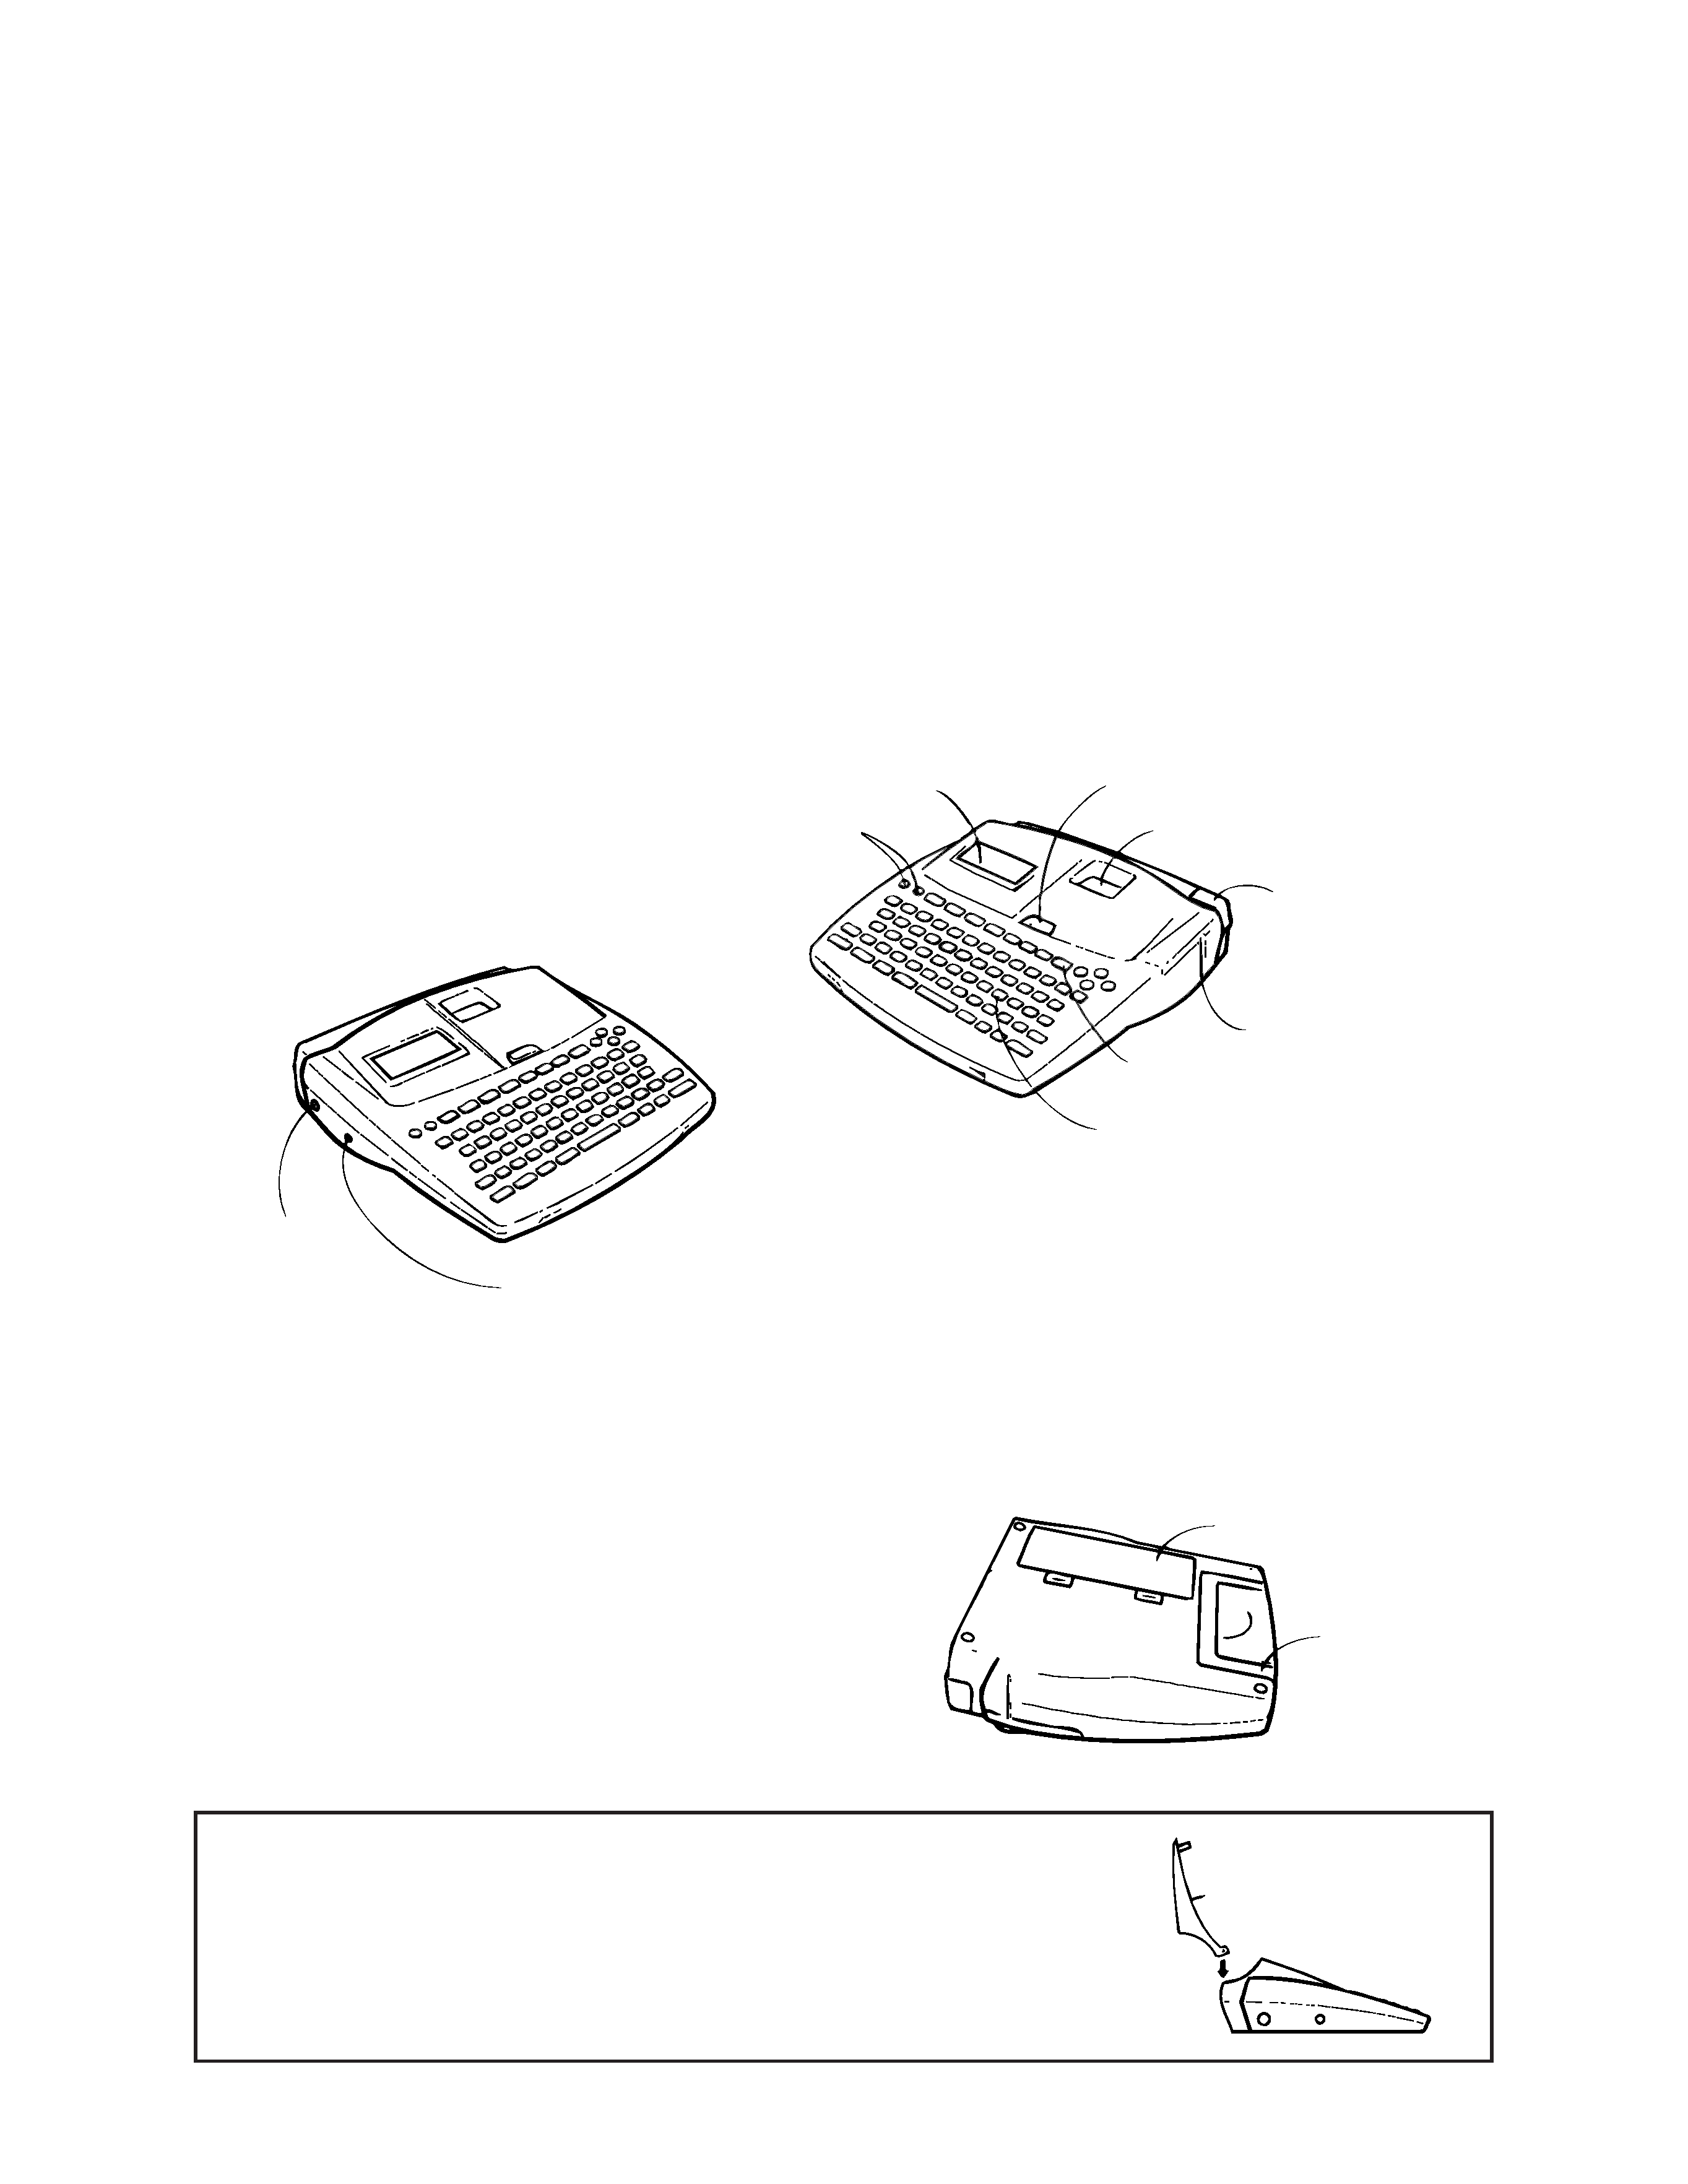
2. GENERAL GUIDE
2-1.
General
s Bottom
Letter keys
Print key
Tape outlet
Tape cutter button
Tape cartridge
compartment
Cover release
Liquid crystal display (LCD)
Power keys
Turn power on and off.
3-pin jack
AC adapter
connector
Main battery
compartment
Handle
Replacing the cover if it comes off
If the cover comes off, replace it as shown in the illustration nearby. Take
care to avoid damaging the tabs and hinges when installing the cover.
s Front
-- 3 --
2-2.
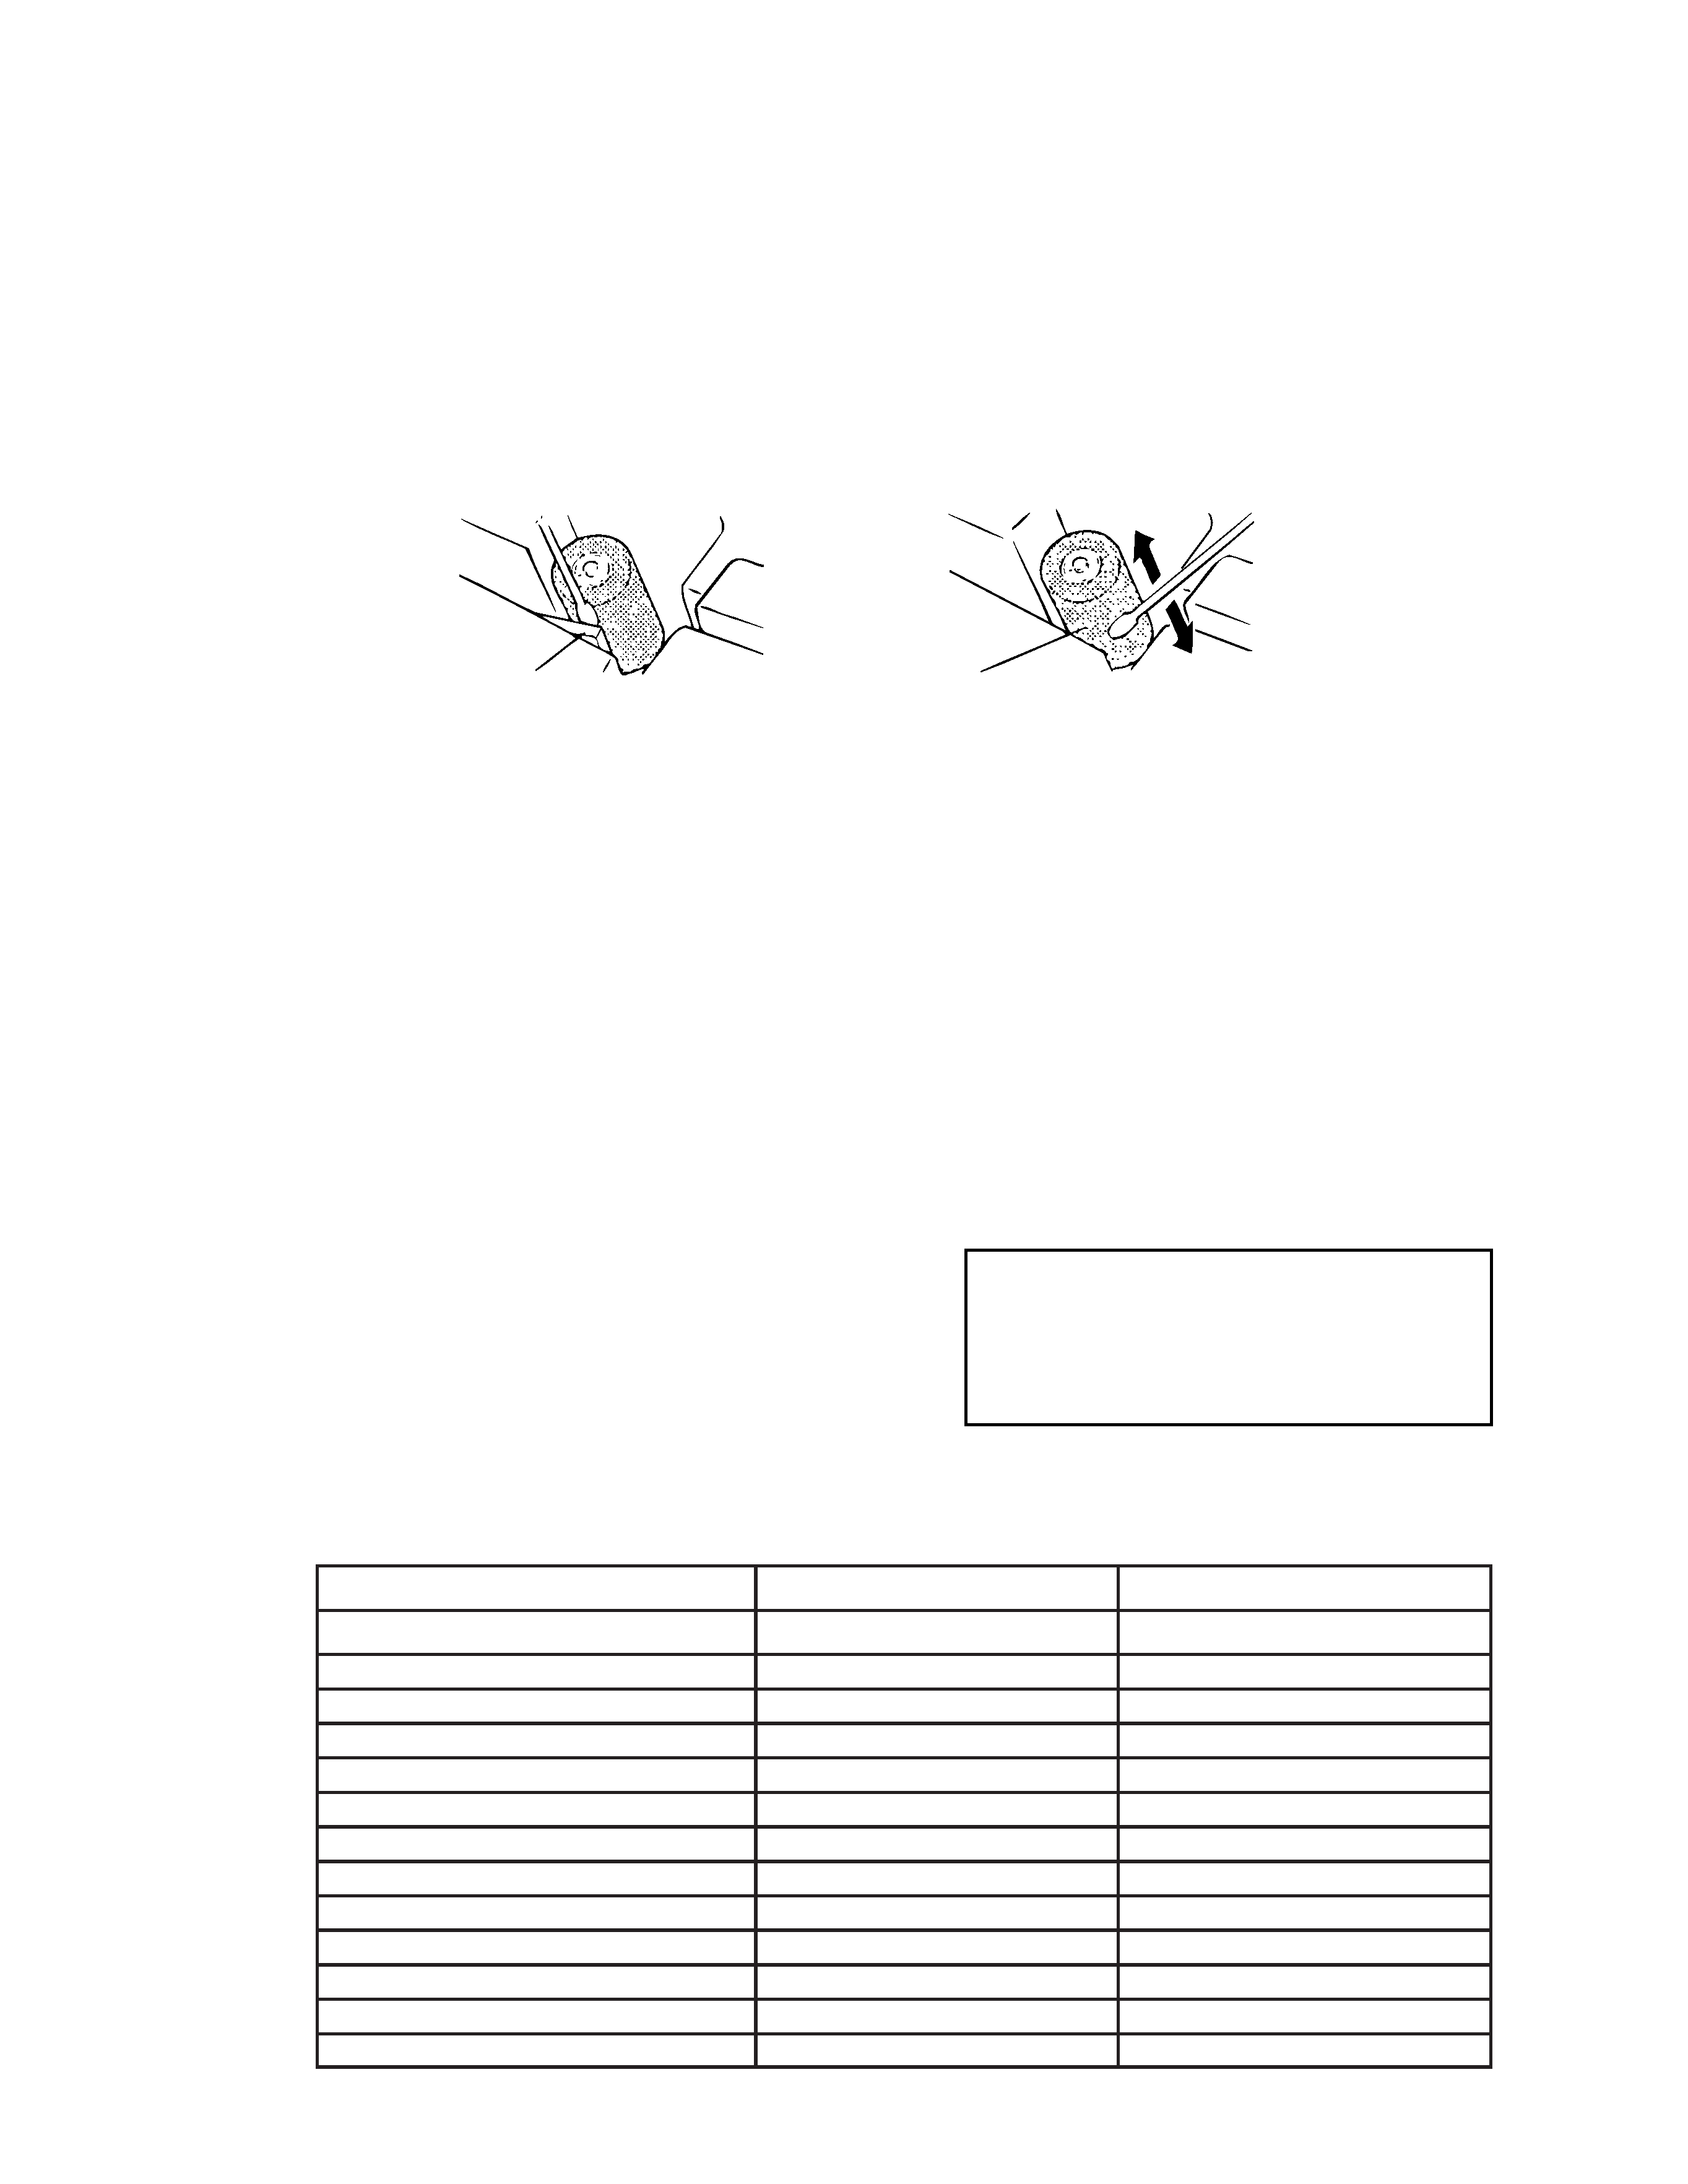
Cleaning the printer head and roller
A dirty printer head and roller can result in poor printing quality. If you have problems with print quality,
use the following procedure to clean the printer head and roller.
s To clean the printer head and roller
1. Make sure the label printer is turned off.
2. Press the tape cartridge compartment cover release and open the compartment cover.
3. Remove the tape cartridge.
4. Use a cotton swab dipped in alcohol to clean the printer head and roller as shown in the illustration.
Printer head
Roller
5. Replace the tape cartridge and close the compartment cover.
3. RESET OPERATION
You should reset the memory of the label printer before using it for the first time, after you have not
used it for a long time, or if nothing happens when you turn power on.
Important!
Resetting label printer memory clears its memory of all input data.
s To reset the memory
1. Make sure that label printer power is off.
2. While holding down the PRINT and ESC keys, press
ON to turn power on.
3. Press SET to initialize the label printer or ESC to
abort the reset operation without initializing any-
thing.
· See below for information on the initial default set-
tings of the label printer following the reset opera-
tion.
· You have to reset the Label Printer if you want to change the on-screen message language. Press
RESET and then perform the procedure perfomed under Message Language.
INITIAL?
SET/ESC
Item
Display
Memory
User characters
Horz/Vert
Text Alignment
Justification
Character spacing
Block length
Mirror printing
Proportional spacing
Smoothing
Block spacing
Auto feed
Reset
Cleared
Cleared
Cleared
Horizontal
Left
Justified
Narrow
Auto
Normal
On
On
Narrow
Long
Power on
Cleared
Retained
Retained
Horizontal
Left
Justified
Narrow
Auto
Normal
On
On
Narrow
Long