-- 9 --
2-2. QW-1699
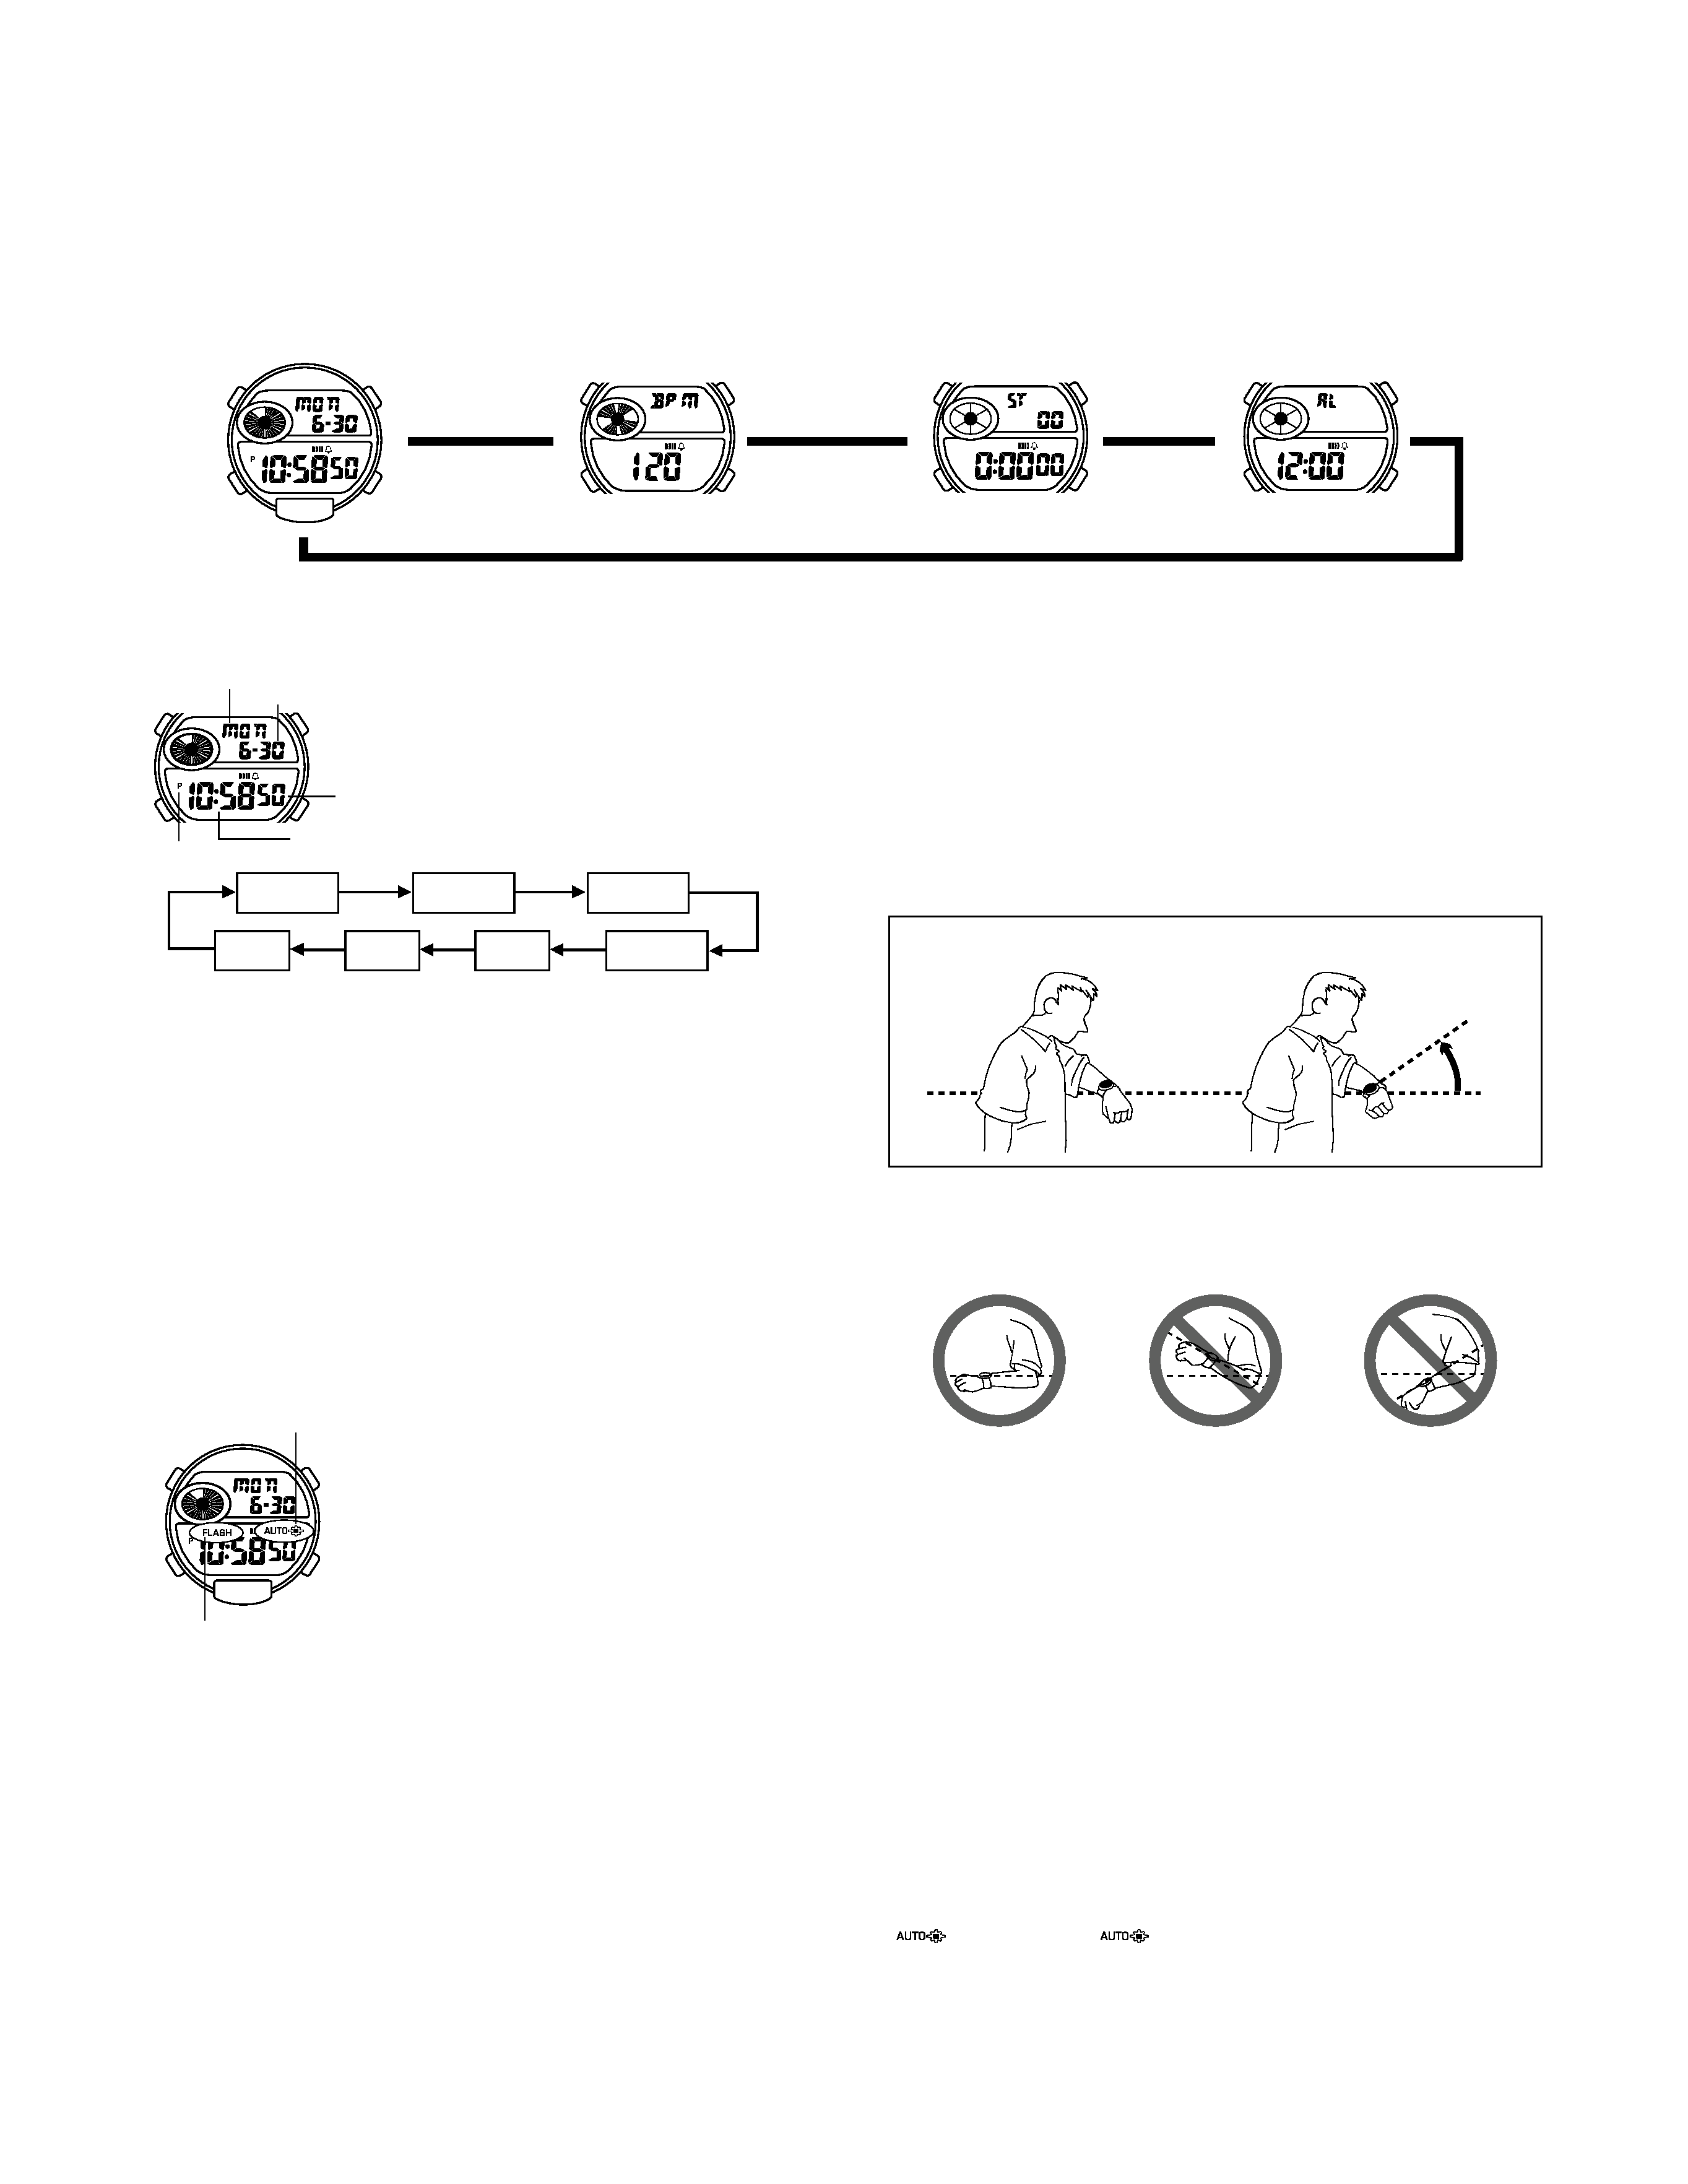
· Press M to change from mode to mode.
A
M
L
B
C
Timekeeping Mode
Beat Counter Mode
Stopwatch Mode
Alarm Mode
v
v
v
v
GENERAL GUIDE
TIMEKEEPING MODE
To set the time and date
1. Hold down A while in the Timekeeping Mode until the
seconds digits start to flash on the display. The seconds
flash because they are
selected.
2. Press M to change the selection in the following
sequence.
3. While the seconds digits are selected (flashing), press C to reset the seconds to 00.
· If you press C while the seconds count is in the range of 30 to 59, the seconds are
reset to 00 and 1 is added to the minutes. If the seconds count is in the range of 00 to
29, the minutes count is unchanged.
4. While any other digits (besides seconds) are selected (flashing), press C to increase
the number. While the 12/24-hour setting is selected, press C to switch between the
two formats.
· Holding down C changes the current selection at high speed.
· When the 12-hour format is selected, the12H indicator appears on the display. With
the 12-hour format, the P (PM) indicator appears on the display to indicate "p.m."
times. There is no indicator for "a.m." times.
· Selecting the 24-hour format causes the 24H and the 24 indicators to appear on the
display.
5. After you set the time and date, press A to return to the Timekeeping Mode.
· The day of the week is automatically set in accordance with the date.
· The date can be set within the range of January 1, 1995 to December 31, 2039.
· If you do not operate any button for a few minutes while a selection is flashing, the
flashing stops and the watch goes back to the Timekeeping Mode automatically.
A
MM
B
Day of week
Month Day
Seconds
PM indicator
Hour : Minutes
Seconds
Hour
Minutes
Day
Month
Year
12/24-Hour
Format
BACKLIGHT FUNCTION
A backlight that uses an EL (electro-lumunescent) panel
causes the entire display to glow for easy reading in the
dark. An auto light switch causes the EL backlight to turn on
when the watch is angled toward your face for reading. An
EL alarm feature can be turned on so the backlight flashes
whenever an alarm or hourly time signal sounds.
· The auto light switch on indicator is shown on the display
in all modes while the auto light switch is on.
· The FLASH indicator is shown on the display in all modes
while the EL alarm is on.
Note
· The backlight of the watch employs an electro-luminescent
(EL) light, which loses illuminating power after very long
use.
· The illumination provided by the backlight may be hard to see when viewed under
direct sunlight.
· The watch will emit an audible sound whenever the display is illuminated. This is caused
by a transistor that vibrates when the EL panel lights up. It does not indicate malfunction
of the watch.
· The backlight automatically turns off whenever an alarm sounds.
To manually turn on the backlight
Pressing L in the Timekeeping, Stopwatch or Alarm Mode causes the backlight to turn
on for about two seconds. Pressing C in the Beat Counter Mode also causes the backlight
to turn on for a fixed amount of time.
· The backlight normally stays on for about two seconds and then turns off automatically.
When the EL alarm is turned on, however, the backlight stays on for about five seconds
instead of two seconds.
· The above operations turn on the backlight, regardless of the current auto light switch
and EL alarm settings.
A
MC
L
B
Auto light switch on indicator
FLASH indicator
To turn the EL alarm on and off
In the Timekeeping Mode, hold down B for about two seconds to toggle the EL alarm
on (FLASH indicator displayed) and off (FLASH indicator not displayed).
· When the EL alarm is on, the backlight flashes while the daily alarm and hourly time
signal tones are sounding. Also, the backlight stays on for about five seconds instead
of the normal two seconds.
· When an auto light switch operation causes the backlight to turn on while the EL alarm
is turned on, the backlight stays lit for about two seconds, and then flashes for two
seconds.
About the Auto Light Switch
While the auto light switch is turned on, the backlight automatically lights for about two
seconds whenever you position your wrist as described below. Avoid wearing the watch
on the inside of your wrist. Doing so causes the auto light switch to operate when it is not
needed, which shortens battery life.
Moving the watch to a position that is parallel to the ground and then tilting it towards
you more than 40 degrees causes the backlight to illuminate.
· The backlight may not illuminate if the face of the watch is more than 15 degrees off
the parallel as shown below. Make sure that the back of your hand is parallel to the
ground.
Parallel to
ground
More than
40
°
· Static electricity or magnetic force can interfere with proper operation of the auto light
switch. If the auto light switch does not illuminate, try moving the watch back to the
starting position (parallel with the ground) and then tilt it back toward you again. If this
does not work, drop your arm all the way down so it hangs at your side, and then bring
it back up again.
· Under certain conditions the backlight may not light until about one second or less
after turn the face of the watch towards you. This does not necessarily indicate
malfunction of the backlight.
Warning!
· Never try to read your watch when mountain climbing or hiking in areas that are
dark or in areas with poor footing. Doing so is dangerous and can result in
serious personal injury.
· Never try to read your watch when running where there is danger of accidents,
especially in locations where there might be vehicular or pedestrian traffic. Doing
so is dangerous and can result in serious personal injury.
· Never try to read your watch when riding on a bicycle or when operating a
motorcycle or any other motor cycle. Doing so is dangerous and can result in a
traffic accident and serious personal injury.
· When you are wearing the watch, make sure that its auto light switch is turned
off before riding on a bicycle or operating a motorcycle or any other motor vehicle.
Sudden and unintended operation of the auto light switch can create a distraction,
which can result in a traffic accident and serious personal injury.
Parallel to ground
More than 15 degrees
too high
More than 15 degrees
too low
To turn the auto light switch on and off
In the Timekeeping Mode, hold down C for one second to turn the auto light switch on
(
displayed) and off (
not displayed).
· In order to protect against running down the battery, the auto light switch is automatically
turned off approximately three hours after you turn it on. Repeat the above procedure
to turn the auto light switch back on if you want.

-- 10 --
BEAT COUNTER MODE
The Beat Counter Mode can be used to produce an audible
signal in accordance with BPM (beats per minute) value,
which is like a digital metronome that can be used for a
variety of different musical applications.
· The letters "BPM" stand for "beats per minute" in this
manual.
· Any time you enter the Beat Counter Mode, the last BPM
value you set appears on the display.
· If you do not operate any button for one hour while in the
Beat Counter Mode, the watch automatically goes back
to the Timekeeping Mode.
To play the beat signal
In the Beat Counter Mode, press B to start a digital beat signal that sounds at the
speed indicated by the BPM value. The higher the BPM value, the faster the beat.
· The digital beat signal sounds for one minute or until you press any button to stop it.
A
MC
L
B
Mode indicator
BPM value
Setting the BPM value
There are two ways you can set the BPM value: by counting beats of some music or
rhythm, or by manually inputting a value.
To count beats
1. In the Beat Counter Mode, press L six times in
accordance with the beat of the music or rhythm.
· Each time you press L , the number on the display
changes in the following sequence:
1 2 3 4 0
2. After you press L the sixth time, the watch calculates an
average number of beats per minute and sets the
applicable BPM value.
· Note that you must press L all six times for this procedure to work correctly.
· If you do not press L within about three seconds after you last pressed it, the watch
automatically cancels the beat count procedure.
· The above procedure sets a value in the range of 60 to 200 beats, in 5-beat steps.
To manually input a value
1. In the Beat Counter Mode, hold down A until the BPM values starts to flash.
2. Press C to increase the BPM value in units of 5 or B to decrease it. Holding down
either button changes the setting at high speed.
· You can set the BPM value within a range of 60 to 200.
· Pressing B and C at the same time changes the BPM value to its standard setting of
120.
3. After you input the BPM value, press A to return to the normal Beat Counter Mode
screen.
A
MC
L
B
STOPWATCH MODE
The Stopwatch Mode lets you measure elapsed time, split
times, and two finishes. The range of the stopwatch is 23
hours, 59 minutes, 59.99 seconds.
First runner
finishes.
Second runner
finishes. Record
time of first runner.
Record time of
second runner.
(a) Elapsed time measurement
CC
C
C
B
C
C
BB
C
B
BC
B
B
Start
Stop
Re-start
Stop
Clear
(b) Split time measurement
Start
Split
Split release
Stop
Clear
(c) Split time and 1st-2nd place times
Start
Split
Stop
Split release Clear
A
M
B
C
Mode indicator
1/100 second
Minutes
Hours
Seconds
ALARM MODE
When the Daily Alarm is turned on, the alarm sounds for 20
seconds at the preset time each day. Press any button to
stop the alarm after it starts to sound.
When the Hourly Time Signal is turned on, the watch beeps
every hour on the hour.
To set the alarm time
1. Hold down A while in the Alarm Mode until the hour digits
start to flash on the display. The hour digits flash because
they are
selected.
· This operation automatically turns on the Daily Alarm.
2. Press M to change the selection in the following
sequence.
A
MC
L
B
Hourly time signal
on indicator
Mode indicator
Alarm on indicator
Hour : Minutes
Hour
Minutes
3. Press C to increase the selected digits. Holding down C increases the selection at
high speed.
· The format (12-hour and 24-hour) of the alarm time matches the format you select for
normal timekeeping.
· When setting the alarm time using the 12-hour format, take care to set the time correctly
as a.m. (no indicator) or p.m. (P indicator).
4. After you set the alarm time, press A to return to the Alarm Mode.
To turn the Daily Alarm and Hourly Time Signal on and off
Press B while in the Alarm Mode to change the status of the Daily Alarm and Hourly
Time Signal in the following sequence.
[Alarm On Indicator/Hourly Time Signal On Indicator]
To test the alarm
Hold down C while in the Alarm Mode to sound the alarm.
Both ON
Both OFF
Daily Alarm
Only
Hourly Time
Signal Only