User's Guide
EA-200
http://world.casio.com/edu_e/
E
In no event shall CASIO Computer Co., Ltd. be liable to anyone for special, collateral,
incidental, or consequential damages in connection with or arising out of the purchase or
use of these materials. Moreover, CASIO Computer Co., Ltd. shall not be liable for any claim
of any kind whatsoever against the use of these materials by any other party.
· The contents of this manual are subject to change without notice.
· No part of this manual may be reproduced in any form without the express written
consent of the manufacturer.
Important!
Please keep your manual and all information handy for future reference.
CASIO ELECTRONICS CO., LTD.
Unit 6, 1000 North Circular Road,
London NW2 7JD, U.K.
Declaration of Conformity
Model Number:
EA-200
Trade Name:
CASIO COMPUTER CO., LTD.
Responsible party: CASIO, INC.
Address:
570 MT. PLEASANT AVENUE, DOVER, NEW JERSEY 07801
Telephone number: 973-361-5400
This device complies with Part 15 of the FCC Rules. Operation is subject to the
following two conditions: (1) This device may not cause harmful interference, and
(2) this device must accept any interference received, including interference that may
cause undesired operation.
GUIDELINES LAID DOWN BY FCC RULES FOR USE OF THE UNIT IN THE U.S.A.
(not applicable to other areas).
NOTICE
This equipment has been tested and found to comply with the limits for a Class B
digital device, pursuant to Part 15 of the FCC Rules. These limits are designed to
provide reasonable protection against harmful interference in a residential
installation. This equipment generates, uses and can radiate radio frequency energy
and, if not installed and used in accordance with the instructions, may cause harmful
interference to radio communications. However, there is no guarantee that
interference will not occur in a particular installation. If this equipment does cause
harmful interference to radio or television reception, which can be determined by
turning the equipment off and on, the user is encouraged to try to correct the
interference by one or more of the following measures:
· Reorient or relocate the receiving antenna.
·Increase the separation between the equipment and receiver.
· Connect the equipment into an outlet on a circuit different from that to which the
receiver is connected.
· Consult the dealer or an experienced radio/TV technician for help.
FCC WARNING
Changes or modifications not expressly approved by the party responsible for
compliance could void the user's authority to operate the equipment.
Proper connectors must be used for connection to host computer and/or peripherals
in order to meet FCC emission limits.
Connector SB-62
EA-200 to Power Graphic Unit

20020601
English
0-1
Contents
English
Handling Precautions ............................................................................ 0-2
Unpacking ............................................................................................. 0-3
About the EA-200 ................................................................................. 0-3
Before Using the EA-200 for the First Time .......................................... 0-3
Chapter 1
General Guide ...................................................................................... 1-1
Supported Calculator Models ...............................................................1-2
Supported Probes ................................................................................. 1-2
Using Commands ................................................................................. 1-3
Using the Voltage Probe, Temperature Probe, Optical Probe,
and Motion Sensor (EA-2) .................................................................... 1-3
Using the Built-in Microphone ...............................................................1-4
Using the Built-in Speaker .................................................................... 1-5
Status Request ..................................................................................... 1-5
Auto Setup ............................................................................................ 1-5
Group Link Function ............................................................................. 1-6
Chapter 2
Examples
Uniformly Accelerated Motion ........................................................... 2-1-1
Period of Pendular Movement ........................................................... 2-2-1
Conservation of Momentum .............................................................. 2-3-1
Charles' Law ..................................................................................... 2-4-1
Polarization of Light .......................................................................... 2-5-1
Natural Frequency and Sound .......................................................... 2-6-1
Column of Air Resonance and the Velocity of Sound ....................... 2-7-1
Construction of the Musical Scale .................................................... 2-8-1
Direct Current and Transient Phenomena ......................................... 2-9-1
AC Circuit ........................................................................................ 2-10-1
Dilute Solution Properties ............................................................... 2-11-1
Exothermic Reaction ....................................................................... 2-12-1
Electromotive Force of a Battery ..................................................... 2-13-1
Sunlight and Solar Cells ................................................................. 2-14-1
Topographic Conditions and Climate .............................................. 2-15-1
Program Library .................................................................. 2-16-1
Appendix A Command Tables
Command 1 Channel Setup ..........................................................
-1-1
Command 3 Sample and Trigger Setup .........................................
-1-2
Command 4 Conversion Equation Setup .......................................
-1-3
Command 5 Data Range Setup .....................................................
-1-3
Command 6 System Setup ............................................................
-1-4
Command 8 Sampling Start ..........................................................
-1-4
Command 10 Sensor Warmup ......................................................
-1-4
Command 11 Buzzer and LED Operation Commands ..................
-1-4
Command 12 Data Send Sequence ..............................................
-1-4
Appendix B Specifications ...............................................
-2-1

20020601
English
· The EA-200 is made up of precision components. Never try to take it apart.
·Avoid dropping the EA-200 and subjecting it to strong impact.
· Do not store the EA-200 or leave it in areas exposed to high temperatures, humidity, low
temperatures, or large amounts of dust. Low temperatures can shorten battery life.
· Replace the main batteries once every two years regardless of how much the EA-200 is
used during that period. Never leave dead batteries in the battery compartment. They
can leak and damage the unit.
· Keep batteries out of the reach of small children. If swallowed, consult with a physician
immediately.
·Avoid using volatile liquids such as thinner or benzine to clean the unit. Wipe it with a
soft, dry cloth, or with a cloth that has been dipped in a solution of water and a neutral
detergent, and wrung out.
·In no event will the manufacturer and its suppliers be liable to you or any other person
for any damages, expenses, lost profits, lost savings or any other damages arising out of
loss of data and/or formulas arising out of malfunction, repairs, or battery replacement.
The user should prepare physical records of data to protect against such data loss.
· Never dispose of batteries, or other components by burning them.
· Replace batteries as soon as possible after the low battery indicator lamp (Batt) lights.
· Be sure that the power switch is set to OFF when replacing batteries.
· If the EA-200 is exposed to a strong electrostatic charge, its memory contents may be
corrupted or the keys may stop working. In such a case, perform the Reset operation to
clear memory contents and restore normal key operation.
· If you start to experience serious operational problems with the EA-200, use a thin,
pointed object to carefully press the P button on the back of the EA-200. Note, however,
that pressing the P button deletes all data currently in EA-200 memory. Proper operation
does not resume after you press the P button, remove its batteries, and then replace
them correctly in accordance with the instructions on page 0-3 of the User's Guide.
· Note that strong vibration or impact during program execution can cause execution to
stop or can corrupt EA-200 memory contents.
· Using the EA-200 near a television or radio can cause interference with TV or radio
reception.
· Before assuming malfunction of the EA-200, be sure to carefully reread this User's
Guide and ensure that the problem is not due to insufficient battery power, programming
or operational errors.
Handling Precautions
· Never allow foreign objects to get into connector holes. Doing so can result in
malfunction.
·Always make sure to connect probes only to their correct terminals. Never force the plug
of a probe into a wrong terminal connector.
· Be sure to turn the EA-200 off before connecting or disconnecting probes.
· Make sure that probes are connected securely before using them to take samples.
· Never insert a probe into an electric outlet. Never attempt to measure high voltages or
household AC. Doing so creates the danger of electric shock.
· Never apply more than 15V to analog channels CH1 or CH2, more than 5V to analog
channel CH3, or more than 5.5V to the SONIC, DIG IN, or DIG OUT channels. Doing so
can damage the EA-200.
· The EA-200 is to be used for educational purpose only. It is not appropriate for
industrial, research, medical, or commercial applications.
0-2
20020701
20020601
English
User's Guide
EA-200
http://world.casio.com/edu_e/
E
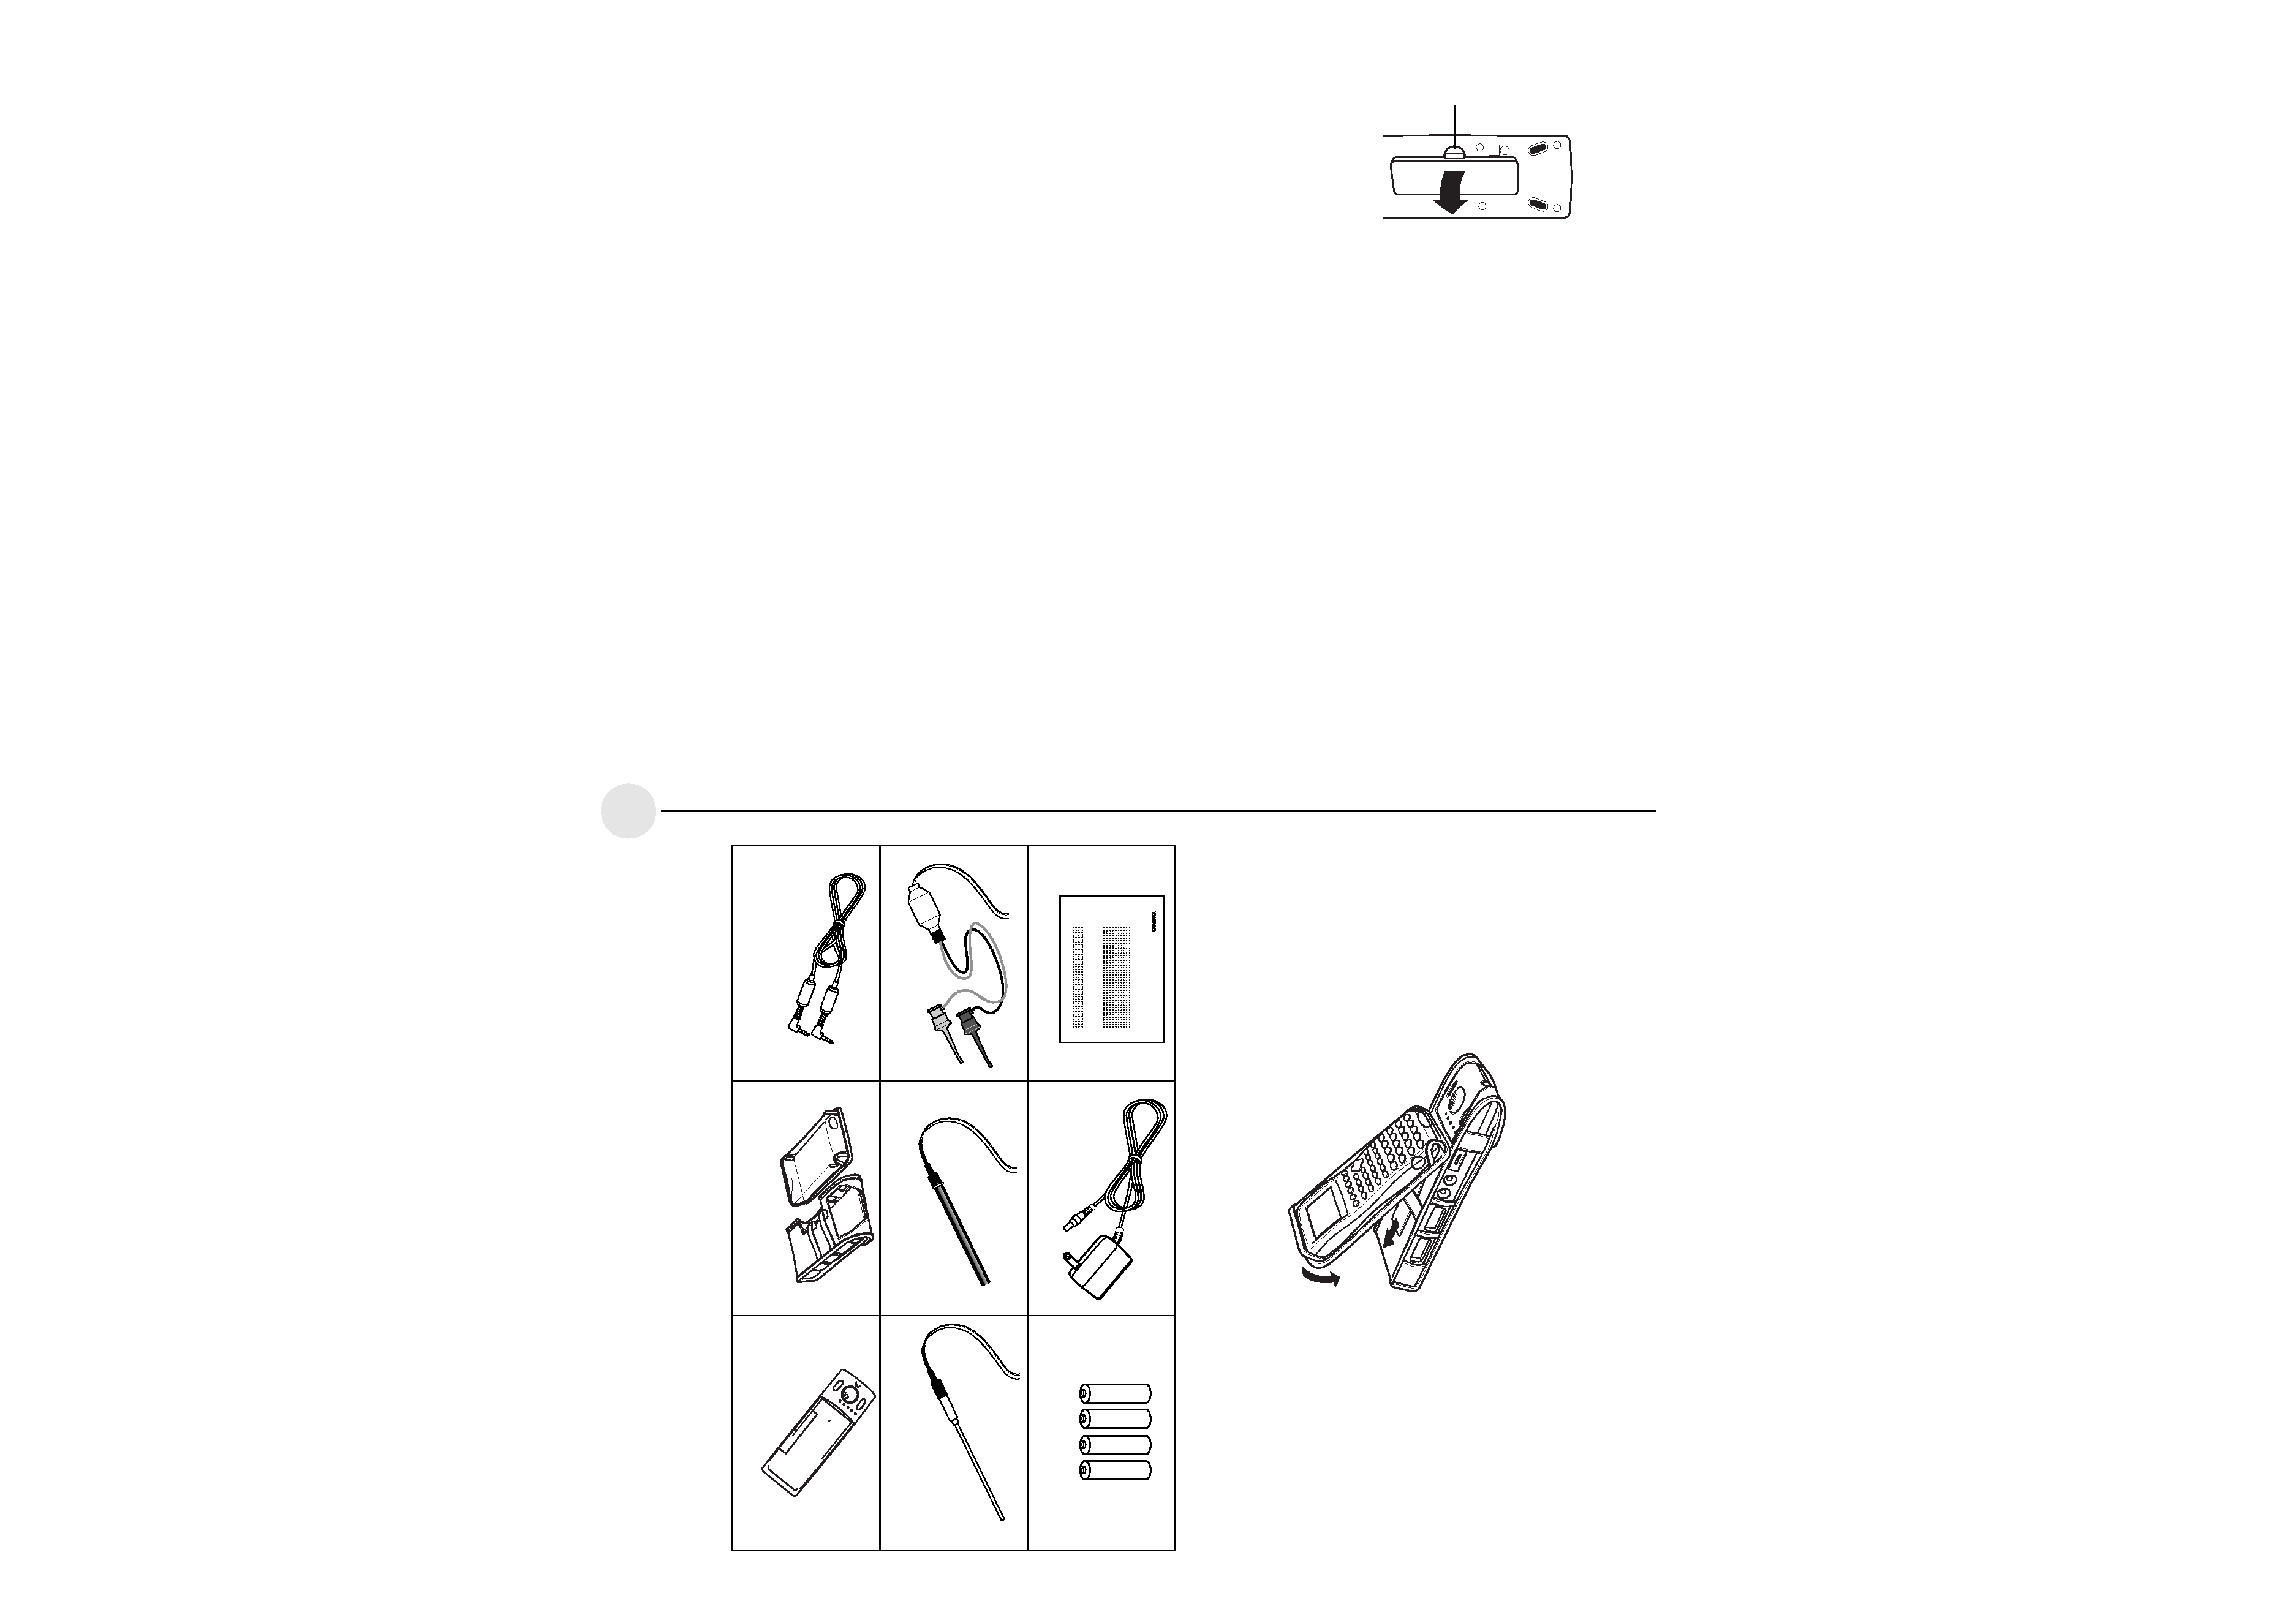
Unpacking
EA-200
Soft case
Data communication cable
(SB-62)
Temperature probe
Optical probe
Voltage probe
Four AA-size alkaline batteries
AC adaptor
User's Guide (this manual)
About the EA-200
The EA-200 is a digital device that makes it possible for you to sample data connected with
everyday natural phenomena.
Data You Can Sample with the EA-200
Various different sensors can be used with the EA-200 to sample temperatures, light,
voltage, distance, and other data. The EA-200 supports sampling of up to 120,000 points,
and simultaneous sampling over five channels. Sampled data can be sent to a compatible
Graphic Scientific Calculator, where it can be viewed and graphed.
Before Using the EA-200 for the First
Time
Power Requirements
Your EA-200 requires four AA-size alkaline batteries for power. Battery life depends on the
amount of time the EA-200 is left on, and the amount of current used by the connected
probe(s). A low battery indicator lamp (Batt) lights to let you know when it is time to replace
batteries. To extend battery life, it is a good idea to use the AC adaptor for power whenever
sampling indoors.
When using the EA-200 in combination with the optional "Motion Sensor (EA-2)", be sure to
power the EA-200 using its bundled AC adaptor (AD-A60024).
Though the EA-200 can normally operate on battery power, separate AC adaptor power is
required while the optional "Motion Sensor (EA-2)" is being used.
Batteries are not loaded in the EA-200 when it is shipped from the factory. Because of this,
use the following procedure to load batteries into the EA-200 before using it for the first time.
To load batteries
1. Remove the battery cover by pulling with your finger at the
point marked 1. If there are batteries in the battery
compartment, remove all four of them.
2. Load four new AA-size batteries. Make sure that the plus and
minus ends of the batteries are facing in the directions shown
by the markings inside the battery case. Replace the battery
cover.
3. Slide the [ON/OFF] switch to turn on the EA-200. To turn off,
slide the [ON/OFF] switch again.
0-3
1
2
Using the Soft Case
1