
EN
FR
ES
ES
IT
SE
R
KCA-420i
Printed in Korea (Y)
68-00493Z61-A
· OWNER'S MANUAL
Please read before using this equipment.
· MODE D'EMPLOI
Veuillez lire avant d'utiliser cet appareil.
· MANUAL DE OPERACIÓN
Léalo antes de utilizar este equipo.
INTERFACE ADAPTER FOR iPodTM
(RCS PONTOISE B 338 101 280)
JEIL Moon Hwa Co.
18-6, 3Ga, Pil-dong, Jung-gu, Seoul, Korea
ALPINE ELECTRONICS MARKETING, INC.
1-1-8 Nishi Gotanda,
Shinagawa-ku,
Tokyo 141-0031, Japan
Phone 03-5496-8231
ALPINE ELECTRONICS OF AMERICA, INC.
19145 Gramercy Place, Torrance,
California 90501, U.S.A.
Phone 1-800-ALPINE-1 (1-800-257-4631)
ALPINE ELECTRONICS OF CANADA, INC.
7300 Warden Ave., Suite 203, Markham,
Ontario L3R 9Z6, Canada
Phone 1-800-ALPINE-1 (1-800-257-4631)
ALPINE ELECTRONICS OF AUSTRALIA PTY. LTD.
6-8 Fiveways Boulevarde Keysborough,
Victoria 3173, Australia
Phone 03-9769-0000
ALPINE ELECTRONICS GmbH
Frankfurter Ring 117,
80807 München, Germany
Phone 089-32 42 640
ALPINE ELECTRONICS OF U.K. LTD.
Alpine House
Fletchamstead Highway, Coventry CV4 9TW,
U.K.
Phone 0870-33 33 763
ALPINE ELECTRONICS FRANCE S.A.R.L.
(RCS PONTOISE B 338 101 280)
98, Rue de la Belle Etoile, Z.I. Paris Nord Il,
B.P. 50016, 95945 Roissy Charles de Gaulle
Cedex, France
Phone 01-48638989
ALPINE ITALIA S.p.A.
Viale C. Colombo 8, 20090 Trezzano
Sul Naviglio (MI), Italy
Phone 02-484781
ALPINE ELECTRONICS DE ESPAÑA, S.A.
Portal de Gamarra 36, Pabellón, 32
01013 Vitoria (Alava)-APDO 133, Spain
Phone 945-283588

1-EN
ENGLISH
Contents
Operating Instructions
WARNING
WARNING .................................................. 2
CAUTION ................................................... 2
PRECAUTIONS ......................................... 3
Installation
Velcro fastener Mounting .................................. 3
Screw-down Mounting ...................................... 3
Connections
1) Connect the iPodTM to the Ai-NET compatible
Head Unit ..................................................... 4
2) Connect the iPodTM to the Ai-NET compatible
Head Unit and CD Changer ......................... 4
3) Connect the iPodTM to the Ai-NET compatible
Audio Visual Head Unit and
Audio Processor ............................................ 5
Operation
Turning Power On and Off ............................... 6
Recalling the iPodTM mode ............................... 6
Adjusting Volume ............................................. 6
Listen to iPodTM Songs ..................................... 7
Searching for a desired Song ............................ 7
Searching by Playlist ..................................... 7
Searching by artist name ............................... 8
Searching by album name ............................. 9
Searching by song name .............................. 10
Quick Search ................................................... 10
Random Play Shuffle (M.I.X.) ....................... 11
Repeat Play ..................................................... 11
Displaying the Text ......................................... 12
Information
In Case of Difficulty ....................................... 13
About the adapter-compatible iPodTM ............ 13
Specifications .................................................. 13
LIMITED WARRANTY

2-EN
WARNING
WARNING
This symbol means important instructions.
Failure to heed them can result in serious
injury or death.
DO NOT DISASSEMBLE OR ALTER.
Doing so may result in an accident, fire or electric shock.
KEEP SMALL OBJECTS SUCH AS BATTERIES OUT OF THE
REACH OF CHILDREN.
Swallowing them may result in serious injury. If swallowed,
consult a physician immediately.
USE ONLY IN CARS WITH A 12 VOLT NEGATIVE GROUND.
(Check with your dealer if you are not sure.) Failure to do so may
result in fire, etc.
BEFORE WIRING, DISCONNECT THE CABLE FROM THE
NEGATIVE BATTERY TERMINAL.
Failure to do so may result in electric shock or injury due to
electrical shorts.
DO NOT SPLICE INTO ELECTRICAL CABLES.
Never cut away cable insulation to supply power to other
equipment. Doing so will exceed the current carrying capacity of
the wire and result in fire or electric shock.
DO NOT DAMAGE PIPE OR WIRING WHEN DRILLING HOLES.
When drilling holes in the chassis for installation, take
precautions so as not to contact, damage or obstruct pipes, fuel
lines, tanks or electrical wiring. Failure to take such precautions
may result in fire.
DO NOT USE BOLTS OR NUTS IN THE BRAKE OR
STEERING SYSTEMS TO MAKE GROUND CONNECTIONS.
Bolts or nuts used for the brake or steering systems (or any other
safety-related system), or tanks should NEVER be used for
installations or ground connections. Using such parts could
disable control of the vehicle and cause fire etc.
DO NOT ALLOW CABLES TO BECOME ENTANGLED IN
SURROUNDING OBJECTS.
Arrange wiring and cables in compliance with the manual to
prevent obstructions when driving. Cables or wiring that obstruct
or hang up on places such as the steering wheel, shift lever, brake
pedals, etc. can be extremely hazardous.
USE THIS PRODUCT FOR MOBILE 12V APPLICATIONS.
Use for other than its designed application may result in fire,
electric shock or other injury.
MAKE THE CORRECT CONNECTIONS.
Failure to make the proper connections may result in fire or
product damage.
CAUTION
This symbol means important instructions.
Failure to heed them can result in injury or
material property damage.
USE SPECIFIED ACCESSORY PARTS AND INSTALL THEM
SECURELY.
Be sure to use only the specified accessory parts. Use of other
than designated parts may damage this unit internally or may not
securely install the unit in place. This may cause parts to become
loose resulting in hazards or product failure.
DO NOT INSTALL IN LOCATIONS WITH HIGH MOISTURE
OR DUST.
Avoid installing the unit in locations with high incidence of
moisture or dust. Moisture or dust that penetrates into this unit
may result in product failure.
HAVE THE WIRING AND INSTALLATION DONE BY
EXPERTS.
The wiring and installation of this unit requires special technical
skill and experience. To ensure safety, always contact the dealer
where you purchased this product to have the work done.
ARRANGE THE WIRING SO IT IS NOT CRIMPED OR
PINCHED BY A SHARP METAL EDGE.
Route the cables and wiring away from moving parts (like the
seat rails) or sharp or pointed edges. This will prevent crimping
and damage to the wiring. If wiring passes through a hole in
metal, use a rubber grommet to prevent the wire's insulation from
being cut by the metal edge of the hole.
Operating Instructions
3-EN
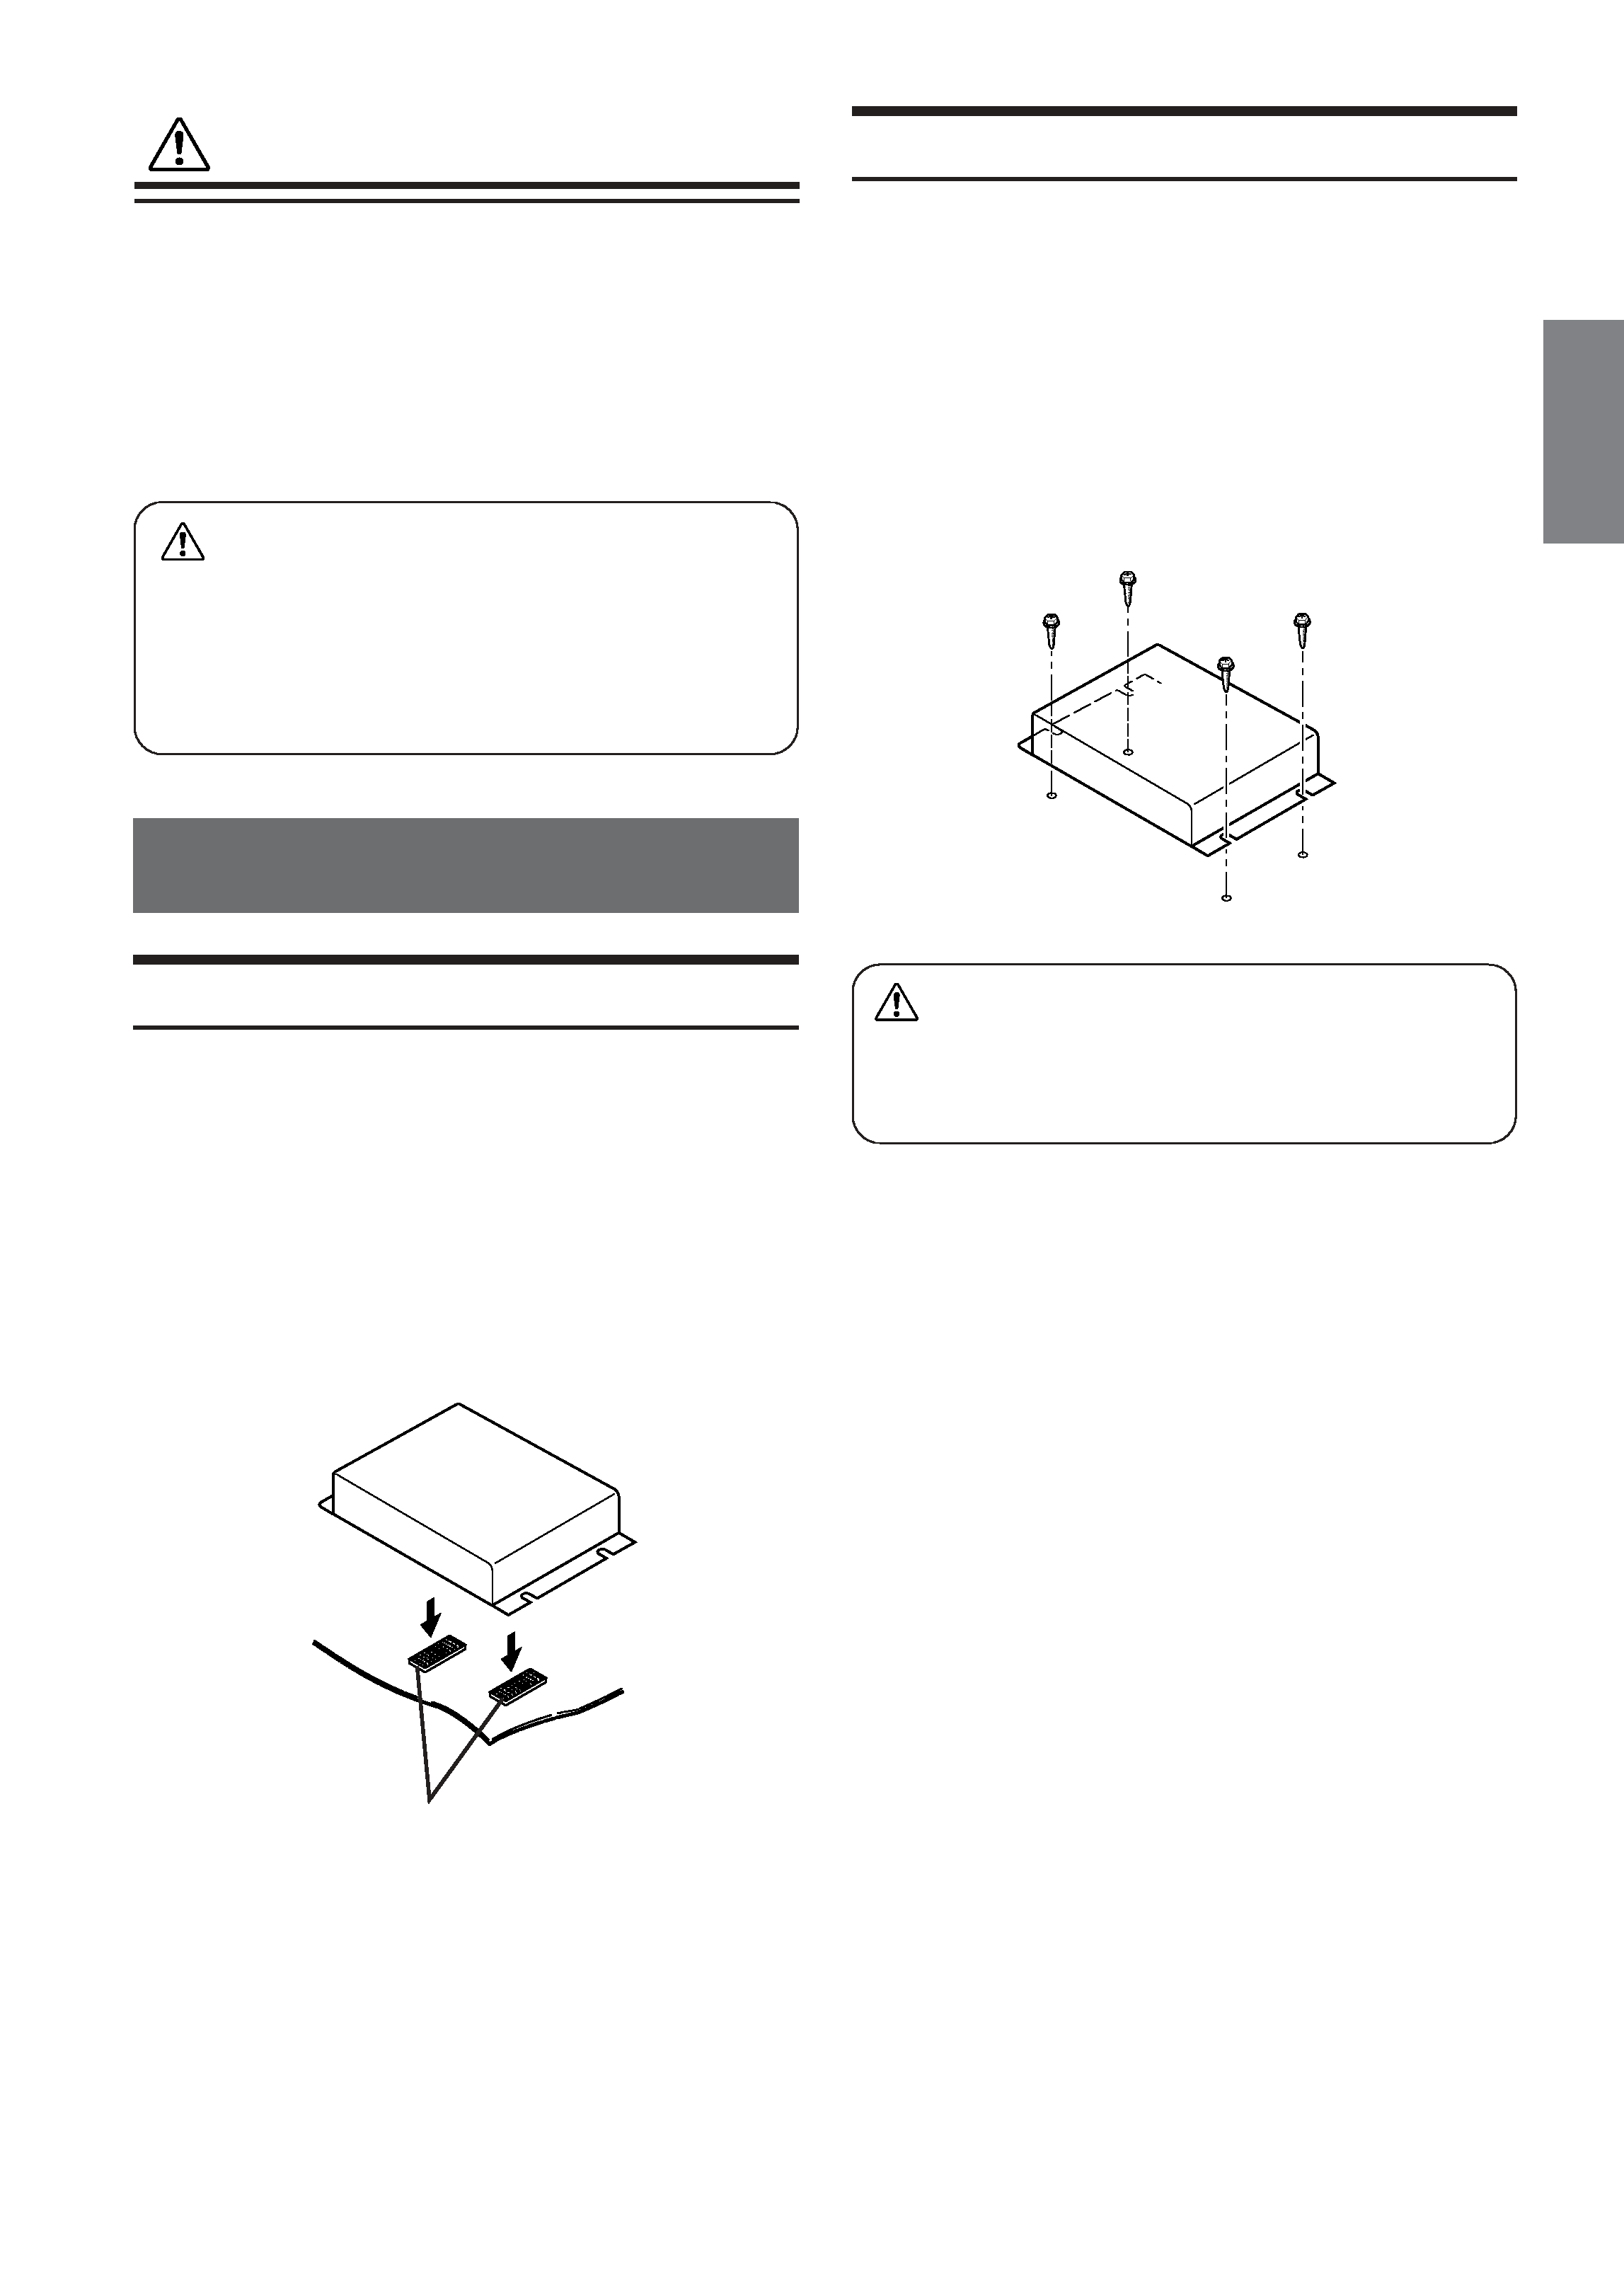
Installation
Velcro fastener Mounting
1 Attach the Velcro fasteners.
Attach two Velcro fasteners to the mounting
surface. The rough side should be facing the
adapter.
2 Press the adapter onto the Velcro fastener in
the mounting position.
Remove the backing to the adhesive on the Velcro
strips. Press the adapter on the mounting location.
Screw-down Mounting
1 Using the adapter as a template, hold it in the
mounting location and mark the holes to be
drilled. Before drilling, make sure that there
are no objects that could be damaged behind
the mounting surface.
2 Drill holes and secure the adapter with the
self-tapping screws (M4 x 14) supplied.
Floor
Velcro fasteners
If the iPod connection cable is damaged due to
improperly connecting the iPod, it may result in
iPod failure.
CAUTION
PRECAUTIONS
On handling the iPodTM
The iPod has not been designed to withstand automotive
temperature extremes. Therefore, you should not leave the
iPod in a vehicle for extended periods. Leaving the iPod
inside a vehicle on a moderately hot or very cold day may
damage the iPod. For further details on the iPod's non-
operating storage temperature, please consult your iPod's
documentation.
CAUTION
· Alpine accepts no responsibility for lost data, etc.,
even if data, etc., is lost while using this product.
· Do not leave the iPod in a vehicle for a long time.
Heat and humidity may damage the iPod and you
may not be able to play it again.
4-EN
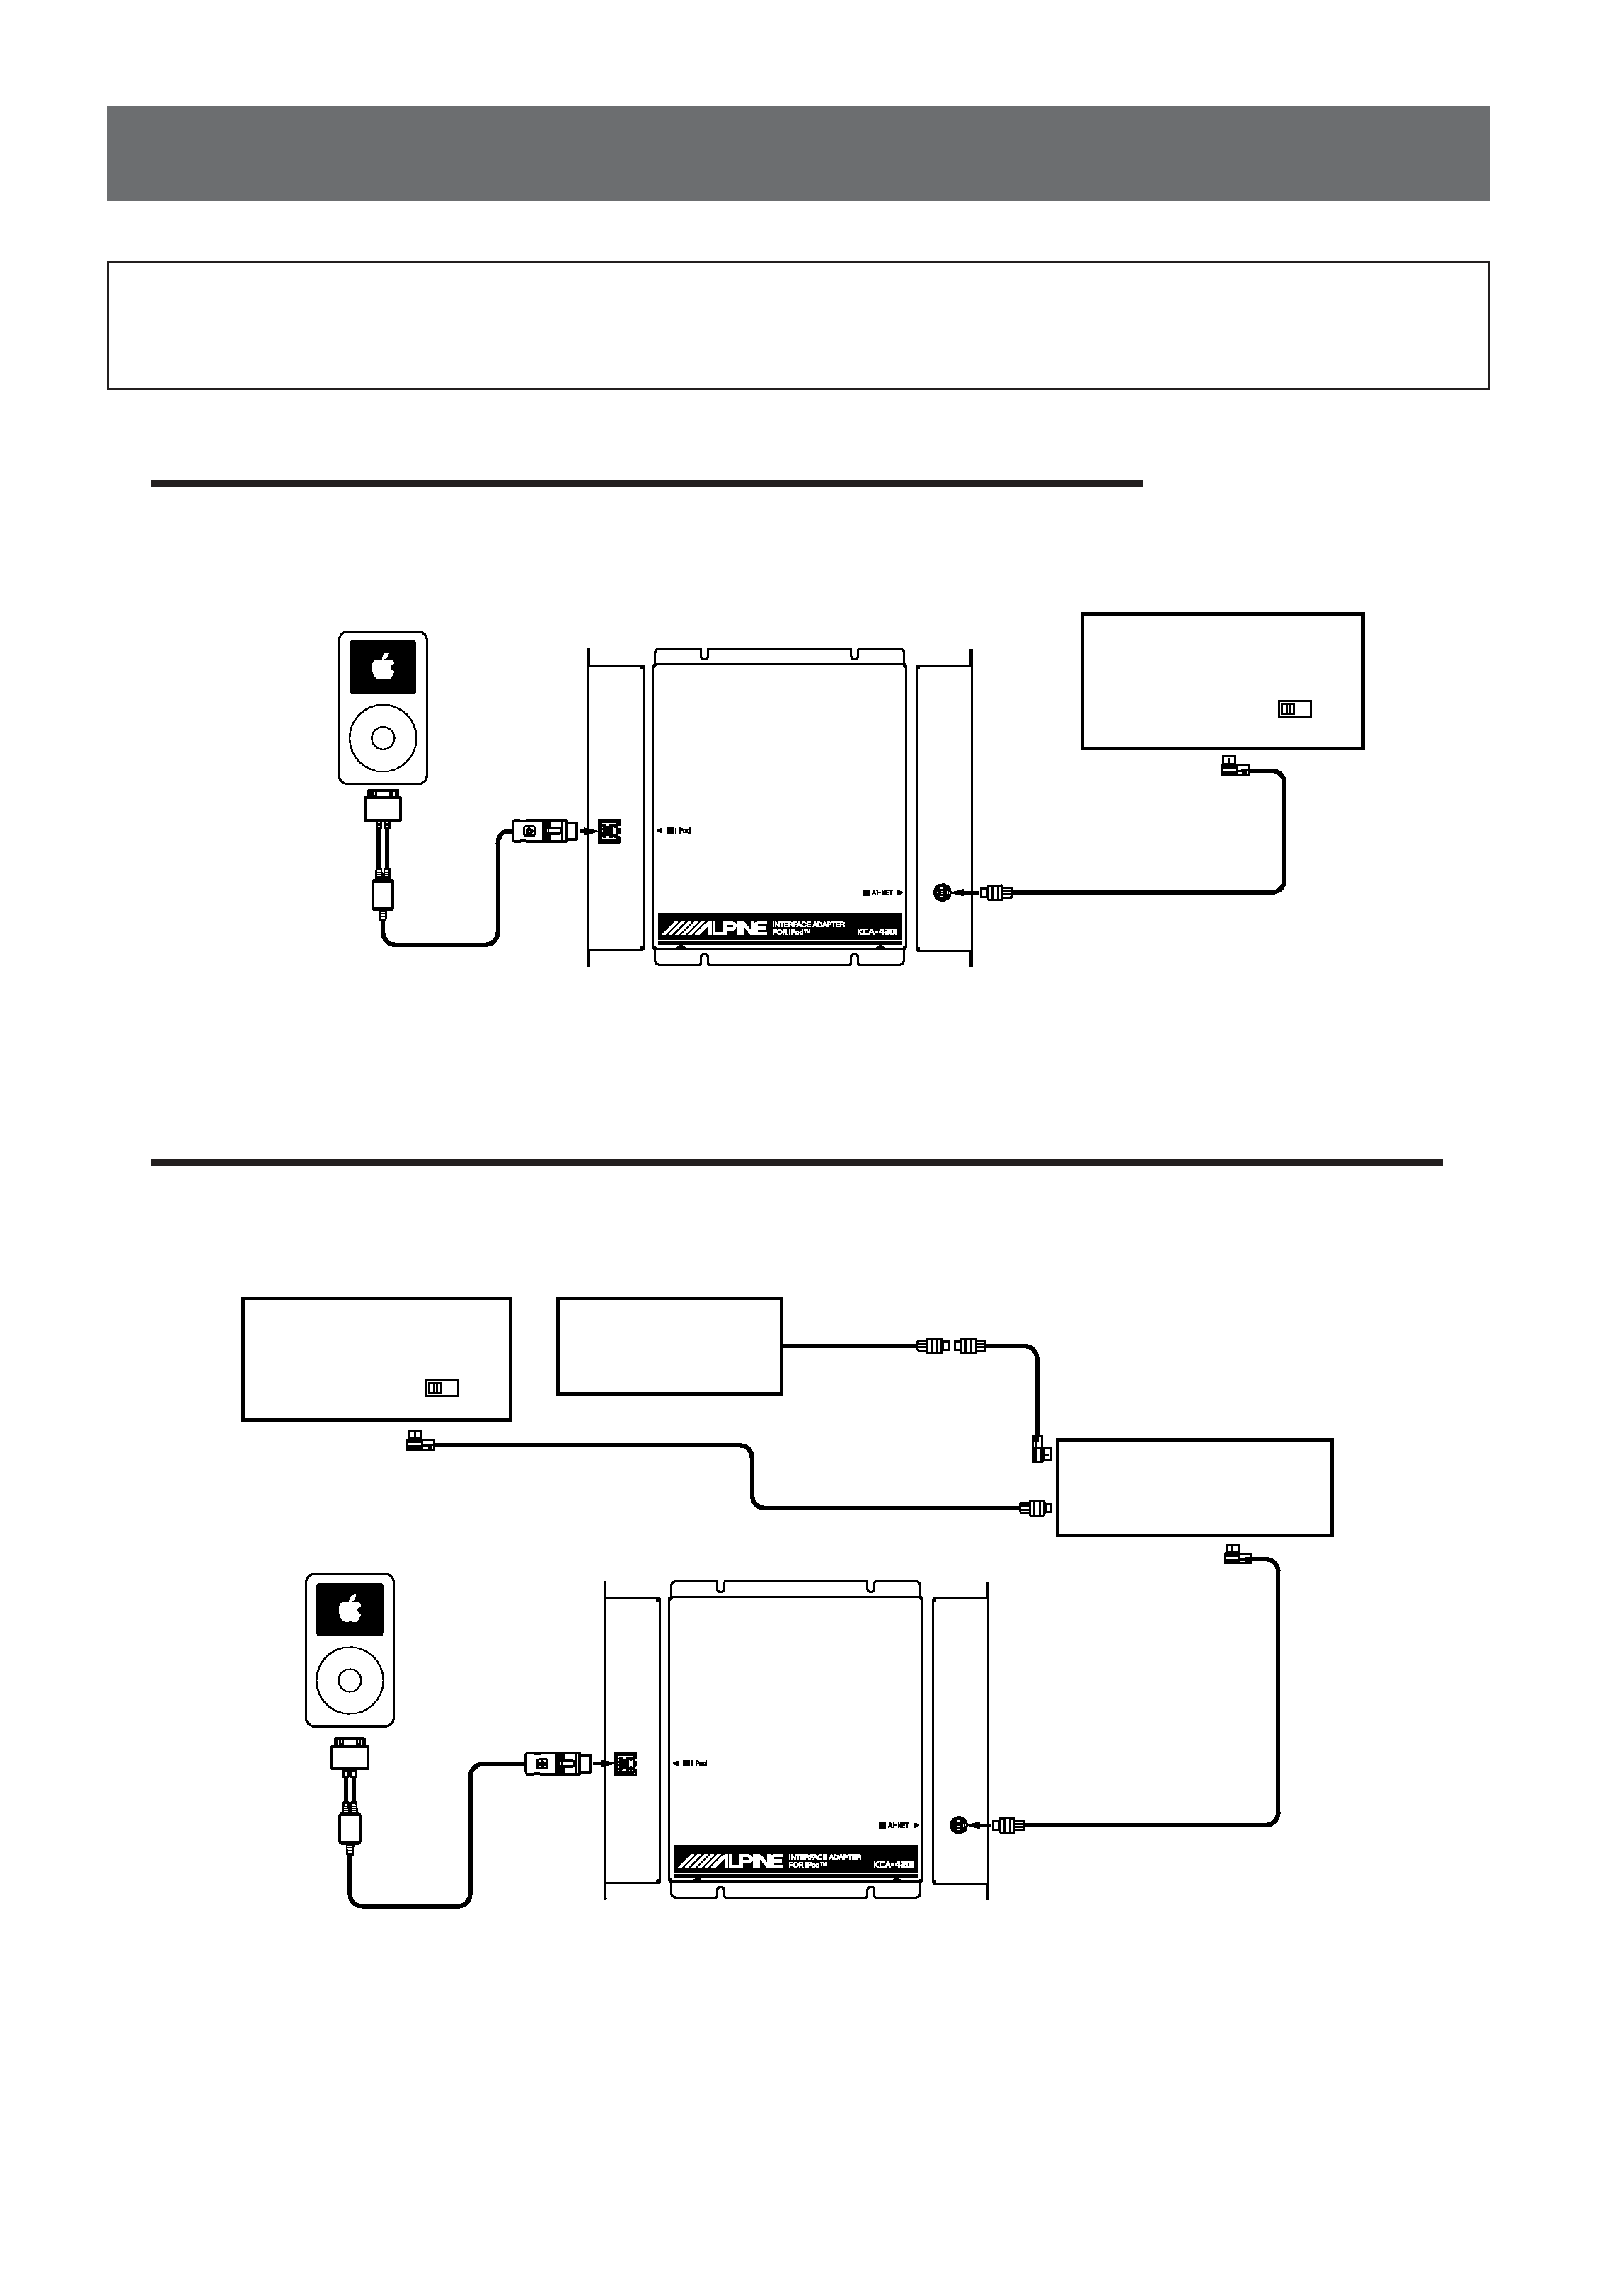
Connections
1) Connect the iPodTM to the Ai-NET compatible Head Unit
Ai-NET
EQ/DIV
NORM
2) Connect the iPodTM to the Ai-NET compatible Head Unit and CD Changer
Ai-NET
EQ/DIV
NORM
iPod, iPod mini (Sold separately)
To Dock
connector
To iPod
terminal
iPod connection
cable (Included)
To Ai-NET
connector
Ai-NET cable (Included)
To Ai-NET
connector
Ai-NET compatible
Head Unit
(Sold separately)
Ai-NET compatible
Head Unit
(Sold separately)
To Ai-NET
connector
To Ai-NET connector
(HEAD UNIT)
Ai-NET cable (KCA-410C Included)
Ai-NET cable
(Included with the CD Changer)
To Ai-NET connector
(CHANGER)
Versatile Link Terminal
KCA-410C
(Sold separately)
Ai-NET compatible
CD Changer
(Sold separately)
iPod, iPod mini (Sold separately)
To Dock
connector
To iPod
terminal
iPod connection
cable (Included)
To Ai-NET
connector
Ai-NET cable
(Included)
To Ai-NET
connector
(CHANGER)
CHA-S634, etc.
When connecting the adapter, confirm the iPod software version. The adapter does not
support software versions prior to iPod Update 2004-04-28. (see "About the adapter-
compatible iPodTM" on page 13).