Active Speaker
System
(Powered Subwoofer)
En (English)
E (Español)
F (Français)
OPERATING INSTRUCTIONS
MODE D'EMPLOI
MANUAL DE INSTRUCCIONES
For assistance and information
(United States and Puerto Rico)
8B-YP6-903-01
001225AMI-U-D
TS-WM7
U
2
En
PRECAUTIONS
WARNING
To reduce the risk of fire or electric shock, do not expose
this appliance to rain or moisture.
"CAUTION:TO REDUCE THE RISK OF
ELECTRIC SHOCK,
DO NOT REMOVE COVER (OR BACK).
NO USER-SERVICEABLE PARTS INSIDE.
REFER SERVICING TO QUALIFIED
SERVICE PERSONNEL."
CAUTION
RISK OF ELECTRIC SHOCK
DO NOT OPEN
Explanation of Graphical Symbols:
The lightning flash with arrowhead
symbol, within an equilateral triangle, is
intended to alert the user to the presence
of uninsulated "dangerous voltage" within
the product's enclosure that may be of
sufficient magnitude to constitute a risk
of electric shock to persons.
The exclamation point within an
equilateral triangle is intended to alert the
user to the presence of important
operating and maintenance (servicing)
instructions
in
the
literature
accompanying the appliance.
Installation
1 Water and moisture -- Do not use this unit near water,
such as near a bathtub, washbowl, swimming pool, or the
like.
2 Heat -- Do not use this unit near sources of heat, including
heating vents, stoves, or other appliances that generate heat.
It also should not be placed in temperatures less than 5°C
(41°F) or greater than 35°C (95°F).
3 Mounting surface -- Place the unit on a flat, even surface.
4 Ventilation -- The unit should be situated with adequate
space around it so that proper heat ventilation is assured.
Allow 10 cm (4 in.) clearance from the rear and the top of the
unit, and 5 cm (2 in.) from each side.
- Do not place the unit on a bed, rug, or similar surface that
may block the ventilation openings.
- Do not install the unit in a bookcase, cabinet, or airtight rack
where ventilation may be impeded.
5 Objects and liquid entry -- Take care that objects or liquids
do not get inside the unit through the ventilation openings.
6 Carts and stands -- When placed or
mounted on a stand or cart, the unit should
be moved with care. Quick stops, excessive
force, and uneven surfaces may cause the
unit or cart to overturn or fall.
7 Wall or ceiling mounting -- The unit should not be
mounted on a wall or ceiling, unless specified in the Operating
Instructions.
Read these Operating Instructions carefully and completely
before operating the unit. All precautions on this booklet
and on the unit should be strictly followed.
Keep the Operating Instructions for future reference.
Electric Power
1 Power sources -- Connect this unit only to power sources
specified in the Operating Instructions, and as marked on the
unit.
2 Polarization -- As a safety feature, some units are equipped
with polarized AC power plugs which can only be inserted
one way into a power outlet. If it is difficult or impossible to
insert the AC power plug into an outlet, turn the plug over
and try again. If it still does not easily insert into the outlet,
please call a qualified service technician to service or replace
the outlet. To avoid defeating the safety feature of the polarized
plug, do not force it into a power outlet.
3 AC power cord
- When disconnecting the AC power cord, pull it out by the AC
power plug. Do not pull the cord itself.
- Never handle the AC power plug with wet hands, as this could
result in fire or shock.
- Power cords should be firmly secured to avoid being severely
bent, pinched, or walked upon. Pay particular attention to the
cord from the unit to the power outlet.
- Avoid overloading AC outlets and extension cords beyond
their capacity, as this could result in fire or shock.
4 Extension cord -- To help prevent electric shock, do not
use a polarized AC power plug with an extension cord,
receptacle, or other outlet unless the polarized plug can be
completely inserted to prevent exposure of the blades of the
plug.
3
En
TABLE OF CONTENTS
PRECAUTIONS .................................... 2
PREPARATIONS ................................... 4
OPERATIONS ...................................... 5
SPECIFICATIONS ................................. 7
Supplied accessories
Connecting cord with RCA phono plugs (1)
OWNER'S RECORD
Record the model number and serial number of your set
(found at the rear of your set) below. Refer to them when
contacting your Aiwa dealer.
Model No. _____________________________
Serial No. _____________________________
Maintenance
Clean the unit only as recommended in the Operating
Instructions.
Damage Requiring Service
Have the units serviced by a qualified service technician if:
- The AC power cord or plug has been damaged
- Foreign objects or liquid have gotten inside the unit
- The unit has been exposed to rain or water
- The unit does not seem to operate normally
- The unit exhibits a marked change in performance
- The unit has been dropped, or the cabinet has been damaged
DO NOT ATTEMPT TO SERVICE THE UNIT YOURSELF.
4
En
Connection
Plug in the AC power cord to the AC power outlet after all other
connections are made.
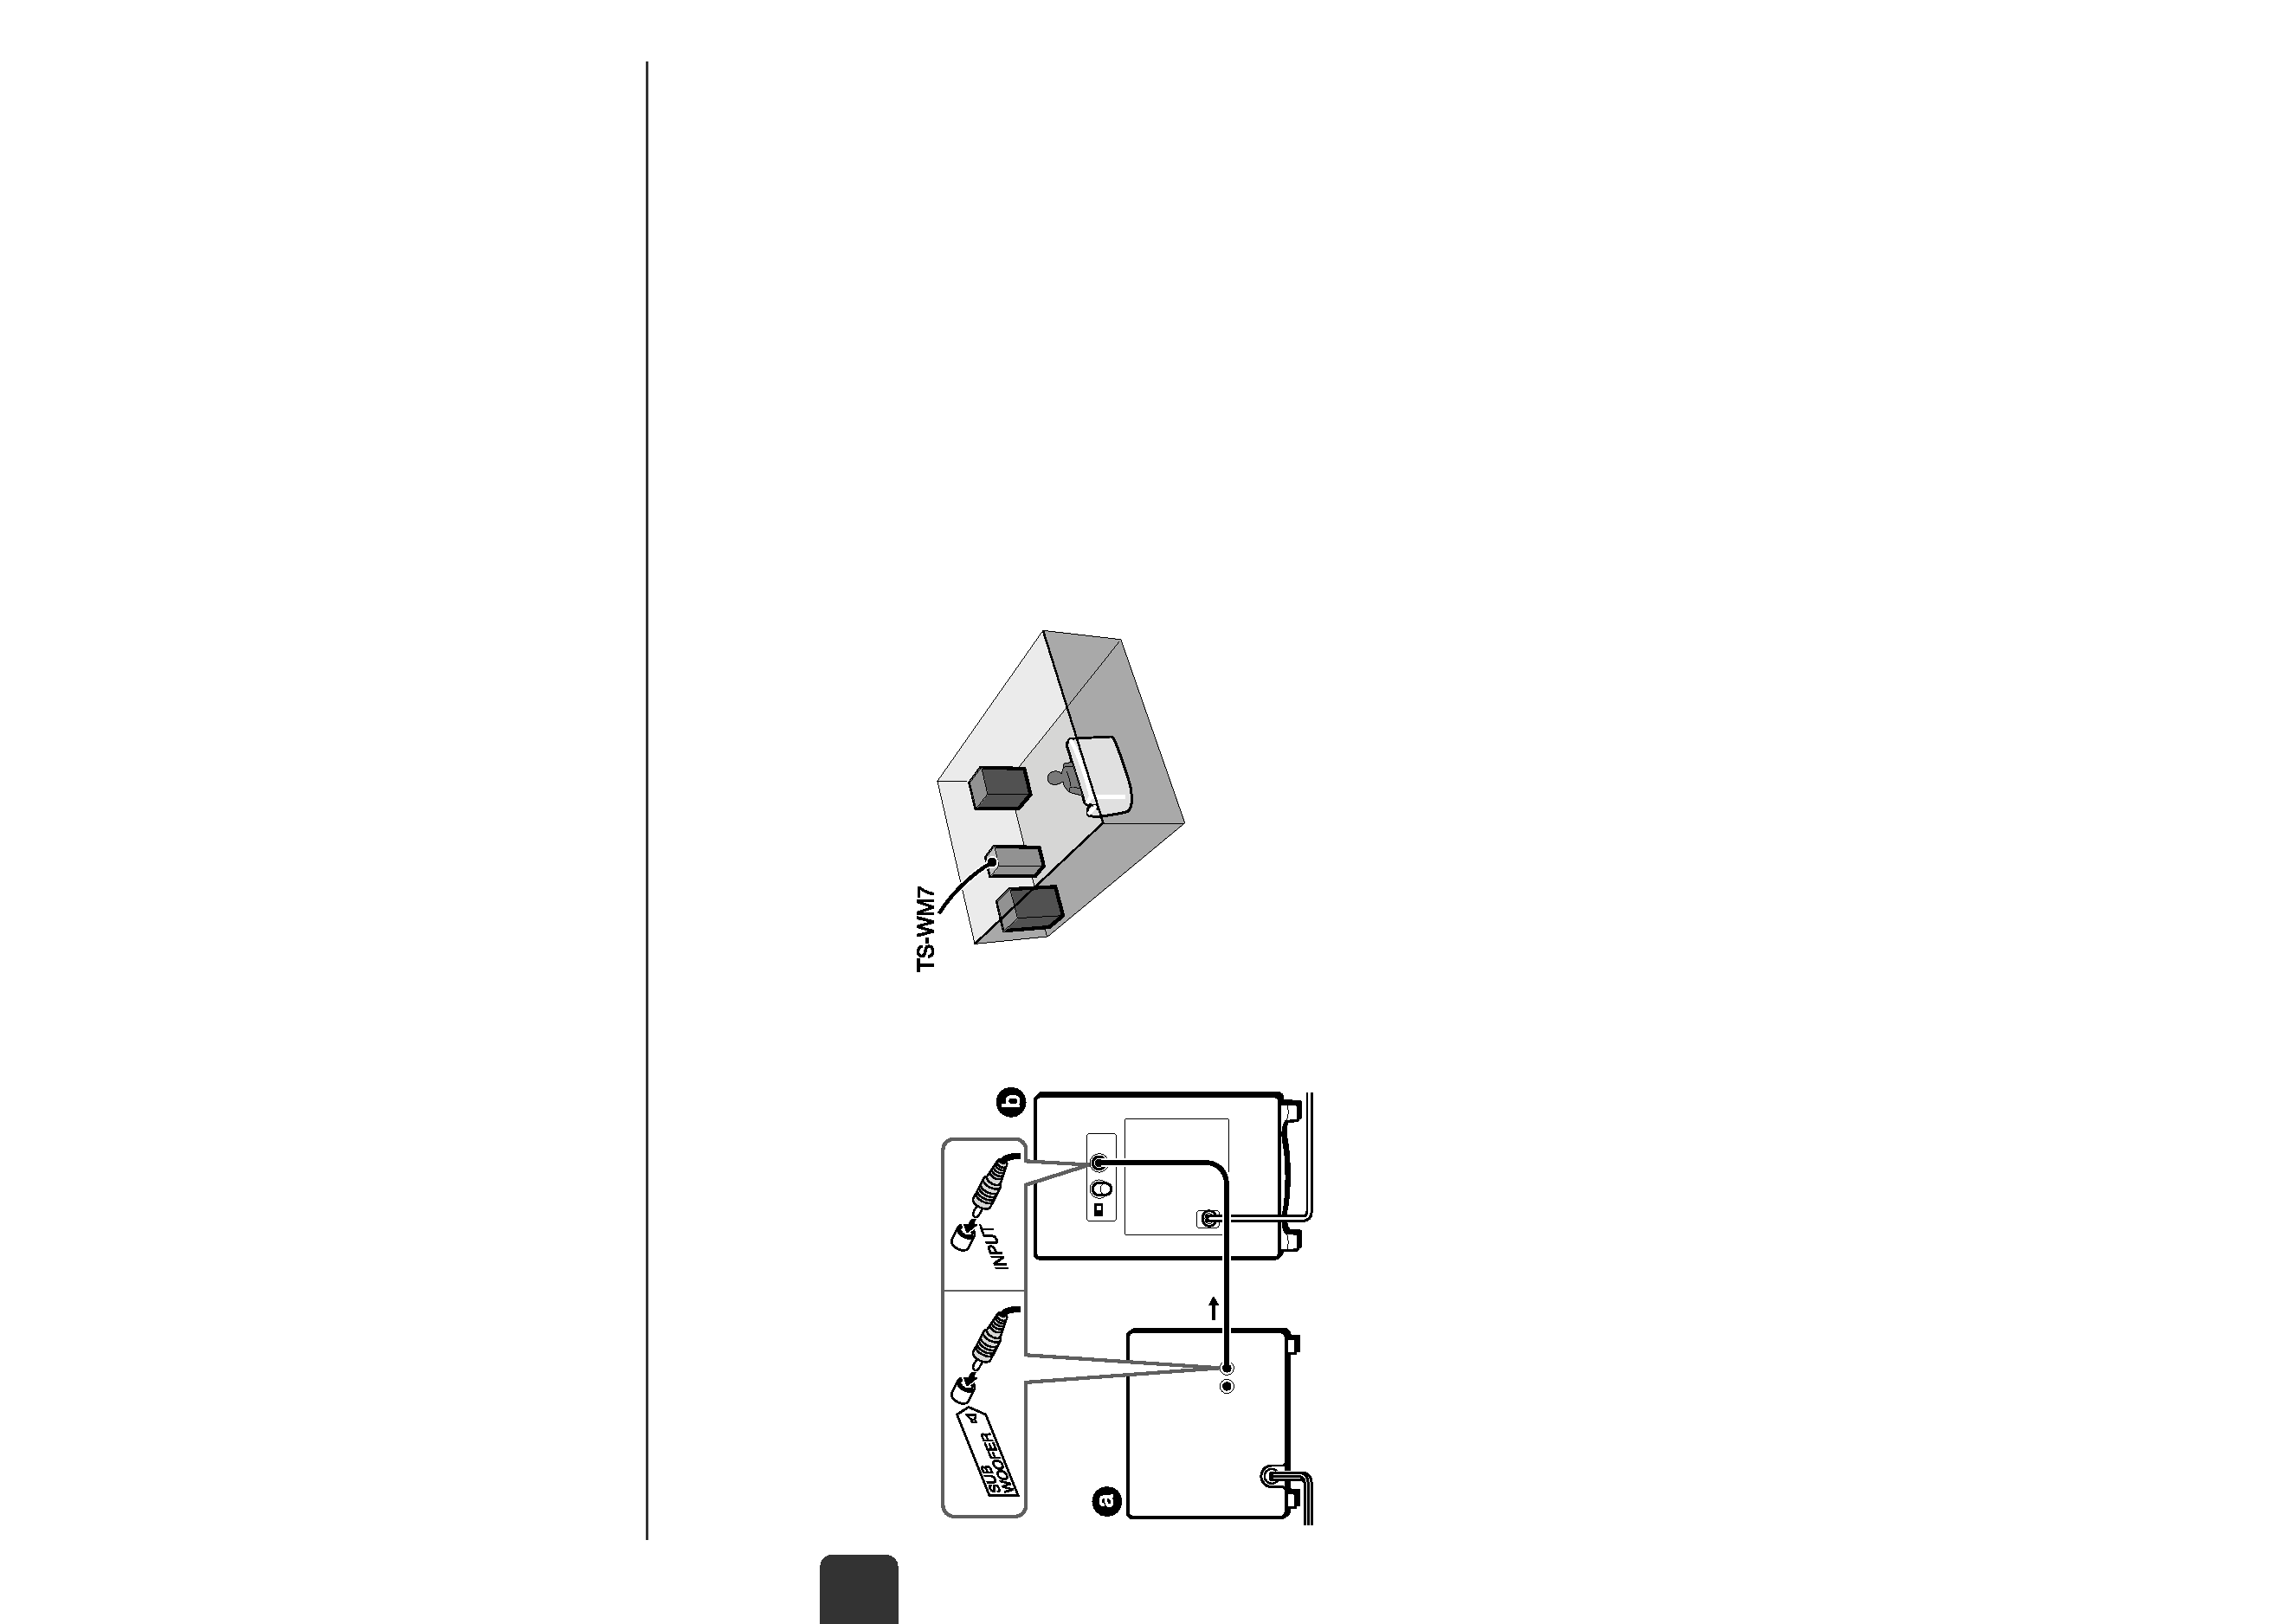
1 Connect the SUB WOOFER or SUPER WOOFER
jack on the unit (stereo system, receiver, etc) side
a to the INPUT (FROM SUPER WOOFER
TERMINAL) jack on the powered subwoofer b
with the supplied connecting cord.
2 Connect the AC power cord to an AC outlet.
PREPARATIONS
Positioning
Because low-frequency sound reproduced by the powered
subwoofer is mostly non-directional, the listener will be unable
to localize the bass source. Accordingly, the powered
subwoofer provides maximum flexibility in terms of
positioning. For the most effective low-frequency sound, the
powered subwoofer should be placed on the floor close to a
wall or in a corner of the room.
(Position example)
5
En
OPERATIONS
Power and Volume
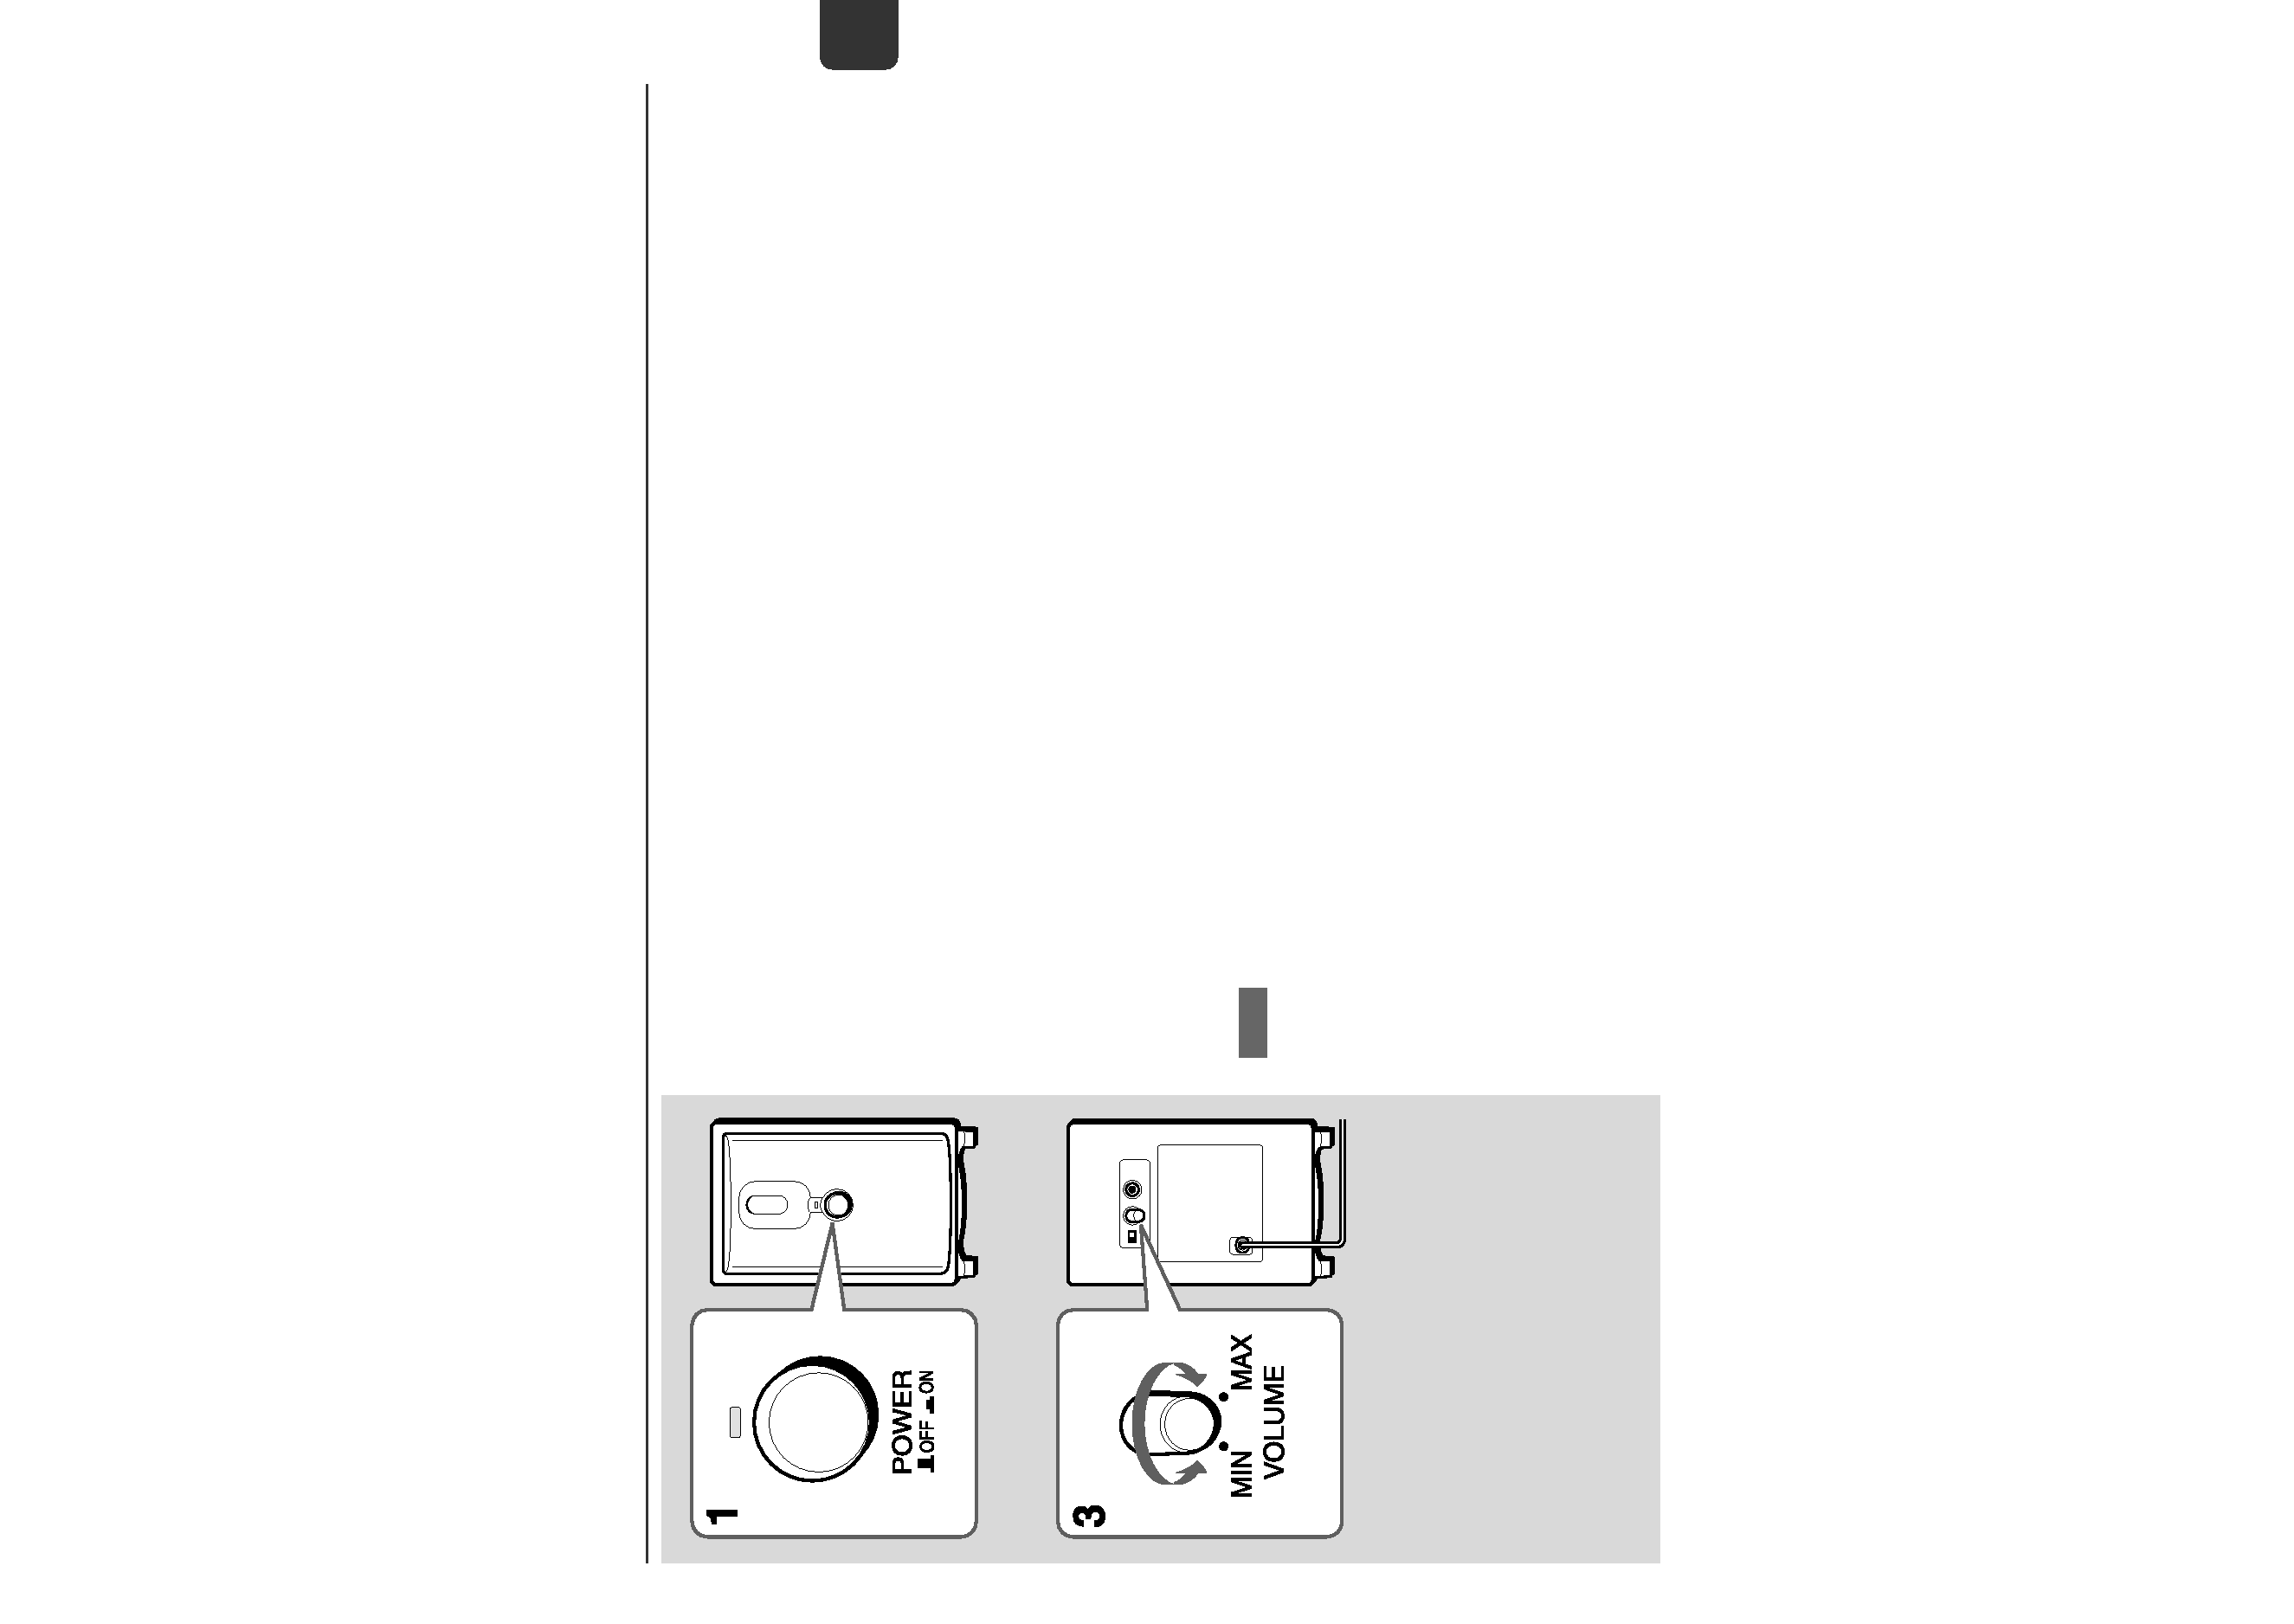
Adjust the volume balance between the powered subwoofer
and the left and right speakers of the connected unit.
1 Press the POWER button.
The indicator above the button lights up.
2 Start playback on the connected unit.
3 Adjust the volume of the powered subwoofer.
Moderate volume setting
To get natural bass sounds, adjust the volume of the powered
subwoofer according to its position and the graphic equalizer
setting of the connected unit.
Adjustment examples
a Set the VOLUME control to a little lower than the middle
when the subwoofer is placed on the floor and the
graphic equalizer is set to off.
b Set the VOLUME control to the middle when the subwoofer
is positioned higher than the floor and the graphic
equalizer is set to off.
Notes
· To avoid overloading the powered subwoofer, do not set the
volume of the connected unit so high that the sound is
distorted.
· Low frequency sounds may be distorted when they are
emphasized by the graphic equalizer on the connected unit.
Adjust the VOLUME control on the powered subwoofer or
the graphic equalizer on the connected unit.
· If the powered subwoofer will not be used for a long period
of time, press the POWER button to turn off the power, and
unplug the AC cord from the wall outlet.
· If the output of sound should stop, press the POWER button
to turn off the power, unplug the AC cord from the Wall
outlet, and then in 5 minutes plug it again.
Auto Power
Before using this function, make sure the POWER button is
set to ON.
The power is automatically turned on when receiving a signal
input from INPUT jack.
The power is automatically turned off if no signal is input for
a while and the indicator of the POWER button becomes
dimmer. If input signal is too weak, this function does not
effect.
