
HS-TX427(YU/YC)ESF Page 1
ENGLISH
8C-HRC-701-01
011211AAK-O-SOB
Printed in China
OWNER'S RECORD
For your convenience, record the model number and the serial number (you will find it in
the cassette holder of your set) in the space provided below. Please refer to them when
you contact your Aiwa dealer in case of difficulty.
Model No.
Serial No.
PRECAUTIONS
To maintain good performance
Do not use the unit in places which are extremely hot, cold, dusty or humid. In particular,
do not keep the unit:
· in a high humidity area such as a bathroom
· near a heater
· in an area exposed to direct sunlight (e.g., inside a parked car, where there could be
a considerable rise in temperature).
Note on listening with the headphones
·Listen at a moderate volume to avoid hearing damage.
·Do not wear the headphones while driving or cycling. It may create a traffic hazard.
·You should use extreme caution or temporarily discontinue use in potentially hazardous
situations, such as walking, jogging, etc.
·Wear them properly; L is left, R is right.
Note on cassette tapes
·Take up any slack in the tape with a pencil or a similar tool before use. Slack tape may
break or jam in the mechanism. A
·C-100 or longer tapes are extremely thin and easily deformed or damaged. They are
not recommended for use in this unit.
To use with the belt clip B
USING ON DRY CELL BATTERIES C
Insert two size AA (R6) dry cell batteries with the 0 and 9 marks correctly aligned.
If the cover of the battery compartment comes off D
Battery replacement
The battery indicator in the display window changes from
to
to
depending on the remaining power of the dry cell batteries. Replace the batteries when
the battery indicator becomes
and starts flashing, tape speed slows down, volume
decreases, or sound becomes distorted.
To maintain preset data
When replacing the batteries, the unit will retain the preset station frequencies for about
1 minute. To prevent the erasure of the memories, replace the batteries within 1 minute.
Note on dry cell batteries
·Make sure that the 0 and 9 marks are correctly aligned.
·Do not mix different types of batteries, or an old battery with a new one.
·Never recharge the batteries, apply heat to them or take them apart.
·When not using the batteries, remove them to prevent needless wear.
· If liquid leaks from the batteries, wipe thoroughly to remove.
HOLD SWITCH E
The HOLD switch deactivates the buttons on the front cabinet a.
Before use, release the HOLD switch. b
When not using the unit, set the HOLD switch to the hold position. c
Accidentally pressed buttons will not function.
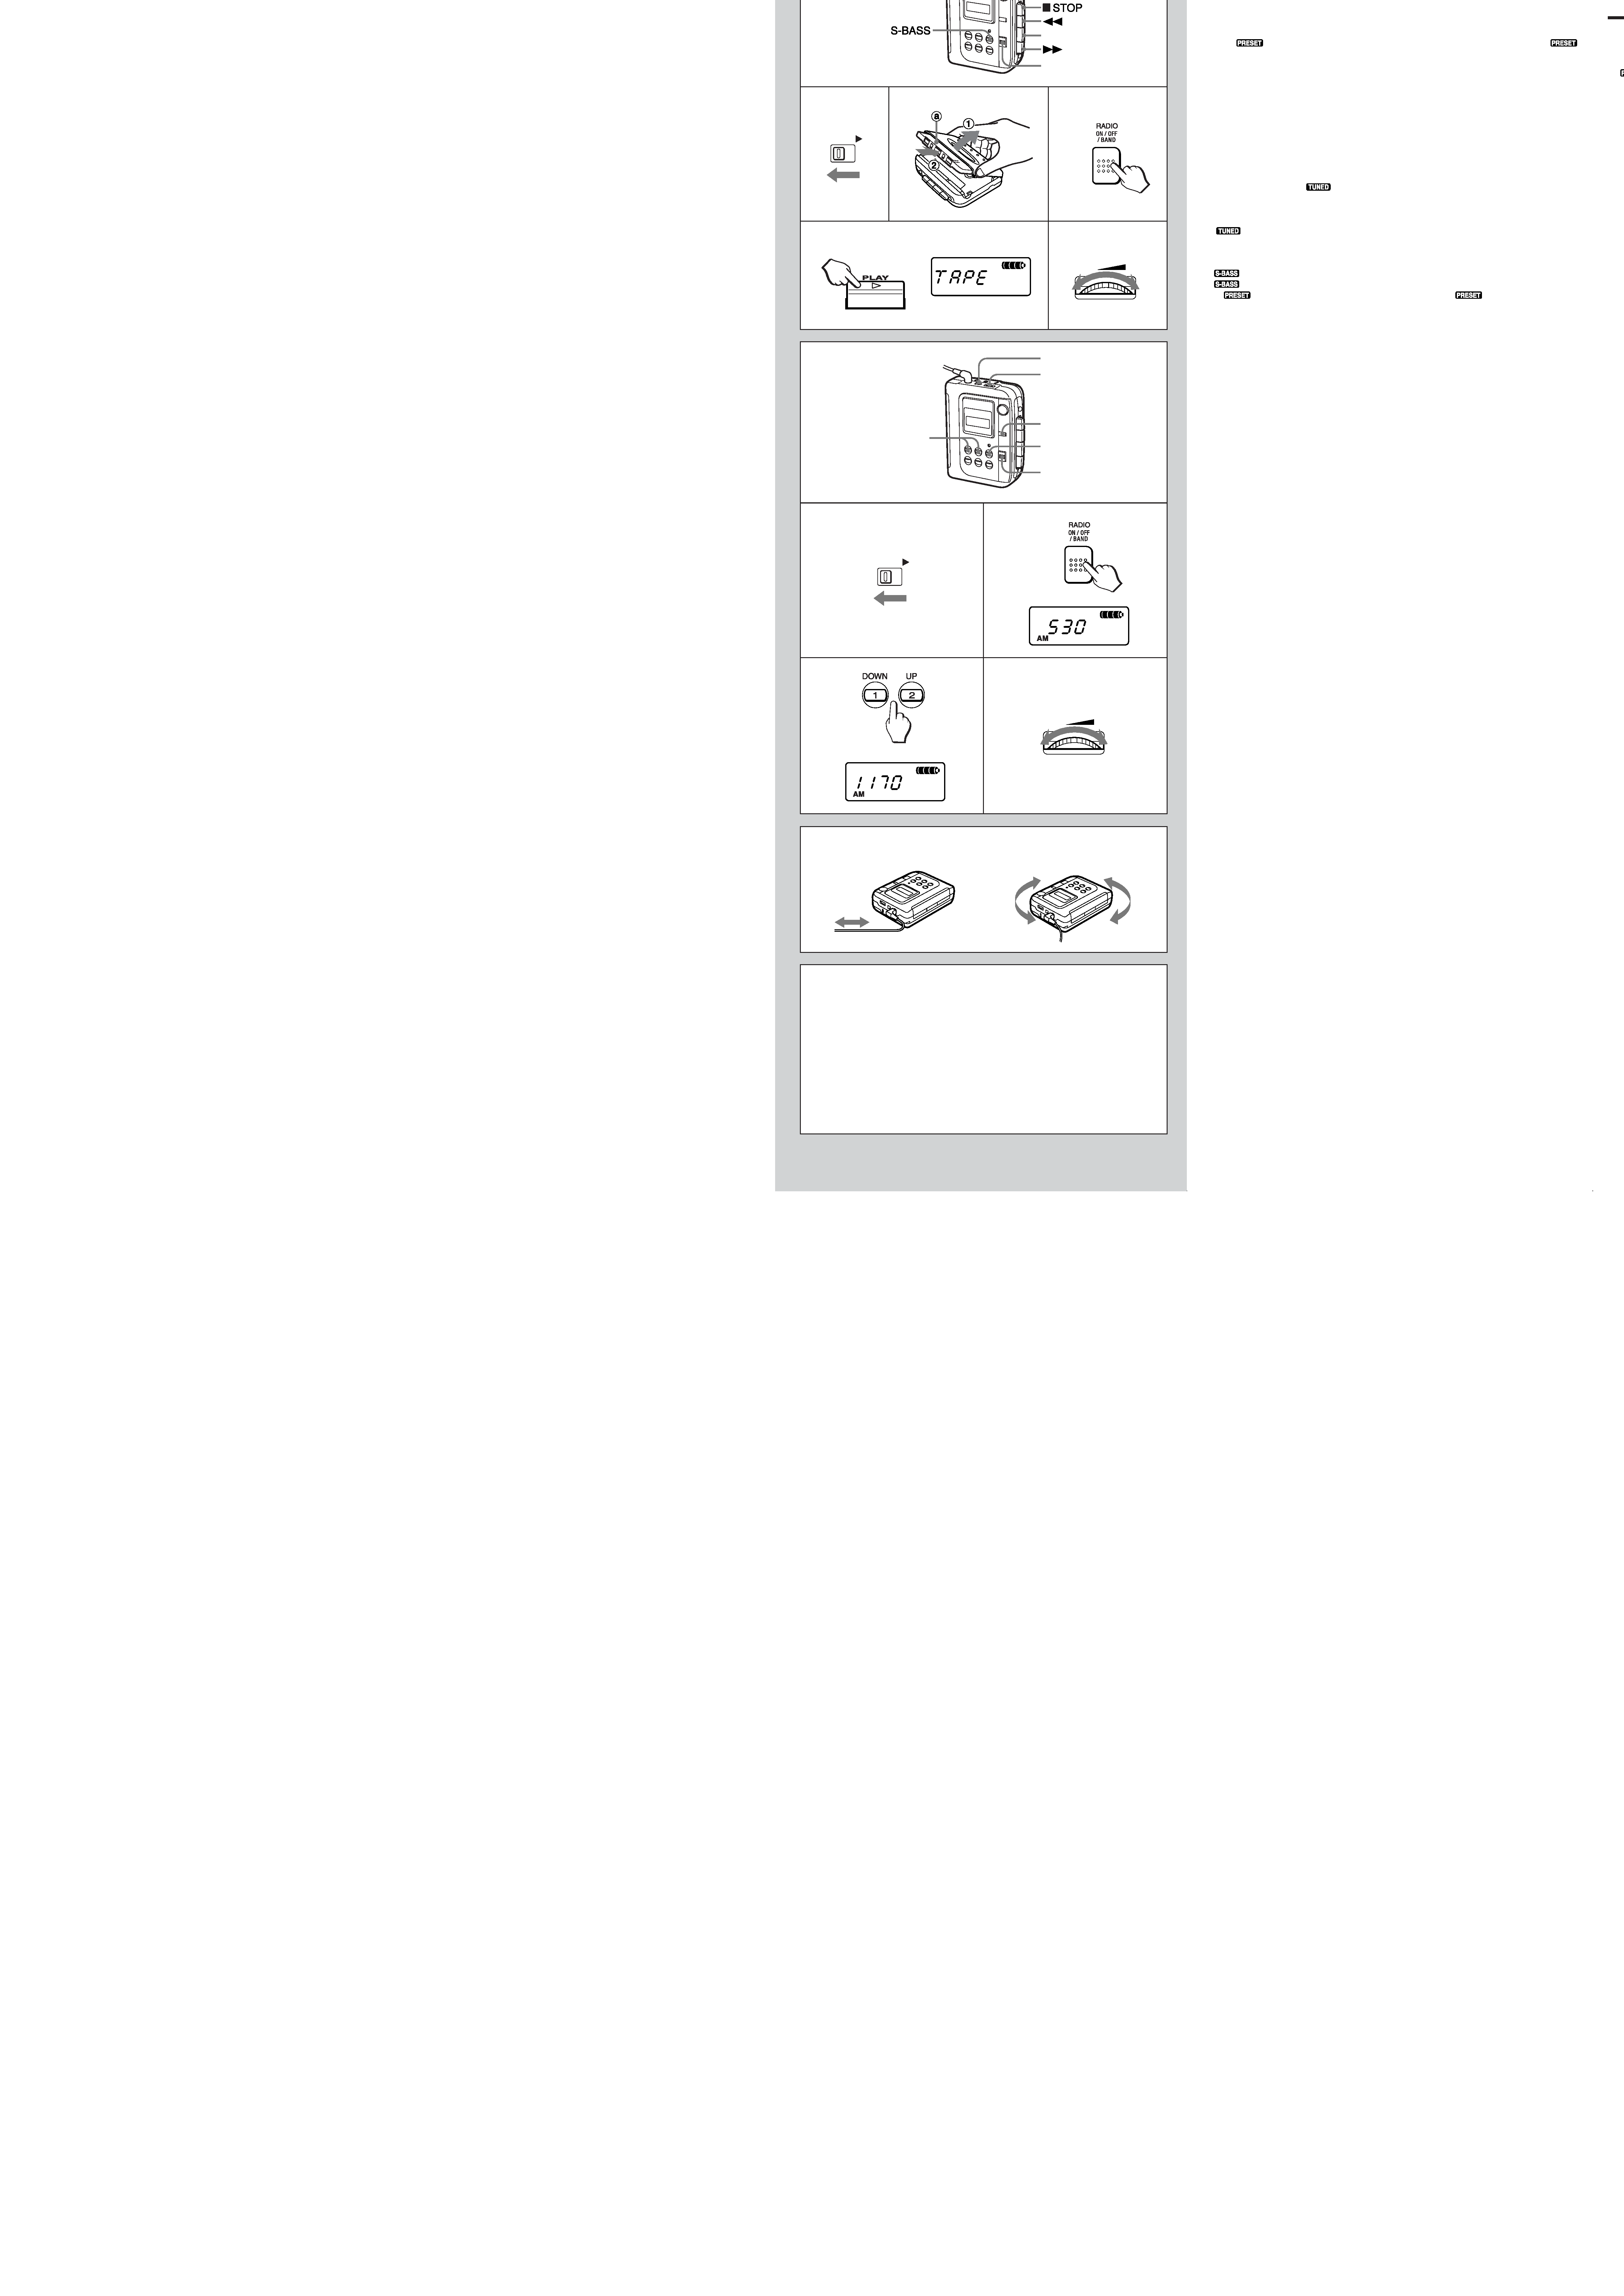
PLAYBACK F
·Use only Type I (normal) tapes.
·Connect the supplied headphones to the \ jack.
1Release the HOLD switch.
2 Open the cassette holder and insert a cassette.
a The side to be played back
3Press the RADIO ON/OFF/BAND button repeatedly until the power is turned off.
4Press the lPLAY button to start playback.
"TAPE" is displayed on the window.
5Adjust the volume.
Basic operation
Press the following buttons.
To fast forward
g button
To rewind
f button
To stop
sSTOP button
·The lPLAY button is released automatically at the end of the tape. However, the f
and g buttons are not released at the end of the tape. Press the sSTOP button to
release them.
·To prevent tape damage, press the sSTOP button first before changing to radio mode.
Super bass
Press the S-BASS button to emphasize the low frequencies.
appears in the display. Press the button again to resume the normal sound.
disappears from the display.
RADIO RECEPTION G
1Release the HOLD switch.
2Press the RADIO ON/OFF/BAND button repeatedly to select AM, FM, TV or WTHR
(weather).
If
is displayed in the display, press the MODE button so that
disappears.
3P
th UP
DOWN b tt
t t
i t
t ti
HS-TX427
STEREO RADIO CASSETTE PLAYER
RADIORREPRODUCTOR DE CASSETTE ESTEREOFONICO
OPERATING INSTRUCTIONS
INSTRUCCIONES DE MANEJO
MODE D'EMPLOI
C
12
3
D
A
B
E
F
1
3
4
5
2
PR
Par
No u
o hú
· e
· c
· e
a
Not
·Es
·No
co
·De
po
·Ut
Not
·Es
rom
·La
tan
Deb
FU
Colo
Si l
Cam
El in
la ca
disto
Par
Cua
pref
cam
Pre
·De
·No
·No
de
·Cu
inn
·Si
IN
El in
Ant
Cua
c
No f
RE
·Ut
·Co
1 S
2 A
a
3 P
la
4 P
E
5 A
Fun
Pres
Para
Para
Para
·El
em
s
·Pa
mo
Sup
Pres
Apa
norm
Des
RE
1 S
2 P
A
S

ESPAÑOL
FRANÇAIS
it in
hen
ular,
d be
d.
ous
may
are
d.
hen
ume
bout
ute.
off.
f
n to
ode.
und.
THR
PRECAUCIONES
Para conservar el buen rendimiento
No utilice el aparato en lugares que sean extremadamente calurosos, fríos, polvorosos
o húmedos. En particular, no lo deje:
· en sitios muy húmedos, como en el baño.
· cerca de calefacciones.
· en sitios expuestos a la luz directa del sol (por ejemplo, dentro de un vehículo
aparcado, donde puede producirse un aumento considerable de la temperatura).
Nota sobre escucha con los auriculares
·Escuche sólo a un volumen moderado para evitar daño al oído.
·No escuche con los auriculares mientras conduce o monta en bicicleta. Puede
convertirse en un peligro para el tráfico.
· Debe tener mucho cuidado o dejar de utilizar los temporalmente en situaciones
potencialmente peligrosas, por ejemplo mientras camina, corre, etc.
·Utilice correctamente los auriculares; "L" es izquierdo y "R" es derecho.
Notas sobre las cintas de cassette
·Estire la cinta con un lápiz o instrumento similar antes de usarla. Una cinta floja puede
romperse o quedar atascada en el mecanismo. A
· Las cintas de cassete C-100 o de mayor longitud son extremadamente finas y por lo
tanto fácilmente deformables. No se recomienda su uso en esta unidad.
Debe utilizarse con el abrochador de cinturón B
FUNCIONAMIENTO CON PILAS C
Coloque dos pilas tamaño AA (R6) con las marcas 0 y 9correctamente alineadas.
Si la cubierta del compartimiento de pilas se sale D
Cambio de las pilas
El indicador de pilas en la ventana indicadora cambia de
a
a
según
la carga remamente en las pilas. Cambie las pilas cuando el indicador de pilas muestra
y empieza a destellar, se reduce la velocidad de la cinta, baja el volumen o se
distorsiona el sonido.
Para mantener los datos prefijados
Cuando cambie las pilas, el aparato mantiene su memoria de las frecuencias de emisoras
prefijadas durante aproximadamente 1 minuto. Para evitar el borrado de las memorias,
cambie las pilas en menos de 1 minuto.
Precauciones a tener en cuenta sobre las pilas secas
·Debe asegurarse que están correctamente alineadas con sus signos 0 y 9.
·No mezcle pilas de tipo diferente, ni una vieja con otra nueva.
·No debe recargarlas de ninguna manera, exponerlas a ninguna fuente de calor ni
desmontarlas.
· Cuando no vaya a utilizar las pilas, extráigalas para evitar que se desgasten
innecesariamante.
·Si nota que hay una fuga, séquelas con un paño.
INTERRUPTORES DE BLOQUEO (HOLD) E
El interruptor HOLD desactiva los botones en el panel delantero a.
Antes de utilizar, suelte el interruptor HOLD. b
Cuando no utilice el aparato, mueva el interruptor HOLD a la posición de bloqueo.
c
No funcionarán los botones aunque presione uno por error.
REPRODUCCIÓN F
·Utilice sólo las cintas de tipo I (normal).
·Conecte los auriculares suministrados en la toma \.
1 Suelte el interruptor HOLD.
2 Abra el compartimiento del casete y coloque un casete.
a El lado a reproducir
3Presione repetidamente el botón RADIO ON/OFF/BAND hasta que se desconecte
la alimentación.
4Presione el botón lPLAY para iniciar la reproducción.
El visor muestra "TAPE".
5Ajuste el volumen.
Funcionamente básico
Presione los siguientes botones.
Para avanzar rápidamente
g botón
Para rebobinar
f botón
Para parar
sSTOP botón
·El botón de reproducción lPLAY se suelta automáticamente al final de la cinta. Sin
embargo los botones f y g no se liberan al final de la cinta. Presione el botón
sSTOP para liberarlos.
·Para evitar dañar la cinta, presione primero el botón sSTOP antes de cambiar al
modo de radio.
Supergraves
Presione el botón S-BASS para dar énfasis a las bajas frecuencias.
Aparece
en la pantalla. Presione nuevamente el botón para volver al sonido
normal.
Desaparece
de la pantalla.
RECEPCION DE LA RADIO G
1 Suelte el interruptor HOLD.
2Presione repetidamente el botón RADIO ON/OFF/BAND para seleccionar entre
AM, FM, TV o WTHR (tiempo).
Si aparece
en la pantalla presione el botón MODE para que se apague
PRECAUTIONS
Pour maintenir de bonnes performances
Ne pas utiliser l'unite dans des endroits extrêmement chauds, froids, poussiéreux ou
humides. En particulier, ne pas laisser l'appareil dans un endroit:
· avec une humidité importante comme dans une salle de bain
· près d'un appareil de chauffage
· dans un endroit exposé au rayonnement direct du soleil (par ex., dans l'habitacle
d'une voiture parquée, où la température peut augmenter dans des proportions
considérables).
Remarque concernant l'écoute avec le casque d'écoute
·Ecouter à un volume modéré afin d'éviter de subir un dommage de l'ouïe.
· Ne pas utiliser le casque en conduisant une voiture ou à bicyclette. Cela peut constituer
un danger pour la circulation.
·Il y a lieu d'être particulièrement attentif, voire d'interrompre provisoirement l'utilisation
de l'appareil, dans des situations potentiellement dangereuses (en traversant une rue,
en faisant du jogging, etc).
·Porter le casque d'écoute correctement; "L" sur la gauche, "R" sur la droite.
Remarques sur les cassettes
·Eliminer tout mou de la bande avec un crayon ou un objet similaire avant l'utilisation.
Une bande desserrée pourraît se rompre ou s'entortiller dans le mécanisme. A
· Les bandes C-100 ou plus sont extrêmement fines et elles se déforment ou
s'endommagent facilement. Il est déconseillé de les utiliser dans cet appareil.
Utilisation avec l'agrafe de ceinture B
FONCTIONNEMENT SUR PILES SECHES C
Insérez deux piles sèches format AA (R6) en alignant correctement les marques 0 et
9.
Si le couvercle du logement des piles se détache D
Remplacement des piles
L'indicateur de capacité des piles passe de
à
et
selon la puissance
restante des piles sèches. Remplacez les piles quand l'indicateur indique
et
commence à clignoter, quand la vitesse de défilement de la bande ou le volume diminue,
ou quand le son est déformé.
Pour conserver les données préréglées
Au remplacement des piles, l'appareil maintiendra les fréquences des stations préréglées
environ 1 minute. Remplacez les piles en moins d'une minute pour éviter leur effacement.
Remarques sur les piles sèches
·Vérifier que les repères 0 et 9 sont correctement alignés.
·Ne pas mélanger différents types de piles, ou une pile usée avec une neuve.
·Ne jamais recharger les piles, ne pas les chauffer et ne pas essayer de les ouvrir.
·Quand les piles ne sont pas utilisées, les sortir pour éviter de les user inutilement.
·Si du liquide fuit des piles, nettoyer convenablement.
COMMUTATEUR DE MAINTIEN E
Le commutateur HOLD désactive les touches à l'avant a.
Avant l'utilisation, libérez le commutateur HOLD. b
Quand l'appareil n'est pas utilisé, réglez le commutateur HOLD à la position de
maintien. c
Les touches pressées par inadvertance resteront sans effet.
LECTURE F
·Utilisez uniquement des cassette de type I (normal).
·Raccordez les écouteurs fournis à la prise \ .
1Relâchez le commutateur HOLD.
2 Ouvrez le logement de la cassette et insérez une cassette.
a La face à lire
3 Appuyez plusieurs fois sur la touche RADIO ON/OFF/BAND jusqu'à la mise
hors tension.
4 Appuyer sur la touche lPLAY pour lancer la lecture.
L'indication "TAPE" apparaît dans la fenêtre d'affichage.
5Ajustez le volume.
Opérations de base
Appuyer sur les touches suivantes.
Pour avancer rapidement
g touche
Pour rebobiner
f touche
Pour arrêter
sSTOP touche
· La touche lPLAY est automatiquement relâchée en fin de bande. Mais les touches
f et g ne le sont pas. Appuyez sur la touche sSTOP pour les désactiver.
· Pour éviter d'endommager la bande magnétique, appuyez d'abord sur la touche
sSTOP avant de passer au mode de radio.
Super graves
Appuyez sur la touche S-BASS pour accentuer les basses fréquences.
s'affiche. Appuyez à nouveau sur la touche pour revenir au son normal.
disparaît de l'affichage.
RECEPTION RADIO G
1Relâchez le commutateur HOLD.
2 Appuyez plusieurs fois sur la touche RADIO ON/OFF/BAND pour sélectionner
AM, FM, TV ou WTHR (météo).
Si
est affiché, maintenez la touche MODE pressée jusqu'à la disparition de
.
3 Appuyez sur la touche UP ou DOWN pour syntoniser une station
1Release the HOLD switch.
2Press the RADIO ON/OFF/BAND button repeatedly to select AM, FM, TV or WTHR
(weather).
If
is displayed in the display, press the MODE button so that
disappears.
3Press the UP or DOWN button to tune in to a station.
4Adjust the volume.
After listening, press the RADIO ON/OFF/BAND button repeatedly to turn off the radio.
You can turn off the radio also by keeping the RADIO ON/OFF/BAND button pressed for
more than 2 seconds.
For quick tuning
(Only for AM and FM)
Keep either the UP or DOWN button pressed, then the frequency in the display changes
rapidly. When the button is released, the frequency changes with a slower speed. If a
station is tuned in to,
appears, but the frequency does not stop. To stop tuning,
press either UP or DOWN button.
Note
may appear also when the unit receives the external noise.
Super bass
Press the S-BASS button to emphasize the low frequencies.
appears in the display. Press the button again to resume the normal sound.
disappears from the display.
If
is displayed, press the MODE button so that
disappears. And then
press the S-BASS button.
For better reception H
FM / TV / WTHR:The headphone cord functions as the antenna. Keep it extended.
AM: Turn the unit to find the position that gives best reception.
About the FM stereo broadcast
The FM broadcast is received in stereo.
However, the sound may be heard in monaural when the FM stereo signal is weak.
H
FM/TV/WTHR
AM
G
12
34
1
2
3
S-BASS
MODE
4
HOLD
VOL
12
3
45
3
4
HOLD
VOL
CAUTION
Modifications or adjustments to this product, which are not expressly approved by
the manufacturer, may void the user's right or authority to operate this product.
This device complies with Part 15 of the FCC Rules. Operation is subject to the
condition that this device does not cause harmful interference.
ATTENTION
Toute modification ou tout réglage de cet appareil non expressément approuvé par
le fabricant peut invalider le droit de l'utilisateur à employer cet appareil.
Ce dispositif est conforme à la Partie 15 de la Réglementation FCC. Son
fonctionnement est soumis à la condition qu'il ne cause pas d'interférences nuisibles.
RE
1 S
2 P
A
S
3 P
4 A
Cua
BAN
pres
Par
(So
Man
rápi
velo
frec
Not
Tam
Sup
Pres
Apa
norm
Si a
pres
Par
FM
AM:
Ace
Se r
Sin
está

HS-TX427(YU/YC)ESF Page 1
THR
dio.
d for
ges
If a
ing,
und.
hen
.
RECEPCION DE LA RADIO G
1 Suelte el interruptor HOLD.
2Presione repetidamente el botón RADIO ON/OFF/BAND para seleccionar entre
AM, FM, TV o WTHR (tiempo).
Si aparece
en la pantalla, presione el botón MODE para que se apague
.
3Presione el botón UP o DOWN para sintonizar una emisora.
4Ajuste el volumen.
Cuando no quiere escuchar más, presione repetidamente el botón RADIO ON/OFF/
BAND para desconectar la radio.También puede desconectar la radio manteniendo
presionado durante más de dos segundos el botón RADIO ON/OFF/BAND.
Para una sintonización rápida
(Solamente para AM y FM)
Mantenga presionado el botón UP o DOWN para que la frecuencia en la pantalla cambie
rápidamente. Cuando se suelta el botón, la frecuencia continúa cambiando a una
velocidad más lenta. Si se sintoniza una emisora, aparece
, sin embargo, la
frecuencia sigue avanzando. Para parar la sintonización, presione el botón UP o DOWN.
Nota
También puede aparecer
cuando la unidad recibe el ruido externo.
Supergraves
Presione el botón S-BASS para dar énfasis a las bajas frecuencias.
Aparece
en la pantalla. Presione nuevamente el botón para volver al sonido
normal. Desaparece
de la pantalla.
Si aparece
, presione el botón MODE para que se apague
. A continuación,
presione el botón S-BASS.
Para mejorar la recepción H
FM / TV / WTHR: El cable de los auriculares funciona como antena. Mantenga
extendido.
AM: Cambie la dirección de la unidad para encontrar la mejor posición de recepción.
Acerca de la transmisión de FM estéreo
Se recibe la emisora FM en estéreo.
Sin embargo, el sonido puede escucharse en monoaural cuando la señal de FM estéreo
está muy débil.
1Relâchez le commutateur HOLD.
2 Appuyez plusieurs fois sur la touche RADIO ON/OFF/BAND pour sélectionner
AM, FM, TV ou WTHR (météo).
Si
est affiché, maintenez la touche MODE pressée jusqu'à la disparition de
.
3 Appuyez sur la touche UP ou DOWN pour syntoniser une station.
4Ajustez le volume.
Après l'écoute, appuyez plusieurs fois sur la touche RADIO ON/OFF/BAND pour couper
la radio.Vous pouvez aussi éteindre la radio en maintenant la touche RADIO ON/OFF/
BAND pressée plus de 2 secondes.
Accord rapide
(Seulement pour AM et FM)
Maintenez la touche UP ou DOWN pressée pour faire changer rapidement la fréquence
affichée. Au relâchement de la touche, la fréquence change plus lentement. Si une
station est accordée,
s'affiche, mais la fréquence ne s'arrête pas de changer.
Pour arrêter l'accord, appuyez à nouveau sur UP ou DOWN.
Remarque
peut aussi apparaître quand l'appareil reçoit du bruit extérieur.
Super graves
Appuyez sur la touche S-BASS pour accentuer les basses fréquences.
s'affiche. Appuyez à nouveau sur la touche pour revenir au son normal.
disparaît de l'affichage.
Si
est affiché, maintenez la touche MODE pressée jusqu'à la disparition de
. Puis, appuyez sur la touche S-BASS.
Pour améliorer la réception H
FM / TV / WTHR: Le cordon du casque d'écoute fonctionne comme antenne. Laissez-
la étendue.
AM: Tourner celui-ci pour trouver la position qui fournit la meilleure réception.
A propos de la diffusion FM stéréo
La diffusion FM est reçue en stéréo.
Mais le son peut être entendu en monaural quand le signal FM stéréo est faible.
HS-TX427(YU/YC)ESF Page 2
ENGLISH
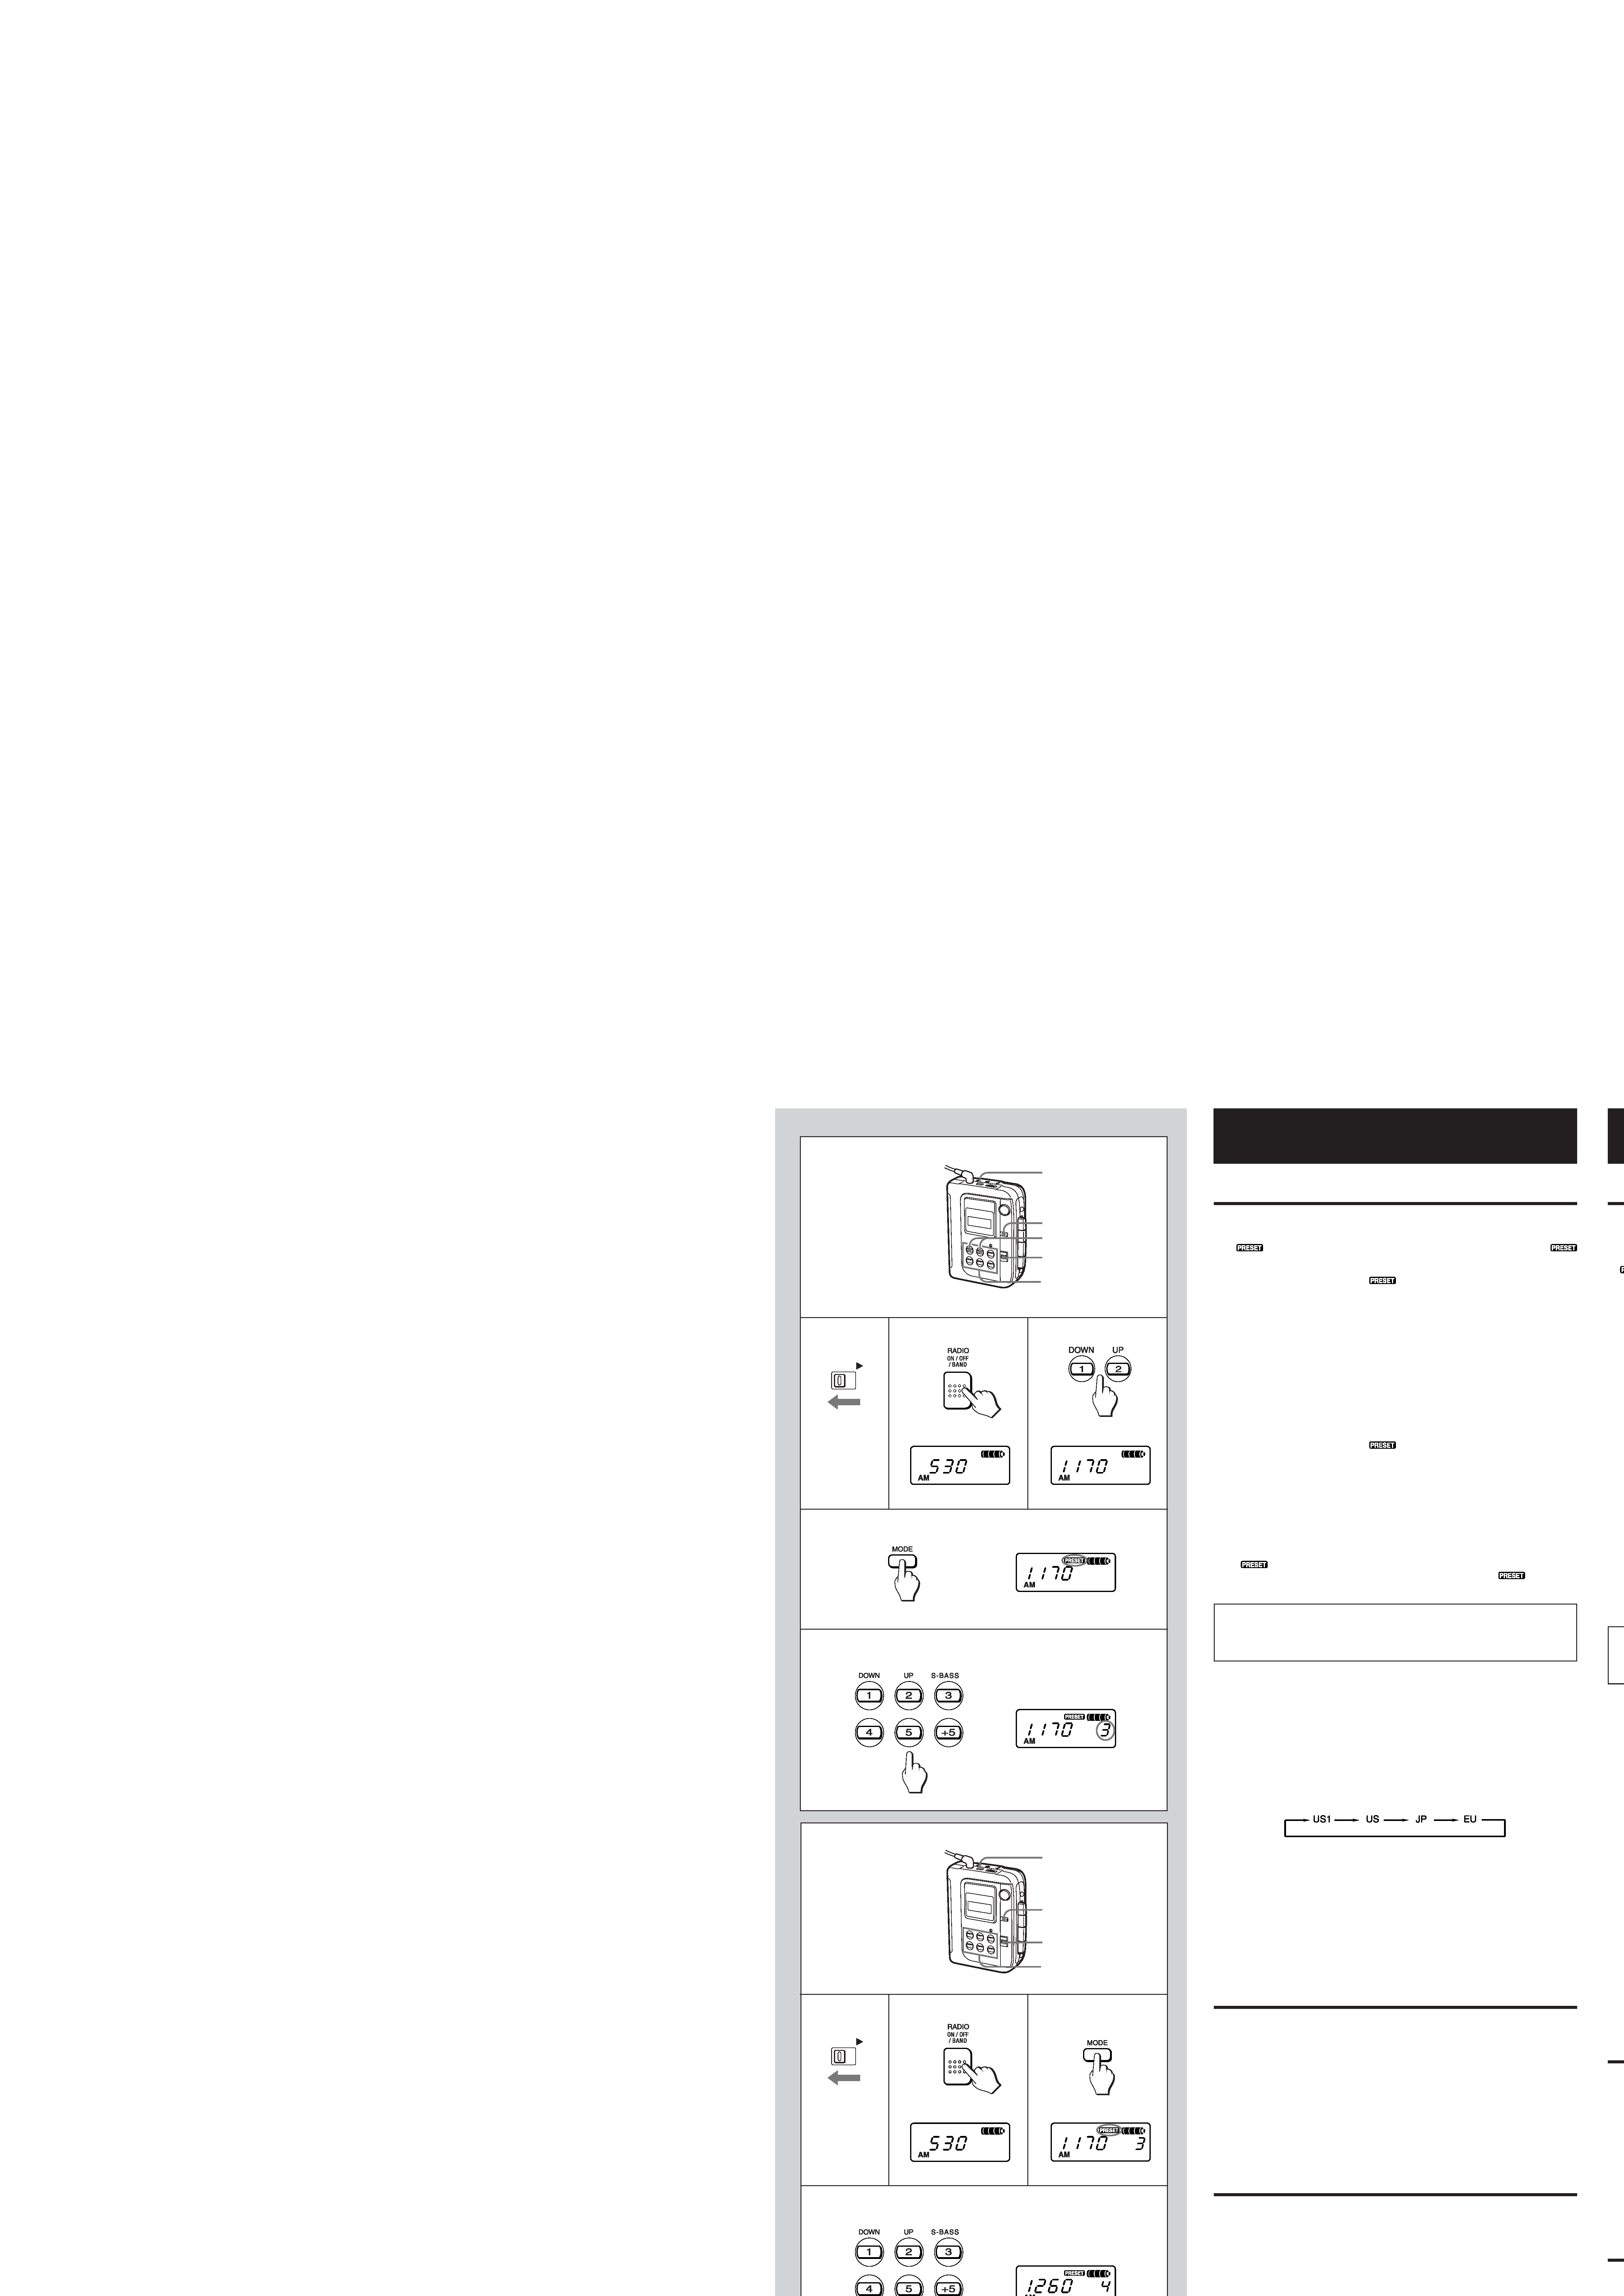
PRESETTING I
This unit can preset 10 stations for each band.
1Release the HOLD switch.
2Press the RADIO ON/OFF/BAND button to select AM, FM, TV or WTHR.
If
is displayed in the display, press the MODE button so that
disappears.
3Press the UP or DOWN button to tune in to a station.
4Press the MODE button so that
appears in the display.
5Keep one of the numeric (1 5) buttons pressed for 1 2 seconds to select the
preset number. For preset number 6 and above, press and release the +5 button
first.
Example: To select preset number 8, press and release the +5 button. While "5" is
flashing, press the 3 button for 1 2 seconds.
To preset two or more stations, repeat the procedure from step 1.
To change the presetting
Repeat the procedure from step 1.
Listening to preset stations J
1Release the HOLD switch.
2Press the RADIO ON/OFF/BAND button to select AM, FM, TV or WTHR.
3Press the MODE button so that
appears in the display.
4 Press and release the numeric (1 5) buttons to select the desired preset number.
For preset number 6 and above, press and release the +5 button first.
Example: To select preset number 8, press and release the +5 button. While "5" is
flashing, press and release the 3 button.
After listening, press the RADIO ON/OFF/BAND button repeatedly to turn off the radio.
You can turn off the radio also by keeping the RADIO ON/OFF/BAND button pressed for
more than 2 seconds.
Note
While
is displayed, the S-BASS button functions as only the numeric "3" button.
To emphasize the low frequencies, press the MODE button so that
disappears,
then press the S-BASS button.
Caution
When selecting a preset station, DO NOT HOLD the numeric (1 5) buttons for
more than a second. Otherwise, currently-tuned station will be preset to that button
instead.
Frequency range and step K
Radio broadcasts have different frequency ranges and change in different steps in different
countries.
This unit is factory preset to use in North and South America (with TV and WTHR bands).
To use the unit in Japan or Europe, change the receivable frequency ranges and steps
as below.
1Release the HOLD switch.
2Press the RADIO ON/OFF/BAND button to turn on the radio.
3Hold down both 4 and +5 buttons simultaneously for 3 seconds.
Each time they are held, the band setting is displayed cyclically as below.
US1: North and South America (with TV and WTHR bands)
US : North and South America (without TV and WTHR bands)
JP : Japan
EU : Europe and other areas
· To return to the factory preset frequency range and step directly, hold down both
UP and DOWN buttons simultaneously for 3 seconds.
· When the frequency range and step are changed, the preset stations are erased.
· When the reception area is changed to US, JP, or EU, the tuner band will change
to AM, FM1 and FM2. FM1 and FM2 have the same frequency range and both can be
used to tune in to an FM station.
MAINTENANCE L
To clean the head and the tape path
After every 10 hours of use, clean the head and the tape path with a head cleaning
cassette or cotton swab moistened with cleaning fluid or denatured alcohol. (These
cleaning kits are commercially available.) When cleaning with a cotton swab a, wipe
the playback head b, the pinch roller c and the capstan d.
To clean the cabinet
Use a soft cloth lightly moistened with a mild detergent solution. Do not use strong
solvents such as alcohol, benzine or thinner.
If erroneous operation or display occurs M
Press the RESET button with a thin rod to reset the unit.
If the unit is reset, the stations that you preset are erased.
SPECIFICATIONS
Frequency range:
Reception area US1
AM 530 1,710 kHz (10 kHz steps)
FM 87.5 108.1 MHz (200 kHz steps)
TV 2 ch 13 ch
WTHR 1 ch 7 ch
Reception area US
AM 530 1,710 kHz (10 kHz steps)
FM1, FM2 87.5 108.1 MHz (200 kHz steps)
Reception area JP
AM 531 1,629 kHz (9 kHz steps)
FM1, FM2 76 108 MHz (100 kHz steps in 76 90 MHz,
I
12
3
4
5
1
2
3
4
5
HOLD
J
4
1
2
3
4
12
3
HOLD
PR
Este
1 S
2 P
W
S
3 P
4 P
5 M
s
y
E
M
Para
Par
Rep
Par
1 S
2 P
3 P
4 P
p
p
E
e
Cua
BAN
pres
Not
Mie
dar
y pr
Pr
Cu
bo
la
Inte
Las
dife
Este
ban
de f
1 S
2 P
3 M
C
s
U
U
J
E
· Pa
fre
se
· Al
bo
· Al
ca
am
MA
Par
Des
case
des
con
el ca
Par
Utili
utilic
Si s
Pres
Si s
ES
Gam
Zon