ENGLISH
A
B
FR-AP20W
RADIO RECEIVER
RECEPTOR DE RADIO
OPERATING INSTRUCTIONS
INSTRUCCIONES DE MANEJO
MODE D'EMPLOI
8B-RU6-901-01
010316AAO-OX
Printed in Hong Kong
WARNING
TO REDUCE THE RISK OF FIRE OR ELECTRIC SHOCK, DO NOT
EXPOSE THIS APPLIANCE TO RAIN OR MOISTURE.
PRECAUTIONS
To maintain good performance
· Do not use the unit in places which are extremely hot, cold, dusty or
humid.
In particular, do not keep the unit:
· in a high humidity area such as a bathroom
· near a heater
· in an area exposed to direct sunlight (inside a parked car, where there
could be a considerable rise in temperature)
· Keep cassette tapes, magnetic cards and other magnetic recorded
materials away from the speaker as the recorded information may be
erased or noise may occur on cassette tapes.
If an erroneous display or operation occurs
A
When an erroneous display or operation occurs, reset the unit pressing
RESET with a thin rod.
When the unit is reset, the time and alarm settings are erased.
MAINTENANCE
To clean the cabinet
Use a soft cloth lightly moistened with a mild detergent solution.
Do not use the strong solvents such as alcohol, benzine or cleaner.
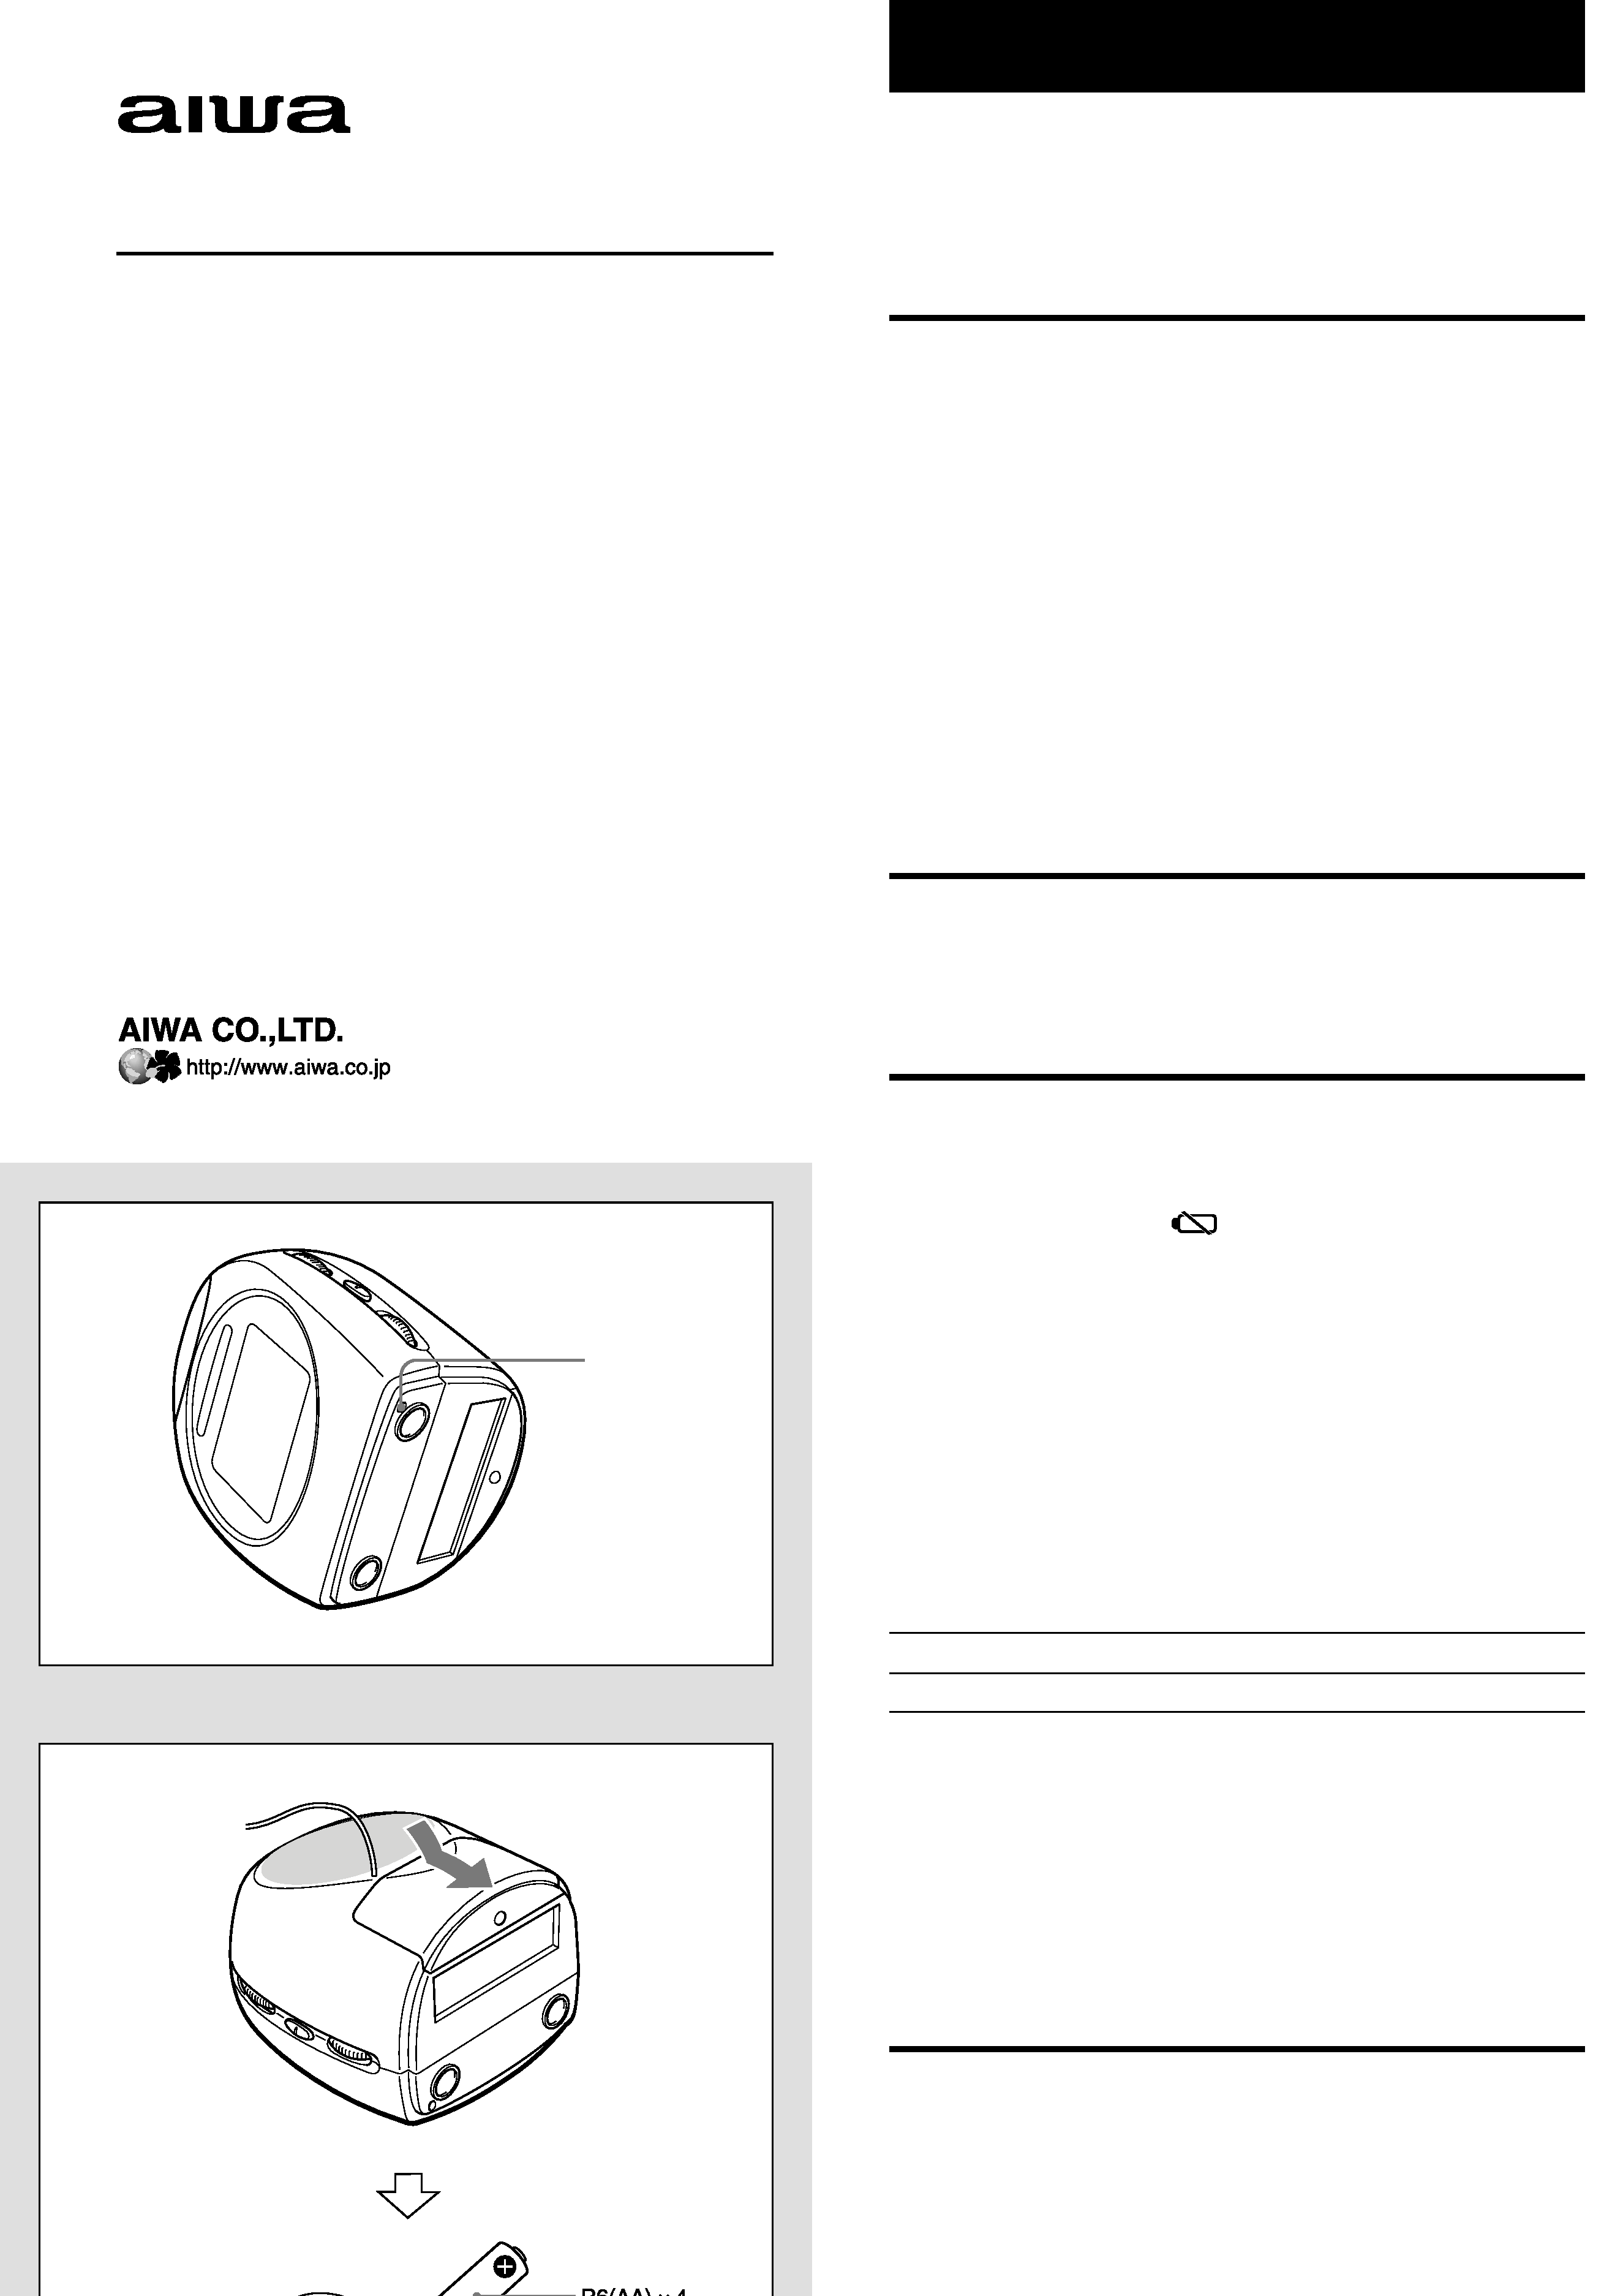
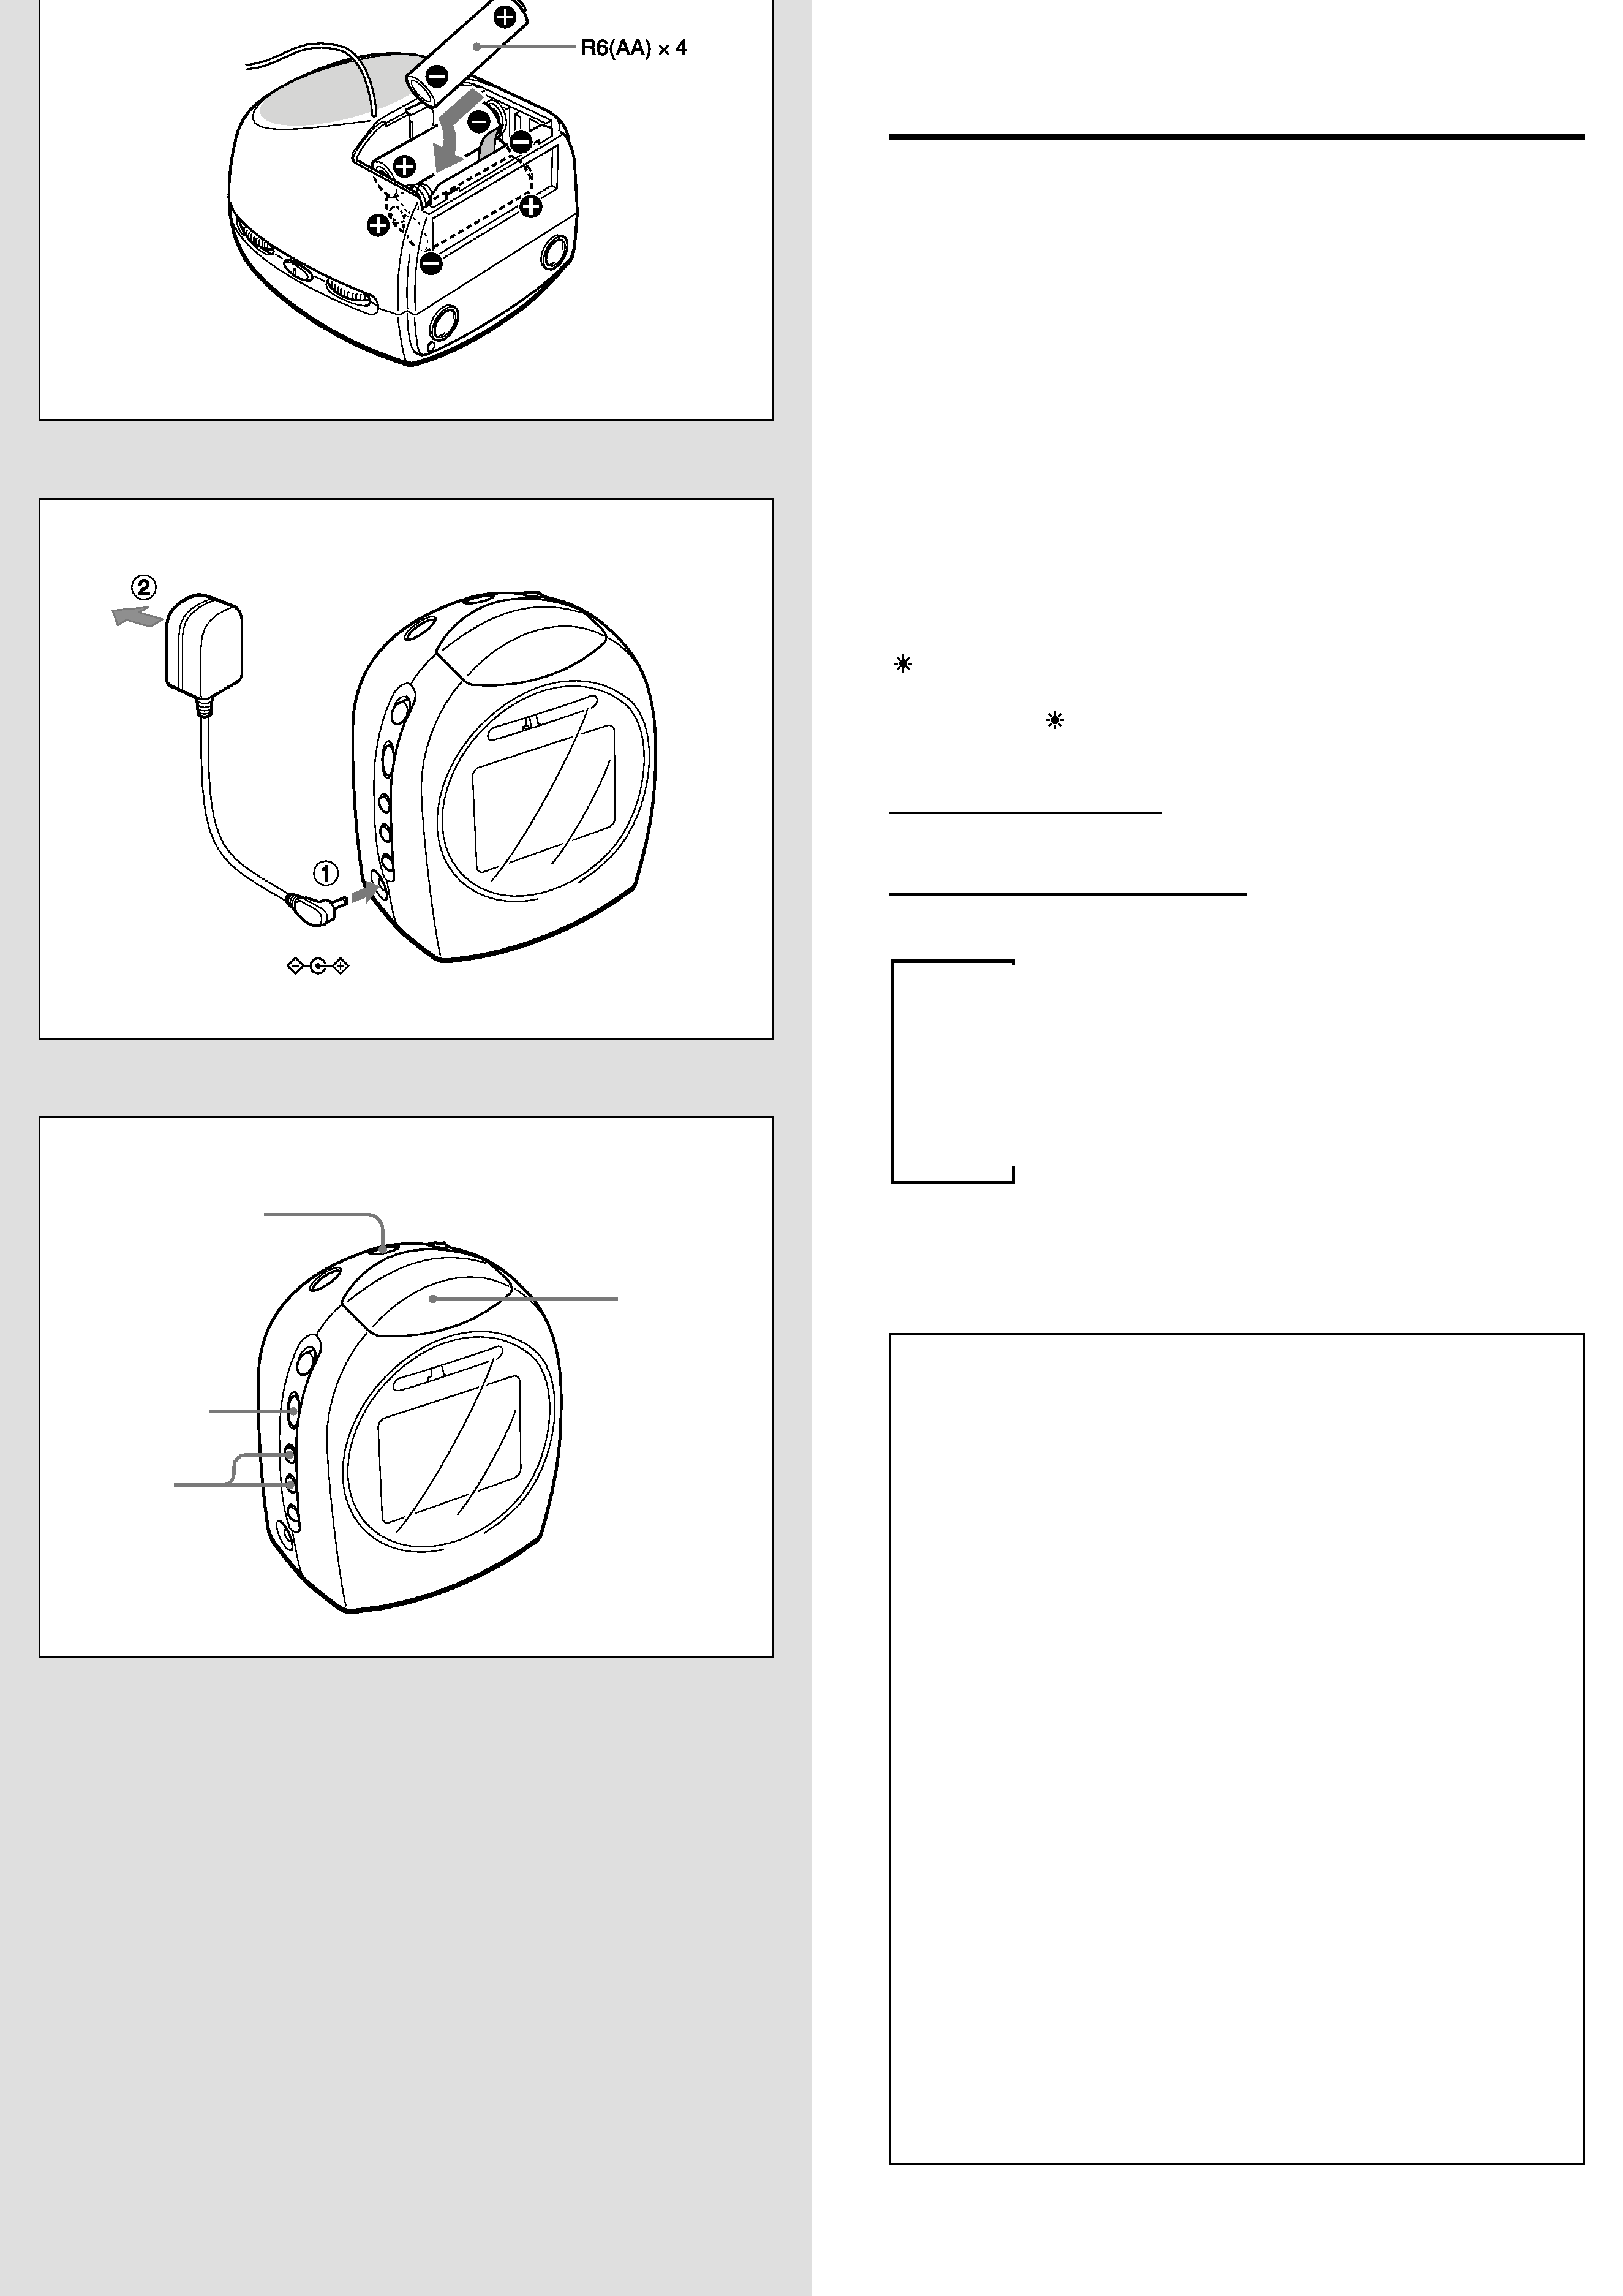
USING ON DRY CELL BATTERIES
B
Open the battery compartment and insert four R6 (size AA) batteries
with the
0 and 9 marks correctly aligned.
Battery replacement
Replace the batteries when "
" is displayed.
If you continue to use the unit, power will go off automatically when the
batteries wear out, and the power cannot be turned on without replacing
the batteries.
Note
· The clock and alarm time are retained for about 3 minutes after the
batteries are removed. Replace the batteries quickly not to erase the
data.
· When using the unit on batteries, disconnect the plug of the AC adaptor
from DC 6.3 V jack. If the plug is connected, the unit cannot be used on
battery power supply.
Battery life
(EIAJ 10 mW using R6 (size AA) manganese batteries)
AM reception
Approx. 65 hours
FM reception
Approx. 50 hours
Battery life may vary according to conditions of use.
Note on dry cell batteries
· Make sure that the
0 and 9 marks are correctly aligned.
· Do not mix different types of batteries, or an old battery with a new one.
· Never recharge the batteries, apply heat to them or take them apart.
· When not using the batteries, remove them to prevent needless wear.
· If liquid leaks from the batteries, wipe thoroughly to remove.
USING ON AC HOUSE CURRENT
C
Connect the supplied AC adaptor.
1 to DC 6.3 V jack
2 to a wall outlet
If a power interruption occurs
The clock and alarm time are retained for about 3 minutes after the power
is interrupted. If 3 minutes pass after the power interruption, set the clock
and alarm time again.
RESET
pp
p
p
,
and alarm time again.
SETTING THE CLOCK
D
1 Insert batteries or connect the AC adaptor.
"AIWA" flashes.
2 Keep SET pressed for 1 second.
Days of the week flashes.
3 Press UP or DOWN to set day of the week, then press SET.
MON: Monday/ TUE: Tuesday/ WED: Wednesday/ THU: Thursday/ FRI:
Friday/ SAT: Saturday/ SUN: Sunday
The clock flashes.
4 Press UP or DOWN to set the current time, then press SET.
To change the time faster, keep UP or DOWN pressed.
The clock starts from 00 seconds.
To change the clock setting
Keep SET pressed for 1 second while the clock is displayed.
Days of the week starts flashing, then repeat the procedure from step 3.
To adjust the time for Daylight-saving time
Keep SUMMER TIME pressed for 3 seconds.
appears in the display and the time advances by 1 hour.
When Daylight-saving time ends, keep SUMMER TIME pressed for 3
seconds again.
disappears in the display.
To turn on the back light of the display
When using on the batteries
To turn on the back light of the display, press SNOOZE & LIGHT once.
It lights for about 3 seconds after the last button operation.
When using on the AC house current
Each time SNOOZE & LIGHT is pressed, the display changes as follows.
V
The back light turns on.
V
The back light becomes dim.
V
The back light turns off.
C
DC 6.3V
D
2,3,4
3,4
SUMMER TIME
SNOOZE &
LIGHT
NOTE
FOR USE IN THE U.S.A.
This equipment has been tested and found to comply with the limits for
a Class B digital device, pursuant to Part 15 of the FCC Rules. These
limits are designed to provide reasonable protection against harmful
interference in a residential installation.
This equipment generates, uses, and can radiate radio frequency
energy and, if not installed and used in accordance with the instructions,
may cause harmful interference to radio communications. However,
there is no guarantee that interference will not occur in a particular
installation. If this equipment does cause harmful interference to radio
or television reception, which can be determined by turning the
equipment off and on, the user is encouraged to try to correct the
interference by one or more of the following measures:
Reorient or relocate the receiving antenna.
Increase the separation between the equipment and receiver.
Connect the equipment into an outlet on circuit different from that
to which the receiver is connected.
Consult the dealer or an experienced radio/TV technician for help.
CAUTION
Modifications or adjustments to this product, which are not expressly
approved by the manufacturer, may void the user's right or authority to
operate this product.
This device complies with Part 15 of the FCC Rules. Operation is
subject to the following two conditions: (1) This device may not cause
harmful interference, and (2) this device must accept any interference
received, including interference that may cause undesired operation.
ESPAÑOL
FRANÇAIS
AVERTISSEMENT
POUR REDUIRE LES RISQUES D'INCENDIE OU DE DECHARGE
ELECTRIQUE, NE PAS EXPOSER CET APPAREIL A LA PLUIE OU A
L'HUMIDITE.
PRECAUTIONS
Pour maintenir de bonnes performances
· Ne pas utiliser cet appareil à un emplacement très chaud, froid,
poussiéreux ou humide. En particulier, ne pas le conserver:
· à un endroit très humide, par exemple une salle de bains
· près d'un appareil de chauffage
· à un endroit en plein soleil (dans une voiture garée, où la température
peut considérablement augmenter)
· Conserver les cassettes, les cartes magnétiques et les autres matériaux
enregistrés magnétiquement loin du haut-parleur, car les informations
enregistrées pourraient être effacées ou des parasites pourraient
apparaître sur les cassettes.
En cas d'affichage ou d'opération erronée
A
Réinitialiser l'appareil en appuyant sur RESET avec une tige fine.
A la réinitialisation de l'appareil, les réglages d'heure et d'alarme sont
effacés.
ENTRETIEN
Nettoyage du coffret
Utiliser un chiffon doux humidifié de solution détergente douce.
Ne pas utiliser de solvant puissant tel qu'alcool, benzine ou détergent.
FONCTIONNEMENT SUR PILES SECHES
B
Ouvrir le logement des piles et insérer quatre piles R6 (format AA)
en alignant correctement les marques
0 et 9.
Remplacement des piles
Remplacer les piles quand "
" est affiché.
Si l'utilisation de l'appareil est poursuivie, l'alimentation se coupera
automatiquement à l'épuisement des piles, et la mise sous tension sera
impossible tant que les piles ne seront pas remplacées.
Remarques
· Le réglage de l'horloge et l'heure d'alarme sont maintenus environ
3 minutes après le retrait des piles. Remplacer rapidement les piles pour
éviter l'effacement des données.
· Quand l'appareil fonctionne sur piles, débrancher la fiche de l'adaptateur
secteur de la prise DC 6.3 V. Si la fiche reste connectée, l'appareil ne
peut pas fonctionner sur piles.
Autonomie des piles
(EIAJ 10 mW avec des piles au manganèse R6 (format AA))
Réception AM
Env. 65 heures
éception FM
Env. 50 heures
L'autonomie des piles peut varier selon les conditions d'utilisation.
Remarques sur les piles sèches
· Vérifier que les polarités
0 et 9 sont correctement alignées.
· Ne pas mélanger différents types de piles, ou une pile ancienne et une
pile neuve.
· Ne jamais recharger les piles, les chauffer ou les démonter.
· Sortir les piles de l'appareil quand elles ne sont pas utilisées pour éviter
une usure inutile.
· Si du liquide fuit des piles, l'essuyer pour l'éliminer complètement.
FONCTIONNEMENT SUR COURANT
SECTEUR
C
Raccorder l'adaptateur secteur fourni.
1 à la prise DC 6.3 V
2 à une prise murale
ADVERTENCIA
PARA REDUCIR EL RIESGO DE INCENDIO O DESCARGA ELECTRICA,
NO EXPONGA ESTE APARATO A LA LLUVIA O HUMEDAD.
PRECAUCIONES
Para mantener sus buenas prestaciones
· No utilice el aparato en lugares muy calientes, fríos, con polvo o humedad.
Especialmente, no debe dejar el aparato:
· en lugares muy húmedos, por ejemplo en el baño
· cerca de la calefacción
· en un lugar expuesto a los rayos del sol (dentro de un coche
estacionado, donde puede aumentar mucho la temperatura)
· Mantenga las cintas de casete, tarjetas magnéticas y demás material
grabado magnéticamente lejos del altavoz porque la información grabada
puede borrarse o pueden aparecer ruidos en las cintas de casete.
Si se produce una indicación o funcionamiento erróneos
A
Cuando se produce una indicación o funcionamiento erróneos, reinicialice
el aparato oprimiendo RESET con una varilla fina.
Cuadno se reinicializa la unidad, se borran los ajustes de la hora y la
alarma.
MANTENIMIENTO
Para limpiar el mueble
Utilice un paño suave ligeramente empapado en una solución detergente
neutra.
No utilice disolventes fuertes tales como alcohol, bencina o limpiador.
USO DE LAS PILAS
B
Abra el portapilas y coloque cuatro pilas R6 (tamaño AA) con las
marcas
0 y 9 correctamente alineadas.
Cambio de la pila
Cambie las pilascuando aparece "
".
Si continúa utilizando la unidad, se desconecta automáticamente la
alimentación cuando se agotan las pilas y no puede volver a conectar si
no se cambian las pilas.
Notas
· El reloj y la hora de la alarma se retienen durante unos 3 minutos después
de sacar las pilas. Cambie rápidamente las pilas para no borrar los datos.
· Cuando se utiliza el aparato con las pilas, desconecte el adaptador de
CA de la toma DC 6.3 V. Si se conecta el enchufe, no puede utilizar el
aparato con la alimentación de las pilas.
Duración de las pilas
(EIAJ de 10 mW utilizando pilas de manganeso R6 (tamaño
AA))
Recepción de AM
Aprox. 65 horas
Recepción de FM
Aprox. 50 horas
La duración de las pilas depende de las condiciones de uso.
Nota sobre las pilas
· Compruebe que las marcas
0 y 9 están bien alineadas.
· No mezcle distintos tipos de pilas o una pila vieja con una nueva.
· No recargue las pilas, caliente o desarme.
· Cuando no utilice las pilas, sáquelas para evitar que se desgasten
inútilmente.
· Si se producen fugas de líquido de las pilas, limpie para sacarlas.
UTILIZACION CON LA CORRIENTE
ELECTRICA DEL HOGAR
C
Conecte el adaptador de CA suministrado.
1 a la toma DC 6.3 V
2 a un tomacorriente de la pared
1 à la prise DC 6.3 V
2 à une prise murale
En cas de panne de courant
Le réglage de l'horloge et l'heure d'alarme sont maintenus environ
3 minutes après la panne de courant. Régler à nouveau l'horloge et l'heure
d'alarme si la panne de courant dure plus de 3 minutes.
REGLAGE DE L'HORLOGE
D
1 Insérer les piles ou raccorder l'adaptateur secteur.
"AIWA" clignote.
2 Maintenir SET pressé pendant 1 seconde.
Les jours de la semaine clignotent.
3 Appuyer sur UP ou DOWN pour régler l'heure de la semaine, puis
sur SET.
MON: Lundi/TUE: Mardi/WED: Mercredi/THU: Jeudi/FRI: Vendredi/SAT:
Samedi/SUN: Dimanche
L'horloge clignote.
4 Appuyer sur UP ou DOWN pour régler l'heure actuelle, puis sur
SET.
Pour changer l'heure plus rapidement, maintenir UP ou DOWN pressé.
L'horloge démarre à 00 seconde.
Pour modifier le réglage de l'horloge
Maintenir SET pressé 1 seconde pendant l'affichage de l'horloge.
Le jour de la semaine se met à clignoter, répéter la procédure à partir de
l'étape 3.
Réglage de l'heure pour l'heure d'été
Maintenir SUMMER TIME pressé 3 secondes.
s'affiche et l'heure avance d'1 heure.
A la fin de la période d'heure d'été, maintenir SUMMER TIME à nouveau
pressé 3 secondes.
disparaîtra de l'affichage.
Pour activer le rétro-éclairage de l'affichage
En fonctionnement sur piles
Pour activer le rétro-éclairage de l'affichage, appuyer une fois sur SNOOZE
& LIGHT.
Il s'allume environ 3 secondes après la dernière sollicitation des touches.
En fonctionnement sur courant secteur
L'affichage change comme suit à chaque pression de SNOOZE & LIGHT.
V
Le rétro-éclairage s'allume.
V
Le rétro-éclairage s'atténue.
V
Le rétro-éclairage s'éteint.
2 a un tomacorriente de la pared
Si se produce un corte de electricidad
Las horas del reloj y la alarma se conservan unos 3 minutos después de
interrumpirse la corriente si transcurren 3 minutos después del corte
eléctrico, vuelva a ajustar el reloj y la hora de la alarma.
AJUSTE DEL RELOJ
D
1 Coloque pilas o conecte el adaptador de CA.
Destella "AIWA".
2 Mantenga SET presionado durante 1 segundo.
Destellan los días de la semana.
3 Presione UP o DOWN para ajustar el día de la semana y presione
SET.
MON: Lunes/TUE: Martes/WED: Miércoles/THU: Jueves/FRI: Viernes/
SAT: Sábado/SUN: Domingo
Destella el reloj.
4 Presione UP o DOWN para ajustar la hora actual y presione SET.
Para cambiar la hora más rápidamente, mantenga presionado UP o
DOWN.
El reloj empieza desde 00 segundos.
Para cambiar el ajuste del reloj
Mantenga SET presionado durante 1 segundo cuando aparezca el reloj.
El día de la semana empieza a destellar y repita el procedimiento desde
el paso 3.
Para ajustar la hora de verano
Mantenga presioado SUMMER TIME durante 3 segundos.
Aparece
en la pantalla y la hora avanza en 1 hora.
Cuando termina la hora de verano, vuelva a mantener presionado
SUMMER TIME durante 3 segundos. Desaparece
de la pantalla.
Para encender la luz de fondo de la pantalla
Cuando se utilizan las pilas
Para encender la luz de fondo de la pantalla, presione SNOOZE & LIGHT
una vez.
Se enciende durante unos 3 segundos después de la última vez que se
presionó un botón.
Cuando se utiliza la corriente de CA del horgar
Cada vez que presione SNOOZE & LIGHT, la pantalla cambia de la
siguiente forma.
V
Se enciende la luz de fondo.
V
Se oscurece la luz de fondo.
V
Se apaga la luz de fondo.
ENGLISH
G
FM
AM
F
E
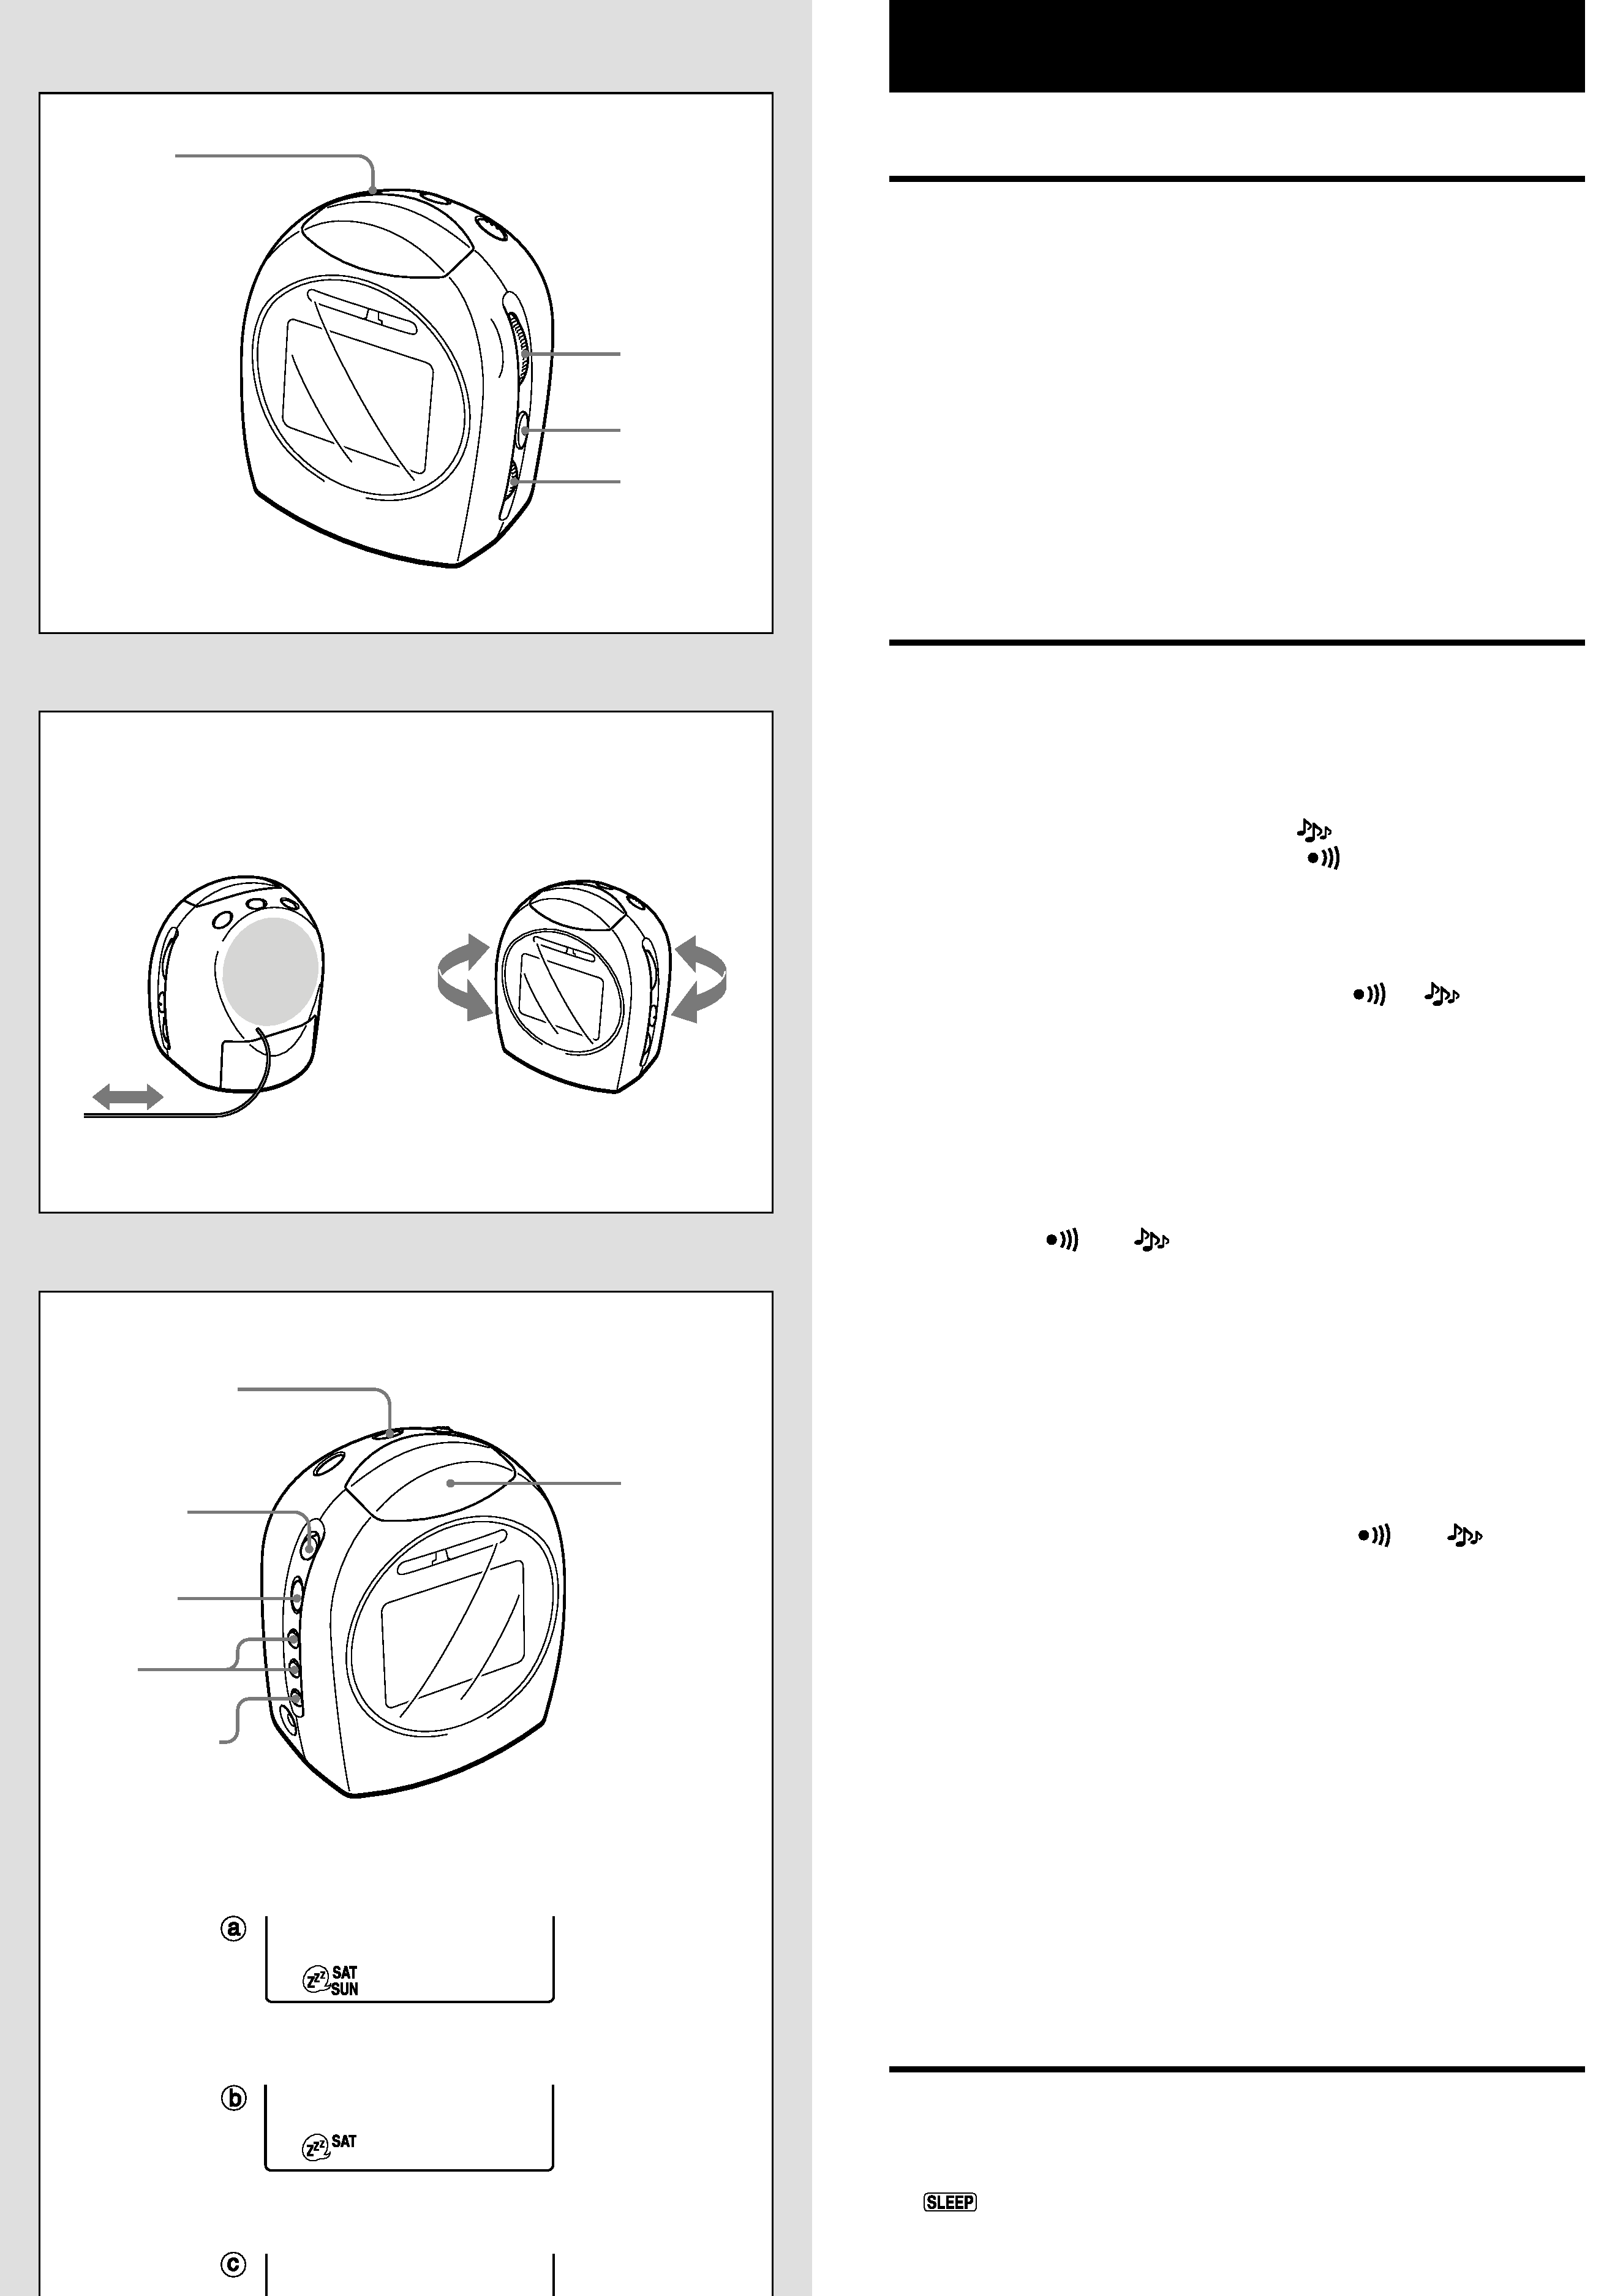
RADIO RECEPTION
E
1 Press RADIO ON/OFF to turn on the radio.
2 Set BAND to select FM or AM.
3 Turn the TUNING control to tune in to a station.
4 Adjust the volume.
After listening, press RADIO ON/OFF to turn off the radio.
For better reception
F
FM: Extend the FM wire antenna fully.
AM: Turn the unit to find the position which gives the best reception.
Note
Do not connect FM wire antenna to external antenna.
ALARM SETTING
G
The radio or buzzer automatically sounds at the designated time every
day.
You can set two different alarm times, one in the radio alarm and one in
the buzzer alarm, so that the alarm timer operates twice a day.
· Before setting, tune in to a station and turn off the radio.
1 Press SET repeatedly to select the radio alarm or buzzer alarm.
To select the radio alarm, press it until
and the alarm time flash.
To select the buzzer alarm, press it until
and the alarm time flash.
2 While the alarm time flashes, press UP or DOWN to set the alarm
time.
To change the time faster, keeps UP or DOWN pressed.
3 Press SET.
The display changes to the current time and
or
lights up.
When the preset time comes, the radio or buzzer sounds. The volume of
the buzzer increases twice after 10 seconds.
To turn off the alarm, press ALARM OFF or SNOOZE. When SNOOZE
is pressed, the alarm or the radio will automatically come on again after
about 5 minutes.
To cancel the alarm before the preset time comes, press ALARM MODE
repeatedly until
and
disappear.
To change the alarm time
Set the alarm time again.
Note
The radio or buzzer automatically turns off after about 1 hour.
To set the alarm timer to sound twice a day
After setting two different alarm times the radio alarm and the buzzer alarm,
then press ALARM MODE repeatedly until both
and
appear in
the display.
About the buzzer sound
The buzzer volume cannot be set with the VOLUME control.
To cancel the alarm only on Saturday and Sunday
You can cancel the alarm every Saturday or Sunday.
After setting the alarm, press WEEKEND ALARM SKIP repeatedly to select
your desired day, then press SET.
Each time WEEKEND ALARM SKIP is pressed, the display changes as
follows:
a The alarm is canceled on every Saturday and Sunday
b The alarm is canceled on every Saturday
c The alarm is canceled on every Sunday
d The alarm sounds every day
SLEEP TIMER SETTING
H
You can use the sleep timer to turn the radio off automatically after up to
90 minutes.
· Before setting, tune in to a station.
1 Press SLEEP.
flashes and "90" (the time to turn off the radio) appears.
2 While the time is displayed, press SLEEP repeatedly to select the
time to turn off the radio.
Each time the button is pressed, the time changes as follows:
3
1
2
4
SNOOZE
1,3
2
ALARM OFF
ALARM
MODE
WEEKEND
ALARM SKIP