
ENGLISH
OWNER'S RECORD
For your convenience, record the model number and the serial number (you will
find it in the battery compartment of your set) in the space provided below. Please
refer to them when you contact your Aiwa dealer in case of difficulty.
Model No. CR-LD121
Serial No.
CAUTION
Modifications or adjustments to this product, which are not expressly approved by
the manufacturer, may void the user's right or authority to operate this product.
This device complies with Part 15 of the FCC Rules. Operation is subject to the
condition that this device does not cause harmful interference.
PRECAUTIONS
To maintain good performance
· Do not use the unit in places which are extremely hot, cold, dusty or humid. In
particular, do not keep the unit:
· in a high humidity area such as a bathroom
· near a heater
· in an area exposed to direct sunlight (e.g., inside a parked car, where it can
become extremely hot)
Note on listening with the headphones
· Listen at moderate volumes to avoid hearing damage.
· Do not wear the headphones while driving or cycling. It may create a traffic hazard.
·You should use extreme caution or temporarily discontinue using the unit in
potentially hazardous situations, such as walking, jogging, etc.
·Wear them properly; L is left, R is right.
· The headphones should be worn with the longer cord behind your neck.
TO INSERT A DRY CELL BATTERY
Insert a size AAA (R03) dry cell battery with the
0 and 9 marks correctly
aligned.
AAA(R03)
Battery life
Battery
size AAA (R03)
size AAA (LR03)
manganese battery
alkaline battery
AM
Approx. 16 hours
Approx. 32 hours
FM
Approx. 11 hours
Approx. 22 hours
Battery replacement
Replace the battery when "
" is displayed.
If you continue to use the unit, power will go off automatically when the battery
wears out, and the power cannot be turned on without replacing the battery.
Note
The stations that you preset and the time are retained for about 5 minutes after the
battery is removed. Replace the battery quickly not to erase the data.
If the cover of the battery compartment comes off
Attach it as illustrated.
Note on dry cell battery
· Make sure that the
0 and 9 marks are correctly aligned.
·To prevent the risk of electrolyte leakage or explosions, never recharge the battery,
apply heat to it, or take it apart.
· When not using the battery, remove it to prevent needless battery wear.
· If liquid leaks from the battery, wipe thoroughly to remove.
CR-LD121
RADIO RECEIVER
OPERATING INSTRUCTIONS
INSTRUCCIONES DE MANEJO
3-255-591-41(1)
PREPARATIONS
Turning on and off
Press POWER to turn on the power. Press it again to turn off the power.
POWER
PRESET/TUNING
Auto power off function
The power will be turned off automatically about 90 minutes after turning on the
power. (Auto power off function)
When the power is turned off by the auto power off function, the beep sound is
heard for about 5 seconds. If you press POWER in these 5 seconds, power will not
be turned off.
To cancel the auto power off function
Operate when the power is turned off.
1Keep PRESET/TUNING pressed for 5 seconds until "ON" appears in the
display.
2 While "ON" is displayed, slide PRESET/TUNING to
- to display "OFF".
3 Press PRESET/TUNING.
To activate the auto power off function again, slide PRESET/TUNING to
+ to
display "ON" in step 2.
Clock setting
When the battery is inserted, or after resetting the unit, "12:00" flashes in the
display.
Set the clock when the power is turned off.
2
1,3
1Keep MEMO/TIME SET pressed for 5 seconds until "AM" and clock flash
in the display.
2 Slide PRESET/TUNING to
+ or - to set the clock.
AM 12:00
midnight
PM 12:00
noon
3 Press MEMO/TIME SET.
The clock starts from 00 second.
If the flashing stops during operation
Repeat the procedure from the beginning.
TUNING IN TO A STATION
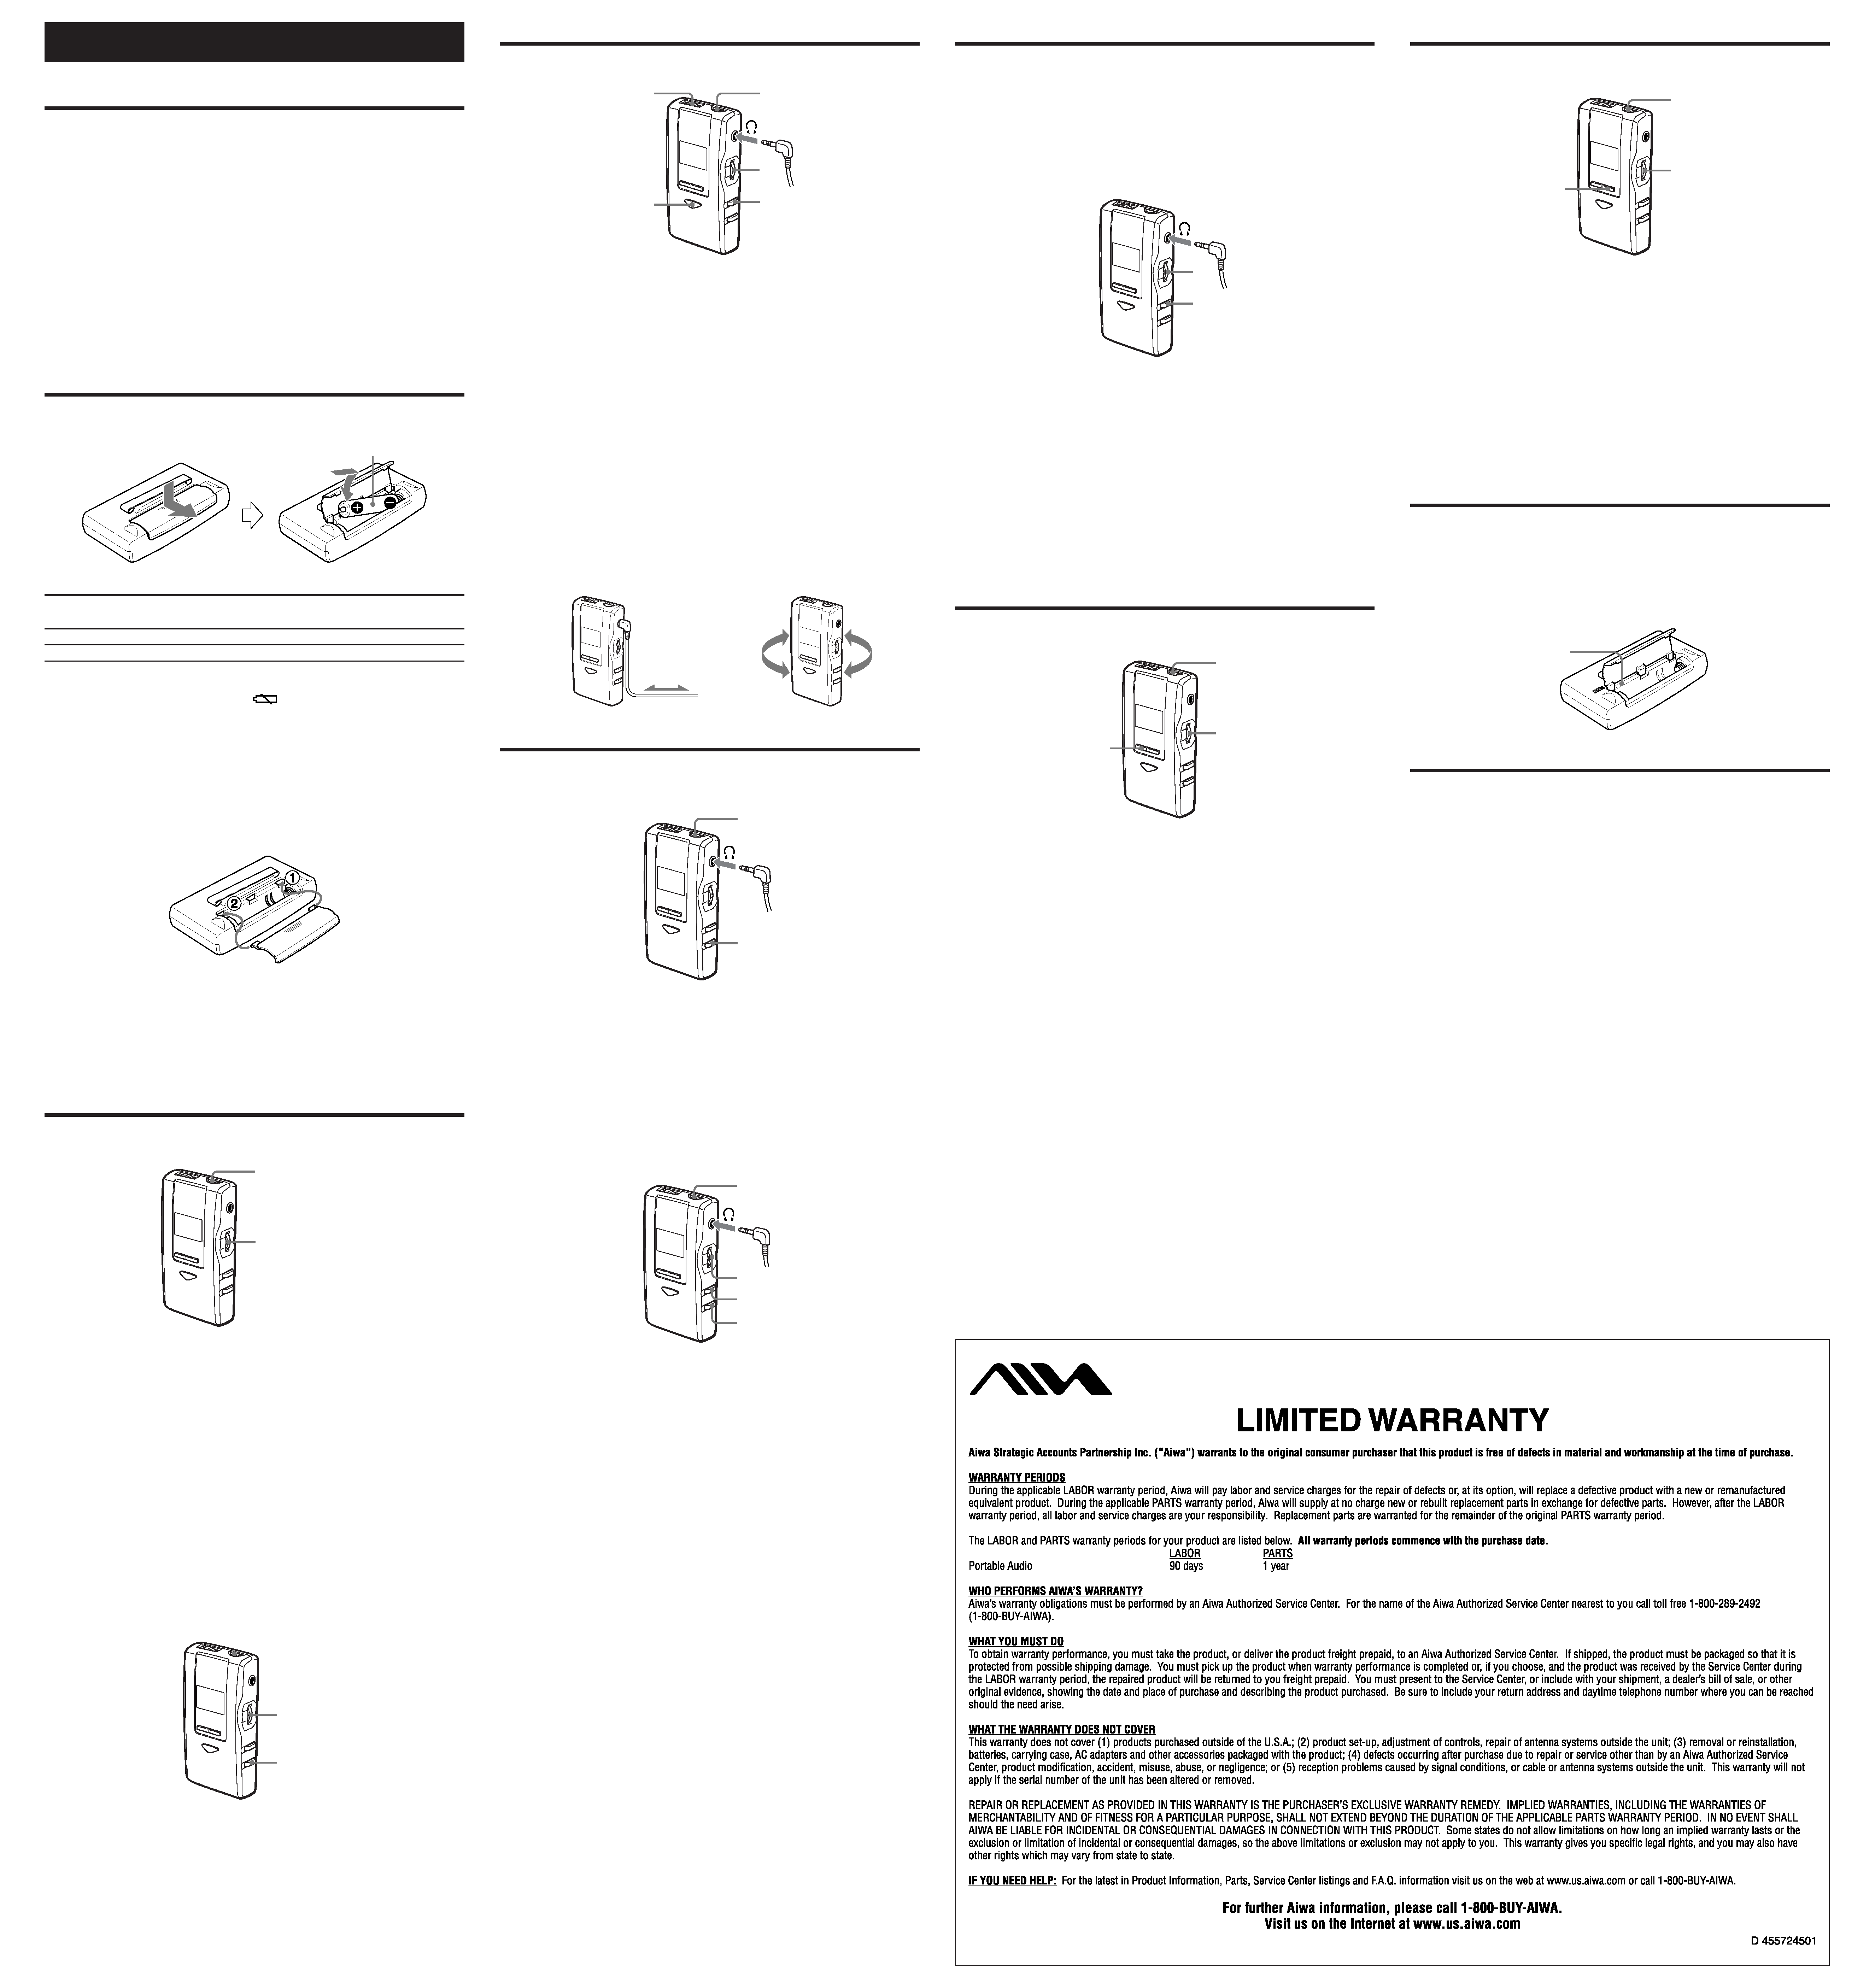
Connect the supplied headphones to the
\ jack.
1
4
DSL
3
2
1 Press POWER to turn on the power.
2 Press BAND repeatedly to select AM, FM1 or FM2.
FM1 and FM2 have the same frequency range. Both can be used to tune in to
an FM station.
3 Slide PRESET/TUNING to
+ or - to tune in to a station.
4 Adjust the volume.
For quick tuning
Keep PRESET/TUNING slide to
+ or - pressed for 1 2 seconds.
When a station is tuned in to, the frequency indicator stops automatically. However,
it may not stop if the broadcast signal is weak.
To obtain powerful heavy bass
Press DSL. "DSL" appears in the display.
To cancel, press DSL again.
For better reception
FM: The headphone cord functions as the FM antenna. Keep it extended.
AM: Turn the unit to find the position which gives the best reception.
FM
AM
PRESETTING STATIONS
Automatic presetting
You can preset up to 15 stations on each band (AM, FM1, FM2).
1
2
1 Press POWER to turn on the power.
2 Keep MEMO/TIME SET pressed for about 5 seconds until "PRESET" flashes.
The unit searches for and memorizes the receivable stations.
Auto presetting ends after 15 stations are preset on each band.
Note
When broadcast signals are very weak, stations cannot be preset automatically.
Preset them manually.
Manual presetting
You can preset up to 15 stations under each preset number (1 15) on each band
(AM, FM1 and FM2).
1
3,5
2
2,4
1 Press POWER to turn on the power.
2Tune in to a station.
3 Press MEMO/TIME SET.
4 Slide PRESET/TUNING to
+ or - repeatedly to select the preset number
while "PRESET" is flashing.
5 Press MEMO/TIME SET while "PRESET" is flashing.
To preset more stations, repeat the procedure from the beginning.
Listening to preset stations
1 Press POWER to turn on the power.
2 Press BAND repeatedly to select AM, FM1 or FM2.
3 Press PRESET/TUNING repeatedly to select the preset number.
Deleting preset stations
1 Select the preset number you wish to delete.
2 Press MEMO/TIME SET.
"PRESET" flashes in the display.
3 While "PRESET" is flashing, slide PRESET/TUNING to
+ or - to select the
preset number "-".
4 Press MEMO/TIME SET.
To delete more preset stations, repeat the procedure from the beginning.
WORLD AREAS
Radio broadcasts have different frequency ranges and change in different steps in
different countries.
The unit has three world reception areas: "U" (North and South America), "J" (Japan)
and "E" (other areas).
The reception area is factory-set to "U". Select "J" to listen to the radio in Japan,
select "E" to listen to the radio in Europe and other countries.
Selecting a reception area
Operate when the power is turned off.
2
1
1Keep BAND pressed for 5 seconds.
"U" appears in the display.
2 While "U" appears, slide PRESET/TUNING to
+ or - to select the reception
area.
The display changes to the clock display after 10 seconds, and the reception
area is changed.
If the reception area disappears during operation
Repeat the procedure from the beginning.
When the reception area is changed
The preset stations are erased.
Note
The unit may not receive all the stations broadcasted in any countries or districts
even if the area is set to "E".
TIMER FUNCTION
The buzzer automatically sounds at the designated time every day.
Before setting the timer, set the clock.
POWER
2
1,3
1Keep TIMER pressed for 5 seconds until the time flashes in the display.
2 While the time is flashing, slide PRESET/TUNING to
+ or - to set the
time.
3 Press TIMER.
5 appears in the display.
When the preset time comes, buzzer sounds for 3 minutes.
To stop the buzzer, press TIMER or POWER.
If the flashing stops during operation
Repeat the procedure from the beginning.
To cancel the timer, press TIMER.
5 goes out and the timer function is canceled.
ALARM FUNCTION
You can use the alarm function to sound the buzzer after up to 180 minutes.
POWER
2
1,3
1Keep ALARM pressed for 5 seconds until the minute flashes in the display.
2 While the minute is flashing, slide PRESET/TUNING to
+ or - to set the
time to sound the buzzer.
Example) To set the alarm 1 hour later, slide PRESET/TUNING to
+ or - to
display 60.
3 Press ALARM.
Q appears in the display.
When the preset time comes, the buzzer sounds for 3 minutes.
To stop the buzzer, press ALARM or POWER.
If the flashing stops during operation
Repeat the procedure from the beginning.
To cancel the alarm function, press ALARM.
Q goes out and the alarm function
is canceled.
MAINTENANCE
To clean the cabinet
Use a soft cloth lightly moistened with a mild detergent solution.
Do not use strong solvents such as alcohol, benzine or thinner.
If erroneous operation or display occurs
Press the RESET button inside the battery compartment of the unit with a thin rod
to reset the unit.
If the unit is reset, the stations that you preset and the time are erased.
RESET
SPECIFICATIONS
Frequency range:
Reception area U
AM: 530 1,710 kHz (10-kHz steps)
FM1, FM2: 87.5 108.1 MHz (200-kHz steps)
Reception area E
AM: 531 1,602 kHz (9-kHz steps)
FM1, FM2: 87.5 108 MHz (50-kHz steps)
Reception area J
AM: 531 1,629 kHz (9-kHz steps)
FM1, FM2: 76 108 MHz (100-kHz steps in 76
90 MHz, 50-kHz steps in 90 108 MHz)
Maximum output:
8 mW + 8 mW (EIAJ 32 ohms)
Power sources:
DC 1.5 V using a size AAA (R03) dry cell battery
Maximum dimensions: 42 (W)
× 80 (H) × 18 (D) mm (1 11/16 × 3 1/4 × 23/32 in.)
(excluding projecting parts and controls)
Weight:
Approx. 44 g (1.6 oz) excluding battery
Accessories:
Stereo headphones (1)
The specifications and external appearance of this unit are subject to change
without notice.
http://www.aiwa.com/
Printed in China
© 2003 Sony Corporation
ESPAÑOL
PRECAUCIONES
Para mantener sus buenas prestaciones
· No utilice el aparato en lugares muy calientes, fríos, con polvo o humedad.
Especialmente, no debe dejar el aparato:
· en lugares muy húmedos, por ejemplo en el baño
· cerca de la calefacción
· en un lugar expuesto a los rayos del sol (por ejemplo dentro de un coche
estacionado, donde puede aumentar mucho la temperatura)
Notas para escuchar con los cascos auriculares
· Escuche a un volumen no muy alto para no dañar sus oídos.
· No utilice los auriculares durante la conducción o al andar en bicicleta. Puede
ser peligroso para el tránsito.
· Debe tener mucho cuidado o dejar de usar provisoriamente en situaciones
peligrosas, por ejemplo cuando camina, corre, etc.
· Utilícelos correctamente: L es izquierdo y R es derecho.
· Los cascos auriculares deben utilizarse con el cable más largo detrás del cuello.
PARA COLOCAR UNA PILA
Coloque una pila tamaño AAA (R03) con las marcas
0 y 9 correctamente
alineadas.
AAA(R03)
Duración de la pila
Pila
Pila de manganeso
Pila alcalina
tamaño AAA (R03)
tamaño AAA (LR03)
AM
Aprox. 16 horas
Aprox. 32 horas
FM
Aprox. 11 horas
Aprox. 22 horas
Cambio de la pila
Reemplace la pila cuando se visualice "
".
Si continúa utilizando el aparato, la corriente se desconectará automáticamente
al agotarse la pila y no podrá volver a conectar sin cambiar la pila.
Nota
Las emisoras prefijadas y la hora se mantienen durante unos 5 minutos después
de sacar la pila. Cambie rápidamente la pila para que no se borren los datos.
Si se sale la tapa del compartimiento de la pila
Colóquela como se indica.
Notas acerca de la pila
· Compruebe que las marcas
0 y 9 están correctamente alineadas.
·Para evitar que pueda haber fugas de electrólito o explosión, no recargue la pila,
caliente o desarme.
· Cuando no utilice la pila, sáquela para evitar que se desgaste inútilmente.
· Si se producen fugas de líquido de la pila, limpie completamente para sacarla.
PREPARATIVOS
Conexión y desconexión
Oprima POWER para conectar el aparato. Oprima nuevamente para desconectarlo.
POWER
PRESET/TUNING
Función de desconexión automática
El aparato se desconectará automáticamente unos 90 minutos después de
conectarlo. (Función de desconexión automática)
Cuando la función de desconexión automática desconecte el aparato, suena un
timbre durante unos 5 segundos. Si oprime POWER durante estos 5 segundos,
no se desconectará el aparato.
Para cancelar la función de desconexión automática
Para hacer funcionar cuando está desconectado el aparato.
1 Mantenga oprimido PRESET/TUNING durante 5 segundos hasta que
aparezca "ON" en la pantalla.
2 Mientras aparece "ON", deslice PRESET/TUNING a
- para que aparezca
"OFF".
3 Oprima PRESET/TUNING.
Para activar nuevamente la función de desconexión automática, deslice
PRESET/TUNING a
+ para que aparezca "ON" en el paso 2.
Ajuste del reloj
Cuando coloque la pila o después de reinicializar la unidad, destella "12:00" en la
pantalla.
Ajuste el reloj con el aparato desconectado.
2
1,3
1 Mantenga oprimido MEMO/TIME SET durante 5 segundos hasta que
destellen "AM" y el reloj en la pantalla.
2 Deslice PRESET/TUNING a
+ o - para ajustar el reloj.
AM 12:00 a medianoche
PM 12:00 al mediodía
3 Oprima MEMO/TIME SET.
El reloj empieza desde 00 segundo.
Si el destello se detiene durante el funcionamiento
Repita el procedimiento desde el principio.
SINTONIZACION DE UNA EMISORA
Conecte los auriculares incluidos en la toma
\.
1
4
DSL
3
2
1 Oprima POWER para conectar el aparato.
2 Oprima BAND repetidamente para seleccionar AM, FM1 o FM2.
FM1 y FM2 tienen la misma gama de frecuencias. Ambos pueden utilizarse
para sintonizar una emisora en FM.
3 Deslice PRESET/TUNING a
+ o - para sintonizar una emisora.
4 Ajuste el volumen.
Para una sintonización rápida
Mantenga oprimido el deslizador PRESET/TUNING a
+ o - durante 1 2
segundos.
Cuando se sintoniza una emisora, el indicador de frecuencia se detiene
automáticamente. Sin embargo, puede no detenerse cuando la señal de la emisora
es débil.
Para obtener graves más potentes
Oprima DSL. Aparece "DSL" en la pantalla.
Para cancelar, oprima nuevamente DSL.
Para mejorar la recepción
FM: El cable de los auriculares funciona como antena de FM. Manténgalo
extendido.
AM: Gire el aparato para encontrar la posición que produce la mejor recepción.
FM
AM
PREFIJADO DE EMISORAS
Prefijado automático
Se pueden prefijar hasta 15 emisoras en cada banda (AM, FM1, FM2).
1
2
1 Oprima POWER para conectar el aparato.
2 Mantenga oprimido MEMO/TIME SET durante 5 segundos hasta que
destelle "PRESET".
El aparato busca y memoriza las emisoras sintonizables.
El prefijado automático termina cuando se prefijan 15 emisora en cada banda.
Nota
Cuando las señales de las emisoras son débiles, éstas no pueden prefijarse
automáticamente. Haga su prefijado manualmente.
Prefijado manual
Se pueden prefijar hasta 15 emisoras en cada número prefijado (1 15) para
cada banda (AM, FM1 y FM2).
1
3,5
2
2,4
1 Oprima POWER para conectar el aparato.
2 Sintonice una emisora
3 Oprima MEMO/TIME SET.
4 Deslice PRESET/TUNING a
+ o - repetidamente para seleccionar el
número prefijado mientras está destellando "PRESET".
5 Oprima MEMO/TIME SET mientras destella "PRESET".
Para prefijar más emisoras, repita el procedimiento desde el principio.
Para escuchar emisoras prefijadas
1 Oprima POWER para conectar el aparato.
2 Oprima BAND repetidamente para seleccionar AM, FM1 o FM2.
3 Oprima PRESET/TUNING repetidamente para seleccionar el número
prefijado.
Borrado de emisoras prefijadas
1 Seleccione el número prefijado que desea borrar.
2 Oprima MEMO/TIME SET.
Destella "PRESET" en la pantalla.
3 Mientras está destellando "PRESET", deslice PRESET/TUNING a
+ o -
para seleccionar el número prefijado "-".
4 Oprima MEMO/TIME SET.
Para borrar más emisoras prefijadas, repita el procedimiento desde el principio.
REGIONES MUNDIALES
Las emisoras de radio tienen distintas gamas de frecuencia y cambian en diferentes
intervalos en distintos países.
La unidad tiene tres regiones de recepción mundial: "U" (América del Norte y del
Sur), "J" (Japón) y "E" (otras regiones).
La región de recepción fue ajustada en fábrica para "U". Seleccione "J" es para
escuchar la radio en Japón, seleccione "E" para escuchar la radio en Europa y
otros países.
Selección de la región de recepción
Haga la operación con el aparato desconectado.
2
1
1 Mantenga oprimido BAND durante 5 segundos.
Aparece "U" en la pantalla.
2 Mientras aparece "U", deslice PRESET/TUNING a
+ o - para seleccionar
el región de recepción.
La pantalla cambia a la indicación del reloj después de 10 segundos y se cambia
la región de recepción.
Si desaparece el región de recepción durante la operación
Repita el procedimiento desde el principio.
Cuando se cambia la región de recepción
Se borran las emisoras prefijadas.
Nota
La unidad puede no recibir todas las emisoras transmitidas en un país o distrito
aunque seleccione la región "E".
FUNCION DEL TEMPORIZADOR
La alarma suena automáticamente a la misma hora todos los días.
Antes de ajustar el temporizador, ajuste el reloj.
POWER
2
1,3
1 Mantenga oprimido TIMER durante 5 segundos hasta que la hora destelle
en la pantalla.
2 Mientras está destellando la hora, deslice PRESET/TUNING a
+ o - para
seleccionar la hora.
3 Oprima TIMER.
Aparece
5 en la pantalla.
Cuando llega la hora prefijada, suena la alarma durante 3 minutos.
Para parar la alarma, oprima TIMER o POWER.
Si se detiene el destello durante la operación
Repita el procedimiento desde el principio.
Para cancelar el temporizador, oprima TIMER. Se apaga
5 y se cancela la
función del temporizador.
FUNCION DE LA ALARMA
Se puede utilizar la función de alarma para que suene la alarma después de
hasta 180 minutos.
POWER
2
1,3
1 Mantenga oprimido ALARM durante 5 segundos hasta que destellan los
minutos en la pantalla.
2 Mientras están destellando los minutos, deslice PRESET/TUNING a
+ o
- para ajustar la hora de sonido del zumbido.
Por ejemplo) ara ajustar la alarma a 1 hora después, deslice PRESET/TUNING
a
+ o - para que aparezca 60.
3 Oprima ALARM.
Aparece
Q en la pantalla.
Cuando llega la hora prefijada, suena la alarma durante 3 minutos.
Para parar la alarma, oprima ALARM o POWER.
Si se detiene el destello durante la operación
Repita el procedimiento desde el principio.
Para cancelar la alarma, oprima ALARM. Se apaga
Q y se cancela la función
de la alarma.
MANTENIMIENTO
Para limpiar el mueble
Utilice un paño suave ligeramente empapado en una solución detergente suave.
No utilice disolventes fuertes tales como alcohol, bencina o diluyente de pintura.
Si se produce una operación o indicación errada
Presione el botón RESET dentro del compartimiento de pila del aparato con una
varilla fina para reinicializar la unidad.
Si lo hace, se borran las emisoras prefijadas y la hora.
RESET
ESPECIFICACIONES
Gama de frecuencia:
Recepción en la región U AM: 530 1.710 kHz (intervalos de 10 kHz)
FM1, FM2: 87,5 108,1 MHz (intervalos de
200 kHz)
Recepción en la región E AM: 531 1.602 kHz (intervalos de 9 kHz)
FM1, FM2: 87,5 108 MHz (intervalos de 50 kHz)
Recepción en la región J AM: 531 1.629 kHz (intervalos de 9 kHz)
FM1, FM2: 76 108 MHz (intervalos de 100 kHz
en 76 90 MHz, intervalos de 50 kHz en 90 108
MHz)
Salida máxima:
8 mW + 8 mW (EIAJ 32 ohmios)
Alimentación eléctrica:
CC de 1,5 V con una pila tamaño AAA (R03)
Dimensiones máximas:
42 (An.)
× 80 (Al.) × 18 (Prof.) mm
(excluyendo partes salientes y controles)
Peso:
Aprox. 44 g sin pila
Accesorios:
Auriculares estéreo (1)
Las especificaciones y aspecto exterior de este aparato están sujetos a cambios
sin previo aviso.