
»
D00637200A
OWNER'S MANUAL
CAUTION: TO REDUCE THE RISK OF ELECTRIC SHOCK, DO NOT
REMOVE COVER (OR BACK). NO USER-SERVICEABLE PARTS INSIDE.
REFER SERVICING TO QUALIFIED SERVICE PERSONNEL.
The exclamation point within an equilateral triangle is intended to alert the user to the presence of
important operating and maintenance (servicing) instructions in the literature accompanying the
appliance.
The lightning flash with arrowhead symbol, within an equilateral triangle, is intended to alert the
user to the presence of uninsulated "dangerous voltage" within the product's enclosure that may be
of sufficient magnitude to constitute a risk of electric shock to persons.
This appliance has a serial number
located on the rear panel. Please
record the model number and serial
number and retain them for your
records.
Model number
Ü
ÿ
Y
WARNING: TO PREVENT FIRE OR SHOCK
HAZARD, DO NOT EXPOSE THIS
APPLIANCE TO RAIN OR MOISTURE.

2 PORTASTUDIO MF-P01
Important Safety Precautions
IMPORTANT (for U.K. Customers)
DO NOT cut off the mains plug from this
equipment.
If the plug fitted is not suitable for the power points
in your home or the cable is too short to reach a
power point, then obtain an appropriate safety
approved extension lead or consult your dealer.
If nonetheless the mains plug is cut off, remove the
fuse and dispose of the plug immediately, to avoid a
possible shock hazard by inadvertent connection to
the mains supply.
If this product is not provided with a mains plug, or
one has to be fitted, then follow the instructions
given below:
IMPORTANT. DO NOT make any connection to
the larger terminal which is marked with the letter E
or by the safety earth symbol ç or coloured
GREEN or GREEN-and-YELLOW.
The wires in the mains lead on this product are
coloured in accordance with the following code:
BLUE:
NEUTRAL
BROWN:
LIVE
As these colours may not correspond with the
coloured markings identifying the terminals in your
plug proceed as follows:
The wire which is coloured BLUE must be
connected to the terminal which is marked with the
letter N or coloured BLACK.
The wire which is coloured BROWN must be
connected to the terminal which is marked with the
letter L or coloured RED.
When replacing the fuse only a correctly rated
approved type should be used and be sure to re-fit
the fuse cover.
IF IN DOUBT -- CONSULT A COMPETENT
ELECTRICIAN.
Important Safety Instructions ............................2
An introduction to the MF-P01 ...........................4
Multitrack recording - a brief
introduction...................................................4
Some safety notes and precautions ...............4
What you need to make recordings ...............6
Connecting the MF-P01..................................6
Parts of the MF-P01 ...........................................7
Recording tracks .............................................10
Setting up .....................................................10
Setting the level ............................................10
Recording the first track ..............................11
Recording the next track (overdubbing) ......11
Mixing down tracks..........................................12
Setting up .....................................................12
Mixdown .......................................................13
Hints and advanced tips .................................13
Recording techniques ..................................13
Recording electric guitars ..........................13
Recording with effects................................14
When you're not recording .........................14
Recording more than four tracks................14
Troubleshooting ...............................................15
Specifications ..................................................15
Table of Contents
PORTASTUDIO MF-P01
3
CAUTION:
... Read all of these Instructions.
... Save these Instructions for later use.
... Follow all Warnings and Instructions marked on the
audio equipment.
1) Read Instructions -- All the safety and operating instruc-
tions should be read before the product is operated.
2) Retain Instructions -- The safety and operating instructions
should be retained for future reference.
3) Heed Warnings -- All warnings on the product and in the
operating instructions should be adhered to.
4) Follow Instructions -- All operating and use instructions
should be followed.
5) Cleaning -- Unplug this product from the wall outlet before
cleaning. Do not use liquid cleaners or aerosol cleaners. Use a
damp cloth for cleaning.
6) Attachments -- Do not use attachments not recommended by
the product manufacturer as they may cause hazards.
7) Water and Moisture -- Do not use this product near water --
for example, near a bath tub, wash bowl, kitchen sink, or laundry
tub; in a wet basement; or near a swimming pool; and the like.
8) Accessories -- Do not place this product on an unstable cart,
stand, tripod, bracket, or table. The product may fall, causing seri-
ous injury to a child or adult, and serious damage to the product.
Use only with a cart, stand, tripod, bracket, or table recommended
by the manufacturer, or sold with the product. Any mounting of the
product should follow the manufacturer's instructions, and should
use a mounting accessory recommended by the manufacturer.
9) A product and cart combination should be moved with care.
Quick stops, excessive force, and uneven surfaces may cause the
product and cart combination to overturn.
10) Ventilation -- Slots and openings in the cabinet are provided
for ventilation and to ensure reliable operation of the product and
to protect it from overheating, and these openings must not be
blocked or covered. The openings should never be blocked by
placing the product on a bed, sofa, rug, or other similar surface.
This product should not be placed in a built-in installation such as a
bookcase or rack unless proper ventilation is provided or the manu-
facturer's instructions have been adhered to.
11) Power Sources -- This product should be operated only
from the type of power source indicated on the marking label. If
you are not sure of the type of power supply to your home, consult
your product dealer or local power company. For products
intended to operate from battery power, or other sources, refer to
the operating instructions.
12) Grounding or Polarization -- This product may be
equipped with a polarized alternating-current line plug (a plug hav-
ing one blade wider than the other). This plug will fit into the
power outlet only one way. This is a safety feature. If you are
unable to insert the plug fully into the outlet, try reversing the plug.
If the plug should still fail to fit, contact your electrician to replace
your obsolete outlet. Do not defeat the safety purpose of the polar-
ized plug.
13) Power-Cord Protection -- Power-supply cords should be
routed so that they are not likely to be walked on or pinched by
items placed upon or against them, paying particular attention to
cords at plugs, convenience receptacles, and the point where they
exit from the product.
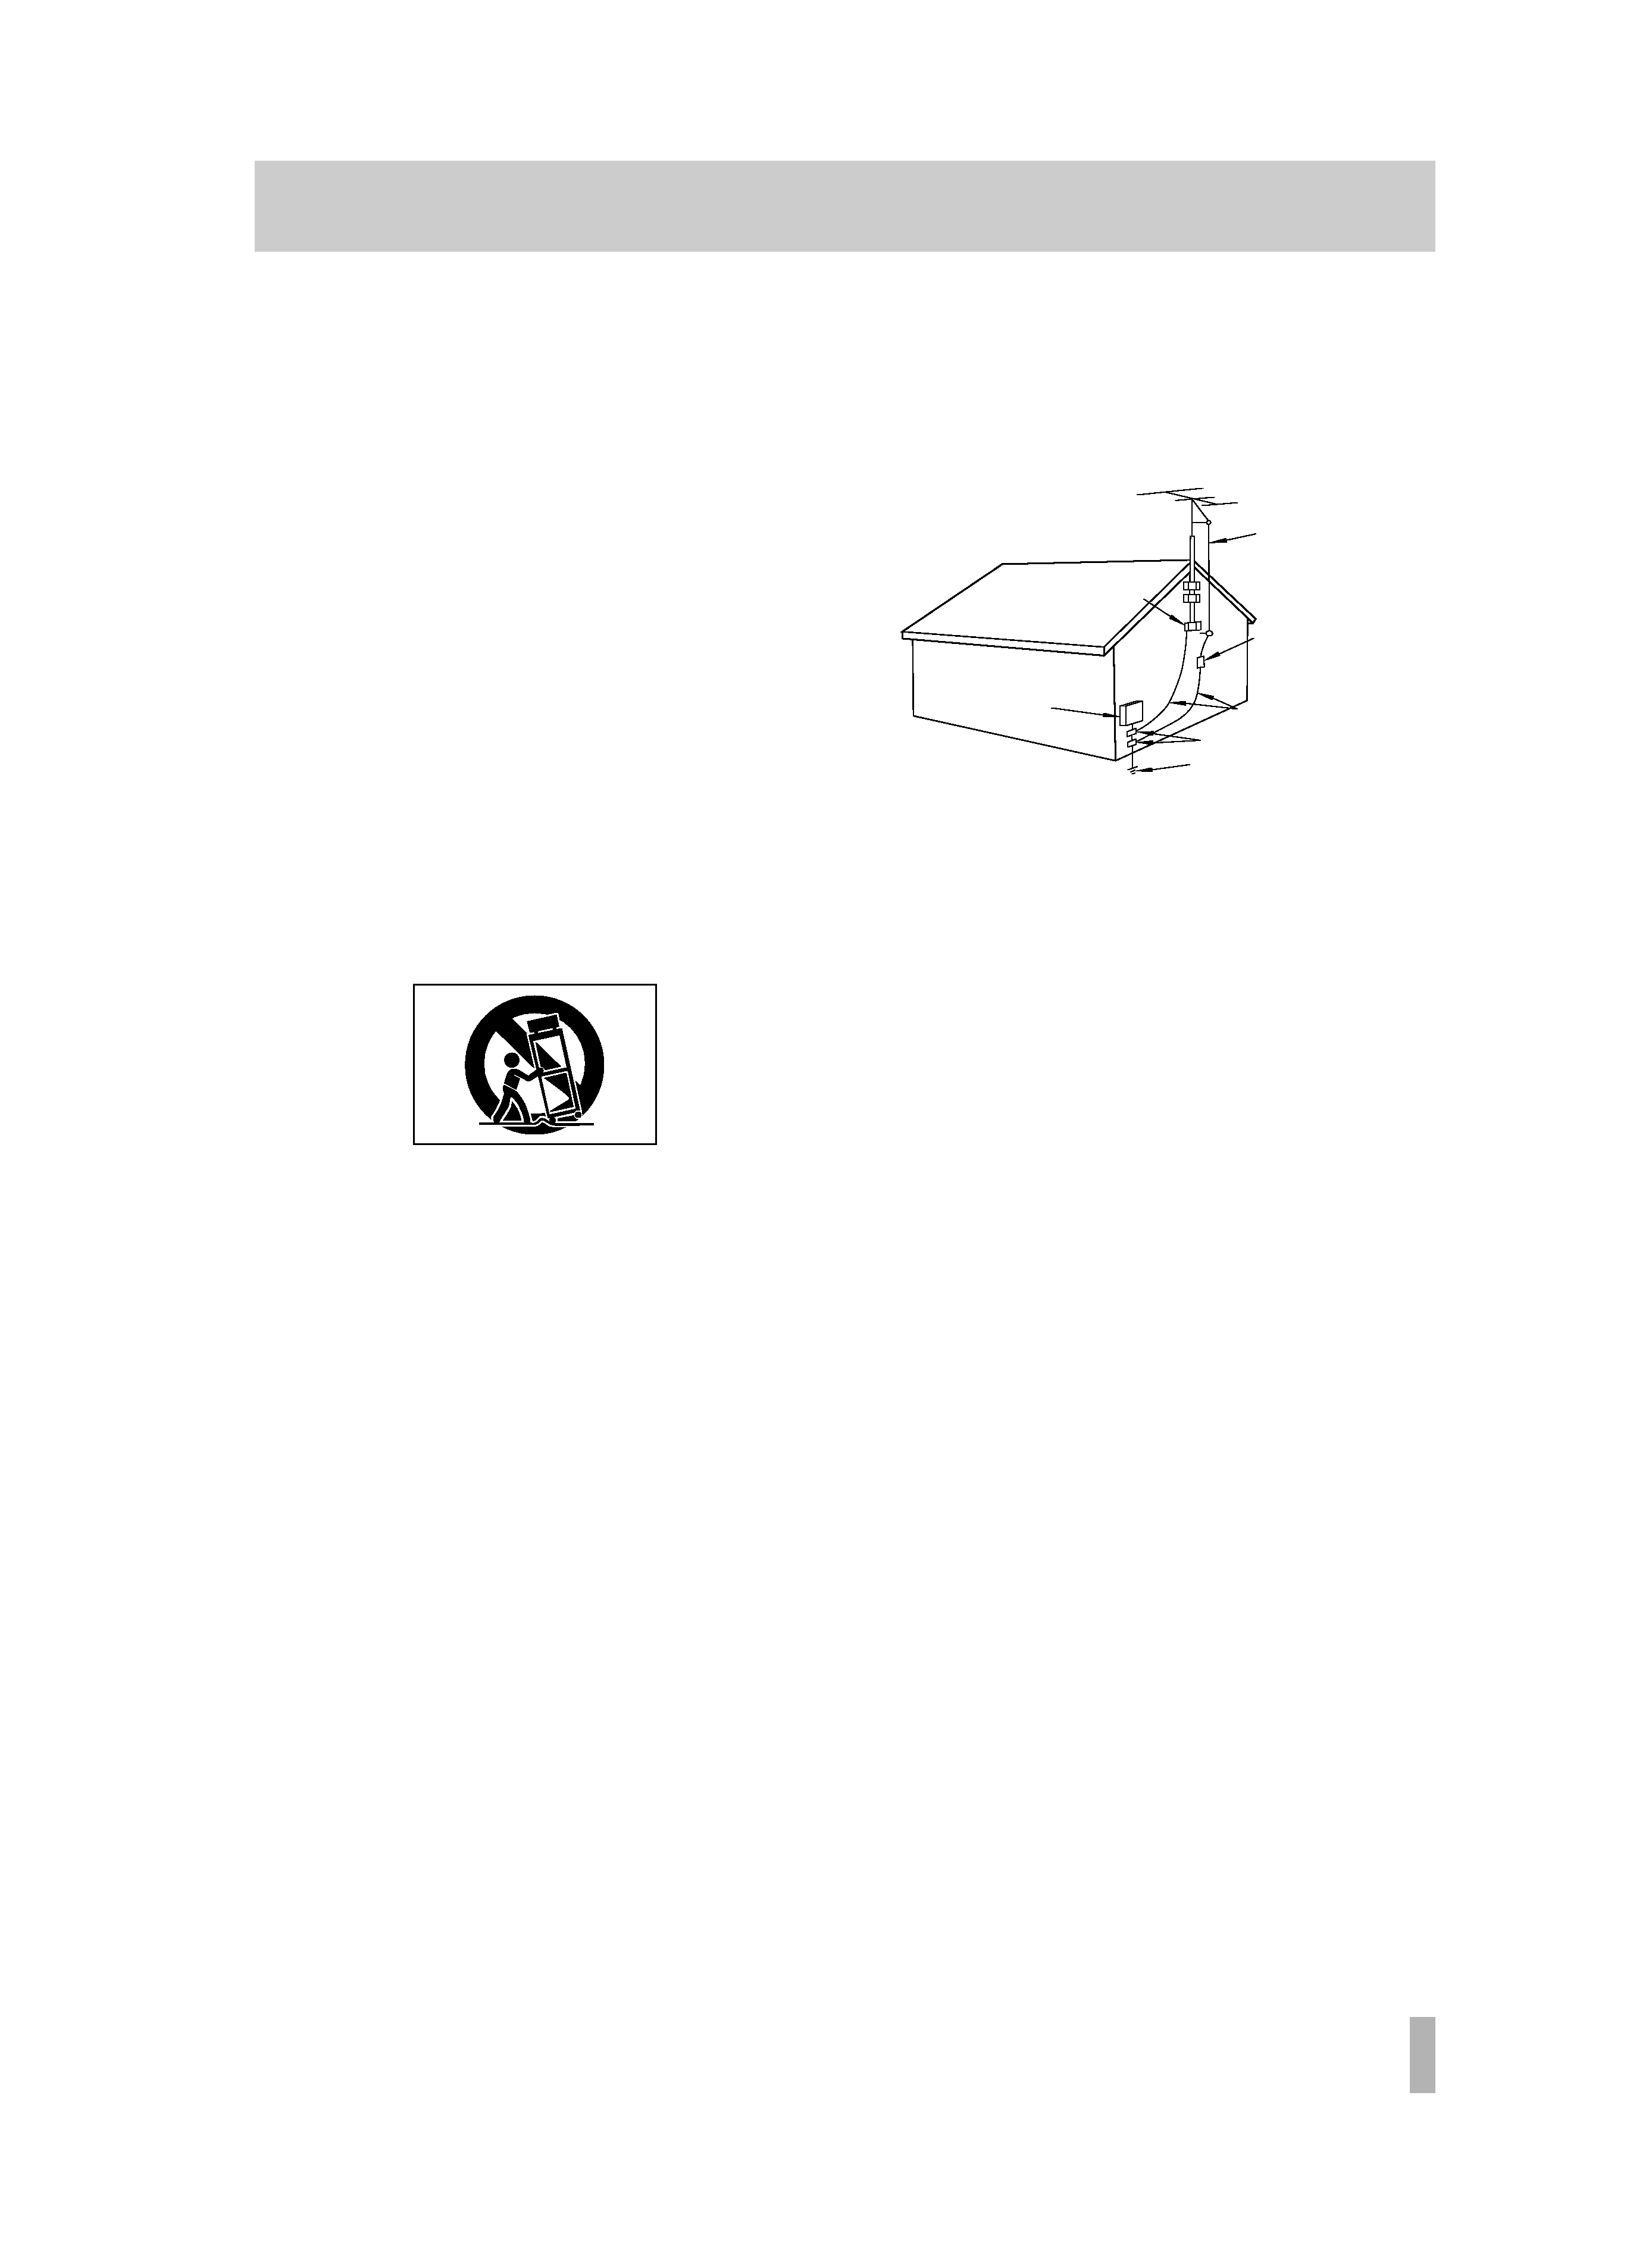
14) Outdoor Antenna Grounding -- If an outside antenna or
cable system is connected to the product, be sure the antenna or
cable system is grounded so as to provide some protection against
voltage surges and built-up static charges. Article 810 of the
National Electrical Code, ANSI/NFPA 70, provides information
with regard to proper grounding of the mast and supporting struc-
ture, grounding of the lead-in wire to an antenna discharge unit,
size of grounding conductors, location of antenna-discharge unit,
connection to grounding electrodes, and requirements for the
grounding electrode.
"Note to CATV system installer:
This reminder is provided to call the CATV system installer's
attention to Section 820-40 of the NEC which provides guidelines
for proper grounding and, in particular, specifies that the cable
ground shall be connected to the grounding system of the building,
as close to the point of cable entry as practical.
15) Lightning -- For added protection for this product during a
lightning storm, or when it is left unattended and unused for long
periods of time, unplug it from the wall outlet and disconnect the
antenna or cable system. This will prevent damage to the product
due to lightning and power-line surges.
16) Power Lines -- An outside antenna system should not be
located in the vicinity of overhead power lines or other electric
light or power circuits, or where it can fall into such power lines or
circuits. When installing an outside antenna system, extreme care
should be taken to keep from touching such power lines or circuits
as contact with them might be fatal.
17) Overloading -- Do not overload wall outlets, extension
cords, or integral convenience receptacles as this can result in risk
of fire or electric shock.
18) Object and Liquid Entry -- Never push objects of any kind
into this product through openings as they may touch dangerous
voltage points or short-out parts that could result in a fire or elec-
tric shock. Never spill liquid of any kind on the product.
19) Servicing -- Do not attempt to service this product yourself
as opening or removing covers may expose you to dangerous volt-
age or other hazards. Refer all servicing to qualified service per-
sonnel.
20) Damage Requiring Service -- Unplug this product from
the wall outlet and refer servicing to qualified service personnel
under the following conditions:
a) when the power-supply cord or plug is damaged.
b) if liquid has been spilled, or objects have fallen into the prod-
uct.
c) if the product has been exposed to rain or water.
d) if the product does not operate normally by following the oper-
ating instructions. Adjust only those controls that are covered by
the operating instructions as an improper adjustment of other con-
trols may result in damage and will often require extensive work
by a qualified technician to restore the product to its normal opera-
tion.
e) if the product has been dropped or damaged in any way.
f) when the product exhibits a distinct change in performance
this indicates a need for service.
21) Replacement Parts -- When replacement parts are
required, be sure the service technician has used replacement parts
specified by the manufacturer or have the same characteristics as
the original part.
Unauthorized substitutions may result in fire, electric shock, or
other hazards.
22) Safety Check -- Upon completion of any service or repairs
to this product, ask the service technician to perform safety checks
to determine that the product is in proper operating condition.
23) Wall or Ceiling Mounting -- The product should be
mounted to a wall or ceiling only as recommended by the manufac-
turer.
24) Heat -- The product should be situated away from heat
sources such as radiators, heat registers, stoves, or other products
(including amplifiers) that produce heat.
ANTENNA
LEAD IN
WIRE
ANTENNA
DISCHARGE UNIT
(NEC SECTION 810-20)
G
ROUNDING CONDUCTORS
(NEC SECTION 810-21)
GROUND CLAMPS
POWER SERVICE GROUNDING
ELECTRODE SYSTEM
(NEC ART 250. PART H)
NEC - NATIONAL ELECTRICAL CODE
ELECTRIC
SERVICE
EQUIPMENT
Example of Antenna Grounding as per
National Electrical Code, ANSI/NFPA 70
GROUND
CLAMP
IMPORTANT SAFETY INSTRUCTIONS

4 PORTASTUDIO MF-P01
The TASCAM MF-P01 PORTASTUDIO allows you
to perform multitrack recordings which are not
possible with an ordinary stereo cassette recorder.
Multitrack recording - a brief
introduction
This section gives you a brief introduction to some of
the terms and techniques used in recording. If you are
unfamiliar with these terms, you may find it useful to
read through this section so that you understand the
rest of the manual, which uses the terms explained
here.
Multitrack recorders
The MF-P01 allows you to record up to 4 tracks on
Type II (chrome) cassette tapes. It accepts an input
and feeds it into a recorder which can record tracks
independently of each other, and builds up the song
by recording new tracks while listening to what has
been recorded before ("overdubbing").
Ordinary cassetteMF-P01
The illustration below shows you how tracks are
arranged on an ordinary stereo cassette tape, as well
as on the MF-P01.
Notice that the stereo cassette arrangement allows
you to use both sides of the cassette, by playing the
tape in the other direction. The MF-P01, however,
uses the whole width of the tape. Notice also that one
pair of L and R tracks on the stereo cassette take up
the same positions as tracks 1 and 2 on the MF-P01.
This allows the MF-P01 to play back normal cassette
tapes using tracks 1 and 2.
Mixing down
When you come to make the final version (on MD,
cassette, etc.), you can adjust the level (volume) and
the stereo position (panning) of each track.
The technique of converting a multitrack recording to
a stereo recording is called "mixing down" to a
"stereo master" recorder. The MF-P01 includes a
mixdown section which allows you to mix to a stereo
cassette or MD recorder.
Some safety notes and precautions
·Always use the PS-P2 power adaptor supplied with
the MF-P01. If you use any other adaptor, there is a
risk of damage, or even fire. Make sure that the
input voltage marked on the PS-P2 adaptor matches
the power supply you are using. If you are in any
doubt, consult your TASCAM dealer.
·Turn off your MF-P01 and remove the cassette
when you are not using the MF-P01. If you will not
be using it for an extended period of time, unplug
the PS-P2 adaptor.
· When connecting or disconnecting the MF-P01 to
or from any other equipment, make sure the power
to the MF-P01 and all other equipment is turned
off. This will avoid possible damage to equipment.
· Do not keep your MF-P01 in a very hot place.
Remember that in sunny weather, the inside of a
parked car heats up very quickly. Avoid leaving
your MF-P01 in such a place.
· Do not spill liquid onto your MF-P01. Avoid
eating, drinking and smoking near it (smoke
particles are bad for audio equipment). If any liquid
or any objects such as paperclips, guitar picks, etc.
fall inside the MF-P01, do not try to operate it.
Return it to a TASCAM service center for repair.
· If the case of the MF-P01 becomes dirty, clean it
only with a damp (not wet) cloth, moistened with a
little detergent. Do not use solvents or thinners, etc.
to clean the MF-P01, as these will damage the
surface.
· There are no parts inside the MF-P01 that you can
repair by yourself. Do not open the MF-P01 case or
try to make any repairs. Return it to a TASCAM
service center for repair.
Tape cassettes
· Since the MF-P01 uses the whole width of a
cassette tape, you can use only one side of a
cassette for playing and recording. You should try
to use either side A or side B for all cassettes, to
avoid confusion when changing tapes.
· Only use Type II (chrome or high position)
cassettes with the MF-P01.
· Remember that because you are only using one
side of the cassette, the marked length of the tape
will be halved (that is, a C60 tape will run for 30
minutes, a C40 for 20 minutes, etc.).
·Always store cassettes in a safe place (away from
the
magnetic
fields
produced
by
speakers,
television sets, computer monitors, etc.).
An introduction to the MF-P01
PORTASTUDIO MF-P01
5
Record-protecting cassettes
The record-protect tab on a cassette stops you
recording on that side when it is removed.
The MF-P01 also recognizes this protection, and will
not allow you to record on the side of a cassette
where this tab has been removed.
However, we suggest that you remove both tabs when
you want to protect a MF-P01 cassette. This will stop
you putting in the cassette the wrong way round and
recording over old material accidentally.
Playing back stereo cassettes
As mentioned earlier, the MF-P01 can play back
cassettes recorded on a stereo cassette recorder, using
tracks 1 and 2.
Also, if tracks 1 and 2 have been recorded on the MF-
P01, these cassettes can be played back on a stereo
cassette recorder.
However, if tracks 3 and 4 are used for recording on
the MF-P01, these cannot be played back on a stereo
cassette recorder.
Also, note that if a cassette has been recorded with
noise reduction, such as Dolby, etc., it will sound
strange when played back on the MF-P01. Any tapes
(tracks 1 and 2) recorded on the MF-P01 should be
played back without noise reduction on a stereo
recorder.
"Dolby" is a registered trademark of
Dolby Laboratories Licensing Corporation.
NOTE
Never use C120 cassettes with the MF-P01. The tape
in these cassettes is thin, and may stretch and break.
Cleaning the heads
You should clean the tape heads of the MF-P01
regularly to keep it working properly. Dirt and tape
oxide buildup on the heads will force the tape away
from the tape head gaps that record and playback.
Head cleaner will remove the dirt and restore the
sound quality.
In addition to affecting performance by coating the
heads, and keeping the tape away from the recording
and playback gaps, dirt and oxide in the tape path will
also act in the same way as very fine sandpaper,
which will wear down internal parts of the MF-P01,
and affect the recording in this way as well.
All of these problems can be avoided if you buy a
head cleaning kit such as the TEAC TZ-261 and keep
it with your MF-P01 for regular use. The kit consists
of head cleaner, cleaner for the rubber parts of the
MF-P01, and cotton-tipped swabs.
WARNING
Only use head and rubber cleaning fluid and cleaning
swabs designed for use with tape recorders. The use
of any other cleaning materials may cause damage to
the MF-P01.
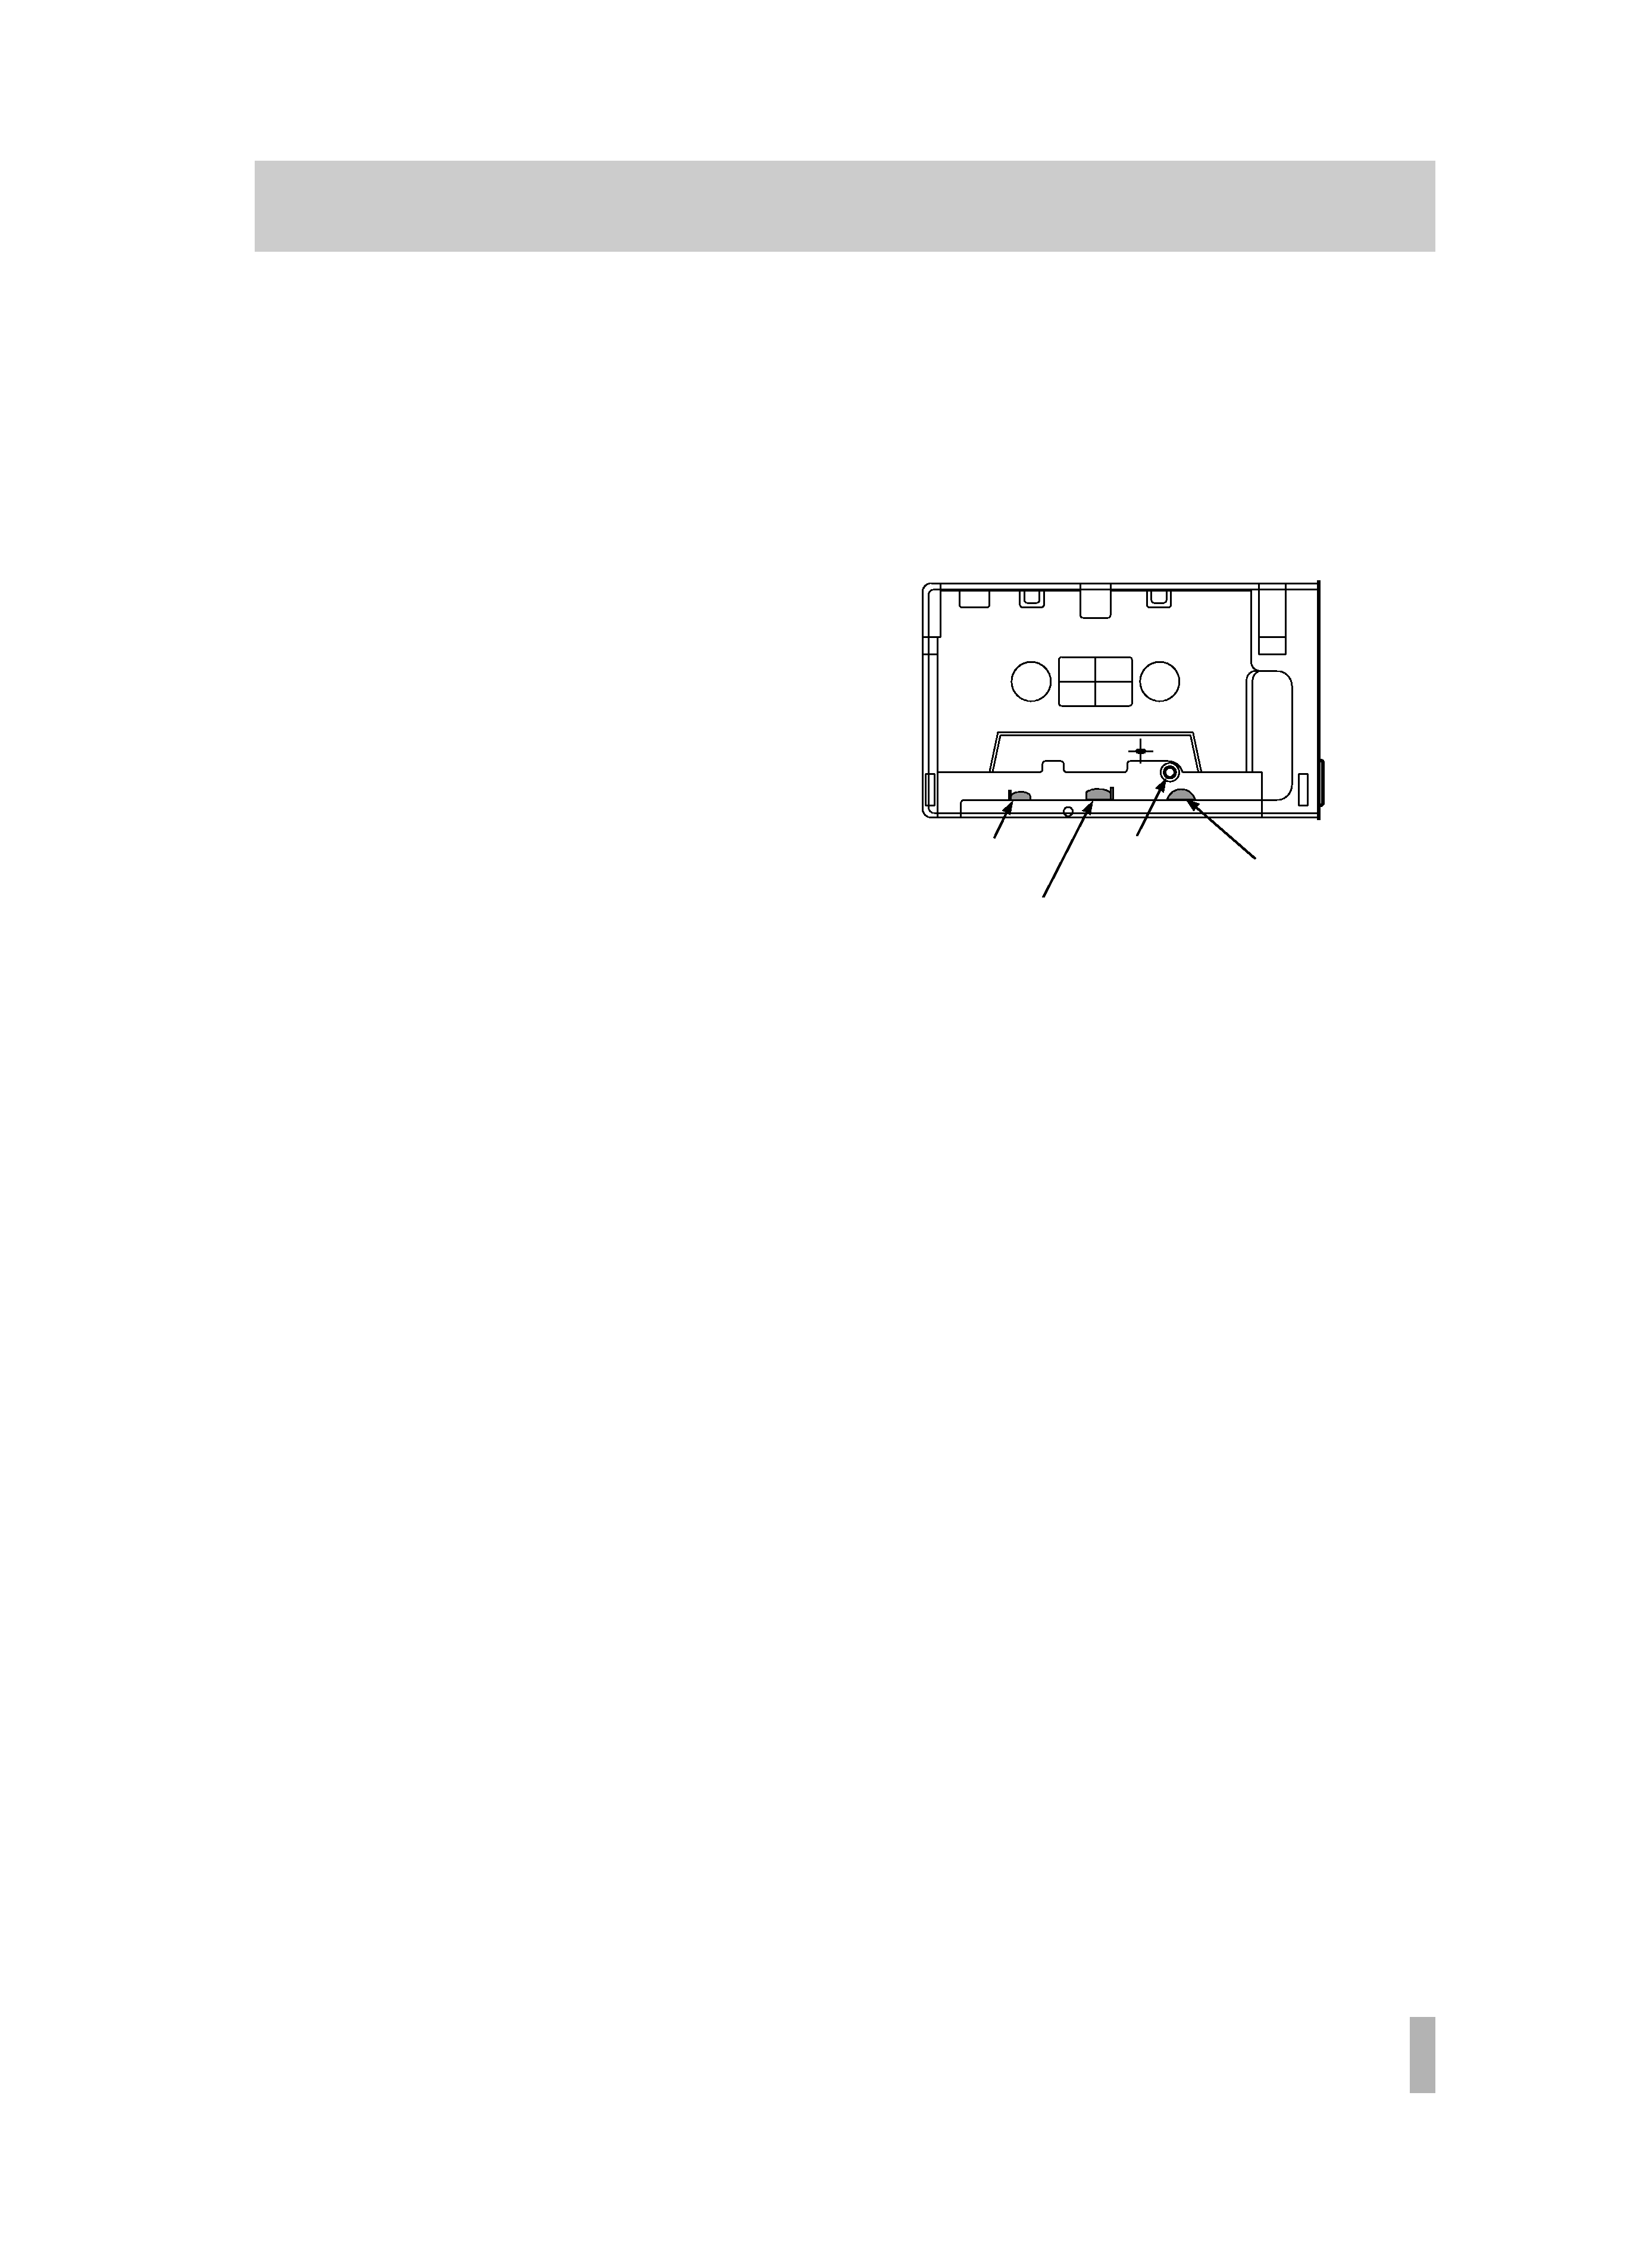
Clean the heads and metal parts of the tape path
before every session with the MF-P01 and also after
every session.
1) Open the tape cassette cover.
2) Carefully clean the heads and metal parts as
shown in the illustration using a swab dipped in
the head cleaning fluid.
3) Dry off the heads with a dry swab.
Cleaning the pinch roller
You should also clean the rubber pinch roller at
regular intervals (at least once each day that you use
the MF-P01).
1) Open the tape cassette cover.
2) Press the PLAY key.
The pinch roller will engage with the capstan shaft
and start turning.
3) Press a swab dipped in the rubber cleaning fluid
against the right side of the pinch roller.
If you press the right side of the roller, the swab
will not get caught between the roller and capstan.
4) Dry the capstan with a dry swab and make sure
that there is no material on the pinch roller or
capstan before you insert a cassette.
ERASE
HEAD
RECORD/REPRODUCE
HEAD
CAPSTAN
PINCH ROLLER
An introduction to the MF-P01