This Guide provides you with the simplest way to use this equipment for recording.
Of course, we strongly suggest that you consult the Owner's Manual for complete details and important safety information.
Z
TEAC CORPORATION 0705. MA-0992A
9A10350200
Quick-Start Recording Guide
CD-RW880
Manual track division
It is possible to divide the recording into tracks while
recording.
While the recording is taking place, press the TRACK
INCREMENT button. The current track number will be
incremented by one.
About CD-R/CD-RW discs
You must use CD-R and CD-RW discs bearing the
"DIGITAL AUDIO" logo. This unit CANNOT RECORD CD-
R and CD-RW discs designed for computer systems.
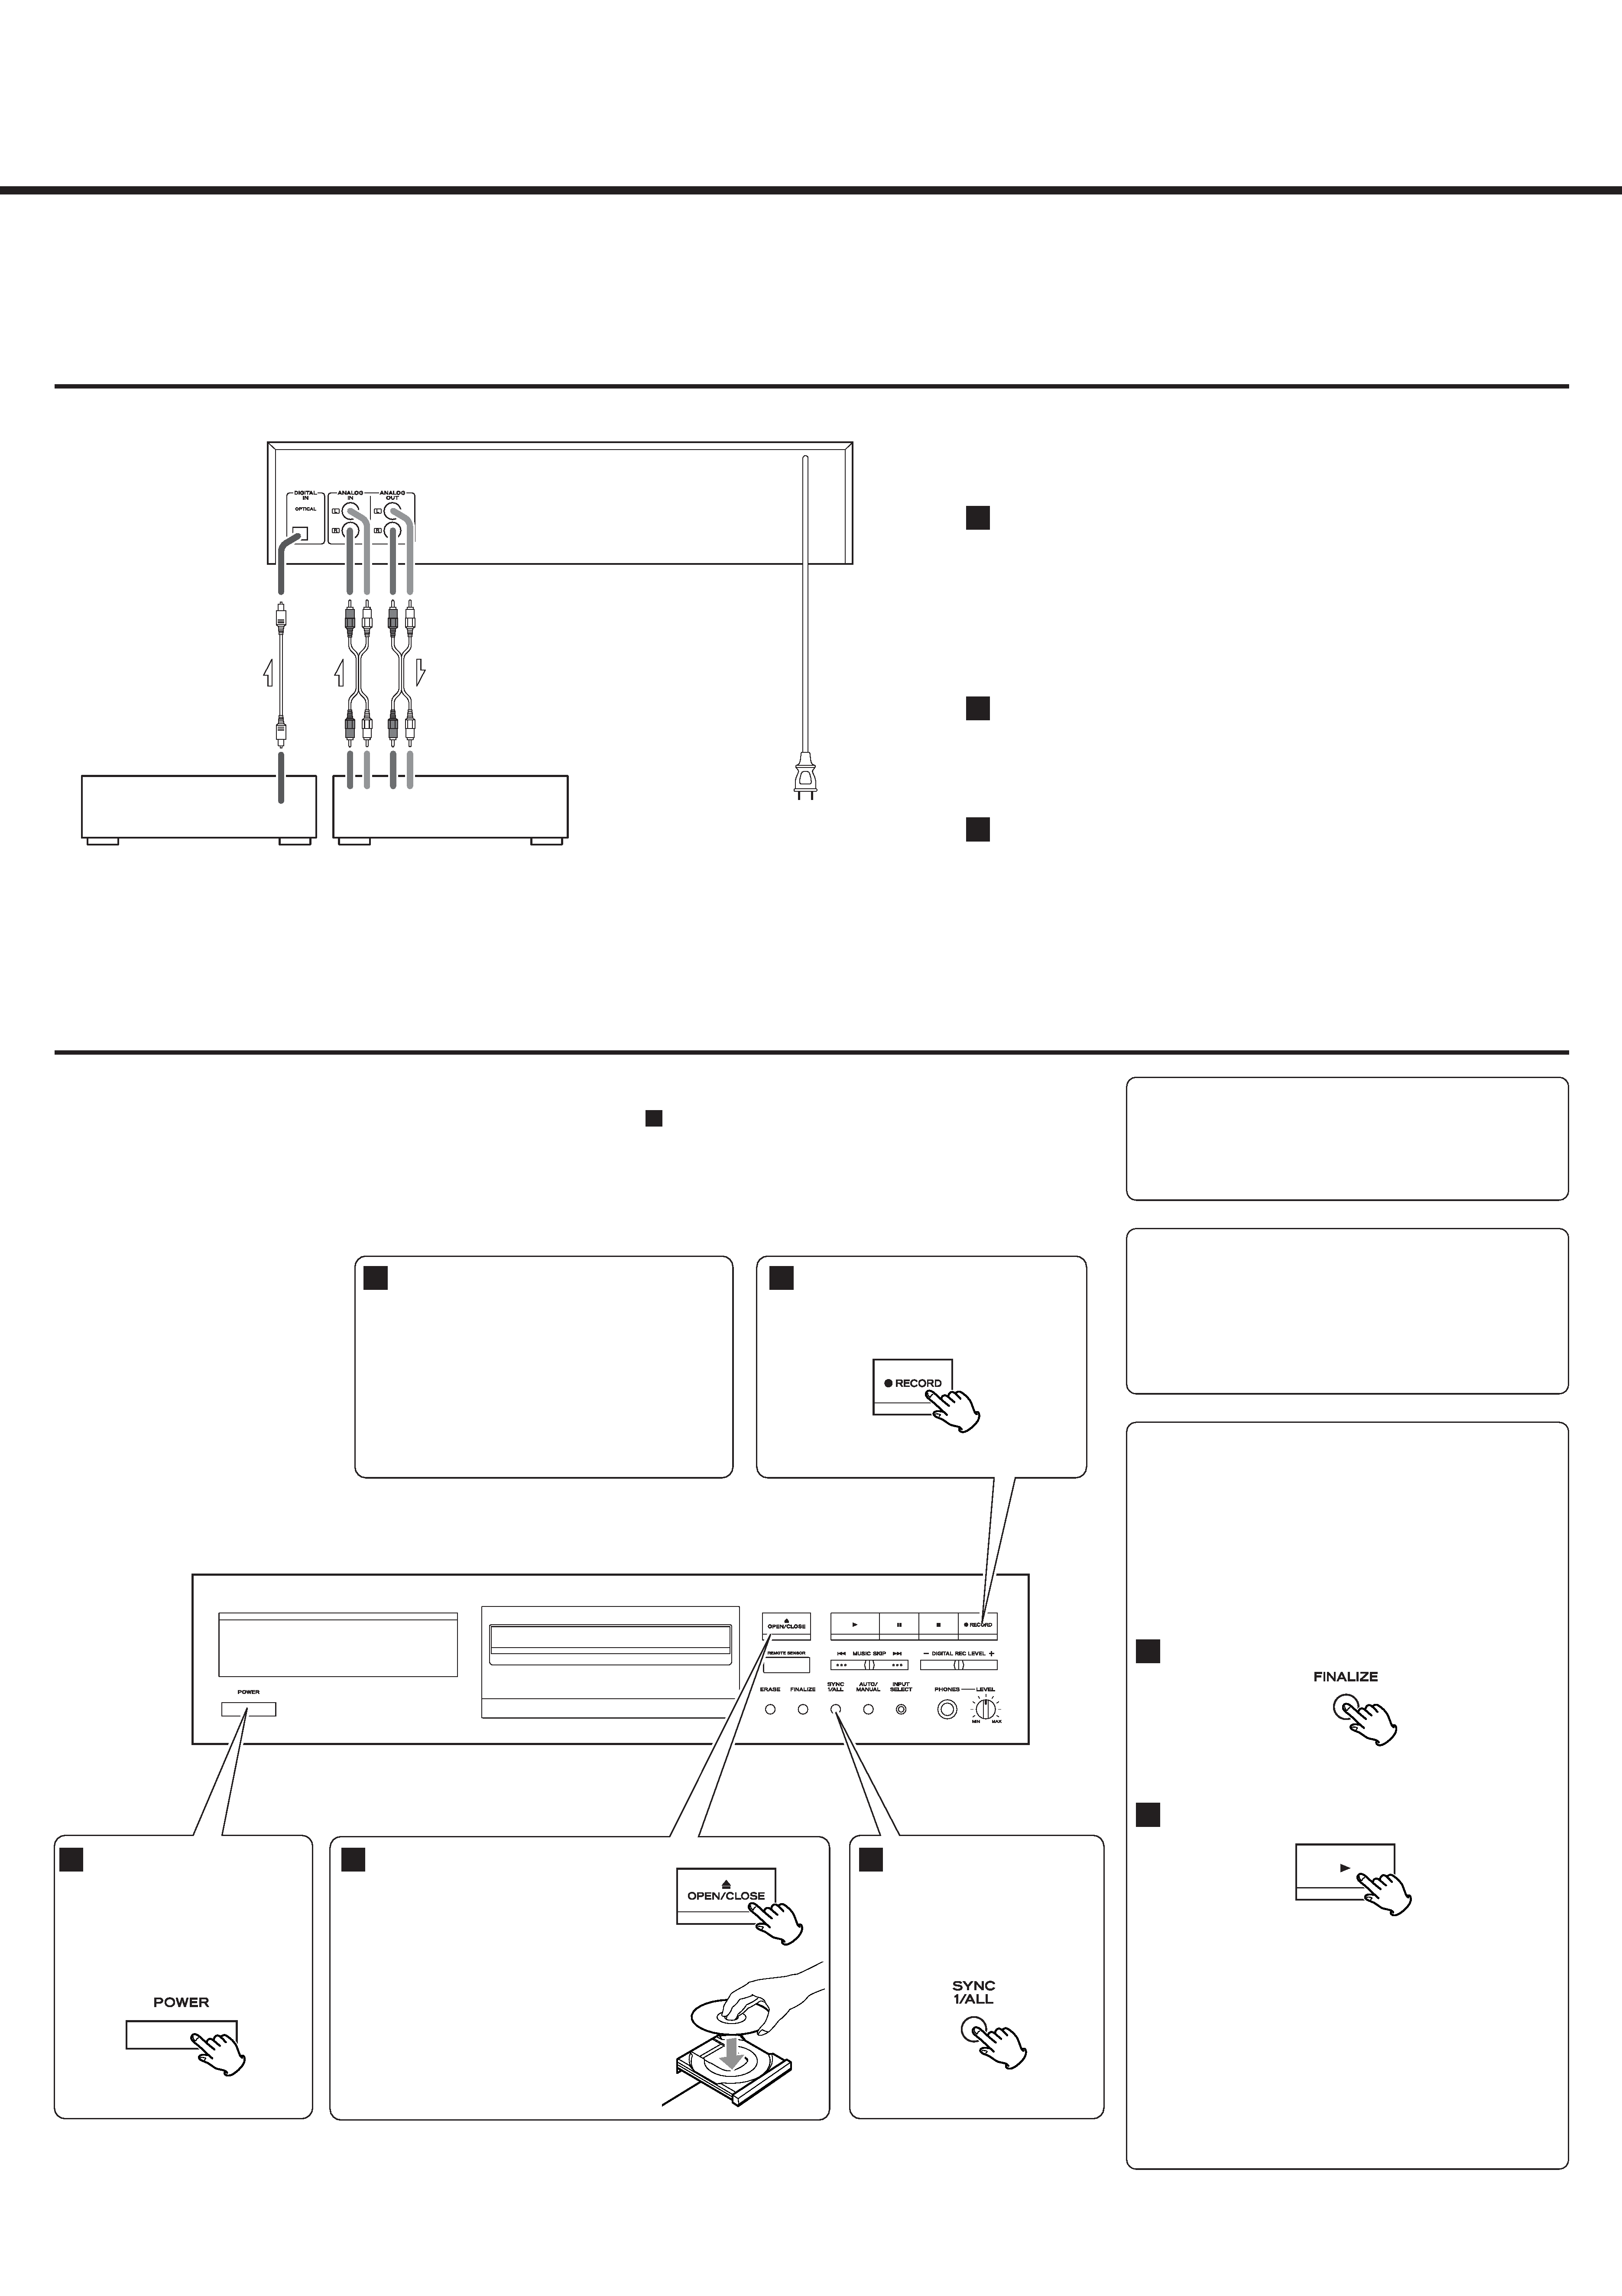
Connections
This is the simplest connection to enjoy CD recording.
Connect the CD-RW880 to your Amplifier, for listening to CD-Rs and
CD-RWs, and for checking recording.
Make sure to connect:
white plug q white jack (L: left channel)
red plug q red jack (R: right channel)
Connect the CD-RW880 to your CD Player or MD Deck using an
optical digital cable.
When using the DIGITAL IN terminal, remove the cap from the terminal.
Finally, connect the power cord.
3
2
1
When the POWER button is pressed, the unit returns to the factory settings.
As this guide is based on the factory settings, be sure to start from step
.
1
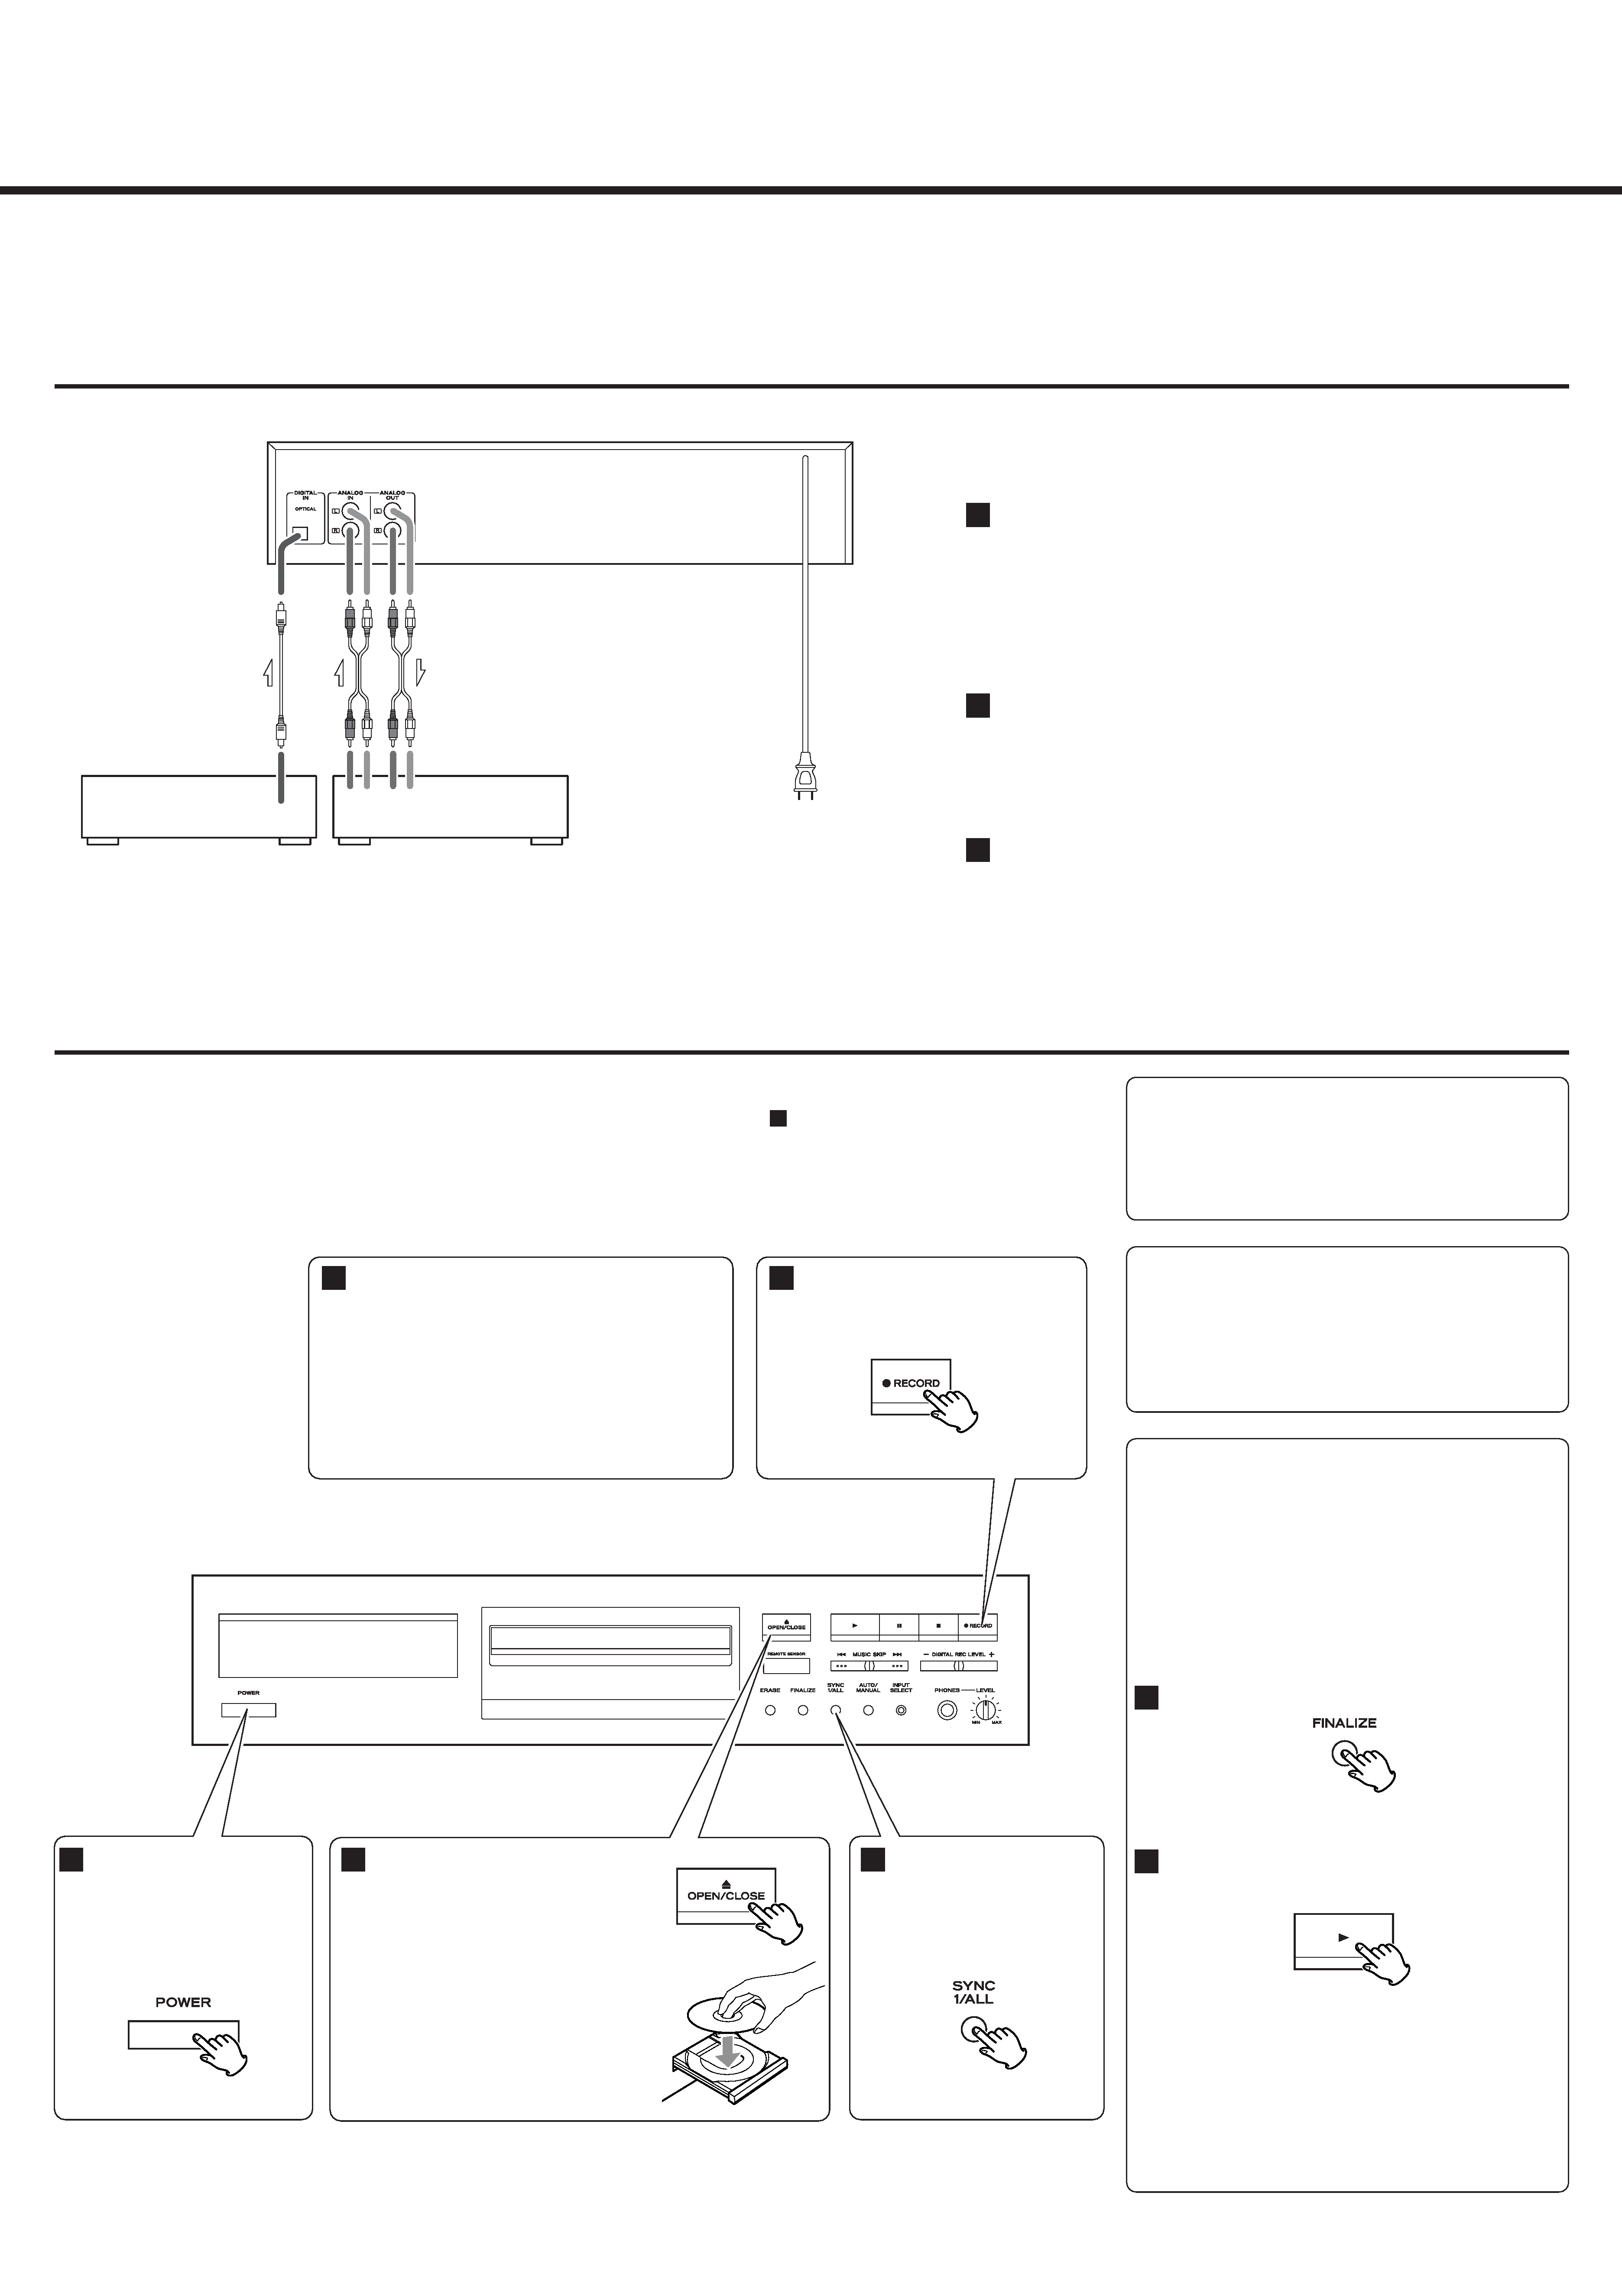
Recording
Finalizing
Although audio data may be written on a CD-R or CD-
RW disc, a standard CD player will not be able to play
back the audio until a final table of contents (TOC) has
been written at the start of the disc.
The process of writing this table of contents is known as
"finalizing". Once this has been done, no further data
can be written to the disk.
Press the FINALIZE button in the stop mode.
"FINALIZE" appears on the display.
Press the PLAY (y) button to start finalizing.
"TOC" and the "REC" indicator blink, and the
remaining time for the finalizing operation appears
in the display.
When the operation has been finished, the display
returns to the track/time display.
<
Although finalized CD-R discs may be played on
most ordinary CD players, remember that some
finalized CD-RW discs may not play on older CD
players.
2
1
Load a recordable CD-R or CD-
RW disc into the unit.
Press the OPEN/CLOSE button (L),
place a disc on the disc tray with the
printed label side up, and then press
the OPEN/CLOSE button (L) to close
the disc tray.
<
Pressing the OPEN/CLOSE button in
the standby mode turns the unit on.
2
Play the source to be recorded.
The unit will start synchronous recording.
<
During digital synchronous recording, if
the input signal stops for 5 seconds,
recording will stop automatically.
<
Press the STOP button to stop the
recording manually.
5
Press the RECORD button.
The unit enters record pause mode.
4
Press the POWER switch.
The unit enters standby
mode, and "STAND-BY"
lights on the display.
1
Select "SYNC ALL" using
the SYNC 1/ALL button.
3
REC PLAY
DIGITAL OUT
RL
RL
CD Player, MD Deck, etc.
Amplifier
AC Outlet
Ce guide vous indique le moyen le plus simple d'utiliser cet équipement pour l'enregistrement.
Bien sûr, nous vous recommandons fortement de consulter le mode d'emploi pour des détails complets et d'importantes informations de sécurité.
Z
Guide rapide pour l'enregistrement
CD-RW880
Séparation manuelle des plages
Il est possible de diviser l'enregistrement en plages
durant l'enregistrement.
Pendant que l'enregistrement se fait, pressez le bouton
TRACK INCREMENT. Le numéro de plage actuel
augmentera d'une unité.
A propos des CD-R/CD-RW
Veuillez utiliser des CD-R et CD-RW portant l'inscription
"DIGITAL AUDIO". Cette unité NE PEUT PAS
ENREGISTRER sur des CD-R et CD-RW conçus pour des
systèmes informatiques.
Connexions
C'est la connexion la plus simple pour enregistrer les CD.
Branchez le CD-RW880 à votre amplificateur pour écouter un CD-R ou
CD-RW et pour vérifier l'enregistrement.
Veillez à brancher:
fiche blanche q prise blanche (L: canal gauche)
fiche rouge q prise rouge (R: canal droit)
Reliez le CD-RW880 à votre lecteur de CD ou à votre platine MD au
moyen d'un câble numérique optique.
Quand vous utilisez la prise d'entrée numérique DIGITAL IN, retirez son
capuchon.
Enfin, branchez le cordon d'alimentation.
3
2
1
Quand l'interrupteur POWER est pressé, l'unité retourne aux réglages d'usine.
Comme ce guide est basé sur les réglages d'usine, veillez à bien commencer par l'étape
.
1
Enregistrement
Finalisation
Même si des données audio sont écrites sur un CD-R ou
CD-RW, un lecteur de CD standard peut ne pas pouvoir
les reproduire si une table des matières (TOC) finale n'a
pas été gravée au début du disque.
Le processus de gravure de cette table des matières se
nomme "finalisation". Une fois qu'il a été effectué,
aucune autre donnée ne peut plus être inscrite sur le
disque.
Pressez le bouton FINALIZE en mode arrêt.
"FINALIZE" s'affiche.
Pressez le bouton PLAY (y ) pour lancer la
finalisation.
"TOC" et l'indicateur "REC" clignotent, et le temps
restant pour l'opération de finalisation s'affiche.
Quand l'opération est terminée, l'affichage de
plage/temps revient.
<
Bien que des CD-R finalisés puissent être lus par des
lecteurs de CD ordinaires, rappelez-vous que des
CD-RW finalisés peuvent ne pas l'être.
2
1
Chargez un CD-R ou CD-RW dans
l'unité.
Pressez le bouton OPEN/CLOSE (L),
placez un disque dans le tiroir avec
sa face imprimée vers le haut puis
pressez le bouton OPEN/CLOSE (L)
pour fermer le tiroir.
<
Presser le bouton OPEN/CLOSE (L)
en mode de veille allume l'unité.
2
Faites jouer la source à enregistrer.
L'unité commence l'enregistrement synchronisé.
<
Durant l'enregistrement numérique synchronisé,
si le signal entrant cesse durant 5 secondes,
l'enregistrement s'arrête automatiquement.
<
Pressez
le
bouton
STOP
pour
arrêter
manuellement l'enregistrement.
5
Pressez le bouton RECORD.
L'unité passe en mode pause
d'enregistrement.
4
Pressez l'interrupteur
POWER.
L'unité passe en veille et
"STAND-BY" s'allume dans
l'écran.
1
Sélectionnez "SYNC
ALL" avec le bouton
SYNC 1/ALL.
3
REC PLAY
DIGITAL OUT
RL
RL
Lecteur de CD,
Platine MD, etc.
Amplificateur
Prise Secteur