
Operating Instructions
Mini Hi-Fi
Component
System
4-227-889-12(1)
©2000 Sony Corporation
MHC-ZX30AV
2
WARNING
To prevent fire or shock hazard, do not
expose the unit to rain or moisture.
To avoid electrical shock, do not open the cabinet.
Refer servicing to qualified personnel only.
Do not install the appliance in a confined space,
such as a bookcase or built-in cabinet.
This appliance is classified as
a CLASS 1 LASER product.
The CLASS 1 LASER
PRODUCT MARKING is
located on the rear exterior.
NOTICE FOR THE CUSTOMERS IN
CANADA
CAUTION
TO PREVENT ELECTRIC SHOCK, DO NOT USE
THIS POLARIZED AC PLUG WITH AN
EXTENSION CORD, RECEPTACLE OR OTHER
OUTLET UNLESS THE BLADES CAN BE FULLY
INSERTED TO PREVENT BLADE EXPOSURE.
ENERGY STAR® is a U.S. registered mark.
As
ENERGY STAR® Partner, Sony Corporation has
determined that this product meets the
ENERGY
STAR® guidelines for energy efficiency.
This stereo system is equipped with the Dolby B-type
noise reduction system*.
* Manufactured under license from Dolby
Laboratories Licensing Corporation.
DOLBY and the double-D symbol ; are
trademarks of Dolby Laboratories Licensing
Corporation.

3
* Canadian and European models only
** European model only
Table of Contents
Getting Started
Step 1: Hooking up the system ................ 4
Step 2: Setting up your speakers .............. 7
Step 3: Setting the time ............................ 9
Step 4: Presetting radio stations ............. 10
Saving the power in standby mode* ....... 12
Basic Operations
Playing a CD ........................................... 13
Recording a CD ....................................... 15
Listening to the radio .............................. 16
Recording from the radio ........................ 18
Playing a tape .......................................... 19
Recording from a tape ............................. 22
The CD Player
Using the CD display .............................. 23
Playing the CD tracks repeatedly ............ 24
Playing the CD tracks in random order ... 25
Programming the CD tracks .................... 26
The Tape Deck
Recording on a tape manually ................. 28
Recording a CD by specifying track order
.......................................................... 29
DJ Effects
Looping part of a CD .............................. 32
Flashing part of a CD .............................. 33
Sound Adjustment
Adjusting the sound ................................ 33
Selecting the preset audio effect file ....... 34
Changing the spectrum analyzer display 36
Selecting surround effects ....................... 37
Enjoying Dolby Pro Logic Surround sound
.......................................................... 38
Controlling the graphic equalizer ............ 39
Creating a personal audio effect file ....... 40
Other Features
Using the Radio Data System (RDS)** .. 41
Falling asleep to music ............................ 43
Waking up to music ................................ 44
Timer-recording radio programs ............. 46
Optional components
Connecting audio components ................ 48
Connecting a VCR .................................. 50
Connecting a DVD player ....................... 50
Connecting external antennas ................. 51
Additional Information
Precautions .............................................. 53
Troubleshooting ...................................... 54
Specifications .......................................... 57
Parts Identification for the remote .......... 60
Index ........................................................ 61
Items in "Sound Mode" and "Set Up
Mode" ................................. Back cover
4
Getting Started
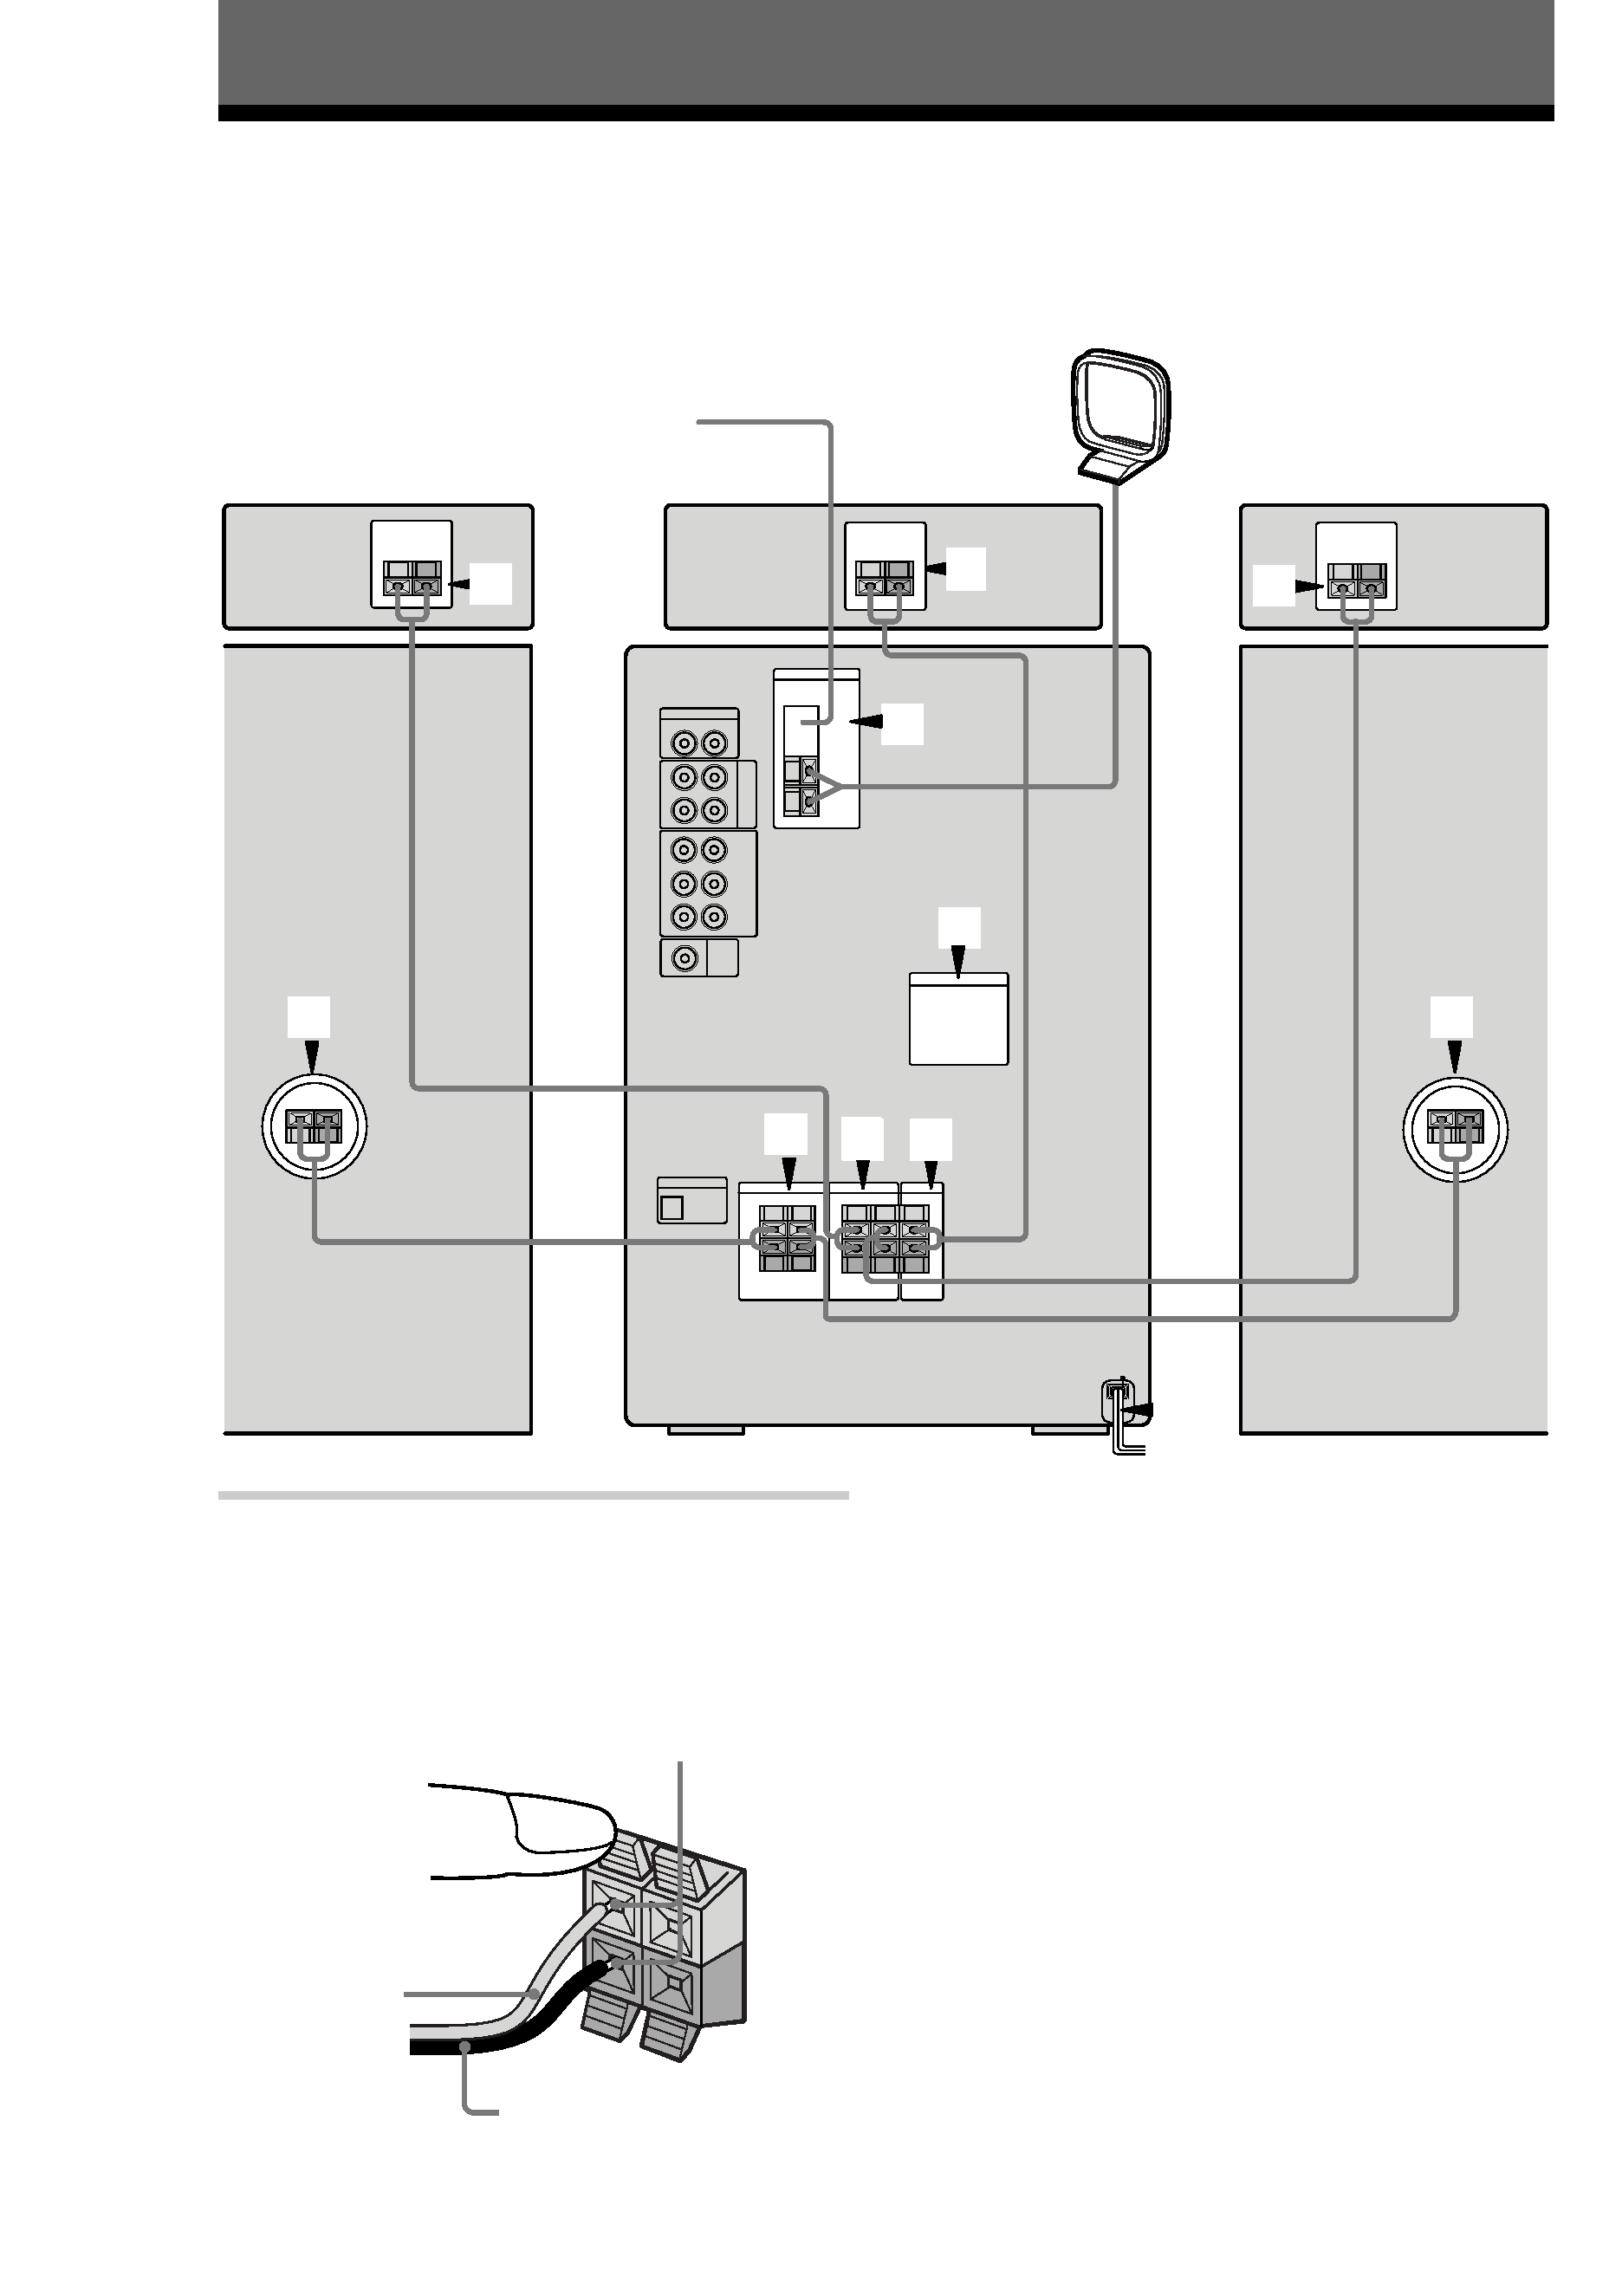
Step 1: Hooking up the system
Follow steps 1 through 6 of the following procedure to hook up your system using the supplied cords
and accessories.
4
6
5
1
3
1
2 3
2
2
1
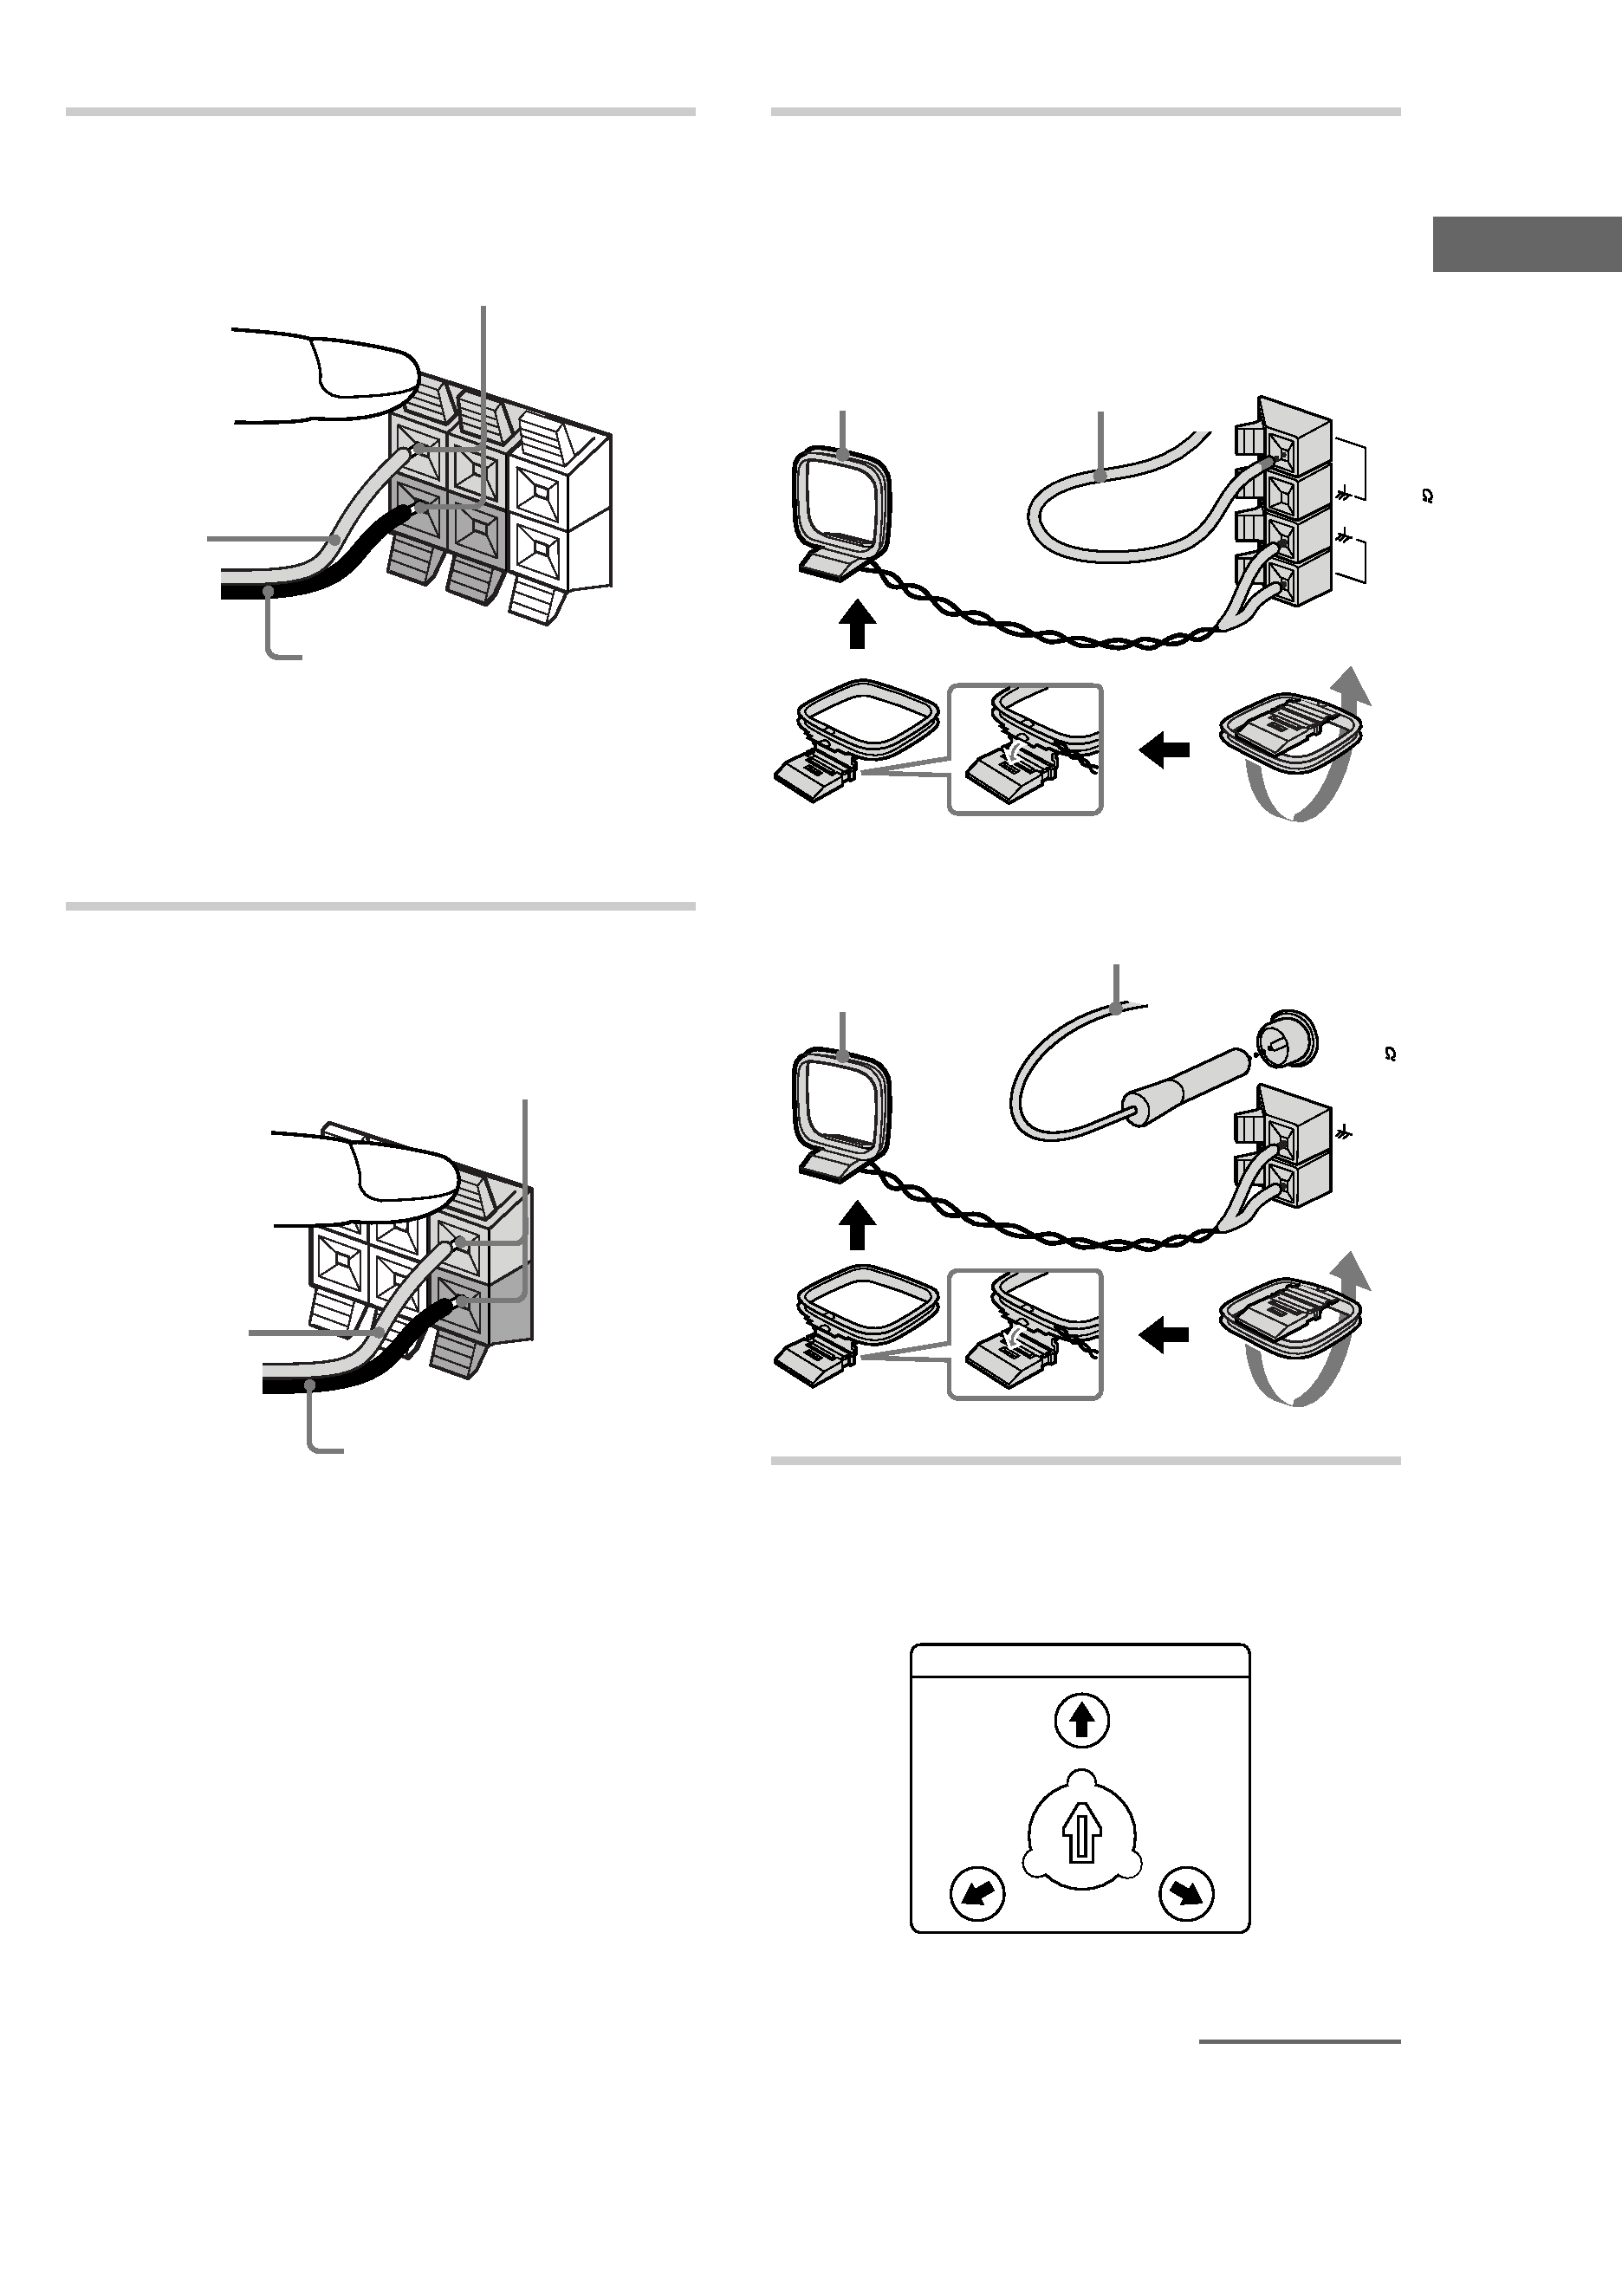
1 Connect the front speakers.
Connect the speaker cords of the front
speakers to the FRONT SPEAKER jacks as
below.
R
L
+
Notes
· Keep the speaker cords away from the
antennas to prevent noise.
· The type of speakers supplied vary according
to the model you purchased (see
"Specifications" on page 57).
Insert only the stripped portion.
AM loop antenna
FM antenna
Front speaker (Left)
Front speaker (Right)
Rear speaker (Left)
Rear speaker (Right)
Center speaker
Black (#)
Red (3)
5
Getting
Started
2 Connect the rear speakers.
Connect the speaker cords of the rear
speakers to the REAR SPEAKER jacks.
R
L
+
+
Notes
· Keep the speaker cords away from the
antennas to prevent noise.
· Do not place the rear speakers on top of a TV.
This may cause color distortion in the TV
screen.
3 Connect the center speaker.
Connect the speaker cords of the center
speaker to the CENTER SPEAKER jacks.
R
L
+
+
Note
Keep the speaker cords away from the antennas
to prevent noise.
4 Connect the FM/AM antennas.
Set up the AM loop antenna, then
connect it.
Jack type A
FM75
AM
Jack type B
FM75
AM
COAXIAL
5 For models with a voltage selector, set
VOLTAGE SELECTOR to the position
of your local power line voltage.
VOLTAGE
SELECTOR
220V
120V
230
240V
-
AM loop antenna
Extend the FM lead
antenna horizontally.
Insert only the stripped portion.
Black/Stripe (#)
Red/Solid
(3)
Insert only the stripped portion.
Black/Stripe (#)
Red/Solid
(3)
continued
AM loop antenna
Extend the FM lead
antenna horizontally.