
KTC-HR200
HD RadioTM TUNER UNIT
INSTRUCTION MANUAL
UNITÉ TUNER HD RadioTM
MODE D'EMPLOI
UNIDAD SINTONIZADORA HD RadioTM
MANUAL DE INSTRUCCIONES
© B64-4188-08/01 (K) LVT1870-001A
Take the time to read through this instruction manual.
Familiarity with installation and operation procedures will help you obtain the best
performance from your new HD Radio tuner unit.
For your records
Record the serial number, found on the back of the unit, in the spaces designated on the
warranty card, and in the space provided below. Refer to the model and serial numbers
whenever you call upon your Kenwood dealer for information or service on the product.
Model KTC-HR200 Serial number
US Residence Only
Register Online
Register your Kenwood product at
w w w.Kenwoodusa.com
En-2 | KTC-HR200
Contents
What is HD Radio Technology?
HD Radio technology enables broadcasters to
transmit a digital signal with its analog signal using
existing frequency allocations for FM and AM stations.
Quality of broadcast is improved to the level of music
CD in digital FM and that of analog FM in digital AM.
Moreover, if receiving condition is good, you can listen
to programs in stereo with the digital AM broadcast.
Digital FM of Supplemental Audio Services can send
up to 7 channels of the Supplemental Program Audio
other than the Main Program Audio.
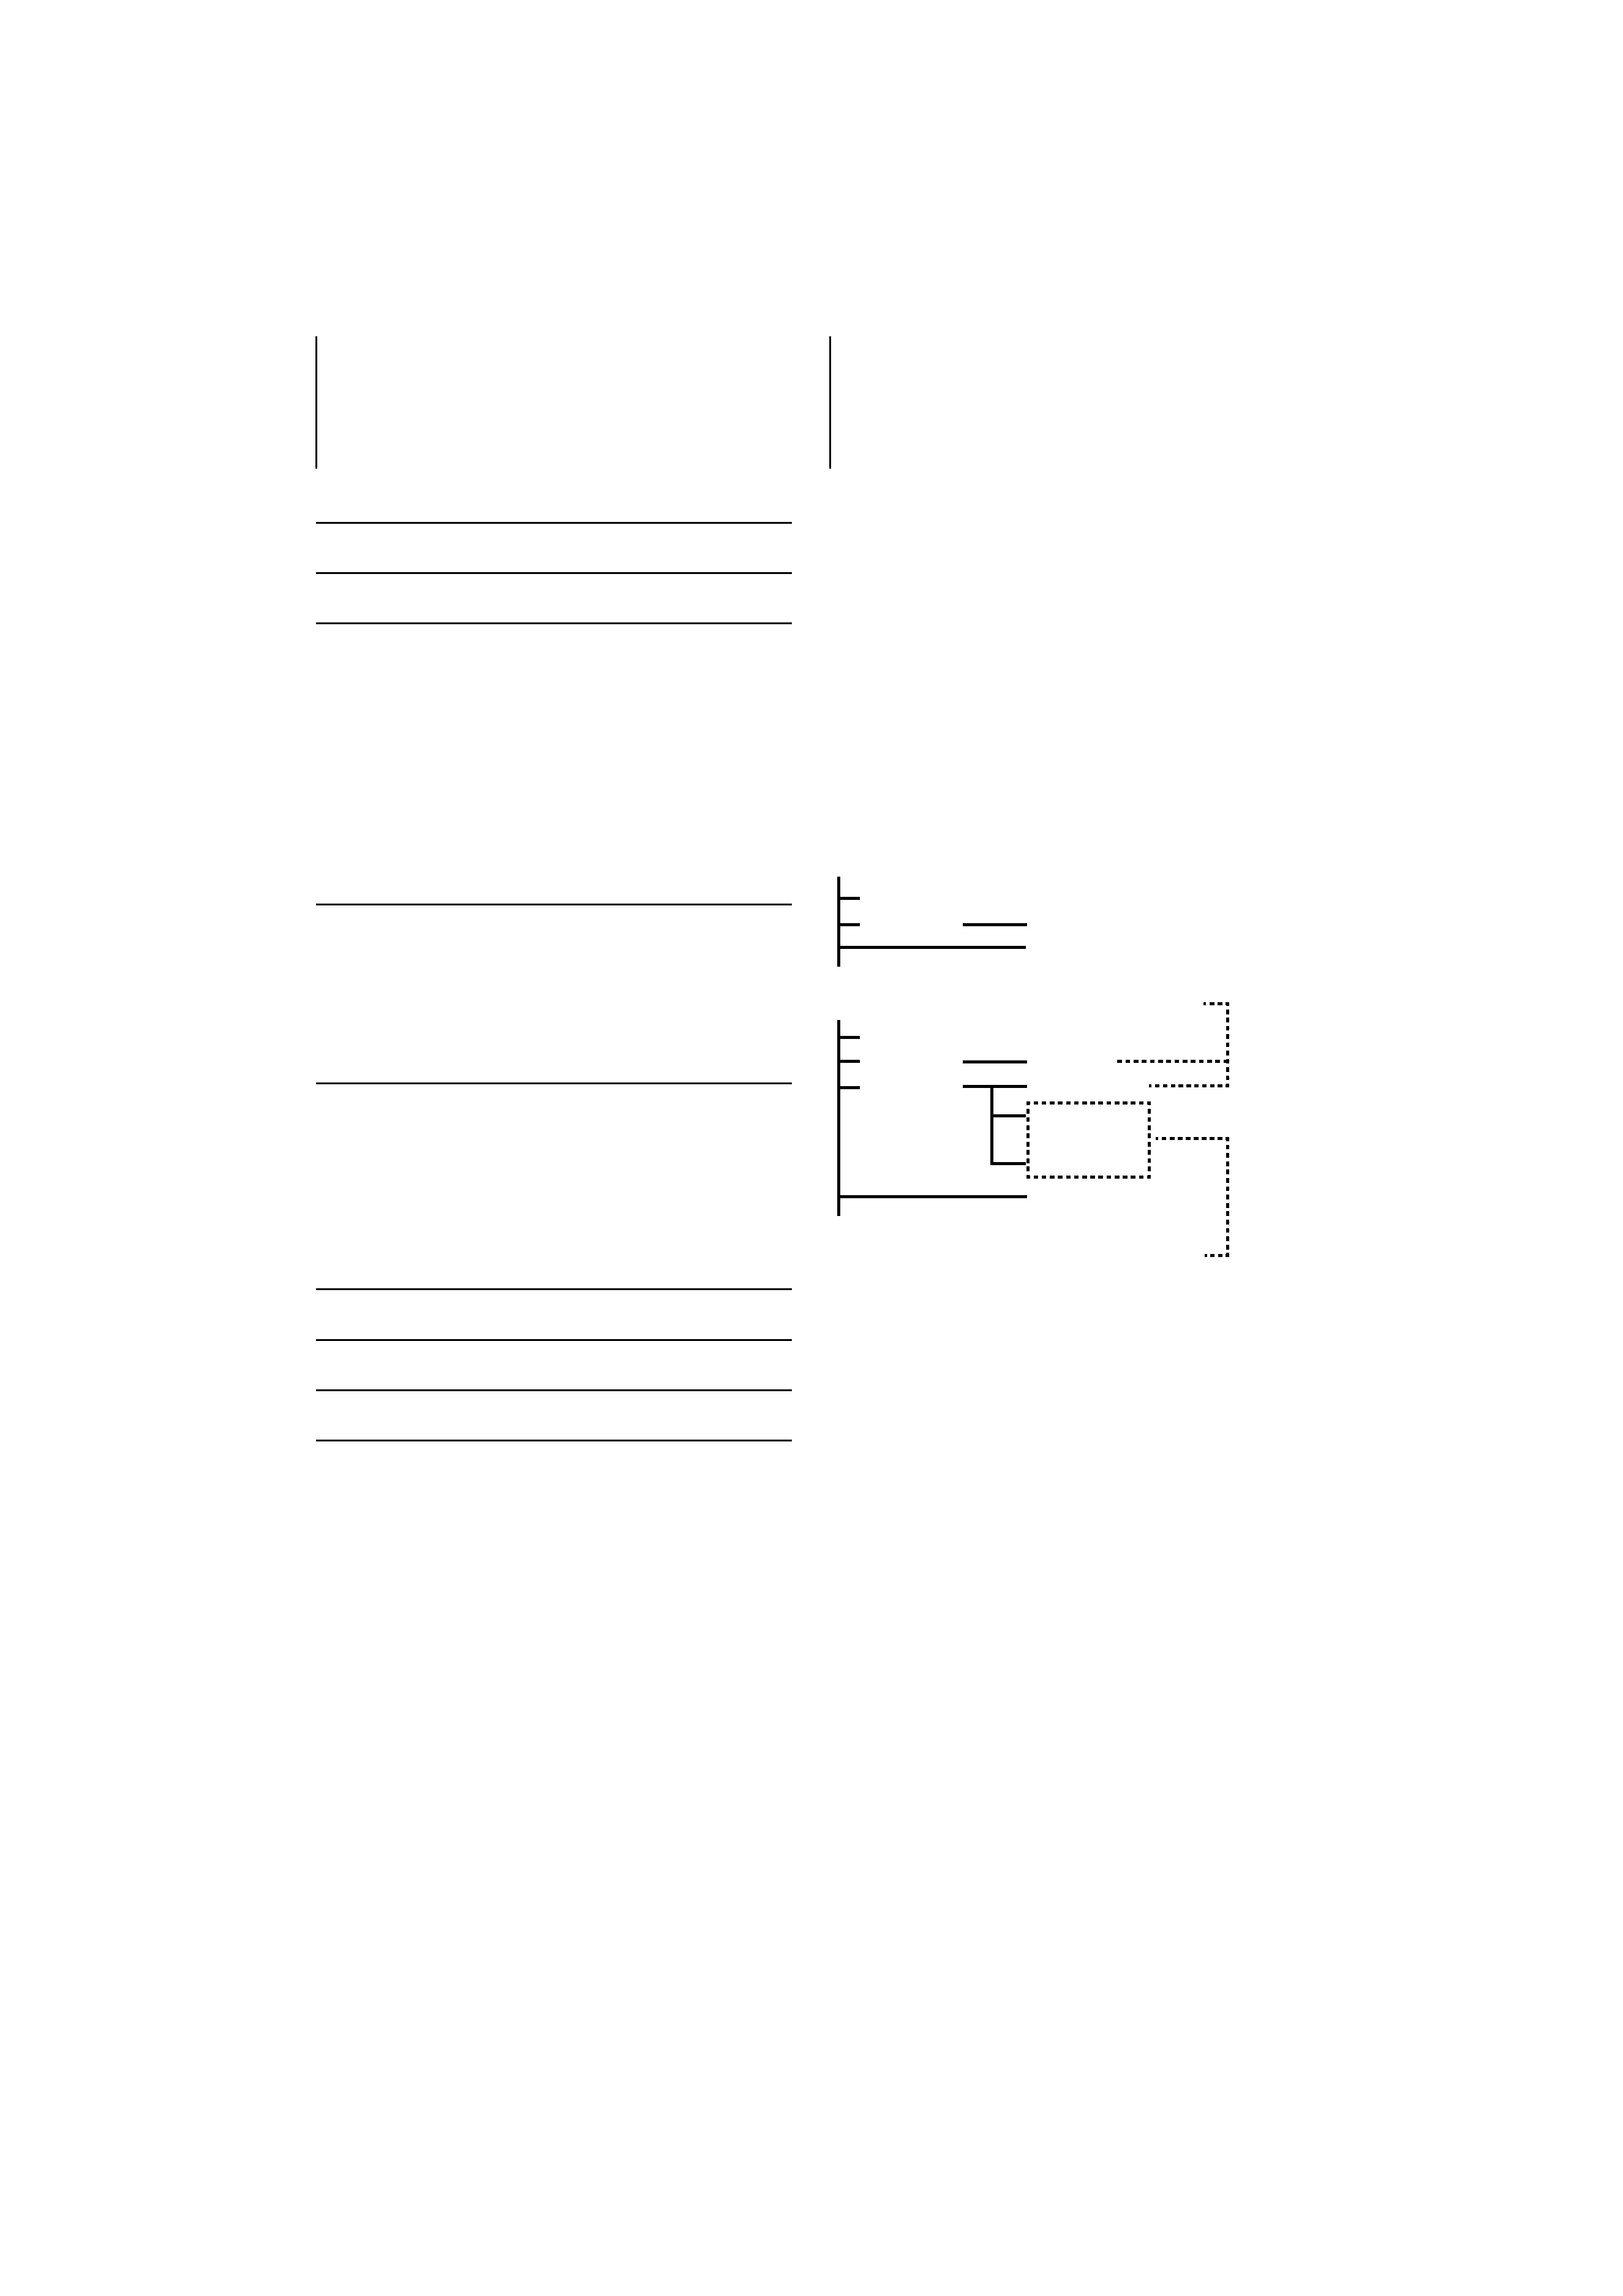
/
· Main Program Audio (hereafter called Main channel)
· Supplemental Program Audio (hereafter called Sub channel)
Analog AM
Digital AM
Analog AM
Digital AM
(HD AM band)
(HD FM band)
Analog FM
Digital FM
Analog FM
Digital FM-1ch
Analog FM
Digital FM-2ch
Digital FM-8ch
Digital FM
Main Program Audio
(Main channel)
Supplemental Program Audio
(Sub channel)
...
Digital broadcasting can send other information than
audio, so you can display data such as title of music.
What is HD Radio Technology?
En-2
Before use
En-3
Operations CD Receiver
En-4
Tuning
Tuning Mode
Receive Mode
Preset Memory
Preset Tuning
Auto Memory Entry
Switching Display
Text Scroll
In HD Radio source
Operations DVD monitor 1
En-8
Functions While Displaying the Control Screen
Seek Mode
Auto Memory
Manual Memory
Receive mode
Operations DVD monitor 2
En-11
Functions While Displaying the Control Screen
Seek Mode
Auto Memory
Manual Memory
Receive mode
Accessories/ Installation Procedure
En-14
Installation
En-15
Troubleshooting Guide
En-16
Specifications
En-17

English
|
En-3
Before use
2WARNING
To prevent injury or fire, take the following
precautions:
· To prevent a short circuit, never put or leave any
metallic objects (such as coins or metal tools) inside
the unit.
Cleaning the Unit
If the faceplate of this unit is stained, wipe it with a
dry soft cloth such as a silicon cloth.
If the faceplate is stained badly, wipe the stain off with
a cloth moistened with neutral cleaner, then wipe it
again with a clean soft dry cloth.
Notes
· If you experience problems during installation,
consult your Kenwood dealer.
· The illustrations of the display and the panel
appearing in this manual are examples used to
explain more clearly how the controls are used.
Therefore, what appears on the display in the
illustrations may differ from what appears on the
display on the actual equipment, and some of the
illustrations on the display may be inapplicable.
Control Units that can be Connected
For the models to which this unit can be connected,
consult your Kenwood dealer.
Note that the following restrictions may occur
depending on a control unit to be used.
· The HD Radio cannot be selected as a dual zone
source.
How to operate the unit
Operations of this unit are described in the instruction
manual of a control unit. For those not described in it,
refer to the following <Operations> section.
· CD Receiver: <Operations CD Receiver> page En-
4
· KVT-512, DDX512, DNX5120, DNX512EX
: <Operations DVD monitor 1> page En-8
· DDX812, DDX712, DNX8120, DNX7120
: <Operations DVD monitor 2> page En-11
/
· Following models are Multi key system models. Operations
different from those of a standard model may be described
in the <Operations CD Receiver> section.
KDC-MP728, KDC-MP828, KDC-X789,KDC-X889
· The display of the capital and small letters may be differed
depending on the model.
En-4 | KTC-HR200
Operations CD Receiver
Tuning
Selecting the station.
1 Select HD Radio source
Press the [SRC] button.
Select the "HD Radio"/"HD RADIO" display.
2 Select the HD FM band
Press the [FM] button.
Each time the [FM] button is pressed it switches
between the HF1, HF2, and HF3 bands.
Select the HD AM band
Press the [AM] button.
3 Tune up or down program
Press the [
4] or [¢] button.
If the sub channel is available in Digital FM
broadcast when <Tuning Mode> is set to Auto
seek or Manual, the channel can be switched.
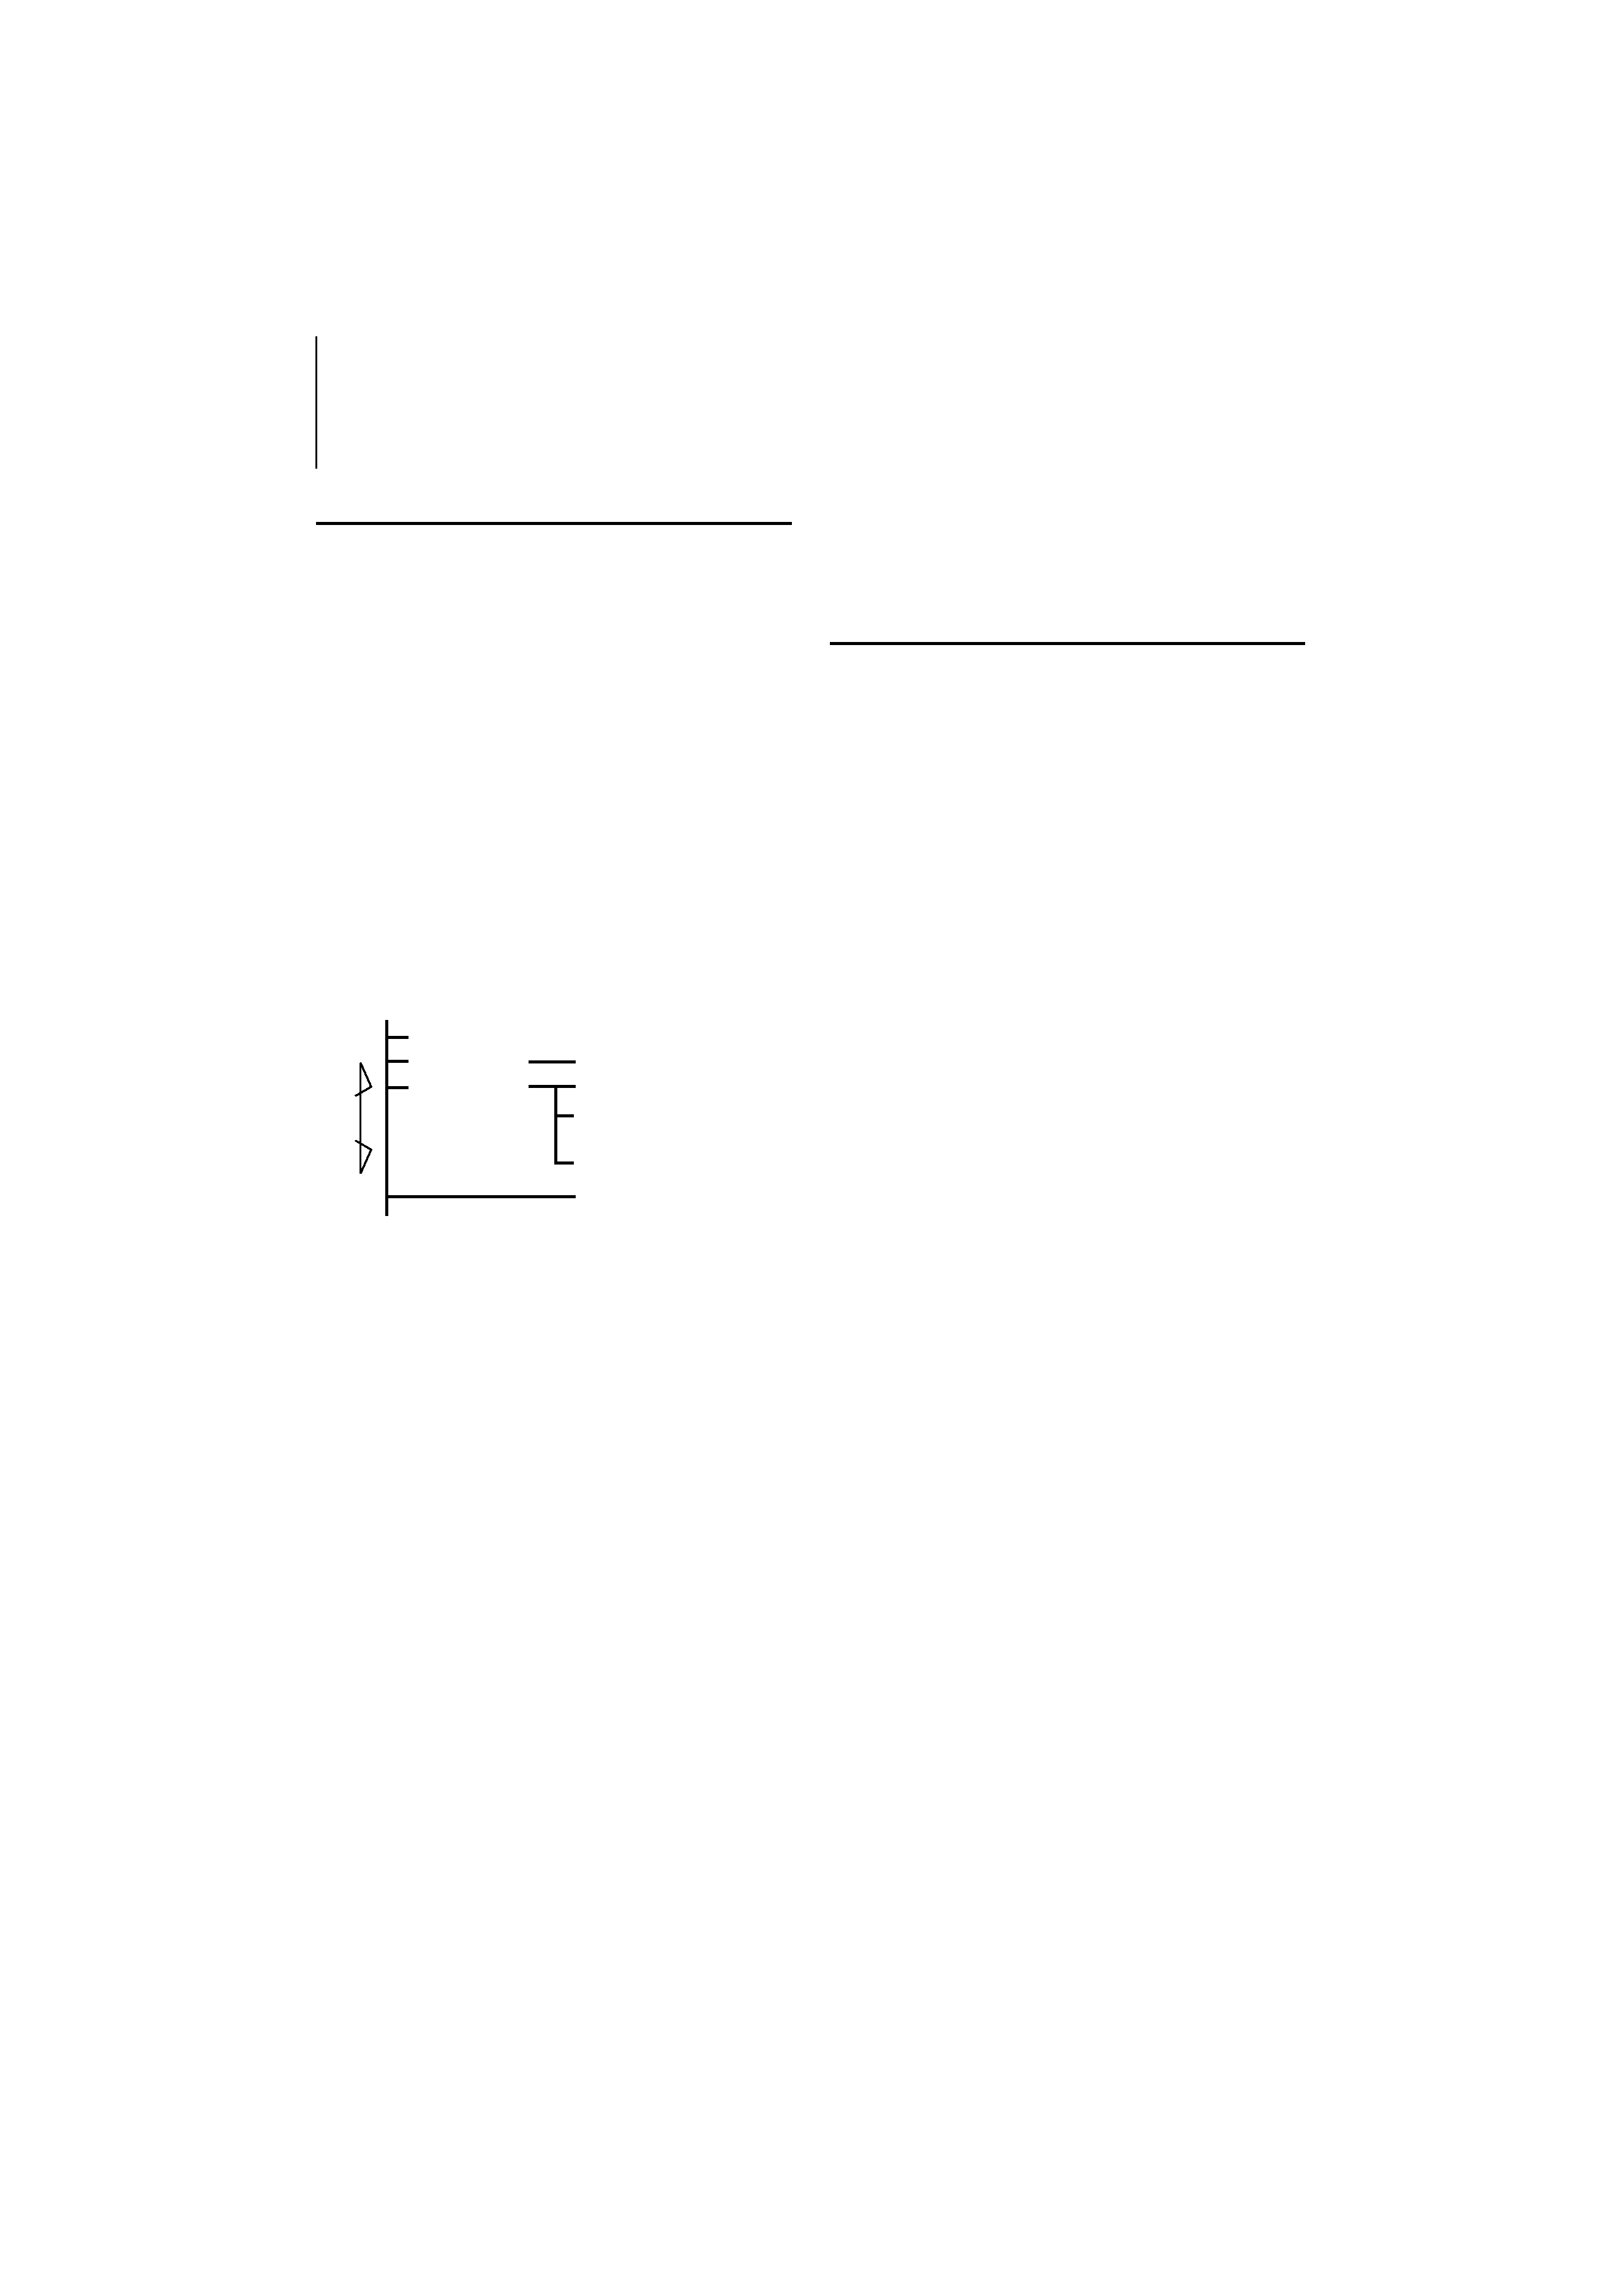
Example:
(HD FM band)
Analog FM 1
Digital FM 2
Analog FM TM
Digital FM-1ch 3
Analog FM £
Digital FM-2ch 4
Digital FM-8ch 0
Digital FM !
...
<Tuning Mode> : Auto seek or Manual
<Receive Mode> : Auto mode
[
4]
[
¢]
· During the reception of 1, tune up:
2
34...
· During the reception of !, tune down: !
0...
/
· Using <Receive Mode> the modes can be switched to
digital broadcast automatic switching, analog broadcast
only, or digital broadcast only.
· When "Digital" has been set with <Receive Mode>, the
seek time will be longer to allow a check of whether the
transmission is a digital broadcast.
· It will take few seconds to receive the digital
broadcasting after selecting the frequency.
· When Tune up button is pressed, it will switch to the
next frequency if is it switched before receiving the
Digital broadcasting. (TM
£)
· When Tune down button is pressed, it will be received
from Analog broadcasting if the Digital broadcasting has
never been received. (!
£)
· When <Tuning Mode> is set to "Manual", the frequency
will be switched while pressing [
4] or [¢] buttons.
· Some of the models have the following displays when
the Main channel and Sub channel are switched.
- "Main"/"Primary"/"PRI": When it is switched to the Main
channel
- "Sub"/"Secondary"/"SEC": When it is switched to Sub
channel
Tuning Mode
Sets the tuning mode.
Press the [AUTO] button.
Each time the button is pressed the Tuning mode
switches as shown below.

English
|
En-5
Receive Mode
Sets the receive mode.
1 Select menu mode using the control unit.
Select the menu item.
Select the "Receive Mode"/ "HDR mode" display.
2 Open Receive mode
Press the setting button of the menu items in
the control unit for at least 1 second.
3 Set the Receive mode
Switching the setting of menu items.
Each time the button is pressed the Receive mode
switches as shown below.
Receive mode
Display
Operation
Auto mode
"Auto"
Automatically tunes to analog
broadcast when there is no digital
broadcast.
Digital
"Digital"
Digital broadcasts only.
Analog
"Analog"
Analog broadcasts only.
4 Exit Receive mode
Press the [MENU] button.
5 Exit Menu mode
Preset Memory
Putting the frequency and channel in the memory.
1 Select the band
Press the [FM] or [AM] button.
2 Select the frequency to put in the memory
Press the [
4] or [¢] button.
3 Put the frequency and channel in the memory
Press the desired [1] -- [6] button for at least 2
seconds.
The preset number display blinks 1 time.
On each band, 1 station can be put in the memory
on each [1] -- [6] button.
Preset Tuning
Calling up the frequency and channel in the
memory.
1 Select the band
Press the [FM] or [AM] button.
2 Call up the frequency and channel
Press the desired [1] -- [6] button.
/
· "Linking" will be displayed for few seconds until it is
received.
· If the Sub channel is not available, the main channel will
be received.
· When <Receive Mode> (page En-5) is set to Digital or
Analog, it cannot be received if the setting is differed
form the preset.