
DVD-RECEIVER
INSTRUCTION MANUAL
KDV-MP3346M
KDV-MP3346
© GET0637-001B [U/UU] (B64-4732-18)
The marking of products using lasers
The label is attached to the chassis/case and says that the component uses laser beams that have been classied
as Class 1. It means that the unit is utilizing laser beams that are of a weaker class. There is no danger of hazardous
radiation outside the unit.
· Manufactured under license from Dolby Laboratories. Dolby and the double-D symbol are trademarks of Dolby
Laboratories.
· "DVD Logo" is a trademark of DVD Format/Logo Licensing Corporation registered in the US, Japan and other
countries.
· DivX® is a registered trademark of DivX, Inc., and is used under license.
· ABOUT DIVX VIDEO: DivX® is a digital video format created by DivX, Inc. This is an ocial DivX Certied device
that plays DivX video. Visit www.divx.com for more information and software tools to convert your les into DivX
video.
· ABOUT DIVX VIDEO-ON-DEMAND: This DivX Certied® device must be registered in order to play DivX Video-
on-Demand (VOD) content. To generate the registration code, locate the DivX VOD section in the device setup
menu. Go to vod.divx.com with this code to complete the registration process and learn more about DivX VOD.
· Microsoft and Windows Media are either registered trademarks or trademarks of Microsoft Corporation in the
United States and/or other countries.
· This product incorporates copyright protection technology that is protected by U.S. patents and other
intellectual property rights. Use of this copyright protection technology must be authorized by Macrovision, and
is intended for home and other limited viewing uses only unless otherwise authorized by Macrovision. Reverse
engineering or disassembly is prohibited.
This symbol mark indicates that Kenwood manufactured this
product so as to decrease harmful in uence on the environment.
For Turkey
Bu ürün 26891sayili Resmi Gazete'de yayimlanan Elektrikli ve Elektronik Eyalarda Bazi Zararli Maddelerin
Kullaniminin Sinirlandirilmasina Dair Yönetmelie uygun olarak üretilmitir.
This product complies with Directive, Number 26891 regarding "REGULATION ON THE RESTRICTION OF THE USE OF
CERTAIN HAZARDOUS SUBSTANCES IN ELECTRICAL AND ELECTRONIC EQUIPMENT".
CoverRear_KDV-MP3346M_001B_f.indd 1-2
12/16/09 4:39:14 PM
Declaration of Conformity with regard to the EMC Directive
2004/108/EC
Manufacturer:
Kenwood Corporation
2967-3 Ishikawa-machi, Hachioji-shi, Tokyo, 192-8525 Japan
EU Representative's:
Kenwood Electronics Europe BV
Amsterdamseweg 37, 1422 AC UITHOORN, The Netherlands
2
ENGLISH
WARNINGS (to prevent injury or fire):
· Never put or leave any metallic objects (such
as coins or metal tools) inside the unit to
prevent short circuit.
· DO NOT install any unit or wire any cable in a
location where;
it may obstruct the steering wheel and
gearshift lever operations.
it may obstruct the operation of safety
devices such as air bags.
it may obstruct visibility.
· DO NOT operate the unit while driving.
· If you need to operate the unit while driving,
be sure to look around carefully.
· The driver must not watch the monitor while
driving.
If the parking brake is not engaged, "DRIVER
MUST NOT WATCH THE MONITOR WHILE
DRIVING." appears on the monitor, and no
playback picture will be shown.
This warning appears only when the parking
brake lead is connected to the parking
brake system built in the car (refer to the
Installation/Connection Manual).
Important to know...
· Lens fogging: When you turn on the car
heater in cold weather, dew or condensation
may form on the lens in the DVD player of the
unit. This condensation on the lens may not
allow discs to play. In such a situation, remove
the disc and wait for the condensation to
evaporate. If the unit still does not operate
normally after a while, consult your Kenwood
dealer.
· When you purchase external components,
check with your Kenwood dealer to make sure
that they work with your model and in your
area.
· Detailed information and notes about the
playable audio files are stated in an online
manual on the following site:
www.kenwood.com/cs/ce/audiofile/
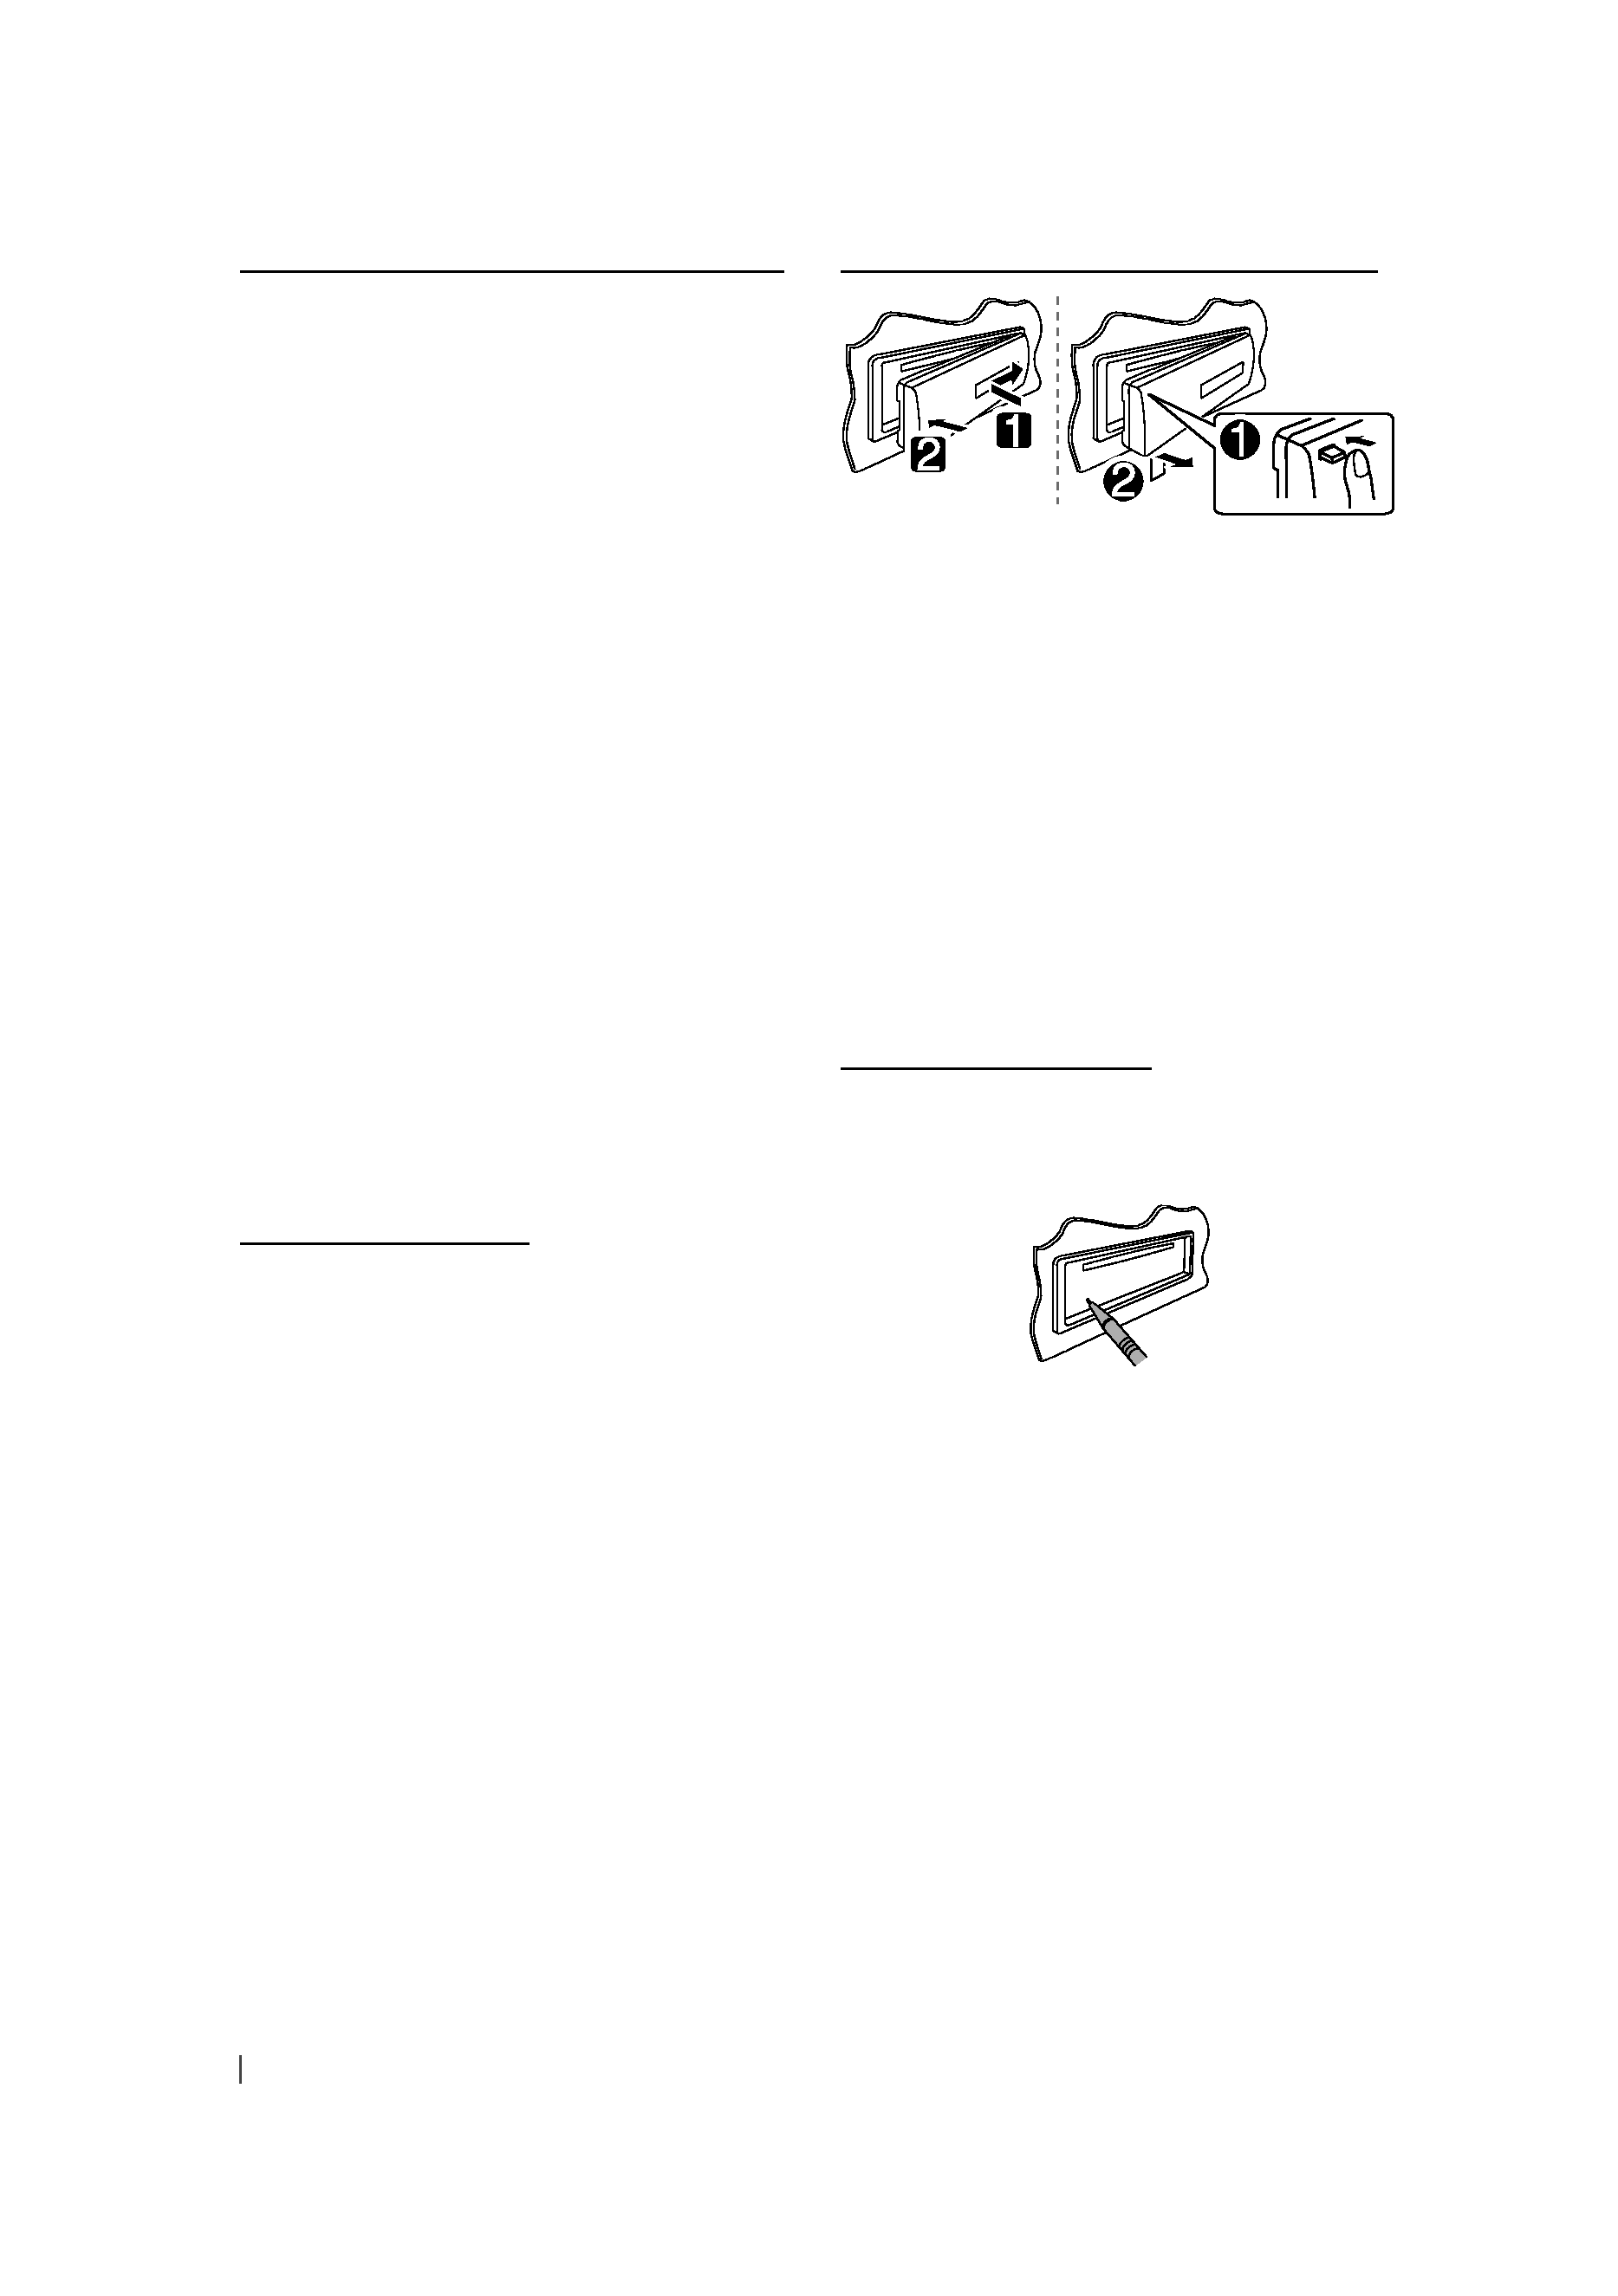
How to attach/detach the control panel
· The control panel is a precision piece of
equipment and can be damaged by shocks or
jolts.
· Keep the control panel in its hard case while
detached.
· Do not expose the control panel (and the
hard case) to direct sunlight or excessive heat
or humidity. Also avoid places with too much
dust or the possibility of water splashing.
· To prevent deterioration, do not touch the
terminals of the unit or control panel with
your fingers.
How to reset your unit
If this unit (or the connected external
components) fails to operate properly, press
the reset button.
The unit returns to factory settings when the
reset button is pressed.
EN02-11_KDV-MP3346M[U]f.indd 2
EN02-11_KDV-MP3346M[U]f.indd 2
11/19/09 4:44:16 PM
11/19/09 4:44:16 PM
3
ENGLISH
CONTENTS
4 Preparation
4 Canceling the display
demonstration
4 Setting the clock
5 Prepare the remote controller
(RC-DV350)
5 Other settings before operations
7 Basic operations
7 Control panel
7 Remote controller (RC-DV350)
9 Listening to the radio
11 Playable disc type
12 Listening to a disc
13 Operation using the control panel
14 Operation using the remote
controller
21 Listening to the other external
components
22 Other adjustments
24 Troubleshooting
26 Maintenance
27 Language codes
28 Specifications
How to read this manual
The illustrations of the display and the panel
appearing in this manual are examples used
to explain more clearly how the controls
are used. Therefore, what appears on the
display in the illustrations may differ from
what appears on the display on the actual
equipment, and some of the illustrations on
the display may be inapplicable.
The following icons/symbols are used to
indicate:
Press and hold the
button(s) until the desired
operation begins.
Turn the control knob.
Turn the control
knob to make a
selection, then press
to confirm.
(
XX)
Reference page number
<XXXX>
Function Control setting item
Continued on the next page
[Hold]
EN02-11_KDV-MP3346M[U]f.indd 3
EN02-11_KDV-MP3346M[U]f.indd 3
11/23/09 2:13:23 PM
11/23/09 2:13:23 PM
4
ENGLISH
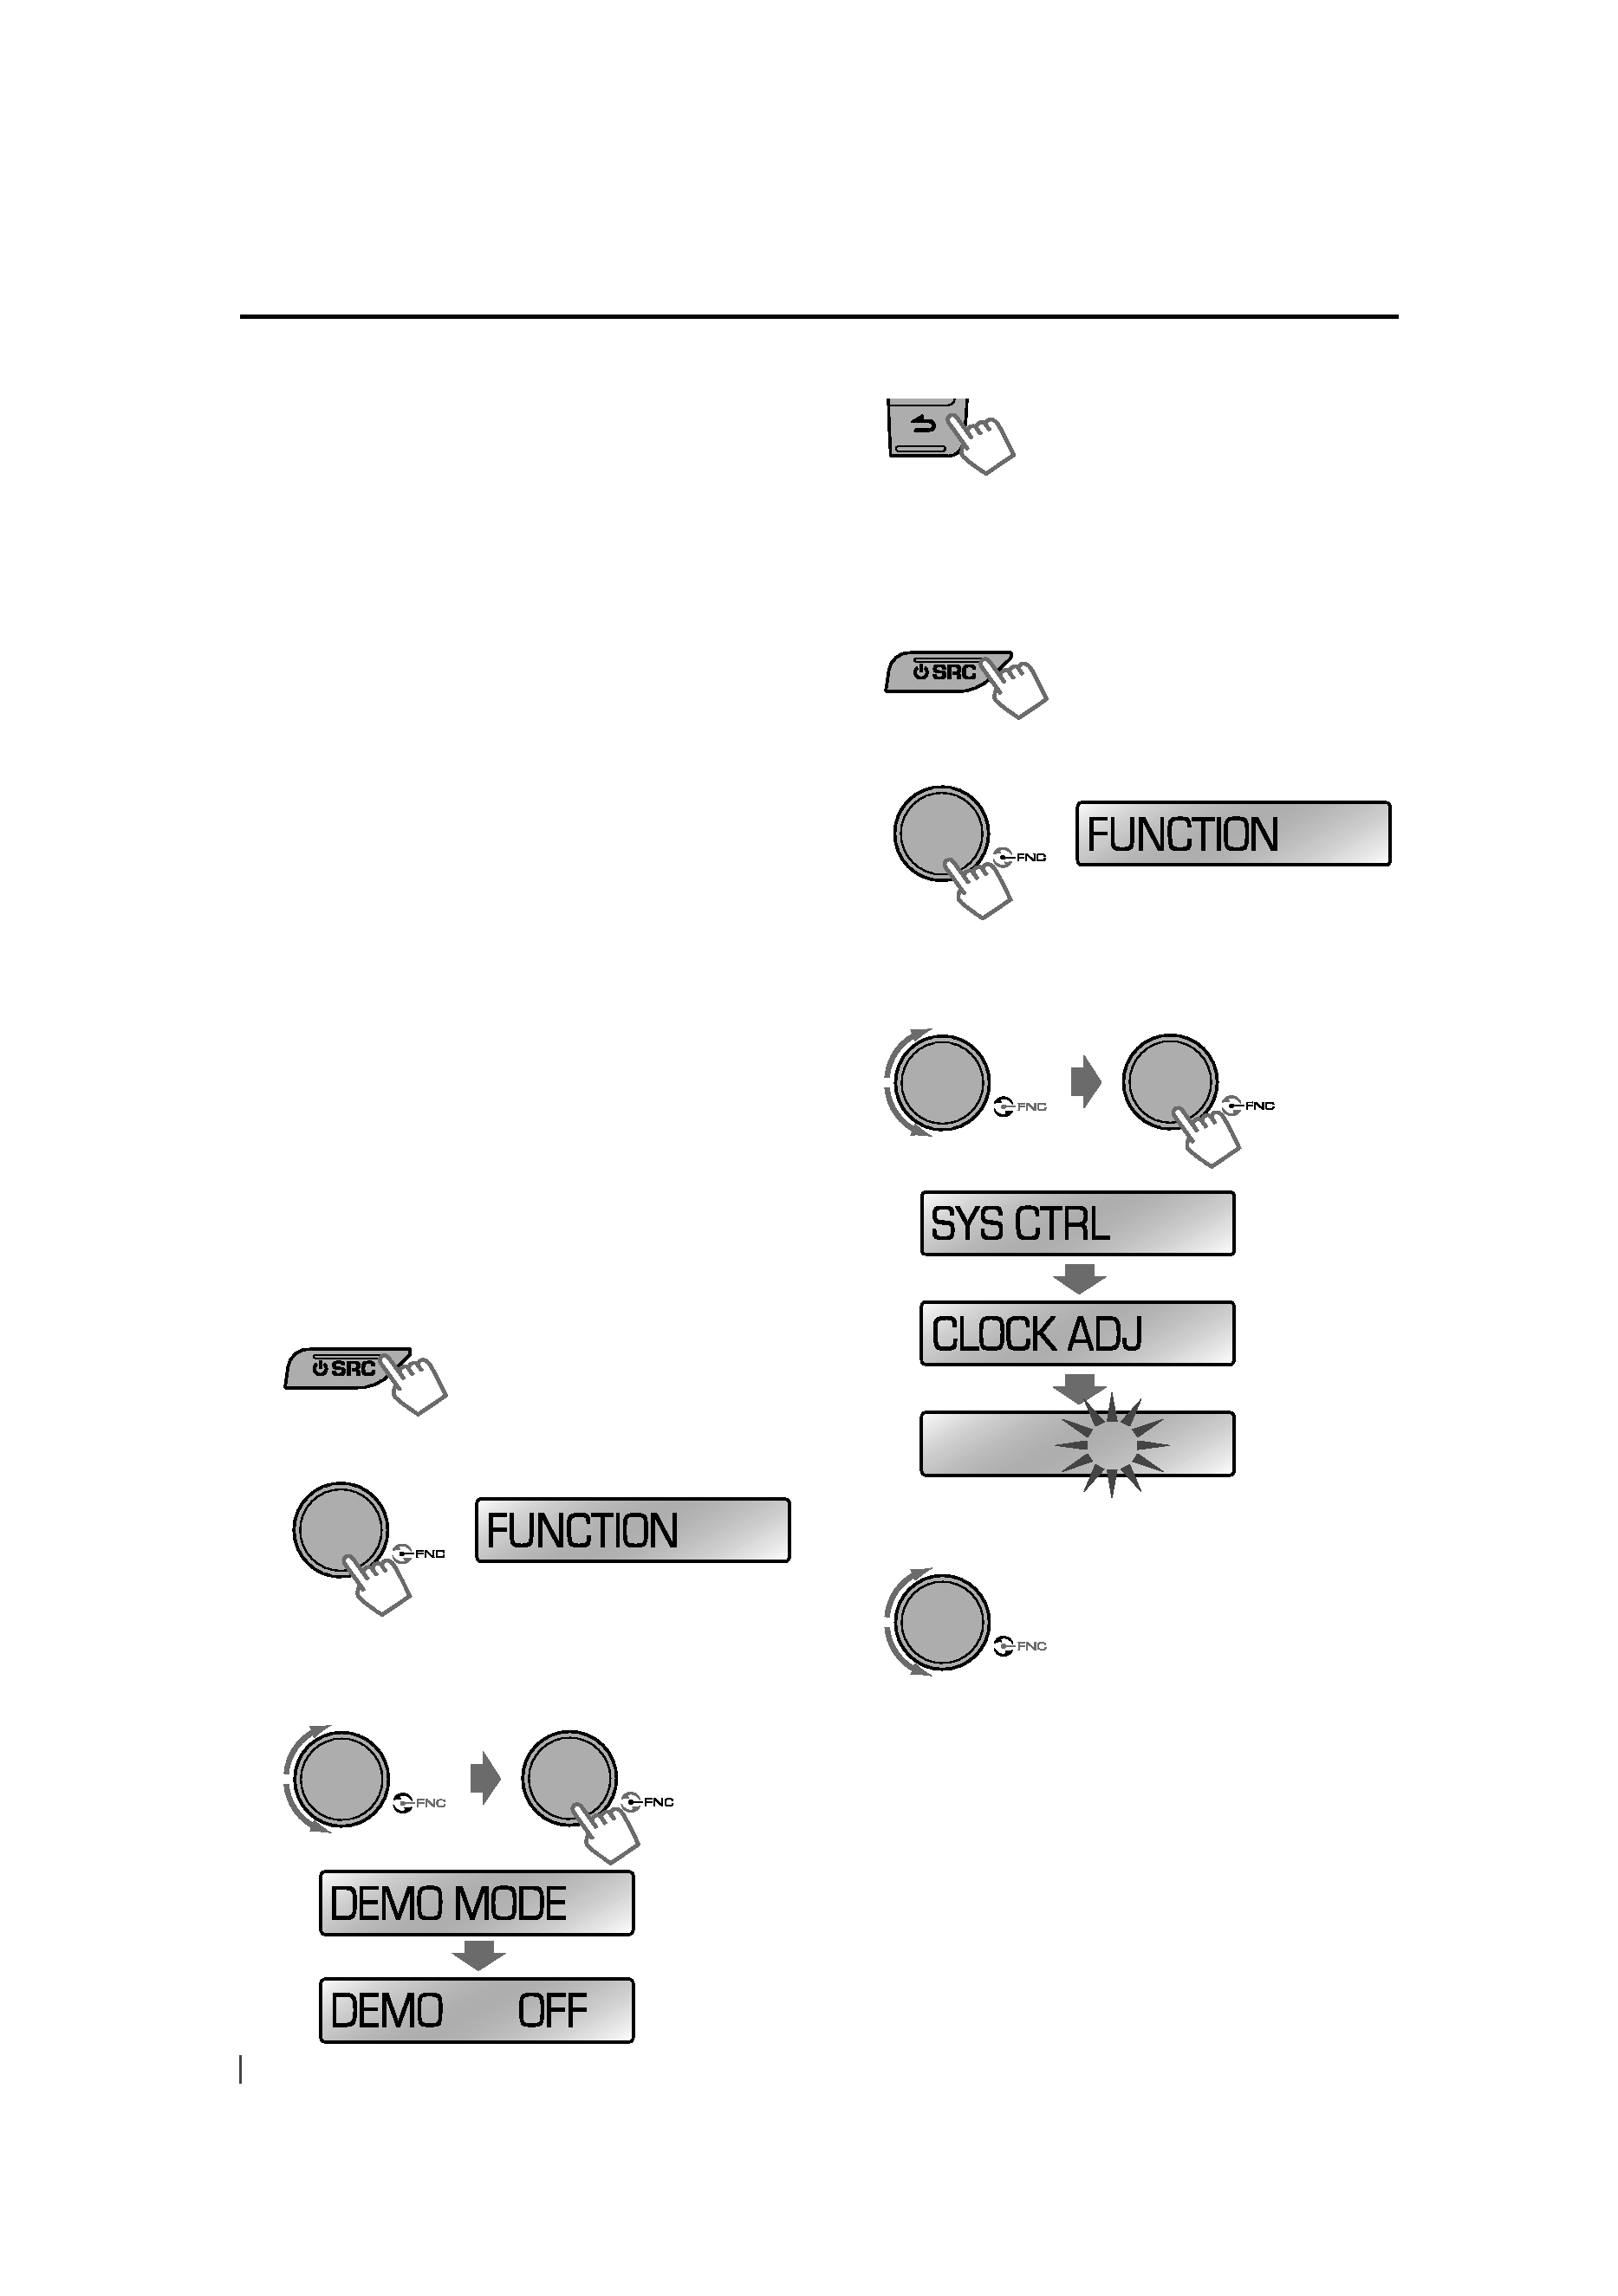
4 Finish the procedure.
Setting the clock
1 Turn on the power.
2 Enter Function Control settings.
3 Turn the control knob to make a
selection, then press to confirm.
1 : 00
4 Adjust the hour.
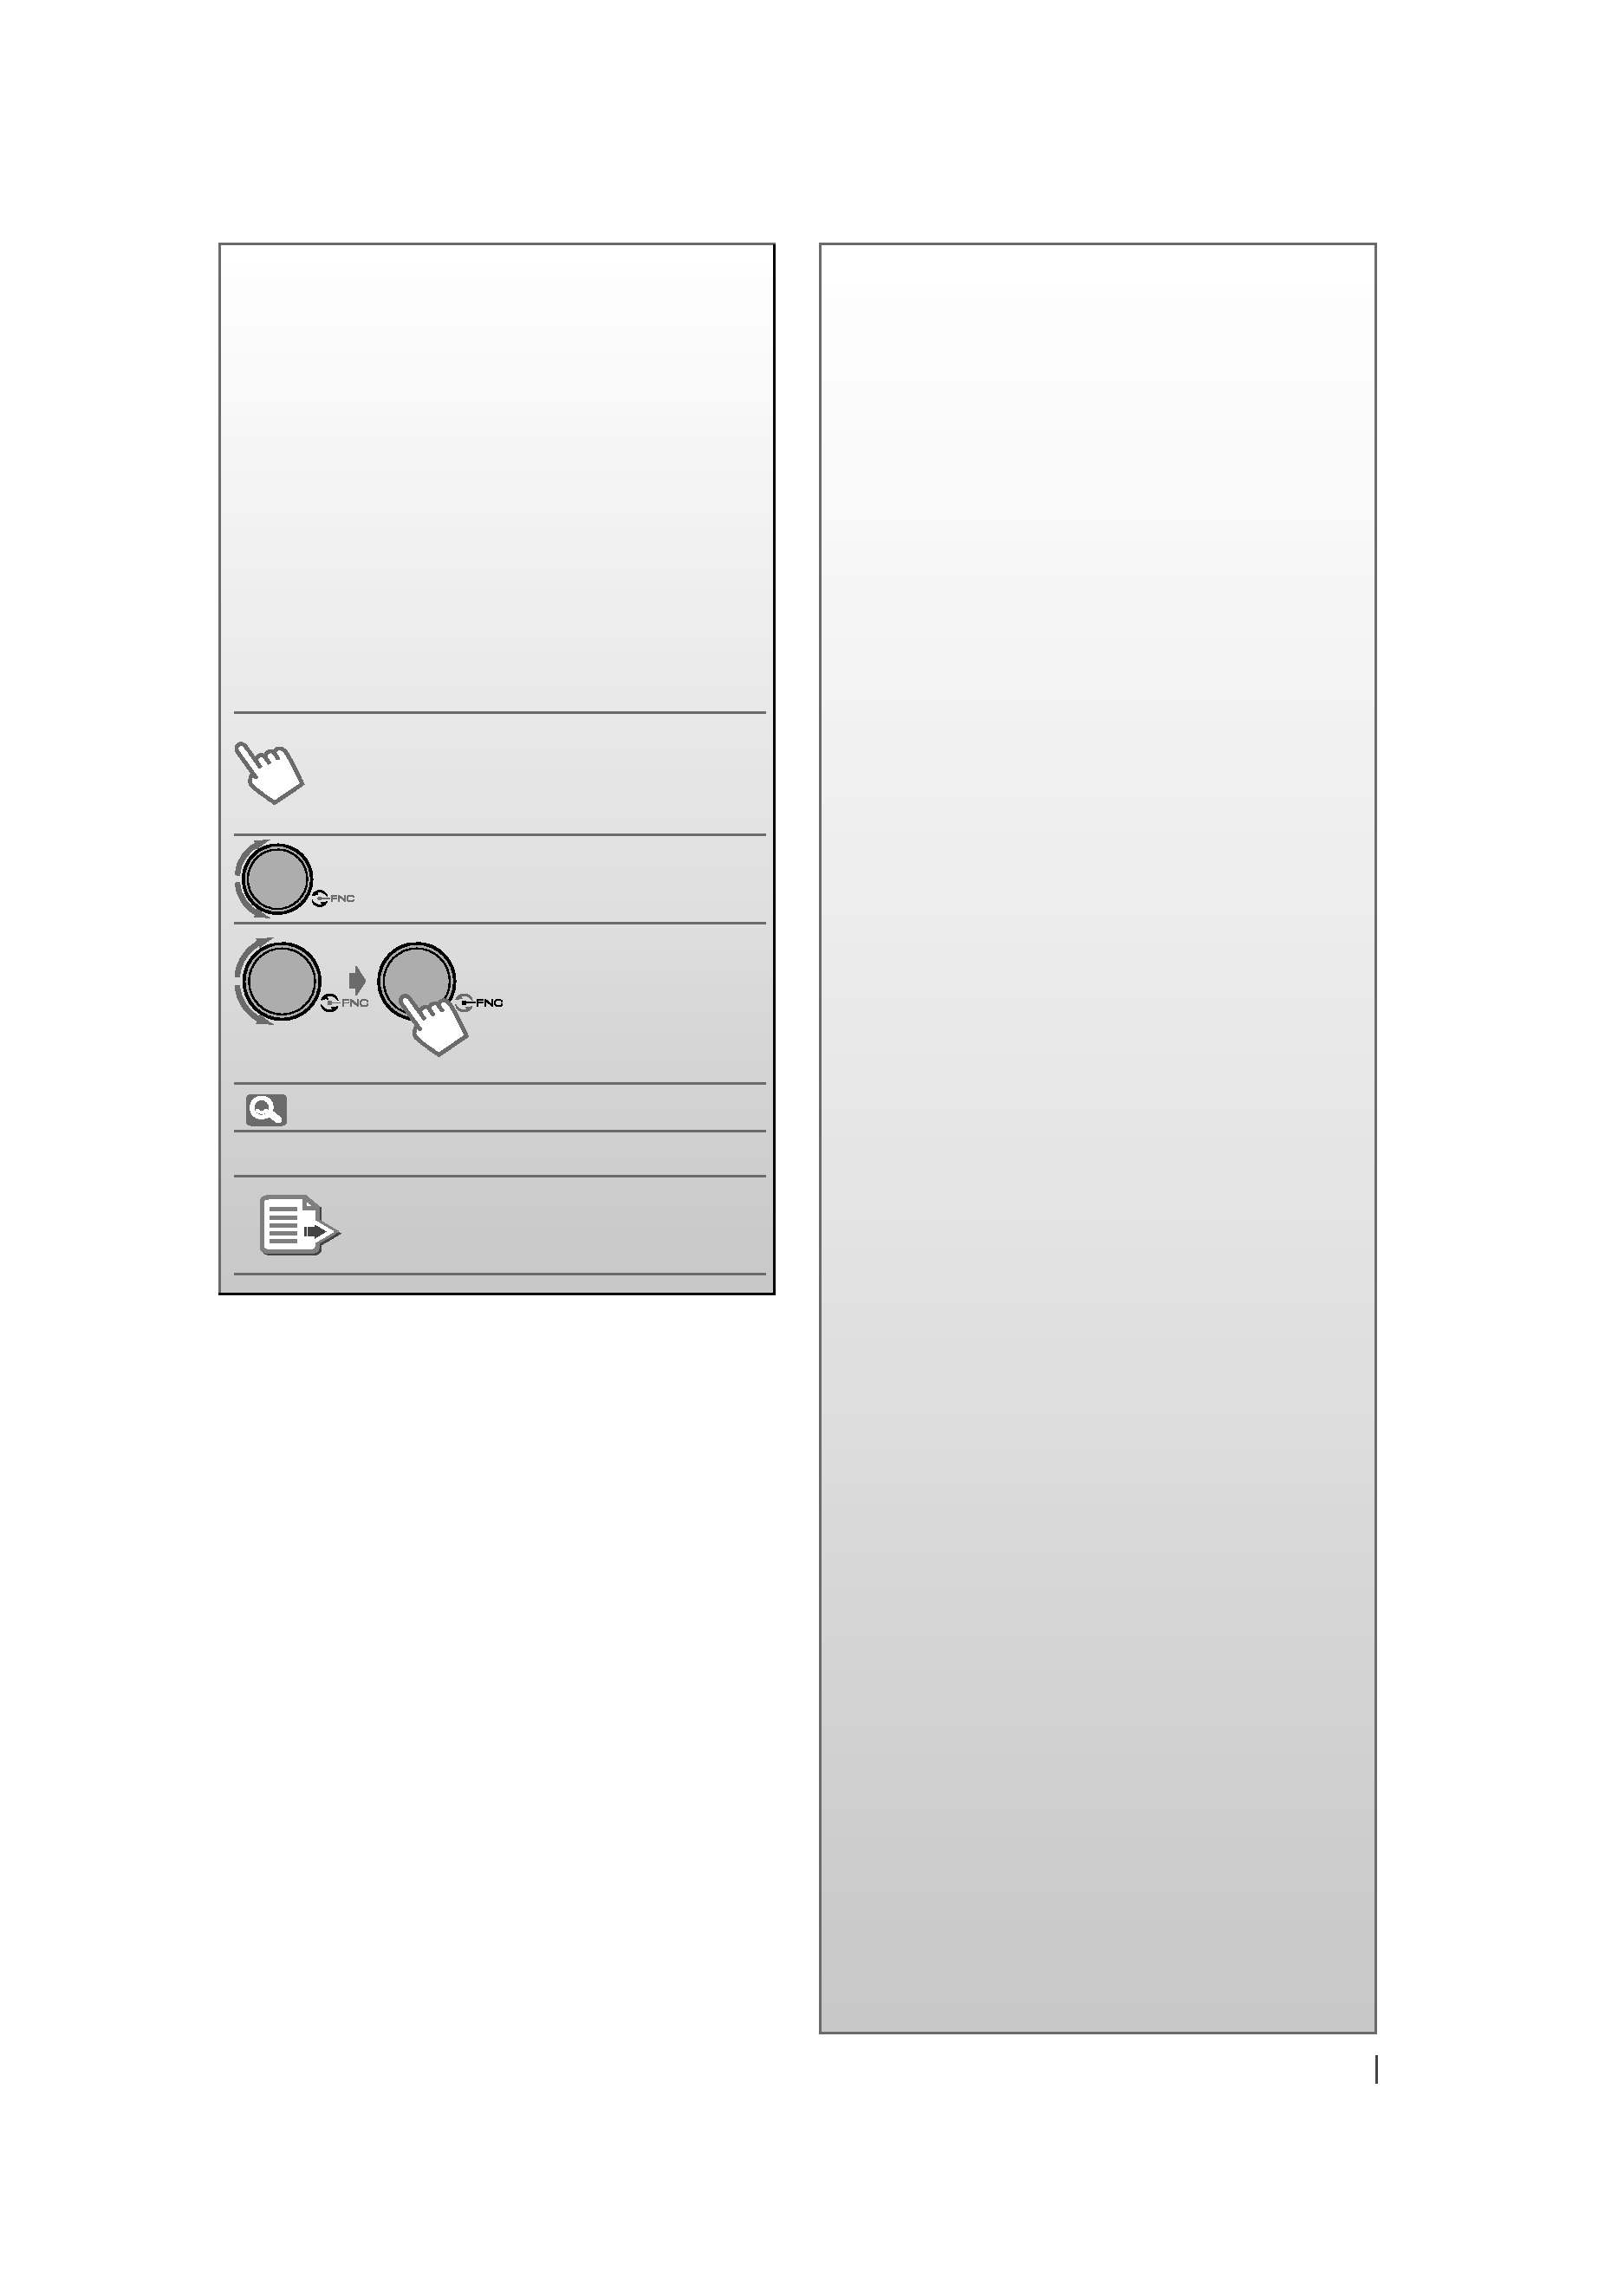
Preparation
[Hold]
The display demonstration is always turned on
unless you cancel it.
When you turn on the power (or after you reset
the unit), the display shows:
"CANCEL"
= "DEMO" = "PRESS" =
"VOL KNOB"
· If no operation is done for about 15 seconds,
"DEMO START" appears and the display
demonstration starts.
To cancel the display demonstration:
1 Press the control knob.
"NO/<YES>" is shown on the display.
2 Press the control knob again to select
"YES".
"DEMO OFF" appears on the display.
· If "NO" is selected, "DEMO START"
appears and the display demonstration
starts.
You can also cancel the display demonstration
from the Function Control settings, see the
following:
Canceling the display
demonstration
1 Turn on the power.
2 Enter Function Control settings.
3 Turn the control knob to make a
selection, then press to confirm.
EN02-11_KDV-MP3346M[U]f.indd 4
EN02-11_KDV-MP3346M[U]f.indd 4
11/19/09 4:44:16 PM
11/19/09 4:44:16 PM
5
ENGLISH
5 Adjust the minute.
1 : 00
Press
4 to return to the hour adjustment.
6 Finish the procedure.
While in clock display screen, press and hold
SCRL DISP will enter <CLOCK ADJ> setting
directly. Perform steps
4 and 5 to adjust the
hour and minute.
Prepare the remote
controller (RC-DV350)
Insert the batteries into the remote controller
by matching the polarity (+ and ) correctly.
AAA/R03
If the range or effectiveness of the remote
control decreases, replace both batteries.
Caution:
· Danger of explosion if battery is incorrectly
replaced. Replace only with the same or
equivalent type.
· Battery shall not be exposed to excessive heat
such as sunshine, fire, or the like.
[Hold]
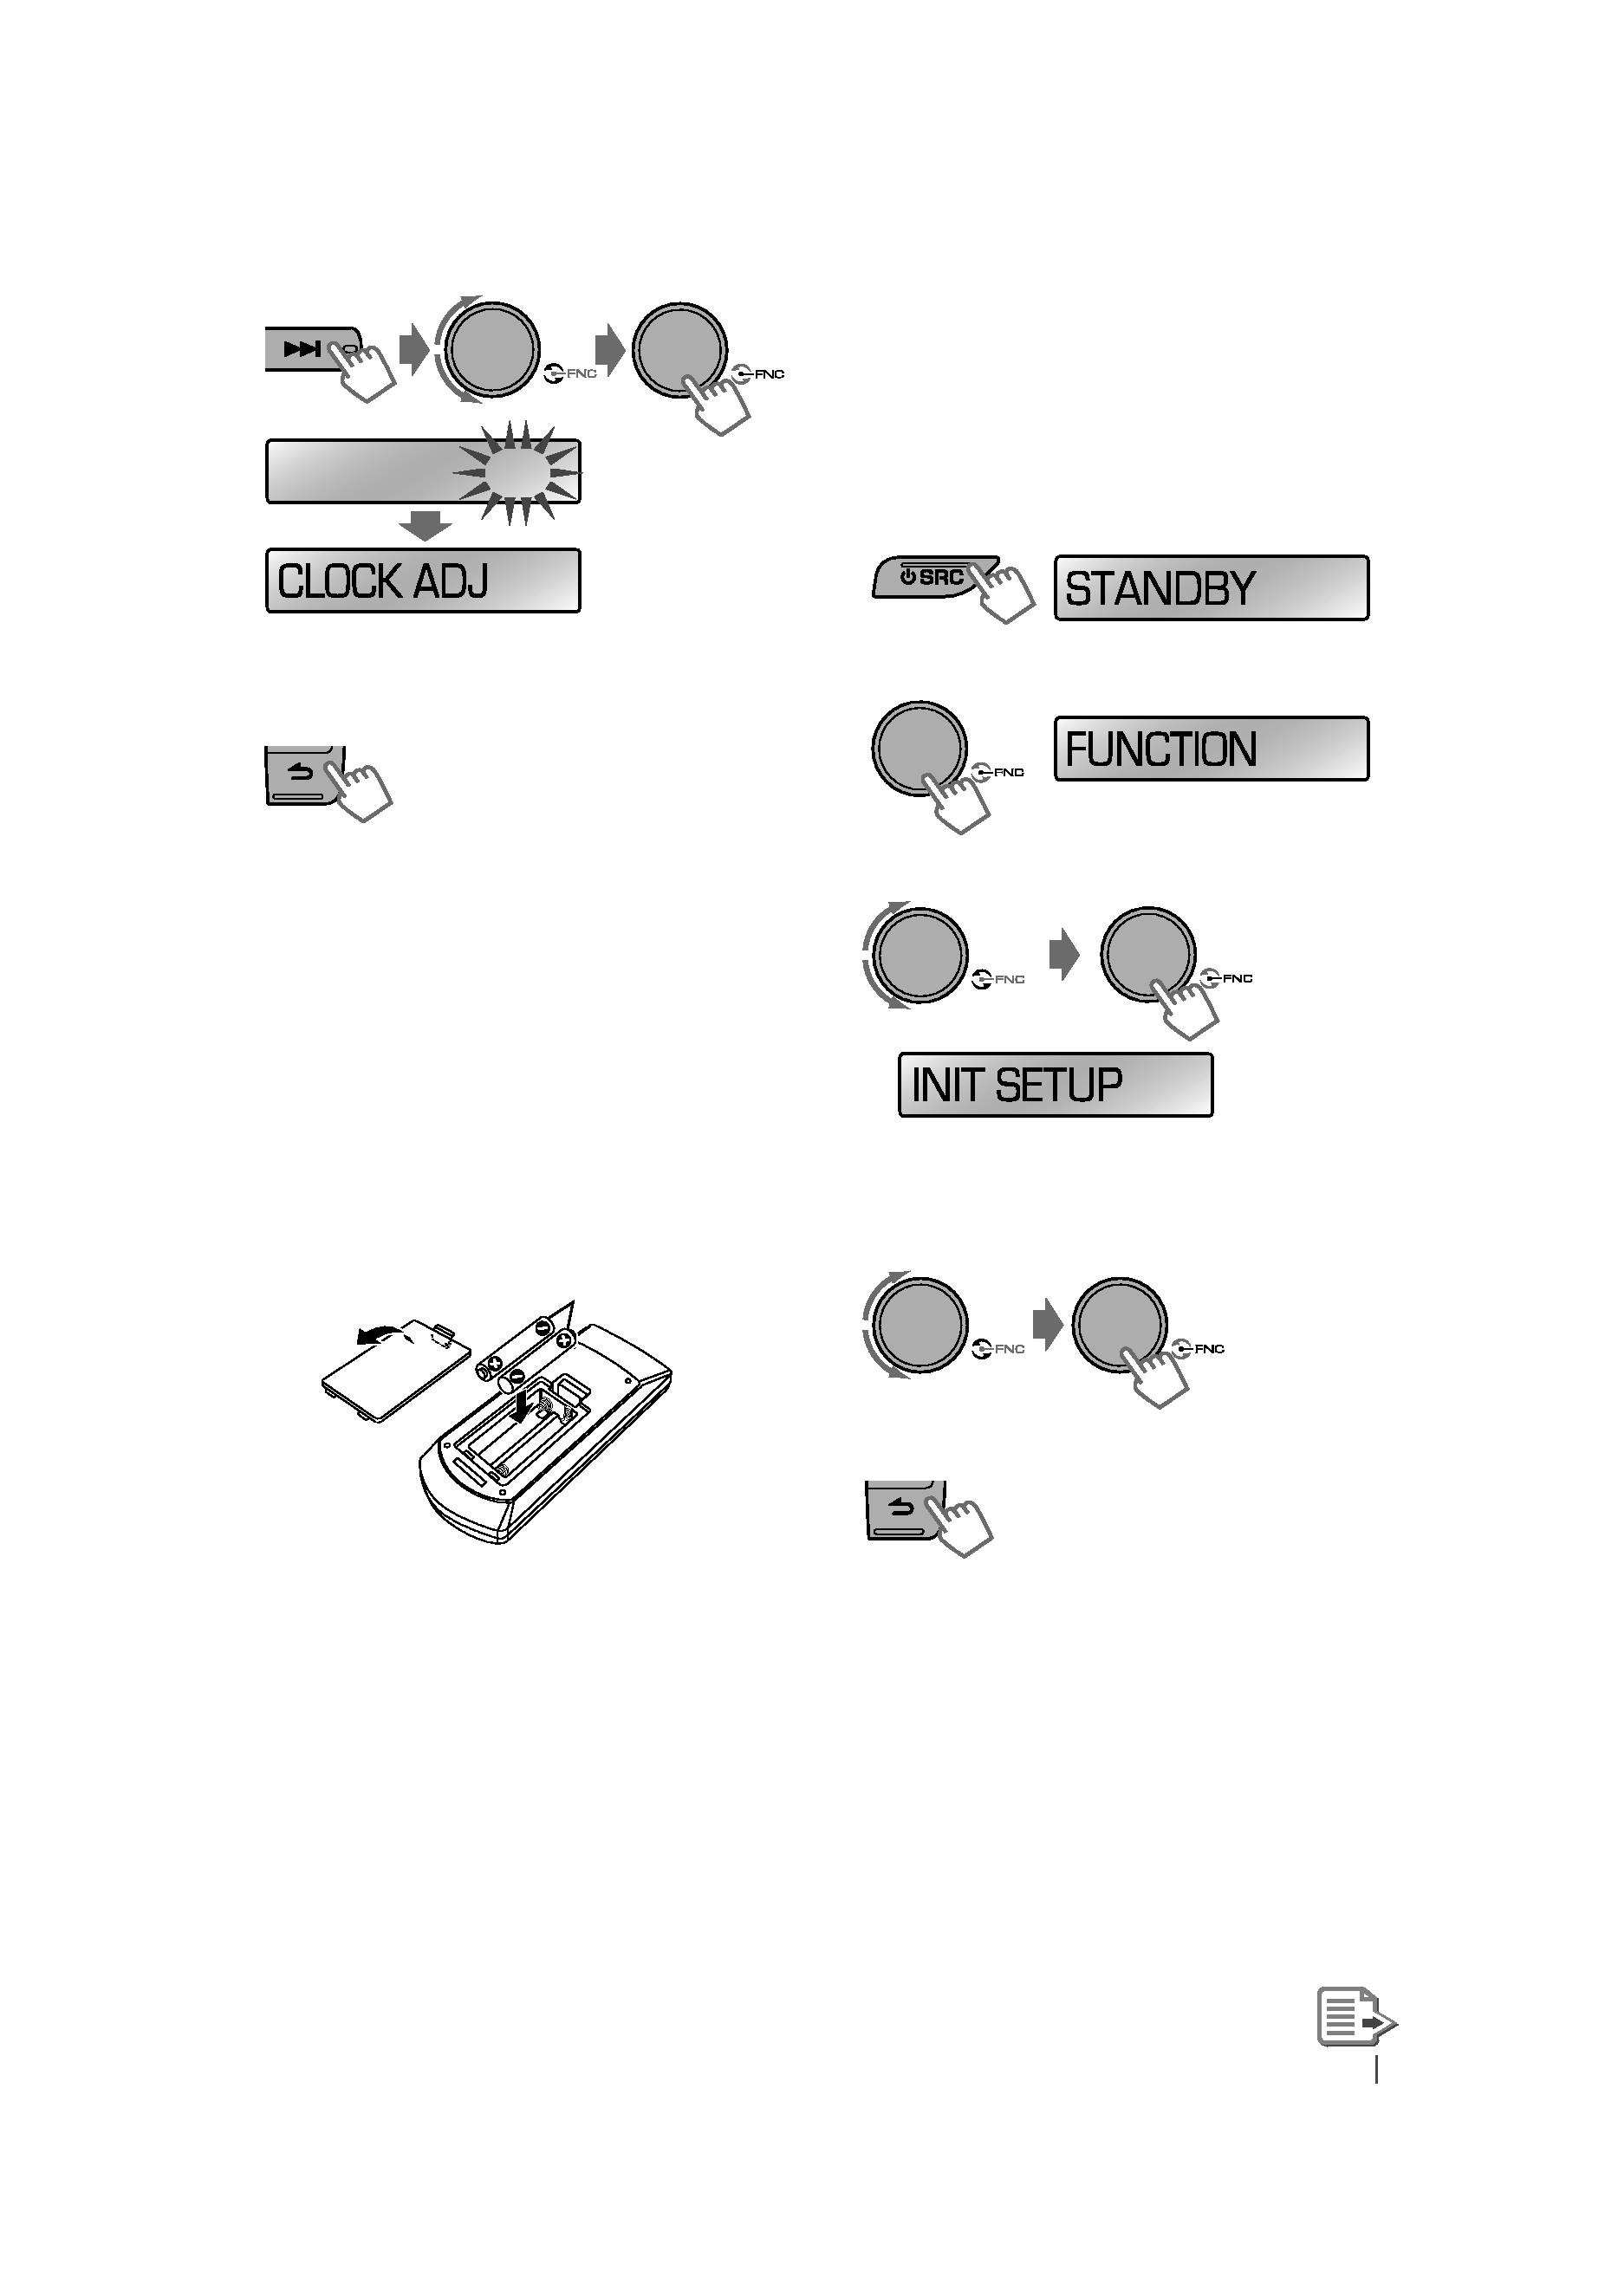
Other settings before
operations
Before using this unit for the first time,
make the following settings for optimum
performance.
1 Turn the unit to standby state.
2 Enter Function Control settings.
3 Select "INIT SETUP."
4 Turn the control knob to make a
selection, then press to confirm.
See table on page 6 for selection.
5 Finish the procedure.
[Hold]
EN02-11_KDV-MP3346M[U]f.indd 5
EN02-11_KDV-MP3346M[U]f.indd 5
11/19/09 4:44:17 PM
11/19/09 4:44:17 PM