NEDERLANDS
ESP
AÑOL
IT
ALIANO
DEUTSCH
FRANÇAIS
ENGLISH
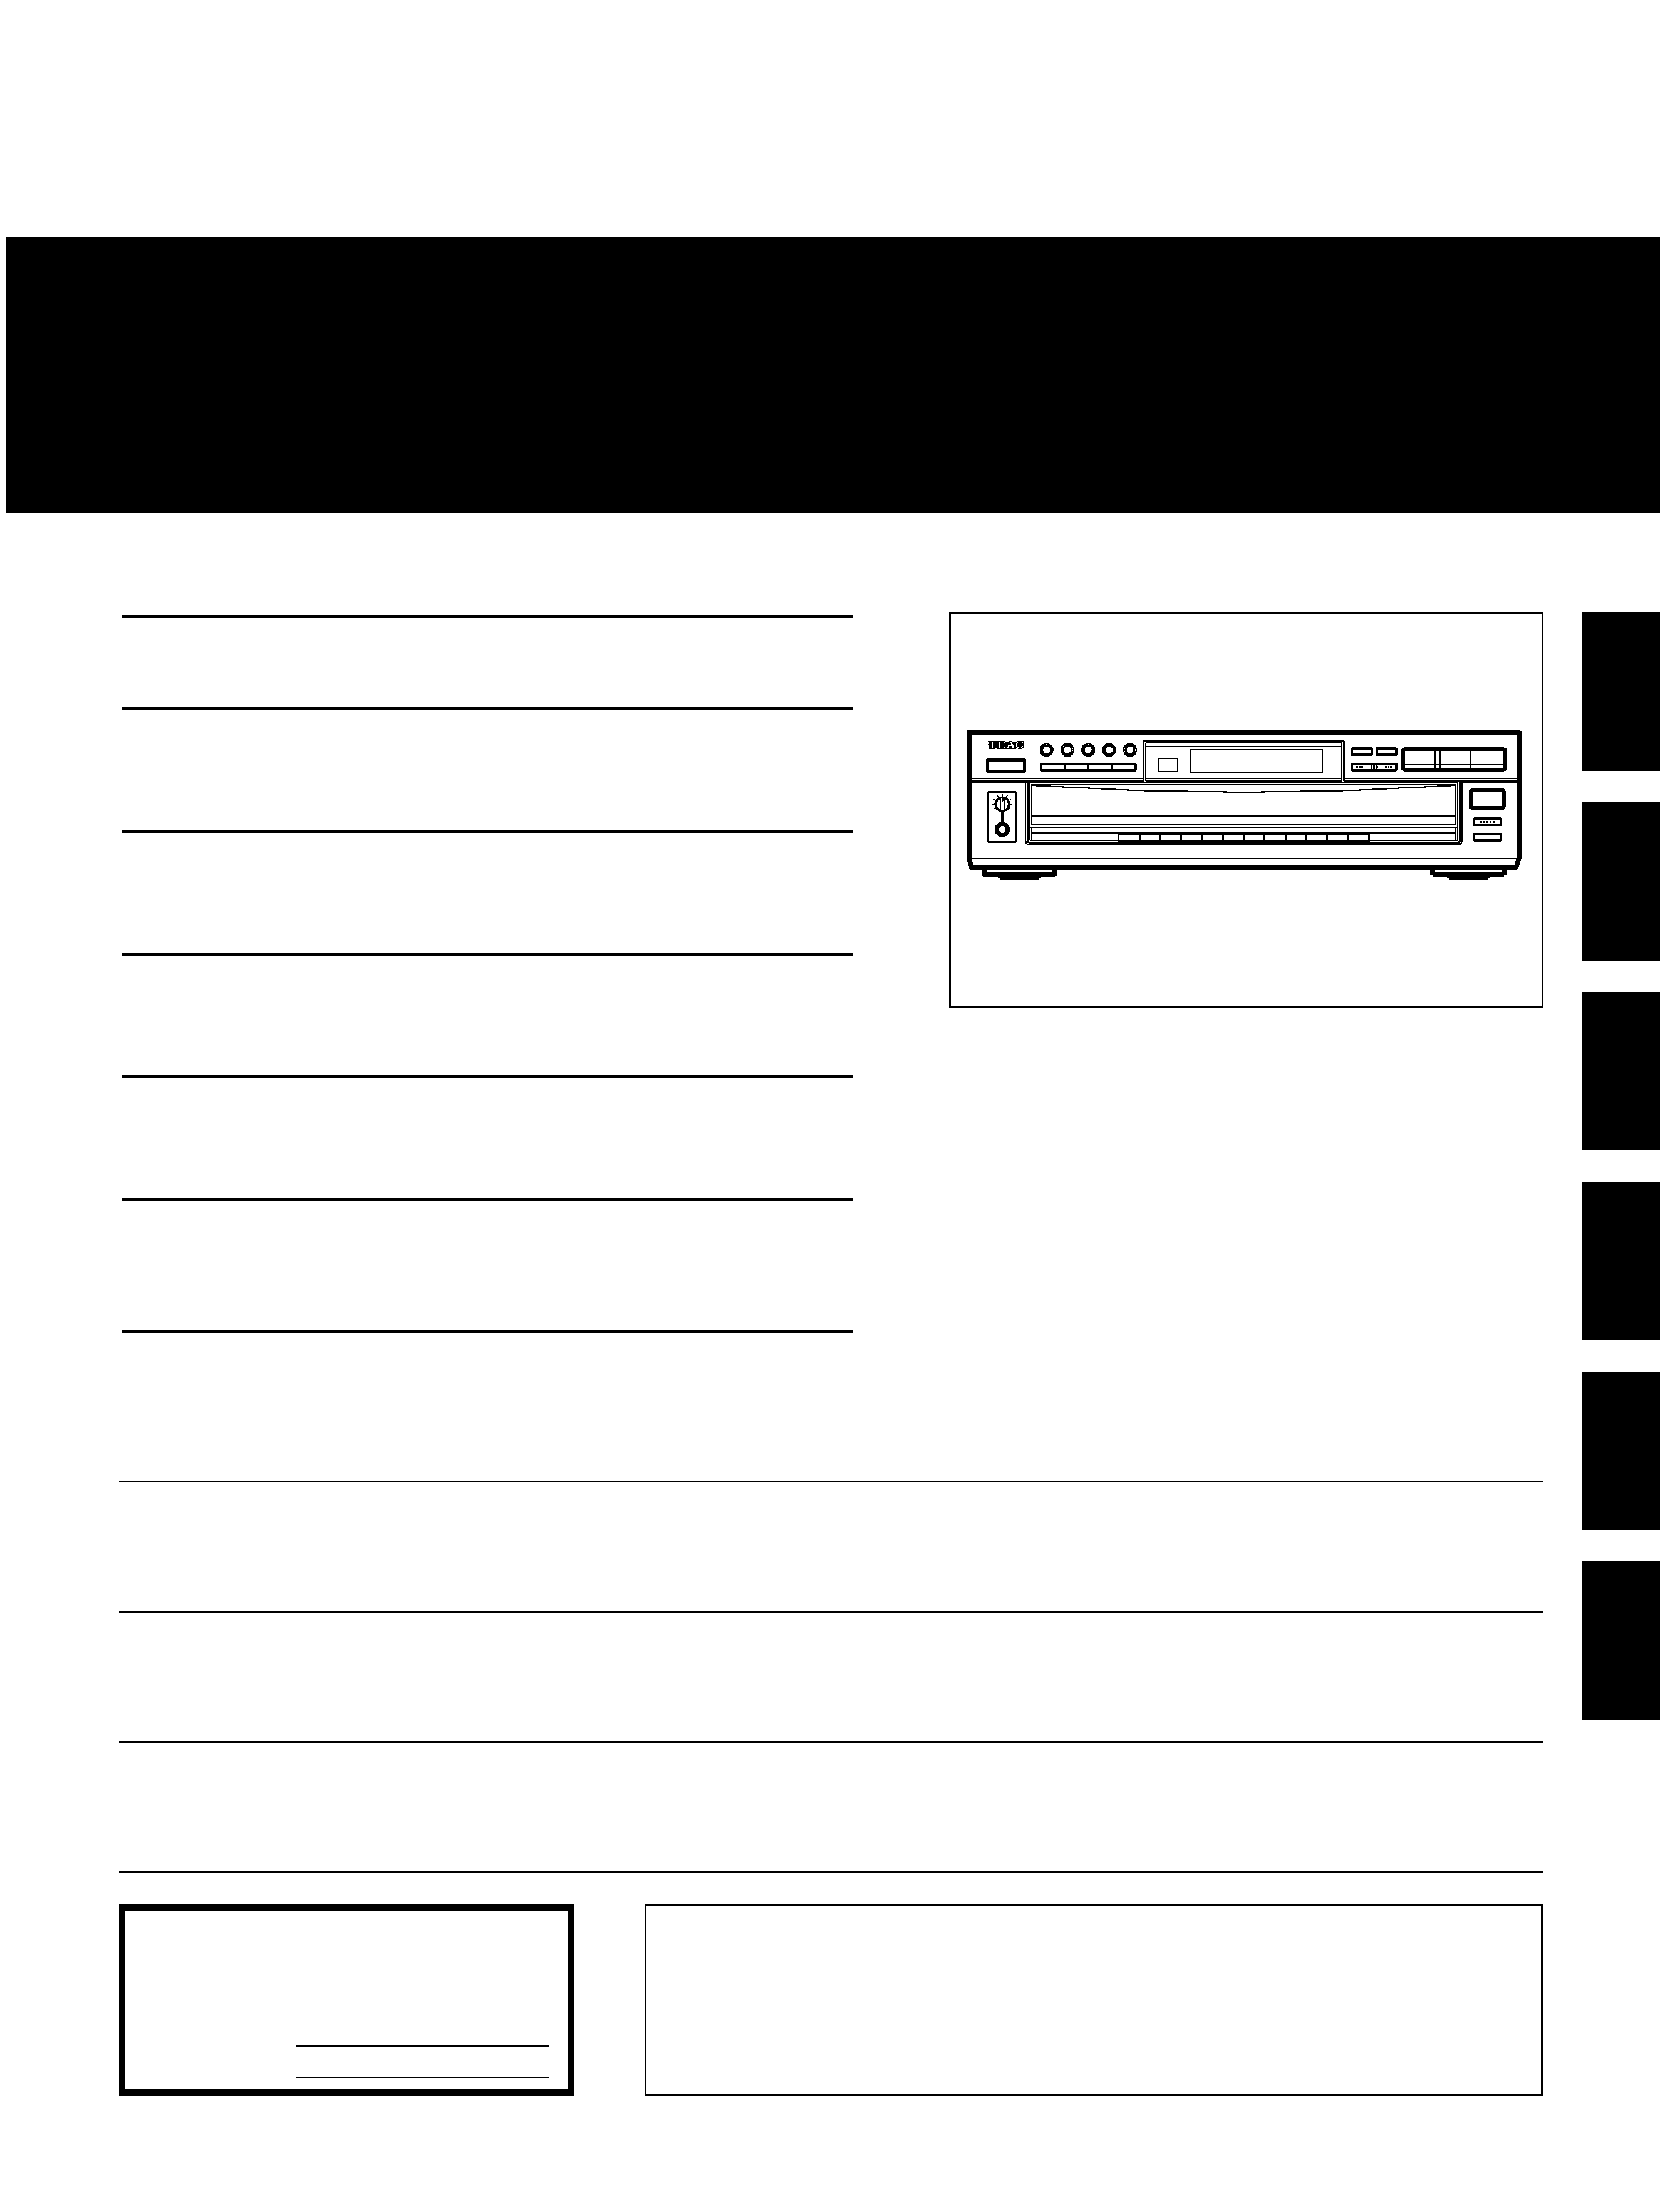
pd-d2500
`
Compact Disc Changer
OWNER'S MANUAL.......................... 3
MANUEL DU PROPRIETAIRE ...........11
BEDIENUNGSANLEITUNG ................19
MANUALE DI ISTRUZIONI ...............27
MANUAL DEL USUARIO...................35
GEBRUIKSAANWIJZING...................43
9A07430100
D
This appliance has a serial number located
on the rear panel. Please record the model
number and serial number and retain them
for your records.
Model number
Serial number
WARNING: TO PREVENT FIRE OR SHOCK
HAZARD, DO NOT EXPOSE THIS
APPLIANCE TO RAIN OR MOISTURE.
The exclamation point within an equilateral triangle is intended to alert the user to the
presence of important operating and maintenance (servicing) instructions in the literature
accompanying the appliance.
The lightning flash with arrowhead symbol, within an equilateral triangle, is intended to alert
the user to the presence of uninsulated "dangerous voltage" within the product's enclosure
that may be of sufficient magnitude to constitute a risk of electric shock to persons.
CAUTION: TO REDUCE THE RISK OF ELECTRIC SHOCK, DO NOT
REMOVE COVER (OR BACK). NO USER-SERVICEABLE PARTS INSIDE.
REFER SERVICING TO QUALIFIED SERVICE PERSONNEL.
Ü
ÿ
Y
Thanks for buying a TEAC. Read this manual carefully to get the best
performance from this unit.
Nous vous remercions pour l'achat d'un appareil TEAC.
Lire ce manuel avec attention pour obtenir les meilleures performances
possibles de cet appareil.
Vielen Dank für den Kauf dieses TEAC-Geräts.
Bitte lesen Sie diese Anleitung sorgfältig durch, um die Leistungs-
fähigkeit dieses Geräts optimal nutzen zu können.
Grazie per aver acquistato un prodotto TEAC.
Leggere attentamente questo manuale per ottenere le migliori prestazioni
da questo apparecchio.
Enhorabuena por la adquisición de un TEAC.
Lea detenidamente este manual a fin de obtener el mejor rendimiento de
esta unidad.
Dank u voor de aanschaf van een TEAC.
Lees deze gebruiksaanwijzing aandachtig door teneinde de beste
prestaties van dit toestel te verkrijgen.
2
IMPORTANT (for U.K. Customers)
DO NOT cut off the mains plug from this
equipment. If the plug fitted is not
suitable for the power points in your
home or the cable is too short to reach
a
power
point,
then
obtain
an
appropriate safety approved extension
lead or consult your dealer.
If nonetheless the mains plug is cut off,
remove the fuse and dispose of the plug
immediately, to avoid a possible shock
hazard by inadvertent connection to the
mains supply.
If this product is not provided with a
mains plug, or one has to be fitted, then
follow the instructions given below:
IMPORTANT. DO NOT make any
connection to the larger terminal which
is marked with the letter E or by the
safety earth symbol © or coloured
GREEN or GREEN-and-YELLOW.
The wires in the mains lead on this
product are coloured in accordance
with the following code:
BLUE:
NEUTRAL
BROWN:
LIVE
As these colours may not correspond
with the coloured markings identifying
the terminals in your plug proceed as
follows:
The wire which is coloured BLUE must
be connected to the terminal which is
marked with the letter N or coloured
BLACK.
The wire which is coloured BROWN
must be connected to the terminal
which is marked with the letter L or
coloured RED.
When replacing the fuse only a
correctly rated approved type should
be used and be sure to re-fit the fuse
cover.
IF
IN
DOUBT
--
CONSULT
A
COMPETENT ELECTRICIAN.
OCAUTION
OACHTUNG
OOBSERVERA
OADVARSEL
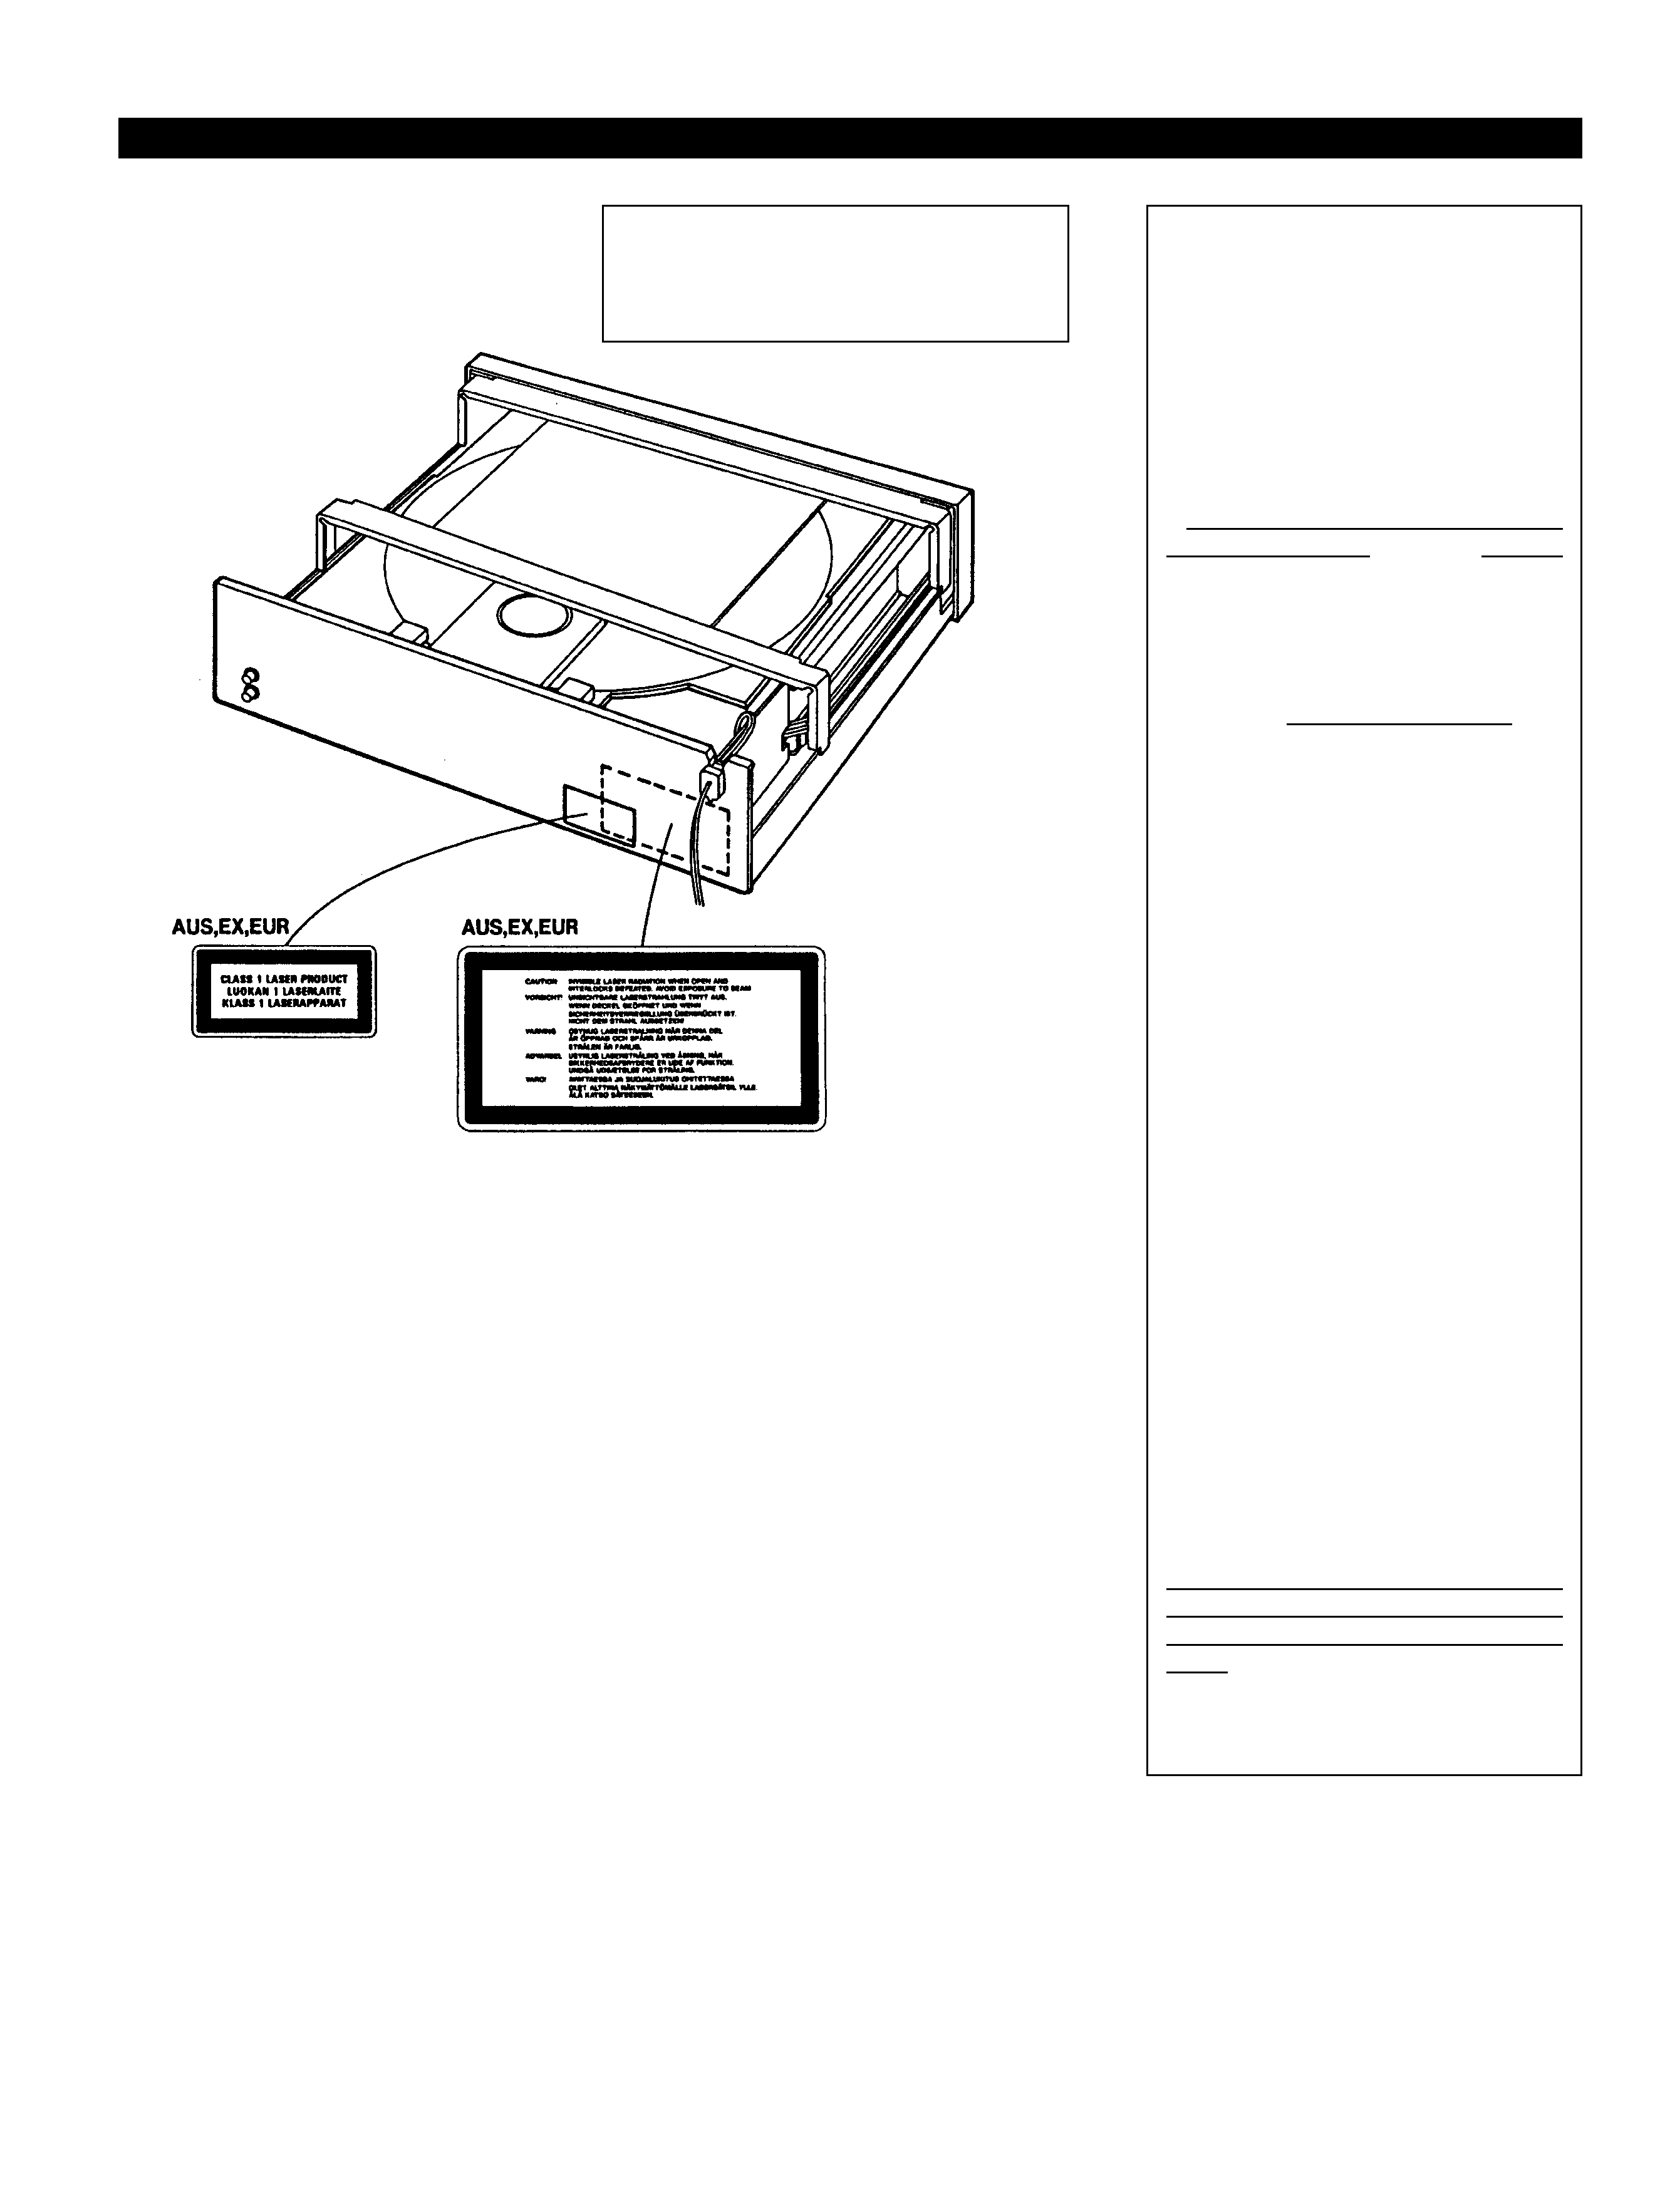
Laser Diode Properties:
Material: Ga-Al-As
Wavelength: 765 _ 815 nm
Laser output: Continuous Wave max 7mW
1 THIS LAVEL IS ATTACHED TO THE PLACE AS ILLUSTRATED TO INFORM THAT THE APPARATUS
CONTAINS A LASER COMPONENT.
1 DIESE AUFKLEBEMARKE IST AN DEM IN DER ABBILDUNG GEZEIGTEN ORT ANGEBRACHT UM
DARAUF HINZUWEISEN, DASS IM INNERN DES GERÄTS EINE LASER-KOMPONENTE BEFINDET.
1 PÅSKRIFTEN SITTER PÅ APPARATEN SOM VISAS SOM UPPMANING OM ATT APPARATEN
OMFATTAR EN INBYGGD LASERKOMPONENT.
1 DETTE MÆRKAT ER ANBRAGT SOM VIST I ILLUSTRATIONEN FOR AT ADVARE BRUGEREN OM AT
APPARATET INDEHOLDER EN LASERKOMPONENT.
2 DETTE MÆRKAT ER SOM VIST PÅ ILLUSTRATIONEN ANBRAGT PÅ INDERSIDEN AF TOPDÆKSLET
FOR AT ADVARE BRUGEREN OM AT YDERLIGERE FREMTRÆNGEN VIL VÆRE FORBUNDET MED
FARE FOR AT UDSÆTTE SIG FOR LASERSTRÅLING.
ADVARSEL -- BETJENING AF ANDRE KONTROLLER OG REGULATORER ELLER BENYTTELES AF
ANDRE FREMGANGSMÅDER END BESKREVET HERI ER FORBUNDET MED FARE FOR
UDSÆTTELSE FOR LASERSTRÅLING.
VARING: APPARATEN INNEHÅLLER LASER LOMPONENT MED
STRÅLNING ÖVERSTIGANDE KLASS 1.
"ADVARSEL: USYNLIG LASERSTRÅLING VED ÅBNING NAR
SIKKERHEDSAFBRYDERE ER UDE AF FUNKTION. UNDGÅ
UDSAETTELSE FOR STRÅLING"
"VAROITUS! SUOJAKOTELOA EI SAA AVATA. LAITE SISÄLTÄÄ
LASERDIODIN. JOKA LÄHETTÄ (NÄKYMÄTÖNTÄ) SILMILLE
VAARALLISTA LASERSÄTEILYÄ".
ADVARSEL: USYNLIG LASERBESTRÅLING NÅR DENNE
DELEN ER ÅPEN OG SIKKERHETSSPERREN ER UTKOBLET
UNNGÅ UTSETTELSE FOR STRÅLING.
Basic Operation
O
Choose the installation location of your
unit carefully. Avoid placing it in direct
sunlight or close to a source of heat.
Also
avoid
locations
subject
to
vibrations and excessive dust, heat, cold
or moisture. Keep away from such
sources that hum, such as transformers
or motors.
O
Do not open the cabinet as this might
result in damage to the circuitry or
electrical shock. If a foreign object
should get into the set, contact your
dealer.
O
Be sure not to handle discs with dirty
fingers. Never insert a disc which has a
crack on the surface.
O
When removing the power plug from the
wall outlet, always pull directly on the
plug, never yank the cord.
O
To keep the laser-pickup clean, do not
touch it, and do not forget to close the
disc tray.
O
Do not attempt to clean the unit with
chemical solvents as this might damage
the finish. Use a clean, dry cloth.
O
Keep this manual in a safe place for
future reference.
This unit has been designed specifically for
reproduction of compact discs bearing the
"D" mark. No other discs can be
reproduced.
O
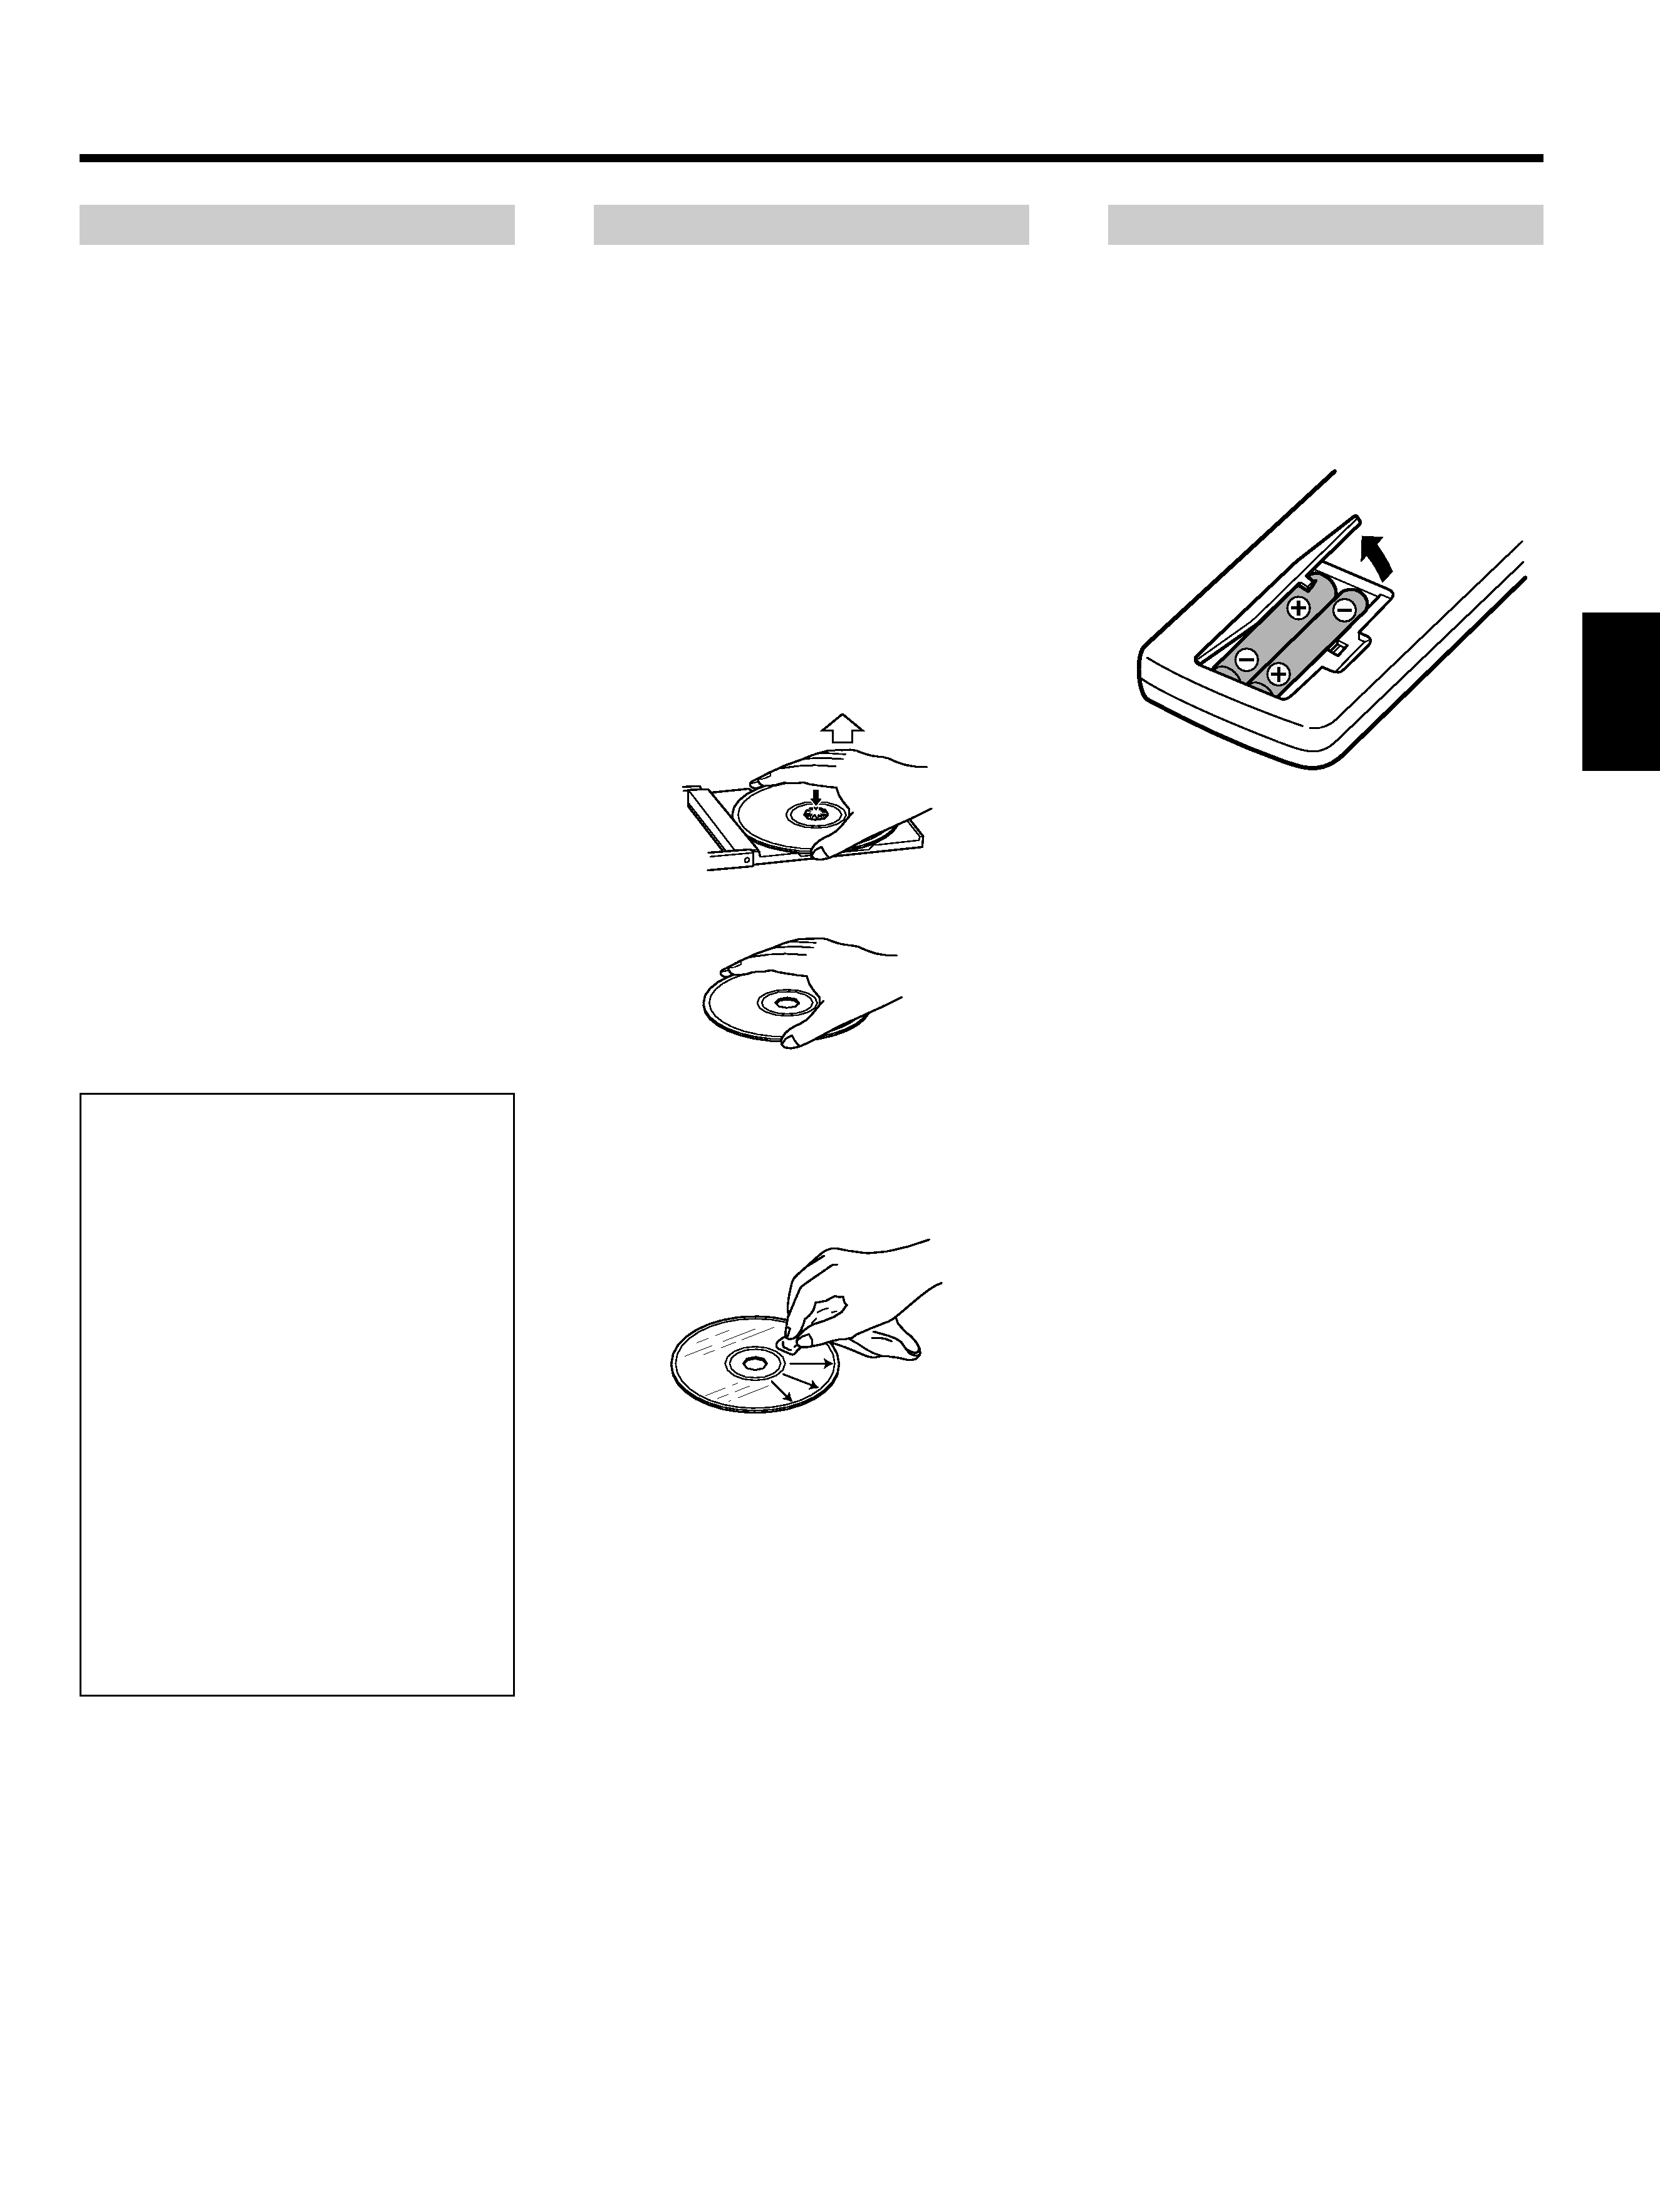
Always place the compact disc in the
disc tray with the label facing upward.
(Compact discs can be played only on
one side.)
O
To remove a disc from its storage case,
press down on the center of the case
and lift the disc out, holding it carefully
by the edges.
How to remove the disc
How to hold the disc
O
Fingermarks and dust should be
carefully wiped off the disc's recorded
surface with a soft cloth.
Wipe radially
O
Never use such chemicals as record
sprays, antistatic sprays or fluid,
benzine or thinner to clean compact
discs.
Such
chemicals
will
do
irreparable damage to the disc's plastic
surface.
O
Discs should be returned to their cases
after use to avoid serious scratches
that could cause the laser pickup to
"skip."
O
Do not expose discs to direct sunlight or
high humidity and temperature for
extended periods.
Long exposure to high temperatures
can warp the disc.
O
Do not stick paper or write anything
with a ballpoint pen on the surface of
the label side.
When operating the remote control unit,
point it towards the remote sensor on the
front panel of the unit.
Battery Installation
1. Remove
the
battery
compartment
cover.
2. Insert two "AA" (IEC, R6, SUM-3) dry
batteries.
Make sure that the batteries are
inserted with their positive and
negative poles positioned correctly.
3. Close the cover until it clicks.
Battery Replacement
If you notice that the distance between
the remote control unit and the player
for correct operation becomes shorter,
it indicates that the batteries are
exhausted. In this case replace the
batteries with new ones.
Precautions Concerning Batteries
O
Be sure to insert the batteries with
correct positive and negative
polarities.
O
Use batteries of the same type. Never
use
different
types
of
batteries
together.
O
Rechargeable and non-rechargeable
batteries can be used. Refer to the
precautions on their labels.
O
When the remote control unit is not to
be used for a long time (more than a
month), remove the batteries from the
remote control unit to prevent them
from leaking. If they leak, wipe away
the
liquid
inside
the
battery
compartment and replace the batteries
with new ones.
O
Do not heat or disassemble batteries
and never dispose of old batteries by
throwing them in fire.
3
ENGLISH
Before Use
Read This Before Operating
Beware of condensation
When the player (or a compact disc) is
moved from a cold to a warm place or
used after a sudden temperature
change, there is the danger of
condensation. Water vapor in the air
could condense on the mechanism or
the laser pickup. If droplets of water
form on these parts, correct playback
will be impossible because the laser
cannot read the information from the
disc correctly. To prevent this, if you
are going to use the player in a
condition where condensation could
occur, you should leave the player for 1
or 2 hours after plugging it into an AC
outlet depending on the amount of
condensation. If this is done, the player
will stabilize at the temperature of its
surroundings.
Handling the Discs
Remote Control Unit
Before making connections, be sure to
read the instruction manual of the stereo
amplifier carefully and turn the power of
the stereo amplifier and the player OFF.
Caution:
If the CD player interferes with the tuner,
TV receiver, etc., allow a reasonable
distance between them.
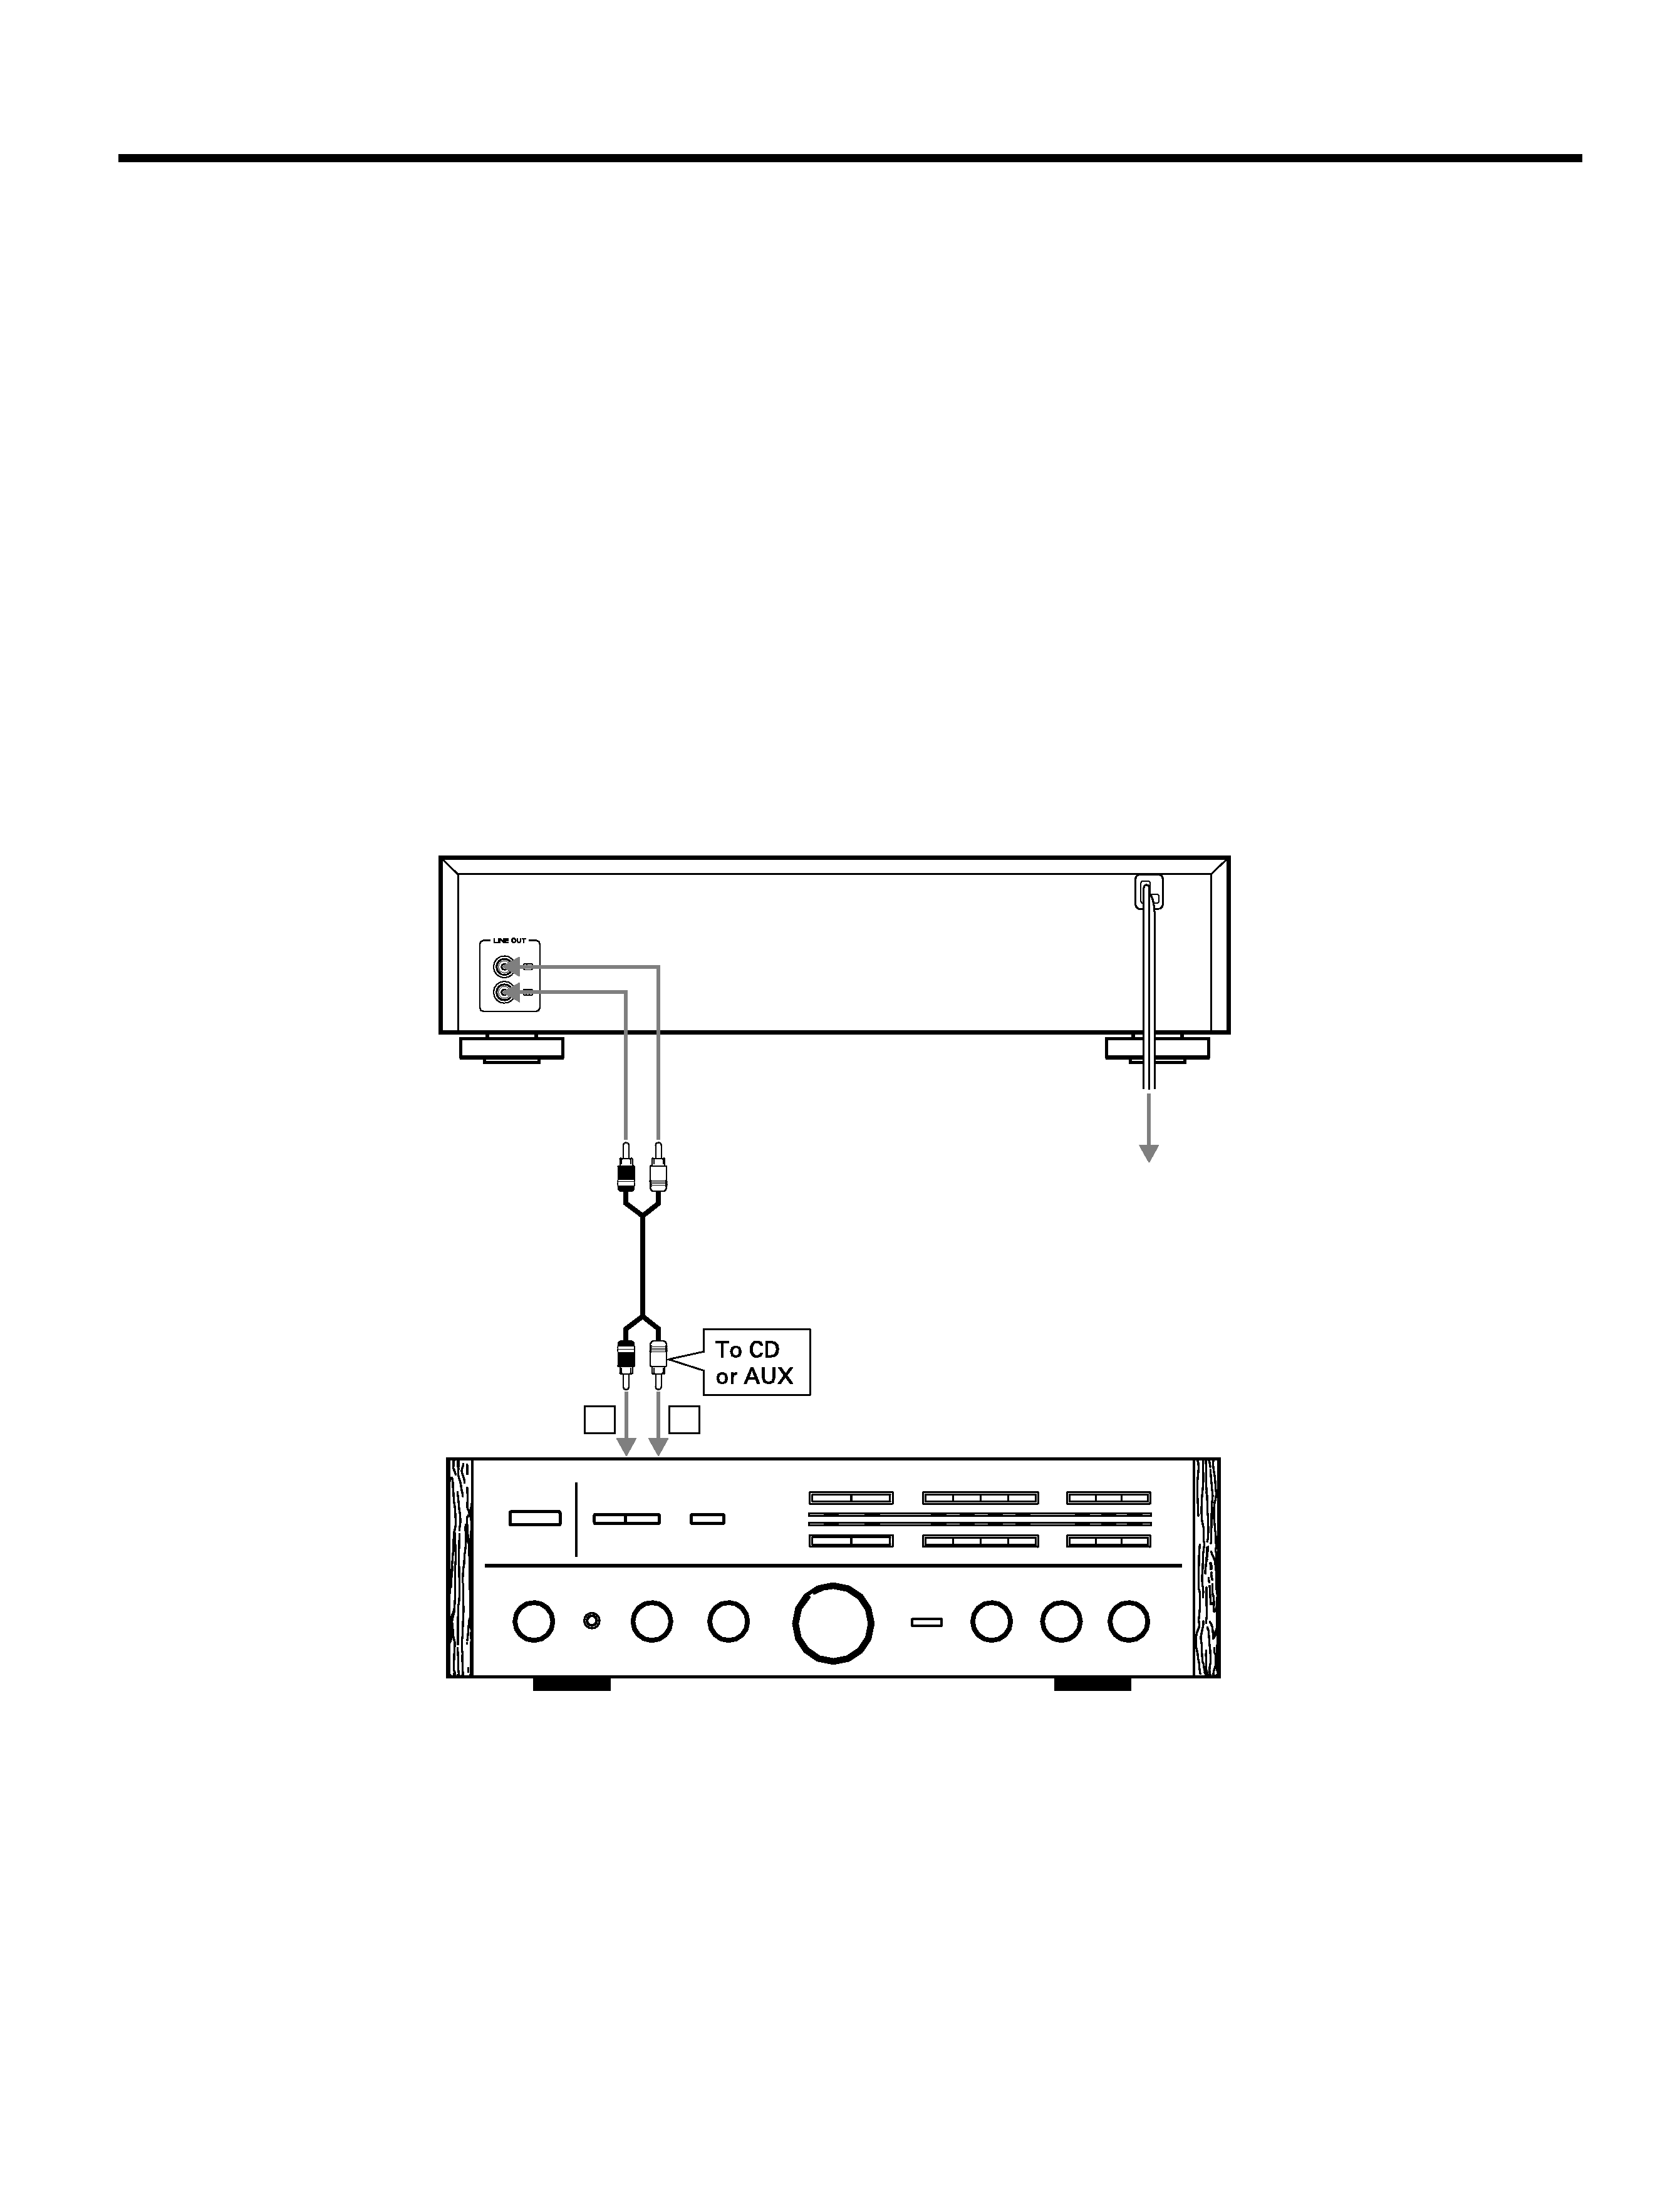
ª Connection with a stereo
amplifier
LINE OUT terminals
Connect the LINE OUT terminals to the CD
or AUX terminals of the stereo amplifier
using an RCA pin plug cord.
... Make sure to match the color-coded
plugs to the appropriate jacks on the
components -- white to white (L), and
red to red (R).
... Be sure to insert each plug securely.
Power cord
Be sure to connect the power cord to an AC
outlet which supplies the correct voltage.
... Hold the power plug when plugging or
unplugging the power cord.
Headphones
When using headphones, connect the
headphone plug into the PHONES jack.
O
Adjust the level of the signals output
from the phones jack.
Connections
4
To AC outlet
Stereo amplifier
RCA pin cord
L
R
PD-D2500
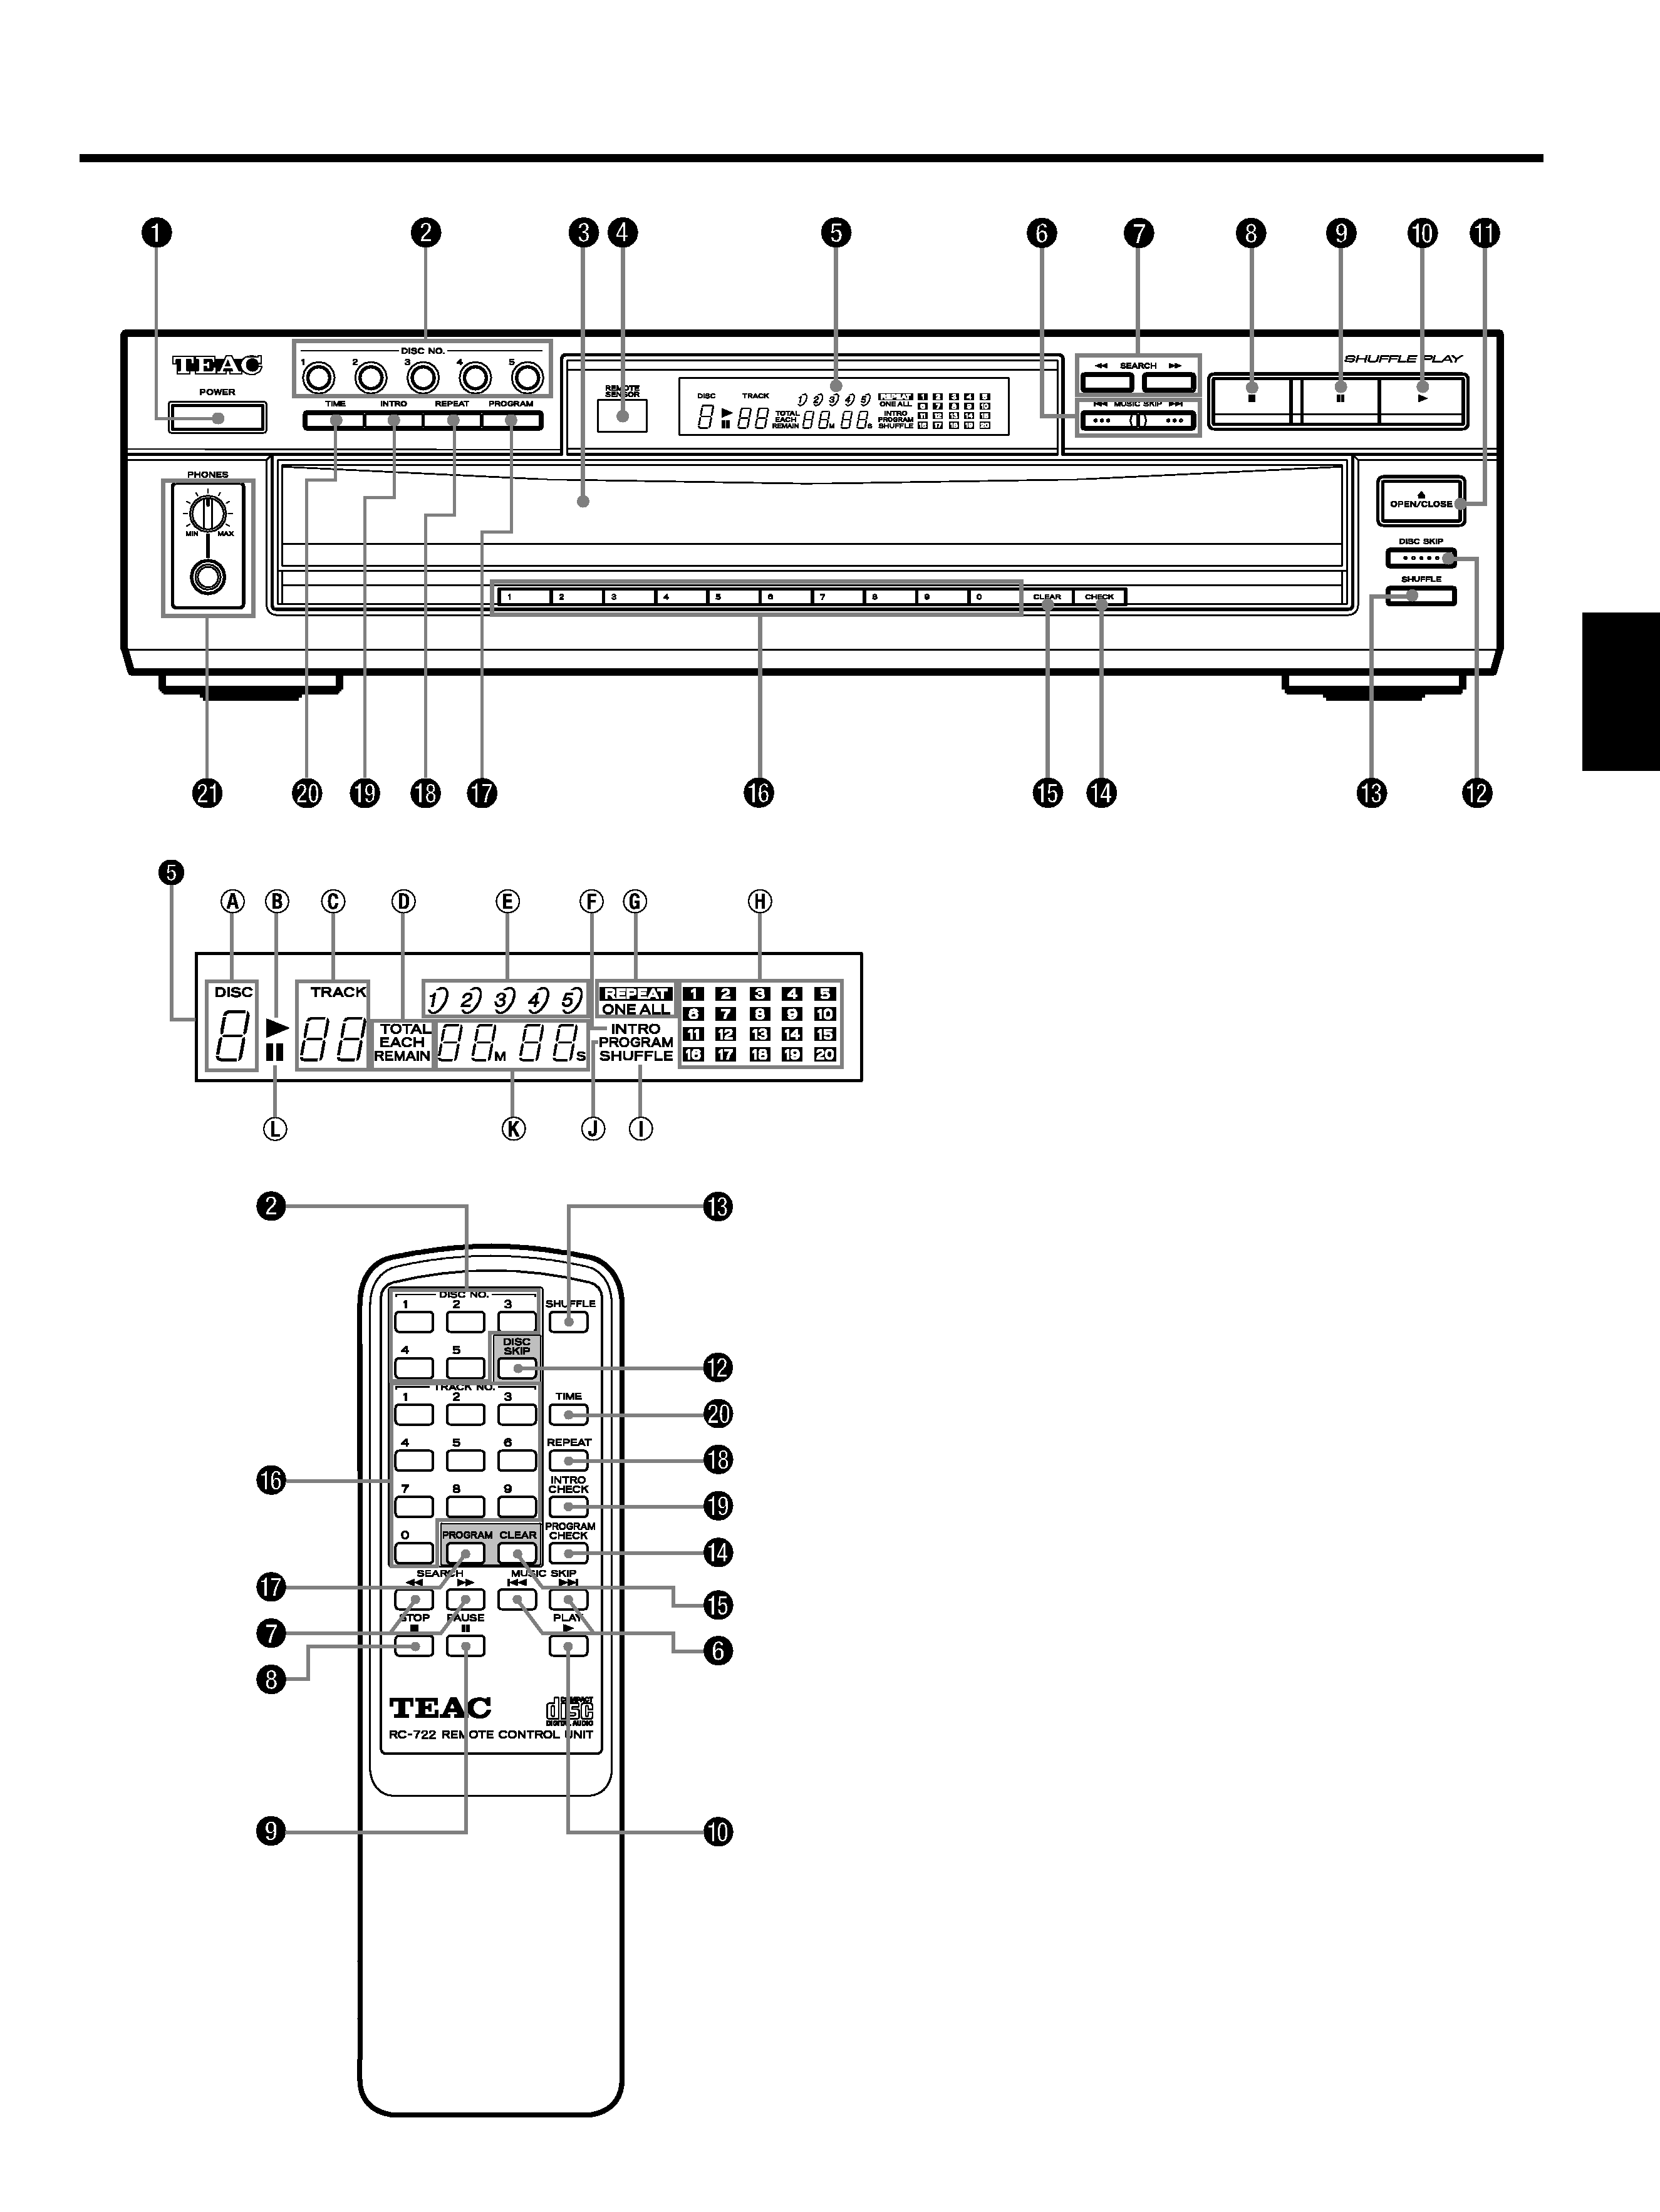
Name of Each Control
5
ENGLISH
1 POWER button
2 DISC NO. (1 ~ 5) buttons
3 Disc tray
4 REMOTE SENSOR
5 Multi-function display window
a DISC indicator
b Play () indicator
c TRACK indicator
d TOTAL/EACH/REMAIN time indicators
e Disc indicators 1) 2) 3) 4) 5)
f INTRO check indicator
g REPEAT (ONE/ALL) indicators
h Music calendar display
i SHUFFLE indicator
j PROGRAM indicator
k Time counter
l Pause () indicator
6 MUSIC SKIP (Ú¿Æ) buttons
7 SEARCH (¿Ò) buttons
8 STOP () button
9 PAUSE () button
0 PLAY () button
q OPEN/CLOSE () button
w DISC SKIP button
e SHUFFLE button
r CHECK (PROGRAM CHECK) button
t CLEAR button
y TRACK NO. (1~ 9, 0) buttons
u PROGRAM button
i REPEAT button
o INTRO (INTRO CHECK) button
p TIME button
a PHONES jack / LEVEL control