1
Setting the reference clock (word sync, etc.)
Before using the DV-RA1000 with other digital equipment, you must set up the audio system so that
one unit acts as the system clock master. The DV-RA1000 can act as a clock master or as a slave.
Press the
MENU key.
Use the wheel to highlight SYSTEM SETUP, and press the
ENTER key.
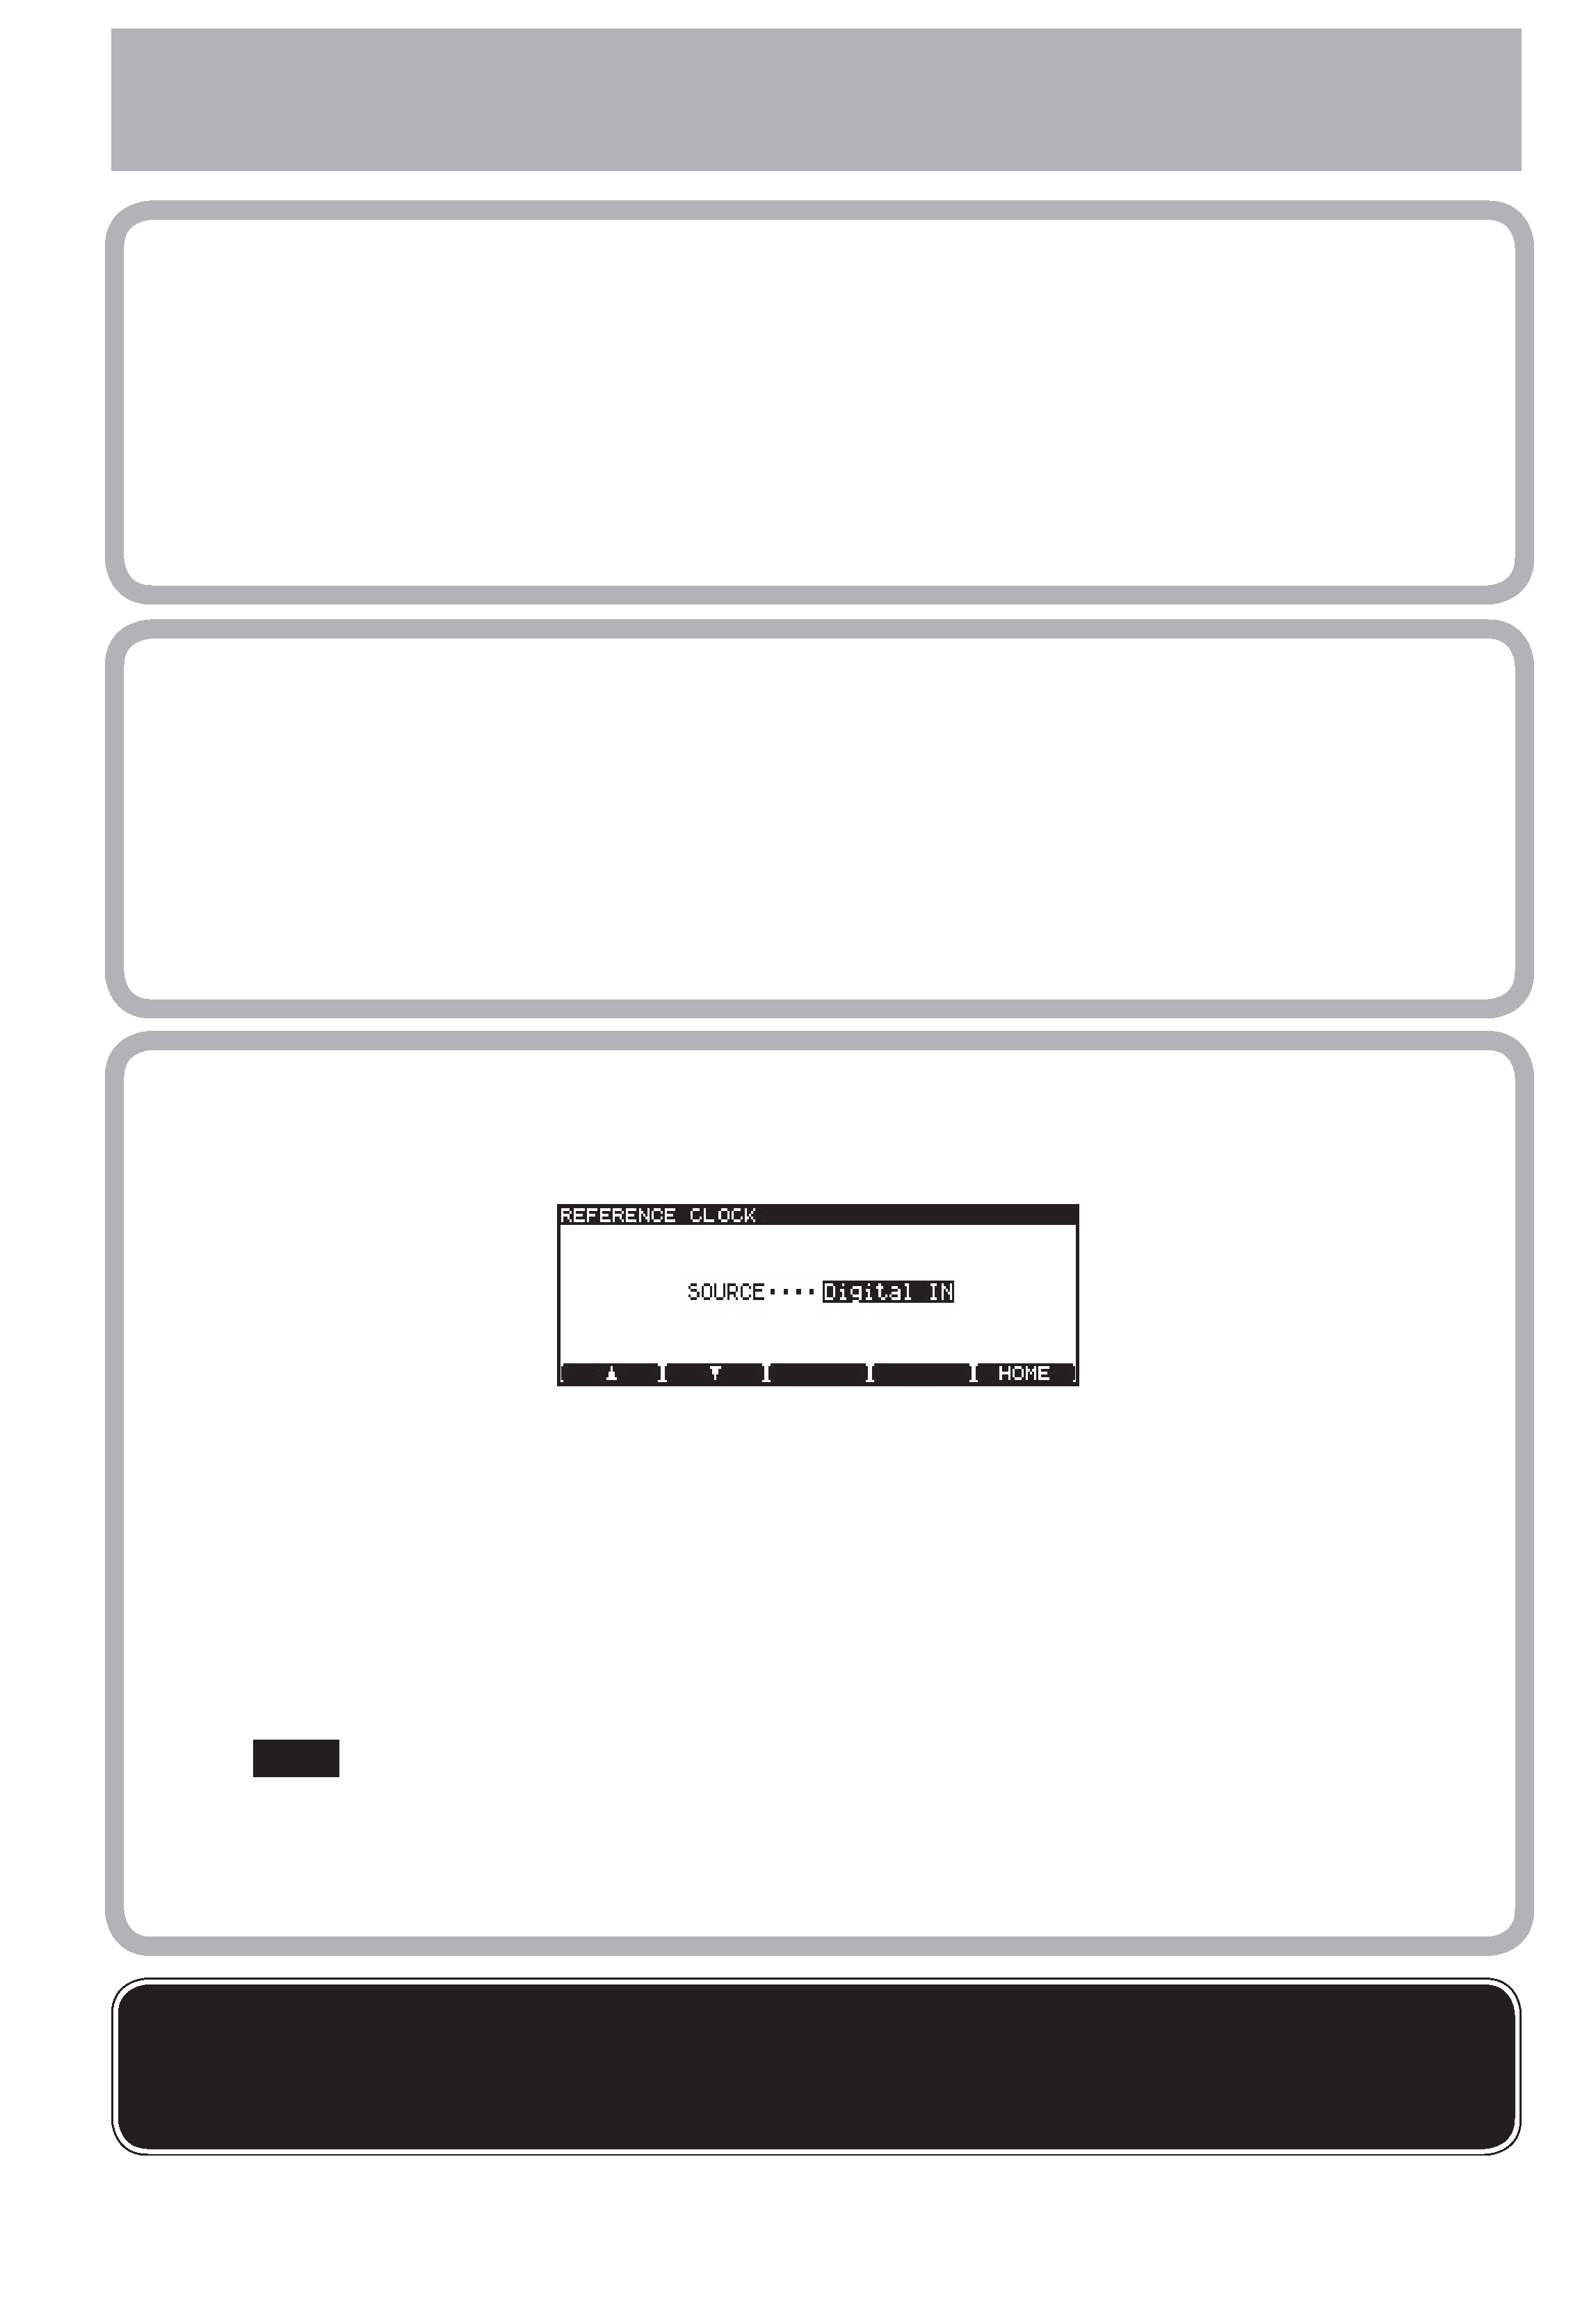
Use the wheel to highlight REFERENCE CLOCK, and press the
ENTER key.
Use the wheel to select the SOURCE as either INTERNAL (the DV-RA1000 acts as the system sync master),
WORD (the sync clock is input through the
WORD SYNC IN BNC connector) or DIGITAL IN.
Press
ENTER to make the setting and return to the SYSTEM SETUP screen.
NOTE that when recording a DSD project, the clock may be either internal, or
input through the dedicated
WORD SYNC IN BNC connector. In either case, the
clock is 44.1kHz. Also remember that when loading a project, the sampling fre-
quency of the DV-RA1000 changes to match that of the project.
Making connections
Analogconnections: use the XLR
ANALOG jacks
for connecting to and from +4dBu equipment,
and the RCA jacks for 10dBV equipment.
Digital connections: use the RCA (pin) jacks for
S/PDIF connections. These can be used at dou-
ble-speed for 88.2 and 96kHz projects.
Use the XLR
DIGITAL jacks for connecting AES/
EBU equipment. Use two connectors (
1 and 2)
for double-wire 88.2 or 96kHz recording, or for
quad-rate recording.
Use the BNC
SDIF-3/DSD-raw connectors (one
per channel) for DSD recording.
Use the BNC
WORD SYNC connectors for mak-
ing system word sync connections.
DV-RA1000 OE Quick Reference Guide
D00847600A
Before you start
Use the DV-RA1000 to record and play back
UDF-format discs containing audio files on
DVD+RW media, as well as using it to create Red
Book audio CDs on standard CD-R and CD-RW
media.
The audio files created on UDF DVD+RW discs
can be played back on the DV-RA1000, and
transferred, using a USB connection, to a digital
audio workstation for editing and mastering.
The 24-bit audio files are organized on the disc
within projects (maximum of 99 files/project)
and the files within a project are all the same
sampling frequency, but a single disc may con-
tain up to 99 projects of different sampling fre-
quencies.
Note that when turning the DV-RA1000 off after recording on DVD+RW media, you should either eject
the disc first (short press of
OPEN/CLOSE) or shut down the unit by holding down the OPEN/CLOSE
(SHUT DOWN) key to write all information to disc.
2
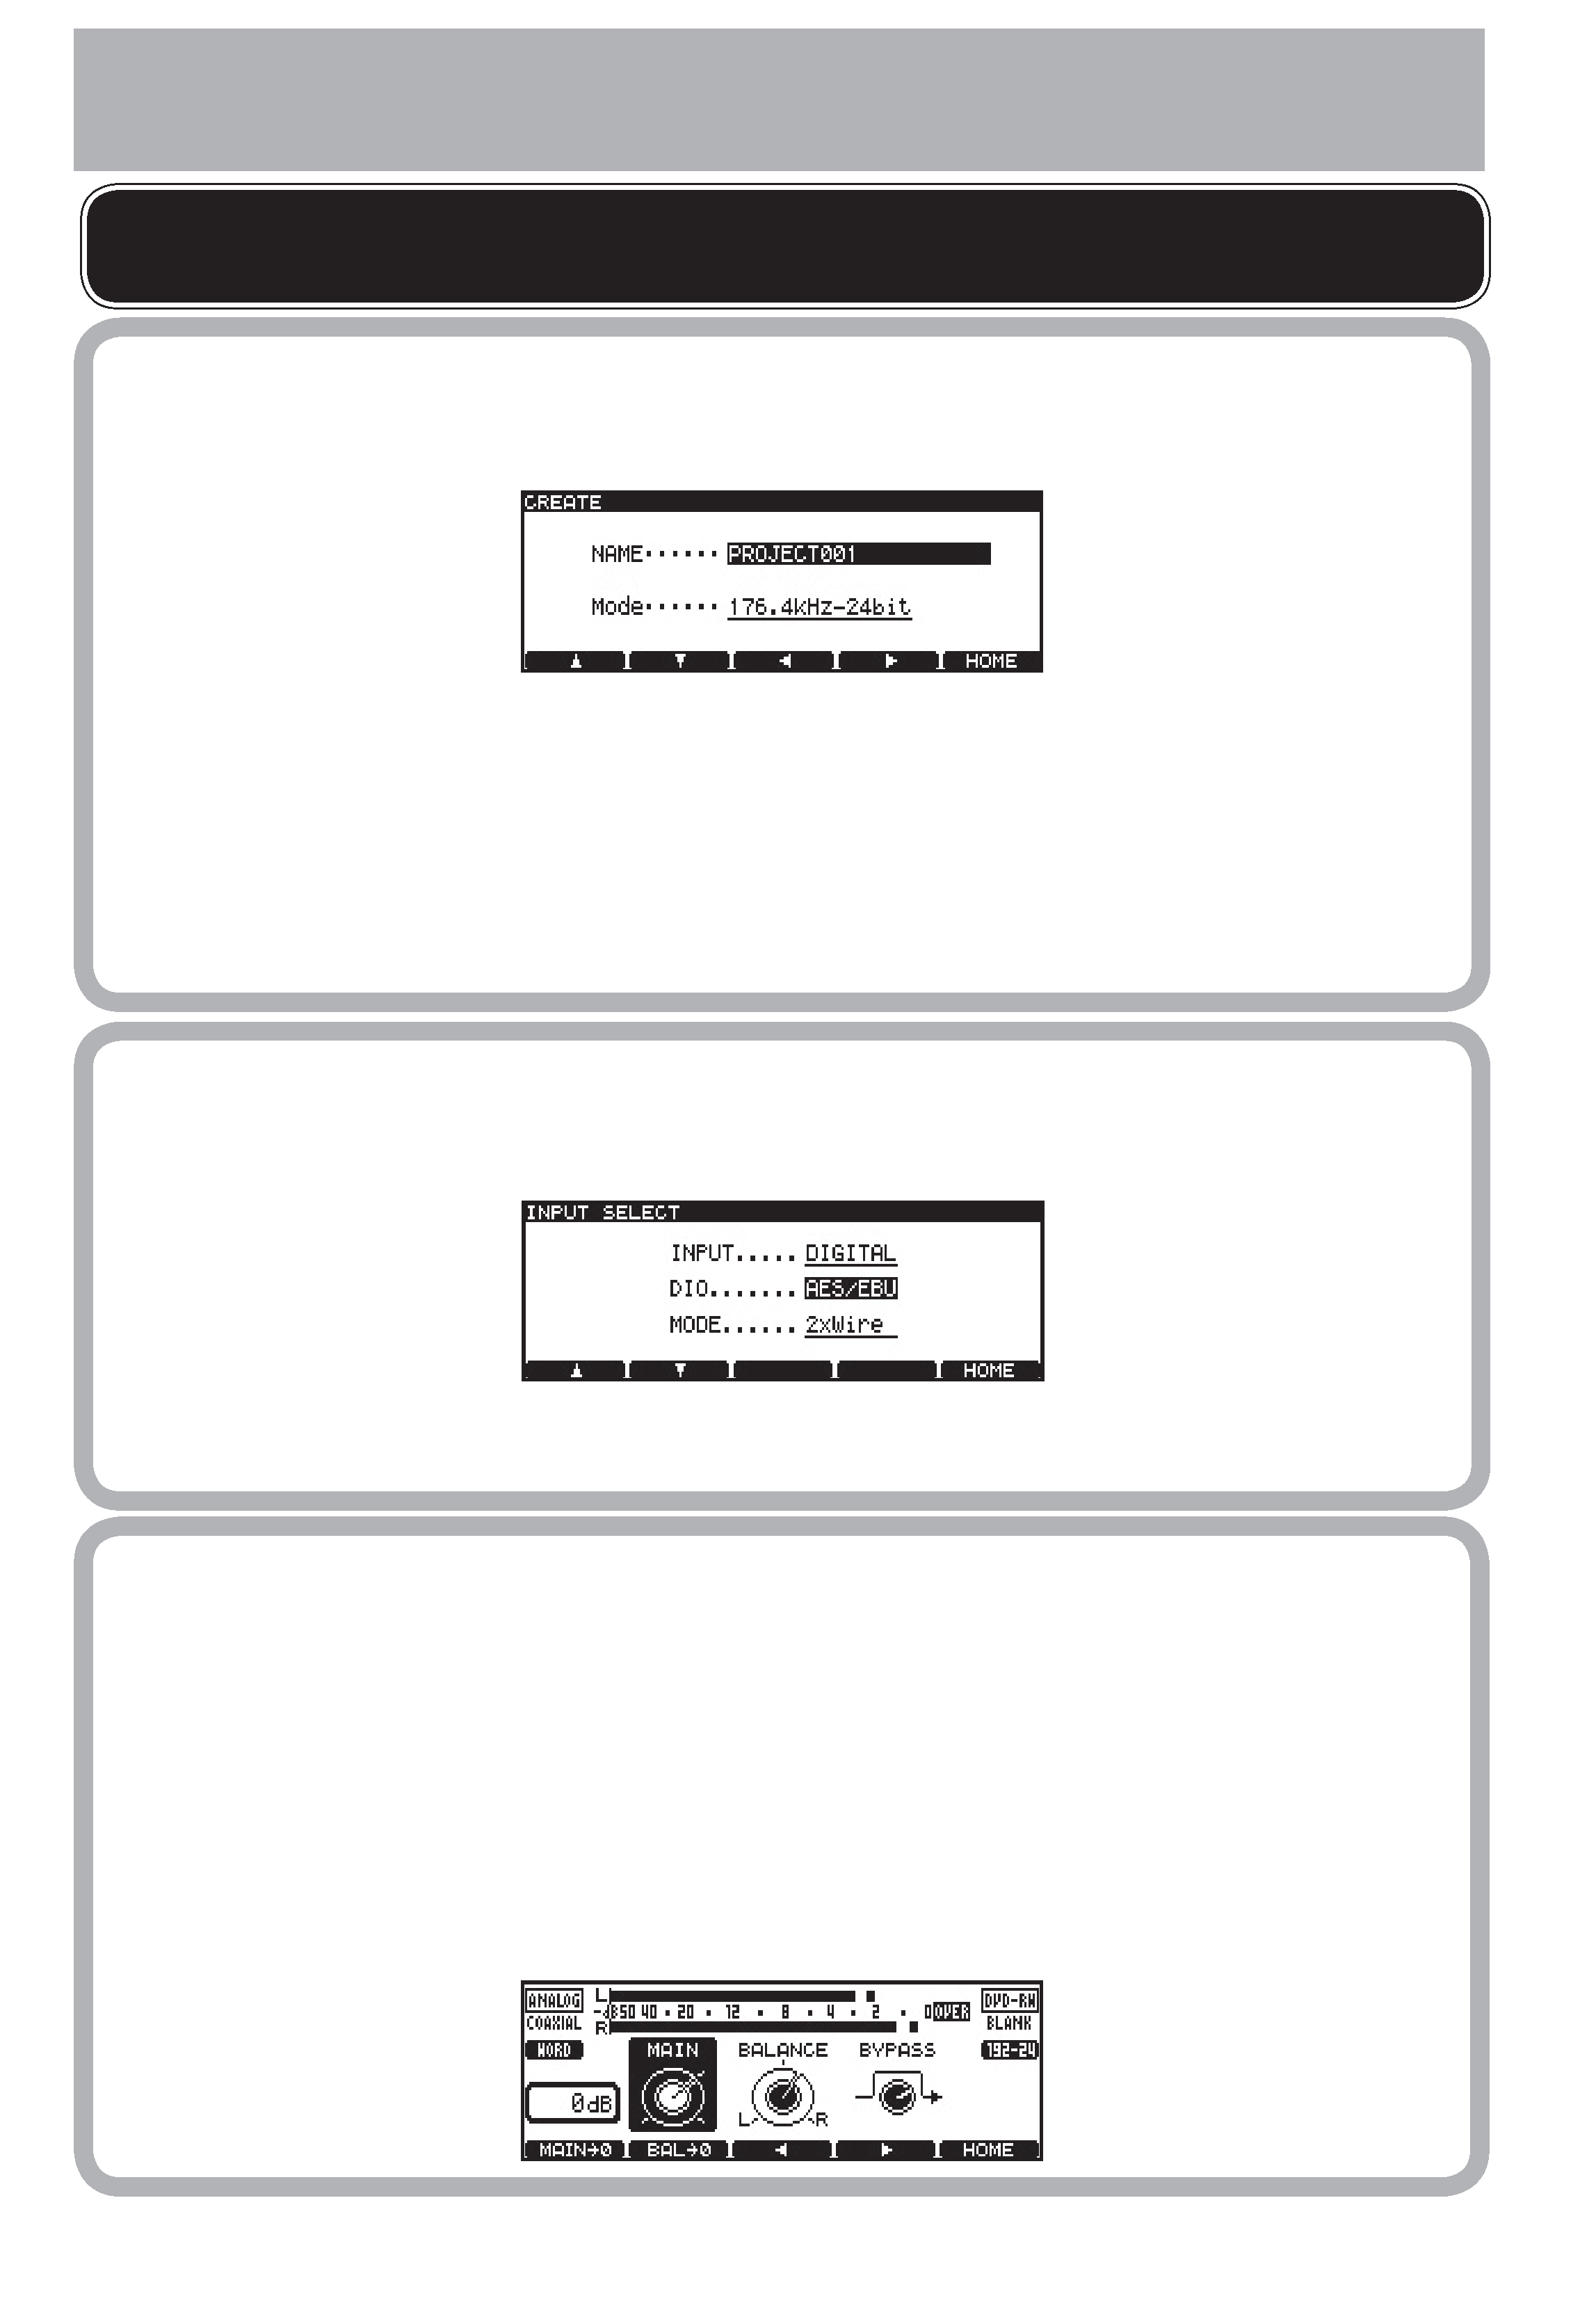
Adjusting the input level
Use the soft keys and wheel to adjust the input level (this procedure works with both analog and
digital inputs).
Press the
INPUT LEVEL key and use F3 and F4 to highlight the on-screen controls: the gain control
(MAIN), the balance control (BALANCE), and the bypass control (BYPASS).
Use the cursor keys and wheel to adjust the input level, the left-right balance, and to turn the bypass on
or off, depending on the control currently highlighted.
Use
F1 (MAIN->0) to reset the input gain to unity gain and F2 (BAL->0) to reset the input signal balance
to center. Press
ENTER to confirm the settings here.
Starting a new DVD disc
When you load a new DVD+RW into the drive, the DV-RA1000 determines that it is blank, and
asks to start a new project.
Press
F4 to start editing the name. Use the wheel and cursor keys to name the project. Press ENTER
when finished.
Use the wheel to select a sampling frequency for the project. Press
ENTER.
The DV-RA1000 will create the new project and start a background format of the whole disc. You can
make settings, etc. while this is taking place, but we recommend that you do not start recording until the
format is over. The top right of the "home" screen shows CLOSE blinking when the background format is
in progress. CLOSE is displayed steadily when formatting is finished (after about 20 minutes).
Preparing to record
Selecting the input
Press
MENU, use the wheel to highlight SYSTEM SETUP, and press ENTER. Highlight INPUT SELECT and
press
ENTER.
Use the cursor keys and wheel to select the type of input (INPUT), the digital terminals to use (DIO) and
the double-speed or double-wire MODE for double-rate digital input. Press
ENTER to confirm.
For best results, and to maintain data integrity, TASCAM strongly recommends the use of new DVD+RW
discs for important recordings.

Transport keys: function in much the same way as most CD recorders.
m
A single press moves back to the start of the current track (or back by a track). Press-
ing and holding the key searches inside the current track.
,
Single press moves forward to the start of the next track. Pressing and holding the key
searches within the current track.
H
Stops playback or recording.
H + m
Acts as a "return to zero" key combination.
y
Starts playback, or recording from record ready mode.
J + y
Press and hold the
READY key and press PLAY to use the wheel as a jog wheel.
J
Pauses playback (also lights in record ready status).
K
Enters record ready mode (the
READY key also lights when ready to record).
MUTE
"Smart" key (long press=non-latching, short press=latching)--mutes the input signal
to the DV-RA1000, and the output signal from the DV-RA1000.
Other keys: These keys access many of the DV-RA1000's "hidden functions"
OPEN/CLOSE
A short press opens or closes the tray. A long press (marked as
SHUT DOWN) starts
the shutdown procedure, writing UDF management information to disk and cancel-
ing the background format if it is in progress.
MARK
Press to set a mark at the current playback position. Marks are stored as part of the
UDFMI on DVD+RW media, and are not stored on CD-R/CD-RW media.
DISPLAY
Press to change the display between elapsed time and remaining time. The choices
available depend on the media, and whether the DV-RA1000 is recording or playing
back.
DISPLAY + wheel
Press and hold the
DISPLAY key and turn the wheel to adjust the display contrast.
DISPLAY + MARK Press and hold DISPLAY and press MARK to bring up the locate list, and then jump
to, edit or delete marks.
F1 through F5
"Soft function keys" which change function depending on the current status of the
unit.
F1 through F4 are often used as cursor keys. F5 is often used as a "return to
home screen" key and is labeled as HOME in these cases.
INPUT LEVEL
Press to bring up the input level screen (see previous page)
MENU
Brings up the menu system
ENTER
From the home screen, brings up the virtual front panel (VFP). From menu screens,
confirms selection and goes "up" a level, or selects and goes "down" a level in the menu
structure.
CANCEL
Goes "up" a level in the menu structure without changing any parameters.
EFFECT
A short press enables effects (indicator lights), or disables them. A long press brings
up the effect editing screen.
MONITOR
Changes between input (lit) and playback (unlit) monitoring.
FADE
Short presses switch fade-in and fade-out for playback and recording through on (in-
dicator lights), rehearsal (indicator flashes) and off. A long press brings up the fade
time setting screen.
SYNC REC
Short presses switch synchronized recording through off, rehearsal (indicator flashes,
and sync time can be "slipped"), and on (indicator lights). A long press brings up the
threshold level setting screen.
What do the front panel controls do?
3
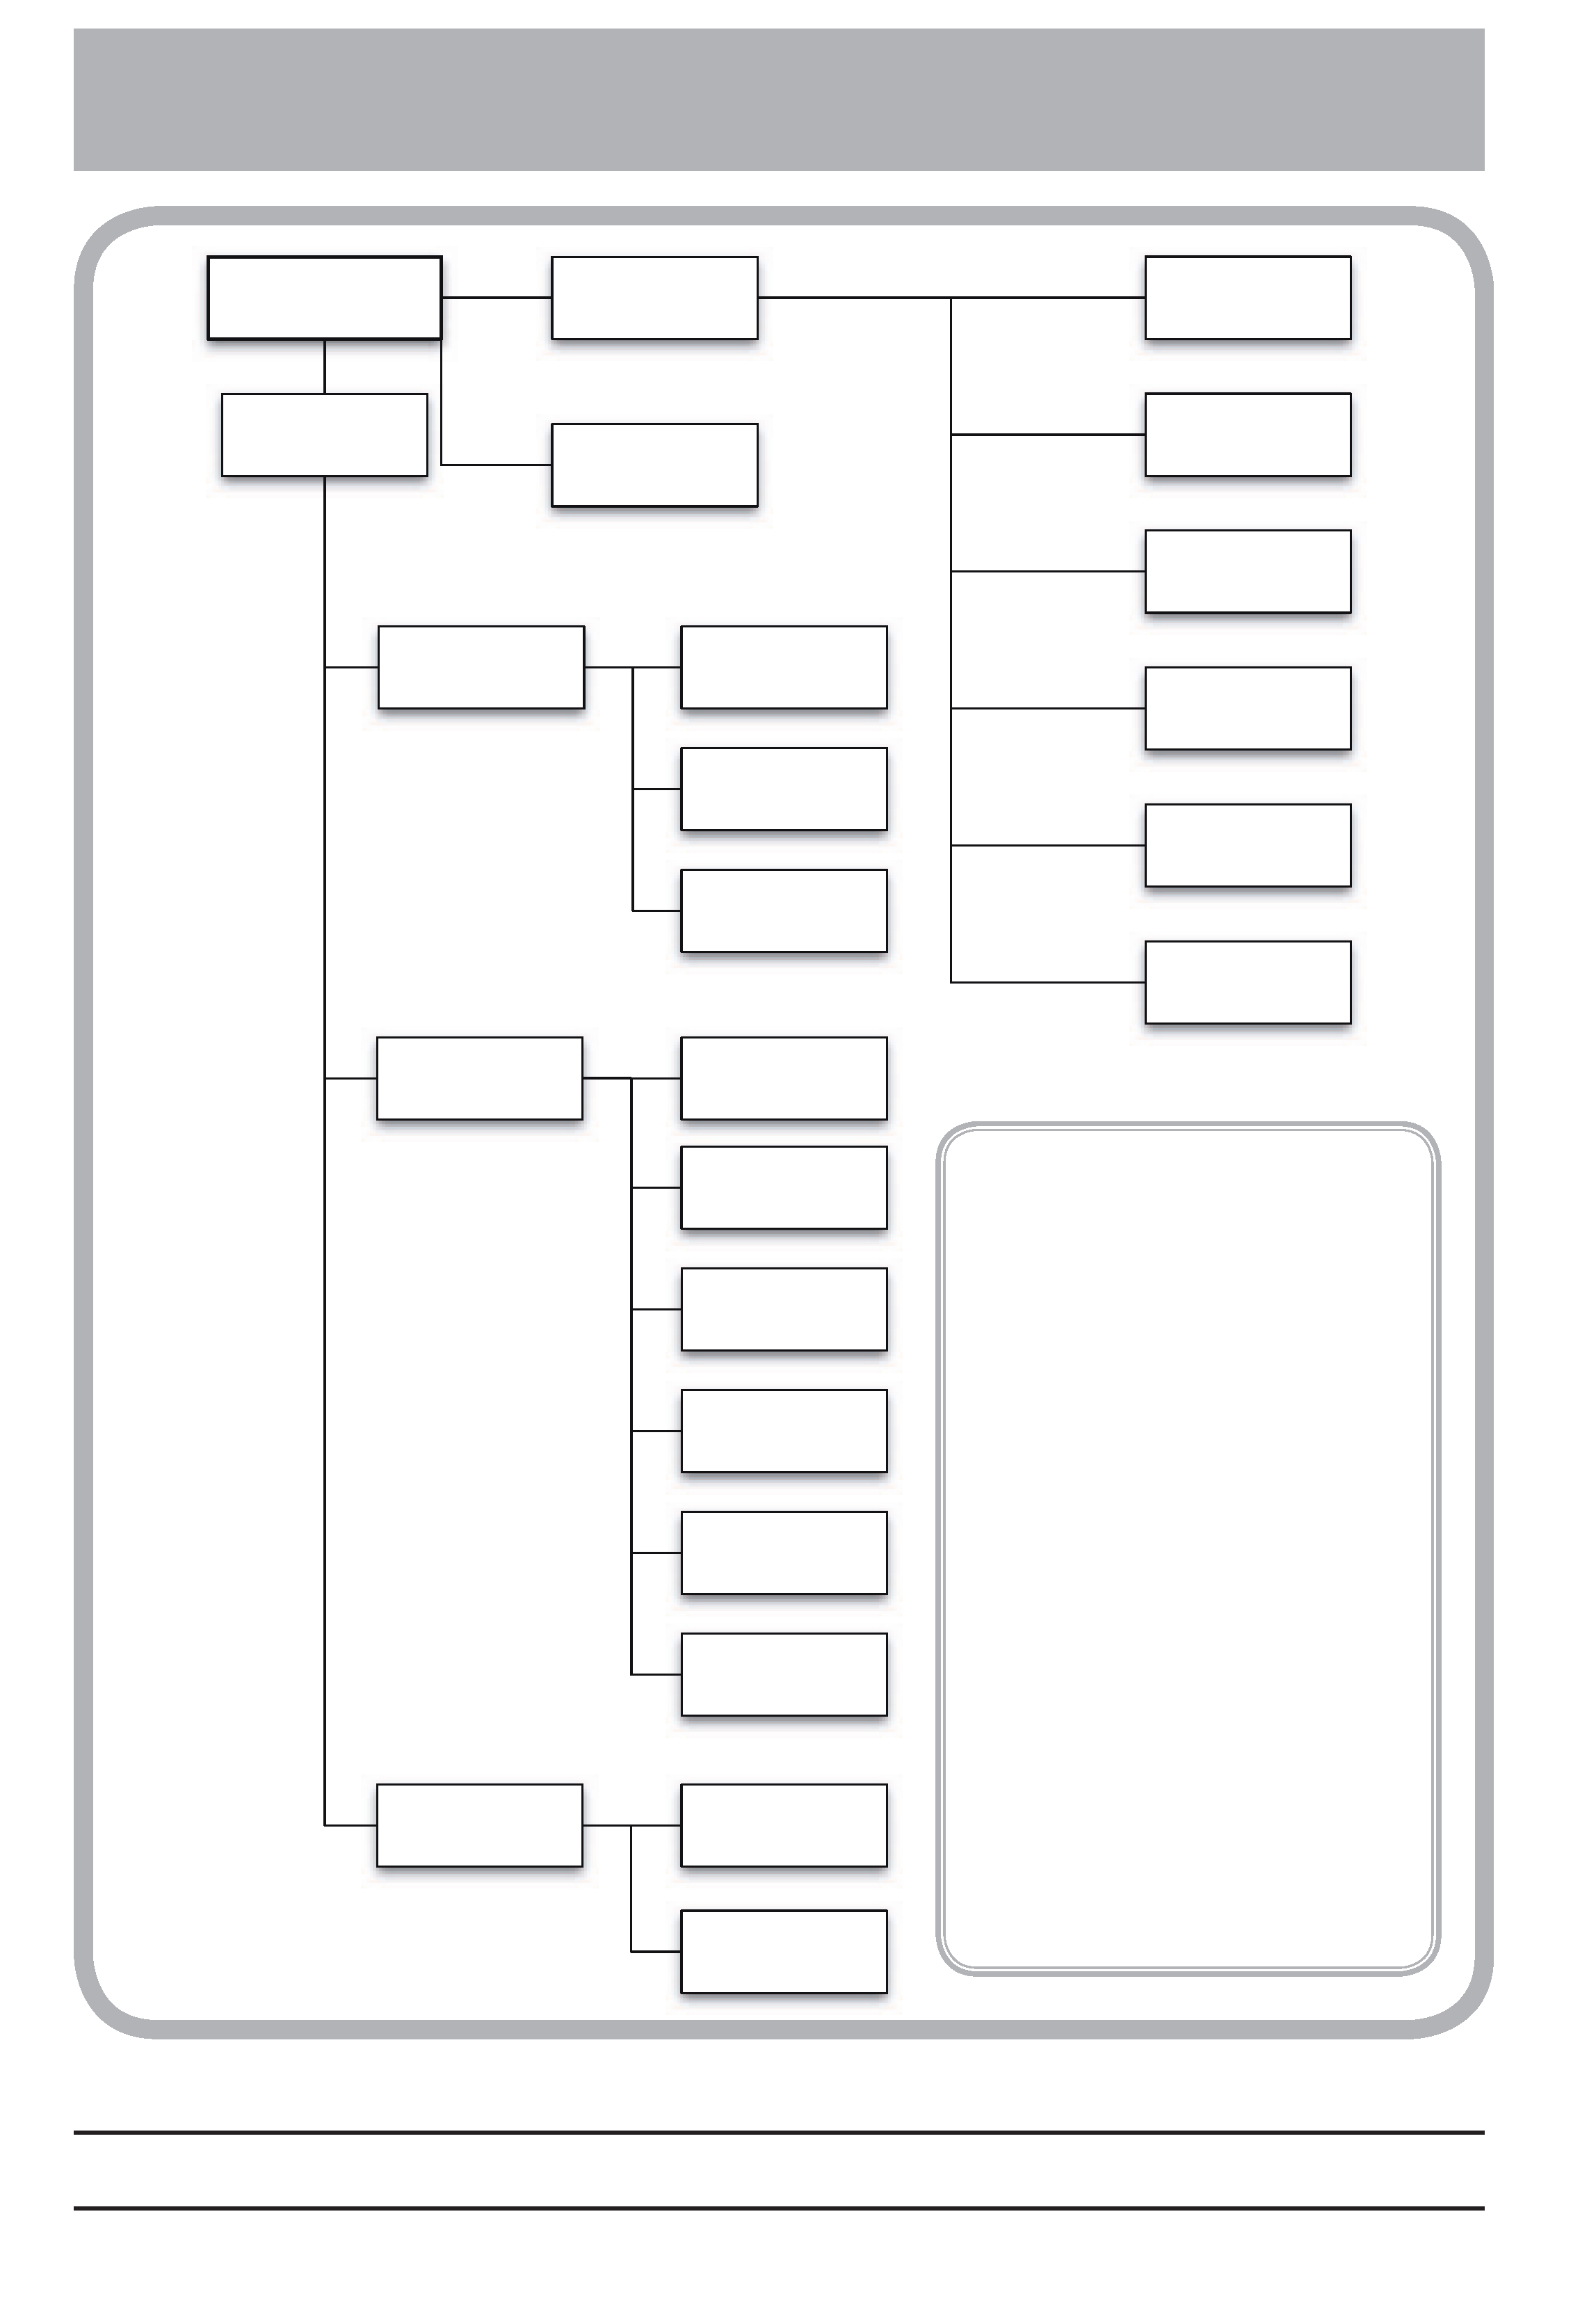
Main menu
(press MENU key)
SYSTEM SETUP
DVD MENU
USB
enables and disables
connection to PC
INPUT SELECT
selects the input
source
REFERENCE CLOCK
selects the word sync
clock
CALENDAR
sets the time and date
on the internal clock
CHECK
checks battery and
firmware version
COPY ID
Sets SCMS copy-
protection
PREFERENCE
sets different working
parameters
PROJECT
EDIT
DISC
SAVE UDFMI
writes unsaved UDF
management
information to disc
FORMAT
re-formats a
DVD+RW disc
CREATE
creates a new project
OPEN
loads an existing
project from disc
PROJECT TEXT
enters and edits text
stored with the
project
RENAME
Renames a recorded
file
DIVIDE
Splits the current file
into two
COMBINE
Combines the current
file and the next into
one file
ERASE
Deletes the current
file
PLAYLIST
Arranges files into a
play list order
UNDO
Undoes (and re-does)
the last edit action
The PREFERENCE menu allows
the following settings to be
made:
METER RELEASE TIME
: The "fall-
back time" for the on-screen
peak meters.
PEAK HOLD
: The time that peak
levels are displayed by the me-
ters.
CALENDAR
: Format of date dis-
play.
TIME ZONE
: Local time zone set-
ting.
SHORT CUT
: Assignment of func-
tions to "soft" keys.
REF. LEVEL
: The reference level
relative to 0dBFS.
RESUME
: Enables or disables
"resume" playback and record-
ing of DVD+RW discs and "re-
sume" playback of CDs.
The DV-RA1000 menu system
Printed in China
TEAC CORPORATION
Phone: (0422) 52-5082
www.tascam.com
3-7-3, Nakacho, Musashino-shi, Tokyo 180-8550, Japan
TEAC AMERICA, INC.
Phone: (323) 726-0303
www.tascam.com
7733 Telegraph Road, Montebello, California 90640
4